
Normal view

There are new articles available, click to refresh the page.
Before yesterdayThe Eclectic Light Company

How to search Time Machine backups?

By: hoakley
22 May 2026 at 14:30

For the last 15 years or so, local Time Machine backup storage has been required to be included in the volumes that are indexed by Spotlight. We also know too well that they have been indexed, as it has been common for their indexing to take longer than the backup they have just made. Some time around the release of Sonoma, those indexing sessions became less noticeable, but unless you tried to search your backups, you probably didn’t notice any change. For, as far as I can tell, Spotlight doesn’t currently appear able to search Time Machine backups reliably, at least not in Sequoia or Tahoe, although this may not be universal.

For most purposes, the ability to search backups is essential. If you have a series of more than 100 backups over the last couple of years, finding a lost file by inspecting each backup individually is a frustrating waste of time, and requires you to know where to look in each. Even if full content and metadata searching aren’t feasible, the ability to search on file attributes such as name, extension and datestamps is surely fundamental.

As we’ve come to expect, Apple’s documentation isn’t in the least bit helpful. What is surprising is that the instructions given are almost identical for every version of macOS from Mojave to Tahoe.

That page opens with a bold promise: “If you use Time Machine to back up your Mac, you can use Spotlight to initiate a search of Time Machine to recover lost or deleted items.”

That’s just what I’m looking for, so how do I do that? “On your Mac, open a Finder window, then type a search word or phrase in the search field in the upper-right corner. Refine the results by specifying search criteria using the search bar.”

Everything’s good so far, but as the document I’m looking isn’t there, how do I search for it in my backups? “Click the Time Machine icon in the menu bar, then choose ‘Browse Time Machine backups’.”

That opens the Time Machine app, blows away my search criteria, and lists the volumes including Macintosh HD and my backup storage, as of now. So how do I search for the file that I accidentally deleted a couple of hours ago?

“Use the arrows and timeline to browse the Time Machine backups.” But that’s looking for the missing file, not searching those backups for it.

If I now step back through my backups to reach one that I know contains that file, I can restore it. But if I type anything into the search field, nothing is found. If I change the scope of the search to that backup, the window title changes but its contents remain blank, and there isn’t even a busy spinner to indicate a search is in progress.

With a little fiddling, I managed to get some results for other searches. Here’s an example where I was looking for files whose name contains logui with the extension swift.
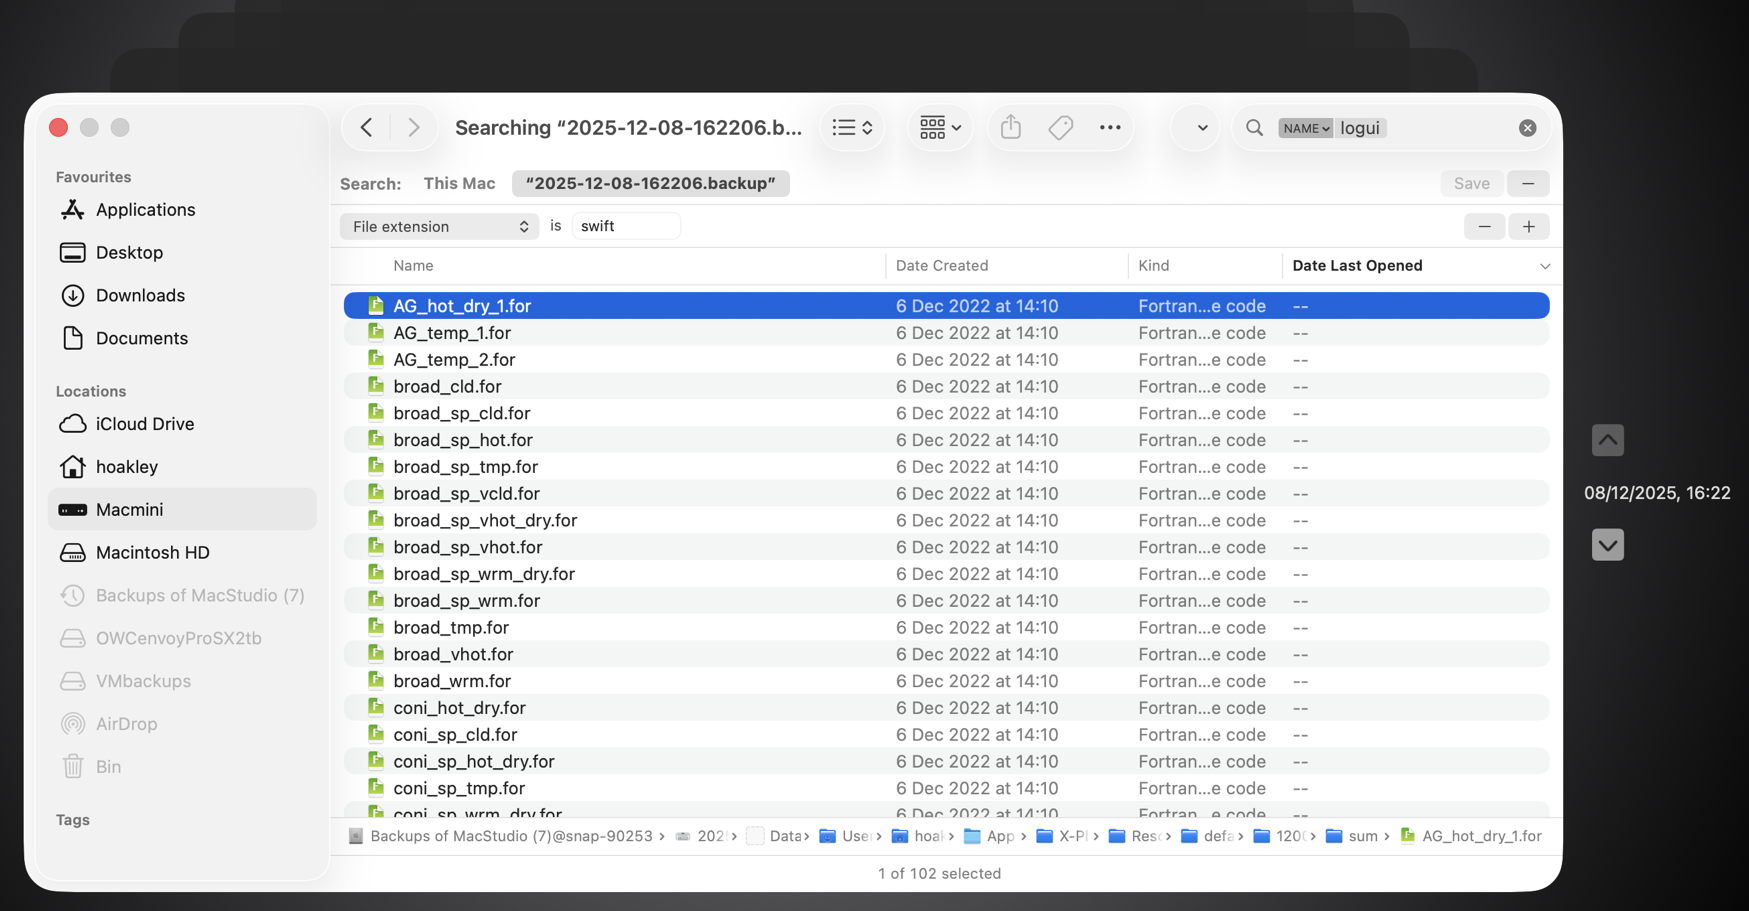
Here I ended up with 102 hits, all of them old Fortran source files, none of which meets either of those criteria.
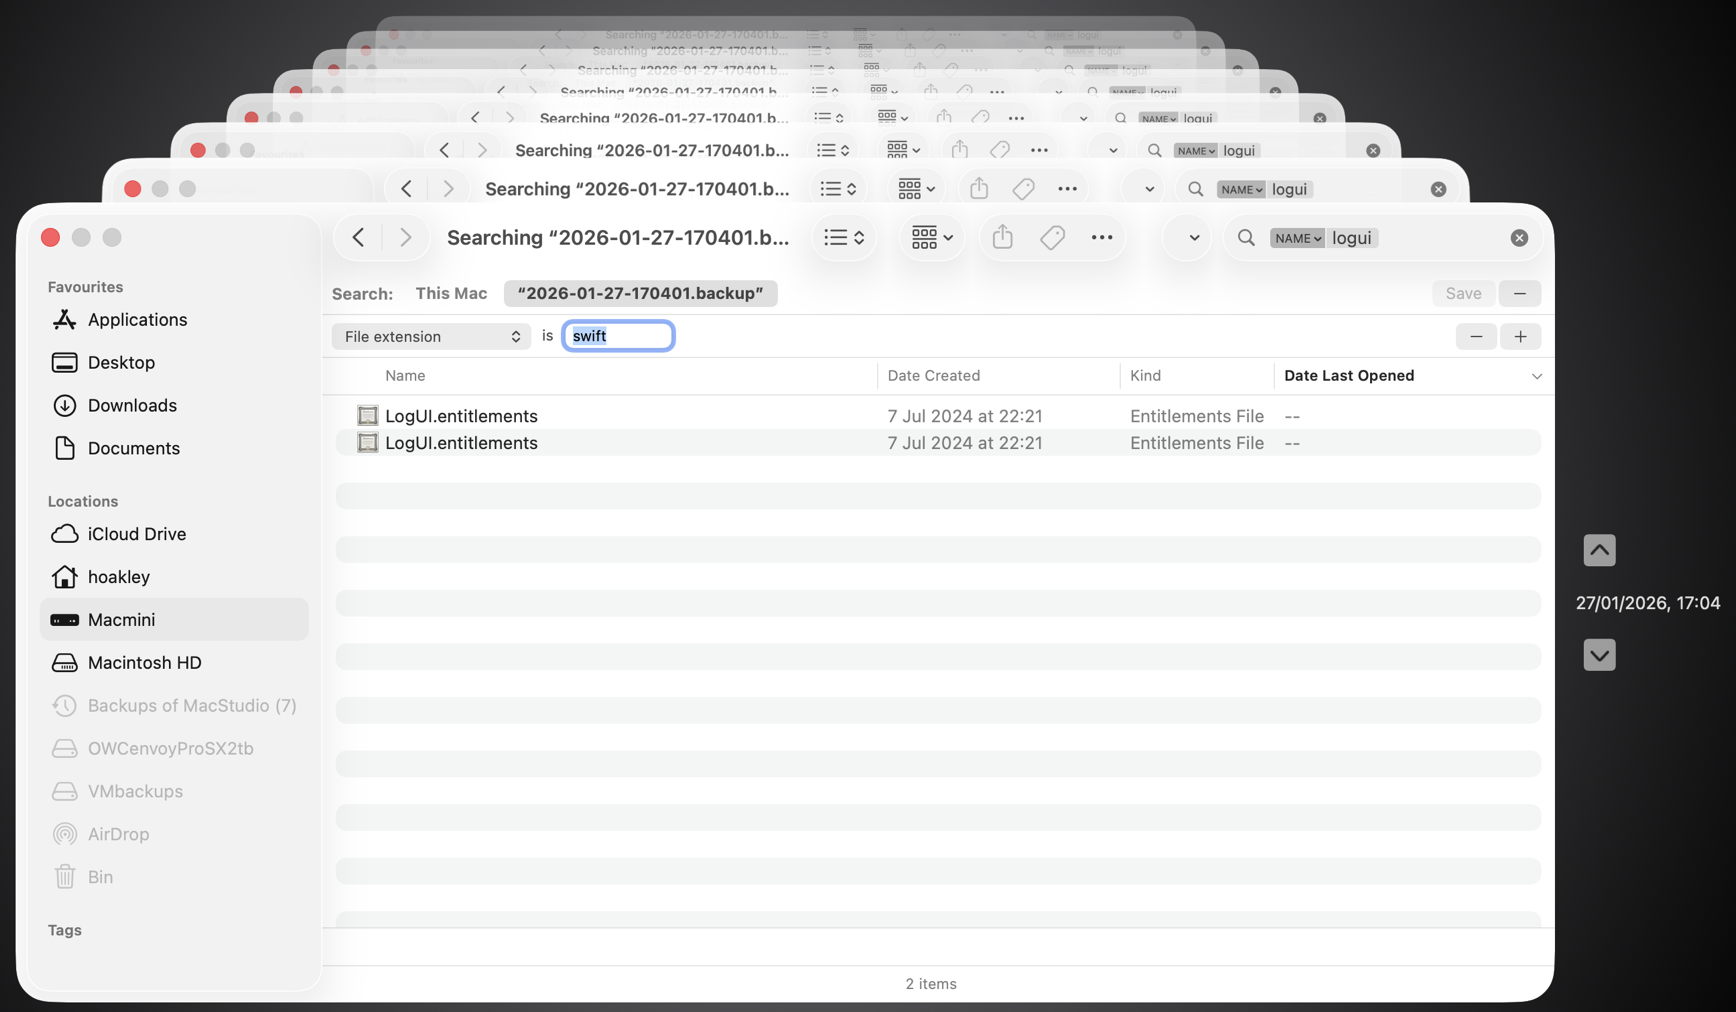
This time the two items found had appropriate names, but a completely different extension.

Undeterred, I left my Mac for over 24 hours, and tried again, only to discover the hourly backup containing my missing file had already been deleted. However, searching for files whose name contains logui with the extension swift proved just as futile. As I can’t disable Spotlight indexing on that volume without macOS telling me that it’s required to be indexed by Spotlight, neither can I force that volume to be reindexed.

There are third-party alternatives, including BackupLoupe and Find Any File (FAF). The former tellingly needs to create and maintain its own indexes, and FAF appears to work fairly reliably but takes an age to search each backup in turn.

In case this was a problem with one set of backups, I have now created a new backup set that suffers identical problems, and have reproduced this in both Sequoia and Tahoe, running on vastly different hardware. My conclusion is that using Spotlight to search Time Machine backups no longer works, and the instructions given by Apple are also broken. If you’ve managed to get reliable search working across your Time Machine backups without resorting to a third-party product, I’d be very grateful if you could explain how you did it.

Explainer: I/O throttling

By: hoakley
28 March 2026 at 16:00

Input and output have long been key factors in computer performance, and capable of bringing everything to a crawl unless carefully managed. This is most obvious when foreground and background processes contend for common resources such as disk storage. A popular solution has been to impose delays on I/O performed for intensive background tasks, like backing up, so giving more important tasks preferential access to I/O. This policy is known as I/O throttling, and has come to determine hardware choice.

For example, folk wisdom is that there’s little point in wasting a faster drive to store your Time Machine backups, because when those backups are made, their write speed is throttled by macOS.

I/O Throttling

Documentation of I/O policy is in the man page for the getiopolicy_np() call in the Standard C Library, last revised in 2019, and prevailing settings are in sysctl’s debug.lowpri_throttle_* values. Those draw a distinction between I/O to local disks, being “I/O sent to the media without going through a network”, such as I/O “to internal and external hard drives, optical media in internal and external drives, flash drives, floppy disks, ram disks, and mounted disk images which reside on these media”, and those to “remote volumes” “that require network activity to complete the operation”. The latter are “currently only supported for remote volumes mounted by SMB or AFP.”

Inclusion of remote volumes is a relatively recent change, as in the previous version of this man page from 2006, they were explicitly excluded as “remote volumes mounted through networks (AFP, SMB, NFS, etc) or disk images residing on remote volumes.”

Five policy levels are supported for IOPOL_TYPE_DISK:

  • IOPOL_IMPORTANT, the default, where I/O is critical to system responsiveness.
  • IOPOL_STANDARD, which may be delayed slightly to allow IOPOL_IMPORTANT to complete quickly, and presumably referred to in sysctl as Tier 1.
  • IOPOL_UTILITY, for brief background threads that may be throttled to prevent impact on higher policy levels, in Tier 2.
  • IOPOL_THROTTLE, for “long-running I/O intensive background work, such as backups, search indexing, or file synchronization”, that will be throttled to prevent impact on higher policy levels, in Tier 3.
  • IOPOL_PASSIVE, for mounting files from disk images, and the like, intended more for server situations so that lower policy levels aren’t slowed by them.

However, the idea that throttled I/O is intentionally slowed at all times isn’t supported by the explanation of how throttling works: “If a throttleable request occurs within a small time window of a request of higher priority, the thread that issued the throttleable I/O is forced to a sleep for a short period. This slows down the thread that issues the throttleable I/O so that higher-priority I/Os can complete with low-latency and receive a greater share of the disk bandwidth.”

Settings in sysctl for Tier 3 give the window duration as 500 milliseconds, and the sleep period as 200 ms, except for SSDs, whose sleep period is considerably shorter at just 25 ms. Those also set a maximum size for I/O at 131,072 bytes. You can view those settings in the debug section of Mints’ sysctl viewer.

Some years ago it was discovered that the user can globally disable IOPOL_THROTTLE and presumably all other IOPOL_TYPE_DISK policy with the command
sudo sysctl debug.lowpri_throttle_enabled=0
although that doesn’t persist across restarts, and isn’t documented in the man page for sysctl. This is provided in an option in St. Clair Software’s App Tamer, to “Accelerate Time Machine backups”, for those who’d rather avoid the command line.

Apple silicon Macs

Since the man page for getiopolicy_np() was last revised, Apple silicon Macs have changed I/O. Most is now handled in some way through specialised Arm cores within the chip, and CPU cores come in two (now three) types, Efficiency and Performance (and Super in the M5 family). Background threads such as those performing the work associated with IOPOL_THROTTLE are now most likely to be running on Efficiency (or M5 Performance) CPU cores.

If you wanted to do away with all throttling, you not only have to change the debug.lowpri_throttle_enabled setting, but you’d need to move those background threads to run them on Performance (M5 Super) CPU cores, which isn’t possible unless you have control over the code. There is evidence that macOS may do this anyway when performing the first full Time Machine backup, which achieves significantly faster speeds than subsequent incremental backups.

Dangers

The big disadvantage of completely disabling I/O throttling policy is this can only be applied globally, so including I/O for Spotlight indexing, file synchronisation, and other background tasks, as well as those needing high-priority access to I/O. Leaving the policy disabled in normal circumstances could readily lead to adverse side-effects, allowing Spotlight indexing threads to swamp important user storage access, for example.

Conclusions

Even when Macs were simpler and all CPU cores were the same, disabling I/O throttling was at best experimental, and ran the risk of compromising higher priority I/O. In Apple silicon Macs, relocating threads from E to P cores isn’t possible, except when running them in a virtual machine. Without that, there seems little if any benefit from disabling I/O throttling. However, the claim that there’s no performance benefit to be obtained from faster backup storage media is demonstrably false. Perhaps it’s time to return I/O throttling to the obscurity it deserves.

❌
❌