Normal view

There are new articles available, click to refresh the page.
Yesterday — 29 May 2026The Eclectic Light Company

What happens in the log when an app crashes as it starts up?

By: hoakley
29 May 2026 at 14:30

In yesterday’s guide to dealing with apps that crash immediately you open them, I carefully avoided mentioning what you might find in the log. This article puts that right.

The list of common causes I gave is:

  • macOS intentionally crashed the app because of an error in code signing, or another serious security failure;
  • the app failed because it was in translocation;
  • the app couldn’t open a damaged or incompatible document;
  • the app had a problem with its Preferences.

Investigating these in the log is among the simplest tasks for those learning to access it, providing the app crashes reliably. Show the seconds value in the menu bar clock, and open the Applications folder containing the app. Select it as the seconds reach about 45, to allow time for its icon to be displayed, then double-click the app to run it as the seconds reach 00, but not a moment earlier. Don’t touch the mouse/trackpad or keyboard for at least 5 seconds, by which time the crash should have occurred and the notification or crash log should have been displayed.

Then open LogUI (or a substitute), and set it to extract and display all the entries for 5 seconds from 00 seconds. If you open a new window in LogUI the start time will be preset to the time you opened the app, all ready to get the log extract.

The double-click is easy to spot in the log, as it’s marked by four almost identical Activity entries with a yellow 🥎 softball emoji, each reading something like
AppKit Finder sendAction:
short entries that are quick to locate. Entries following the fourth of those then report what happened next.

Code signing errors

These are normally easy to recognise, as they start with a call to verify the signature,
00.940943 Finder sendAction:
00.963228 syspolicyd SecTrustEvaluateIfNecessary
00.963982 trustd SecKeyVerifySignature

that’s followed by an error that’s repeated many times,
00.981296 lsd com.apple.securityd MacOS error: -67030

Follow those down a bit further and you’ll see this reported in other subsystems
01.013084 com.apple.launchservices Error -67030 validating the signing information for [private], error=Error Domain=NSOSStatusErrorDomain Code=-67030 "(null)" UserInfo={SecCSArchitecture=arm64}

Normally, this will be checked again by AMFI (Apple Mobile File Integrity)
01.030162 amfid Entering OSX path for /Users/hoakley/Documents/000aa/DelightEd.app/Contents/MacOS/DelightEd
01.031629 amfid SecKeyVerifySignature
01.036291 amfid com.apple.securityd MacOS error: -67030
01.048491 error amfid com.apple.MobileFileIntegrity.framework Code failed basic validity check (error: -67030): Error Domain=NSOSStatusErrorDomain Code=-67030 UserInfo={SecCSArchitecture=[private]}
01.048857 amfid /Users/hoakley/Documents/000aa/DelightEd.app/Contents/MacOS/DelightEd not valid: Error Domain=AppleMobileFileIntegrityError Code=-420 "The signature on the file is invalid" UserInfo={NSURL=file:///Users/hoakley/Documents/
000aa/DelightEd.app/Contents/MacOS/DelightEd, NSLocalizedDescription=The signature on the file is invalid}

That’s confirmed and actioned by the kernel
01.048950 kernel AMFI: code signature validation failed.
01.052968 amfid com.apple.MobileFileIntegrity [private]: Broken signature with Team ID fatal.
01.053043 kernel AMFI: When validating /Users/hoakley/Documents/000aa/DelightEd.app/Contents/MacOS/DelightEd: The code contains a Team ID, but validating its signature failed. Please check your system log.
01.053052 kernel mac_vnode_check_signature: /Users/hoakley/Documents/000aa/DelightEd.app/Contents/MacOS/DelightEd: code signature validation failed fatally: When validating /Users/hoakley/Documents/000aa/DelightEd.app/Contents/MacOS/DelightEd: The code contains a Team ID, but validating its signature failed. Please check your system log.
01.053059 kernel validation of code signature failed through MACF policy: 1
01.053061 kernel check_signature[pid: 2718]: error = 1
01.053066 kernel proc 2718: load code signature error 4 for file "DelightEd"
01.053461 kernel AMFI: hook..execve() killing xpcproxy (pid 2718): Attempt to execute completely unsigned code (must be at least ad-hoc signed).
01.053624 kernel ASP: Sleep interrupted: ref 29, signal 0x100, pid: 2718

with the conclusion
01.053627 kernel ASP: Security policy would not allow process: 2718, /Users/hoakley/Documents/000aa/DelightEd.app/Contents/MacOS/DelightEd

You’re not likely to miss those.

Common error codes from signature validation include:

  • -2147409652 CSSMERR_TP_CERT_REVOKED, the certificate has been revoked
  • -67007 resource envelope is obsolete (version 1 signature)
  • -67008 unsealed contents present in the root directory of an embedded framework
  • -67013 resource envelope is obsolete (custom omit rules)
  • -67021 nested code is modified or invalid
  • -67023 invalid resource directory (directory or signature have been modified)
  • -67030 invalid Info.plist (plist or signature have been modified)
  • -67054 a sealed resource is missing or invalid
  • -67056 code has no resources but signature indicates they must be present
  • -67061 invalid signature (code or signature have been modified)
  • -67062 code object is not signed at all, which is by far the most common.

In this case, I had changed a single character in the app’s Info.plist, which broke its CDHashes, and resulted in the correct error code of -67030.

App translocation

In this case, you’re looking for two related pieces of evidence, that a process mentions the act of translocation, and that the app is run from a translocation location. Again, these normally aren’t hard to find.

Shortly after the double-click,
00.968186 Finder sendAction:
you should see mention of the creation of the translocation directory
01.040587 lsd com.apple.securityd SecTranslocateCreateSecureDirectoryForURL: created /private/var/folders/x4/
x00kny5x0_5dsnmmxhtw6hc80000gn/T/AppTranslocation/B9651238-6B8C-4750-BFAC-E0D1A327768C/d/DelightEd.app

A little further down the log you’ll see the app being referenced in that long path
01.069877 amfid Entering OSX path for /private/var/folders/x4/x00kny5x0_5dsnmmxhtw6hc80000gn/T/AppTranslocation/
B9651238-6B8C-4750-BFAC-E0D1A327768C/d/DelightEd.app/Contents/MacOS/DelightEd
01.090927 com.apple.runningboard _executablePath = /private/var/folders/x4/x00kny5x0_5dsnmmxhtw6hc80000gn/T/AppTranslocation/
B9651238-6B8C-4750-BFAC-E0D1A327768C/d/DelightEd.app/Contents/MacOS/DelightEd

and so on.

If you’re struggling to find those, select the Messages item at the right end of the toolbar in LogUI, type the app name into the search box there and press Return, to filter entries.

Failed to open document

Of the four common causes of early app crashes, these are hardest to find evidence in the log. This is because the only process likely to know what went wrong is the app itself, and few third-party apps write anything useful to the log. You might find a useful entry or two by setting that menu at the right end of LogUI’s toolbar to Processes, entering the app name into the search box, and pressing Return. However, in many cases there will be little or no useful information.

Preference file problems

My previous article referred only to standard preferences that are handled by cfprefsd. Some apps run their own preferences using their own code, and neither cfprefsd nor the defaults command covers them. If they have a problem when accessing those custom files, it’s most unlikely to be recorded in the log.

In other apps, you should look for evidence that the crash happened shortly after the cfprefsd service is connected to the app, to support the standard features.

Starting once again with the double-click
01.579559 Finder sendAction:
it may take some time for the opening stages to complete. You should then see the XPC connection between the app and cfprefsd being set up for both root and the user
01.638428 DelightEd com.apple.xpc [0x102cf6980] activating connection: mach=true listener=false peer=false name=com.apple.cfprefsd.daemon
01.638504 DelightEd com.apple.xpc [0x102cf7960] activating connection: mach=true listener=false peer=false name=com.apple.cfprefsd.agent
01.638563 cfprefsd com.apple.xpc [0xa252bdb00] activating connection: mach=false listener=false peer=true name=com.apple.cfprefsd.daemon.peer[2910].0xa252bdb00
01.638659 cfprefsd com.apple.xpc [0x86f2d3600] activating connection: mach=false listener=false peer=true name=com.apple.cfprefsd.agent.peer[2910].0x86f2d3600

The app will normally crash during or shortly after the loading of preferences, marked by entries like
01.641152 DelightEd Loading Preferences From User CFPrefsD
01.706158 DelightEd Loading Preferences From System CFPrefsD

These too can be found more easily by setting the menu at the right end of LogUI’s toolbar to Processes, entering the app name into the search box, and pressing Return.

Happy hunting!
Before yesterdayThe Eclectic Light Company

How to fix an app that crashes as it starts up

By: hoakley
28 May 2026 at 14:30

One of the most common and frustrating problems with apps is when they crash as soon as you try to open them. Before that app has even had a chance to display its menu bar or splash screen, it has vanished, leaving you without a clue as to why. How could its developer release an app that can’t even run? Where do you look for clues as to what happened when the app was only there for an instant? Fortunately, this is when examining the crash log can be useful, and could help solve the problem.

Common causes include:

  • macOS intentionally crashed the app because of an error in code signing, or another serious security failure;
  • the app failed because it was in translocation;
  • the app couldn’t open a damaged or incompatible document;
  • the app had a problem with its Preferences.

Signs and logs

Depending on the type of Mac, the version of macOS it’s running, and the nature of the crash, you may see nothing at all, a simple notification, or a full crash report.

crashreport2

crashreport1

While panic logs can be impossible to recover if you miss them, app crash reports are almost invariably saved to disk, normally in the path ~/Library/Logs/DiagnosticReports, although in some cases you’ll have to look a bit harder there, or in /Library/Logs/DiagnosticReports. As the report’s name should start with the app name, they’re easy to identify, and double-clicking them opens the report in Console (one of its good uses).

Reading the crash log

In the upper Translated Report look for the following:

  • Path – check whether this is a long semi-random path typical of app translocation.
  • Code Type – on an Apple silicon Mac, check whether the app is running native on Arm, or translated by Rosetta 2.
  • Exception Type – this could be EXC_BAD_ACCESS (SIGKILL (Code Signature Invalid)) if macOS has crashed the app because of a code signing problem.
  • Termination Reason – this may be given as Namespace CODESIGNING, Code 2 Invalid Page or similar for code signature problems.

An exception type of EXC_CRASH (SIGKILL) indicates macOS terminated the app, and its crash report should give a Termination Reason with a code explaining the reason for the crash. Apple silicon Macs running recent versions of macOS are less likely to crash apps with signature problems, as they now tend to handle these in a dialog reporting the app is damaged and offering to remove it. Intel Macs with older macOS are more likely to crash the app and leave you wondering.

If you want to learn more about crash reports, they’re well documented for developers, starting from this master page. Worth reading are:

Code signing errors

One recent and innocent cause of signing and notarisation errors occurs in apps that update themselves, normally using the popular Sparkle method. If an app had worked fine before it updated itself and then can’t start up, it may not have updated its code signature or notarisation correctly. This is easy to fix, by deleting the broken app and downloading a fresh copy of the current version. If that still crashes with a signature error, contact its developer as it may have a bigger problem.

Apparency, free from Mothers Ruin, is the definitive app for checking code signing and notarisation problems. It doesn’t just identify the problem, but explains it in careful detail.

If you’re absolutely certain that the app doesn’t contain any malicious code, you may be able to work around code signing errors by re-signing the app. Doing this to an app that might be malicious would be extremely dangerous, so you require great confidence in the app’s integrity.

Before proceeding any further, you might need to add Terminal to the list in the App Management section of Privacy & Security settings, otherwise your commands could be unable to make any changes to the app. Once you’ve done that, open Terminal and use the command
codesign --remove-signature MyApp.app
to strip the existing signature from the app MyApp.app. Note that two hyphens precede remove-signature. When that’s done, use the command
codesign --sign - MyApp.app
to sign that app with an ad hoc signature. Ad hoc signatures provide only limited security, as they don’t use an Apple-issued certificate for verification against a chain of trust. They’re widely used by malware as a result, and easily exploited.

If that doesn’t work you’ll need to refer the problem to the app’s developer, who should in any case be informed of any problems with their app’s code signature, notarisation or security checks.

App translocation

There are some circumstances in which perfectly good apps may prove unable to run as expected when they’ve been translocated, and some become stuck in translocation, continuing to crash each time you try to run them. If you’ve looked at the crash log, the Path given there should make it obvious if that app is being run in translocation.

The best solution is to try reinstalling the app. Delete the current copy, and download the app again from its source on the internet. If it comes as a compressed archive, decompress it, then move the app from the folder it came in to one of your Applications folders before trying to run it. Do this one app at a time, rather than as one of several, and ensure it doesn’t remain in the folder it came in. If that doesn’t help, contact its developer.

A more hazardous option is to strip the quarantine extended attribute from the download, but you should only consider that as a last resort as it reduces the security checks made by macOS.

Failed to open document

If the app was last quit with a document still open, and that document now has a serious incompatibility with the app, that can cause the app to crash when it’s next opened, and tries to re-open that document. The same effect can occur when an app is opened by opening one of its documents. Try opening the app alone before opening the document. If necessary you can enable Close windows when quitting an application, in the Windows section of Desktop & Dock settings, or move the offending document to a different volume so that app loses track of it.

Preference file problems

Apps that use Property List files stored in ~/Library/Preferences, or an equivalent in the app’s folder in the ~/Library/Containers folder, open them during app startup. If that preference file is malformed or corrupted, it can cause the app to crash when it tries reading it. This may not be easy to recognise in a crash log, although references there to cfprefsd, the path to the preference file, or UserDefaults are useful clues.

The best way to address this is to delete the app’s preference file, forcing the app to create a fresh default preference file, and open normally again. Although you can do this by locating the correct file and dragging it to the Trash, it’s more reliable to use the defaults command in Terminal, as that should delete the right copy and avoid overwriting it and causing the problem to recur. For this you’ll need the app’s formal ID, available from Apparency or taking a peek at the value for the CFBundleIdentifier key in its Info.plist. It should be in the form of a reverse URL like com.mothersruin.Apparency.

The command that you need to enter into Terminal is of the form
defaults delete com.developer.appname
where com.developer.appname is the app’s ID or CFBundleIdentifier.

You should then be able to open the app, which will have to recreate its default settings, hopefully without crashing again.

Other causes

Most other potential causes tend to prolong app opening rather than causing it to crash. Apps that check for updates over the internet usually do so soon after opening, but should perform that check without blocking or crashing the app. Similarly, apps needing to connect to an external authorisation service more usually hang, leaving their Dock icon bouncing indefinitely.

Any damaged or incompatible app may well crash during opening. If you suspect that, check with the app’s support site that the version you are trying to run is the latest that’s compatible with your Mac and macOS. If in doubt, re-install the app.

Apple has released an update to XProtect for all macOS

By: hoakley
28 May 2026 at 01:45

Apple has released its regular weekly update to XProtect for all versions of macOS, bringing it to version 5346. As usual it doesn’t release information about what security issues this update might address.

This version removes 11 Yara rules for MACOS.f3edc61, MACOS.d1e06b8, OSX.Bundlore.D, OSX.OpinionSpy, OSX.DevilRobber.A, OSX.DevilRobber.B, OSX.Mdropper.i, OSX.FkCodec.i, MACOS.d4735e3, MACOS.HONKBOX.B, and MACOS.FLUFFYFERRET.CT, and many of the component rules for MACOS.ADLOAD. There are no changes in the Osascript rules in XPScripts.yr.

You can check whether this update has been installed by opening System Information via About This Mac, and selecting the Installations item under Software.

A full listing of security data file versions is given by SilentKnight and SystHist for El Capitan to Tahoe available from their product page. If your Mac hasn’t yet installed this update, you can force it using SilentKnight or at the command line.

If you want to install this as a named update in SilentKnight, its label is XProtectPlistConfigData_10_15-5346

Sequoia and Tahoe systems only

This update has already been released for Sequoia and Tahoe via iCloud. If you want to check it manually, use the Terminal command
sudo xprotect check
then enter your admin password. If that returns version 5346 but your Mac still reports an older version is installed, you should be able to force the update using
sudo xprotect update

What’s in that phishing email?

By: hoakley
26 May 2026 at 14:30

A few years ago I almost lost my main email addresses when their provider made changes. I had apparently missed a series of warning messages they had sent, as I had assumed those were just phishing attacks and deleted them without clicking on their links. Given that some days I get more than half a dozen potentially malicious emails claiming to come from that provider, I needed a better way to check the few that might be genuine. But how could I do that without putting myself at risk of a phishing attack?

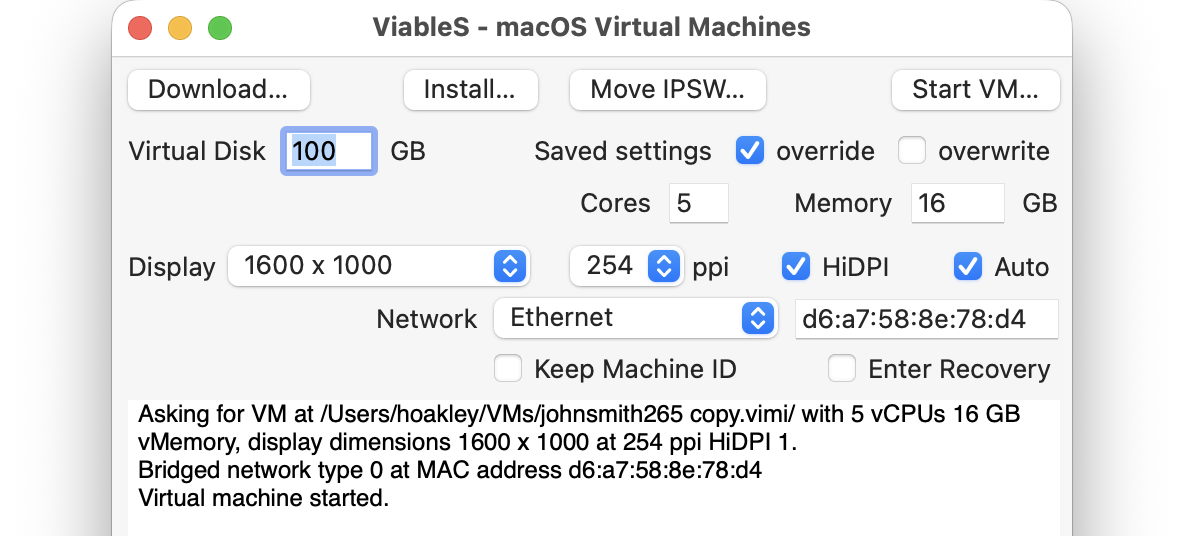
What I needed was a way to be able to click on a link safe in the knowledge that my Mac would be completely isolated from any consequences. The solution is to use a locked-down virtual machine running in total isolation from the host. This is supported in a special version of my free virtualiser Viable, named ViableS, or you may be able to do something similar using a different virtualiser.

First download the IPSW image file for the latest release of macOS, either directly using Viable or from the links to Apple’s source given by Mr. Macintosh. Use Viable to build that into a fresh 100 GB VM with a single user named John Smith and a password of password. That way any stolen secrets will be effectively anonymous, and won’t even reveal your username. At this stage, run the VM with shared folders so you can transfer in any apps you might want, and the link to the suspicious site.

If you’re going to use your locked-down VM again, rather than having to create a fresh VM every time, you can now duplicate it using Command-D. The VM’s disk image is stored as a sparse file, and duplication should result in a clone anyway, greatly reducing the space taken on disk.

Save the suspicious message to a PDF or similarly accessible file, and transfer that into the VM now. Once that’s all set up and ready to go, shut that VM down.

From here on, only run that VM using ViableS, as it runs in a sandbox and has no support for sharing folders with the host, although it obviously needs a network connection to let you follow the link in the saved message. All my virtualisers including ViableS have been granted the restricted entitlement to use bridged networking, so they get their own IP address rather than sharing the host’s, and that should allow their networking to be operated securely.

The VM is now as well protected and isolated from the host Mac as possible. The virtualiser is running in a sandbox, it has no shared access to files between host and VM, and is using a bogus name and password. To remind you that VM is locked down, ViableS adds a red goblin 👺 emoji to the window’s title bar. Having double-checked each of those settings, open the saved message in the VM and click on the suspicious link.

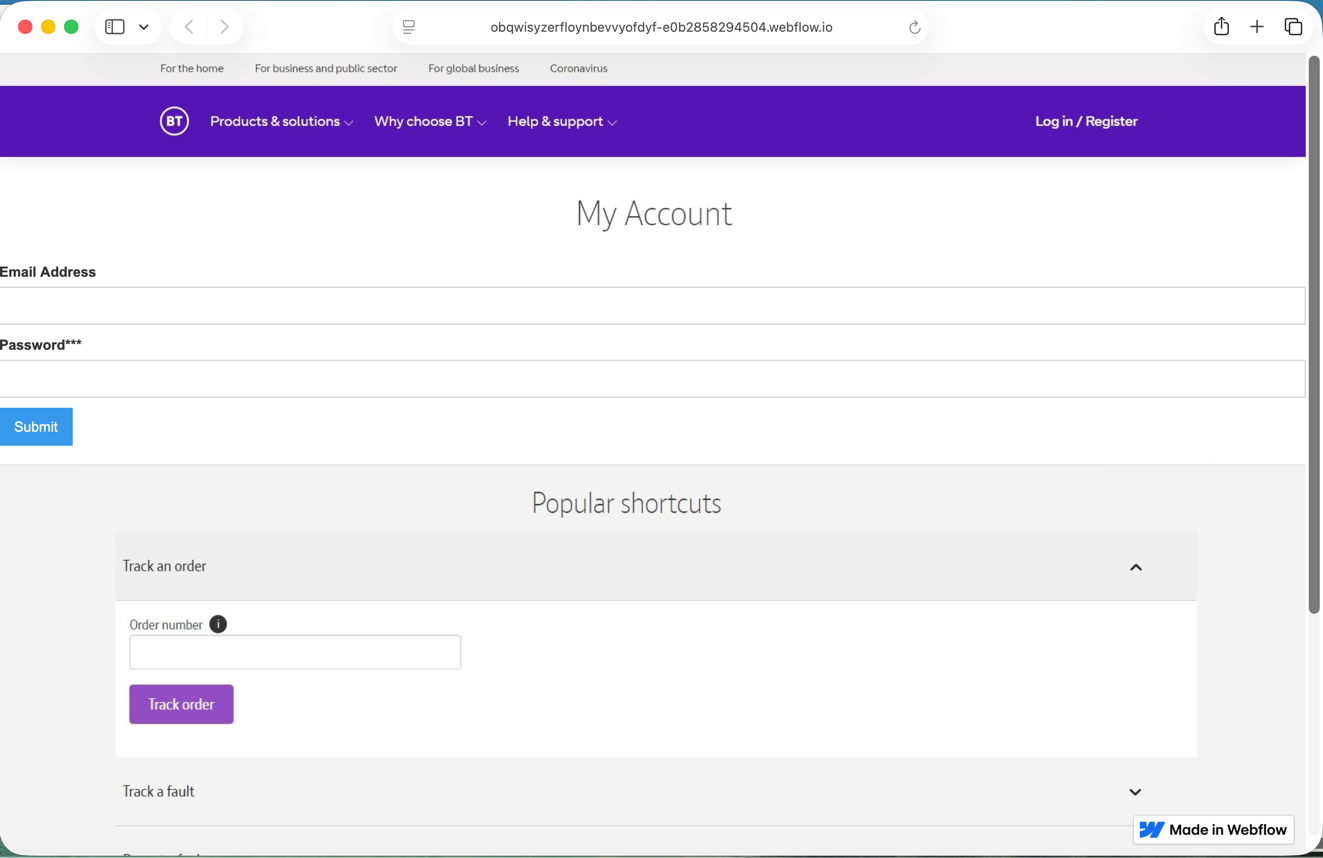
In this case, it took me to a fake version of the provider’s site built hastily using Webflow, where I was prompted to enter my email address and password, as if that would somehow ensure my email account wouldn’t be deleted. Take your time here and remember to enter your fake address and password, in my case j.smith@btconnect.com and password.

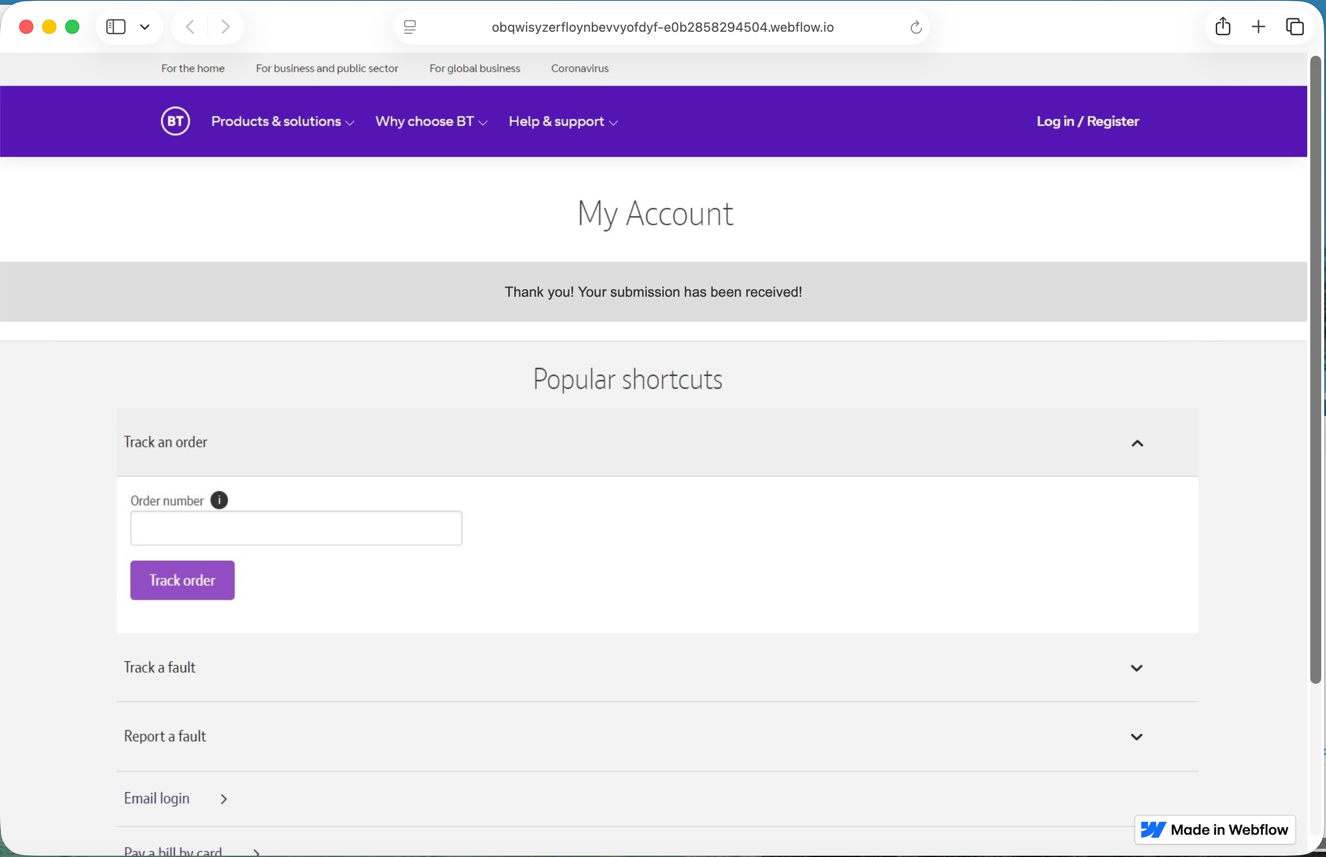
The rest of this fake proved non-functional. Whoever had set it up was clearly just harvesting user names and passwords, presumably to sell on for others to exploit in depth.

Other links might download a poisoned PDF, or take you to a ClickFix exploit.

Having reassured yourself that the email was phishing and not genuine, you can now shut down the locked-down VM and trash it. Virtualisation came to the rescue again.

Apple has released an update to XProtect for all macOS

By: hoakley
20 May 2026 at 02:28

Apple has released its regular weekly update to XProtect for all versions of macOS, bringing it to version 5345. As usual it doesn’t release information about what security issues this update might address.

This version adds one new Yara rule for MACOS.SILLYSTRAW.IMA, which appears to be a new genus, and in the Osascript rules in XPScripts.yr it adds a new rule for MACOS.OSASCRIPT.TADE and amends the existing rule for MACOS.OSASCRIPT.SYPR.

You can check whether this update has been installed by opening System Information via About This Mac, and selecting the Installations item under Software.

A full listing of security data file versions is given by SilentKnight and SystHist for El Capitan to Tahoe available from their product page. If your Mac hasn’t yet installed this update, you can force it using SilentKnight or at the command line.

If you want to install this as a named update in SilentKnight, its label is XProtectPlistConfigData_10_15-5345

Sequoia and Tahoe systems only

This update has already been released for Sequoia and Tahoe via iCloud. If you want to check it manually, use the Terminal command
sudo xprotect check
then enter your admin password. If that returns version 5345 but your Mac still reports an older version is installed, you should be able to force the update using
sudo xprotect update

Apple has released an update to XProtect for all macOS

By: hoakley
13 May 2026 at 02:22

Apple has released an update to XProtect for all versions of macOS, bringing it to version 5344. Version 5343 doesn’t appear to have been released. As usual it doesn’t release information about what security issues this update might address.

This version makes minor amendments to the Yara rules for MACOS.SHEEPSWAP.OBF.C, MACOS.SHEEPSWAP.OBFE.COMMON and MACOS.ADLOAD. There has been no change in the Osascript rules in XPScripts.yr.

You can check whether this update has been installed by opening System Information via About This Mac, and selecting the Installations item under Software.

A full listing of security data file versions is given by SilentKnight and SystHist for El Capitan to Tahoe available from their product page. If your Mac hasn’t yet installed this update, you can force it using SilentKnight or at the command line.

If you want to install this as a named update in SilentKnight, its label is XProtectPlistConfigData_10_15-5344

Sequoia and Tahoe systems only

This update has already been released for Sequoia and Tahoe via iCloud. If you want to check it manually, use the Terminal command
sudo xprotect check
then enter your admin password. If that returns version 5344 but your Mac still reports an older version is installed, you should be able to force the update using
sudo xprotect update

What has changed in macOS Tahoe 26.5?

By: hoakley
12 May 2026 at 04:27

The update bringing macOS Tahoe to version 26.5 is modest in size and, apart from its security fixes, seems largely routine maintenance.

The only release notes worth reading are those listing vulnerabilities fixed, available here. Among the 69 listed there are 9 in the kernel, which must be the highest number in any recent macOS update. I wonder whether those have been swelled by AI, and one of the kernel bugs is credited to a researcher “with Claude and Anthropic Research”. There could of course be fixes resulting from early use of Mythos, but they’re unlikely to appear in a public list. None of the fixes listed are reported as being known to exist in the wild.

The new build number for 26.5 is 25F71. Apple silicon Macs have a firmware update bringing them to mBoot 18000.120.36, and Intel Macs with T2 chips are updated to 2103.100.6.0.0 (iBridge 23.16.15067.0.0,0).

Bundled apps have routine increments in version numbers:

  • Books, from version 8.4 to 8.5
  • Freeform, 4.4 to 4.5
  • Music, 1.6.4 to 1.6.5
  • News, 11.4 to 11.5
  • Passwords, 2.4 to 2.5
  • Safari, 26.4 (21624.1.16.11.4) to 26.5 (21624.2.5.11.4)
  • Stocks, 8.4 to 8.5
  • TV, 1.6.4 to 1.6.5.

Although there are abundant increments in build numbers reflecting routine maintenance, there are few substantial changes apparent in /System/Library, including:

  • In kernel extensions, the whole AGX series has a substantial change in version, as does AppleUSBAudio, and smbfs is updated to version 6.0.1
  • APFS is incremented to version 2811.120.14
  • There’s a new AppleAccountTransparency in private frameworks.

Apple has released macOS Tahoe 26.5, and security updates 15.7.7 and 14.8.7

By: hoakley
12 May 2026 at 01:21

Apple has released the update to bring macOS Tahoe to version 26.5, and security updates for Sequoia and Sonoma to bring them to 15.7.7 and 14.8.7.

If you were expecting 15.7.6 or 14.8.6, then you’ll be as surprised as I was that Apple appears to have skipped those and gone straight on to x.x.7. I haven’t seen any explanation for this curious change in version numbering.

Download size for the 26.5 update on an Apple silicon Mac is around 3.8 GB, and the last 5 minutes of preparation takes maybe a tad longer than that. Intel Macs should download around 2.9 GB instead.

In Apple silicon Macs, firmware is updated to mBoot 18000.120.36, while Intel firmware is updated to 2103.100.6.0.0 (iBridge 23.16.15067.0.0,0).

Release notes are the bland and unhelpful statement that “This update includes enhancements, bug fixes, and security updates for your Mac.”

Security release notes are here for Tahoe with around 69 vulnerabilities fixed including more kernel bugs than I’ve ever seen in a single update, here for Sequoia with around 45, and here for Sonoma with a mere 43 or so.

Apple still hasn’t posted any enterprise release notes here but might think of something to report later.

Updated 20:00 GMT 11 May 2026 with firmware info.

Apple has released an update to XProtect for all macOS

By: hoakley
6 May 2026 at 02:23

Apple has released an update to XProtect for all versions of macOS, bringing it to version 5342. As usual it doesn’t release information about what security issues this update might address.

This version doesn’t appear to bring any additions or amendments to either the main Yara rules, or for Osascript rules in XPScripts.yr, but there has been extensive reformatting, tidying, and relabeling of lists.

You can check whether this update has been installed by opening System Information via About This Mac, and selecting the Installations item under Software.

A full listing of security data file versions is given by SilentKnight and SystHist for El Capitan to Tahoe available from their product page. If your Mac hasn’t yet installed this update, you can force it using SilentKnight or at the command line.

If you want to install this as a named update in SilentKnight, its label is XProtectPlistConfigData_10_15-5342

Sequoia and Tahoe systems only

This update has now been released for Sequoia and Tahoe via iCloud. If you want to check it manually, use the Terminal command
sudo xprotect check
then enter your admin password. If that returns version 5342 but your Mac still reports an older version is installed, you should be able to force the update using
sudo xprotect update

Apple has released an update to XProtect for all macOS

By: hoakley
29 April 2026 at 02:36

Apple has released an update to XProtect for all versions of macOS, bringing it to version 5341; the previous public release was 5338. As usual it doesn’t release information about what security issues this update might address.

This version amends the Yara rule for MACOS.PIRRIT.TWEN, and adds new rules for MACOS.AIRPIPE.IM, MACOS.EIGER.SUNOTO, MACOS.EIGER.BA and MACOS.MONCH.BA. Osascript rules in XPScripts.yr have amendments to those for MACOS.OSASCRIPT.BOZO, MACOS.OSASCRIPT.BOWISP and MACOS.OSASCRIPT.GEPEPA, and new rules added for MACOS.OSASCRIPT.DUCACI, MACOS.OSASCRIPT.DUCOOB and MACOS.OSASCRIPT.AMSCLUCL.

You can check whether this update has been installed by opening System Information via About This Mac, and selecting the Installations item under Software.

A full listing of security data file versions is given by SilentKnight and SystHist for El Capitan to Tahoe available from their product page. If your Mac hasn’t yet installed this update, you can force it using SilentKnight or at the command line.

If you want to install this as a named update in SilentKnight, its label is XProtectPlistConfigData_10_15-5341

Sequoia and Tahoe systems only

This update has now been released for Sequoia and Tahoe via iCloud. If you want to check it manually, use the Terminal command
sudo xprotect check
then enter your admin password. If that returns version 5341 but your Mac still reports an older version is installed, you should be able to force the update using
sudo xprotect update

Explainer: sandboxes

By: hoakley
11 April 2026 at 15:00

For a computer to be really secure, it mustn’t run any untrusted code. In macOS that would mean banning all third-party apps, which would severely limit the usefulness of a Mac. One way round this is to run all untrusted code in a tightly restricted environment, denying it the ability to access memory, storage or other resources outside those dedicated to it by its sandbox, managed by macOS.

Even that’s too restrictive for the vast majority of apps. You expect an image editor to be able to open and save images in folders you control, such as ~/Documents, those in your Pictures folder or Photos Library. So having put an app into its sandbox, the next thing you need to do is provide it ways to ease some of those restrictions. In Apple’s operating systems, those are granted according to entitlements burned into the app’s signature.

Considering our hypothetical sandboxed image editor, those entitlements are likely to include com.apple.security.files.user-selected.read-write, giving the app read and write access to files the user has selected in a standard macOS Open or Save dialog.

This overlaps with privacy protection controlled by TCC. The standard user folder for images is ~/Pictures, so to gain read and write access to that the app needs an entitlement for com.apple.security.assets.pictures.read-write as well. Then there’s the desire to gain direct access to any built-in or external camera to capture movies and still images, requiring com.apple.security.device.camera, another entitlement overlapping with those to protect privacy.

What started off as an app running entirely within its sandbox is gradually being allowed to do more, and that sandbox is becoming less effective as the app gains access to more outside resources. Although this might appear increasingly pointless, balanced compromises can be reached that limit an app’s attack surface without frustrating users.

Apple requires all apps distributed through its App Store to run in their app sandbox, something marked in the app by another entitlement com.apple.security.app-sandbox, and explained here.

macOS also applies sandbox features to apps that aren’t marked to be run in a sandbox, most notably to implement privacy protection. By default, when any app tries to list the contents of a protected folder, the sandbox blocks that unless the privacy controller TCC authorises access. Unfortunately that can lead to complex interactions between sandboxing and TCC.

The Finder and other bundled utilities in macOS don’t reveal the entitlements claimed by sandboxed apps, indeed they don’t even tell you whether an app runs in a sandbox in the first place, a curious omission. For that you’ll need a third-party tool such as Mothers Ruin’s Apparency. Some sandboxed apps have such long lists of entitlements that they seem allowed to do almost anything, and you might wonder how effective that sandbox would be at preventing malicious behaviour from affecting your Mac.

Entitlements aren’t necessarily an indicator that an app is sandboxed, either: com.apple.security.app-sandbox is the tell-tale sign. Apple also uses entitlements to grant access to certain restricted features in macOS, like snapshots. Look at the entitlements of apps like Carbon Copy Cloner that have access to snapshots and you’ll see com.apple.developer.vfs.snapshot there for that purpose, even though that app isn’t sandboxed.

Because entitlements, including that to sandbox the app, are burned into an app’s signature, the only way to remove any of them is to strip the app’s signature altogether, and remove the whole lot. You would then have to re-sign the app using an ad hoc signature, and you’re pretty well guaranteed that your doctored app won’t run at all. So there’s no practical way out of sandboxing and entitlements for those apps requiring them.

Another distinctive feature of a sandboxed app is its named container folder, in ~/Library/Containers, where its sandboxed storage is located. An app’s container is created automatically by macOS when that app is run for the first time, but isn’t cleaned up when the app is removed, so can become orphaned and merit careful manual removal.

As App Store apps have to be sandboxed, but notarized apps supplied outside the App Store don’t, it might be tempting to see them as alternatives, or complementary to one another, but they’re very different. A few apps like BBEdit are both sandboxed and notarized, but that’s usually even harder than it sounds, and quite an accomplishment when it works well. But the restrictions of the sandbox make it impossible for many apps to do their jobs, so there will always be a need for those that don’t run in a sandbox.

Apple has released an update to XProtect for all macOS

By: hoakley
10 April 2026 at 14:06

Overnight, Apple has released its regular weekly update to XProtect, bringing it to version 5338. As usual it doesn’t release information about what security issues this update might address.

This version adds four new Yara rules for MACOS.BONZAIBREEZE, MACOS.BONZAIBUFFOON, MACOS.BONZAIBOOMER and BONZAIBUNNY, additions to the Bonzai family of what appear to be clickfix stealers. To accompany those are four new entries in the Osascript rules in XPScripts.yr, for MACOS.OSASCRIPT.BOPADO, MACOS.OSASCRIPT.BOSTA, MACOS.OSASCRIPT.BOMSPAA and MACOS.OSASCRIPT.BOMSPAB.

You can check whether this update has been installed by opening System Information via About This Mac, and selecting the Installations item under Software.

A full listing of security data file versions is given by SilentKnight and SystHist for El Capitan to Tahoe available from their product page. If your Mac hasn’t yet installed this update, you can force it using SilentKnight or at the command line.

If you want to install this as a named update in SilentKnight, its label is XProtectPlistConfigData_10_15-5338

Sequoia and Tahoe systems only

This update has now (as of 1700 GMT 10 April) been released for Sequoia and Tahoe via iCloud. If you want to check it manually, use the Terminal command
sudo xprotect check
then enter your admin password. If that returns version 5338 but your Mac still reports an older version is installed, you should be able to force the update using
sudo xprotect update

Last Week on My Mac: Consent, intent and privacy

By: hoakley
5 April 2026 at 15:00

Privacy protection changed radically in macOS Mojave and Catalina, but in the last couple of weeks I have realised how seven years later it’s still commonly misunderstood. While most can see how it protects access to hardware resources like the camera, and app data such as calendars, when it comes to Files & Folders and Full Disk Access, many remain hopelessly lost. This compromises our privacy, as all too often we end up giving an app Full Disk Access when it doesn’t need it.

Much of this confusion is the result of inadequate explanation, or to be more blunt, total absence of information. Apple’s otherwise commendable account of privacy controls barely mentions Macs and concentrates almost exclusively on iPhones, which don’t have Full Disk Access, and whose Files & Folders control is primitive by comparison. The Platform Security Guide also has remarkably little of relevance to say. Perhaps the closest we have to a conceptual account is that given by Kelly Yancey in his section of the Advances in macOS Security presentation at WWDC19.

Perhaps the most prevalent mystery is why a user’s Documents folder should be protected, and why so many apps need to ask for access to that folder? Before answering that, we need to understand two underlying concepts, of consent and intent.

It’s precisely because the Documents folder is so popular for our documents that it needs protection. A rogue app with uncontrolled access might be able to acquire tax and financial details, as well as having access to much of your personal information. So we need control over which apps can access which files there.

When we want to open a document, we express our intent to access its contents when we open that document in a File Open dialog, using Open Recent or a similar command, or by double-clicking the document. We choose the app we trust with the document’s contents, and the document, in our intent.

When an app wants to open a document without our direct involvement there’s the danger that, no matter what the file’s permissions might say, we don’t want a page layout app looking through our tax returns. For those apps we trust to have direct access to files in our Documents folder we thus give our consent to that action. If the app asks for access and we don’t trust it, then we refuse our consent, and the app is locked out.

Thus, the only ways that an app can open documents in the Documents folder are by our intent, or by giving our consent, and those involve different processes.

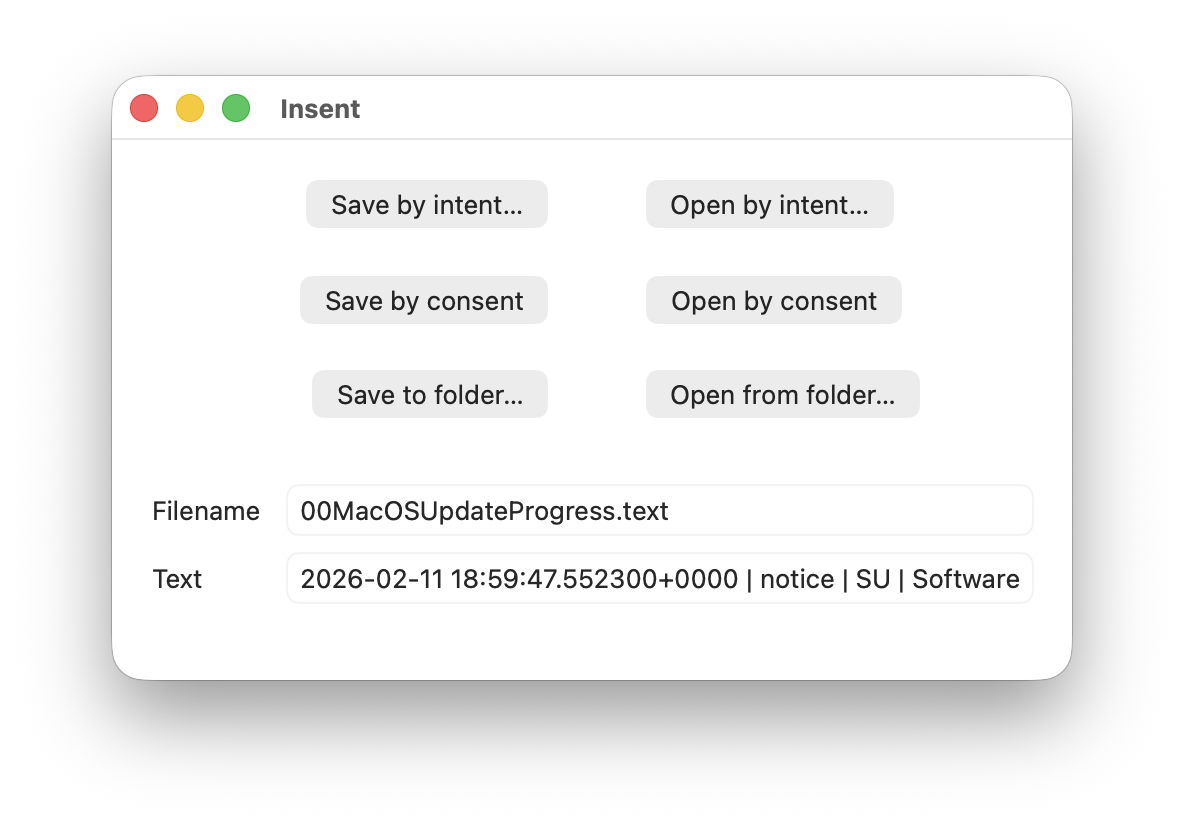
To help understand this more clearly, I’ve put together a little app Insent, a portmanteau of the words intent and consent. I also thought you might appreciate the Hallowe’en pumpkin in its icon.

Here I’ll use just two of its six buttons to draw the distinction between intent and consent. Once you’ve unarchived Insent’s folder, drag the app from there to one of your Applications folders, or somewhere similar, to run it. Open the app, click through its standard notarisation dialog, and you’ll see its main window.

Insent can read and write text files with the extensions .txt or .text. Confirm that it can open one in a protected location like your Desktop or Downloads folder by clicking on its Open by intent… button at the top right. You’ll see a standard File Open dialog in which you can select and open that file, and its filename and the opening characters of that file will be shown in the text boxes below. There will be no request to give access to that protected folder (consent) as you have expressed your intent to open that file.

Next, ensure that your Documents folder has at least one text file accessible at its top level. Then click on the Open by consent button. Instead of asking you which file to open, Insent now chooses that by itself, picking a text file at random from inside your Documents folder.

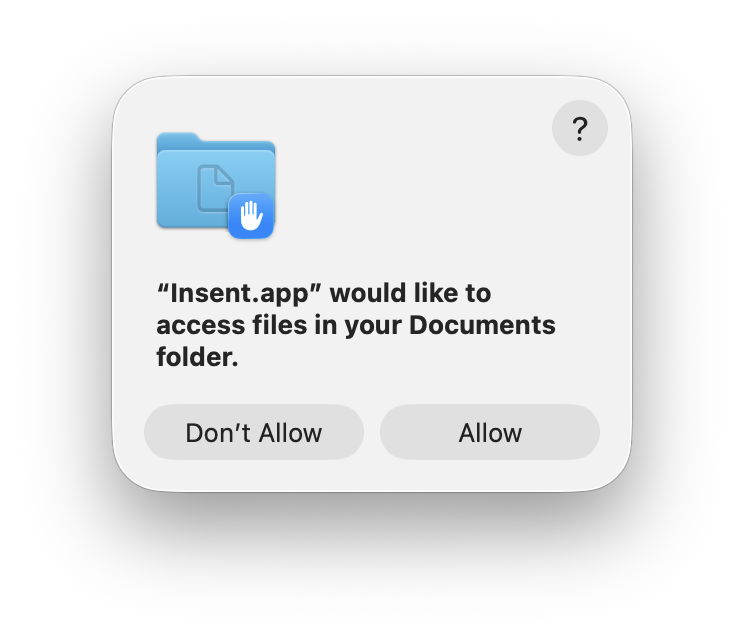
You should now see this dialog requesting your consent to allow that access to go ahead. Click on the Allow button, and the filename and text will then be displayed in those two text boxes, confirming Insent was given access.

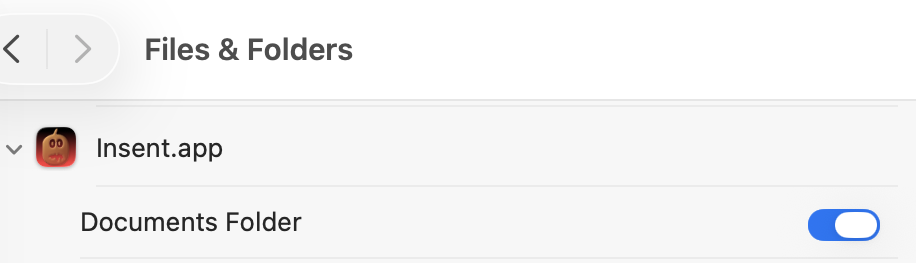
You’ll also see Insent has been added to the Files & Folders section in Privacy & Security settings, with access specifically to the Documents folder.

Confirm that control does what it claims by quitting Insent, turning access to the Documents folder off, opening Insent, and clicking on Open by consent again. Now instead of seeing the filename, you’ll see the message that Insent [Couldn't get contents of Documents folder], because you withdrew your consent.

With that privacy control still disabled, try clicking on the Save by consent… button. This writes a brief text file whose name starts with Insent followed by a UUID into your Documents folder – the same folder you’ve withdrawn consent from, and where it can’t read a text file. But if you click on Open by intent… and select that same file there, so expressing your intent to open it, it should still open normally.

These few minutes have shown:

  • Folders including ~/Documents are protected to restrict reading not writing files.
  • Apps retain the ability to read files in protected folders by user intent, when explicitly opening the file.
  • Apps themselves can only open files in protected folders with express user consent.
  • Each consent in Folders & Files is limited to the app and the protected folder.
  • Consent will be sought automatically when an app tries to access a protected folder.
  • When consent has been given and is then disabled, the app will be denied access to files in that protected folder.

So the next time you’re invited to give an app access to a protected folder, you’ll know that it’s trying to access its contents. If you don’t think that app should have free access to the files in that folder, deny that request, and don’t whatever you do be persuaded to give the app Full Disk Access just to have a quieter time, or because Support recommends it.

Insent version 1.0 for macOS 13.5 or later is available from here: insent10
and I’ll be returning to it later next week.

Apple has released an update to XProtect for macOS prior to Sequoia

By: hoakley
4 April 2026 at 13:32

Apple has overnight released its out-of-cycle update to XProtect for macOS prior to Sequoia, bringing it to version 5337. This update has already been released for macOS Sequoia and Tahoe, and this update provides the same version for those Macs still using on the older bundle location.

This version removes the Yara rule for MACOS.SOMA.MAENB, and makes no changes to the Osascript rules in XPScripts.yr.

You can check whether this update has been installed by opening System Information via About This Mac, and selecting the Installations item under Software.

A full listing of security data file versions is given by SilentKnight and SystHist for El Capitan to Tahoe available from their product page. If your Mac hasn’t yet installed this update, you can force it using SilentKnight or at the command line.

If you want to install this as a named update in SilentKnight, its label is XProtectPlistConfigData_10_15-5337

Sequoia and Tahoe systems only

This update has already been released for Sequoia and Tahoe via iCloud. If you want to check it manually, use the Terminal command
sudo xprotect check
then enter your admin password. If that returns version 5337 but your Mac still reports an older version is installed, you should be able to force the update using
sudo xprotect update

Apple has released an update to XProtect for Sequoia & Tahoe only

By: hoakley
3 April 2026 at 14:39

Apple has just released an out-of-cycle update to XProtect for macOS Sequoia and Tahoe only, bringing it to version 5337. As usual it doesn’t release information about what security issues this update might address.

This version removes the Yara rule for MACOS.SOMA.MAENB, and makes no changes to the Osascript rules in XPScripts.yr.

You can check whether this update has been installed by opening System Information via About This Mac, and selecting the Installations item under Software.

A full listing of security data file versions is given by SilentKnight and SystHist for El Capitan to Tahoe available from their product page.

Currently this update is only available for Macs running Sequoia or Tahoe. Those running earlier versions of macOS can only update to XProtect version 5336 via softwareupdate.

This update has only been released for Sequoia and Tahoe via iCloud. If you want to check it manually, use the Terminal command
sudo xprotect check
then enter your admin password. If that returns version 5337 but your Mac still reports an older version is installed, you should be able to force the update using
sudo xprotect update

Buying a used Mac

By: hoakley
2 April 2026 at 14:30

Macs are well known for their longevity, and are substantially cheaper when purchased used. This is a good time to consider buying a used Mac, as prices for Intel models are continuing to fall, and earlier Apple silicon models are becoming more widely available. However, buying any used computer is higher risk than buying new. This article explains how to reduce that risk.

Official refurbs

If you’re looking for discounted recent models, then the best place is Apple’s refurb store, in your local version of this page. These should be effectively as new, and include relatively recent models, but you’re unlikely to make big savings here. They’re ideal if you enjoy unboxing, as refurbs ship in their standard packaging.

Resellers

Most countries have retailers who specialise in preparing and selling used Macs. Among the best known are:

These are staffed by Apple-trained technicians who check each Mac thoroughly. They offer a wider range of models, many of them at highly affordable prices. Most offer a return period, as well as a one-year warranty, and are subject to local consumer protection law.

Private vendors

My one and only golden rule is never to buy a used Mac without seeing it in the flesh beforehand. That bargain a thousand miles away could turn out to have been stolen, and even if it’s genuine you could still end up with a useless Mac. I’ve never heard of anyone buying a house or car without seeing it for themselves, and a Mac should be no different. I suppose it’s feasible to go through the following checks over FaceTime or Zoom, but there are so many skilled con artists around I wouldn’t risk it.

When you arrive and see the Mac you’re about to purchase, work systematically through the following.

Provenance

Your first and most important question is whether this Mac is the seller’s to start with. The best answer comes in the form of its original proof of purchase, giving its serial number. Check that matches the serial number in Hardware Overview in System Information. If it doesn’t, then thank them politely and leave as quickly as you can. While you’re looking in that section, if the Mac has a T2 or Apple silicon chip, at the foot of that information you’ll see its Activation Lock Status: if that’s enabled, make a careful note, as you’ll need to get that disabled before you take your new Mac away. Intel Macs without T2 chips don’t have that to worry about.

Establishing provenance gets more complicated if that Mac has had more than one previous owner, but the current owner should ideally have a chain of bills of sale to reassure you. If they don’t, then that Mac may well have a murky past that could catch up with you.

Condition

Once you have confidence that you’re dealing with the real owner of the Mac, check it out as thoroughly as you can, without rushing or stripping it down to its logic board. A careful and undistracted visual examination is important, and gives clues through its general cleanliness as to how well it has been cared for.

It would be comforting to run hardware diagnostics just in case, although that’s not a particularly sensitive check for incipient problems. In ideal circumstances you’d want to check wear and any errors on its internal SSD using DriveDx or another SMART utility, but you’re unlikely to get the chance. If you have a friend who is a hardware technician, they could be a real boon to take along, just as you should take a good mechanic when you check out a used car.

AppleCare

If the current owner has AppleCare cover on that Mac, they should in most cases be able to transfer that with its sale. This requires them to sign into My Support for the agreement number and details, and with the original sales receipt for that Mac, to contact Apple Support and give them your details as the new owner. Apple explains this here, with useful onward links.

Haggle

I wish you success in agreeing the best price.

Activation Lock (Intel T2, Apple silicon)

The last hurdle in a successful purchase is the one most often forgotten, and the cause of much buyer remorse. It’s all the fault of Activation Lock and Find My Mac. These ensure that the owner’s Apple ID and password are required before that Mac can be used, erased, or Find My Mac disabled. In effect they make that Mac useless to anyone else until Activation Lock has been disabled.

Macs with T2 or Apple silicon chips running Catalina or later, where the user has 2FA on their Apple ID, are likely to be protected by Activation Lock. There is an additional requirement, depending on their architecture:

  • Apple silicon Macs must have their security policy set to Full Security;
  • Intel T2 Macs must have startup security set to Secure Boot, with booting from external drives disallowed.

Activation Lock is most commonly enabled when Find My Mac is turned on, and turning that off also disables Activation Lock. That requires entry of the current user’s Apple ID password, so must be done by the seller before they part with their Mac.

There are other ways to disable it:

  • It’s automatically disabled when the owner runs Erase All Content and Settings, only available on T2 and Apple silicon models anyway.
  • Activation lock can be disabled in the owner’s account at www[.]iCloud[.]com/find by removing that Mac from the list of All Devices there.
  • If you have proof of purchase, you can request Activation Lock to be removed by Apple support, but that’s a last measure and not something you should ever choose.

Apple’s guidance is here.

Never take possession of someone else’s Mac while its Activation Lock is active, as it will only cause you trouble and grief.

Handover

If everything is going well, you should be ready for the Mac to be handed over to your possession, accompanied by a written record of the sale. The conclusion is best seen as a mutual arrangement, as it gives the seller confidence that any data on that Mac is completely erased, and you the confidence that you’re about to gain a Mac you can use.

eacas

If it’s an Intel Mac, confirm with one another that it starts up without requiring a firmware password. If it has a T2 or Apple silicon chip, use its Erase All Content and Settings together to ensure that all its old files are made unreadable, and to be certain that Find My Mac and Activation Lock are disabled. Sadly, erasing older Intel Macs without T2 chips is a slower and more complicated process.

Checklist
  • Inspect the Mac before handing over any money.
  • Check proof of purchase and serial number, noting Activation Lock status.
  • Visual examination, check SSD health if possible.
  • Agree the price.
  • Transfer AppleCare if available.
  • Disable Activation Lock (in EACAS if available).
  • Obtain written record of sale.
  • Ensure no firmware password (Intel only).
  • Erase, preferably using EACAS where available.

Apple has just released an update to XProtect for all macOS

By: hoakley
1 April 2026 at 03:16

Apple has just released its regular weekly update to XProtect, bringing it to version 5336. As usual it doesn’t release information about what security issues this update might address.

This version adds two new rules for MACOS.WANNABEWALLABY.IMA and MACOS.WANNABEWALLABY.STA, amends rules for MACOS.TIMELYTURTLE.DYHEOC, MACOS.SOMA.MAENA, and MACOS.SOMA.MAENB, and changes some rule UUIDs. In the Osascript rules in XPScripts.yr, it amends the rule for MACOS.OSASCRIPT.SYPR.

You can check whether this update has been installed by opening System Information via About This Mac, and selecting the Installations item under Software.

A full listing of security data file versions is given by SilentKnight and SystHist for El Capitan to Tahoe available from their product page. If your Mac hasn’t yet installed this update, you can force it using SilentKnight or at the command line.

If you want to install this as a named update in SilentKnight, its label is XProtectPlistConfigData_10_15-5336

Sequoia and Tahoe systems only

This update hasn’t yet been released for Sequoia and Tahoe via iCloud. If you want to check it manually, use the Terminal command
sudo xprotect check
then enter your admin password. If that returns version 5336 but your Mac still reports an older version is installed, you should be able to force the update using
sudo xprotect update

Apple has just released an update to XProtect for all macOS

By: hoakley
26 March 2026 at 04:07

Apple has just released its regular weekly update to XProtect, bringing it to version 5335. As usual it doesn’t release information about what security issues this update might address.

This version adds two new Yara rules for MACOS.TIMELYTURTLE.OBDR and MACOS.SOMA.MAENB, and amends the existing rule for MACOS.SOMA.BYTE.SEQUENCE.B. In the Osascript rules in XPScripts.yr, it relocates those for TABUPA, REBUPA, DUVAST, DUCUHA and DUSTCO.

You can check whether this update has been installed by opening System Information via About This Mac, and selecting the Installations item under Software.

A full listing of security data file versions is given by SilentKnight and SystHist for El Capitan to Tahoe available from their product page. If your Mac hasn’t yet installed this update, you can force it using SilentKnight or at the command line.

If you want to install this as a named update in SilentKnight, its label is XProtectPlistConfigData_10_15-5335

Sequoia and Tahoe systems only

This update has already been released for Sequoia and Tahoe via iCloud. If you want to check it manually, use the Terminal command
sudo xprotect check
then enter your admin password. If that returns version 5335 but your Mac still reports an older version is installed, you should be able to force the update using
sudo xprotect update

What has changed in macOS Tahoe 26.4?

By: hoakley
25 March 2026 at 06:04

The update to bring macOS Tahoe up to version 26.4 is hefty at around 7.15 GB (more than double that if you’re unlucky), and reflects a great deal of bug fixes and improvements in almost every subsystem. Apple provides three good sets of release notes:

  • General release notes include the addition of an option to use compact tabs in Safari, Freeform’s new Creator Studio enhancements, and a facility for Purchase Sharing in Family Sharing. Oh, and the requisite eight new emoji.
  • Enterprise release notes are extensive, but contain little for the non-enterprise user.
  • Security release notes list over 70 fixes, many of which are significant, but none are reported as being known to be exploited in the wild at present.

The new build number of 26.4 is 25E246. The Darwin Kernel version is 25.4.0, and XNU 12377.101.15~1.

Apple silicon firmware is updated to a completely different version numbering system, and is now reported as mBoot version 18000.101.7. If you’re running SilentKnight older than version 2.14 (71), then it’s likely that it will crash as a result of this change in firmware version. Please use version 2.14 from here.

Firmware in Intel Macs with T2 chips remains with the previous system, and is updated from 2094.80.5.0.0 (iBridge 23.16.13120.0.0,0) to 2103.100.6.0.0 (iBridge 23.16.14242.0.0,0).

Looking through the bundled apps and /System/Library, there are a great many increments in build numbers reflecting the extensive changes made. Here are a few of the more substantial changes found.

In bundled apps:

  • Books goes from version 8.1 to 8.4
  • Freeform, version 4.3 to 4.4
  • iPhone Mirroring, version 1.5 to 1.6
  • Music, version 1.6.3 to 1.6.4
  • Safari, version 26.3.1 (21623.2.7.111.2) in BSI (a) to 26.4 (21624.1.16.11.4)
  • TV, version 1.6.3 to 1.6.4
  • Audio MIDI Setup, version 3.7 to 3.8
  • Digital Color Meter, version 6.10 to 6.11
  • Screen Sharing, version 6.2 (758.1) to 6.1 (760.4), note the reduction in version number.

In /System/Library:

  • AGX kernel extensions all have build increments
  • AppleDiskImages2 kext has a build increment
  • AppleEmbeddedAudio kext and its plugin kexts have build increments
  • AppleIntel Graphics kexts have version increments
  • AppleStorageDrivers kext and its plugin kexts have build increments
  • APFS is updated from 2632.80.1 to 2811.101.1, suggesting a substantial change has been made
  • new private frameworks include ASMExclaveSupport, AccelerateOpt, AlwaysOnExclavesDaemon, AnteroAgent, AppRemoteAssets, AudioPasscodeDSP, BNNSOdieDelegate, CookingData, CoreTransparency, DynamicPrefetching, InAppFeedback, NanoPassKit, PartnerVisualSearch, a whole family of Unilog frameworks, and a group of iCloudWeb frameworks
  • mdimporters updated include those for Application, CoreMedia, Mail, Office, iWork but not RichText.

After seeing the new CookingData private framework, I looked out for RecipeKit, but was disappointed not to see it.

This is probably going to be the last such substantial update to macOS Tahoe, as much of Apple’s engineering effort is transferring to make macOS 27 ready for release as a beta at WWDC in early June.

Apple has released macOS Tahoe 26.4, and security updates 15.7.5 and 14.8.5

By: hoakley
25 March 2026 at 02:19

Apple has released the update to bring macOS Tahoe to version 26.4, and security updates for Sequoia and Sonoma to bring them to 15.7.5 and 14.8.5.

Download size for the 26.4 update on Apple silicon Mac is very large, at around 7.15 GB, but only about 4.14 GB on Intel Macs.

Release notes for 26.4 include:

  • support for new AirPods Max 2
  • compact tabs as an option in Safari
  • Freeform joins Creator Studio, with advanced tools and a premium content library
  • Purchase Sharing in Family Sharing

and eight new emoji.

Security release notes for 26.4 list over 70 fixes, those for Sequoia 15.7.5 list about 56, and those for Sonoma 14.8.5 list about 50. None are reported as being known to be exploited in the wild at present.

Enterprise release notes for 26.4 are here.

Firmware in Apple silicon Macs is updated to a new mBoot firmware version numbering system, with the current version given as 18000.101.7. The macOS build number is 25E246, and Safari is version 26.4 (21624.1.16.11.4). Firmware in Intel Macs with T2 chips is updated from 2094.80.5.0.0 (iBridge 23.16.13120.0.0,0) to 2103.100.6.0.0 (iBridge 23.16.14242.0.0,0).

If you’re running SilentKnight older than version 2.14 (71), then it’s likely that it will crash as a result of the change in firmware version. Please use version 2.14 from here.

I’ll be posting an analysis of what has changed later today.

Updated 09:15 25 March 2026 with firmware details for Intel Macs.

What is a Background Security Improvement, and how does it work?

By: hoakley
19 March 2026 at 15:30

Since the introduction of the Signed System Volume in Big Sur, the great majority of macOS has been strongly protected. So strongly that applying the smallest security patch has required the full might of a macOS update. There are times when something more lightweight enables Apple to promulgate urgent patches swiftly and efficiently, and that’s what a Background Security Improvement or BSI does.

This was set up when macOS Monterey introduced cryptexes to contain Safari, its WebKit supporting library, and the large dyld caches for general support in Frameworks. Cryptexes are cryptographically sealed disk images that aren’t mounted like other volumes, but are grafted into arbitrary locations in the file system. In Ventura they were used for Rapid Security Responses (RSR), in many ways indistinguishable from BSIs.

This week’s first BSI for macOS 26.3.1 is a good example: it fixes one serious vulnerability in WebKit. Rather than building that into a full update to 26.3.2, because it only requires changes in the cryptex containing Safari and WebKit, this BSI swaps out the existing App cryptex and replaces it with a patched one. For those who don’t want to install BSIs, those same vulnerabilities should be fixed in the next set of security updates to macOS.

Controls

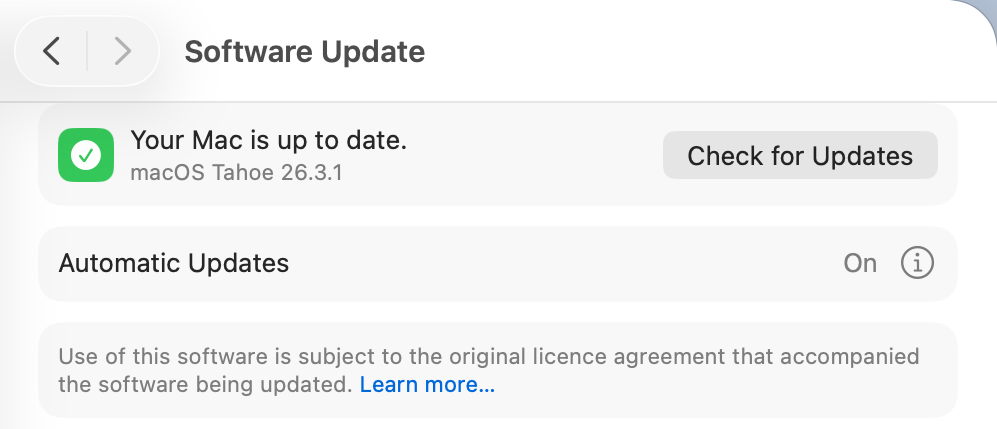
Look in Software Update settings, and you’ll see no mention of any BSI, and that will claim your Mac is up to date, even though it’s not.

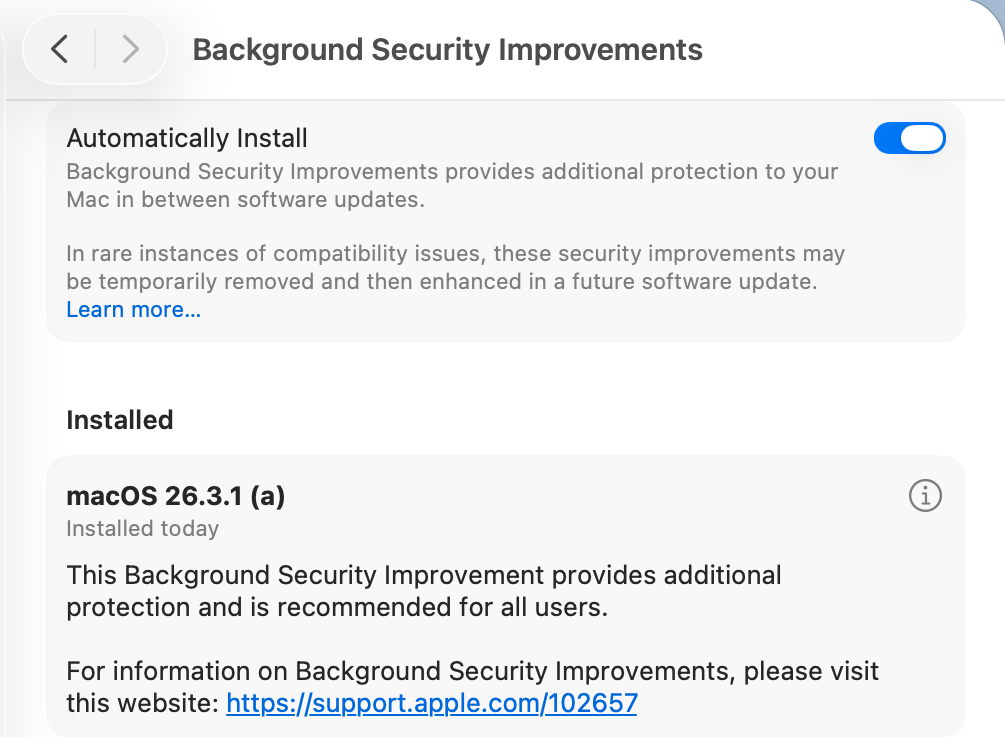
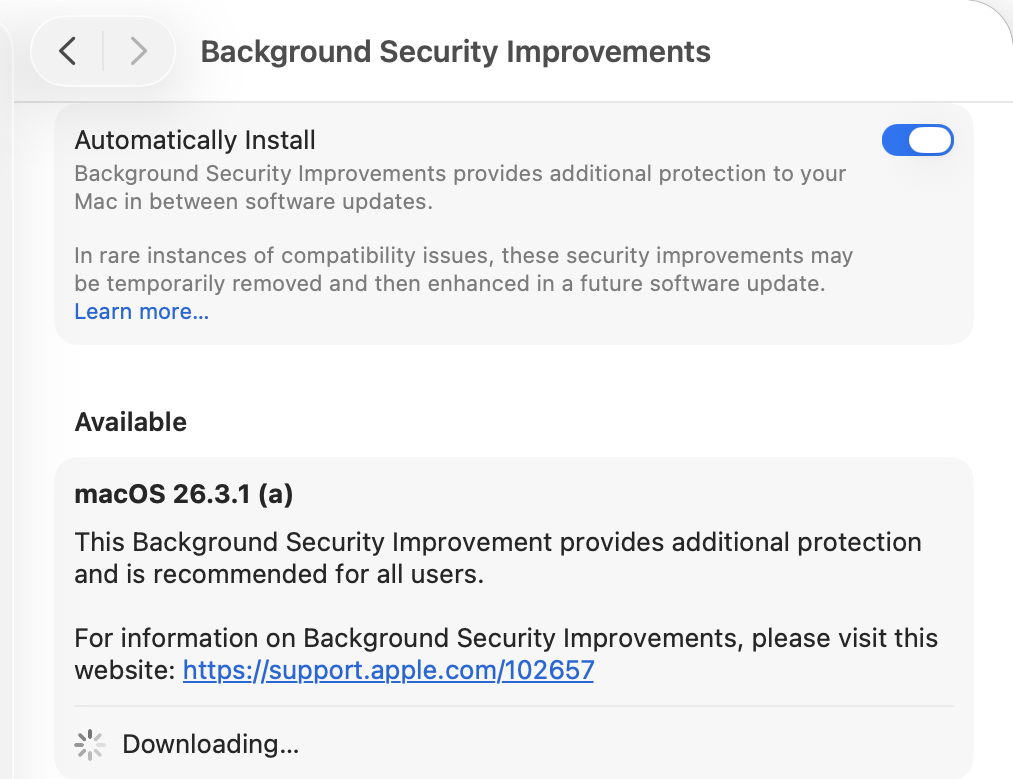
BSIs are controlled in their section listed close to the foot of Privacy & Security settings. If you want your Mac to be offered BSIs when they’re available, you must enable Automatically Install first. Despite those words, BSIs don’t appear to install in the least bit automatically, and you should be offered those available for the installed version of macOS. When you’ve chosen to download and install one and authenticated, you’ll see a progress spinner rather than a bar.

As soon as downloading and preparation are complete, you should be given a few seconds before your Mac restarts to complete the installation. This is all very brief, but once you’ve authenticated to start the process, it will run through to completion automatically.

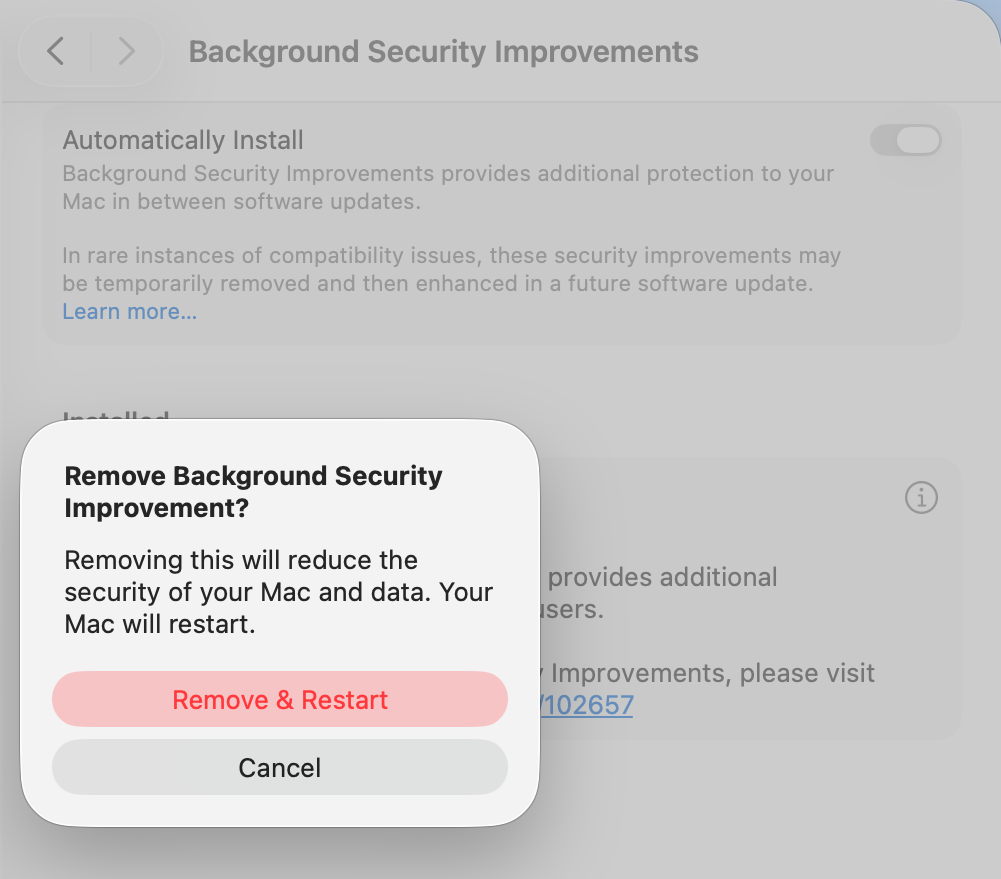
Once your Mac has restarted, you always retain the option to remove any BSI and return to an unpatched cryptex. To see that, click on the ⓘ Info button on the right.

If you decide you want to remove the BSI, your Mac will need to be restarted.

Problems

If you know a BSI is available but Privacy & Security settings appear unable to find it, something I’ve encountered in Virtual Machines, try running SilentKnight. Although BSIs aren’t controlled in Software Update, they do still use the same softwareupdate system used by SilentKnight. Normally you shouldn’t try to install BSIs using SilentKnight, as installation will fail. However, you can turn this to your advantage when a BSI is being elusive.

Once SilentKnight has downloaded and failed to install the BSI, you should be notified of that failure. Restart your Mac, give it a couple of minutes to settle once you’ve logged back in, and open the BSI section in Privacy & Security settings again. The downloaded BSI should now be available, and shouldn’t even need to be downloaded.

If you think a BSI has caused another problem, such as instability in Safari, use the ⓘ Info button to remove that BSI.

Installing a BSI does weird things to the macOS version and build numbers, and those can break scripts and possibly some apps. While ProcessInfo.processInfo.operatingSystemVersion doesn’t contain a field for the BSI letter, ProcessInfo.processInfo.operatingSystemVersionString does return a full version description including the BSI letter and extended build number. In Terminal, sw_vers -productVersion returns the regular version number without BSI, while sw_vers -productVersionExtra returns the BSI designation alone.

Currently, SilentKnight and Skint ignore BSIs, and won’t inform you if you could have one installed except by listing it as an available installation, nor will they check whether your Mac is up to date with the latest BSI. Experience from RSRs in Ventura shows that trying to track lightweight updates like RSRs or BSIs is only going to annoy those who don’t want to install them, and as they can change in a short period, they are hard to track reliably. SilentKnight does report the full version and build number, and SystHist lists details of all BSIs that Mac has installed.

Limitations

Like the RSRs of Ventura, BSIs can only work for a limited range of patches. If a vulnerability needs a fix outside Safari, WebKit, and the dyld caches, then it will require a full macOS update to fix it. BSIs are only ever likely to be provided for the current version of the latest major version of macOS.

From its first account of RSRs, Apple has claimed that some RSRs and BSIs shouldn’t require a restart to apply their patches. However, every RSR and BSI to date has had to be completed by restarting that Mac, which is mildly disruptive and not as lightweight as we’d like.

If you disable Automatically Install in the BSI section of Privacy & Security settings, then your Mac won’t be informed about or have access to any BSIs.

Under the hood

Despite their control being part of Privacy & Security settings, BSIs are managed like all other macOS and related updates by softwareupdated. What is most remarkable about them is their speed of download, preparation and installation compared with macOS updates. From detection of a new BSI to logging back into the restarted Mac can take little more than five minutes.

Apple’s in-house term for BSIs is the same as it used for RSRs, Splat. You’ll also come across Semi-splat, which should be a transient state in which the Splat Restore Version is different from the Cryptex1 Restore Version. That’s normally rectified after the reboot.

softwareupdated checks specifically for BSIs by scanning the update server catalogue for Splat updates. In this case, for an App cryptex, the download size is given as 214 MB. There’s a brief preflight phase, followed by its download. Although no progress indicator is shown in Privacy & Security settings, softwareupdated does record progress, but using similar figures for a full macOS update. Under those, preparing the update is set at 60% progress.

Applying the update takes around 2.5 seconds, at which stage softwareupdated reports that Semi-splat is active because of unequal restore versions, and rollback objects are checked.

Once the Mac has restarted, property list paths are checked for six different Splat versions, enabling the restore versions to be rectified and Semi-splat is no longer active. A brief purge of update assets is performed, and softwareupdated checks once again for any available updates.

Is a BSI just an RSR in disguise?

Apart from the move of its control from Software Update to Privacy & Security settings, there appear to be few if any differences between them. This is even reflected in version numbering. Installing the first RSR for macOS 13.3.1 brought it to version 13.3.1 (a), with a build number of 22E772610a. This first BSI for macOS 26.3.1 brings it to version 26.3.1 (a), with a build number of 25D771280a.

Most telling, though, are the accounts of RSRs and BSIs given in Apple’s Platform Security Guide, which are almost word-for-word identical apart from their names. It seems most likely that a BSI is a rebranded RSR in a bid to move on from the loss of confidence in RSRs following unfortunate errors nearly three years ago.

Key points

  • If you’re running the current version of the latest major version of macOS, BSIs provide lightweight fixes for some vulnerabilities, including those in Safari and WebKit.
  • Enable them in Privacy & Security settings, in their section at the foot. If they aren’t enabled there, you won’t be offered them at all.
  • Control their installation in that section. Once you’ve agreed to install one and have authenticated, your Mac is likely to restart automatically soon after the BSI has been downloaded.
  • Remove and revert a troublesome BSI using the ⓘ Info button there.

Apple’s documentation

Support note about BSIs
List of BSIs by date
Security release notes for BSIs

Although the US English version of Apple’s Platform Security Guide has replaced its section on RSRs with an almost identical account of BSIs, most other localised versions of that guide still contain the old RSR version.

Previously

What is a Rapid Security Response (RSR)?
How an RSR went badly wrong

Apple has just released the first Background Security Improvement for macOS Tahoe

By: hoakley
18 March 2026 at 02:27

Apple has just released its first public Background Security Improvement (BSI) for macOS 26.3.1 Tahoe, labelled as BSI (a)-25D771280a. Once installed, macOS will identify itself as version 26.3.1 (a), with a build number of 25D771280a.

You can install this through Privacy & Security Settings, in the Background Security Improvements section. It doesn’t appear listed in Software Update, although SilentKnight will offer it. Please don’t try to use SilentKnight to install this, though, as it will download successfully but fail to install unless you then use the BSI section in Privacy & Security settings, which will finish the job off.

Apple has now released details of the single vulnerability that this fixes, in WebKit. As a result it updates Safari from 26.3.1 (21623.2.7.11.7) to 26.3.1 (21623.2.7.111.2).

Following installation, your Mac will need to restart for the BSI to be applied.

Apple has just released an update to XProtect for all macOS

By: hoakley
18 March 2026 at 02:11

Apple has just released its regular weekly update to XProtect, bringing it to version 5334. As usual it doesn’t release information about what security issues this update might address.

This version makes no changes to its main Yara rules. Changes to the OSASCRIPT rules in XPScripts.yr include amendments to more than a dozen of them, and two new rules are added for MACOS.OSASCRIPT.GEPEPA and MACOS.OSASCRIPT.TAPEPA. Several rules that previously added the property wide to their text now have wide ascii instead.

You can check whether this update has been installed by opening System Information via About This Mac, and selecting the Installations item under Software.

A full listing of security data file versions is given by SilentKnight and SystHist for El Capitan to Tahoe available from their product page. If your Mac hasn’t yet installed this update, you can force it using SilentKnight or at the command line.

If you want to install this as a named update in SilentKnight, its label is XProtectPlistConfigData_10_15-5334

Sequoia and Tahoe systems only

This update has now been released for Sequoia and Tahoe via iCloud. If you want to check it manually, use the Terminal command
sudo xprotect check
then enter your admin password. If that returns version 5334 but your Mac still reports an older version is installed, you should be able to force the update using
sudo xprotect update

❌
❌