Normal view

There are new articles available, click to refresh the page.
Before yesterdayMain stream

How long does the log keep entries?

By: hoakley
12 March 2026 at 15:30

One of the most contentious questions arising from yesterday’s critical examination of ChatGPT’s recommendations, is how long does the Unified log keep entries before they’re purged? ChatGPT seemed confident that some at least can be retained for more than a month, even as long as a year. Can they?

Traditional text logs are removed after a fixed period of time. One popular method is to archive the past day’s log in the early hours of each morning, as part of routine housekeeping. Those daily archives are then kept for several days before being deleted during housekeeping. That’s far too simple and restrictive for the Mac’s Unified log.

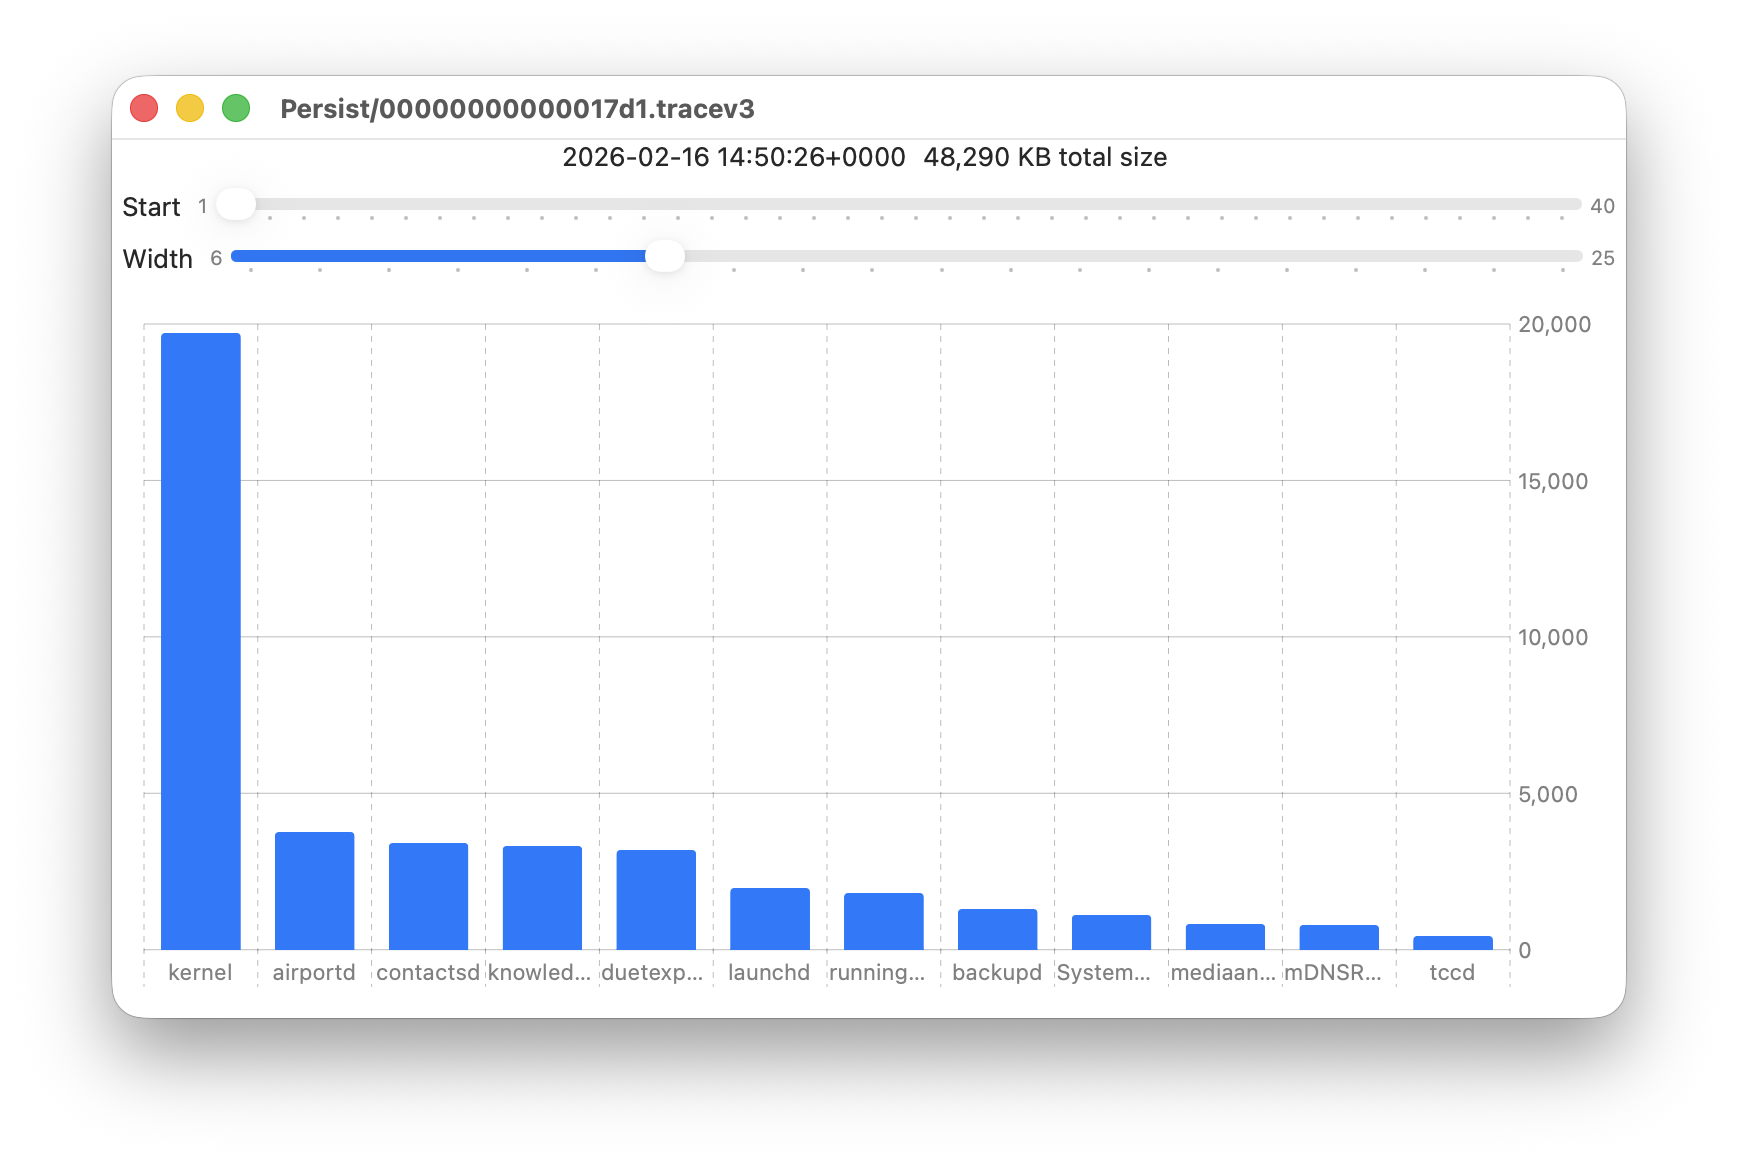
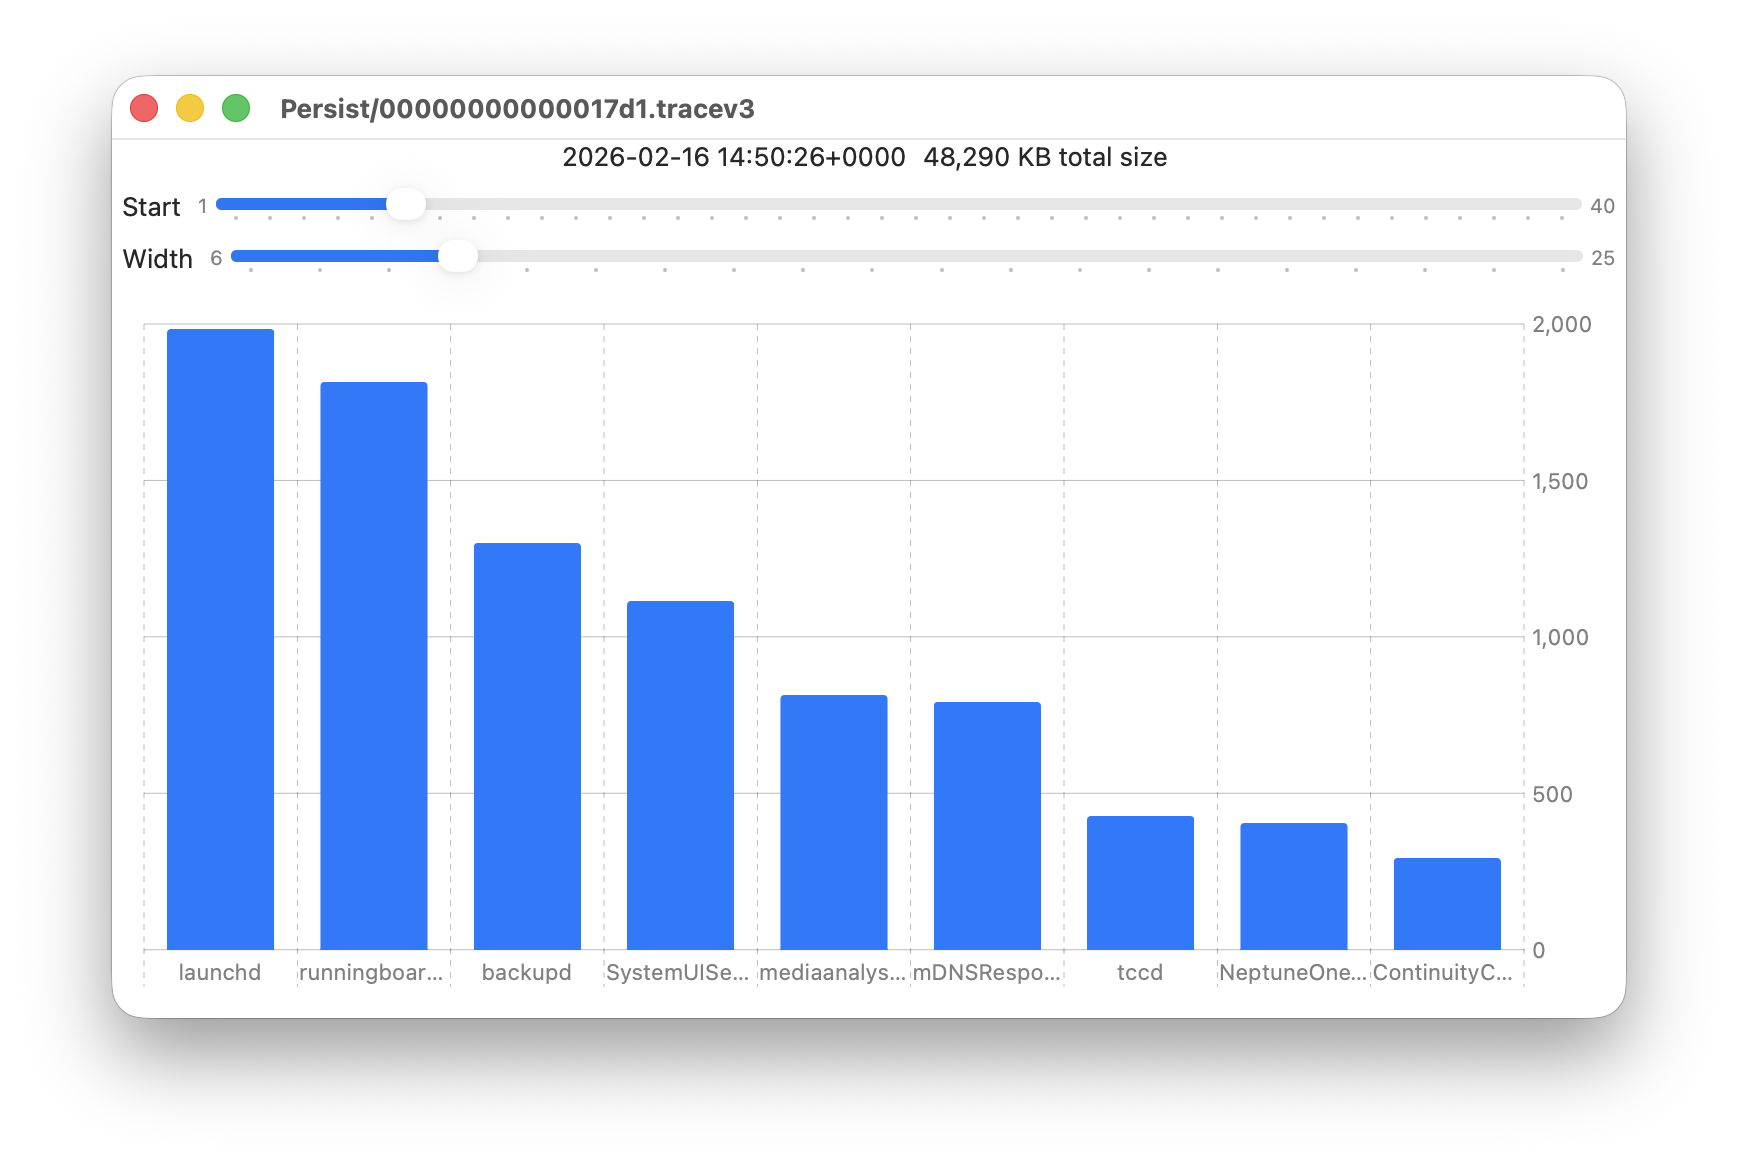
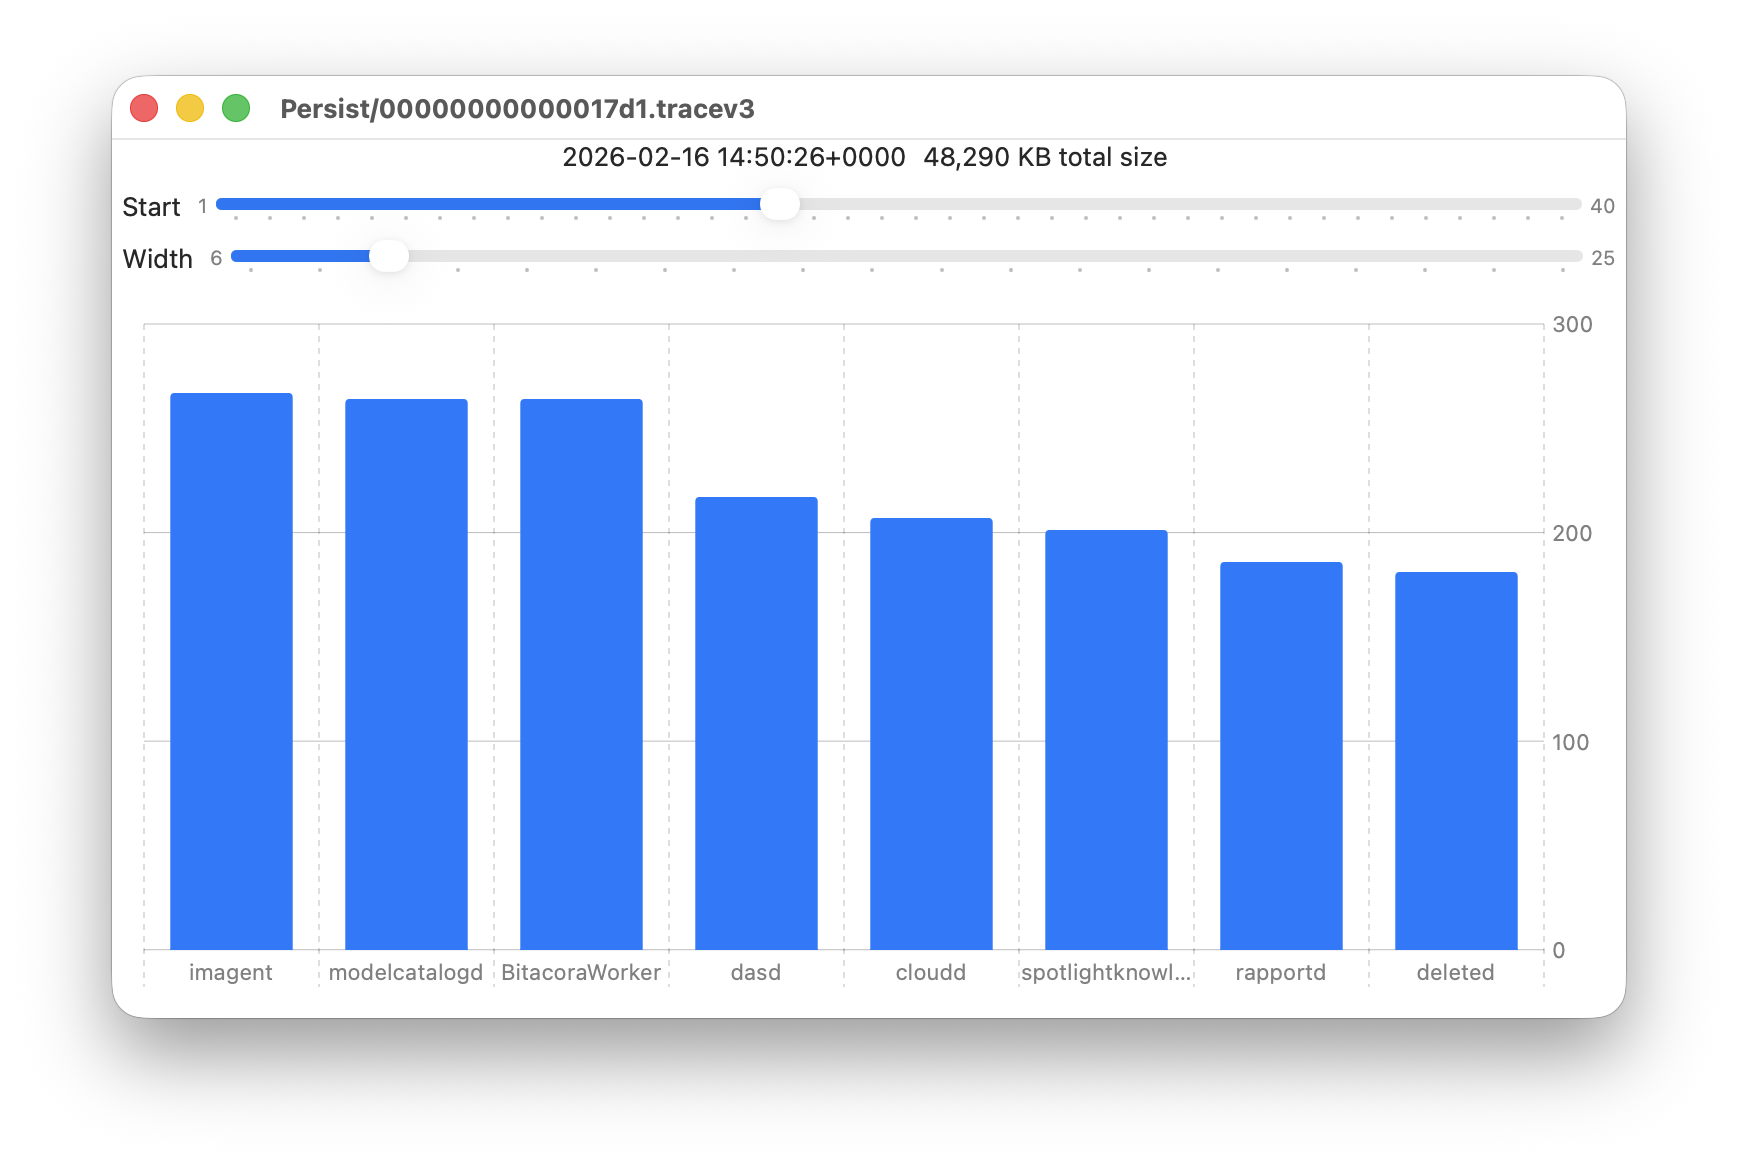
Apple’s logs, in macOS and all its devices, are stored in proprietary tracev3 files, sorted into three folders:

  • Persist, containing the bulk of log entries, retained to keep their total size to about 525 MB in about 50-55 files;
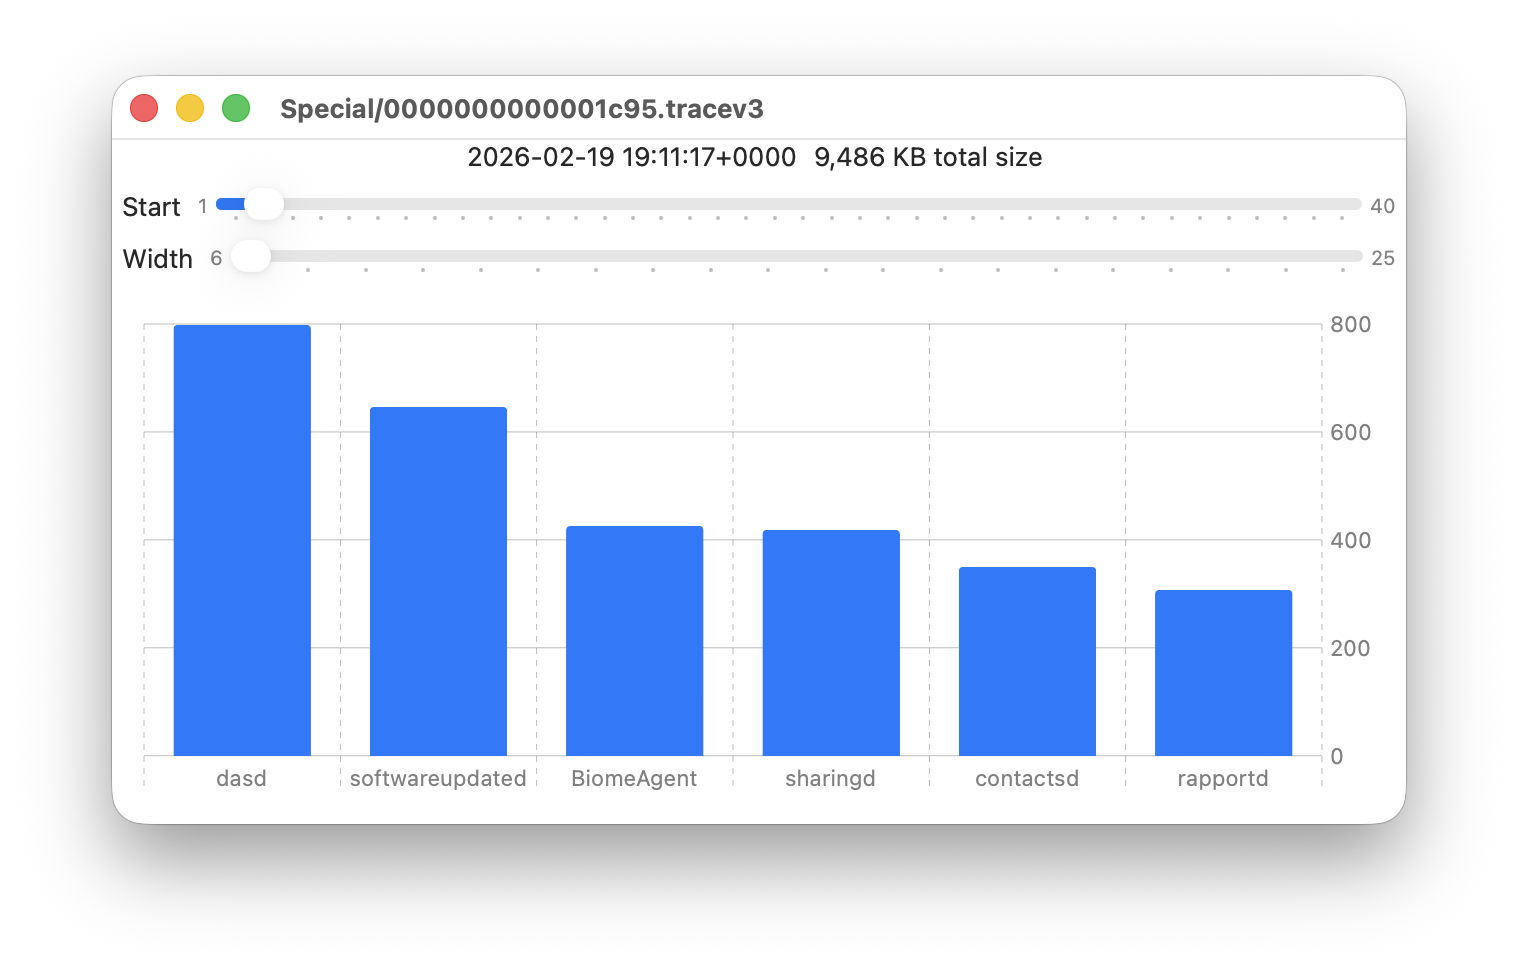
  • Special, including fault and error categories, whose entries are slowly purged over time until none remain in the oldest log files, so have a variable total size and number.
  • Signpost, used for performance measurements, which also undergo slow purging until they vanish.

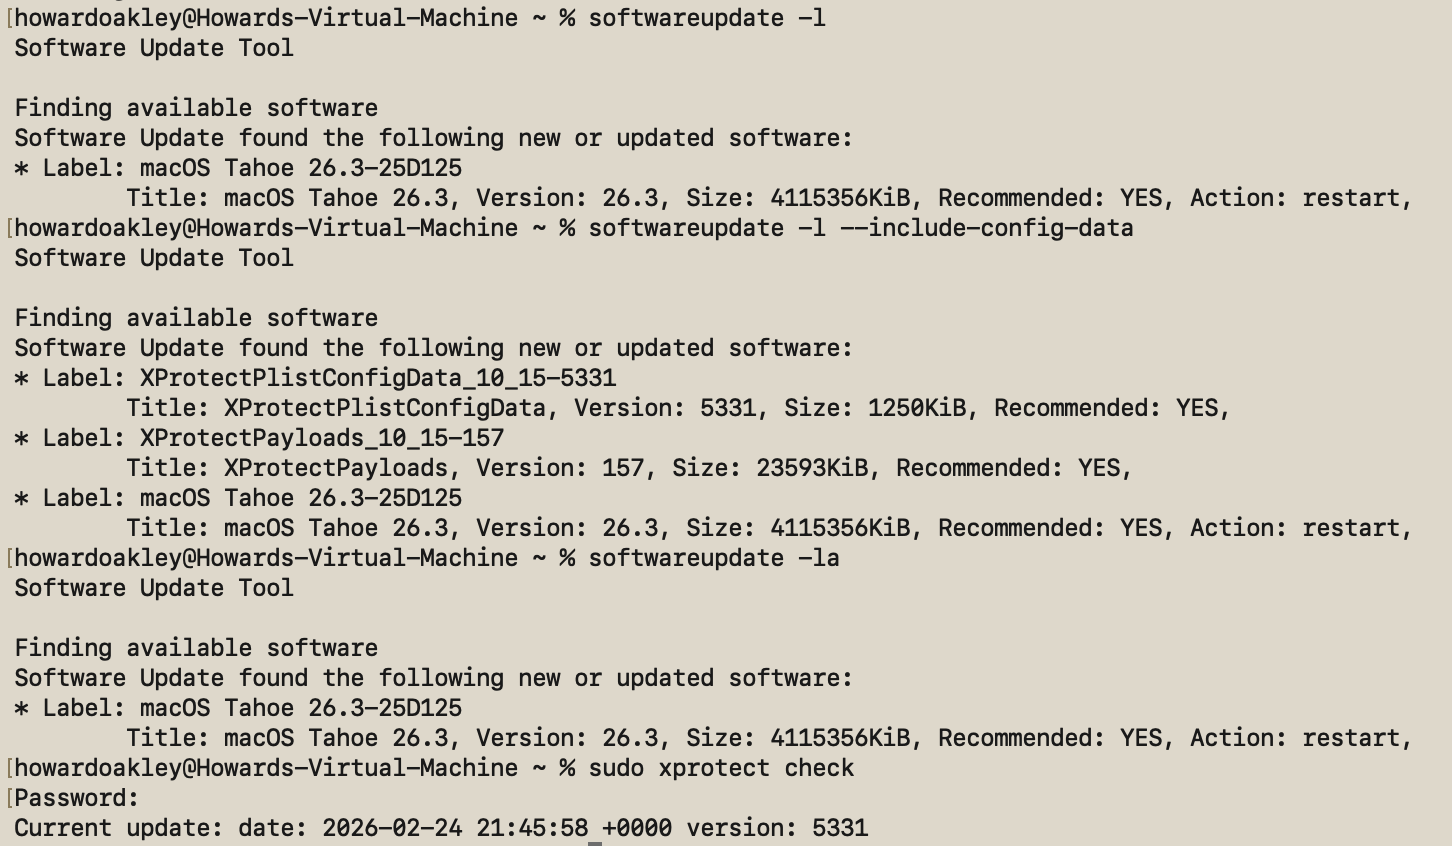
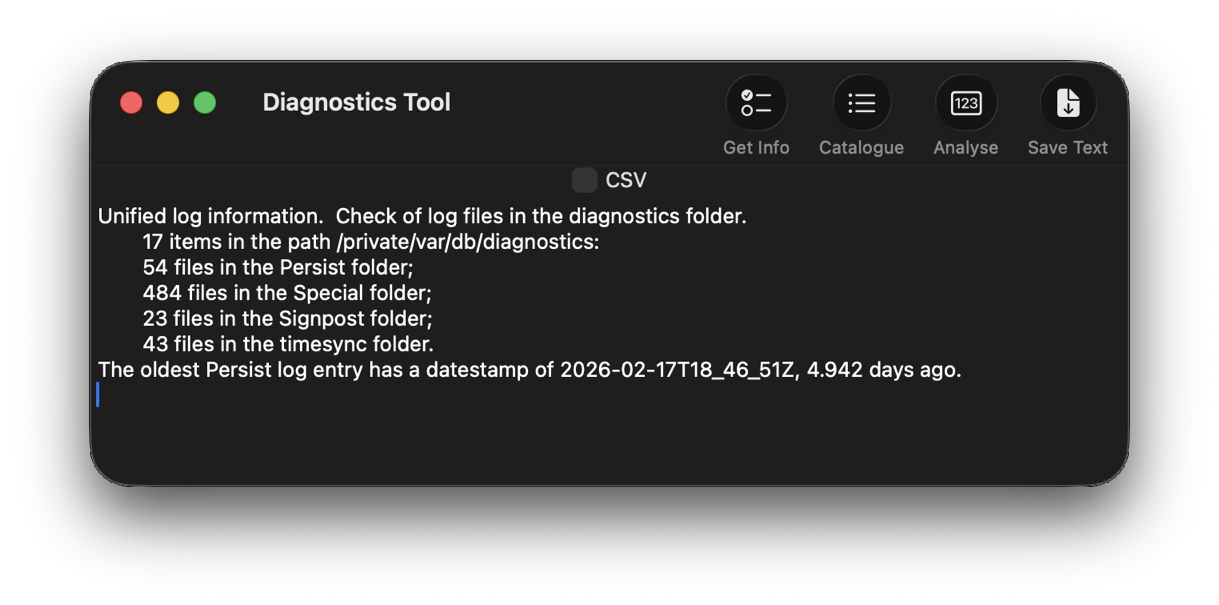
One simple way to estimate the period for which log entries are retained is to find the date of creation of the oldest log file in each of those folders. On a Mac mini M4 Pro run largely during the daytime, those dates were

  • Persist, earliest date of creation 7 March 2026 at 16:54
  • Special, 9 February 2026 at 19:41
  • Signpost, 3 March 2026 at 16:41

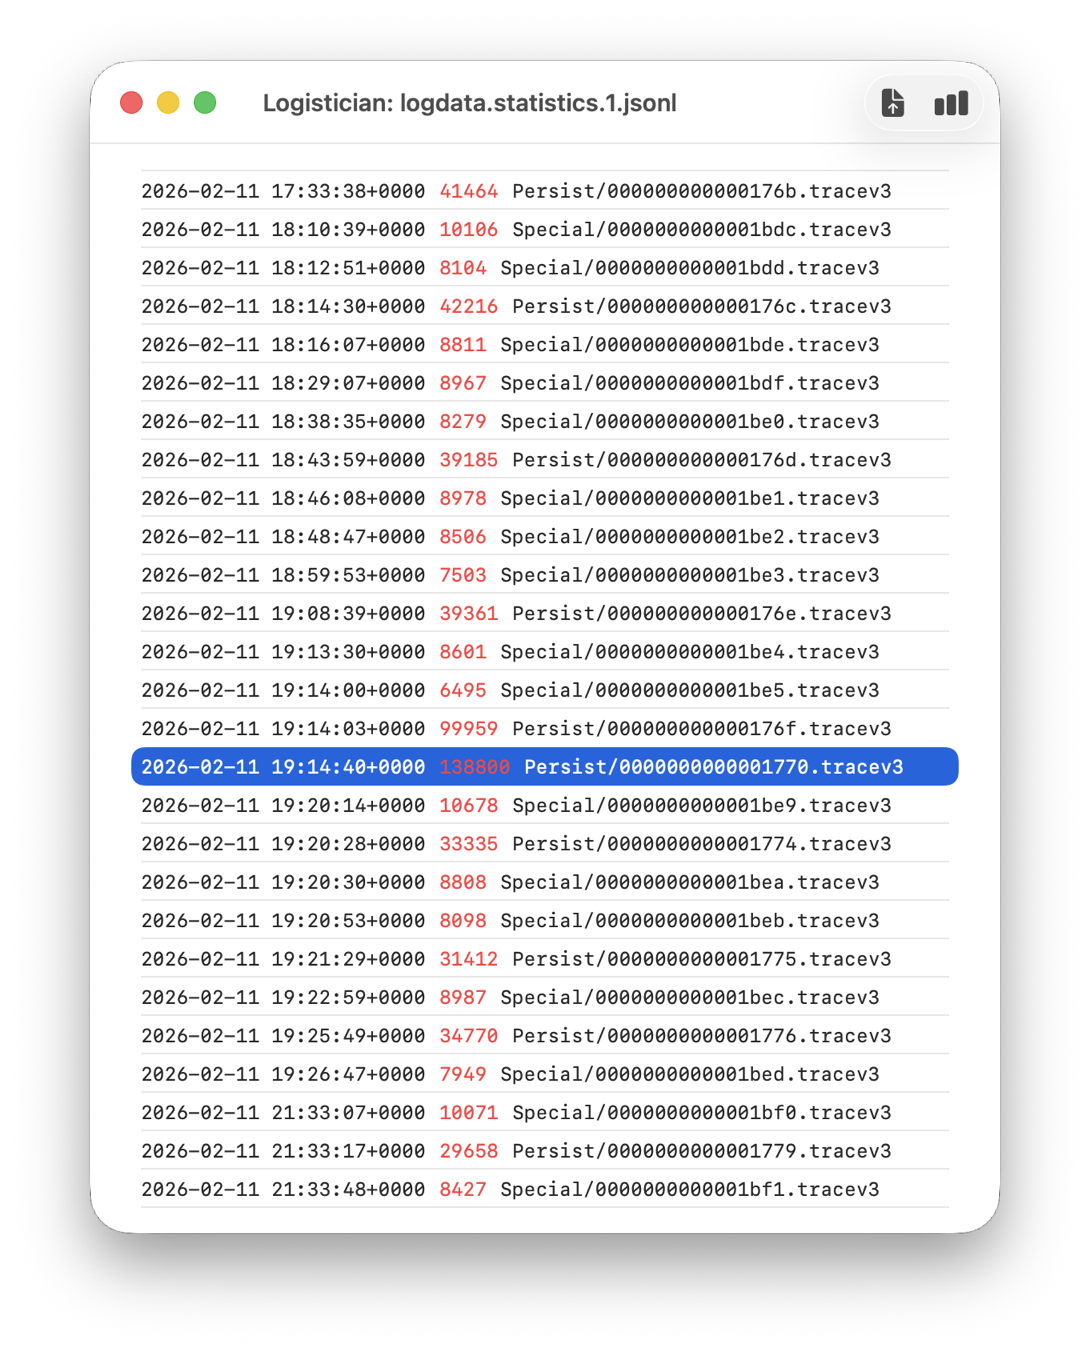
when checked on 10 March. Those indicate a full log record is available for the previous 3 days, followed by a steady decline with age to the oldest entry 31 days ago. That compares with statistical data available in my app Logistician going back as far as 14 January, although all entries between then and 9 February have now been removed and lost.

Retrieving old log entries

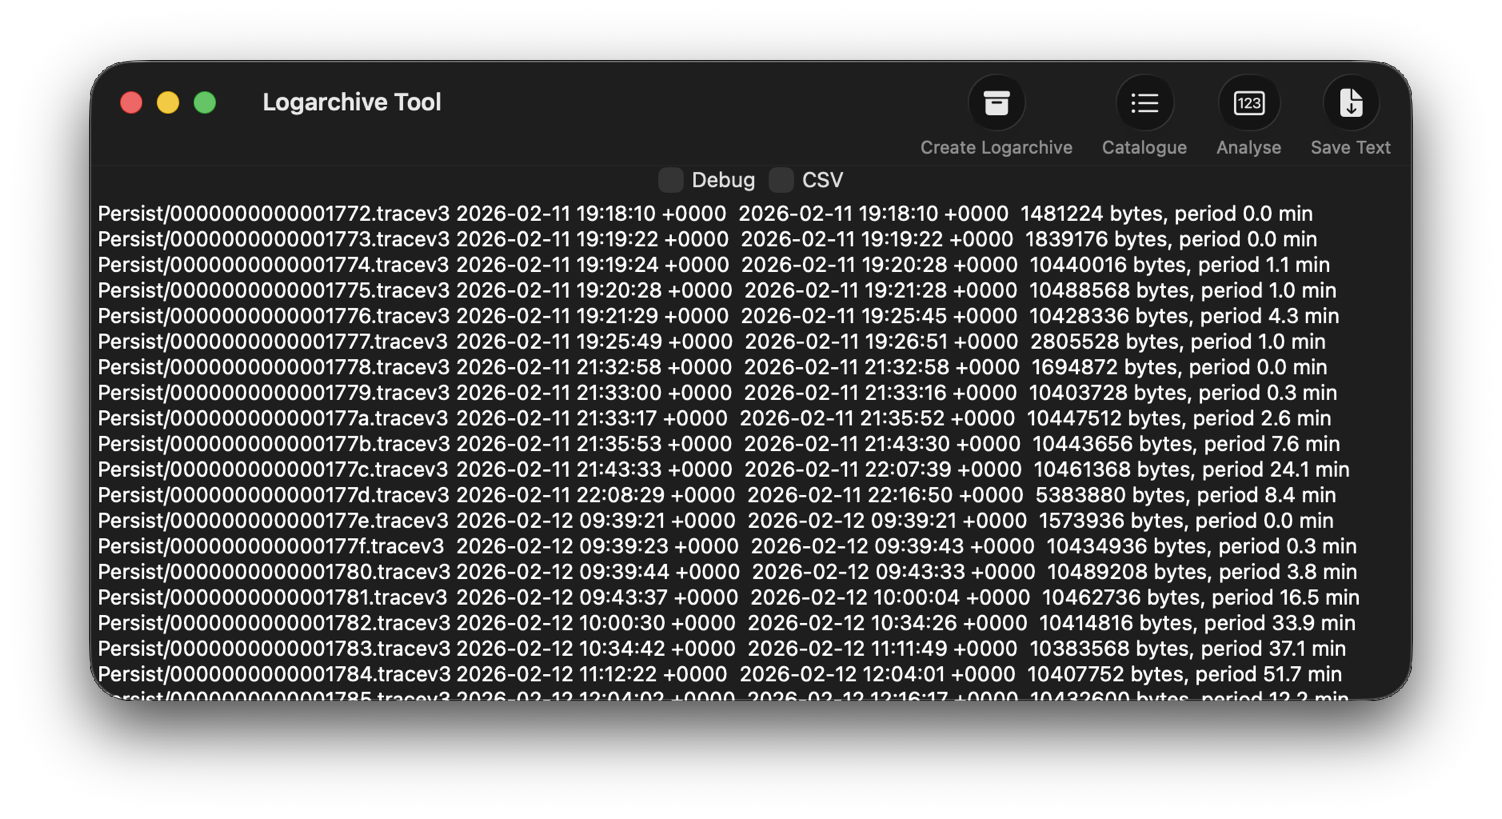
The real test of how many log entries have been retained is to try to retrieve them. Although the oldest Special log file was created on 9 February, the oldest log entry I could retrieve was the start of the boot process on 11 February, in Special log files returning a total of over 44,000 entries for that day. However, no further log entries could be found after those until the morning of 24 February, a gap of over ten days.

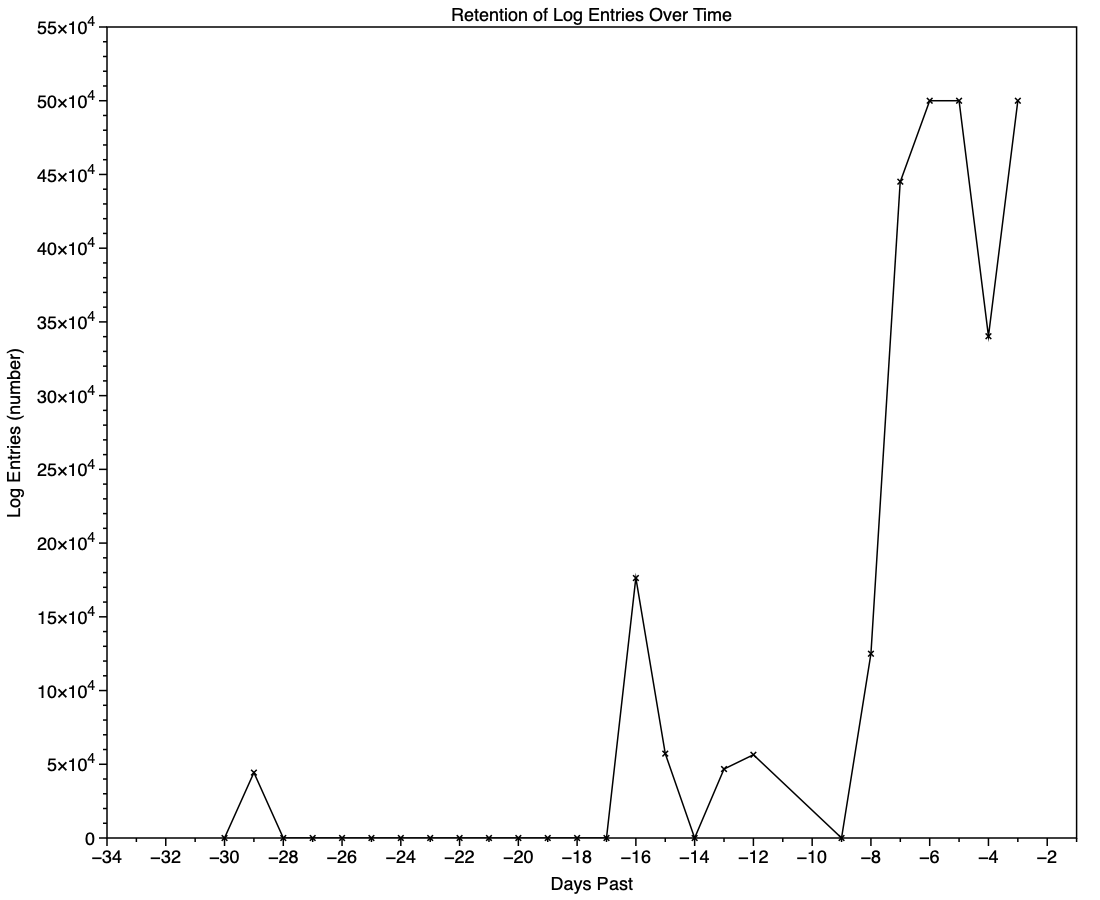
This chart shows the numbers of log entries that could be found and read at intervals over previous days. Where a total of 500,000 is shown, that means over 500,000 for that 24 hour period. I checked these using two different methods of access, using the OSLog API in LogUI, and via the log show command in Ulbow. In all cases, log show returned slightly fewer than OSLog.

It’s clear that with only 3 days of full Persist log files, very few entries have been retained from earlier than 7 days ago, and beyond that retention numbers are erratic.

Over the period prior to the oldest Persist file, when entries could only be coming from Special log files, those included both regular and boundary types, and categories were diverse, including fault, error, notice and info, and weren’t confined to the first two of those categories. Most subsystems were represented, but very few entries were made by the kernel. There is thus no obvious pattern to the longer retention of entries in Special files.

Ephemeral entries

Log entries are initially written to memory, before logd writes most of them to permanent storage in tracev3 log files on disk.

mul102LogdFlow

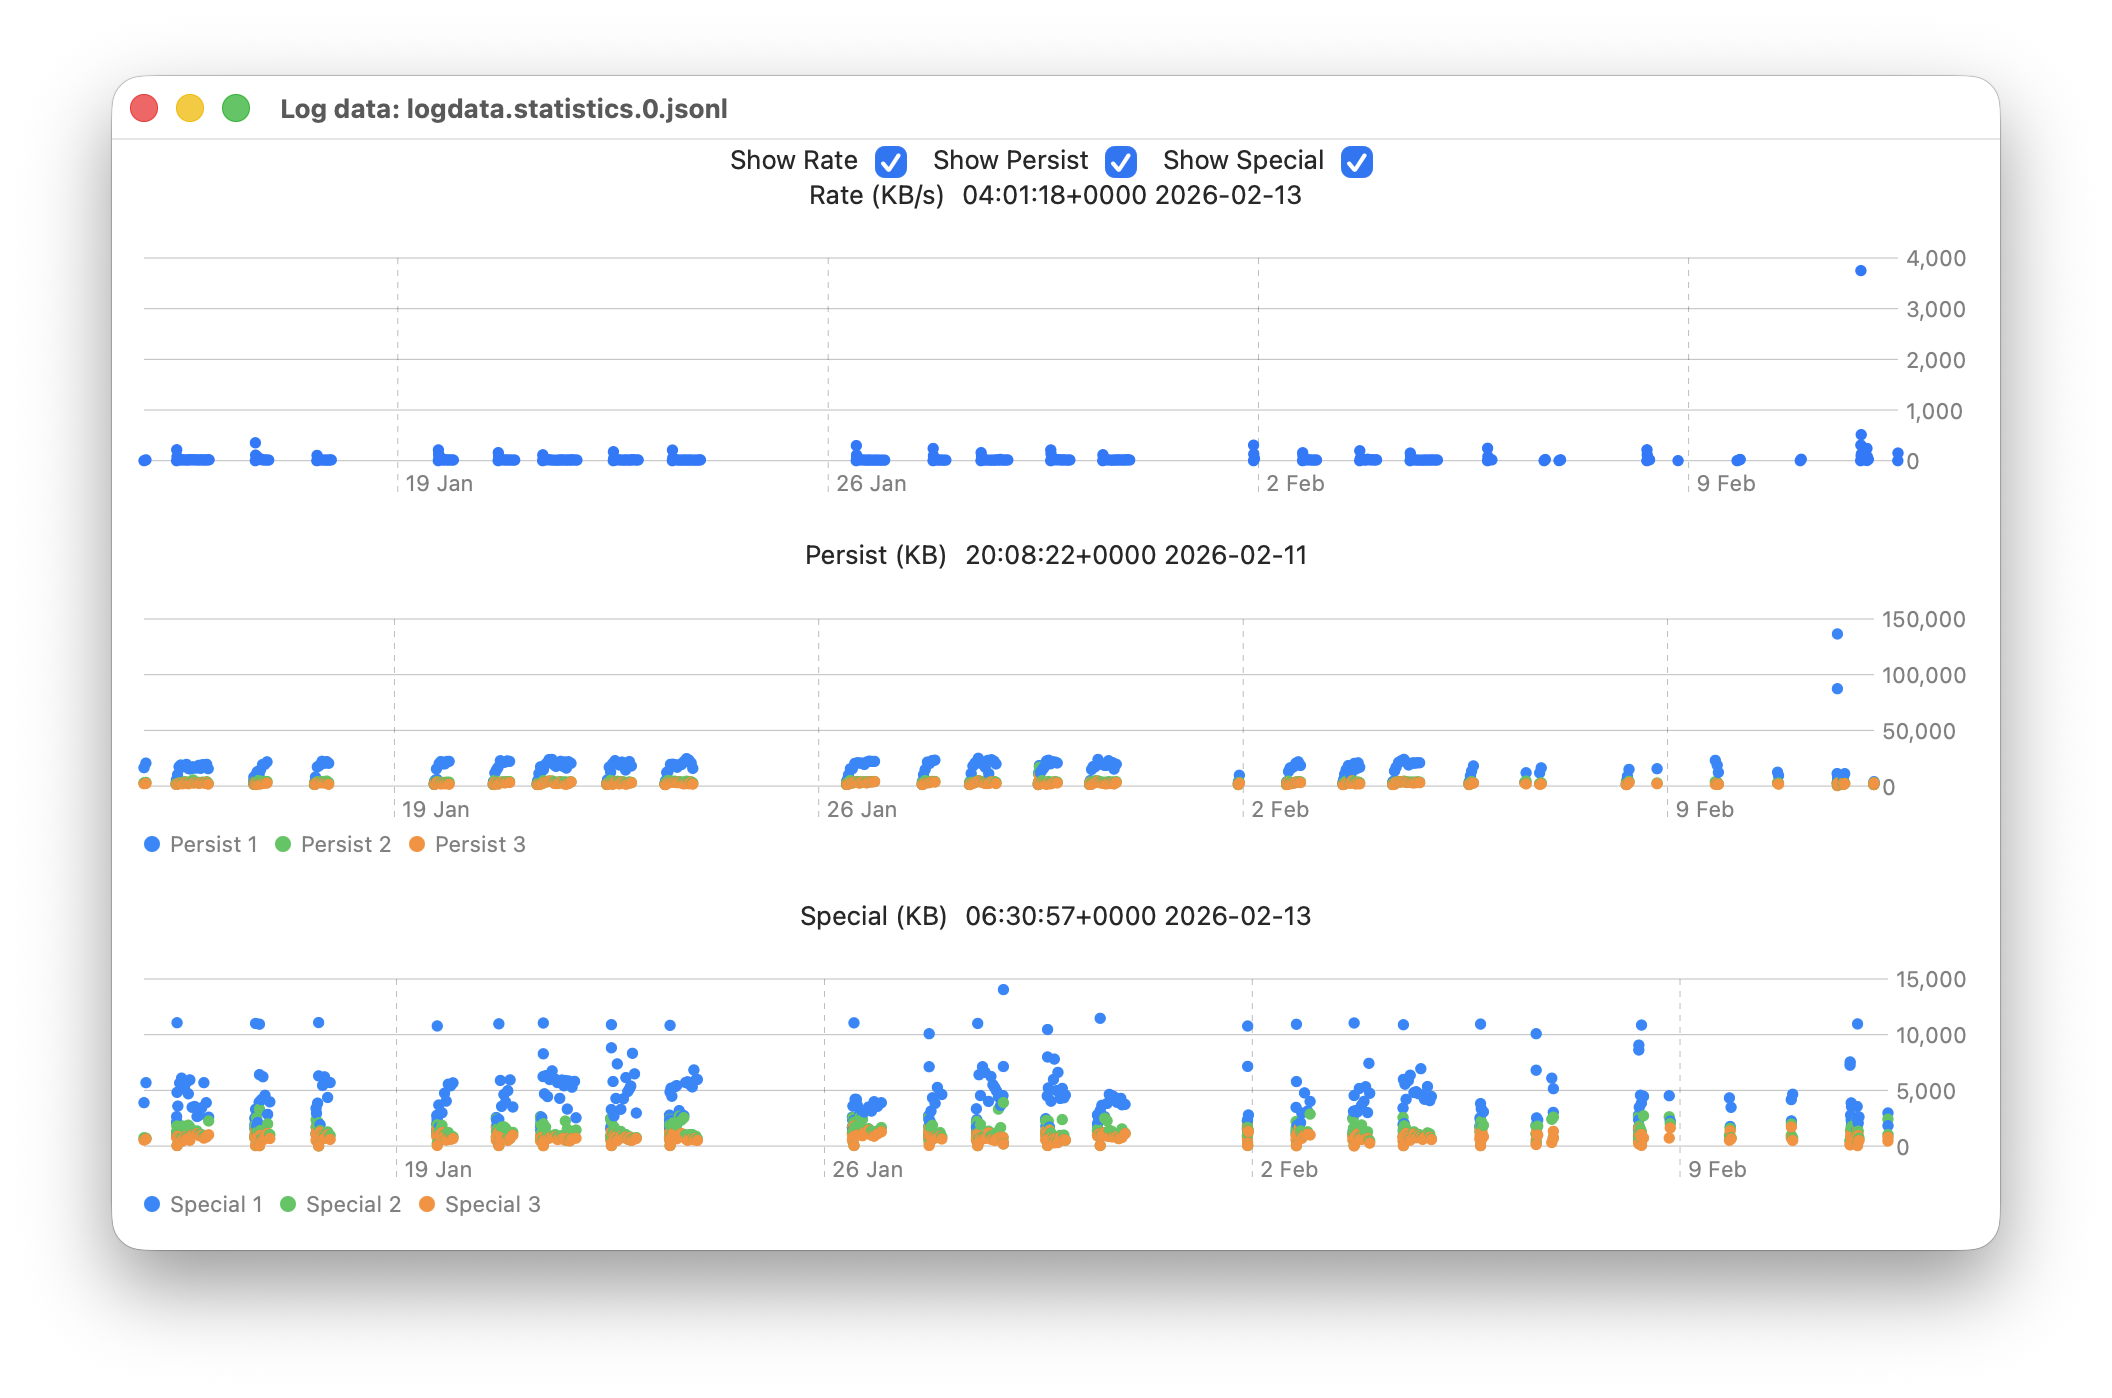
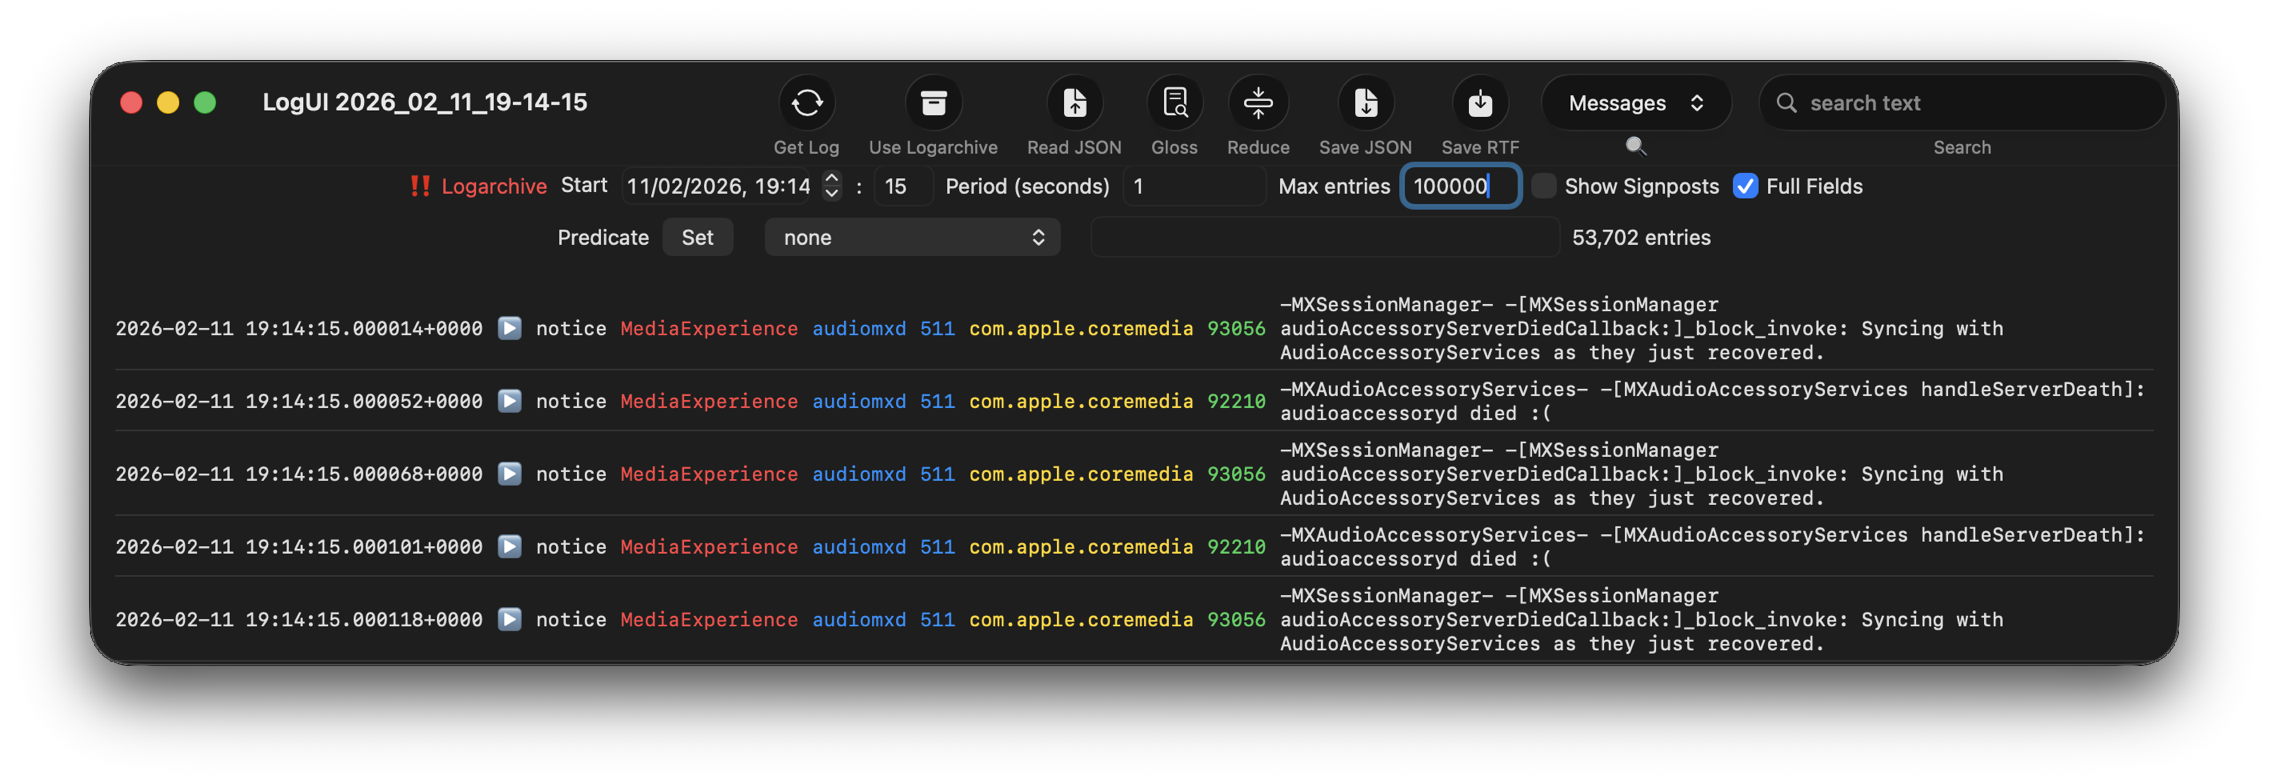
The first substantial purging of entries thus occurs when logd decides which are ephemeral and won’t be retained on disk. This can be seen by following the number of entries in a short period of high activity in the log, over time, and is shown in the chart below for a sample period of 3 seconds.

When fetched from the log within a minute of the entries being written, a total of 22,783 entries were recovered. Five minutes later there were only 82% of those remaining. Attrition of entries then continued more slowly, leaving 80% after 8 hours. Analysis suggests that over this period in which there were about 6,100 log entries per second written to disk, approximately 1,700 log entries per second were only kept in memory and never written to disk. That suggests about 22% were ephemeral, a proportion that’s likely to vary according to the origin and nature of log entries.

Summary

  • A fifth of log entries are likely to be ephemeral, and lost from the log within the first minutes after they’re written.
  • Most retained log entries are written in Persist logs, where tracev3 files are removed by age to keep their total size to just over 500 MB. Those should preserve the bulk of log entries for hours or days after they’re written.
  • Entries stored in Special log files may be retained for significantly longer, here up to a maximum of 29 days. Although those may contain fault and error categories, retention doesn’t follow an obvious pattern, making their period of retention impossible to predict.
  • In practice, the period in which a fairly complete log record can be expected is that applied to Persist files, which varies according to the rate of writing log entries. In most cases now that’s unlikely to be longer than 5 days, and could be less than 12 hours.
  • You can’t draw conclusions from the apparent absence of certain log entries from the log prior to the earliest entries in Persist log files, as it’s likely that those entries will have been removed.
  • Expecting to retrieve log entries from earlier than 5 days ago is almost certain to fail.

Why does AI tell you to use Terminal so much?

By: hoakley
11 March 2026 at 15:30

There’s a striking difference between troubleshooting recommendations made by AI and those of humans. If you’ve tried using AI to help solve a problem with your Mac, you’ll have seen how heavily it relies on commands typed into Terminal. Look through advice given by humans, though, and you’ll see they rely more on apps with GUI interfaces. Rather than sending you straight to fsck_apfs, for instance, most humans will prefer to direct you to Disk Utility and its First Aid feature.

This is because most popular AI like ChatGPT, Claude and Grok is based on LLMs, Large Language Models, built on tokens for words. The great majority of humans using Macs work primarily in its GUI, using apps rather than Terminal commands. Verbalising the use of GUI apps is relatively difficult, and with the popularity of YouTube rather than written blogs, is becoming a dying art.

Command tools are all very well, but in this context they have disadvantages, among them being:

  • Few understand the commands used, and AI seldom explains those provided unless explicitly asked to do so. This results in the human learning little other than a long list of incomprehensible commands, and acquiring neither understanding nor insight.
  • Commands often lack the safeguards normally built into in apps, so can more readily cause damage or mislead.
  • Commands can readily generate overwhelmingly large output, even when piped to a file for later browsing.
  • Pasting commands into Terminal has become a favourite way to trick the unsuspecting into installing malware.

Even for an advanced user, confident assertions made by an AI can mislead. Here’s an example taken from ChatGPT’s advice on potential detections of malicious software. For this I have set ChatGPT’s output in italics, together with its commands as code. It’s worth noting that each command was explicitly given for the bash command shell, although in macOS Catalina (in 2019) Terminal changed to use zsh rather than bash as its default.

ChatGPT starts this exchange with a teaser that few could resist:
If you want, I can also show you how to tell in 10 seconds whether a Mac actually has malware despite these logs (there are 3 very specific indicators in Console).

Vague predicate

Here’s the most reliable way to see if macOS has ever detected malware on your Mac using Apple’s internal security logs.
1. Check the XProtect malware history
Open Terminal and run:

log show --predicate 'subsystem == "com.apple.XProtectFramework"' --last 30d

This log show command doesn’t access “Apple’s internal security logs”, which don’t exist, but the Unified log. Nor does the recommendation use Console to access the log, as promised. The predicate given is too non-specific to be useful for the stated purpose, and the time period of 30 days is absurdly long and doesn’t match the claimed period either.

On my Mac with the longest log records, its oldest Special tracev3 log file was created on 9 Feb 2026, and now has only 43 KB left from its original size of 11,298 KB, and the next oldest from 10 Feb has 34 KB left from 11,148 KB. On an older Intel Mac, the oldest creation date of a Special log file was 6 March, just 4 days previously, not 30.

When run on the first of those on 10 March, with longer log records, that log show command returns two Fault entries from 11 Feb, and more complete records from Special logs starting on 2 March, but no full log records until 6 March.

The predicate used is too general to select useful entries and is overwhelming, as it returns a total of 1,505 log entries for that command.

Log entries a year old

2. Specifically check for remediation events
To filter just real detections:

log show --predicate 'eventMessage CONTAINS "remediat"' --last 365d
If nothing prints, no malware has been removed in the last year.

ChatGPT here defines “real detections” as those for which remediation was attempted. I know of no evidence from research to support that assumption. Given the limitations in retrieving log entries from 30 days noted above, it seems absurd to assume that any log entries will be retained from over 360 days ago.

It’s malware only if blocked

3. Check Gatekeeper malware blocks
Run:

--predicate 'process == "syspolicyd" AND eventMessage CONTAINS "malware"' --last 365d

ChatGPT has here redefined its original claim to limit it to malware that was blocked by Gatekeeper, and once again assumes it can retrieve log entries from over 360 days ago.

No verification

4. Verify XProtect definitions are current
Run:

system_profiler SPInstallHistoryDataType | grep -i xprotect
You should see recent updates like:
XProtectPlistConfigData
XProtectPayloads
Apple updates these silently in the background.

This is one of its most curious recommendations, as system_profiler is the command line interface to System Information, a familiar and far more accessible app. What that command does is look for the case-insensitive string “xprotect” in the Installations list. Unfortunately, it proves useless, as all you’ll see is a long list containing those lines, without any dates of installation or version numbers. On my older Mac, piping the output to a file writes those two words on 6,528 lines without any other information about those updates.

I know of two ways to determine whether XProtect and XProtect Remediator data are current, one being SilentKnight and the other Skint, both freely available from this site. You could also perhaps construct your own script to check the catalogue on Apple’s software update server against the versions installed on your Mac, and there may well be others. But ChatGPT’s command simply doesn’t do what it claims.

How not to verify system security

Finally, ChatGPT makes another tempting offer:
If you want, I can also show you one macOS command that lists every XProtect Remediator module currently installed (there are about 20–30 of them and most people don’t realize they exist). It’s a good way to verify the system security stack is intact.

This is yet another unnecessary command. To see the scanning modules in XProtect Remediator, all you need do is look inside its bundle at /Library/Apple/System/Library/CoreServices/XProtect.app. The MacOS folder there should currently contain exactly 25 scanning modules, plus the XProtect executable itself. How listing those can possibly verify anything about the “system security stack” and whether it’s “intact” escapes me.

Conclusions

  • Of the five recommended procedures, all were Terminal commands, despite two of them being readily performed in the GUI. AI has an unhealthy preference for using command tools even when an action is more accessible in the GUI.
  • None of the five recommended procedures accomplished what was claimed, and the fourth to “verify XProtect definitions are current” was comically incorrect.
  • Using AI to troubleshoot Mac problems is neither instructive nor does it build understanding.
  • AI is training the unsuspecting to blindly copy and paste Terminal commands, which puts them at risk of being exploited by malicious software.

Previously

Claude diagnoses the log

Recover files from a sick Mac

By: hoakley
10 March 2026 at 15:30

Gone are the days when you could pop the hard drive out of a sick Mac and connect it to another to recover its contents. This article explains how you may be able to transfer some or all of the contents of a modern Mac’s internal SSD to another Mac.

Any Mac: Thunderbolt

As long as you can get your Mac up and running, the fastest way to transfer files from its internal storage is back-to-back Thunderbolt networking, easily set up in Network settings. All you need is another Mac with a free Thunderbolt port and a suitable cable to connect them directly.

Apple silicon: Share Disk

If you can get an Apple silicon Mac to start up in Recovery mode, or Fallback Recovery, then you’ve got a good chance of salvaging whatever you need from its internal SSD.

Connect it back-to-back with another Mac using a Thunderbolt 4 (or 3) cable. Start the sick Mac up in Recovery, pass through to Options and authenticate as necessary. In the Utilities menu there select the Share Disk command.

Select the volume you want to share, and when necessary unlock it with the password required for its encryption.

On the other Mac, that shared volume should appear as a networked device, connected as Guest, or on the Desktop. Despite that, you should have full access to its contents. This connection uses SMB, so listing large folders in the Finder will be surprisingly slow.

Now you can copy across all the files you want to your other Mac. That’s impressively quick, and can read them at about 3 GB/s, as you’d expect from a fast locally attached SSD. However, because of the SMB overhead, copying many small files is noticeably slower.

This can also get a bit kludgy when you’ve finished and want to disconnect. Trying to eject the shared volume may not work, and even when you stop sharing on the Mac in Recovery, and disconnect the cable, you may find the other Mac just won’t let go of it.

This only works with a single volume at a time. If you have added volumes to your Mac’s internal SSD, then you’ll have to repeat the process to access files on a different volume. But it does allow you to choose which volume to share.

Apple silicon: DFU mode

If you’re unable to put your sick Mac into Recovery, or Fallback Recovery, it’s still possible it has entered DFU mode, or could do so when started up to engage that mode. This is explored in more detail in this article, but doesn’t give you access to the contents of the Mac’s internal storage. You could try reviving it rather than performing a full Restore, though, as that isn’t destructive of its contents.

Intel T2: Target Disk

There are now two ways to enter Target Disk Mode on an Intel Mac with a T2 chip: if the Mac is already up and running (and not near-dead at all), you can opt for this in System Settings > General > Startup Disk, although I’m not sure why you would want to. If the Target really is sick, the only way you’re likely to engage this mode is to hold the T key during startup until the Thunderbolt symbol appears on its display.

The Target and Host must now be connected using a Thunderbolt 3 or 4 cable, although between Macs that are both running Catalina or earlier, a USB or USB-C cable could be used instead.

Shortly after they’re connected and ready, the Target’s internal Data volume should mount in the Host’s Finder. You should then be prompted for its FileVault password, and gain access to its contents. As with Apple silicon Macs, you can also copy files from the Host to the Target. To disconnect the Host and Target, eject the Target’s volume from the Host, then press and hold the Power button on the Target to shut it down.

Note that Target Disk Mode doesn’t offer a choice of volume.

Any Mac: External Boot Disk

If an Intel Mac with a T2 chip already has its boot security set (using Startup Security Utility) to allow it boot from an external disk, you may be able to get that to work, then mount the internal SSD to allow you to recover its contents to that or another external disk.

This is unlikely to work with an Apple silicon Mac, though, as it must always start the boot process from its internal SSD before it can continue booting from a system installed on an external bootable disk.

Summary

  • Cable: Thunderbolt 4 (or 3) connecting the two Macs back-to-back.
  • Apple silicon Mac: Recovery mode, Utilities menu, Share Disk.
  • Intel T2 Mac: T key held during startup.
  • Eject the Target’s disk on completion.
  • Apple silicon Mac: disconnect button, then shut down.
  • Intel T2 Mac: hold the Power button to shut down.

What can you do when Software Update can’t?

By: hoakley
5 March 2026 at 15:30

What can you do when you know there’s an update available, but your Mac is pretending there isn’t? I’m here referring to those delivered through Software Update, so come from Apple’s software update servers. Although there are several ways to talk to it, all such updates rely on the softwareupdated service, giving you a choice of solutions.

Check the obvious

Before going any further, check that updates aren’t being blocked because there’s insufficient free space on your Mac’s startup disk, and a laptop has ample charge in its battery or is running on mains power.

Restart

Sometimes softwareupdated seems to lapse into a coma, and the best way to wake it up is to restart your Mac. Don’t expect it to jump into action as soon as you’ve logged in, but give it five minutes first.

Safe mode

If a standard restart doesn’t do the trick, start your Mac up in Safe mode, leave it five minutes, and try again. Although Apple no longer includes this as one of the purposes of Safe mode, by disabling third-party extensions it gives softwareupdated every opportunity to do what it’s there for.

SilentKnight

If you haven’t been using my free SilentKnight to check for updates, this is a good time to do so. Because it calls softwareupdated with an undocumented option, that sometimes kicks it into action. If all you want to do is download the latest XProtect or other security data update, SilentKnight can do that for you, even if you don’t want to update macOS.

While you can download and install macOS updates in SilentKnight, that doesn’t display a progress bar and lacks other features found in Software Update in System Settings. If SilentKnight’s checks find a macOS update you want to install, you’re therefore better off opening Software Update and obtaining the update from there.

Where it comes into its own is in dealing with concurrent macOS updates and security data updates, as it makes it easy for you to download and install single updates and leave others alone. That’s explained here.

XProtect in Sequoia and Tahoe

These most recent versions of macOS have to update two copies of XProtect, and inconveniently use different mechanisms for each. Their primary copy relies on the xprotect command tool, whose command
sudo xprotect update
should obtain a copy via iCloud and install it in the right place, provided that Apple has released it through iCloud. Their secondary copy is updated in the normal way by SilentKnight, Software Update or softwareupdate.

softwareupdate

This command tool is the most direct interface to softwareupdated, and that used by SilentKnight, but you need to know its secret options if you’re going to get the best out of it.

If all you want is a list of available macOS updates,
softwareupdate -l
works fine, and using -la does much the same. Neither will display security data updates like those for XProtect or XProtect Remediator, though. To see those, use the undocumented option
softwareupdate -l --include-config-data
and that should provide the full list. As you’ll probably want to download them individually, use the command
softwareupdate -i --include-config-data updatename
where updatename is the word given as the Label in the listing.

Another invaluable feature of softwareupdate is its list of full installers available for direct download. That’s generated by
softwareupdate --list-full-installers

The current list includes:

  • Tahoe 26.1, 26.2, 26.3
  • Sequoia 15.7.2, 15.7.3, 15.7.4
  • Sonoma 14.8.2, 14.8.3, 14.8.4
  • Ventura 13.7.8
  • Monterey 12.7.4, 12.7.6
  • Big Sur 11.7.10, 11.7.11
  • Catalina 10.15.6, 10.15.7 builds 19H2, 19H15
  • Mojave 10.14.6
  • High Sierra 10.13.6

but that given will include only those compatible with the Mac used to obtain the list. When you want to download one of them, use the command
sudo softwareupdate --fetch-full-installer --full-installer-version 11.7.11
giving the version you want. If you want a different version, then check with one of the sites that provides links to a fuller list, such as Mr. Macintosh.

Avoid using the option to download but not install updates, based on softwareupdate -d, as downloads can go missing from /Library/Updates where you’d expect them, and this doesn’t work at all for macOS updates.

On Apple silicon Macs only, you can use the command
sudo softwareupdate --install-rosetta --agree-to-license
to download and install Rosetta 2 and avoid its normal installation dialog.

Checklist

  • Check free space and (in laptops) power.
  • Restart and try again.
  • Start up in Safe mode and try there.
  • Try SilentKnight.
  • In Sequoia and Tahoe, XProtect also needs separate xprotect command.
  • softwareupdate -l --include-config-data
  • To install individual update softwareupdate -i --include-config-data updatename

Lost in the log? Here’s Logistician 1.1

By: hoakley
27 February 2026 at 15:30

If you’re still struggling to find your way around the log, or not even prepared to try, I have a new version of my log statistics and navigation utility Logistician that should help. This enhances its list of log files by adding further details, and adds a completely new graphical view to help identify periods of unusual log activity.

Log list

As I showed here a couple of days ago, Logistician opens the JSONL statistics files maintained by logd in /var/db/diagnostics, alongside folders containing the tracev3 log files. The list of those originally gave a minimum of information, and that has been increased to contain:

  • the start date and time of each file, in addition to the date and time it was closed
  • the period during which that file had entries added to it, in seconds
  • the size of log data within the file, in KB
  • the average rate at which log data was written to that file, in B/s
  • the path to that file, which reveals whether its type is Persist, Special or Signpost, hence the nature of its contents.

Start date and time are taken from those for the closing of its predecessor, so can’t be given for the first file of each type. They can also span a period during which the Mac was shut down, although that’s usually obvious from the low rate at which log data was written.

Point plot

The new window available plots point values for the whole series of log files in the current list.

This displays any of three different plots:

  • rate of log data written to Persist log files over the period for which log files are listed, in B/s;
  • amount of log data written to Persist log files over that period, in KB;
  • amount of log data written to Special log files over that period, in KB.

For the latter two, quantities shown are for the three processes that entered the largest data in that period. I have looked at identifying the processes concerned, but that’s far too complex to do here.

Signpost log files contain special types of entry intended to be used to assess performance, and contribute little to other analyses, so are excluded from these plots. Regular log entries are either saved to Persist or Special types, although it’s unclear as to which entries go to each. Some processes only appear to use one, although the entries for many processes can be saved to either. Although there are similarities in the patterns of Persist and Special files, they also differ in other respects. These three plots appear most suitable when looking for anomalies in the log.

Although these plots make it easy to identify the date of an anomaly such as the high outliers at the far right, for 11 February, they can’t tell you the time of the file you should analyse. For that, Logistician reports the time and date of the location that the pointer is hovering over. Place the pointer over the high rate value, for example, and you’ll see it occurred at about 20:14:00. This helps you identify which of the listed log files has that high peak rate, hence the time period to inspect using LogUI.

Traditionally, the moment you move the pointer from a chart area, hover information like that is removed. If that were done here, it would make it infuriatingly hard to refer to the list of log files. So these dates and times show those at the last moment the pointer was over that point plot. The knack is to hover over the point of interest, then move the pointer off that chart vertically, so as not to alter the time indicated. I’m looking at alternative methods of locking the time shown, to make that easier, but that presents more complex coding challenges, as do methods of zooming in on smaller periods of time.

In case you’re wondering, the overall period covered by these point plots, divided across the two log statistics files maintained, is approximately 6 weeks, as indicated by the X scales shown here.

Logistician version 1.1 is now available for Sonoma and later from here: logistician11a
and will shortly be getting its place in a Product Page and other listings here.

Enjoy!

Update: thanks to Jake for finding a divide by zero bug that could crash Logistician when opening a JSONL file. I have fixed this in build 14, now available above. Please download that and replace copies of the original build 12, so you shouldn’t encounter that crash. My apologies.

Investigate a past event in the log

By: hoakley
25 February 2026 at 15:30

We don’t always notice something is wrong within a few hours of the event that caused a problem. Sometimes it can take days or weeks before we realise that we need to check something in the log. By that time all trace has vanished, as the active log will have rolled those log entries long before we go looking for them. This article shows how to recover and analyse events from the more distant past, using a Time Machine backup and my free utilities LogUI and Logistician. My target is the macOS 26.3 Tahoe update installed on my Mac mini M4 Pro on 11 February, and I performed this analysis 11 days later, on 22 February.

When was the event?

In this case I remember updating at around 18:30-19:30 on 11 February, but I don’t even need to recall the date. I first copied the logdata.statistics.1.jsonl file from my active log in /var/db/diagnostics to a working folder in ~/Documents, then opened it using Logistician.

The log file listing between 18:10:39 and 19:26:47 on 11 February 2026 shows a remarkably rapid turnover of log files that’s an obvious marker of that update. Highlighted here is a Persist file that’s exceptionally large at 139 MB of log entries for a collection period of just 37 seconds, although like other tracev3 log files in the Persist folder that only takes 10.5 MB of disk space.

Retrieve the log

Although I’m confident those logs were removed many days ago, I open LogUI, then select its Diagnostics Tool from the Window menu. I click the Get Info tool and select my active log in /var/db/diagnostics. That tells me that the oldest log entry there dates from 17 February, so there’s no point in trying to find those entries in that log.

Like all good backup utilities, Time Machine also backs up the whole of the log folders, and I can use those to create a logarchive file for analysis. I therefore locate the next backup made after those log entries were written, on 12 February, and copy the /var/db/diagnostics and /var/db/uuidtext folders into a new folder in my working folder, ready to turn them into a logarchive.

In LogUI, I open its Logarchive Tool from the Window menu and use that to turn those folders into a logarchive I can access using LogUI. I check that freshly created logarchive using the Catalogue tool to confirm that it contains the log files I want to browse.

Identify the event

With the historical log safely preserved in a logarchive and a defined time of interest, my next task is to identify the event I want to investigate. In this case, I could probably go straight ahead and look at all entries for a few seconds, but in other circumstances you may need to know which entries to look for.

Back in Logistician, I select that extraordinary Persist log file and view it in a Chart. Most of the other log files over this period look like this:

with large quantities of entries from softwareupdated, com.apple.MobileSoftwareUpdate and similar processes. But the huge Persist file that filled in only 37 seconds is exceptional.

Almost all its entries are from audiomxd, and all other entries are dwarfed by its size.

Browse the event

By default when you click on LogUI’s Get Log tool it will fetch those log entries from the active log. To switch that source to my logarchive file, I click on the Use Logarchive tool and select the logarchive I just created in my Documents folder. To remind me that it’s no longer looking in the active log, that window then displays a red-letter caution of !! Logarchive to the left of the Start control. That also reminds me to use dates and times within the range covered by that logarchive.

I set the Start to ten seconds into the collection period of that large Persist file, a period of 1 second, and the maximum number of entries to 100,000, then click on the Get Log tool.

This is one of the most remarkable log extracts I have ever seen: in this 1 second period, the audiomxd process in com.apple.coremedia wrote about 53,000 entries to the log. Over the 37 seconds of log records in that single Persist file, audiomxd must have written at least 1.5 million log entries. These are all apparently the result of the ‘death’ of the AudioAccessory service audioaccessoryd, and its recovery after updating macOS.

Summary

  1. Identify approximate time of event from /var/db/diagnostics/logdata.statistics.1.jsonl using Logistician.
  2. Check in LogUI whether that falls within the period of the active log.
  3. If not, retrieve /var/db/diagnostics and /var/db/uuidtext from the next backup made after the event.
  4. Convert those folders into a logarchive using LogUI’s Logarchive tool, and check it contains the period of the event.
  5. Identify the processes involved using Logistician’s chart.
  6. Set LogUI to use that logarchive, enter the correct date and time, and get log entries for the required processes.

Last Week on My Mac: A log statistician

By: hoakley
22 February 2026 at 16:00

If you don’t know exactly what you’re looking for, and when it happened, the log has been a hostile place. Doom-scrolling through tens of thousands of log entries in the hope of stumbling across a clue is tedious, and the odds have been stacked against you. So last week I’ve been doing something to redress the balance and shorten those odds, and I’m delighted to offer its first version in Logistician. This has nothing to do with logistics, but is all about log statistics.

Alongside folders containing your Mac’s Unified log files, in /var/db/diagnostics, you’ll see files with names starting with logdata.statistics. A couple are text files that only go back a day or two, and others have the extension jsonl. If you were privileged to test some beta-releases of macOS Tahoe, you may have some database files as well, but here it’s those jsonl files I’m concerned with.

Inside them are basic statistical summaries of every log file that’s been saved in your Mac for the last few weeks or months. Even though the original log files have long since been deleted, summaries of their contents are still available in files like logdata.statistics.1.jsonl, and those are opened up by Logistician.

As the files in /var/db/diagnostics are still live, and may be changed as logd does its housekeeping, copy those jsonl files to somewhere in your Home folder, like a folder in ~/Documents. Open Logistician, click on its Read JSONL tool, select one of those copies and open it.

Logistician’s window displays the file’s contents in a list, with the oldest at the top. It gives the date and time that file was saved, just after the last log entry was written to it, its size in KB, whether it was a Persist (regular log), Special (longer supplementary log entries) or Signpost (performance measurements) collection, and the name of the file.

Select one of those file entries and click on the Chart selection tool at the top right to see its data plotted out in the Chart view.

Data provided for each log file listed includes a breakdown of the total size of log entries from that process or subsystem, and Logistician’s Chart view displays those data as a bar chart. The height of each bar represents the total size in KB of log entries made by that process in that specific log file. As there are a 50 bars available, two sliders set the size and location of that window on the data:

  • Start sets the number of the first bar on the left, beginning at 1 for the greatest size, usually the kernel, and increasing to 40 for a process with very few log entries, just ten from the smallest.
  • Width sets the number of bars to display, ranging from 6 to 25. The more shown, the harder it is to read the names of processes at the foot of each bar, and the less precisely you can read the size of their log data at the right.

These sliders are set to show 9 bars from number 6 at the left (the sixth highest log data, written by launchd) to number 14 at the right (14th highest, written by ContinuityCaptureAgent). Of interest here are around 400 KB of log entries from NeptuneOneWallpaper.

Here are 8 bars from 17 to 24, with smaller quantities written to the log of around 200 KB each. They include the DAS service dasd and cloudd for iCloud.

It’s easy to flip quickly through a series of log files: click on the next file you want to view in the main list, click on the Chart selection tool and values will be displayed immediately.

Fascinating though that might be, it doesn’t in itself answer many questions. Add a log browser like LogUI, though, and the combination helps you locate and identify unusual activity, problems, and specific events.

I happened to notice one Special log file that was closed at 19:11:17 on 19 February has high log data from softwareupdated. The previous Special log file was closed at 18:20:04, so somewhere between those times my Mac checked for software updates.

To ensure the full entries were still available in the log, I opened LogUI’s Diagnostics Tool to confirm that its earliest entries were a couple of days earlier.

I then set LogUI to a Start time of 18:20:04 with a Period of 600 seconds, and a Predicate set to a processImagePath of softwareupdated, to look for entries from that process. My first check located all the softwareupdated entries around 18:29:25, when I had apparently run SilentKnight. As a bonus, I discovered from those that SilentKnight was stuck in app translocation, so have been able to fix that (again).

Logistician version 1.0 build 7 for macOS Sonoma and later is now available from here: logistician106
I will add it to other pages here when I’m more confident that this initial version is stable and does what it claims in its detailed Help book.

Enjoy!

In the background: Identification

By: hoakley
20 February 2026 at 15:30

Processes and their threads running in the background can be hard to identify. When they’re having problems, or you just want to discover what WardaSynthesizer is, it can be frustrating trying to obtain more information. In some cases you’ll end up referring to the list of background items in Login Items & Extensions, in General settings. Many of its entries should be self-explanatory, or aided by the information revealed in their 🔍 button, but some cryptically refer to Item from unidentified developer, for example.

This article suggests where to go next, and where to look when a background process doesn’t appear in that list.

Activity Monitor

Switch Activity Monitor’s view to CPU, ensure the View menu is set to show All Processes, then locate and select the process you’re interested in. Click the ⓘ button in the toolbar to see the path to the executable, its parent process and other useful information.

However, Activity Monitor only lists active processes, and those that have quit won’t appear until they’re active again.

BTM dump

Many background processes, including those listed in Login Items & Extensions, are now managed by macOS Background Task Management (BTM), which maintains a detailed list of them in its store in /var/db/com.apple.backgroundtaskmanagement/BackgroundItems-v16.btm. Although not documented in any man page, you can obtain that as a BTM dump, using the command
sudo sfltool dumpbtm > ~/Documents/btmdump.text
to write it to the text file btmdump.text in your Documents folder. This uses sfltool, originally intended to manage the Shared File List (hence the sfl), that has gained additional features covering Service Management, although its man page hasn’t caught up yet and the most help you’ll get is from Apple’s account in its Platform Deployment Guide.

The BTM dump lists full Service Management information for every item currently being managed, by user ID. Normally, the two important user IDs would be 0 for root and 501 for the primary admin user, but here the first list, with a UID of -2, appears to be a composite covering most Background Items. You should also check those for the current user, such as 501. A typical entry might be:
UUID: 9A087CA1-250D-4FA6-B00A-67086509C958
Name: Alfred 5.app
Developer Name: (null)
Team Identifier: XZZXE9SED4
Type: app (0x2)
Flags: [ ] (0)
Disposition: [enabled, allowed, not notified] (0x3)
Identifier: 2.com.runningwithcrayons.Alfred
URL: file:///Applications/Alfred%205.app/
Generation: 0
Bundle Identifier: com.runningwithcrayons.Alfred

This gives the location of the executable that is loaded. The Developer Name given is taken from its code signing certificate. The Disposition field is probably most relevant to identifying those causing problems, as it should reflect the status of that entry in the Login Items list, and whether the user has been notified.

BTM attributions

Apple also maintains a property list containing details of many helpers and other executables used by major third-party apps. This can be found at /System/Library/PrivateFrameworks/BackgroundTaskManagement.framework/Versions/A/Resources/attributions.plist

In nearly 4,000 lines of dictionaries, Apple lists many of the more common background and helper apps you’re likely to encounter, from Adobe Creative Cloud services to ZoomDaemon. Among the useful information given about each are its associated bundle identifiers, the path to its executable, and the developer’s Team Identifier for their signing certificate. Although the identities of most of those should be obvious, if you’re confronted by the sort of fragmentary information that System Settings can offer, this can be a great help.

Log entries

The BTM subsystem is identified in the log as com.apple.backgroundtaskmanagement. One simple way to observe its activity is to obtain a full log extract for a period of interest using LogUI, then set the popup to the left of its search box to Subsystems, enter com.apple.background in the search box and press Return.

Key points

  • In Activity Monitor select the process and press the ⓘ button;
  • sudo sfltool dumpbtm for a BTM dump;
  • attributions.plist in /System/Library/PrivateFrameworks/BackgroundTaskManagement.framework;
  • log subsystem com.apple.backgroundtaskmanagement.

Is your Mac dead, in DFU mode, or alive?

By: hoakley
4 February 2026 at 15:30

You pressed the Power button on your Mac, and nothing happened. It didn’t show signs of starting up, so is it dead, or just pretending? The distinction might seem obvious until you consider DFU mode.

Power reaching the Mac, no sign of life

Simple mains/AC power problems have caught many out: if your Mac isn’t showing any signs of life when it should, ensure that power is reaching it in the first place. Never put yourself at any risk of coming into contact with any live cable, though. Good checks are to verify that the mains socket/receptacle delivers power correctly to another system, and that the Mac’s power cable also does its job. If you’re in any doubt about the electrical safety of either, stop immediately, make everything safe, and obtain professional advice.

If you’re confident that power is going into your Mac, the next and more difficult question is whether the Mac’s hardware is dead, or it has entered DFU mode. DFU mode is the fallback for all Apple silicon Macs that encounter a problem early in the boot process, whether it’s in ROM or later stages before the kernel starts. This also applies to Intel T2 Macs that encounter problems when loading iBridge firmware for their T2 chip, as explained below.

Is it in DFU mode?

Most Apple silicon Macs and T2 models that have entered DFU mode show no obvious signs of life. This is even true of MacBook Pro models with MagSafe 3 power cables: in DFU mode, their LED doesn’t light up. Neither will a notebook keyboard light, nor is there normally any indication that a built-in display has power. Built-in trackpads also feel dead.

Notable exceptions to this are:

  • Mac Studio and Mac mini, whose power status indicator light should display amber;
  • Mac Pro, whose status indicator light should display amber and may flash.

For all models, once they have connected successfully to a second Mac in DFU mode, you should see the Apple logo and a progress bar on any connected display during IPSW download.

For the Mac Pro, the status indicator light will flash amber in different patterns as a result of memory, PCIe card and other faults. Apple explains those separately for the Mac Pro 2019 and Mac Pro 2023.

DFU mode is detailed by Apple in this support note.

Spontaneously entering DFU mode should be a very rare event, but in most cases the only way to determine whether it has happened is to connect the Mac using an appropriate USB cable to another Mac running recent macOS, which should then connect to the Mac that’s in DFU mode. If that’s suspected, try a firmware Refresh in the first instance to see if that occurs, as that’s non-destructive of the internal SSD’s contents.

Connecting the Macs requires attention to detail. The cable used should be capable of transferring data via USB-C but not Thunderbolt. This is a limitation imposed by DFU mode, and must be observed if the Macs are to connect. That should be connected to the DFU port on the dead Mac, one of its USB-C+Thunderbolt ports. Apple lists those here, and they’re given in MacTracker.

If you aren’t sure, or can’t connect a suitable Mac, it may be best to assume that it’s in DFU mode, and shut it down with a 10 second press of the Power button. On a laptop, DFU mode should use very little power, as there’s normally only one CPU core running and little else. However, as that Mac can’t be charged in DFU mode, this could eventually lead to discharge of the battery.

Not in DFU mode

If there are no signs of life and the Mac isn’t in DFU mode, then it has most probably suffered a fatal hardware failure, and needs the attention of an authorised Apple service provider. If it shows no signs of life in response to a normal press of the Power button, then it’s extremely unlikely to start up in Recovery mode to let you run Diagnostics there.

Signs of life

If the Mac shows signs of life, the next question is how far it proceeds with the boot process:

  • It doesn’t reach the login window
    • because it freezes and fails to make any further progress, perhaps displaying the Apple logo and progress bar, but no further;
    • because it enters a boot loop, in which a kernel panic occurs during boot, forcing the Mac to restart, or to shut down, only to repeat the same sequence.
  • It reaches the login window, but sticks there.
  • The login window allows user selection and password entry, but refuses any further progress.
  • Login is successful, but the Mac freezes or reboots shortly afterwards.
  • Login is successful, and problems occur later.

That determines whether you can get it to start up in Recovery mode, and gain access to the tools it provides.

Boot processes

BootProcess

Once a T2 Mac has performed its Power-On Self-Test (POST) and initialised the SMC, the T2 sub-system establishes the level of Secure Boot in force, and, if that’s Full or Medium Security, boot.efi is checked before being loaded, and that leads through to the rest of the boot process. Apple provides a key to the different screens that can appear during these stages.

Boot security in Apple silicon Macs aims to provide a verified chain of trust through each step in the boot process to the loading of macOS, that can’t be exploited by malicious components. Booting an M-series Mac thus starts with the immutable Boot ROM in the hardware, whose most important task is to verify the executable for the next stage, then load and run it. If that isn’t possible, then the fallback is to go into DFU mode and await a connection over USB.

SecureBootM1v2fw

In the event of early boot failure, the only recourse seems to be to abandon the process, and leave the Mac in DFU mode, although Macs running Tahoe could now enter Recovery Assistant to try to fix the problem.

Should you restart or cold boot?

By: hoakley
27 January 2026 at 15:30

There are two ways to restart a Mac that’s already running: you can either use the Apple menu command Restart (or an equivalent in Terminal), or you can shut it down, leave it a few seconds, and start it up afresh in what’s known as a cold boot. This article examines whether there’s any difference, and which you should prefer.

Differences

When a desktop Mac starts up from cold, its power supply starts providing power to its internal components, and when the boot process starts they are all initialised from their power-off state. There’s one small exception to that in the internal clock, possibly part of the Always On Processor (AOP) in Apple silicon Macs.

It’s commonly held that a regular (or warm) restart doesn’t interrupt the power supplied to internal components, as Intel Macs may not undergo power-on self-testing (POST) when only restarted. That doesn’t appear to be correct, though, as it’s easily demonstrated that Intel Macs with T2 chips do undertake a POST during a restart. Apple silicon Macs don’t appear to perform a similar form of POST. Neither does there appear to be any difference for peripherals, which are shut down before being started up again whether the Mac is booted warm or cold.

It’s also most unusual to attempt a true cold boot, particularly in a laptop. To remove all power from a desktop Mac requires it to be disconnected from its mains power supply, and for a laptop the internal battery also needs to be isolated or removed, something only performed during service by a technician.

What is clear is that the period during which power is turned off is very different: during a warm restart that’s only a second or two.

Received wisdom is that this allows data to be retained in memory through a warm restart, but that it’s wiped clean after a cold boot. This was first documented by Alex Halderman and others, who used it to perform ‘cold boot’ attacks to recover encryption keys. They demonstrated that RAM contents were still recoverable many seconds after shutting down, and could be used to recover encryption keys and other critically secure data. A great deal has changed since that research was undertaken. As far as the protection of secrets is concerned, all modern Macs have secure enclaves and use Extended Anti-Replay Technology (xART) to prevent that.

It’s thus plausible that there could be some differences in hardware between a restart and a cold boot, but careful comparison of log entries during booting from a Mac’s internal SSD fails to reveal any significant differences there.

How long to wait?

There appears to be no useful evidence for recent and current Macs to determine how long you should wait between shutdown and a cold boot. Periods given range widely, from a few seconds to a minute or more.

Experience

There are many reports of cold boots resolving problems that weren’t affected by a warm restart, but those are generally if not exclusively for Intel Macs, and most usually those without T2 chips.

I have only once experienced a problem in an Apple silicon Mac that required a cold boot, and that occurred a couple of years ago with a dual-boot setup that wouldn’t restart into its primary macOS on its internal SSD, but would do so when started up with a cold boot.

Cold booting is sometimes recommended following more severe problems, such as a freeze or kernel panic. As the normal way to recover from a frozen Mac is to force shutdown using the Power button, there is no option other than a cold boot. Kernel panics should normally result in an automatic restart, the behaviour that demonstrates that a panic took place, and only after that restart is the panic confirmed in an alert, from where the panic log can be accessed. There is no option to perform a cold boot until after the restart. Apple silicon Macs are almost invariably cold booted into Recovery or Safe mode, as those require a long hold of the Power button.

Thus the choice between a restart and a cold boot is usually determined by the problem that has occurred.

Summary

  • Perform a cold boot by shutting down, waiting at least ten seconds, then starting up again.
  • A cold boot may sometimes be more effective at fixing problems than a restart.
  • If you have tried restarting your Mac to address a problem and that didn’t help, try a cold boot.
  • Cold booting may be more effective at addressing problems with external boot disks, or possibly with other peripherals.
  • We don’t fully understand why a cold boot might differ in effect from a restart, but it could.
  • There is no evidence that a Mac should always, or usually, be cold-booted rather than restarted.

What was that, a crash, freeze or panic?

By: hoakley
26 January 2026 at 15:30

Using the correct term to describe unexpected events when they occur on your Mac is central to troubleshooting. Vague words like crash could mean anything from a full-blown kernel panic bringing your Mac to its knees, to an app showing an error message and quitting quietly. Before you can start thinking of causes or remedies, it’s essential to distinguish these main types:

  • A kernel panic is when macOS can’t continue running any more due to software damage, and your Mac has to restart itself to resume normal services.
  • A freeze is when the error is severe enough to prevent a normal, ordered kernel panic, and you have to force your Mac to shut down by pressing the Power button.
  • An app crash is when an app suddenly quits without warning, but doesn’t take down macOS or trigger a kernel panic.
  • An unresponsive app shows the spinning beachball and is listed in the Force Quit dialog as not responding.

Kernel panic

The kernel runs at a special level of privilege to isolate it from the chaos that may be going on in userland. Apps should be able to come and go, crashing whenever they need, but the kernel and its extensions should continue running unaffected. There are three particular risks that the kernel is exposed to:

  • hardware (and device firmware) failure or error,
  • kernel extensions,
  • problems occurring in the Secure Enclave.

Hardware failure, whether it’s a sick GPU, wobbly memory, or a failing disk, can cause kernel panics and may be a good reason for running Diagnostics after your Mac has suffered a kernel panic.

The kernel requires a great many extensions in order for it to do anything useful: macOS Tahoe currently ships with around 945 as standard. Third-party kernel extensions have been common in the past, but now should have largely been replaced by system extensions and their relatives. Although the kernel is better isolated from those, that doesn’t always work reliably. As a result, kernel panics should now be rare in Apple silicon Macs, which have to be run at reduced security if they’re to load third-party kernel extensions.

Secure enclave panics are a recent phenomenon, can only occur in Macs with T1, T2 or Apple silicon chips, and should be extremely rare.

Because of the seriousness of kernel panics, they should generate a special panic log, the starting point for discovering why any panic has occurred. A minute or so after logging back into your Mac once it has restarted, you should see a panic alert with the offer to view its report. Without a panic log, it’s almost impossible to obtain any useful evidence as to their cause, as the panic usually ensures that all other log records are lost. Unfortunately, recent versions of macOS don’t make it easy to save the panic log, and many users just send a copy to Apple assuming that will do something to solve their panics, which it doesn’t. When you see a panic alert, always view the report, copy and paste it into a document, and save it for reference.

Freeze

It’s also possible for a Mac to come to a grinding halt, and rather than suffering a kernel panic, just freeze. You can experience something similar if you run Disk Utility’s First Aid on your Mac’s Data volume when running in normal mode: the contents of the display and clock stop updating, and the Mac is completely unresponsive to any input. When running First Aid, that should only last a few seconds; when your Mac freezes, it may recover spontaneously, but in many cases the only way to regain control is to force it to shut down by pressing and holding the Power button. Whatever you do, only shut mains power off to your Mac as a last resort, as that risks damage to file systems and loss of data.

Freezes can also occur through a different mechanism: rather than a fatal error in the kernel causing it to panic, a freeze may originate from WindowServer and the GPU, hence failure to update the display.

App crash

crashreport1

These are known under various euphemisms such as an unexpected quit, and come in two main forms. They most commonly result when an app encounters a problem it can’t solve, for instance if it’s expecting to find a chunk of data in memory, but instead there’s nothing, and its code can’t handle that gracefully. These should be reported to the developer so they can identify the problem and modify the app’s code to prevent the crash from occurring. For the user it may be possible to determine the circumstances that cause the crash, and work around them.

crashreport2

macOS itself will deliberately crash apps in certain circumstances, such as when its security system finds a broken signature, or the app tries to access something protected for privacy without having the right of access. While diagnosing bugs in apps is generally beyond the ability of even advanced users, an app’s crash report should reveal external causes such as a security failure, which are of importance to both user and developer.

Unresponsive app

spinningbeachball

Apps are generally written so that activities that might take noticeable time are run in the background and don’t impair the app’s responsiveness to the user. There are circumstances where that smooth running doesn’t work, and the spinning beachball cursor is displayed to indicate the app is no longer responsive.

This doesn’t mean that the app has crashed, and for certain operations it can be difficult if not impossible to avoid. For example, it’s possible to obtain log extracts containing hundreds of thousands of entries using Ulbow. When there are so many, formatting their text in the app’s window takes noticeable time and will inevitably result in pauses spent with the spinning beachball.

forcequit

Apps can also enter more prolonged periods of unresponsiveness, sometimes indefinite, from which the only way out is to force them to quit using the Finder’s Force Quit window (Command-Option-Escape), actually handled for it by loginwindow. macOS writes special logs to record these problems, but they are of no benefit to the user.

Unexpected behaviour

pulp

Apps including the Finder can behave in many ways you don’t expect, as Pulp newsreader did when it first ran in macOS Catalina, above. In these cases it’s most useful to distinguish between problems that render the app unusable or result in data loss, and those that have lesser consequences and can possibly be worked around.

Key points

  • A Mac restarts spontaneously following a kernel panic; watch for the panic log and save a copy.
  • When everything stops dead, particularly on the display, the Mac has frozen and normally needs to be shut down by holding the Power button.
  • When an app unexpectedly quits it has crashed, or has been crashed by macOS.
  • A prolonged spinning beachball cursor is an unresponsive app, and may need to be forced to quit.

❌
❌