Reading view

There are new articles available, click to refresh the page.

macOS Sequoia 15.1 next week

Apple provided developers with two Release Candidates of macOS Sequoia 15.1 this week. Provided there are no serious problems that come to light in the second of those, it’s likely that 15.1 will be released early next week, probably on Monday 28th. This article looks at what that brings, whether it’s safe to upgrade to Sequoia yet, and what comes next.

All supported Macs

Traditionally, the x.1 update is scheduled to be released about a month after the initial upgrade to a new major version of macOS, and brings with it the first wave of bug fixes, and a few features that weren’t quite ready in time.

Although there are reports of some other bugs in Sequoia, by far the most disruptive have been those affecting networking. Apple fixed the most serious of those in 15.0.1, released on 4 October, but some have continued to experience problems. Opinion from those testing betas of 15.1 are that it does resolve all those, and for the great majority should be ready for general use, provided that third-party apps are compatible. So if you normally wait for the x.1 version to be released before considering upgrading, this should fit the bill.

Apple does provide a list of fixes for developers, although as there’s no mention of any networking problems there, I suspect this isn’t of much help to users.

Apple silicon Macs

For those whose Macs run an M-series chip, the main interest in 15.1 is the first batch of Apple Intelligence features. Over the coming months, these should include:

  • Writing Tools, a suite of mainly on-device features for summarising and rewriting text.
  • Image Playground, producing synthetic images such as Genmoji, again using on-device methods.
  • Siri and related enhancements for user assistance, using on-device methods.
  • ChatGPT access, for more general AI features using text.
  • App-specific enhancement to Photos, including Clean Up, and others.

Of those, 15.1 brings Writing Tools and some other enhancements, but doesn’t bring Image Playground or ChatGPT. Although some have claimed that makes 15.1 little better, that understates the value and quality of Writing Tools for many.

Writing Tools should be accessible to pretty well any recent app that displays significant amounts of text. Although I haven’t intended the lower text view in SilentKnight to support them, Writing Tools are available there from the contextual menu (Control-click). They work great with all the text editors I have tested, including TextEdit, BBEdit, CotEditor, Pages, my Rich Text editor DelightEd, and even in my PDF viewer Podofyllin.

The initial release of Writing Tools in 15.1 does have language and regional limitations. It requires that your Mac’s primary language, as set in Language & Region settings, is set to English (US), although you can still switch to a secondary language such as English (UK) if you prefer. The other key control is in the new Apple Intelligence & Siri settings, where Siri’s language needs to be English (United States). As I don’t like Siri’s spoken interface, I have disabled that by setting the Listen for control to Off, and instead enabled a Keyboard shortcut to open Siri’s interactive window.

Apple has announced future support for non-US variants of English, and next year for other primary languages. However, Writing Tools still work excellently on British English, even that of Charles Dickens, with the settings described above.

When you have updated or upgraded to Sequoia 15.1, I suggest you download text versions of books by your favourite author(s) from Project Gutenberg and explore features in Writing Tools using those as prose sources.

Future Sequoia updates

Apple has this week released the first beta-test of Sequoia 15.2, with most if not all of the other Apple Intelligence features, including Image Playground and ChatGPT. Assuming testing proceeds well and there are no serious problems, this is likely to be released in the first couple of weeks in December. Although not confirmed yet, this should open supported languages to include most major regional variants of English.

Slated for next year is the extension of Apple Intelligence to cover French, German, Italian, Japanese, Korean, Portuguese, Spanish, Vietnamese, and others. However, these features aren’t likely to appear in the countries of the EU this year, and Apple hasn’t yet indicated when that’s expected.

For those concerned about on- and off-device AI and privacy, all the standard features of Writing Tools and Image Playground involve on-device processing, and don’t send your data to remote servers. If you choose to enable ChatGPT access, then that is handled off-device, but is opt-in, and requires a separate sign-in process to access either an anonymised free account or an existing ChatGPT account. You can also require confirmation of any Siri requests handled with ChatGPT before sending any information off-device.

Apple has already published a list of fixes in the first beta of 15.2, although it remains to be seen what it does for users.

M4 Macs

Apple has also signalled that it will be releasing new Macs next week, widely rumoured to be the first to use the M4 chip.

Summary

  • Sequoia 15.1 early next week, probably on 28 October, with Writing Tools in US English, and remaining networking bug fixes.
  • Sequoia 15.2 already in beta, probably for release in early December, with Image Playground, ChatGPT, and the remainder of this first wave of AI tools, including most other English variants.
  • Try Writing Tools out: I think they’re wonderful.

How to keep up to date with SilentKnight without upgrading by mistake

This is the time of year when macOS keeps offering you the upgrade to the new version of macOS, but you may not want to go there yet. This article explains how you can stay running your existing version of macOS, while keeping it up to date.

Skint and SkintM

By default, SilentKnight is intended to download all the latest updates from Apple’s software update servers. Although you can configure it to behave differently, as I explain below, you may like to look at Skint or its menu bar sibling SkintM. Those don’t check for updates, they only check installed versions. They will warn you when your Mac has fallen behind with updates, and let you decide what you want to do.

Skint and SkintM do check that your Mac is running the latest version of its major release of macOS, and is happy if you’re still running Monterey, Ventura or Sonoma, as well as Sequoia, but it will advise you when they fall behind with their security updates; after all, that’s what it’s for.

Switching SilentKnight to manual

For many, SilentKnight’s button to Install all updates is most worrying, as that might inadvertently upgrade macOS to Sequoia. In fact, it isn’t dangerous at all, but before I explain why, you can remove that button altogether. Open SilentKnight, and its Settings, and set them to look as below.

skseq1

This will still download and install the updates you want, but you won’t be tempted to inappropriately install the lot of them.

Once you’ve done that, click the Set button, quit SilentKnight, and run it again. Now when it tells you there are updates to be installed, you can’t click on a button to bring upgrade disaster.

skupdate2

In fact, after testing SilentKnight with macOS updates and upgrades, they don’t work like that anyway. If SilentKnight were to download a macOS update or upgrade, it can’t complete its installation. macOS first tells you that the update couldn’t be installed, then offers to install it in Software Update. All you have to do is shut your Mac down at that point, then start it up in Safe mode and the update will be stopped.

skupdate4

However, for your comfort and safety, I recommend unticking Allow Install All Updates, just in case.

Installing only the updates you want

Having avoided the update you don’t want, you now need to download and install those that you do. Scroll the lower text view to the bottom, to reveal all the updates available. Each has an opening line that declares it’s a Label, like
* Label: XProtectPayloads_10_15-142
It’s that label you use to identify each update.

skseq2

In the File menu, select the Install Named Update… command to open the manual updating window. One by one, copy and paste the label from the main window into the Name of update box and click on the Install Named Update button. SilentKnight will then tell you that it has been downloaded and installed. It only takes a few seconds to work through a list of updates like XProtect that you do want, and bring your Mac up to date without inadvertently upgrading it to Sequoia.

skseq3

Further information

SilentKnight has a wealth of additional information that will help you solve problems like these. The most common are explained in its short text SilentKnight Help, in the Help menu, and there’s also a detailed Help Reference in the same menu.

Key points

Open Settings, and untick Allow Install All Updates, click Set, then quit the app. Open it again, and install each named update one at a time using that command in the File menu, pasting the Label in for each wanted update and clicking the Install Named Update button for each.

This assumes that you are running the latest version of SilentKnight, 2.11. If you’re still running version 1 you need to update for Catalina or later.

Last Week on My Mac: Upgrade games

Autumn is upon us. Yesterday we had the first frost of the season, amid the leaves now shedding from our trees. In Scotland, the first falls of snow have painted the mountains in their winter colours. And those who haven’t yet upgraded to Apple’s latest version of macOS are already being pestered if not tricked into installing Sequoia, as we suffer Apple’s annual upgrade game-playing.

For many, upgrading to macOS 15.0 isn’t an option at present. Reasons fall into two categories: third-party support, and the limitations in this initial release.

Much as we might desire, several major vendors of Mac products haven’t yet been able to test against recent versions of macOS 15.0 and confirm their products are fully compatible. Latest information from Adobe, for example, states that “We’re currently in the process of testing and optimizing our latest apps to run on macOS 15 Sequoia. We recommend that you check the system requirements of your Adobe apps for the latest information on compatibility with operating systems and hardware.”

Although Microsoft’s most widely used products such as Office are reported to be fully compatible, that’s not the case with Microsoft Defender for Endpoint on Mac, for which Microsoft warns: “We’re recommending that customers who have Network Protection enabled in their organization to either: delay updating to macOS Sequoia (version 15.0); or use the instructions to disable Network Extension as described in Troubleshoot NetExt issues in Microsoft Defender for Endpoint on Mac. This causes Network Protection, Web Content Filtering, and IP address/URL Indicators to be nonfunctional.” There are similar warnings from VPN providers and vendors of security software.

That brings me to draw attention to one of the known limitations in Sequoia 15.0. There have been widespread reports of problems with networking, many attributable to the software firewall. Products across a wide range of vendors are affected, and many simply can’t function properly in Sequoia.

Upgrade games are dangerous too. Many of us use our Macs to work, not just for leisure. Upgrading to face problems that prevent productive work has serious consequences. It’s not as if reversing a macOS upgrade is a trivial and brief process. For good security reasons, modern macOS makes it hard and time-consuming, and for most it involves preparing a bootable installer of a previous known good version, and replacing Sequoia with that. In some cases that may require migration of all user data from a backup, adding further risk to the process. In many cases, downgrading will take several hours before the user can resume their work.

I faced my own problem, which has had significant impact on writing articles for this blog. This was an inconvenient time for me, as last week I’ve been writing a tutorial and my regular monthly section for MacFormat and MacLife magazines, while trying to maintain my average of two full articles every day for this blog. Troubles never occur when you’ve got the time to deal with them.

This blog is hosted in WordPress at WordPress.com, but written and maintained using Red Sweater’s outstanding MarsEdit. When I upgraded my iMac Pro to Sequoia on 16 September, MarsEdit started unexpectedly quitting in the midst of my editing articles. I sent Red Sweater an automated bug report, although at that stage I didn’t have a clue what was the cause of the problem. Daniel Jalkut from Red Sweater got back to me within a few hours to follow up, and within a further hour had reproduced and identified the bug. It only affected Intel Macs, is new to Sequoia, and he had already reported it to Apple, although it clearly hadn’t been fixed in the 15.0 release.

I was stuck in Sequoia – my two articles required me to be running it, and no substitute was possible – but editing blog articles was like playing Russian roulette. For a few days, I did most of my editing in BBEdit, pasting completed articles into MarsEdit once they were ready to upload. Then Daniel Jalkut came up trumps with an update to MarsEdit that worked around the bug in Sequoia. Just as I had dispatched my two articles for publication, and was about to write those for this weekend, everything returned to normal. It was a reminder of how troublesome a first release can be, and how much we rely on the skill and knowledge of third-party developers like Daniel from Red Sweater.

I’m sure that Apple’s engineers understand full well the dangers of precipitate upgrading, and many will be just as concerned at the marketing thrust to cajole and trick users into upgrading without making an informed decision that it’s a wise move. So when macOS notifies you that your upgrade to Sequoia is “ready”, don’t assume that your Mac has downloaded it and is poised to automatically install it whether you want to upgrade or not. Chances are that the upgrade is only “ready” on Apple’s software update servers, and you can safely let it stay there until you’re ready to upgrade as a choice, not a compulsion. However much I might enthuse for early upgrading, it requires voluntary informed consent, please, Apple.

What should you do when an update goes wrong?

Even the smallest of updates to macOS or its security components can leave your Mac in a mess. Once those feelings of panic are subsiding, what should you do next?

Boot loop

There’s one emergency situation that happens on rare occasions after a failed firmware update: a boot loop, in which the Mac tries to start up, hits a kernel panic early, so tries to restart again, and continues in that loop. If that happens, press and hold the Power button until it shuts down, and refer to this article.

Restart, Safe mode

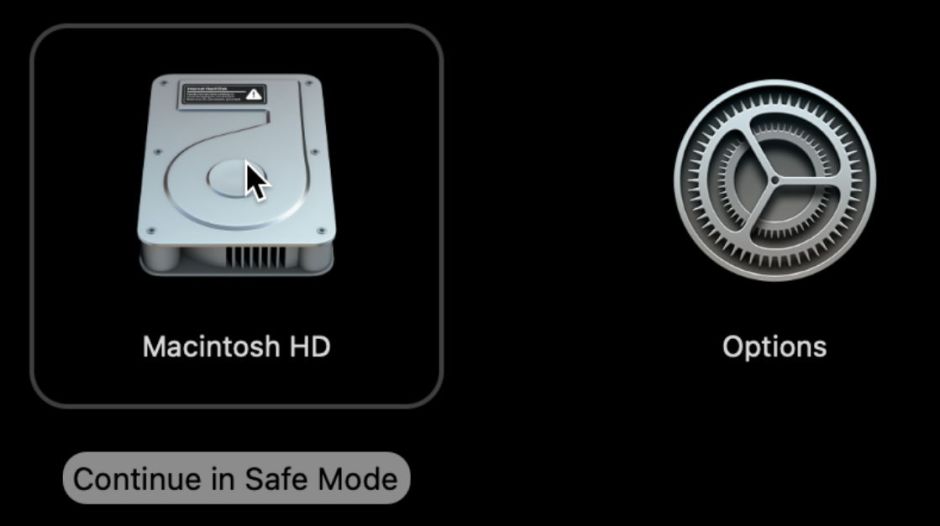
Otherwise the first thing to try is simply restarting your Mac normally. If that proves a problem, or things are still awry, try Safe mode. On an Apple silicon Mac, shut it down, wait ten seconds or so, then start it up in Recovery, select the disk to use for Safe mode, hold the Shift key, and click Continue in Safe Mode.

recovery02

On an Intel Mac, hold the Shift key during startup.

Once running, leave your Mac for a couple of minutes, then restart in normal mode, with your fingers tightly crossed.

Sometimes Safe mode works fine, but as soon as you return to normal mode everything goes wrong again. That’s a good indicator that something you have installed is at fault, rather than the macOS update, although it’s normally a combination of both working against one another. You now need to hunt down the third-party software that has become upset by the update, and either update or remove it.

If Safe mode either doesn’t help, or you can’t even enter it, then your Mac’s problems could be from the macOS update itself or something third-party, and teasing them apart isn’t going to be easy. This is when you should, for the first time, ask yourself whether you want to return to your previous version of macOS without the update, or try to fix what you’ve got. You can change your mind later, but this is a key question that determines what you do next.

Reinstall

Until Big Sur, the next step for those wanting to stay with the update was to install it differently, most commonly using the Combo update, because that contained all the changed components since the first release of that version of macOS, but was smaller and simpler than a full installer. Because of the way that macOS is now installed into a Signed System Volume (SSV), actually a snapshot, this is no longer available, and the only alternative beyond the update that brought your Mac’s problems is a full installer.

Before going any further, bear in mind that macOS booted from an SSV is very different to that of the past. Macs with T2 and especially Apple silicon chips verify the contents of the SSV down to the last bit, and they’re checked against what Apple considers to be a ‘perfect install’. So the incomplete or broken updates of the past simply can’t happen with an SSV, which is guaranteed to be perfect as Apple intended. Installing another identical copy of that is therefore most unlikely to change anything.

Simplest is to start up in Recovery mode and re-install the current version of macOS, which should by now be the version you’re trying to run. When you do that, ensure you install to your current Volume Group so that the existing Data volume is connected up with the fresh System volume. Because that may not always work, before starting this journey, ensure you’ve got a full copy of your Data volume. Carbon Copy Cloner is an excellent tool for doing that if you don’t already have a full Time Machine backup.

There are variations too, although these bring greater risk that your current Data volume will get trashed or ignored. You can download the latest installer app from the App Store, or in Terminal, which gives you a more precise choice that’s essential should you want to downgrade. The following command lists available macOS installers:
softwareupdate --list-full-installers

Currently, that list includes for Intel Macs:

  • Sequoia 15.0,
  • Sonoma 14.7, 14.6.1, 14.6, 14.4.1,
  • Ventura 13.7, 13.6.9, 13.6.8, 13.6.6,
  • Monterey 12.7.6, 12.7.4,
  • Big Sur 11.7.10,
  • Catalina 10.15.7, 10.15.6,
  • Mojave 10.14.6,
  • High Sierra 10.13.6.

You can then use a command like
sudo softwareupdate --fetch-full-installer --full-installer-version 11.7.7
to download the installer of your choice.

For an even wider choice, visit a site such as Mr. Macintosh.

This article explores other options in detail.

If you install macOS afresh with your existing Data volume and the problems persist, then it’s most likely they result not from any error in the system update, but in third-party software. You can then rip out all third-party extensions and anything from your apps that persists, until you find the offender.

Revert to previous

Returning to a previous version of macOS isn’t an easy option after you’ve performed a macOS update. There’s no secret Roll Back button, and you’ll have to perform a fresh install of that older version of macOS, ensuring that hitches up with your existing Data volume. If the latter part doesn’t work, be prepared to migrate from a backup into a fresh Data volume.

Intel Macs have one significant limitation here: firmware. While you can roll the system back, you can’t return an Intel Mac’s firmware to a previous version. So if the problems you’re encountering are firmware-related, your Intel Mac is out of luck.

Apple silicon Macs can readily be reverted to older firmware, by putting them into DFU mode and restoring an older version of macOS complete with its firmware, using Apple Configurator 2. You’ll need another Mac to run that free app (from the App Store), and the first time you do this is daunting, but it’s a valuable feature that can recover from apparent disaster.

Apple Support

If your Mac suffers any significant problems after a macOS update, don’t be afraid to contact Apple Support. Sometimes updates have serious failings with specific models, and only Apple Support is likely to discover this, and offer a way forward. Otherwise, I wish you success diagnosing and fixing your problems.

Summary

  • If in a boot loop, press and hold the Power button to shut down.
  • Otherwise restart the Mac.
  • If necessary, start up in Safe mode, wait a couple of minutes, and restart in normal mode.
  • Consider reinstalling that version of macOS.
  • Reverting to a previous version is a slow and hard process.
  • Consider contacting Apple Support.

Apple has released macOS 15.0 Sequoia and security updates to 14.7 and 13.7

As promised last week, Apple has released the upgrade to macOS 15.0 Sequoia, together with security updates to bring Sonoma to version 14.7, and Ventura to 13.7. There should also be Safari updates to accompany the latter two.

The Sequoia update is around 6.6 GB for Apple silicon Macs, and 14.7 is around 1.6 GB. For Intel Macs, 15.0 is around 4.9 GB as an ‘update’, and 14.7 is around 860 MB.

Security release notes for Sequoia list around 77 vulnerabilities addressed, including two in the kernel, none of which Apple is aware may have been exploited in the wild. Release notes list 36 vulnerabilities addressed in Sonoma 14.7 here, and there are 30 listed for Ventura 13.7 here.

iBoot firmware is updated to version 11881.1.1, Intel T2 firmware to version 2069.0.0.0.0 (iBridge 22.16.10353.0.0,0), and Safari to 18.0 (20619.1.26.31.6).

After completing the upgrade to 15.0, you are likely to see that the installed XProtect version is 0, in other words that there is no XProtect data. You can leave your Mac to automatically download the required data from iCloud, or manually force it using the command
sudo xprotect update
then entering your admin password. That will normally ‘activate’ the XProtect data previously installed, and set the version to 5272, although that will then need to be updated to 5273 separately. Don’t be surprised if you end up repeating the trip to Terminal to get this to work.

If you use .NET, you may wish to delay upgrading to Sequoia: see this article for further details. Thanks to Raoul for pointing this out.

Last updated 0810 GMT 17 September 2024.

Looking ahead to Sequoia’s updates

Later today, Apple is expected to release macOS Sequoia 15.0. For those interested in planning their immediate or delayed upgrade, these are my forecast dates for its minor versions over the coming year. Like all the best weather forecasts, this is most accurate for the next 5 days, and those for further into the future are likely to be decreasingly reliable.

Minor version release dates for Sonoma have been broadly similar to those of others since Big Sur:

  • 14.0 – 26 September,
  • 14.1 – 25 October,
  • 14.2 – 11 December,
  • 14.3 – 22 January,
  • 14.4 – 07 March,
  • 14.5 – 13 May,
  • 14.6 – 29 July,
  • 14.7 – 16 September.

Ventura differed mostly because it had a later start date to its cycle, in October, resulting in the delay of 13.1 until December. Subsequent versions thus trailed Sonoma by one, for example with 13.5 on 24 July, against 14.6 on 29 July. Although Apple is believed to have some flexibility in the release dates for minor updates, the timetable for the cycle appears to be fixed well in advance, and is probably already at least pencilled in for Sequoia.

Most minor updates bring new versions of firmware, the kernel and key kernel extensions such as APFS. In between those may be patch updates to fix serious bugs or security vulnerabilities that can’t wait for the next minor version, such as 14.3.1 on 8 February, two weeks after 14.3 and a month before 14.4.

According to Apple’s release notes, the current release candidate for 15.0 has no significant bugs that remain unfixed, and we hope that remains the case.

15.1: October 2024

Apple has already announced that this first ‘minor’ update will bring its AI features, including most significantly Writing Tools. Although those have been in beta-testing for almost as long as 15.0, in terms of changes, the step from 15.0 will in many ways be greater than that from 14.6 to 15.0. However, that only applies to Apple silicon Macs that support AI.

For all Macs, this is likely to bring fixes for some more substantial bugs, although because of the short interval between 15.0 and 15.1, few are likely to be addressed until 15.2.

This update is likely to coincide with new Mac products launched at an as-yet unannounced Mac event in October, where Apple is expected to promote its new M4 Macs as being ‘made for AI’, much in the way that it did last week with the iPhone 16 range.

15.2: December 2024

Turnaround time fixing even straightforward high priority bugs makes it likely that most in 15.0 will be addressed not in 15.1 but 15.2, before Christmas. This will also catch the first fixes and any additional enhancements required by AI, so may well be one of the more substantial updates this cycle. The aim is to give engineering teams a chance to catch up with the vacation without leaving too much to await their return in the New Year.

15.3: January 2025

This update is largely constrained by the effects of the Christmas vacation, but should enable most issues arising in 15.0 and 15.1 to be fixed, leaving Sequoia running sweetly.

15.4: March 2025

This is the major mid-cycle update, that is most likely to contain new and enhanced features, often making it the largest update of the cycle. Apple also seems to use this to introduce initial versions of new features intended to become fully functional before the end of the cycle. One example of this was XProtect Remediator, released on 14 March 2022 in Monterey 12.3, but not really functional until June that year.

Unfortunately, these enhancements can also cause problems, and this update in March has a track record of sporadic more serious bugs, including the occasional kernel panic.

15.5: May 2025

A month or so before the first beta-release of the next major version of macOS, this normally aims to fix as many remaining bugs as possible, and progress any enhancements introduced in the previous update. If you’ve reported a bug before April, then if it’s going to be fixed in this cycle, this is the most likely time; any new bugs reported after this update are most likely to be carried over to the next major release.

15.6: July 2025

This really is the last chance for fixes and feature-tweaks before the next major version is released in September. If all is working out well, this should be the most stable and bug-free release, although in some years late changes have turned this update into a nightmare, and Sonoma required a patch update in early August to address those.

When best to upgrade?

If third-party software, hardware and other compatibility requirements don’t apply, there’s no way to predict which is the best version to choose as an upgrade from previous macOS. Every version contains bugs, some of them may be serious, others may be infuriating and intrude into your workflows. But those aren’t predictable. If you’re unsure, wait a few days after a minor update, or even 15.0, check around with others, and decide then. If you’re really cautious and have an Apple silicon Mac, I suggest you might like to consider upgrading a week or two after the release of 15.1, by which time most of any major issues with 15.0 and AI should have come to the surface.

For myself, I already have my designated beta-testing Mac, a MacBook Pro M3 Pro, running 15.1 beta, and my other three Macs (iMac Pro, Mac Studio M1 Max and MacBook Pro 16-inch 2019) will all be running 15.0 by midnight tonight, I hope. I’ll let you know how I get on.

Last Week on my Mac: 15.0 or wait for 15.1?

It’s strange to think that, as we’re wondering whether and when to upgrade to Sequoia, Apple’s engineering teams are already at work on macOS 16. While they’re thinking out what we’ll chew over next summer, you may well be asking if you should upgrade to 15.0 next week, wait for the AI features coming in 15.1 next month, or leave your decision until 2025?

For those with Macs and iPhones that can both be upgraded, iPhone Mirroring is probably the most obviously attractive new feature. It completes the integration of Continuity, and could transform your workflows. Fortunately for such a key feature, it should work with all supported Macs, not just Apple silicon models. There’s one small and temporary disappointment, though, as drag and drop between Mac and iPhone isn’t expected in 15.0, but in an update “later this year”.

The new Passwords app should spare you from wanting to pay for a third-party password manager. This is much more than just shelling out the existing Passwords feature from Safari and System Settings, and at last gives full control over passkeys and other shared secrets in your Keychain in iCloud.

Although some see Sequoia’s new dislike for apps that aren’t notarized (or from the App Store) as an unnecessary burden, for most of us this will raise the bar against running malware and increase our margin of safety. It has been some time since any malicious software has been successfully notarized, and most of the current epidemic of stealers aren’t even signed with a Developer certificate. Instead, they usually prompt the user to open them using the existing Finder bypass, something that no longer works in Sequoia without explicitly and individually giving permission to that app in Privacy & Security settings.

It will be interesting to see how malware developers respond to this challenge, as trying to give the user detailed instructions as to how they can be run without being blocked by Gatekeeper should now arouse the suspicion of even the most careless and inattentive.

While we’re on the subject of security, remember that Sequoia is now the only version of macOS that gets full security updates over the coming year. While Sonoma and Ventura will still get some, if you want the lot then you’ll need to upgrade. Monterey, of course, now gets none at all. This gets more brutal when considering other bugs that aren’t relevant to security: those will only be fixed in Sequoia, not even in Sonoma.

For those who virtualise macOS on Apple silicon, support for Apple ID gives VMs access to iCloud Drive at last, although it stops short of enabling the App Store or its apps, so isn’t as useful as it should have been. There are two important restrictions to this:

  • Apple ID can only be used in a Sequoia guest running on a Sequoia host, and
  • the Sequoia VM has to be built from a Sequoia IPSW file, and can’t be upgraded from a Sonoma or earlier VM.

As long as your Mac stays with Sonoma, you won’t be able to use Apple ID in any of its VMs, including Sequoia. This still leaves us with the paradox that Apple wants us to buy and run apps from its App Store, but VMs are the one place where you can’t use them.

Among the less prominent improvements that have caught my attention are a timed messaging feature of Send Later in Messages, and a batch of improvements in Freeform. If you’ve come to like that relatively new app, you should find Sequoia worth the effort. I’ve also been impressed to see one of the oldest bugs remaining in the Finder has finally been addressed in macOS 15. I’ll be putting the bunting out in celebration after I’ve upgraded on Monday.

As with Sonoma, some of the most important new features haven’t been documented even for developers. Among those are changes to XProtect in terms of its updating and management, and speculation as to how that might affect its function. As I have explained, XProtect’s detection rules have grown enormously over the last few months, and it’s likely that Apple intends improving how XProtect can apply its Yara rules, and making their updating more efficient.

Finally, Sequoia is almost certainly going to be delivered as if it were an update, and won’t download its installer app unless you’re upgrading from a significantly older version of macOS, just as has happened in all recent macOS upgrades. Remember that upgrading macOS these days comes with a one-way ticket: changing your mind afterwards will cost you a lot of time and messing about to step back to Sonoma. However, accidental upgrades shouldn’t be feared. For instance, if you inadvertently click the Install all updates button in SilentKnight and want to reverse that for a macOS update, let the download complete, shut down, start up in Safe mode, wait a minute, then restart in normal mode.

Whatever you choose tomorrow, I hope it works well for you. And in case you’re wondering, if you’ve got an Apple silicon Mac, you’re going to love 15.1.

Updating macOS with an Installer and in Recovery

With macOS Sequoia fast approaching from the horizon comes the question as to how to upgrade and update, whether to Sequoia or one of its recent predecessors. If you’re happy to go with what Software Update offers, then that’s usually simplest and most efficient. This article considers what you should do if you want something different, from updating to any previous version, to using a single installer to update several different Macs.

Procedures given here should work with all versions of macOS from Monterey onwards. They may work too with Big Sur, but its installers weren’t always as reliable, so you should there be well-prepared to have to migrate from a backup in case the installation creates a fresh, empty Data volume instead of firmlinking up to your existing one.

Which installer?

As Apple discontinued standalone updater packages when it introduced Big Sur, the choice now is between downloading the full Installer app, and performing the process in Recovery mode. The latter severely limits your choice to what it’s prepared to offer, so you’re almost certainly going to need to obtain the full Installer for the version of macOS you want. Rather than use the Installer app provided in the App Store, download the Installer package from the links given by Mr. Macintosh. Those provide a package that’s easier to store and move around, unlike the Installer app itself. It will typically be a little over 13.5 GB, and works on both Intel and Apple silicon Macs.

Standard procedure

As with any update or upgrade, first ensure you have a full recent backup before starting. If anything does go wrong during the procedure you’ll then be able to perform a fresh install and migrate from that backup.

Unless you want to install everything afresh and migrate from your backup, don’t try erasing either your System or Data volume. You’d have to do that in Recovery mode anyway, limiting your options as to which version of macOS you can install unless you create a bootable installer first.

Double-click the installer package to launch it in the Installer utility. The default is to save the Installer app to your current Applications folder, which should work fine as long as you remember to delete it once you’ve finished. Once complete, launch that Installer app and follow its instructions.

sininstall2

When macOS restarts at the end of the process, check the version now running, confirm that your Data volume has survived intact, and run SilentKnight to ensure that all security data files are up-to-date.

Recovery

Intel Macs have a slight advantage when it comes to installing macOS in Recovery mode, as depending on the keys held during startup, you should be able to coax a choice of versions out of an Intel system. Unless you simply want to install or update to the current version, though, you’ll probably want to avoid doing so in Recovery.

sininstall3

There’s another good reason for not using Recovery, in that delivery of installers to Macs running in Recovery can be painfully slow, and you may well be in for a longer wait than if you downloaded the Installer direct.

However, if you want to erase the current boot volume group on your Mac’s internal storage so you can install a fresh copy of macOS and restore the contents of its Data volume from backups, Recovery is normally the best place to do that. Apple works through the process for Intel Macs, and Apple silicon models. The key step is to select the Macintosh HD boot volume group and click on the Erase tool to perform Erase Volume Group.

When the SSV was first introduced in Big Sur, there were many problems resulting from erasing just one volume in the boot volume group. If that happened to be the System volume, when macOS was installed it created a new firmlinked Data volume, leaving the existing Data volume as an orphan. That was usually done in a misguided attempt to have a fresh install of the System volume and SSV while keeping the existing contents of the Data volume, but doesn’t do that. Every installation of the SSV in any given version of macOS since Big Sur is identical, so it isn’t necessary to erase it, but simply to install or update macOS.

Bootable installer disk

Another traditional way to install macOS is using a bootable installer disk, normally a USB ‘thumb’ drive, although you can also create a small HFS+ volume for the purpose on an external SSD. Apple provides detailed instructions for doing this using a range of versions of macOS.

In many cases, installing a version of macOS older than the one that’s currently running requires this, as old Installers usually fail to run in newer macOS. Unfortunately, on Apple silicon Macs, this isn’t the powerful tool that it once was, as the Mac doesn’t boot fully from the external disk, and as a result it has no role in dealing with problems with internal storage.

Virtual Machines on Apple silicon

Installer apps and Recovery installs both work fine in virtual machines running on Apple silicon hosts. However, there’s one special circumstance you need to beware of. One of the major new features in virtualisation in Sequoia is support for iCloud and some other services dependent on Apple ID. If you want to use those, then the VM must be created new in Sequoia, using a Sequoia IPSW image. You can’t update or upgrade an existing VM from a previous version of macOS and use iCloud services in it.

Summary

  • If you can, use Software Update to update or upgrade macOS, as it minimises download size and is simplest.
  • If you want to perform a different update, or run one installer on several Macs, download and use the appropriate Installer package.
  • If you want to erase the existing system including all your data, use Recovery mode to erase the whole volume group, then install macOS and migrate from your backup.
  • Never erase only your Mac’s System volume, as that will orphan its current Data volume.
  • If you want to downgrade to an older version of macOS, you’ll probably need to do so from a bootable installer disk.
  • If you want a VM to use iCloud, then create a fresh VM using a Sequoia IPSW, as an upgraded VM can’t access iCloud.

❌