Reading view

There are new articles available, click to refresh the page.

Check Writing Tools using AIR

Apple has made great play over the privacy provided in its new AI tools. If you’ve just updated your Apple silicon Mac to Sequoia 15.1 and are wondering how you can check on this for Writing Tools, this article explains how.

aisettings1

When running on a capable Mac, with an M-series chip, macOS captures details of all AI use in its Apple Intelligence Report (AIR). Control and access that from its new entry in Privacy & Security settings, where you’ll find it towards the end, just above the final Security section. Open that, and you’ll see you can set the Report Duration to 15 minutes, 7 days, or turn it off altogether. As report sizes can grow quickly with a little use of Writing Tools, I suggest you start off with 15 minutes, or you might get overwhelmed.

aisettings2

When you want to browse a report, simply click on the button to Export Activity, and save the AIR report.

Apple Intelligence Reports are written out to JSON files that can be viewed using a text editor if you don’t have a specialist JSON editor. They’re usually bulky, and much of their content may be encoded binary that’s of little meaningful use. However, at the start you’ll see a series of modelRequests.

Each modelRequest begins with the timestamp of the request, given in decimal seconds since 1970. That’s followed by a UUID, information on the prompt template used, and shortly after that is the text that was extracted and used by Writing Tools. For longer passages of text, you may see that it’s divided up into a series of shorter sections that match the paragraphs given in a summary.

After that input text, the language localisation is given, currently en_US as other variants and languages won’t be available until macOS 15.2 later this year. Next, the response is provided, as inserted into the Writing Tools or text window. That section ends with:

  • model, the name of the AI model used, such as com.apple.fm.language.instruct_server_v1.text_summarizer, and the version.
  • clientIdentifier, such as com.apple.WritingTools.xpc.WritingToolsViewService for normal use of Writing Tools in an app.
  • executionEnvironment, currently expected to be PrivateCloudCompute, which tells you where the AI processing took place.

After the list of modelRequests, you’ll probably see a long series of privateCloudComputeRequests full of incomprehensible data for sepAttestations and provisioningCertificateChains, part of the validation information for use of PrivateCloudCompute. If this all seems a little long-winded, try looking in the logs when Writing Tools are in use!

I’m very grateful to Tim, who has drawn my attention to these reports, and points out that use of PrivateCloudCompute appears confined to macOS at the moment. A similar report is also available for iOS 18.1, but iPhones don’t appear to rely on PrivateCloudCompute in the same way.

We must remember that, while Apple considers Writing Tools now ready for general use, it’s still officially a beta-release, and over the coming months is likely to undergo significant change. This poses the question of whether Writing Tools will run on-device in the future, something only Apple can answer. What appears to happen at present is that the only local processing that takes place is tokenisation of text to prepare it for remote processing using Apple’s PrivateCloudCompute service, which actually performs the heavy lifting before returning its results to the Mac. However, macOS also appears to wake up the slumbering Neural Engine (ANE) for most Writing Tools services. Why that happens remains a mystery.

If you want to watch progress as AI features develop in macOS, you may find Apple Intelligence Reports a useful way to track that. If you do come across entries that seem to have used on-device services instead of PrivateCloudCompute, please let us know.

What has changed in macOS Sequoia 15.1?

The macOS 15.1 update is the first scheduled update since Sequoia’s release last month, and brings with it a great many fixes as expected. From user reports, it’s believed to complete correcting problems reported with networking in 15.0, some of which were addressed in 15.0.1, although Apple hasn’t confirmed that.

Apple’s release notes are helpfully more detailed than usual, and include the following:

  • new Writing Tools, but only for Apple silicon Macs set to US English as their primary language, with Siri also set to US English,
  • a new-look Siri with Type to Siri for those who don’t want to talk to it, richer language understanding and context, and Apple product knowledge,
  • Photos can find by description, and now features Clean Up to remove unwanted parts,
  • Notifications has summaries, and a new Reduce Interruptions focus,
  • Mail and Messages have Smart Reply for suggested responses,
  • Notes has transcription summaries,
  • iPhone Mirroring now supports drag and drop.

To clarify the requirement to get Writing Tools and other AI to work, the Mac must have an Apple silicon chip (M1 to M4), and:

  1. in System Settings, General, Language & Region, the Primary language must be set to English (US), although any other language can be set secondarily, and made the current language in the keyboard menu, and
  2. in Apple Intelligence & Siri, the Language set for Siri Requests must be English (United States), although you can turn Listen for Off if you don’t want to converse with Siri vocally.

Once those are set, you should be able to turn Apple Intelligence on. There will then be a short period on the waiting list, for macOS to download the additional models required. You’ll be notified when it’s ready to use.

Security release notes are available here, and list 50 entries, none of which Apple suspects may already have been exploited.

iBoot firmware on Apple silicon Macs is updated to version 11881.41.5, and T2 firmware to 2069.40.2.0.0 (iBridge: 22.16.11072.0.0,0). The macOS build number is 24B83, with kernel version 24.1.0. There are no firmware updates for Intel Macs without T2 chips.

Significant changes seen in bundled apps include:

  • Books, to version 7.1
  • Freeform, to version 3.1
  • iPhone Mirroring, to version 1.1
  • Mail and Messages, large build increments
  • Music, to version 1.5.1
  • News, to version 10.1
  • Passwords, to version 1.1
  • Photos, large build increment
  • Reminders, large build increment
  • Safari, to version 18.1 (20619.2.8.11.10)
  • Shortcuts, large build increment
  • TV, to version 1.5.1
  • Tips, to version 15.1.

Inevitably, there are many build increments in components related to Apple Intelligence. Other significant changes to /System/Library include:

  • Audio/Plug-Ins/HAL MacAudio driver, to version 510.2
  • CoreServices Desk View app, to version 2.0
  • CoreServices Siri app, to version 3401.24.3.14.7
  • Significant changes across many AGX and AppleEmbeddedAudio kernel extensions
  • A new AppleT8140 kernel extension
  • APFS is updated to version 2313.41.1
  • Many public frameworks have updated build numbers, among them FileProvider
  • A new ImagePlayground public framework, which has moved from being private, in anticipation of the new app coming in macOS 15.2
  • Many private frameworks have substantial increments in build numbers, particularly Biome, Cloud, Email, Mail, Photo, Photos, Spotlight and FileProvider
  • A new DesignLibrary private framework.

Although this isn’t a particularly large update, it does come with the first wave of AI features, and a wide range of other improvements and bug fixes.

Updated 2030 GMT 1 November 2024 with info on non-T2 Intel firmware updates.

Apple has released macOS Sequoia 15.1, and security updates to 14.7.1 and 13.7.1

As expected, Apple has released the update to macOS 15.1 Sequoia, together with security updates to bring Sonoma to version 14.7.1, and Ventura to 13.7.1. There should also be Safari updates to accompany the latter two.

The Sequoia update is around 2.9 GB for Apple silicon Macs, and about 2.4 GB for Intel models.

As expected, this brings the first release of Writing Tools, in the first wave of new AI features, only for Apple silicon Macs using US English as both their primary language, and that set for Siri. Apple hasn’t got round to providing any list of new or changed features, and you may find that offered by Software Update is the same as for 15.0.

Security release notes are available here for 15.1, which has around 50 entries, here for 14.7.1 with around 39, and here for 13.7.1 with around 36.

iBoot firmware on Apple silicon Macs is updated to version 11881.41.5, T2 firmware to 2069.40.2.0.0 (iBridge: 22.16.11072.0.0,0), and Safari to 18.1 (20619.2.8.11.10).

I will post details of changes found later tonight.

[Updated 1820 GMT 28 October 2024.]

Last Week on My Mac: Writing Tools

Early this coming week those fortunate enough to have an Apple silicon Mac will be able to update Sequoia to version 15.1 and try out Writing Tools at last. I’ve been testing and using them since the first beta of 15.1 back when the daylight lasted well into the night. I’ve been surprised at how lukewarm some have been at their arrival, particularly as most of those comments have come from those who make a living from their writing.

Perhaps the best way to show what Writing Tools can do is with an example, using the text from yesterday’s article A brief history of Mac firmware, a little over a thousand fairly technical words. I concentrate here on Writing Tools’ summary modes rather than its rewriting features, although they’re also thoroughly sound and useful in the right context.

Summary

Producing a succinct single paragraph summary is a challenge for even the most literate of humans. I’m impressed with Writing Tools’ 62 word offering of:
Mac firmware has undergone significant changes, from the Macintosh ROM in Classic Macs to Open Firmware in PowerPC models and EFI in Intel Macs. EFI, later evolving to UEFI, provides hardware access and boot services, while Apple silicon Macs employ a verified chain of trust for enhanced security. Firmware updates are now integrated into macOS installers and updaters, ensuring security and accessibility.

Key points

With so much information in the original, a key point summary should provide a better reflection of my original thousand words. Rather than reproducing the full 250 words generated by Writing Tools, here’s an excerpt covering one of the more challenging sections:

  • Firmware Security Issue: Researchers demonstrated proof-of-concept attacks on Mac firmware, highlighting potential vulnerabilities.
  • Firmware Update Policy Change: Apple transitioned from separate firmware updates to delivering them through system upgrades and updates.
  • Firmware Security Concern: In 2017, Duo Labs researchers discovered many Macs running outdated firmware, raising security concerns.
  • Apple’s Response: Apple hired security researchers and developed eficheck, a tool to check and report firmware versions to Apple.

I don’t think I could better that.

List

The third type of summary suitable for that article is a detailed list. This strips everything else out to leave terse factual sentences. For the whole text, it reduces to 833 words, a reflection on its already dense information. You’re unlikely to want to use this with longer passages, but here’s the same section given as key points above:

  • In March 2015, two security researchers from LegbaCore demonstrated proof-of-concept attacks on the BIOS of several computers.
  • The attacks could have been used to implant malicious code.
  • Later that year, Kovah and Trammell Hudson turned their attention to Macs.
  • They demonstrated a firmware worm named Thunderstrike 2.
  • For the first nine years of Intel Macs, Apple had provided EFI firmware updates separately from updates to OS X.
  • In 2015, Apple changed the way that it supplied firmware, delivering it only as part of system upgrades and updates.
  • Although older separate firmware updates are still available, those were the last.
  • In 2017, Rich Smith and Pepijn Bruienne of Duo Labs discovered that many Macs were running outdated firmware.
  • Their concern was about the security risk posed by outdated firmware.
  • Apple had already been busy hiring Xeno Kovah and Corey Kallenberg who started work there in November 2015, and Nikolaj Schlej, another firmware security researcher, who joined them the following August.
  • They developed a new tool eficheck, released in High Sierra on 25 September 2017.
  • eficheck checked current firmware against a local database of versions known to be ‘good’, and with the user’s permission sent a report to Apple in the event that it found discrepancies.

Table

The fourth summary option is to generate a table. Unfortunately, my example wouldn’t produce a useful table without substantial additional knowledge. However, I’ve found this useful on long passages from fiction, where it can summarise relationships between different characters, and similar tasks.

On device and on target

Once Sequoia 15.1 has been released and I’ve had a chance to explore the internals of Writing Tools further, I’ll look at its processing and energy costs. Two important features distinguish it from other contemporary AI tools: all data remains on-device throughout, and it’s primarily using your text rather than a large language model built from vast quantities of text garnered from around the internet.

Privacy doesn’t generally worry me particularly, as much of what I write on Macs is destined in some way or another to be published, whether it’s in an article here, one in the magazines that I write for, or source code that will be built into apps. However, I do take exception to others making money out of my labours without my express consent, so I’ll generally be only too happy to keep my AI on-device.

I also think it’s important to draw a clear distinction between what Writing Tools offers, and the likes of ChatGPT. Now that I’m testing Sequoia 15.2 beta, I have been looking at that contrast. While you can’t ask Writing Tools questions (why would you want to when you have the whole text and its summaries?), I thought I’d see how ChatGPT answered one of my stock test questions for AI: what is the SSV?

At my first asking, ChatGPT didn’t have sufficient context, and told me that it’s a side-by-side vehicle, so I refined my question to what is the SSV in macOS?

Although much of its answer was correct and informative, the second sentence stated with complete confidence that the SSV was introduced in macOS Catalina, which is of course completely incorrect, as Catalina has a read-only System volume but not a Signed System Volume as was introduced in Big Sur. But you’d only spot that serious factual error if you already knew the answer.

Give me Writing Tools and my own fact-checking, thank you.

macOS Sequoia 15.1 next week

Apple provided developers with two Release Candidates of macOS Sequoia 15.1 this week. Provided there are no serious problems that come to light in the second of those, it’s likely that 15.1 will be released early next week, probably on Monday 28th. This article looks at what that brings, whether it’s safe to upgrade to Sequoia yet, and what comes next.

All supported Macs

Traditionally, the x.1 update is scheduled to be released about a month after the initial upgrade to a new major version of macOS, and brings with it the first wave of bug fixes, and a few features that weren’t quite ready in time.

Although there are reports of some other bugs in Sequoia, by far the most disruptive have been those affecting networking. Apple fixed the most serious of those in 15.0.1, released on 4 October, but some have continued to experience problems. Opinion from those testing betas of 15.1 are that it does resolve all those, and for the great majority should be ready for general use, provided that third-party apps are compatible. So if you normally wait for the x.1 version to be released before considering upgrading, this should fit the bill.

Apple does provide a list of fixes for developers, although as there’s no mention of any networking problems there, I suspect this isn’t of much help to users.

Apple silicon Macs

For those whose Macs run an M-series chip, the main interest in 15.1 is the first batch of Apple Intelligence features. Over the coming months, these should include:

  • Writing Tools, a suite of mainly on-device features for summarising and rewriting text.
  • Image Playground, producing synthetic images such as Genmoji, again using on-device methods.
  • Siri and related enhancements for user assistance, using on-device methods.
  • ChatGPT access, for more general AI features using text.
  • App-specific enhancement to Photos, including Clean Up, and others.

Of those, 15.1 brings Writing Tools and some other enhancements, but doesn’t bring Image Playground or ChatGPT. Although some have claimed that makes 15.1 little better, that understates the value and quality of Writing Tools for many.

Writing Tools should be accessible to pretty well any recent app that displays significant amounts of text. Although I haven’t intended the lower text view in SilentKnight to support them, Writing Tools are available there from the contextual menu (Control-click). They work great with all the text editors I have tested, including TextEdit, BBEdit, CotEditor, Pages, my Rich Text editor DelightEd, and even in my PDF viewer Podofyllin.

The initial release of Writing Tools in 15.1 does have language and regional limitations. It requires that your Mac’s primary language, as set in Language & Region settings, is set to English (US), although you can still switch to a secondary language such as English (UK) if you prefer. The other key control is in the new Apple Intelligence & Siri settings, where Siri’s language needs to be English (United States). As I don’t like Siri’s spoken interface, I have disabled that by setting the Listen for control to Off, and instead enabled a Keyboard shortcut to open Siri’s interactive window.

Apple has announced future support for non-US variants of English, and next year for other primary languages. However, Writing Tools still work excellently on British English, even that of Charles Dickens, with the settings described above.

When you have updated or upgraded to Sequoia 15.1, I suggest you download text versions of books by your favourite author(s) from Project Gutenberg and explore features in Writing Tools using those as prose sources.

Future Sequoia updates

Apple has this week released the first beta-test of Sequoia 15.2, with most if not all of the other Apple Intelligence features, including Image Playground and ChatGPT. Assuming testing proceeds well and there are no serious problems, this is likely to be released in the first couple of weeks in December. Although not confirmed yet, this should open supported languages to include most major regional variants of English.

Slated for next year is the extension of Apple Intelligence to cover French, German, Italian, Japanese, Korean, Portuguese, Spanish, Vietnamese, and others. However, these features aren’t likely to appear in the countries of the EU this year, and Apple hasn’t yet indicated when that’s expected.

For those concerned about on- and off-device AI and privacy, all the standard features of Writing Tools and Image Playground involve on-device processing, and don’t send your data to remote servers. If you choose to enable ChatGPT access, then that is handled off-device, but is opt-in, and requires a separate sign-in process to access either an anonymised free account or an existing ChatGPT account. You can also require confirmation of any Siri requests handled with ChatGPT before sending any information off-device.

Apple has already published a list of fixes in the first beta of 15.2, although it remains to be seen what it does for users.

M4 Macs

Apple has also signalled that it will be releasing new Macs next week, widely rumoured to be the first to use the M4 chip.

Summary

  • Sequoia 15.1 early next week, probably on 28 October, with Writing Tools in US English, and remaining networking bug fixes.
  • Sequoia 15.2 already in beta, probably for release in early December, with Image Playground, ChatGPT, and the remainder of this first wave of AI tools, including most other English variants.
  • Try Writing Tools out: I think they’re wonderful.

寻找适合的自建聊天工具

到现在为止,并没有找到最合适的解决方案(目前最靠谱的是 Nextcloud Talk 和 Voce Chat)。先把过程中考虑到的一些因素,记录下来,作为借鉴。

我的目的,是如何更便捷地,和墙内小范围的朋友、家人,保持联系,在对话中不受信息审查。现有的聊天软件,能够不翻墙使用的,几乎没有了,即使有,也不是长久之计。所以最靠谱的方式,大概只有通过一台海外的 vps,自建服务,供小范围的人使用。如果传播范围不大,除非 gfw 变成白名单,否则应该都可以长期使用。

下面是选择各种自建聊天工具时,会考虑到的因素。这些因素之间,有些是互相冲突的。对不同需求的人,在这些因素之间考虑的权重,也不一样。对于我上述的需求来说,

  • 不需要考虑的因素,用黑色显示;
  • 希望能有,但没有也无所谓的因素,用蓝色显示;
  • 非常希望能满足的因素,用绿色显示。

首先,我希望这是一个可以挂机的聊天工具,可以在收到信息时,从手机接收到通知;而不仅仅是个网页聊天室,只能在专门打开网站时,才能聊天:

  • 可以持续挂机,通过 app 或者「Chrome 把网站添加到桌面」的功能,实时接收来信通知
  • 除了手机外,也能在 pc 的浏览器里使用

要联系的人,并不擅长电脑技术和操作,因此

  • 不需要翻墙使用
  • 操作简便
  • 有中文界面

这些人,可能并不属于同一个群体。所以,需要为不同的人群,架设不同的服务地址,互相分开。

  • 在一台 vps 上,同时部署多个聊天服务。一些功能更加完善的聊天服务如 xmpp,因为需要独占端口,并不能满足这一点;

安全性方面:

  • 信息加密
  • 开源
  • 不和中央服务器连接,一些 self-host 的服务,会经常连接开发者的服务器,虽然只是检查升级或校验程序完整性,但还是看着心虚;
  • 完全通过域名交互,不向其它服务器暴露 ip 地址
  • 用户之间的私信,对管理员也不可见,否则,其实开个 fediverse 实例,可以满足这里很多条要求;
  • 用户之间不会互相暴露信息,譬如很多协同工作平台,可以互相看到所有用户的名单、email……

架设系统的便利程度:

  • 支持 docker + nginx 部署,或者直接放进 php 目录就能运行
  • 系统开销小,内存上 G 的那种就算了吧;
  • 不需要 mysql 等专门数据库,因为规模不大,sqlite 就足够了;
  • 能部署在网站的子目录下,不需要独占一个子域名;

对聊天功能的需求:

  • 是否要加入去中心化网络,和其它服务器的用户交流?对我来说,这不是必须的。而且这在部署的便利性、轻量级、安全性、同时部署多个服务……等方面,都会造成冲突;
  • 可以群聊,也可以一对一私聊
  • 可以传输文件;
  • 支持语音
  • 支持视频;
  • 注册过程简洁,可以由管理员直接生成账户;
  • 可以关闭对外注册

……………还有什么要补充的吗?


已经考察过的工具

其实最理想的,应该是一个 php 的聊天室……能通过 chrome 在手机桌面接收消息通知就可以。轻量化、可以塞到任何目录下、没有中文我自己汉化也可以。但是,真的没找到靠谱的…………求推荐!!!

ps,如果联系人有一定电脑常识,也懂英文的话,用 mycryptochat 做临时沟通,蛮好用的。

目前最合适的,是 Nextcloud Talk,用 docker + sqlite + nginx,是可以做到快速部署的;占用内存不到 300MB,勉强可以接受(所以开销更高的方案,基本不考虑了);而 nextcloud 作为一个庞大的办公平台,其 web 界面对于非技术人士,未免有些眼花缭乱。

xmpp 和 matrix 服务器,可以做到开销更小,但也在 100MB 以上,还涉及独占端口的调整,部署起来繁琐很多。似乎也可以把跨实例通信的功能关掉,做成封闭社区,配置和开销会简单一些。但还没仔细研究。

各种协同平台类,如 Mattermost、Rocket.Chat,系统开销过大,就算了。

这两年有个国人开发的 VoceChat 工具,评价很不错。可以 docker + nginx 部署,内存 30MB,有 web 界面和自己的 app。推荐大家可以试试。目前发现的一些问题:

  • 免费 license 有 20 个用户的限制。 问题不大;
  • nginx 不能反代到子目录,只能独占域名的根目录;
  • 可以看到其它用户的 email,但用邀请码注册的话,可以填假的,不用验证;
  • 最大的问题:VoceChat 的语音聊天模块,是外挂的 agora.io,——是著名的大陆运营商,当年 clubhouse 因此遭受很大质疑。所以,不要用它的语音功能谈关键的信息。进而,这个软件的文字聊天的安全性,虽然是开源,但使用官方 docker 时,也让人有些嘀咕了。

Telegram 中文搜索方案探索

因为过年忘记带上电脑的电源适配器,好久没有更新博客了。生活总是稀疏平常,随着时间的推移,愈发觉得有些东西其实寥寥数语就可以讲完,无需长篇累牍地写上一篇长文。或许这是频道写多的弊端,就像让习惯了微博的人去写博客一样,内心必然是比较抵触的。但博客这种载体好就好在文字可以随着时间沉淀下来,记录自己思考和成长的过程,快餐式的频道内容无法与之相提并论。

本文写在为频道部署按关键词索引的机器人之后,顺带盘点一下 IT 社群和自留地为了让大家更为迅速地寻找自己想要的内容,做过了哪些努力。请注意,并没有一劳永逸解决全平台群组和频道中文搜素问题的方案。由于我个人对索引群友发言存在精神洁癖,因此这篇文章的受众是 TG 频道主。

《Telegram 中文搜索方案探索》

Telegram 中文搜索现状

照例还是要啰嗦几句,讲讲我为什么要针对中文搜索下如此大的功夫。

Telegram 目前的搜索逻辑是根据「单词」来进行的,请注意这里的「单词」不一定是常见的单词,前后含有空格和标点符号则自成「单词」。譬如:Newlearner 如果写成“[空格] New lear ner [空格]”,那么在搜索中,你可以找到 New、lear、ner 这三个「单词」 。

这个搜索逻辑不可避免地带来一些问题,由于中文字与字之间是连贯没有空格的,如果你想要搜索某个历史关键词来找到之前的消息,可以说是很困难的。让我再次举例比较一下:

随着越来越多新朋友的加入,日聊天数量越来越多,有必要减少一些无关话题以保证群聊的高话题相关性。相关性不高的话题建议大家去对应群聊讨论

随着越来越多新朋友的加入,日聊天数量越来越多,有必要减少一些 无关 话题 以保证群聊的高 话题 相关性。相关性不高的 话题 建议大家去对应群聊讨论

可以看到第二段的“话题”一词前后都有空格,我如果想要搜索到这段话(群置顶),只需要搜“无关 话题”即可。而第一段话则搜索不出任何结果。九歌有一句鸽人鸽语叫做:“反正只要足够香,你的眼神就可以不要。”而我每次想要 forword,需要搜索“你的眼神就可以不要”才可以找到这句话。

那么中文搜索逻辑如此,含大量空格的英文搜素体验会好吗,或许如此。但 Telegram 的搜索始终做不到类似浏览器关键词那样的「拆词」,搜索“New”是找不到“Newlearner”的。和中文一样,很多小语种也被这套搜索的逻辑深深地困扰。

从 Telegram 搜索逻辑入手

所以 Telegram 中文搜索难用已成事实,我将从 Telegram 搜索逻辑入手,和大家分享一下我前期做过什么努力。

  • 为频道消息打 Tag
  • 频道群组聊天时,将关键词前后空格
  • 含有英文的句子中,将英文前后空格

通过以上步骤,就将「我记得某消息有个关键词叫…」的问题转化为「某消息我当时打了什么 Tag、其中是否含有关键词(英文)」。

这里附上一张我们不对外公开的、主编内部材料:自留地 Tag 列表(不完整)

《Telegram 中文搜索方案探索》

在实际操作的过程中,我们觉得自己需要这么一张 Tag 表,便于对消息进行一个大致的分类和便于搜索。但随着时间的推移,消息数量的累计,Tag 起到的只剩下一个分类的作用,且分类后消息数量依然庞大。不得不采用 Tag + 英文关键词这样的方式使这套机制正常运作。

因此弊端非常明显:

  • Tag 太多让读者无法自动联想和对号入座,有时候频道主编也不能。而过于宽泛的 Tag 带来的依然是海量的信息量
  • 空格是个好文明,但不是所有的群友和频道主都能在聊天和编辑频道内容中做到

基于此我们认为,脱离 Telegram 的搜索体系,采用全局爬虫才是这个问题的最优解,目的是实实在在地让大家通过「关键词」去探索频道内容或寻找之前消息。

手动整理的尝试

既然决定脱离 Telegram 这个搜索框架,我首先想到了自己的博客。博客是一个公开的内容展示平台,且可以配合浏览器进行无死角的关键词搜索。于是在去年12月份,我开始了艰难的手动频道内容整理,详见 Newlearnerの自留地导航页

《Telegram 中文搜索方案探索》

经过两天的手动整理,我把具有实用性的技巧、文章、源码、软件工具等收录到这个导航页,形式是标题+链接。关注自留地的老读者都知道,我们之前每天推送信息的数量较多,其中夹杂着大量的时效性、羊毛新闻等。这个导航页主要目的有二:提供一个简单的分类、便于读者们搜索。

网站上线以来,阅读量近 5K。说实话并不算很多,我认为一方面不是每个读者都有搜索的需求,另一方面打开网页搜索体验确实没有 Telegram 内直接搜索来得直接。

基于 Web 的搜索引擎

在今年1月份,为了进一步优化大家的搜索体验,我和 sssoou.com 站长达成合作,将自留地展示于首页便于大家勾选并进行搜索。这种网页爬虫+搜索引擎的方案我比较喜欢,使用起来也确实很方便。

《Telegram 中文搜索方案探索》

基于 Pyhton 的索引 Bot

上面的两套方案都跳出了 Telegram,转战浏览器,有些读者可能认为这样的体验不太好。因此近日我决心搭建一个关键词搜索 TG Bot,这样在兼顾体验的同时能够快速找出自己想要的消息。

方案选择

首先在 GitHub 上找到了几套方案:

由于无需细说的自留地和 IT 社群附属关系,我们打算为频道做一个关键词搜索机器人。相比第一个项目提供搜素结果展示/选择界面,第三个项目则直接将所有相关消息暴力 forword,因此体验很差。经过一番比较,我们决定使用 telegram-search 作为机器人搭建方案。

部署

部署过程中得到了开发者 EEYHN 的无私帮助,在这里先表示感谢。大致部署过程如下:

#申请机器人 && clone 到本地
git clone https://github.com/EYHN/telegram-search.git

#安装依赖
pip install -r requirements.txt

#修改 main.py && 创建 session 文件夹
mkdir session

#生成数据库文件
python main.py

#针对小内存机器,建立 Swap(1G),并
sysctl -w vm.max_map_count=262144

#修改 main.py 中 Docker 环境参数
ES_JAVA_OPTS=-Xms512m -Xmx512m

#安装 docker 相关环境并运行
docker-compose up -d

运行之后机器人会实时抓取频道消息,并使用 elasticsearch 建立搜索引擎,整个项目对内存大小有一定的要求。如果你想要修改结果展示的字数,可以在 main.py 中找到相关代码,默认值为 15 个字符。

使用

机器人使用的是 Lucene 查询语法,可以精准到关键字词、日期。很多朋友直接输入关键词,对结果产生了很多疑问和不满,这里也来统一解答一下。先举个例子,例如我需要查询含有“动森”(动物森友会)的频道消息:

  • 直接输入“动森”查询,会发现结果很多。这是由于未遵循查询语法,结果将含有“动”和“森”的所有消息全部列出。
  • 当根据语法要求,输入“+动森”,会发现结果依然很多。这是因为词库并不认为「动森」是一个名词,而将含有“动”和“森”的所有消息全部列出。
  • 因此正确的做法是,输入“+动 +森”,这表示搜索所有既含有“动”又含有“森”的消息。

《Telegram 中文搜索方案探索》

总结与其他思路

照例来一张表格做一个横向对比:

  基于 Telegram 框架 支持分类 按日期搜索 准确搜索关键词 备注
Telegram 自带搜索 对中文搜索不友好
Tag 与空格 操作难度大
自留地导航(博客) 人力付出多
Web 搜索引擎 精确但需要浏览器和站主收录
Telegram 索引 Bot 精确、基于 TG 但需要自学搜索语法和服务器开销

通过以上表格,相信大家对本文介绍的几种方案有了一个更直观的认知。在 Telegram 没有打算添加非英语语种的分词搜素措施前,我们应该不断寻找方法,改善群友和读者的搜索体验。最后附上我想到的其他思路:

  • 对于个人:Windows 端支持导出频道全部内容,将其放置于浏览器,并加以搜索即可
  • 对于群主/频道主:可以做一个关键词回复机器人,触发某关键词回复相关内容或者链接。但操作难度大、关键词并不明确且无法满足所有人的需求,只能做一些常用的,也称不上「搜索」或者「索引」

最后啰嗦一句,以上方案并不一定适合每位频道主,在信息累积到一定量之前简单的方法见效还是不错的。譬如我作为一个频道主,更新频率不高,每次更新完之后在 Notion 等处记录下 Tag、关键词和标题链接等重要信息,也可以做到自我索引。索引,既方便了自己,也方便了频道读者,因此非做不可。

希望以上内容为其他频道主提供一些有益的思路。更重要的是,让我们的读者了解到我们为了让大家有一个良好的搜索环境,做了哪些跨平台的方案。

Telegram 频道:Newlearnerの自留地 导航页

欢迎关注 Telegram 频道 Newlearnerの自留地 的各位!

四个月前,应群友建议,我决定创建一个频道,在其中分享一些东西。在当时,水群的聊天数量已经不少,分享进去的东西容易被刷屏以至于难以寻找。四个月过去了,我现在是一个 5K 频道的频道主,自认为我做了我喜欢做的事情而且还算有点成功。

但是最近我一直在思考一个问题:Newlearnerの自留地以 IT 资讯和分享为主,但由于更新频率较高,Telegram 对于中文搜索支持太差。因为消息众多,即使打了 Tag,寻找起来还是很困难。更不用说后来关注的朋友,不会知道频道前面发送过哪些内容,老实说有些内容我自己也不记得自己发过。

因此,我打算抽出一点时间,为我的频道做一个导航页。我将在本篇博文中按照不同分类(而非时间)顺序给大家整理之前发过的信息,并在每周末添加本周的信息作为补充。因此本文会越来越长,建议大家使用浏览器关键字搜索

《Telegram 频道:Newlearnerの自留地 导航页》

收录标准

按规矩我应该先说说哪些内容会被收录到本篇博文:时效性较弱的,具有实用性的技巧、文章、源码、软件工具等,不会收录时效性强新闻、羊毛消息、折扣消息、无厘头的碎碎念等在我的频道出现频率相对不算低的消息。有关 #Wallpers、#Keyboards 和 #Android 的内容可以通过 Tag 准确找到,这里就不再整理相关所有内容。

提醒各位频道主,发频道消息务必打 Tag,否则日积月累寻找起来难度十足。

下面,让我们开始,每个二级标题都是一个分类👇

Telegram

iOS

macOS

工具/软件/技巧

开源相关

XXX 和 TA 的 XXX 

音视频/流媒体

博客专栏

硬件相关

Refresh 周报

un.Block 区块链周报

Fabric 周报

科技新闻

VPS/代理/网络相关

每周觅食

准大学生数字生活指南

其他

最后的话

日积月累,自留地的内容数量不可小觑,初次整理内容花了我两天的时间。今后,我会每周整理并更新自留地的最新内容。

由于内容众多,分类也相对粗糙。有些消息其实可以放在多个分类,我根据自己的想法将其放在了最正确、最相关的分类。大部分消息是按照发布时间排序,也有少部分信息和之前的消息内容相关联,我就将它们放在了一起。大家使用时,可以在浏览器中搜索相关的关键词

是为导航,其实也是一个几个月来的总结。一路以来得到很多人的支持,这个频道也是社区共建共享的,感谢之情无法言表。这个由我手动整理的导航,希望能够给喜欢自留地的朋友们带来便利。

20.4.18 日更新:

在20年三月初,自留地迎来了一批优秀新主编的加入,我们也改变了以往零碎、众多且不定期发布消息的模式。一个人可能会爬得很高,但我深知只有一群人才能走得更远!

Hungrymark-书签化文件/网页/软件的macOS应用

大概在一周前我偶然得知了这个新开发的软件:Hungrymark,和它的名字一样,这是一个收藏怪专用的软件。借助 Hungrymark,我们可以将自己常用或者生僻难找的「网页/文件/软件」书签化收藏,并且方便随时调用。

今天来和大家分享下我是怎么用这款软件的,这也是本博客为数不多的软件介绍博文。主要是最近忙于 Telegram 频道和其他事宜,一心不能二用,博客更新放缓。

欢迎关注 TG 频道:Newlearnerの自留地

《Hungrymark-书签化文件/网页/软件的macOS应用》

简介与软件特色

Hungrymark 是一款能够快速访问你收集的网址、本地常用文件、文件夹、APP的软件。难得的是开发者并没有强调「效率工具」,这个词和「装机必备」一样让我反感

特色

1、收藏网址 / 本地app / 文件和文件夹
2、快速访问收藏的书签,文件书签可以直接运行,或者在finder中查看
3、访问web书签可以选择使用哪种浏览器
4、方便的访问本地磁盘文件,挂载在本地的网络磁盘(Samba共享服务,或者AFP共享服务等)
5、支持(多级)分组,组内可以使用分割线进行再分组
6、可以建立多个规则文件,譬如「工作」「家」「孩子」
7、提供选择本地文件路径,自动复制到剪贴板,方便的粘贴到书签文件中
8、配置文件采用类 Markdown 语法书写,简单易懂
9、菜单栏直接调用,方便快捷

v1.2 新增:
1、支持拖拽网页收藏
2、支持拖拽文件、文件夹、APP 收藏
3、添加悬停预览功能
4、支持浏览器(Chrome / Safari)书签导入
5、支持直接执行脚本书签

这款软件最能打动我的地方就是上手简单并且功能对口,个人不喜欢各种花里胡哨需要配来配去的「效率软件」,偏实用主义。此外这个规则的书写方式我也很喜欢,虽然 GUI 可能会更方便些。这让我想起了曾经 Surge 和 Clash 手动撸配置的日子。

TODO

1、 icloud 同步
2、文件预览
3、分组加密
4、浏览器插件
5、插件功能

针对新功能今后博客会随之更新,并用删除线划掉已经实现的功能。

如何使用

在 v1.2 之后,Hungrymark 才用了图形化交互方式,创建书签组和添加内容均可以通过拖拽等方式完成。因此以下 Markdown 文件的书写仅做参考,非必须。

纯文本配置规则

1. 注释以 “//”开头 (必须在行首,不能在元素中间)
2. 空行将被忽略
3. 组名之前必须有 “*”
4. 组里元素可以是书签或者是组
5. 书签项规则 : 文件路径或网址 + 空格 + 标题 (标题可以忽略)
6. 组元素必须用 Tab 或者空格缩进 (不要混合使用 Tab 和 空格)
7. 使用”—“来创建分割线

配置示例

// 简单示例
  /Applications/Calendar.app "Apple Calendar"
  /Applications/Calculator.app
  ---
  https://www.apple.com "Apple website"
  https://www.icloud.com
  ---
  https://www.bing.com "Bing search"
  https://www.xbox.com/ "Xbox official Website"
  ---
  /Applications/Skype.app
  "/Applications/Visual Studio Code.app"

// 分组示例
* "Apple Web & App"
  https://www.apple.com "Apple website"
  https://www.icloud.com
  ---
  /Applications/Calendar.app "Apple Calendar"
  /Applications/Calculator.app

// 多级分组示例
* "Microsoft Web & App"
  * "Web"
    https://www.bing.com "Bing search"
    https://www.xbox.com/ "Xbox official Website"
  * "App"
    "/Applications/Skype.app"
    "/Applications/Visual Studio Code.app"

在书写文件/文件夹/APP 路径时,尽量调用软件自带「获取文件路径」工具,因为这个软件的路径书写和 Terminal 不是很一样,尤其是带空格的软件。总的来说没有太高的技术要求,甚至可以直接用 macOS 自带的「文本编辑器」写。

写好之后保存配置,到顶部菜单栏 Hungrymark 图标处查看是否能正常显示:

《Hungrymark-书签化文件/网页/软件的macOS应用》

设置选项

  • 选择书签文件:针对不同的「场景」可以有不同的选择
  • 书签点击行为:直接打开文件/打开文件所在文件夹
  • 显示URL:显示/不显示文件、APP、网页的具体地址
  • 文件列表排序:支持按修改时间/创建时间/文件名升序/倒序排列
  • 默认浏览器:网页默认打开的浏览器,支持 Chrome / Firefox / Safari / 随系统设置

考虑到以后要加入更多的功能,我还是希望开发者能把这个设置单独做成一个弹窗界面显示,不过目前的这种菜单栏多层级显示和软件的主题很搭配。

我的配置

在购买之前我大概有了一个简单的规划:可以收纳一些相对不常用的 APP,配合 Dock 就不需要常去 Launchpad 到处找了。此外直接访问某个目录也很好,譬如我有访问 .ssh 和 Chrome 浏览器 插件crx 目录的需求,而他们要么需要手动取消隐藏,要么及其难找。然后就是搭配各种 Automator 使用,这个我觉得也可以再开一篇博文专门来讲

浏览器书签

《Hungrymark-书签化文件/网页/软件的macOS应用》

* "浏览器书签"
  https://www.newlearner.site "我的博客"
  https://www.newlearner.site/wp-login.php "博客后台"
  https://www.v2ex.com "V2EX"
  https://www.hostloc.com/forum.php "全球主机交流论坛"
  https://www.gcores.com "机核网"
  https://twitter.com "Twitter"
  https://www.zfrontier.com "装备前线"
  https://mail.yandex.com "Yandex"

都是一些每天需要访问的网页,有的因为信息量过大,強上 RSS 会爆炸。好处在于不需要去 Chrome 书签栏里面到处找,因为我的书签栏分层现象十分普遍(败笔)。

常用软件

《Hungrymark-书签化文件/网页/软件的macOS应用》

* "常用软件"
  /Applications/校园网登录.app "登录校园网"
  /Applications/Reeder.app "Reeder"
  /Applications/FinalShell.app "FinalShell"
  "/Applications/Moon FM.app" "Moon FM"
  "/Applications/Sublime Text.app"   "Sublime Text"
  "/Applications/Utilities/Disk Utility.app" "磁盘工具"
  "/Applications/Utilities/Script Editor.app" "脚本编辑器"
  /Applications/解锁Dock.app "解锁Dock"
  /Applications/锁定Dock.app "锁定Dock"

准确的说应该是「次常用软件」,我的 Dock 塞得够满了,朋友常常感叹这么小的图标怎么点。在里面我加上了日常要用的譬如文本编辑器和SSH工具,剩下的基本是一些 Automator 软件了,我觉得有必要简单讲一下。

Automator(自动操作)是 macOS 上面一个自动流程的工具,我们可以借助它做一些简单的小 app,譬如「校园网自动登录」「一键锁定 Dock」「一键关闭所有通知弹窗」「一键提取 iTunes 旧版 PKG」「一键生成 ISO 镜像」等,有些在前面的博文中讲过实现方式。

  • 拿「校园网自动登录」举一个例子,首先编写这个脚本:

#!/usr/bin/python3
# -*- coding: utf-8 -*-
 
import base64
import requests
 
USER_ACCOUNT='电话'
DOMAIN_SELECTION='CMCC/ChinaNet/Unicom'
USER_PASSWATD='密码'
 
#登录地址
post_addr="登录网址"
 
#构造头部信息
post_header={
    'Host': '登录域名',
    'User-Agent':'Mozilla/5.0 (X11; Linux x86_64; rv:55.0) Gecko/20100101 Firefox/55.0',
    'Accept': 'application/json, text/javascript, */*; q=0.01',
    'Accept-Language':'zh-CN,zh;q=0.8,en-US;q=0.5,en;q=0.3',
    'Accept-Encoding': 'gzip, deflate',
    'Content-Type': 'application/x-www-form-urlencoded',
    'X-Requested-With':'XMLHttpRequest',
    'Referer':'自己抓',
    'Content-Length': '67',
 
    'Cookie':'自己抓',
    'Connection':'keep-alive',
}
 
 
post_data={'domain':DOMAIN_SELECTION,
           'enablemacauth':'0',
           'password':base64.b64encode(USER_PASSWATD.encode()),
           'username':USER_ACCOUNT
          }
#发送post请求登录网页
z=requests.post(post_addr,data=post_data,headers=post_header)
#z.text为str类型的json数据因此先编码成byte类型在解码成unicode型这样就可以正常输出中文
s=z.text.encode('utf-8').decode('unicode-escape')
print(s)

接着放到固定的路径,在 Automator 中创建应用程序,选择「运行 shell 脚本」输入运行命令并保存为 APP。接着交给 Hungrymark 保存到书签,用的时候一点即可。

  • 再比如「一键关闭所有通知弹窗」,如法炮制即可:

//使用 applescript 运行

on run {input, parameters}
	tell application "System Events"
		tell process "NotificationCenter"
			set theWindows to every window
			repeat with i from 0 to number of items in theWindows
				try
					set this_item to item ((number of items in theWindows) - i) of theWindows
					click button 1 of this_item
				on error
					-- nothing
				end try
			end repeat
		end tell
	end tell
end run

因此我和我的朋友都认为这是一款「懒人必备」软件,它和其他软件相互搭配,可以玩出各种花样(证明你到底有多懒)。

文件目录

《Hungrymark-书签化文件/网页/软件的macOS应用》

* "文件目录"
  
  /Users/xxx/.ssh "SSH"
  /Users/xxx/Documents/Surge "Surge 配置" 
  "/Users/xxx/Library/Application Support/Mellow" "Mellow 配置"
  "/Users/xxx/Library/Application Support/Google/Chrome/Default/Extensions" "Chrome 扩展"
  /Users/xxx/uds "UDS"

选了几个典型而常用又及其难找的文件/文件夹,方便随时打开并编辑

总的来说

适合自己的就是最好的,这个软件做的事情就是「聚合」,把一些杂七杂八的东西整齐呈现在用户的眼前。这样在我们需要用到的时候就不用浪费时间多次寻找,我觉得有些「一劳永逸」的意思。

一块钱真的很良心了,开发者本来打算自用,家人用了之后也觉得不错并建议他上架,我们才得以见到一款优秀的 mark 软件。将来软件也会不断更新,加入新的功能。因此如果有这方面的需求,不妨支持一下。

个人来讲其实还有一个小小的建议:希望能够自定义应用中各项的 logo,因为有些真的大果粒感严重。

GoIndex - GoogleDrive直链目录索引网盘

本站一直采用  开发的 OneIndex 作为网站的分享网盘,今天和大家来说说 donwa 大佬的又一力作:GoIndex。从此,GoogleDrive 也有了免费的直链目录索引前端,可以直接分享给别人,也可以自己作为私密盘使用。感谢各位开发者的辛勤劳动。

当然,本文不会局限于 GoIndex 这个项目,同时也会和大家介绍一下类似的可用于谷歌云盘直链下载的前端、接口。

交流群:Newlearnerの水群

《GoIndex - GoogleDrive直链目录索引网盘》

简介

GoIndex,即 Google Drive Directory Index,是部署在 CloudFlare Workers 的程序,调用了rclone的接口。可以将 Google Drive 文件以目录形式列出,并直连下载。流量走 CloudFlare ,网速由 CloudFlare 决定。因此,该项目的可用性完全取决于 CloudFlare 是否提供免费的服务。如果将来 CloudFlare 上市之后取消了免费计划,那么该方案成本会上升一个台阶。

目前是测试版,页面的风格和 OneIndex 类似,但是作者没有做容错和缓存,也没有做管理后台。这些是可以通过添加一些代码来解决的,期待后续作者的更新。

9月9日更新:1.0.2版本,加入了添加前端文件缓存功能和文件预览功能(临时)

9月12日更新:1.0.6版本,加入新主题 classic

Github地址:https://github.com/donwa/goindex

Demo地址:https://index.gd.workers.dev(material)https://indexc.gd.workers.dev(classic)

下面来说说 GoIndex 的优点:

  • 开源免费
  • 可直链下载文件,免翻
  • 目前支持mp4视频在线播放
  • 调用 CloudFlare Workers,没有额外成本
  • 从零到一的飞跃,即质变
  • 利用无限盘或共享盘的机制可以做大型分享云盘

部署流程

1、访问 https://install.gd.workers.dev,点击获取验证码

《GoIndex - GoogleDrive直链目录索引网盘》

2、点击之后跳转到谷歌验证界面,允许rclone应用程序访问,会获得一串认证码,复制到「Auth认证码」一栏。关于「目录ID」打开团队盘(文件夹或别人共享的文件夹),看地址栏。https://drive.google.com/drive/folders/{这后面一堆代码就是id},将这串代码复制到「目录ID」这一栏。接着填写「根目录密码」,默认为 index。最后点击生成代码

《GoIndex - GoogleDrive直链目录索引网盘》

3、将生成的JS代码保存,用同一个谷歌邮箱注册 cloudflare。注册好之后,进入首页,点击「Get started with Workers」。

《GoIndex - GoogleDrive直链目录索引网盘》

作者在新版本正式加入了「主题选择」和「MP4在线播放」功能:

  • 主题选择(9.12更新)

在新 index.js 中作者加入了「根目录访问认证」这一功能,在第三步得到的JS代码中,有以下片段:

var authConfig = {
    "siteName": "GoIndex", // 网站名称
    "root_pass": "index",  // 根目录密码,优先于.password
    "version" : "1.0.6", // 程序版本
    "theme" : "material", // material  classic 
    "client_id": "202264815644.apps.googleusercontent.com",
    "client_secret": "X4Z3ca8xfWDb1Voo-F9a7ZxJ",
    "refresh_token": "", // 授权 token
    "root": "root" // 根目录ID
};

在「themes」选项后面填写主题的名称,可供选择的主题有”material”和”classic”,自行查看 Demo。在这里我们还可以命名网站名称,设置根目录密码。

  • MP4在线播放(9.9更新)

作者在1.0.2版本中加入了文件预览功能,其中包括视频在线播放。大家更新到1.0.2或更高版本之后无需使用以下代码即可实现mp4在线播放,也就是重装GoIndex,会自动安装最新版。

(以下代码适用于1.0.1及以下版本)把以下代码放入<head></head>之间:

<script src="https://cdn.staticfile.org/jquery/3.3.1/jquery.min.js"></script>
    <script src="https://cdn.staticfile.org/layer/2.3/layer.js"></script>
    <script>
  $(function () {
    $('.mdui-list').on('click','li',function(){
      var href = $(this).children('a').attr('href');
      console.log(href);
      if(href.lastIndexOf(".mp4") > -1) {
              layer.open({
                type: 1,
                title: decodeURI(href.substring(href.lastIndexOf("/") + 1, href.length)),
                shadeClose: true,
                shade: 0.8,
                area: ['100%', '100%'],
                content: '<center><video controls autoplay=true preload=auto style="width:80%;object-fit: cover;" src="' + href + '"></video></center>'
              });
              return false;
            }
    });     
  });
    </script>

4、进入 Workers 之后,会看到一个名为 worker.dev 的域名,这是CF提供的域名,一旦确认不可修改。接着输入一个自定义前缀(例如xxx),点击 Set up domain。在 Script 里复制刚才的代码code,右下角Run可以在右边看到浏览状态,左边上方可以修改地址,例如修改为111并保存。那么 111.xxx.workers.dev 就是你的域名地址了。打开这个域名,你就会看到谷歌网盘目录索引网页!

《GoIndex - GoogleDrive直链目录索引网盘》

5、如果不想使用预设的 worker.dev 域名,在执行完以上操作之后,绑定一个自己的域名到 CloudFlare。进入 DNS 管理页面,选择「Workers」。点击右侧的「Add route」,并根据提示设置route。route一项请填写你绑定cf的域名,自定义前缀,提前解析好,结尾跟上 /*。例如:gd.newlearner.site/*

《GoIndex - GoogleDrive直链目录索引网盘》

《GoIndex - GoogleDrive直链目录索引网盘》

6、设置文件夹密码

上面提到我们可以设置「首页登录认证」,对于文件夹,作者依然沿用了之前OneIndex的.password方案。将写有密码的.password文件上传到GD目录,则该目录需要密码验证后方可访问。

密码文件只能保护该文件不被列举,不能保护该文件夹的子文件夹不被列举,也不保护文件夹下文件不被下载。

程序文件中 root_pass 只为根目录密码,优先于 .password 文件

安全与隐私问题

有人可能会质疑,直接从  install.gd.workers.dev 通过验证,是否存在风险?

风险是有的,因为该网页可以保存谷歌用户的 refresh_token 从而读取你的GD文件,这从技术上可行。但我也提到了,作者是 OneIndex 开发者,做的贡献有目共睹,没有必要做这样的事情。作者本人也公开表示这个网页不会自动保存用户的 refresh_token。

同时,该程序也调用了rclone的 client_id 和 client_secret,如果对这个程序也有疑问,可以选择不用或者自己造轮子。

下面来讲一下不通过 install.gd.workers.dev 网页部署该程序的大致流程:

  • 在本地安装 rclone
  • 按照 https://rclone.org/drive 流程进行授权
  • 执行 rclone config file 查看 rclone.conf 路径,找到root_folder_id和refresh_token记录下来
  • 下载 https://github.com/donwa/goindex 中的 index.js 并填入 root 和 refresh_token
  • 复制代码 到 CloudFlare 部署

如果之前已经成功部署,也可以到这里取消授权:https://myaccount.google.com/security

拓展

利用 CloudFlare Workers 是个好思路,基于此又有一些成品轮子和大家见面,这利一并介绍下。

  • 萌咖 GoogleDrive API

萌咖大佬也用 workers 造了一个直连下载谷歌云盘文件的轮子,不过没有前端页面,只有一个 API 接口。

普通模式API:https://api.moeclub.org/GoogleDrive/<FileID>,走 谷歌CDN

高级接口模式API:https://api.moeclub.org/GoogleDrive/<FileID>/NoLimit,走 Cloudflare CDN,支持断点续传

这里的<FileID>是谷歌云盘分享链接中 id= 后面的一串字符,举个例子:https://drive.google.com/open?id=1x5SoOpOWSS5jxJSU7XyHlhG2EiPgHGGM,则<FileID>为1x5SoOpOWSS5jxJSU7XyHlhG2EiPgHGGM。

⚠️注意:一定要通过分享链接获取文件ID,经本人测试:团队盘、他人分享的文件不可以使用此API,只适用于个人(自己)网盘的分享

  • CF – Workers

沿用的依然是上面的部署方式,但作者自己写了一个 index.js,把页面做成了一个搜索框样式直链下载。支持在线播放视频和直链下载文件。

《GoIndex - GoogleDrive直链目录索引网盘》

Github:https://github.com/reruin/workers/blob/master/link/index.js

Demo:https://link.reruin.workers.dev

安装的时候把上文粘贴的代码换成项目中的JS代码即可。

使用

link.reruin.workers.dev/gd/<FileID> 中转下载
/gda/<FileID>?output=redirect 原始链接下载
/gda/<FileID>?output=json 获取文件详细信息(JSON格式)
/gda/<FileID>?output=preview 预览该文件(仅支持图片、视频、音频)
/gda/<FileID>?output=media 尝试使用转码模式播放视频文件(如wmv,rmvb)

羊毛虽好,请勿竭泽而渔。善待cf,从我做起。想要用得好,请自行申请EDU无限谷歌云盘或者加入他人的团队盘!


参考文章:

GoIndex预览版

GD 直链工具 cf-worker 版

回应下GoIndex获取token的风险问题以及临时解决方案


利用Yandex搭建个人域名邮箱服务

今天我利用Yandex搭建了一个域名邮箱服务,事实证明有一个自己的域名邮箱好处多多,比如自定义前缀,在需要重复注册某网站/服务时优势尽显。

在刚刚搭建好博客之后,我大奥降级跑去贴吧发了个贴,大致的意思是欢迎大家来讨论macOS。瑞先森跟我说其实有了域名之后可以优先考虑搭建一个域名邮箱,比如i@newlearner.site。我当时不以为意,觉得gmail等邮件服务足够我使用了。

去年双十一的时候着实让我感受到了域名邮箱的方便,你可以通过两个邮箱注册两个搬瓦工账号购买两套双十一套餐,防止将来出手的时候死在一个账号而无法出手,只能出租。What’s more,这玩意不需要手机号。不需要额外的邮箱或者QQ,即开即用,十分方便。

因此我开始研究如何搭建域名邮箱,一开始考虑的自然是服务器邮件方案。当时重点关注了几个主流的搭建方案,最后发现问题很多:TOS、搭建的繁琐性、spf与dkim的设置等,更不用提服务器需要自己维护所带来的备份等工作。于是不了了之。

今年上半年注册了yandex邮箱,偶然看见该邮件供应商提供个人域名邮箱服务,于是开始了我的搭建个人域名邮箱之路。

交流群:Newlearnerの水群

《利用Yandex搭建个人域名邮箱服务》

简介

Yandex(俄语:Яндекс)是一家俄罗斯互联网企业,旗下的搜索引擎在俄国内拥有逾60%的市场占有率,同时也提供其他的一系列互联网产品和服务。

Yandex mail注册入口(必须):mail.yandex.com

个人域名邮箱申请入口:Connect Yandex

今天的重点是Yandex的域名邮箱注册。

相对优势

  • 由大型企业/服务商维护,无需自行维护
  • 免费,并可提供1000个自定义前缀邮箱,每个用户10G容量
  • 成品spf、dkim,降低被认证为垃圾邮件的几率
  • 注册相比自行搭建步骤简单
  • 搭建好后多开邮箱账号无需门槛

当然有一些企业或者个人出于种种考虑会选择自行服务器搭建,这也无可厚非,无需捧一踩一

申请流程

1、注册Yandex邮箱

传送门:https://passport.yandex.com/registration

《利用Yandex搭建个人域名邮箱服务》

可以选择用电话号码或者设置安全问题两种方式注册,笔者是使用Google Voice注册的。

2、注册域名邮箱

个人域名邮箱申请入口:Connect Yandex,输入你的顶级域名注册。

《利用Yandex搭建个人域名邮箱服务》

接着就是验证该域名所有权,一共有四种方式:

  • Html files:放一个指定名称的html文件到服务器根目录
  • Meta tag:在网站首页加入指定的meta头
  • Whois:不推荐,因为大部分的whois都被商家做了保护
  • DNS record:在DNS解析中加入指定的TXT项

对于不懂得网站搭建的朋友,前两种方法注定是行不通了,只能在DNS管理后台做dns记录。如果你有自己的网站,优先选择方案二,加入一个meta头即可。

下面来讲解一下DNS record的设置方法,进入DNS的后台面板,点击添加TXT记录:

Name(host)填写yandex-verification

Value填写验证页面给定的值,比如5c10414be60d8631

做好验证之后就是等待通过验证的过程,此过程可能短至一天,长至数月,请耐心等待。笔者在今年上半年申请之后没有立即通过,直到最近群友提起才重新拾起查看。

当你点击这里,出现如下图显示画面时,说明你已经成功申请域名邮箱:

《利用Yandex搭建个人域名邮箱服务》

配置MX、SPF与DKIM记录

1、配置MX记录

进入DNS管理后台,找到mail设置或者可以填写MX记录的地方,Name(Host)填写@或者你的顶级域名,Value填写mx.yandex.net.,Priority填写10《利用Yandex搭建个人域名邮箱服务》解析好之后静待生效即可。

2、配置SPF和DKIM

SPF记录有助于降低从域名邮箱发送的电子邮件被标记为垃圾邮件的风险,因此一定要设置。进入DNS管理后台,添加新的TXT记录。Name(Host)填写@或者顶级域名,Value填写v = spf1 redirect = _spf.yandex.net

具体可以参考官网:传送门

使用DKIM签名,电子邮件收件人可以验证邮件是否真的来自所谓的发件人。进入DNS管理后台,添加新的TXT记录。Name(Host)填写mail._domainkey,Value填写Yandex.Connect设置中复制的公钥中的文本块。

公钥获取地址:传送门

具体可以参考官网:传送门

《利用Yandex搭建个人域名邮箱服务》解析好之后静待生效即可。

自定义域名邮箱前缀

如果你完成了以上所有步骤并且通过了Yandex的官方验证,那么恭喜你,你已经有了属于自己的域名邮箱。下面要做的工作就是通过简单的设置自定义域名邮箱的前缀。

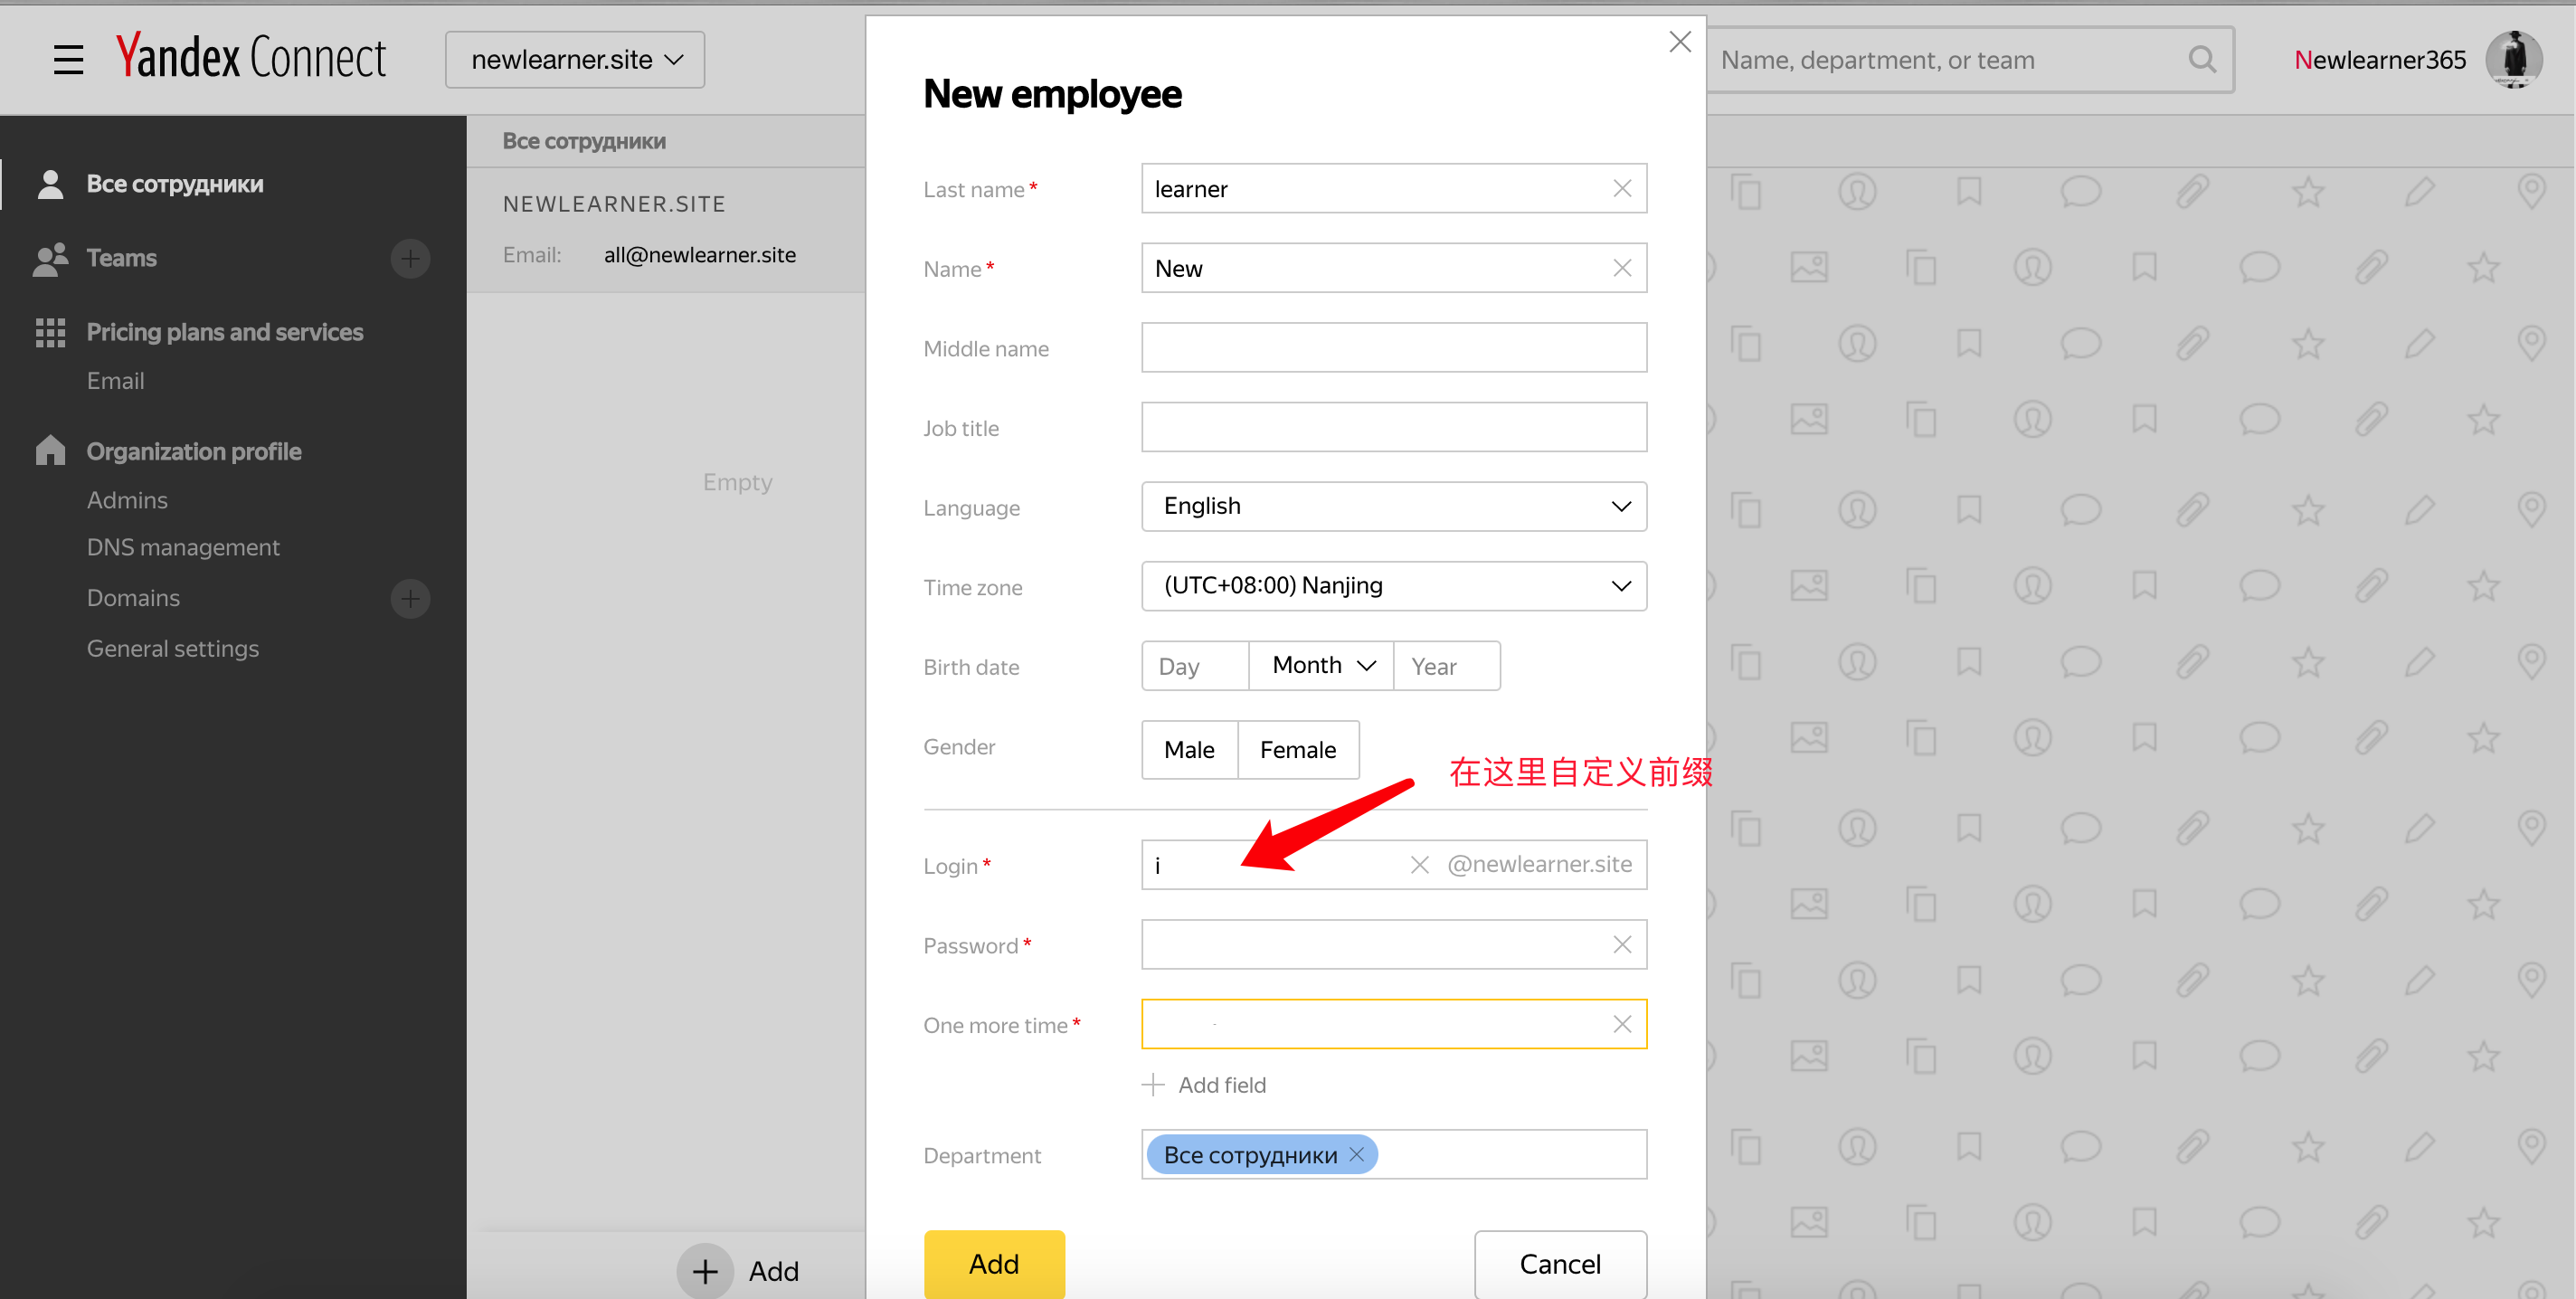
进入这里(Все сотрудники),点击「Add」添加一位用户,并完成域名前缀和密码的设置。

《利用Yandex搭建个人域名邮箱服务》《利用Yandex搭建个人域名邮箱服务》

创建好之后回到Yandex mail官网登录,用户名和密码填写刚刚创建的信息即可。切记一定要登录,因为这里有一个协议需要同意,同意后该自定义前缀的域名邮箱方可开通。

Enjoy it!

其他

POP3:pop.yandex.com SSL端口:995

SMTP:smtp.yandex.com SSL端口:465

IMAP:imap.yandex.com SSL端口:993

API:https://tech.yandex.com/domain/doc/about-docpage/

DNS record全指南:

《利用Yandex搭建个人域名邮箱服务》


参考文章:

维基百科

如有乐享

Yandex Wiki

ZeroTier—P2P内网穿透工具

最近没事逛B乎的时候看到有人在安利一款内网穿透工具叫做ZeroTier,是基于P2P(peer to peer)的,出于兴趣安装并了体验了这个所谓的「无需公网ip,端对端穿透,多达100台设备」的免费工具。

之前介绍了npsfrp这两款内网穿透工具,他们的共同特点都是需要一个带有公网ip的服务器做中心节点,通过反向代理的方式实现内网穿透,因而需要做各种端口映射。而ZeroTier则像一个全球大型交换机,通过P2PVPN这种方式实现你的多台设备连在同一个虚拟交换机下面从而实现穿透。

经过体验之后我先上结论:官方的中心节点服务器太慢,建议自建中心服务器Moon。那样的话不如直接用nps和frp,除非你对端口映射有心理阴影。

交流群:Newlearnerの水群

《ZeroTier—P2P内网穿透工具》

简介与原理

官网: https://www.zerotier.com/

官方Github:https://github.com/zerotier

Zerotier在笔记本电脑,台式机,电话,嵌入式设备,云资源和应用之间建立了Peer to Peer VPN(P2PVPN)连接,在客户端通过ZeroTier One在对等体之间建立直接连接,即使它们位于NAT之后。连接到虚拟LAN的任何计算机和设备通常通过NAT和路由器设备与Internet连接。ZeroTier One使用STUN打孔来建立NAT后对等体之间的直接VPN连接。

说的直白一点,就是通过P2P等方式实现形如交换机或路由器上LAN设备的内网互联。

《ZeroTier—P2P内网穿透工具》

ZeroTier 官方搭建了一个行星根服务器叫做“行星Planet“,行星根服务器唯一的且是免费的,它记录了所有的路径信息。除此之外还有 12 个遍布全球的付费根服务器。所以使用免费套餐,连接时的延迟可能会很高,尤其是移动,毕竟 Earth 在国外。不过ZeroTier 能自己创建根服务器“卫星 Moon”,提供了一个解决网络延时、卡顿和失联的可能解决方案。连接行星或卫星的服务器成为”叶子节点 Leaf“。

每个免费套餐可以享受100台设备的内网互联,还是挺良心的。

注册与客户端安装

  • 注册与Planet配置

登录官网注册即可,填写你的邮箱和密码。

《ZeroTier—P2P内网穿透工具》

注册好之后我们来建立一个Network并分配内网网段:

《ZeroTier—P2P内网穿透工具》《ZeroTier—P2P内网穿透工具》

《ZeroTier—P2P内网穿透工具》

以上信息中Network ID需要牢记,这是客户端连接到行星服务器的唯一识别码。

  • 客户端配置

ZeroTier支持Windows、macOS、Linux 三大桌面平台,iOS、Android 两大移动平台,QNAP(威连通)、Synology(群晖)、Western Digital MyCloud NAS(西部数据)三个 NAS 平台,还支持 OpenWrt/LEDE 开源路由器项目。

可以说是支持的很全面了,对于路由器想多说两句:除非你有两台路由器,一台放在家里,另一台放在公司等地,并且有大量设备连接于这两台路由器且需要内网穿透,否则不要在路由器上面部署ZeroTier,仅使用单设备客户端即可。并且为了连接的稳定性,强烈建议自己部署Moon节点。

下载地址:https://www.zerotier.com/download/

我们以iOS和Mac设备为例介绍一下客户端如何与Planet相连接并分配到内网地址:

iOS下载好ZeroTier One之后填入刚刚的Network ID,配置好VPN之后会启动连接,届时会根据MAC地址分配给设备一个唯一认证字符串Node ID,可用来在web配置界面保留该设备不被删除以及帮助我们区分设备。

《ZeroTier—P2P内网穿透工具》


macOS同理,并且可以使用命令行辅助:

《ZeroTier—P2P内网穿透工具》

# 启动
zerotier-one -d

# 获取地址和服务状态
zerotier-cli status

# 加入、离开、列出网络
zerotier-cli join # Network ID
zerotier-cli leave # Network ID
zerotier-cli listnetworks

  • 认证设备和组网

回到一开始注册的网页,会发现设备当中多了两台,在前面的方框打钩即可。根据Node ID判断设备的类型,牢记设备被分配的ip。

《ZeroTier—P2P内网穿透工具》

简单使用体验

很遗憾我这边的体验可以用极差来形容,并且对B乎人均几十ping、不断连还可以流畅传输文件产生怀疑。当然移动要负一部分责任,不过我觉得这还是和Planet远在国外水土不服有关系。

测试环境:MBP连接电信网络,iPhone连接移动4G网络

从图中可以看到丢包严重,ping一直在400ms左右波动,最后测试结果丢包率高达85%。并且iOS上面有断连的情况发生。

《ZeroTier—P2P内网穿透工具》

最后还是成功连接上了Mac的ssh,我觉得这样的内网体验大概也只能连接ssh了:

《ZeroTier—P2P内网穿透工具》

优缺点

优点

1、配置简单上手方便

2、支持多设备多平台

3、无需配置端口映射,组网即用

4、免费且可以无需公网服务器

5、安全性从某种程度来讲好于自己维护的服务器

6、给设备分配唯一标识符,无需DDNS

缺点

1、Planet服务器在国外,在国内使用不稳定

2、相对于frp、nps等项目应用范围较小,更偏向于组网

针对以上的优缺点,我的建议是:

想要稳定&体验好,建议直接上npsfrp这两款工具,或者使用国内的花生壳等付费服务。

纯组网并有简单穿透需求,又不想大费周章,可以采用ZeroTier。进一步追求稳定,自己搭建Moon服务器。

Moon服务器搭建

  • 部署

#下载并安装
curl -s https://install.zerotier.com/ | sudo bash
#加入创建好的局域网
zerotier-cli join <network id>
#生成并给配置文件赋权
chmod 777 /var/lib/zerotier-one
cd /var/lib/zerotier-one
zerotier-idtool initmoon identity.public > moon.json
#查看本机Node ID
zerotier-cli info

生成好moon.json之后我们需要手动修改一项参数:

将下面的 “stableEndpoints”: [“公网ip/端口”] 补全完整并保存,并检验id是否有误

{
 "id": "",
 "objtype": "world",
 "roots": [
  {
   "identity": "",
   "stableEndpoints": ["公网ip/端口"]
  }
 ],
 "signingKey": "",
 "signingKey_SECRET": "",
 "updatesMustBeSignedBy": "",
 "worldType": "moon"
}

#生成moon.json
zerotier-idtool genmoon moon.json
#新建文件夹
mkdir moons.d
mv xxxxxxxxxxx.moon moons.d
#kill
killall -9 zerotier-one
#启动
zerotier-one -d

  • 使用

zerotier-cli orbit <id> <id>

*id为之前配置文件中的参数

  • 检验

zerotier-cli listpeers

列表中出现带有”MOON“字样的公网ip节点则说明部署成功。

关于ZeroTier就尝试了这么多,很多人可能关心路由器的配置,鉴于本人条件有限不能一一尝试。现在很多路由器固件提供了ZeroTier的下载,弄好防火墙和路由表即可,不过注意穿透两边的内网地址网段不要相同。


参考文章

维基百科
ZeroTier Wiki

安卓上的记账软件:Gnucash Pocket

最近又试了一圈 Android 上的记账软件。各种时兴的记账 app 里,仍然没有靠谱的。最终的选择,是停更了五年的:Gnucash Pocket,——Gnucash 的非官方手机版。Google Play 上早就没有了,只能自己编译,或者下载 2018 年的 apk(还很好用 😛


个人需求,并非面面俱到的记账;而是针对一些小项目(譬如一次多人旅行、入门一个兴趣领域时的投入……),记录相关的开销。所以,我的核心需求,是能够在多个项目间,方便进行切换,这一点,是市面上很多记账软件,无法做到的。

一些记账软件里常见的,但我并不需要,甚至会反感的功能:

  • 和其它 app、乃至和你的银行账户,对接数据
  • 繁复的报表(我可以导出到 pc 后自己整理
  • 实时汇率
  • 多设备、多用户,实时同步信息(这个还是想要的,但不是必需
  • 需要注册网站用户

很多年前我找过这样的 app,并没有找到合适的,也就放弃了。如今又把 app store 里的常见记账软件,试了一圈,仍然没找到靠谱的(一些上来就要手机号注册的,我就不试了…)。最终还是投奔鼎鼎大名的 Gnucash。——这是从上个世纪就已经存在的老牌开源记账软件了,支持 Win / Linux / Mac 平台,我在 pc 上也很常用;但是并没有官方的手机版本。官网的 wiki 介绍了一些第三方开发的手机版本。感觉最好用的,是 Gnucash Pocket,原作者从 2014 维持到 2018 年,就停更了,后来被人 fork 了继续维护,但 fork 版不提供现成的 apk。原版 2018 年的最终版本的 apk,我用起来挺好的,没什么大问题。

注意:我说的是 Gnucash Pocket,而不是 Google Play 里的 Gnucash Mobile。Gnucash 的 wiki 官网对这两个 app 都有介绍。这些都是第三方开发的项目,和 Gnucash 官网没有关系。Gnucash Mobile 感觉很难用:不支持多项目,而且似乎先要导入一个在桌面 Gnucash 建好的账户模板……以及,那几个 ios 上的版本,我没有试过,并不知道是否好用。


Gnucash Pocket 的优点:

  • 完备的复式记账功能,——很多记账软件里眼花缭乱的功能,譬如 AA 账单之类,其实都可以通过设计合适的账目结构来实现
  • 在多个项目切换
  • 不依赖网络,可离线使用
  • 数据可导出到 Gnucash 桌面版
  • 支持多币种
  • 免费,开源
  • 无广告,不需要注册用户

缺点:

  • 不能实时多设备/多用户同步
  • 菜单里通往各个功能的入口不全,譬如缺一个一键回到首页的功能……

具体用法就不多介绍了。这里只是向那些,有类似需求和记账知识的人,介绍有这么个东西。具体用法应该很好摸索。


Gnucash Pocket 和 Gnucash 桌面版的数据迁移

记账的项目告一段落后,可以把数据从 app 导出,再导出到桌面版的 Gnucash,进行归档或进一步的处理。注意,如果账目里只有一种货币,那么选择 .csv .qif 格式,都可以顺利地迁移数据;但是,如果账目里有多种货币,这两种格式都会出现问题,就只能导出成 xml 格式。导出的文件有个看着很怪的 .gnca 扩展名,没关系,在桌面版的 Gnucash 里,直接 file – open – 打开这个 .gnca 文件,就可以了。桌面版的 Gnucash 项目,选择 save as 成 xml 文件,传到手机里,也可以用 app 打开继续记账。

写作工具

为了写长篇论文,整理各种散碎的构思和素材,尝试了一圈现有的写作工具。把体验的过程记一下。

先说结论。符合刚需,可供选择的,只有下面这几个。目前的考虑次序是:

  • 思源笔记、Lattics、Scrivener(付费)、Manuskript、Joplin、CherryTree

参考过,因为不满足刚需被淘汰的:

  • Effie、Flomo、Heptabase、Logseq、Notion、Obsidian、Onenote、QuollWriter、Ulysses、Writeathon、Zettlr、印象笔记

有一些我知道但没有去试的,譬如 IA Writer。以及这些年似乎有很多,给网文作者开发的写作工具,就不去一个个试了。毕竟我只是要找个自己能用的,而不是做这方面的全面评测。

不在意的要素:

首先,我寻找的这个工具,是为了一个特定的写作项目,而不是日常泛泛的信息管理。所以,一些对于后者而言,很重要的功能,我是不需要考虑的。

  • 运行速度。我知道一些工具,在文档增加到上万条后,会变得很卡。但我这里最多几百个文档,就不必考虑这个问题。
  • 是否便于导出 / 迁移到其它工具。一些工具的迁移性很差,乃至管理很多信息后,让人有被这个软件绑架了的感觉。但对我而言,只是需要把几篇最终成品,手动转移到其它工具去排版。

一些对我而言的刚性需求:

  • 支持 Windows。一些传说中很优秀,但只能苹果用的,我就不去看了。淘汰:
    • Ulysses
  • 内容对运营商不可见,尤其是大陆背景的运营商。淘汰:
    • Notion、印象笔记、etc.
  • 可离线使用。有一些工具,我不确定能不能离线,但安装桌面客户端后,需要先注册个账号才能用。而且这么搞得大多是国内开发。结合上面那条,我就不继续试了。淘汰:
    • Effie、Flomo、Writeathon
  • 支持三层以上的目录结构。淘汰:
    • Onenote,这个只是随口提一下, onenote 的块编辑太迷了,我试过几次,从来没习惯
    • Logseq
    • QuollWriter
  • 可拖拽排序。这一条淘汰了很多,其实非常优秀的工具。其中一些,甚至是我日常其它方面的主力工具。但对于构思长篇文章而言,可以随时拖拽排序,而不是改变文件名手动排序,对我很重要。淘汰:
    • Obsidian,很可惜,Obsidian 在其它方面几乎完美。有可以手动拖拽的插件,但只能改变第一层目录的顺序
    • Zettlr,这个我也很喜欢,而且它整合 zotero 的功能似乎很好用。我回头会试着用它来整理成稿
  • 费用。能免费用当然最好;可以花钱,但作为一个我会长期使用却又不是每天使用的工具,我更希望是一次性买断(譬如 Scrivener),而不能接受付费订阅模式。淘汰:
    • Heptabase

一些不是刚需,但会是我选择的重要因素:

  • 界面舒适程度。一些老牌的英文软件,打开后默认的界面,还是满不适应的……而且英文字体也很小。虽然很多是可以定制的,但我没时间慢慢去调。
  • 可视化的 markdown
  • 内部文章链接,是否双链倒无所谓
  • 分屏,同时编辑两篇文章

其它可有可无的加分项:

  • 可以把不同的项目存在独立的文件夹里,每次只打开一个项目,便于在不同项目之间切换。
    • Lattics 好像是不可以的?所有的项目都放在一个边栏界面里。这样偶尔用一次无所谓,但不能作为长期进行多个项目的工具。
    • Joplin 在这一点上减分比较大,但反而是因为,这本来就是我的日常主力笔记工具,和项目混在一起,就太乱了。
  • 可以调用其它外部编辑器
  • 支持 zotero,具体我还没细看
  • 卡片模式,我还没体验到,单独用一个文件夹来保存零碎想法,和卡片比,有什么区别?
  • 多设备同步,这大概是思源和 Lattics 的付费功能?
  • 直接在文件管理器里,访问项目的文本和媒体文件
  • 学习复杂度
  • 卡片模式
  • 开源
  • 费用

六种工具的横向比较。空白的是我还没仔细看的。

ScrivenerLattics思源ManuskriptCherryTreeJoplin
界面★★★★★★★★★★★★★
markdownxxx
内部链接x
分屏xx
切换项目xx
外部编辑器xxxxx
zoteroxxx
卡片x
多设备xxx
管理媒体文件
学习复杂度★★★★★★★★★★★★★★★
开源xxx
国产xxxx
费用买断免费+订阅免费+订阅免费免费免费
❌