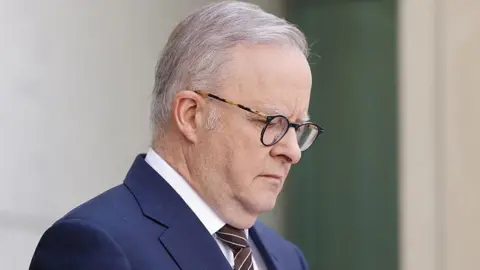
Prime Minister Anthony Albanese, right, at a news conference in Canberra, Australia, on Friday. He announced a nationwide gun buyback plan on the heels of a deadly mass shooting in Sydney last weekend.
Restricting Tehran’s growth and water use — however politically difficult — would be more prudent than trying to engineer ever more elaborate workarounds.
Restricting Tehran’s growth and water use — however politically difficult — would be more prudent than trying to engineer ever more elaborate workarounds.
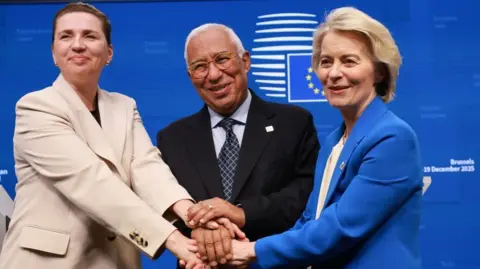
Danish Prime Minister Mette Frederiksen (left), European Council President Antonio Costa and European Commission President Ursula von der Leyen announce the deal at the summit in Brussels
European Union leaders have struck a deal to give Ukraine a €90bn (£79bn; $105bn) loan after failing to agree on using frozen Russian assets.
The agreement, which leaders said would meet Ukraine's military and economic needs for the next two years, came after more than a day of talks at a summit in Brussels.
"We committed, we delivered," EU chief Antonio Costa wrote on X as he announced the deal to provide a loan backed by the bloc's common budget.
Ukrainian President Volodymyr Zelensky had urged leaders to use €200 billion of frozen Russian assets but Belgium, where the vast bulk of the cash is held, demanded guarantees on sharing liability that proved too much for other countries.
In another development, French President Emmanuel Macron said he believed it would be "useful" for Europe to re-engage with Russian President Vladimir Putin.
"I believe that it's in our interest as Europeans and Ukrainians to find the right framework to re-engage this discussion," he said, adding that Europeans should find the means to do so "in coming weeks".
EU leaders avoided "chaos and division" with their decision to provide Ukraine with a loan through borrowing cash rather than use frozen Russian assets, Belgian Prime Minister Bart De Wever said early on Friday.
"We remained united," De Wever added.
Ukraine is months from running out of cash and Zelensky said without an injection by spring Ukraine would "have to reduce production of drones".
The EU estimates Ukraine needs an extra €135 billion to stay afloat over the next two years, with the cash crunch set to start in April.
German Chancellor Friedrich Merz, who had pushed for the asset plan, said the final decision on the loan "sends a clear signal" to Putin.
Russia had warned EU leaders not to use its money, but Polish Prime Minister Donald Tusk said they had to "rise to this occasion".
The agreement offers Kyiv a desperately needed lifeline amid a flurry of diplomacy as US President Donald Trump pushes for a quick deal to end Russia's war.
US and Russian officials are due to meet in Miami this weekend for further talks on a peace plan, a White House official has told AFP news agency. It is thought Kremlin envoy Kirill Dmitriev will talk to Trump envoys Steve Witkoff and Jared Kushner in Miami.
Meanwhile, Zelensky announced Ukrainian and US delegations would hold new talks on Friday and Saturday in the United States.
He said he wanted Washington to give more details on the guarantees it could offer to protect Ukraine from another invasion.
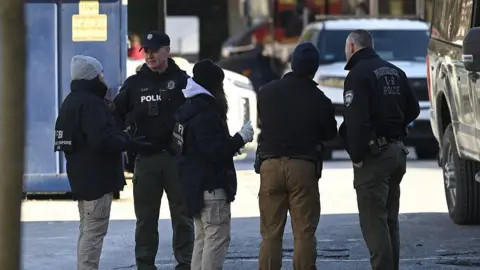
Members of the FBI Evidence Response Team work at the scene of a mass shooting at Brown University in Providence, Rhode Island on 16 December 2025
Police have issued an arrest warrant for the suspect in a mass shooting at Brown University that killed two people and injured nine others, sources close to the investigation told the BBC's US partner, CBS News.
Authorities are now searching for the person and a car the suspect is believed to have rented, according to CBS. They have not publicly identified the suspect.
They also are looking into a possible link between the shooting at Brown and the killing of a professor at Massachusetts Institute of Technology two days later.
The search is now in its sixth day, with investigators knocking on doors, asking for home-security videos, and appealing to the public for tips to find the gunman.
A news conference that police in Providence, Rhode Island, had planned for Thursday afternoon was abruptly cancelled, but they said they expected to give an update later in the day.
On Thursday, authorities told CBS sources that they are investigating possible connections between the shooting and the killing of an Massachusetts Institute of Technology (MIT) nuclear science and engineering professor two days later.
Nuno F Gomes Loureiro, 47, from Portugal, was shot "multiple times" on Monday at his home in Brookline, Massachusetts, which is about 50 miles (80km) from Providence.
Police have obtained an arrest warrant for a suspect, sources told CBS. The sources said a rental car matching the same description was seen at both crime scenes.
Federal authorities had previously said there was no link between the two murders.
On Wednesday, authorities released a photo of an individual they believe was in close proximity to their primary person of interest.
Providence Police Chief Oscar Perez said they wanted to speak with the person, "who may have information relevant to the investigation".
The chief also said the killer "could be anywhere", adding that "we don't know where the person is or who he is".
A day earlier, police had shown footage of a person of interest where a man was seen walking around the university campus with a black mask over his mouth, possibly "casing" the area before the crime, Perez said.
Members of the public have expressed frustration that the mass shooting investigation has appeared to yield little progress so far.
In response, Rhode Island Attorney General Peter Neronha said he believed the killer would be caught "and it is just a matter of time before we catch him".
The FBI has offered a $50,000 (£37,350) reward for information leading to the identification, arrest and conviction of the person responsible for the attack.
The shooting occurred at Brown University's Barus & Holley engineering building during final exams.
Authorities identified the two students killed as Ella Cook, a sophomore from Alabama, and Mukhammad Aziz Umurzokov, an Uzbek-American freshman student.
A reordering of the rules of trade, set on top of transformational change in technology, demographics and climate, is remaking jobs, politics and lives.
A reordering of the rules of trade, set on top of transformational change in technology, demographics and climate, is remaking jobs, politics and lives.
As military officials sound the alarm over Russian hybrid attacks, the chair of Parliament’s defense committee said the government’s progress on ramping up home defense was “glacial.”
British soldiers during an exercise in Smardan, Romania, in February. In June, the British government published a strategic defense review that said the country must move to “war-fighting readiness.”
TikTok's Chinese owner ByteDance has signed binding agreements with US and global investors to sell the majority of its business in America, TikTok's boss told employees on Thursday.
Half of the joint venture will be owned by a group of investors, including Oracle, Silver Lake and the Emirati investment firm MGX, according to a memo sent by chief executive Shou Zi Chew.
The deal, which is set to close on 22 January, would end years of efforts by Washington to force ByteDance to sell its US operations over national security concerns.
The deal is line with one unveiled in September, when US President Donald Trump delayed the enforcement of a law that would ban the app unless it was sold.
In the memo, TikTok said the deal will enable "over 170 million Americans to continue discovering a world of endless possibilities as part of a vital global community".
The White House referred the BBC to TikTok when contacted for comment.
PHOENIX — Members of the MAGA faithful gathered here Thursday to kick off Turning Point USA’s America Fest, the largest meeting for the organization since its founder, Charlie Kirk, was shot to death on a Utah college campus in September.
Despite that somber backdrop, the event quickly devolved into a spectacle of MAGA infighting.
Ben Shapiro, the first speaker after widow Erika Kirk, ripped into those who would take the same stage in the coming hours and days. He called out conservative commentators, blasting Candace Owens, Tucker Carlson, Megyn Kelly and Steve Bannon as “frauds and grifters.”
“The conservative movement is in serious danger,” Shapiro said, arguing the danger is not just on the left, but “from charlatans who claim to speak in the name of principle but actually traffic in conspiracism and dishonesty.”
He called Bannon “a PR flack for Jeffrey Epstein” ahead of the imminent release of files related to the late convicted sex offender, while praising President Donald Trump and his administration's handling of the issue. Trump pushed to stop Republicans in Congress from voting to release the files, though he signed the legislation once it was passed. Both Bannon and Trump appear in photos with Epstein that were released by House Democrats.
Shapiro particularly focused on Carlson — both for elevating Owens’ conspiracy theories about Kirk's murder and for his recent interview with far-right influencer Nick Fuentes, a Holocaust denier who has repeatedly pushed antisemitic tropes. Carlson, a former Fox News host, now hosts his show on X and routinely garners millions of views.
“The people who refused to condemn Candace’s truly vicious attacks — and some of them are speaking here tonight — are guilty of cowardice,” Shapiro said, adding later: “If you host a Hitler apologist, Nazi-loving, anti-American piece of refuse like Nick Fuentes … you ought to own it.”
Both the Fuentes interview and Owens’ conspiracies have embroiled the party in recent weeks. On Wednesday, Shapiro called on the Heritage Foundation, the powerful conservative think tank whose president defended the interview, to change its tune about Carlson’s elevation of Fuentes.
Carlson responded with heat of his own from the stage Thursday.
“That guy is pompous,” Carlson said, saying he “laughed” while watching clips of Shapiro's speech backstage. “Calls to deplatform at a Charlie Kirk event? That’s hilarious.”
Carlson went on to rail against cancel culture, and promised the crowd that he was not antisemitic. “Antisemitism is not just naughty, it’s immoral,” he said.
Erika Kirk addressed the MAGA movement’s fractures, while casting her late husband as a rare unifier and pleading with the crowd to embrace disagreement. “You won’t agree with everyone on this stage this weekend,” she said. “And that's okay. Welcome to America.”
The event wasn’t entirely heated. Actor Russell Brand — who spoke between Shapiro and Carlson — focused on Christianity, while sprinkling attacks on vaccines and the pharmaceutical industry into his remarks. And earlier in the day, attendees danced to upbeat music, repeatedly chanted “USA” and celebrated Trump’s return to the White House at the Phoenix Convention Center, which is plastered with imagery of Charlie Kirk. More than 30,000 people gathered for the event.
Kirk’s influence on young people was particularly evident, with thousands of high school and college attendees, some of whom posed for photos in front of a tent that resembled the one Kirk was speaking in front of when he was shot during “The American Comeback Tour.”
Erika Kirk — who now serves as Turning Point’s CEO — said 80 percent of attendees had never been to America Fest before, and one-third of them were students. More than 140,000 people have submitted requests to join the organization since Kirk’s death, bringing the membership to over 1 million people across 4,000 chapters at high schools and colleges, she added.
While the group has welcomed speakers from across the conservative movement, it made clear choices about which politicians to welcome to the stage, providing a glimpse into how the organization hopes to shape the future of the GOP. Texas Attorney General Ken Paxton and GOP Rep. Mike Collins, both candidates for Senate, and gubernatorial hopefuls Andy Biggs of Arizona and Byron Donalds of Florida, were given slots on the main stage.
Erika Kirk also made a point of promising to elevate Vice President JD Vance — who will close the event on Sunday — to the White House in 2028. Vance leads early polls of the likely GOP field.
“We are going to get my husband’s friend JD Vance elected for 48 in the most resounding way possible,” she said.
The Bank of Japan moved to slow inflation as the prime minister is borrowing more to fund an ambitious effort to build up industry and support households.
The Australian government has announced a gun buyback scheme in the wake of the Bondi Beach attack - its deadliest mass shooting in decades.
The scheme is the largest since the Port Arthur massacre in 1996, which left 35 people dead and prompted Australia to introduce world-leading gun control measures.
Fifteen people were killed and dozens injured on Sunday when two gunmen, believed to have been motivated by "Islamic State ideology", opened fire on a Jewish festival at the country's most iconic beach.
On Friday police said a group of men who were arrested in Sydney after travelling from the state of Victoria had "extremist Islamic ideology".
Police allege Sunday's attack, which they have declared a terrorist incident, was committed by a father-son duo. Naveed Akram, 24, has been charged with 59 offences, including 15 counts of murder and one of committing a terrorist act. His father Sajid was killed during the attack.
The day after the shooting, national cabinet - which includes representatives from the federal government and leaders from all states and territories - agreed to tighten gun controls.
Speaking to media on Friday, Prime Minister Anthony Albanese said there are now more than 4 million firearms in Australia - more than at the time of the Port Arthur massacre.
"We know that one of these terrorists held a firearm licence and had six guns, in spite of living in the middle of Sydney's suburbs... There's no reason why someone in that situation needed that many guns.
"We need to get more guns off our streets."
Earlier on Friday, a senior New South Wales police officer told national broadcaster ABC seven men arrested by counter terrorism police in Sydney on Thursday evening may have been on their way to Bondi.
Tactical officers swarmed on the group, who had travelled from Victoria and were known to police there, in dramatic scenes in the suburb of Liverpool.
NSW Police Deputy Commissioner David Hudson said "some indication" that Bondi was one of the locations they were considering visiting, but "with no specific intent in mind or proven at this stage".
Rarely used national security powers were relied upon to swoop before their plans developed.
"We made the decision that we weren't going to … take any chances in relation to what they might be doing," he said.
Officers found a knife, but no guns or other weapons, Mr Hudson added.