Reading view

There are new articles available, click to refresh the page.

A brief history of Mac OS version numbers

With strong rumours that Apple intends changing its version numbering system for the next major release of macOS and its other operating systems, it’s a good time to see how we got to macOS 15.

Early Classic Mac OS

The first version of Classic Mac OS released with the original Macintosh 128K naturally came with System 1.0 and Finder 1.0. Within a few months, version numbering was already becoming confusing, when the successor System Software 0.1 had apparently started at 0.0, but the System itself had reached 1.1. This worsened when System Software 1.0 was released two years later, and came with System 3.1 and Finder 5.2.

Apple then adopted its first triplet numbering scheme that resembled modern Semantic Versioning in System 6.0 of June 1988. Over the following three years that worked its way steadily up to version 6.0.8, then handed over to System 7 on 13 May 1991 without any minor versions being released.

System 7

The first full use of the triplet numbering scheme came with System 7. That had four minor versions, 7.0, 7.1, 7.5 and 7.6, with each having patch releases such as 7.0.1 in between. This scheme followed the rules:

  • the first number gives the major version;
  • the second number gives the minor version that should remain backward-compatible in its changes;
  • the third number gives the patch version denoting backward-compatible bug fixes.

It was then that Apple started to release special versions of Mac OS to support new models, for example 7.1P5 for Performa models, complicating the numbering. This was even worse with System 7.1.2, which was only supplied with some early Power Macs and a few 68K Quadra models. That was accompanied by System 7.1.2P, a special version for models released around the time that Apple also released System 7.5, in September 1994.

System 7.5 brought a different numbering scheme to deal with exceptions. For example:

  • System 7.5.3 Revision 2 followed 7.5.3 without any Revision 1, and made various improvements;
  • System 7.5.3 Revisions 2.1 and 2.2 were released on the same day to address problems with Revision 2 on different models;
  • System 7.5.4 was never released at all, and the next release was 7.5.5.

Fortunately, the remaining versions of Classic Mac OS were conventional in their numbering, until the last in Mac OS 9.2.2 in December 2001.

Mac OS X

The public beta of Mac OS X introduced build numbers to supplement their triplet version numbering. At this time, the build number was based broadly on three components:

  • the first number or build train gives the major version, starting from 4 for 10.0, as this includes NeXTSTEP up to version 3;
  • the letter gives the minor version number, starting from A, which can also be bumped for hardware-specific builds, so may not match the triplet minor version number;
  • the remaining number is the sequential build number within that minor version, usually incremented daily. That’s normally three digits, but an additional digit can be prefixed to indicate specific hardware platforms.

Triplet versions and build numbers were surprisingly well behaved until 2010, although separate build numbers were used during the transition from PowerPC to Intel architecture in Mac OS X 10.4 Tiger.

The first signs of complications came with Mac OS X 10.6.3, in March-April 2010, which came in three different builds and a v1.1, and 10.6.8 also had a v1.1 released a month after the original update. Mac OS X 10.7 Lion set a trend for a final Supplemental Update to 10.7.5, and frequent Security and Supplemental Updates became the rule by 2018, with macOS 10.12 Sierra and its successors.

By 2019, these updates had become uncontrollable. macOS 10.14 Mojave, for example, had three Supplemental Updates in the two months after its final release, named as 10.14.6 Supplemental Update, 10.14.6 Supplemental Update (a second time), and 10.14.6 Supplemental Update 2 (really 3).

macOS 11

The first version of macOS to support Apple silicon Macs, macOS 11 Big Sur, had been generally expected as macOS 10.16, but shortly before its announcement at WWDC in June 2020 the decision was made for it to become macOS 11, incrementing the major version number for the first time in almost 20 years. As that reset the minor version number from 15 to 0, there was the potential for chaos, as many scripts and much code had come to ignore the major version number, and to rely on the minor version to determine which release was running.

To cater for this, when those checked ProcessInfo.processInfo.operatingSystemVersion.minorVersion (or its equivalent), Big Sur identified itself as macOS 10.16. Apps ported to Xcode 12 used the 11.0 SDK; when they checked ProcessInfo.processInfo.operatingSystemVersion.minorVersion (or its equivalent), Big Sur identified itself as macOS 11.0. Those who relied on command tools were provided with a workaround, as
sw_vers -productVersion
returned 10.16 when running in Big Sur on an Intel Mac, but 11.0 on an Apple Silicon Mac.

This enabled Apple to return to a triplet scheme without the complications of Supplemental Updates or other vagaries. Each year’s major version of macOS has thus been x.0, with scheduled minor versions numbered from x.1 to x.5 or x.6, and intermediate patch releases (usually security updates) from x.x.1 upwards. At the end of its year as the current release of macOS, x.6 marked the start of its first year of security-only support, and x.7 for the second and final year. The exception to this has been Sonoma, which started its first year of security-only support with version 14.7, so its security updates have coincided in their minor and patch numbers with the older Ventura.

The only complication to this much clearer system was introduced in Ventura with Rapid Security Responses (RSRs). Those didn’t change the triplet version, as macOS proper remained unchanged, but added a letter to form, for example, macOS 13.4.1 (c). That proved clumsy, and when reflected in a resulting Safari version number it broke a lot of major websites that were unable to identify the browser version correctly. Since RSRs have fallen out of favour, this proved to be a passing phase.

When I wrote about the unexpected change in version numbering brought in Big Sur, I claimed that “no matter what Apple may eventually settle on, I shouldn’t have to change that again for many years.” I’m not sure that five counts as many, but here we go again.

References

Semantic Versions, SemVer
Apple package version numbering
Robservatory Mac OS X versions and release dates
System updates, including security data etc., since 2016

A brief history of fonts in Mac OS

The first Macs came with bitmap fonts stored in FONT resources, and those were normally used in the set sizes supplied, as they scaled so poorly. Later in 1984, with the release of the ‘Fat’ Mac 512K and its 128K ROM, Apple moved to NFNT bitmap fonts with a more flexible ID scheme. This continued to change the following year with the introduction of the LaserWriter printer and its built-in PostScript fonts, but those fonts remained in the printer, and Mac displays stayed with bitmap NFNT fonts.

At the outset, Apple had taken a small liberty with the size of the point, the standard unit in typography and print design. In normal US usage there were 72.27 points per inch, which Apple rounded down to 72 for the Mac, where it has remained ever since.

Adobe introduced PostScript Type 1 fonts, still primarily for PostScript laser printers and Adobe Type Manager software. Although competitors reverse-engineered the Type 1 format, Adobe brought them into costly licensing agreements, so limiting access to their rendering. This provoked Apple to start developing a rival outline format, later to be termed spline fonts or sfnt. This project was initially known internally as Bass, then renamed Royal, and was released as TrueType with System 7 in May 1991.

As late as 2002 Mac OS 9.2 still used some bitmap fonts.

Throughout Classic Mac OS, fonts were stored as resources, and in the early years had to be installed using Font/DA Mover, a bundled utility that also performed ID reconciliation. DA stood for Desk Accessory, which also required careful installation.

This is Font/DA Mover 4.1 in 1999.

Individual fonts were grouped into FOND font families, also introduced with the 128K ROM. These could include both NFNT and TrueType sfnt font types. FOND families each had their own ID, but those weren’t unique, so fonts had to be specified by name.

With the success of TrueType, Classic Mac OS became the first operating system to be able to work without the use of bitmap fonts, but still couldn’t itself render PostScript Type 1 fonts to a display. Those using Macs for pre-print design paid for Adobe Type Manager to perform that rendering.

TrueType was revolutionary in opening up font internals in a way that hadn’t been possible with Adobe’s control over PostScript Type 1 fonts. At the time I was writing CAD/CAM apps to support extreme-format cutting systems used by sailmakers and others, who also wanted to cut large characters from fabrics. One of Apple’s TrueType engineers worked closely with me to convert the outline drawing commands in TrueType glyphs into cutter control streams to fabricate letters and numbers sometimes several feet/metres high. I never did work out what point size they would have been.

Microsoft licensed TrueType free from Apple, but Adobe fought back by opening up its Type 1 font format as free to use. Apple enhanced TrueType in 1994, with TrueType GX, bringing Variations to compete with Adobe’s Multiple Master fonts, but it never caught on and few GX fonts were ever released. Its technology was, though, incorporated into Microsoft’s TrueType Open in 1994, and two years later that was merged with support for Type 1 features in OpenType, which became an ISO standard in 2007. The final milestone, for now at least, was the release of OpenType 1.8 in 2016, with its full incorporation of the font Variations of TrueType GX and Adobe’s Multiple Master fonts.

FontLab was originally developed for Windows, and version 3 came to Mac OS 8 in 1988. It’s seen here in 2001, in Mac OS 9.

The release of Mac OS X in 2001 drew Mac fonts away from their previous reliance on resource forks. Font suitcases thus moved to a data-fork format with the extension dfont.

These font suitcases are seen in data-fork format in Mac OS X 10.3 Panther in 2004.

At that time, Apple’s bundled Font Book app had limited features. Here it’s displaying a data-fork format TrueType font Zapfino.

Fontage was a substitute with additional features.

Mac OS X has also brought substantial improvements in Apple Advanced Typography (AAT), a successor to TrueType GX. Mac OS X 10.4 largely completed advanced support for Latin scripts, with later versions of OS X and macOS extending that to Arabic and Asian languages.

Major foundries produced their own software. This is Linotype’s FontExplorer X in 2006, helping to repair a PostScript font suitcase with missing files for download to a PostScript printer.

By 2006, FontLab had developed into FontLab Studio, seen here editing glyphs from my own handwritten font.

Linotype released a Pro version of its FontExplorer X, shown here in 2010. For typographers, designers and font nerds it revealed almost everything there was to know about a font, here a TrueType Helvetica variant.

The other major font design app for Mac OS was Fontographer, developed by James R Von Ehr II, and released by his company Altsys in 1986. This was the successor to an earlier bitmap font editor named Fontastic, and two years later Altsys released the pioneering illustration app FreeHand. In 1995, Altsys was bought by Macromedia, then ten years later Fontographer was bought by FontLab. This shows Fontographer 5.0, released in 2010, and sadly abandoned a few years later.

References

Chapter 4 in Apple’s Inside Macintosh: Text (1993)

Wikipedia’s list of typefaces in Mac OS X
PostScript fonts on Wikipedia
TrueType on Wikipedia
OpenType on Wikipedia

A brief history of text on the Mac

When the Mac 128K was launched, the computing world was quite happy working with text composed using single-byte characters, and the full 256 characters of Extended ASCII seemed quite sufficient. In those days, encoding text for each language was based on its code page, a different set of 256 characters according to that language’s needs and conventions.

The Mac’s initial version of Extended ASCII became its standard Mac OS Roman encoding by System 6.0.4 in 1989. Since then it has been modified to add support for the euro currency symbol in 1998, and is still supported in macOS. Other code pages for single-byte character encoding extended to Mac OS Icelandic, for example, which formed the basis of Macintosh Latin used by the popular Kermit file-transfer software.

Many languages can’t be encoded in such small character sets, and required 2-byte encodings instead. Dealing with these complexities and support for different writing directions became the task of the Script Manager, introduced in System 4.1 in 1987.

Another fundamental concept in Mac OS has been that text isn’t just a character set, but has to be drawn on the display with other graphics content. Text handling thus became integrated with its rendering and features such as word breaking and ligatures. Support for handling text using mixed scripts came in two optional extensions: WorldScript I for single-byte encodings, and WorldScript II for 2-byte encodings such as Chinese, Japanese and Korean.

There were two more mundane complications for the Classic Mac OS user: line termination, and string handling in code.

While MS-DOS and PCs used the combination of carriage return and line feed characters (\r\n) to terminate lines, Classic Mac OS used carriage return (\r) alone, then Mac OS X followed the Unix convention of using line feed (\n) alone. Although the better text editors supported each of those, and would convert text files between them, that became tedious.

Much application development for Classic Mac OS was performed in Apple’s Macintosh Programmer’s Workshop (MPW) using the extended implementation of Pascal known as Object Pascal. This had adopted UCSD Pascal string format, in which the first byte(s) in its native strings contained the length of the string in bytes, rather than its first character. This was all the more confusing when combining projects with C, whose native string format didn’t preface its characters with length, but terminated every string with a null byte.

In 1985, while working on KanjiTalk, the heart of the Mac’s Japanese localisation, Mark Davis and Ken Krugler developed ideas that eventually led to Unicode. When Davis hired Lee Collins to join him at Apple from Xerox, they developed their proposals further, and in 1987 Apple was one of the founders of the Unicode Consortium. The following year, Apple decided to build Unicode support into TrueType, the new font standard it released in System 7 in 1991.

In 1998 System 8.5 integrated support for Unicode text, in Apple Type Services for Unicode Imaging, ATSUI, which was still supported until 2022, and has finally been removed altogether in macOS 14 Sonoma the following year. Initial support for Unicode included UTF-16 encoding to the Unicode Standard version 2.1. Conversion between text encodings was provided by the Text Encoding Conversion Manager.

Core Text superseded ATSUI in Mac OS X 10.5 Leopard in 2007, and is part of the Cocoa text system inherited from NeXTSTEP.

One unexpected new feature of Unicode was the LastResort, the symbol shown for a code point that doesn’t exist yet, and the product of garbled text, seen here in 2007.

Even in familiar languages like Greek, Unicode offers exotics such as GREEK CAPITAL LETTER ALPHA WITH DASIA AND PERISPOMENI AND PROSGEGRAMMENI, whatever that might be used for.

However, Unicode has brought its own problems, among them its acceptance of multiple code points (character encodings) for visually identical characters. In normal text use this can impede searching, but becomes more critical with the naming of files and directories.

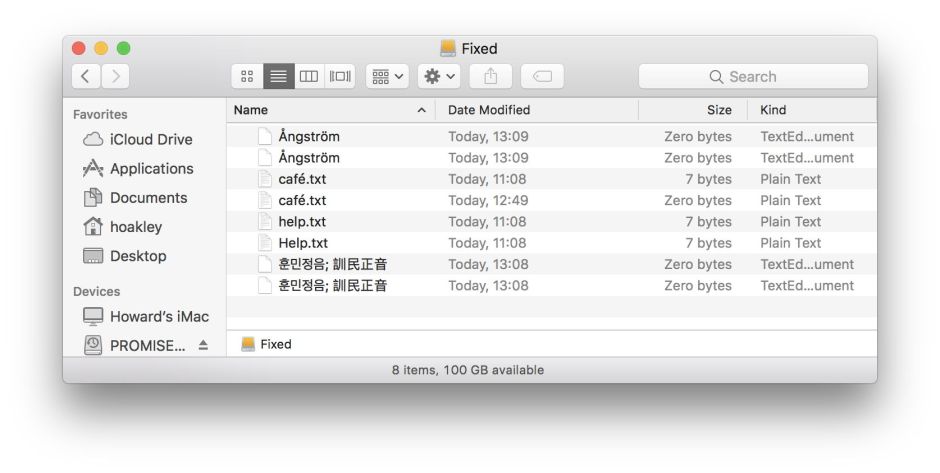
The letter Å can be represented in UTF-8 as either C3 85 (Form C) or 41 CC 8A (Form D). Search for the word Ångström using Form C, and you won’t find the same word using Form D instead. A file system that allows both forms to appear independently in file and directory names appears to the user to allow items with duplicate names, and that poses further problems for search.

In Apple’s Macintosh Extended (HFS+) file system, Unicode normalisation is used to map characters to Unicode Form D, but when Apple developed APFS it intended to leave any normalisation to apps. Early releases of APFS thus didn’t perform normalisation, resulting in many problems for app developers and users. This was rectified by incorporating a normalisation layer into macOS to return to the relative sanity of Form D.

apfelstrudel10

apfsvol08

It would perhaps be better to close without mentioning the annual additions to emoji supported in Unicode, as announced prominently in macOS updates. It has been a long and sometimes arduous journey from Extended ASCII to the 😁 of 🤷.

Apple Inside Macintosh: Text (1993)
Pascal string types in the Free Pascal and Lazarus Wiki
Unicode – the beginnings, Mark Davis and others
Apple Core Text Programming Guide (2007-2014)
Apple Core Text, current documentation

A brief history of disk images on the Mac

Disk images, files that contain the contents of a physical storage medium, go back long before the first Mac. Among other tasks, they were originally used to contain representations of floppy disks for replication in manufacture.

Today disk images are at the heart of macOS, and widely used by third-parties. They’re an essential part of macOS installers, home to Recovery mode, and the basis for cryptexes. They’ve been used to burn and replicate optical disks, to archive disk contents, extensively for network backups, and for the distribution of software.

Classic Mac OS

In Classic Mac OS there were two utilities that worked with different formats: Disk Copy used replicas later in DC42 format, after Disk Copy version 4.2, while compressed formats known as DART were handled by the Disk Archive/Retrieval Tool, hence their name.

Mac OS 9 brought Disk Copy 6.0 with added support for the New Disk Image Format (NDIF), which supported resource forks, and ended with its last release version 6.3.3. This also supported read-only Rdxx formats.

By this time, variants of formats had become complex. Here, Disk Copy is configured to create a read-only compressed .img file containing the contents of a standard 1.4 MB floppy disk. In the upper window, it has completed validating the checksum on a self-mounting .smi disk image that’s part of a DiskSet. These could also be signed, using certificates issued not by Apple but by DigiSign.

Here’s Disk Copy saving an image of a hard disk using a similar read-only compressed format, this time to accommodate 1.5 GB.

Mac OS X

The release of Mac OS X 10.1 Puma in 2001 brought Apple’s new Universal Disk Image Format (UDIF), used in DMG disk images, which only had a single fork as its resource fork was embedded in the data fork. Although pre-release versions of Disk Copy 6.4 and 6.5 were available with UDIF support for Mac OS 9, neither was ever released, leaving Classic Mac OS without access to UDIF images. Its support for compression options in Apple Data Compression (ADC) unified the two disk image types, and extended support for images larger than a floppy disk. This new format enabled disk images to represent whole storage devices, complete with a partition map and disk-based drivers.

Tools provided in Mac OS X for working with disk images include Disk Utility and the command tool hdiutil.

On 21 January 2002, the first version of DropDMG, a third-party substitute for creating disk images, was released by C-Command Software. This quickly enabled developers to create disk images with artwork, licences and other features that weren’t accessible from the tools bundled in Mac OS X. DropDMG has flourished over the last 23 years, and remains popular today.

dmgdropdmg

DropDMG’s options for creating a new disk image far exceed those in Disk Utility. Particularly helpful are the compatible version hints shown on various options, to remind you of which file systems are available in different macOS versions, and which types of disk image container are supported. DropDMG will even convert old NDIF disk images last used in Mac OS 9 to more modern formats. It will also change the password of an encrypted disk image from a menu command.

In Mac OS X 10.2 (2002), UDIF and most other supported formats were served from a kernel extension without requiring a helper process. The following year, 10.3 Panther started using a faceless utility DiskImageMounter to mount disk images. Apple then dropped support for embedded resource forks in disk images in Mac OS X 10.4.7, and newly created disk images became less compatible with older Mac OS versions.

Sparse bundles

Until Mac OS X 10.5 Leopard in 2007, all disk images had used single-file formats, although some could be segmented across file sets. Leopard introduced the sparse bundle with its folder of smaller band files containing data. These enabled the image to grow and shrink in size, and became popular means of storing mountable Mac file systems on servers using different file systems.

This is another third-party tool that improved access to disk images from the GUI, DMG Packager, seen in 2009. Unlike DropDMG, this appears to have vanished without trace.

In 2011, with the release of Mac OS X 10.7 Lion, Apple removed more support for old disk image formats. DiskImageMounter no longer opened NDIF .img, .smi self-mounting, .dc42 and .dart compressed formats, although the hdiutil command tool still retained some access to them.

Disk Utility, seen here in 2011, has provided basic access to many disk image formats, but these are only a small selection of options available in the hdiutil command tool, or in DropDMG.

Disk Utility offers a lot of options when you create a new disk image.

This shows the complex set of options available when creating a new disk image in Disk Utility in OS X 10.10 Yosemite, before the advent of APFS.

Support for compression was enhanced in OS X 10.11 El Capitan with the addition of lzfse in a new ULFO format, and macOS 10.15 Catalina added lzma in ULMO. In both cases, these new formats aren’t accessible in older versions of macOS.

APFS support

The arrival of a pre-release version of the new APFS file system in macOS 10.12 Sierra brought its support in disk images, although only for experimental purposes, and Apple cautioned users to ensure their contents were well backed up.

In addition to adding the more efficient ULMO compressed format, macOS 10.15 Catalina is the last to support many Classic Mac OS disk image formats, including those from DiskCopy42, DART and NDIF from Disk Copy 6.x. Support for AppleSingle and MacBinary encodings, and dual-fork file support, were also removed in macOS 11.0 Big Sur in 2020.

This ‘warning’ alert from 2020 illustrates one of the longstanding issues with disk images. Although integrity checking of disk images using checksums has been valuable, when an error is found there’s no possibility of repair or recovery as the image can’t be ‘attached’, so its file system can’t be mounted.

macOS 12 Monterey in 2021 brought multiple deprecations of older formats, including UDBZ using bzip2 compression, segmented UDIF images, and embedded resources. It’s also thought to be the first version of macOS in which UDIF read/write images (UDRW) have been stored in APFS sparse file format, although Apple has nowhere mentioned that. This has transformed what had previously been space-inefficient disk images that retained empty storage into a format that can prove almost as efficient as sparse bundles. This results from the Trim on mounting HFS+ and APFS file systems within the image freeing unused space, enabling that to be saved in the sparse file format.

Disk images have never been glamorous, but have remained at the heart of every Mac.

References

man hdiutil
Introduction
Tools
How read-write disk images have gone sparse
Performance
Bands, Compaction and Space Efficiency

Appendix: Disk image formats

Supported
  • UDRW – UDIF read/write
  • UDRO – UDIF read-only
  • UDCO – UDIF ADC-compressed
  • UDZO – UDIF zlib-compressed
  • ULFO – UDIF lzfse-compressed (OS X 10.11)
  • ULMO – UDIF lzma-compressed (macOS 10.15)
  • UDTO – DVD/CD-R master for export
  • UDSP – sparse image, grows with content
  • UDSB – sparse bundle, grows with content, bundle-backed, Mac OS X 10.5
  • UFBI – UDIF entire image with MD5 checksum.
Unsupported
  • DC42 – Disk Copy 4.2 (Classic)
  • DART – compressed, for Disk Archive/Retrieval Tool (Classic)
  • Rdxx – read-only Disk Copy 6.0 formats
  • NDIF – Disk Copy 6.0, including IMG and self-mounting SMI
  • IDME – ‘Internet enabled’, on downloading post-processed to automatically copy visible contents into a folder, then move the image to the Trash. Now deemed highly insecure.
  • UDBZ – UDIF bzip2-compressed image (deprecated).

Last Week on My Mac: Bring back the magic

One of the magic tricks that characterised the Mac was its association between documents and their apps. No longer did a user have to type in both the name of the app and the document they wanted it to edit. All they needed to do was double-click the document, and it magically opened in the right app.

In Classic Mac OS, that was accomplished by hidden Desktop databases and type and creator codes. For example, a text document might have the type TEXT and a creator code of ttxt. When you double-clicked on that, the Finder looked up which app had the creator code ttxt, which turned out to be the SimpleText editor, and opened that document using that app.

Although those ancient type and creator codes still live on today in modern macOS, they no longer fulfil that role. Instead, each file has what used to be a Uniform Type Indicator (UTI), now wrapped into a UTType, such as public.plain-text, normally determined by the extension to its name, .txt or .text. When you double-click on a file, LaunchServices looks up that UTType in its registry, discovers which app is set as the default to open documents of that type, then launches that app with an AppleEvent to open the document you picked.

Recognising that we often want to open a document using a different app rather than the default, the Finder’s contextual menu offers a list of suitable apps in its Open With command. That list is built and maintained by LaunchServices, and has changed in recent versions of macOS. Whereas those lists used to consist of apps installed in the traditional Application folders, LaunchServices now scours every accessible volume and folder using Spotlight’s indexes to build the biggest lists possible. If you happen to have an old copy of an app tucked away in a dusty corner, LaunchServices will find it and proudly display it alongside those in everyday use, like a game dog triumphantly presenting not one dead pheasant but every one from miles around.

For those with lean systems, this gives them the flexibility to open a large text document using BBEdit rather than TextEdit, or to select which image editor to use for a JPEG. But for those of us with lots of apps lurking in storage, the result is absurd and almost unusable. It’s bad enough working through the 33 apps that LaunchServices lists as PNG editors, but being offered 70 text editors is beyond a joke.

Unfortunately, there’s no lasting way to block unwanted apps from being added to the list LaunchServices builds for this Open With feature. You can gain temporary relief by excluding them from Spotlight search, but should you ever open the folder they’re in using the Finder, those are all added back. This also afflicts apps in folders shared with a Virtual Machine, where the list includes App Store apps that can’t even be run from within that VM.

There are, of course, alternatives. I could drag and drop the document from its Finder window towards the top of my 27-inch display to the app’s icon in the Dock at the foot, which is marginally less awkward than negotiating my way through that list of 70 apps.

But there are better solutions: why not empower me to determine which of those 70 apps should be offered in the Open With list? This is such a radical idea that it used to be possible with the lsregister command that has become progressively impotent, as LaunchServices has cast its net further in quest of more apps to flood me with. Or maybe use a little machine learning to include only those text editors I use most frequently to open documents? Apple could even brand that LaunchServices Intelligence, although that’s a little overstated.

I can’t help but think of what those magicians from forty years ago would have done, but I’m certain they wouldn’t have offered me that list of 70 apps to choose from.

A brief history of installing Mac OS: Mac OS 9.1

Installing and updating the Mac’s operating system has probably changed more over the last 41 years than any other feature. Initially in Classic Mac OS there was little more to do than install the System and ‘bless’ that disk to make it bootable. As the System became more complex and grew various extensions this required a more formal installation process, and Mac OS and its components were stored inside the System Folder. In this article, I summarise how this worked towards the end of Classic Mac OS, in version 9.1 in 2001, the same year that Mac OS X 10.0 Cheetah was released.

By this time, Mac OS was distributed on CD-ROM rather than a stack of floppy disks, and it was quite usual to install only selected parts of it. Installation was considerably easier if you had more than one volume available on your Mac’s hard disk, as that allowed you to run from one volume while installing or updating into another. As those were HFS+ volumes, they were fixed-size partitions of the disk, corresponding to containers in APFS.

ROM updates were provided separately, and you had to check Apple’s support site to discover whether your Mac required an update. If it did, then that had to be performed as a separate step before upgrading Mac OS.

Another vital task before installing or upgrading Mac OS was to run the new version of Disk First Aid provided on the CD-ROM to check and repair disks. Minor errors were common, but if left they could bring disaster, leaving one or more volumes completely broken.

macos912

Once all mounted volumes had been checked and repaired using Disk First Aid, you opened the Drive Setup utility provided on the installer CD-ROM. Although the Mac OS installer would by default update any disk drivers it could, it was best to do this manually first, then restart the Mac, so those updated drivers could be used during installation.

Classic Mac OS installer apps relied on proprietary compressed archives called tomes containing the software to be installed. A full installation of Mac OS 9.1 consisted of multiple tomes for each of its components including the main system, Internet access, ColorSync, and so on.

macos913

Once restarted you then ran the installer, which was largely self-explanatory. If you were updating a volume that already had Mac OS on it, you could opt to perform a clean install by selecting this as one of the install options. There was also a freeware Clean Install Assistant to help move over old System Folder contents easily.

tomeinstall1

Although recent installers had improved considerably, most normally opted for a ‘custom’ installation by clicking on the Customise button, rather than just accepting that recommended.

macos914

That enabled you to browse through the components to be installed, and to ensure that nothing important to you was missed out. If you didn’t get those right first time, you could always run the installer later to add the bits you forgot.

macos915

It was also common practice to check what was in the Recommended Installation for each component. There were a great many components in the main Mac OS 9.1 install item, some of which were seldom wanted. You needed to take your time and browse these thoroughly before pressing ahead. Once the installation had completed, you then used the Startup Disk control panel to select the volume containing Mac OS 9.1, and restarted.

macos916

Starting up from the newly installed system then opened the Mac OS Setup Assistant to configure the new system. You might then find that some drivers were missing, in this case for a Graphire pad. Many of those could be found and installed from the Internet.

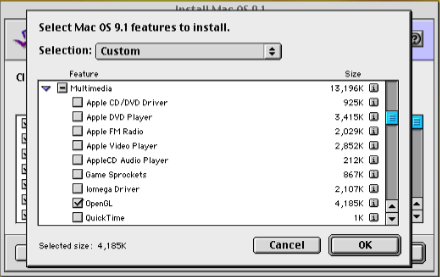
The installer could also be run to install or re-install individual components of Mac OS using its Customize button.

tomeinstall3

For example, to re-install the OpenGL components from within Mac OS 9.1, you opted for a custom installation mode for the Mac OS 9.1 group, and unchecked all the other components. Because these were listed in a hierarchical series, this was fairly quick provided you were careful not to leave any checked inadvertently.

tomeinstall4

Some components, such as QuickTime, weren’t readily installed from the Mac OS Installer. If you looked through the folders on the CD-ROM could locate their installer scripts. Sometimes, double-clicking that script would start the installation process. However, particularly with Mac OS 9.1, you would probably see this error message. In that case, you’d have to perform a manual install from its file tome, using the freeware TomeViewer utility.

tomeinstall5

You dragged and dropped the installation tome file on TomeViewer, and it opened up its contents as a list like this. You could either get it to extract the entire contents of the tome, or you could select one or more files and extract them into a folder before installing them manually into the System Folder of your choice.

tomeinstall6

Once you had saved the individual components you needed, you dragged and dropped them onto your System Folder. It would automatically put them into the correct folders within – Control Panels, Extensions, etc. However, some might require to be put in sub-folders within those. If you were unsure, you could always copy the layout of a fully functional System Folder.

Installing and maintaining Mac OS 9.1 was a complex process even when you were content to follow the recommended installation, and it could easily occupy you for several hours to get it just right.

❌