Now we’ve got LogUI to give us the times of log entries down to the nearest nanosecond, it’s time to see whether that’s any improvement over other tools. Given that Mach Absolute Time resolves to nanoseconds (10^-9 seconds) in Intel Macs, and just under 42 nanoseconds in Apple silicon Macs, can we now resolve times of events better than when using microseconds (10^-6 seconds)?
Methods
To test this out, I used my command tool blowhole that can run a tight loop writing entries in the log as fast as possible. To do this, it uses the code for index in 1...number {
os_log("%d", log: Blowhole.gen_log, type: type, index)
}
I then wrote loops of 20 to the log of an iMac Pro (Intel Xeon W CPU), M3 Pro and M4 Pro, and extracted the resulting log entries using LogUI with its new nanosecond times.
Results
Plotting these times against loop number resulted in unexpected patterns.
In this graph, results from the iMac Pro are shown in black, those from the M3 Pro in blue, and the M4 Pro in red. Although less well-ordered in the first to fourth loops, from the fifth loop onwards there were linear relationships between time of log entries and loop number. Linear regression equations are shown in the legend, and demonstrate:
on the iMac Pro each loop takes 1.0 x 10^-6 seconds, i.e. 1 μs;
on the M3 Pro each loop takes 5.6 x 10^-7 seconds, i.e. 0.6 μs;
on the M4 Pro each loop takes 4.6 x 10^-7 seconds, i.e. 0.5 μs.
which perhaps isn’t surprising.
However, the patterns of individual points are quite different. Apart from loops 4 and 5, subsequent loops on the iMac Pro are evenly spaced in time. Those on the Apple silicon chips are grouped in pairs or, for loops 14-16 on the M4 Pro, in a triplet, where two or three loops are assigned the same time in the log.
Looking at time differences, a clear pattern emerges, that log times are incremented in steps of 954 ns. For the iMac Pro, each loop occurs one step later, while for the M3 Pro and M4 Pro steps between pairs and triplets are also 954 ns. In a few cases, the step difference is slightly greater at around 1192 ns instead of 954 ns. Apple silicon chips are faster on average because each step includes two or more loops, while the iMac Pro only manages one loop per step.
Explanation
If log entry times had been given in microseconds rather than nanoseconds, the same patterns would have been seen. But without the additional precision in their times, it wouldn’t have been clear that multiple log entries were being written with identical times, down to the nanosecond.
One likely explanation is that macOS only writes log entries approximately every microsecond, and the entry time recorded for each is that of that writing. Writing log entries must occur asynchronously for the M3 Pro and M4 Pro to be able to send pairs or triplets to be written, rather than having to wait for each writing process to complete.
Thus, the time resolution of log entries is approximately 1 μs, or 954 or 1192 ns to be more precise, and that’s the same regardless of whether macOS is running on a recent Intel Mac or the latest Apple silicon chips. Although a time resolution of 1 μs is sufficient for general purposes, if you want to dig deeper, as I have done here, access to the finer resolution provided in nanosecond times is essential.
Conclusions
Times written in log entries are incremented every 954 or 1192 ns on both Intel and Apple silicon.
Faster Apple silicon chips can write more than one entry in the same time increment.
Although expressing the time of log entries in microseconds is sufficient for general purposes, using nanoseconds can confirm which have occurred simultaneously.
The Music of Time
So what is a Dance to the Music of Time? It’s one of Nicolas Poussin’s most brilliant paintings, that inspired a series of twelve novels written by Anthony Powell. While I wouldn’t attempt to summarise those, here’s the painting to enjoy.
Nicolas Poussin (1594–1665), A Dance to the Music of Time (c 1634-6), oil on canvas, 82.5 × 104 cm, The Wallace Collection, London. Wikimedia Commons.
Poussin’s Dance to the Music of Time (c 1634-6) shows four young people dancing, who are currently believed to be Poverty (male at the back, facing away), Labour (closest to Time and looking at him), Wealth (in golden skirt and sandals, also looking at Time), and Pleasure (blue and red clothes) who fixes the viewer with a very knowing smile. Opposite Pleasure is a small herm of Janus, whose two faces look to the past and the future. Father Time at the right is playing his lyre to provide the music, and an infant seated by him holds a sandglass, to measure time periods. Above them in the heavens, Aurora (goddess of the dawn) precedes Apollo’s sun chariot, on which the large ring represents the Zodiac, thus the passage of the months. Behind the chariot are the Horai, the four seasons of the year.
Macs keep time exceedingly precisely, although there are important differences here between Intel and Apple silicon models. Their most precise record of time is given in Mach Absolute Time (MAT), the number of ‘ticks’ since an arbitrary start. In Intel Macs, each tick occurs every nanosecond (10^-9 second), providing high resolution, but ticks are less frequent in Apple silicon chips, occurring once every 41.666… nanoseconds instead.
You can test this on an Apple silicon Mac using my free utility Mints, which has a convenient button to display Mach timebase information. Run Mints in native mode, the default as it’s a Universal App, and it reports the Arm values; force it to launch as an app translated by Rosetta, and it will give the same timebase as an Intel Mac.
Although entries in the log are recorded in MAT’s high resolution, most methods of accessing log entries lose much of that precision. The datestamps provided by the log show command, for example, round time to the nearest microsecond (10^-6 second), although it’s capable of delivering a field in MAT’s nanoseconds. The bundled Console app is similar, but lacks any option to display MAT. My Ulbow app can display both datestamps with microseconds and MAT, but until now LogUI has been limited to displaying only time in milliseconds (10^-3 second).
To put these into context, in each microsecond the P core in the CPU of an M4 chip can complete execution of over 1,000 instructions, and in a millisecond that becomes more than a million instructions.
LogUI has been constrained by the formatted output available using Date and DateFormatter in the macOS API, which appear to be incapable of generating time any more precisely than milliseconds. After several earlier unsuccessful attempts, I’m now able to obtain time in nanoseconds, using Calendar and DateComponents in the API. For example, to obtain a formatted string containing the nanosecond component of a Date variable named date: let nanoSeconds = Calendar.current.component(.nanosecond, from: date)
let nsTime = String(format: "%09d", nanoSeconds)
The string nsTime can then be spliced into a formatted date string.
I have incorporated this into a new build of LogUI, which also has extended information about the log display in its Help book. LogUI 1.0 build 48 is now available from here: logui148
and from its Product Page.
Tomorrow I’ll consider whether these more precise times are of use, and what we can learn from them.
For many, the significance of macOS 16 won’t lie in its additions, but in its potential removals: will it support any Intel Macs, and if so, which? For such a contentious issue, speculation has been disappointingly limited in the run-up to the anticipated announcement at the start of WWDC next month.
I have seen popular but unfounded assertions that Apple supports Macs with its current version of Mac OS for a period of five years. There are different interpretations as to whether that time should run from a model’s date of first release, or when it was discontinued. As many Macs have been offered for sale for over a year, that can make a big difference. As I demonstrated yesterday in my latest brief history, previous transitions haven’t followed any consistent rules.
History
The last 68K Mac was available up to October 1996, but with the transition to PowerPC Macs, Classic Mac OS dropped support for 68K models in October 1998, after only 2 years support.
The last PowerPC Mac was offered by Apple over a brief period between October 2005 and August 2006, but support for it was dropped from Mac OS X after exactly 3 years in August 2009. Even if you start the clock when that G5 model was first released, any five-year rule would have required it to be supported by current Mac OS X for at least another year.
Late Intel Mac models are more complicated, as the last volume sales of Intel iMacs ceased in March 2022, but Apple continued to offer the Intel Mac Pro until June 2023. If Apple did have a five-year rule it would now be committed to maintaining full macOS support for some Intel Macs until the autumn/fall of either 2027 or 2028, even if by then most of them had been replaced by Apple silicon models.
Savings
Other opinions claim that Apple will continue to support just some remaining Intel Macs beyond macOS 16, but others currently running Sequoia will be dropped. The flaw in that is cost, as significant reductions in cost would only be achieved by eliminating all Intel support.
If macOS 16 were to support a single Intel Mac, then there would be little change in its cost. It would still need to consist largely of Universal binaries, there would still need to be kernel extensions to support Intel chipsets and old graphics cards, and most of all those would need to be included in every update to macOS 16 until it ceases security updates in the summer of 2028.
There’s also the question of continuing support for Rosetta 2, together with all its supporting Intel dyld caches; they alone account for around 1 GB of every downloaded update for Apple silicon Macs. Apple has ensured that, unlike Rosetta in transitional versions of Mac OS X, Rosetta 2 can be dropped with Intel support in macOS, as it will remain available in lightweight virtual machines running previous versions of macOS, for the rare cases it’s still needed.
Demand
Like many other business decisions, termination of support is largely driven by marketing and cost. Apple appears to have continued supporting 2019 iMacs as the last Intel models without T2 chips largely because of Enterprise customers who have continued using them in their large fleets. On the other hand, it dropped support for the 2013 Mac Pro, sold for six years up to December 2019, after macOS 12 Monterey was replaced by Ventura in 2022, less than three years after the last of that model was sold.
Decision time
Without knowing the demand from Enterprise users for continuing support of Intel Macs in the next major version of macOS, and the number of Intel Macs that have been upgraded to run Sequoia, it’s anyone’s guess as to what Apple has decided. We won’t know that for a couple of weeks yet, but I’ll guarantee that either way there’ll be disappointment. If macOS 16 doesn’t support any Intel Macs, there’ll be those who are upset because they won’t be able to upgrade, and if it does there’ll be those who are upset at its features that are only available on Apple silicon Macs.
But if it does turn out to be Arm-only, perhaps the biggest losers will be those who hope for OpenCore Legacy Patcher (OCLP) support to enable their cherished Mac to continue running the current macOS. If macOS 16 is no longer Universal, then it will simply never run on any Intel Mac. Apple could see that as a good way to convince those who have been sitting on the fence that it’s time for a new Mac.
Macs have undergone three major hardware architectural transitions over the last 41 years, and it may well be that this year sees the completion of the last of those. I’ve previously given a brief account of those changes in CPUs; this article summarises when and how those transitions have taken place.
Classic Macs used Motorola’s 68K series of processors until the Spring of 1994, when the first transition to PowerPC processors started.
PowerPC 1994-98
Apple had originally intended to launch its new range of Power Macs on the tenth birthday of the Mac in January 1994, but its first three models, the 6100, 7100 and 8100, weren’t ready until March, when they came with System 7.1.2 and a PowerPC ‘enabler’. Much of the system was still in 68K code, so to enable its continuing use, and to allow the running of existing 68K apps, it came with a built-in 68K emulator. That was surprisingly mature, as it had first been developed by Gary Davidian for use in experimental RISC-based Macs during 1990, as part of the Cognac project to identify a successor for the 68K.
Mac OS supported both PowerPC and 68K architectures from March 1994 to Mac OS 8.1 in January 1998. Support was dropped from 8.5 in October of that year, although the 68K emulator remained until the final version of Classic Mac OS, 9.2.2, released in December 2001. The last 68K Macs were the LC 580, produced between April 1995 and April 1996, and the PowerBook 190cs, discontinued in October 1996.
Thus, the transition period to PowerPC processors lasted from March 1994 to October 1998, a period of 4.5 years.
Apple System Profiler here shows details of a Power Mac G3 Blue and White from 1999.
TattleTech reveals that it was the first model to be officially assigned a name in the new series, as a PowerMac1,1, or 406 in the old Machine ID numbering.
Running a Windows PC in emulation using VirtualPC, seen here in July 1999, was useful but hardly performant.
PowerPC processors reigned for just over a decade before Apple switched a second time, to Intel CPUs.
Intel 2006-09
Moving to a well-established architecture was anticipated to be quicker, and when Apple announced the change at WWDC in 2005, Steve Jobs expected the hardware transition to start by June 2006, and to be completed by early 2008. In fact, the first Intel Macs shipped in January and February 2006, the iMac and Mac mini respectively. The last Power Mac G5 was produced between October 2005 and August 2006, and by the end of that year the full range of Intel Macs was complete.
Mac OS X came with initial Intel support in 10.4.4, installed on the first iMacs. The last version to run on PowerPC processors was 10.5.8 in August 2009, and in the same month Mac OS X 10.6 was Intel-only.
Rather than opting for another software emulator to run PowerPC code on Intel processors, Apple licensed code translation technology named QuickTransit from Transitive Corporation, an extension of Dynamite technology developed by the University of Manchester, England. This version of Rosetta could translate G3, G4 and AltiVec instructions, but not those specific to the PowerPC G5 processor. This was bundled in Mac OS X from 10.4.4 in January 2006, until it was discontinued in 10.6.8 in July 2011.
The transition period to Intel processors lasted from January 2006 to August 2009, a period of just over 3.5 years.
Apple silicon 2020-?
Apple’s third transition has been distinguished by its lengthy and staged preparation, and the fact that its goal was the first Mac that has been completely designed and developed by Apple. Its roots go back to a partnership with the British microcomputer manufacturer Acorn Computers in the 1980s that led to the development of the Acorn RISC Machine using an early RISC processor, and the origin of the name ARM. During the 1990s Apple, through Larry Tesler, was a major investor in ARM, who provided the processor for Apple’s Newton handheld devices launched in 1993. Although the Newton was a commercial failure, it was the germ for the first iPhone in 2007, and the iPad three years later.
Another landmark in the preparations for Apple silicon Macs was the incorporation of the T2 Arm-based ‘security chip’ in Intel Macs from December 2017 onwards, although Apple didn’t incorporate that into a regular iMac model until as late as 2020.
Apple announced this transition at WWDC in June 2020, and the first Apple silicon Macs shipped in November that year, Mac mini, MacBook Pro and MacBook Air models. This was less than a year after the release of the last Intel Mac, the delayed Mac Pro of December 2019, which continued in production until June 2023, and the more popular 27-inch iMac made between August 2020 and March 2022. First Apple silicon Macs came with macOS 11.0, and both architectures remain supported as far as macOS 15 Sequoia, from 2024.
To enable its new Macs to run apps built for Intel x86 processors, Apple returned to code translation in Rosetta 2, bundled in macOS 11 and later, but downloaded and updated separately. To accelerate the launching of x86-64 apps, this uses both ‘just-in-time’ translation at the time of launch, and ahead-of-time (AOT) when an x86-64 single-architecture binary is installed. In contrast to its earlier emulator and even the first version of Rosetta, this performs spectacularly well.
The transition to Apple silicon thus started in November 2020, and appears likely to end with the release of macOS 16 in the autumn/fall of 2025. That would be a period of almost 5 years, even longer than the first transition to PowerPC. This time we’re better prepared for the future, as Apple silicon Macs offer excellent virtualisation of macOS, allowing the latest chips to run macOS as old as Monterey from 2021, together with full support for x86-64 apps using Rosetta 2 in the virtual machine.
It has been a long time since I last compared performance between CPU cores in Intel and Apple silicon Macs. This article compares six in-core measures of CPU performance across four different models, two with Intel processors, an M3 Pro, and an M4 Pro.
If you’re interested in comparing performance across mixed code modelling that in common apps, then look no further than Geekbench. The purpose of my tests isn’t to replicate those, but to gain insight into the CPU cores themselves, when running tight number-crunching loops largely using their registers and accessing memory as little as possible. This set of tests lays emphasis on those run at low Quality of Service (QoS), thus on the E cores of Apple silicon chips. Although those run relatively little user code, they are responsible for much of the background processing performed by macOS, and can run threads at high QoS when there are no free P cores available, although they do that at higher frequencies to deliver better performance.
Mac mini 2024, M4 Pro, 48 GB memory, Sequoia 15.5.
Six test subroutines were used in a GUI harness, as described in many of my previous articles. Normally, those include tests I have coded in Arm Assembly language, but for cross-platform comparisons I rely on the following coded in Swift:
float mmul, direct calculation of 16 x 16 matrix multiplication using nested for loops on Floats.
integer dot product, direct calculation of vector dot product on vectors of 4 Ints.
simd_float4 calculation of the dot-product using simd_dot in the Accelerate library.
vDSP_mmul, a function from the vDSP sub-library in Accelerate, multiplies two 16 x 16 32-bit floating point matrices, which in M1 and M3 chips appears to use the AMX co-processor;
SparseMultiply, a function from Accelerate’s Sparse Solvers, multiplies a sparse and a dense matrix, and may use the AMX co-processor in M1 and M3 chips.
BNNSMatMul matrix multiplication of 32-bit floating-point numbers, here in the Accelerate library, and since deprecated.
Source code for the last four is given in the appendix to this article.
Each test was run first in a single thread, then in four threads simultaneously. Loop throughput per second was calculated from the average time taken for each of the four threads to complete, and compared against the single thread to ensure it was representative. Results are expressed as percentages compared to test throughput at high QoS on the iMac Pro set at 100%. Thus a test result reported here as 200% indicates the cores being tested completed calculations in loops at twice the rate of those in the cores of the iMac Pro, so are ‘twice the speed’.
High QoS
User threads are normally run at high QoS, so getting the best performance available from the CPU cores. In Apple silicon chips, those threads are run preferentially on P cores at high frequency, although that may not be at the core’s maximum. Results are charted below.
Each cluster of bars here shows loop throughput for one test relative to the iMac Pro’s 3.2 GHz 8-core Xeon processor at 100%. Pale blue and red bars are for the two Intel Macs, the M3 Pro is dark blue, and the M4 Pro green. The first three tests demonstrate what was expected, with an increase in performance in the M3 Pro, and even more in the M4 Pro to reach about 200%.
Results from vDSP matrix multiplication are different, with less of an increase in the M3 Pro, and a reduction in the M4 Pro. This may reflect issues in the code used in the Accelerate library. That contrasts with the huge increases in performance seen in the last two tests, rising to a peak of over 400% in BNNS matrix multiplication.
With that single exception, P cores in recent Apple silicon chips are out-performing Intel CPU cores by wider margins than can be accounted for in terms of frequency alone.
Low QoS
When expressed relative to loop throughput at high QoS, no clear trend emerges in Apple silicon chips. This reflects the differences in handling of threads run at low QoS: as the Intel CPUs used in Macs only have a single core type, they can only run low QoS threads at lower priority on the same cores. In Apple silicon chips, low QoS threads are run exclusively on E cores running at frequencies substantially lower than their maximum, for energy efficiency. This is reflected in the chart below.
In the Intel Xeon W of the iMac Pro, low QoS threads are run at a fairly uniform throughput of about 45% that of high QoS threads, and in the Intel Core i9 that percentage is even lower, at around 35%. Throughput in Apple silicon E cores is more variable, and in the case of the last test, the E cores in the M4 Pro reach 66% of the throughput of the Intel Xeon at high QoS. Thus, Apple appears to have chosen the frequencies used to run low QoS threads in the E cores to deliver the required economy rather than a set level of performance.
Conclusions
CPU P core performance in M3 and M4 chips is generally far superior to CPUs in late Intel Macs.
Performance in M3 P cores is typically 160% that of a Xeon or i9 core, rising to 330%.
Performance in M4 P cores is typically 190% that of a Xeon or i9 core, rising to 400%.
Performance in E cores when running low QoS threads is more variable, and typically around 30% that of a Xeon or i9 core at high QoS, to achieve superior economy in energy use.
On Intel processors running macOS Sequoia, low QoS threads are run significantly slower than high QoS threads, at about 45% (Xeon) or 30-35% (i9).
My apologies for omitting legends from the first version of the two charts, and thanks to @holabotaz for drawing my attention to that error, now corrected.
From the outset, the Macintosh was a single integrated unit, at a time when other personal computers came with separate displays.
Macintosh 128K (1984), Apple Museum Prague. Image by Benoît Prieur, via Wikimedia Commons.
It took three years for Macs to diverge into the all-in-one SE and the modular Macintosh II with its conventional case and separate colour monitor. The meteoric rise of desktop publishing demanded large, deep and heavy cathode-ray tube (CRT) colour displays that only came separately, and needed long graphics cards that had to be fitted inside the computer’s chassis.
Although the Mac SE weighed up to almost 10 kg (22 pounds), many lugged them around in soft cases slung over their shoulders, providing a degree of portability. There are some folk whose backs still bear witness to those days of the luggable Mac.
Integral CRT displays hardly changed over this period. The Macintosh 128K came with a 9 inch screen displaying a mere 512 x 342 pixels in monochrome. Ten years later, the Color Classic was the first all-in-one to come with a 10 inch colour screen, and that only increased resolution to 512 x 384 pixels. Neither was there any support for external displays, until the LC 520 in July 1993, with its 14 inch colour CRT at 640 x 480 resolution and display port.
During the 1990s, Apple offered various Power Macintosh, Performa and LC all-in-one models featuring integral or piggybacked displays, culminating in the Power Macintosh 5500 in 1997, with its 15 inch CRT of which less than 13 inches were viewable, and supporting up to 832 x 624 pixels.
Twentieth Anniversary Macintosh (1997). Image by Shelby Jueden, via Wikimedia Commons.
Apple’s next innovative all-in-one was the Twentieth Anniversary Macintosh (TAM), released a year late in 1997. It came with a 12.1 inch backlit active-matrix screen rather than the traditional CRT, in this unique design. Although a limited edition intended to be a collector’s item, it was overpriced and sold poorly, and has since been eclipsed by the most innovative model since the original 128K.
In May 1998, Apple announced the first iMac, based on a PowerPC G3 processor and a 15 inch CRT, of which 13.8 inches are viewable at resolutions of up to 1024 x 768 pixels. The design wrapped the case around the bulk of the display in the form of a ‘gumdrop’, using coloured translucent plastic later offered in a range of bright colours.
iMac G3 (1998). Image by Felix Winkelnkemper, via Wikimedia Commons.
It was also technically innovative, featuring novel USB ports and discarding the traditional floppy disk drive in favour of optical and hard drives. This shipped in August 1998, with hardware revisions that October and the following January.
A few months later Apple quietly slipped out the Power Macintosh G3 All-in-One, but that proved to be a dead-end and has been largely forgotten in favour of the iconic iMac.
By January 2002, flat-panel displays were starting to displace bulky CRTs, and Apple made use of them in its first flat-panel iMac. This featured a PowerPC G4 processor, and a 15 inch TFT active-matrix LCD delivering up to 1024 x 768 pixels. The computer components were assembled into a heavy hemispherical base on which the display was mounted using a hinged stainless steel arm resembling an Anglepoise desk lamp, which had been designed in 1932 by George Carwardine and is still in production.
iMac G4 (2002). Image by Maxime Bober, via Wikimedia Commons.
This ‘Anglepoise’ mount remains the best adjustable mechanism used with a display, ensured effortless positioning to suit each user, and eventually supported 20 inch flat-panel displays.
iMac G4 (2002), display mount. Image by Maxime Bober, via Wikimedia Commons.
With displays now thin enough to allow computer components to be integrated behind the screen, the next step was to eliminate the heavy base. Apple achieved that in August 2004 with the iMac G5, in its 17 and 20 inch models. With the switch to Intel processors and further integration in computer components, display size rose to 24 inches in 2007, and 27 inches two years later.
For many, the zenith of the iMac came in Retina 5K displays first offered in 2014, and the most powerful Intel iMac of all, the 27 inch iMac Pro released at the end of 2017. The latter features Intel Xeon processors with 8 or 10 cores together with the new T2 security chip. Although it doesn’t appear to have sold well, it was popular with developers and others during the hiatus between the Mac Pro models of 2013 and 2019.
Although the iMac Pro was the first Mac to feature a T2 chip, their inclusion in other iMacs was delayed until Apple had already announced its move to Apple silicon models. The last Intel iMac with a 27 inch Retina 5K display was released in August 2020, three months before Apple shipped the first M1 Mac mini and others.
Since May 2021, Apple has offered a succession of three iMacs powered by its M-series chips, all with a 24 inch Retina 4.5K display. They follow in the line of the original iMac from 1998, and come in a range of colours. But there are many who are still clinging onto ageing Intel iMacs in the hope that, one day, Apple will offer an all-in-one in the spirit of the iMac Pro, with a Pro grade chip and a 27 inch Retina 5K display.
Evolution of iMacs. Graphics by Giulia Piccoli Trapletti, via Wikimedia Commons.
In computing, the term Quality of Service is widely used to refer to communication and network performance, but for Macs it has another more significant meaning, as the property that determines the performance of each thread run on your Mac, most importantly in Apple silicon chips.
Processes and threads
Each process running on your Mac consists of at least one thread. Threads are single flows of code execution run on one CPU core at a time, sharing virtual memory allocated to that process, but with their own stack. In addition to the process’s main thread, it can create additional threads as it requires, which can then be scheduled to run in parallel on different cores. As all recent Macs have more than one core, processes with more than one thread can make good use of more than one core, and so run faster.
Take the example of a file compressor. If it’s coded so that it can perform its compression in four threads that can be run simultaneously, then it will compress files in roughly a quarter of the time when it runs on four CPU cores, compared with running on a single core (ignoring input and output to disk).
That only works when those four cores are all free. If your Mac is also trying to build its Spotlight indexes at the same time, the threads doing that will compete with those of your compression app. That’s where the thread’s Quality of Service (QoS) settings come in, as they assign priority. On Apple silicon Macs, a thread’s QoS will also help determine whether it’s run on its Performance or Efficiency cores.
Standard QoS settings
QoS is set by the process, and is normally chosen from the standard list:
QoS 9 (binary 001001), named background and intended for threads performing maintenance, which don’t need to be run with any higher priority.
QoS 17 (binary 010001), utility, for tasks the user doesn’t track actively.
QoS 25 (binary 011001), userInitiated, for tasks that the user needs to complete to be able to use the app.
QoS 33 (binary 100001), userInteractive, for user-interactive tasks, such as handling events and the app’s interface.
There’s also a ‘default’ value of QoS between 17 and 25, an unspecified value, and in some circumstances you might come across others used by macOS.
These are the QoS values exposed to the programmer. Internally, macOS uses a more complex scheme with different values.
CPU core type
When running apps on Intel Macs, because all their CPU cores are identical, QoS has more limited effect, and is largely used to determine priority when there are threads queued for execution on a limited number of cores.
Apple silicon Macs are completely different, as they have two types of CPU core, Efficiency (E) cores designed to use less energy and normally run at lower frequencies, and Performance (P) cores that can run at higher frequencies and deliver maximum performance, but using more energy.
QoS is therefore used to determine which type of core a thread should be run on. Threads with a QoS of 9 (background) are run on E cores, and can’t be promoted to run on P cores, even when there are inactive P cores and the E cores are heavily loaded. Threads with a QoS of 17 and above will be preferentially run on P cores when they’re available, but when they’re all fully occupied, macOS will run them on E cores instead. In that case, the E cores will be run at higher frequencies for better performance with less economy.
If your Apple silicon Mac has a base variant chip with 4 E and 4 P cores, this results in the following:
apps with a total of up to 4 threads at high QoS will be scheduled and run at full speed on the P cores;
when those P cores are all busy with high QoS threads, running another thread will then result in that being run on the E cores, and slightly slower than it would on a P core;
a total of 8 high QoS threads can thus be run on P and E cores together;
when running low QoS background threads on E cores, a maximum of 4 can be run at any time when the E cores are available, but those threads can’t spill over and run on the P cores, even if those are idle.
Controls
As QoS is normally either set by the process for its threads, or for services in their LaunchDaemon or LaunchAgent property list, the user has little direct control. A few apps now provide settings to adjust the QoS of their worker threads. Among those in the compression utility Keka, together with a couple of my own utilities such as the Dintch integrity checker.
In Keka’s settings, you can give its tasks a maximum number of threads, and even run them at custom Quality of Service (QoS) if you want them to be run in the background on E cores, and not interrupt your work on P cores.
Dintch has a simple slider, with the green tortoise to run it on E cores alone, and the red racing car at full speed on the P cores.
App Tamer and taskpolicy
The great majority of threads run at low QoS on the E cores are those of macOS and its services like Spotlight indexing. When a thread has already been assigned a low QoS, there’s currently no utility or tool that can promote it so it’s run at a higher QoS. In practice this means that you can’t accelerate those tasks.
What you can do, though, is demote threads with higher QoS to run at low QoS, more slowly and in the background. The best way to do this is using St. Clair Software’s excellent utility App Tamer. If you prefer, you can use the taskpolicy command tool instead. For instance, the command taskpolicy -b -p 567
will confine all threads of the process with PID 567 to the E cluster, and can be reversed using the -B option for threads with higher QoS (but not those set to low QoS by the process).
That can be seen in this CPU History window from Activity Monitor. An app has run four threads, two at low QoS and two at high QoS. In the left side of each core trace they are run on their respective cores, as set by their QoS. The app’s process was then changed using taskpolicy -b and the threads run again, as seen in the right. The two threads with high QoS are then run together with the two with low QoS in the four E cores alone.
Virtualisation
Although Game Mode does alter the effects of QoS and core allocation, its impact is limited. The one significant exception to the way that QoS works is in virtualisation.
macOS Virtual Machines running on Apple silicon chips are automatically assigned a high QoS, and run preferentially on P cores. Thus, even when running threads at low QoS, those are run within threads on the host’s P cores. This remains the only known method of electively running low QoS threads on P cores.
Key points
Threads are single flows of code execution run on one CPU core at a time, sharing virtual memory allocated to that process, but with their own stack.
Apps and processes set the Quality of Service (QoS) for each of the threads they run.
On Apple silicon chips, low QoS of background results in that thread being run on E cores alone.
Higher QoS threads are preferentially allocated to P cores, but when they aren’t available, that thread will be run on E cores at high frequency.
Some apps now provide controls over the QoS of their worker threads.
App Tamer and taskpolicy let you demote high QoS threads to be run with low QoS on the E cores, but can’t promote low QoS threads to run faster on P cores.
Virtual machines run all threads at high QoS as far as the host Mac is concerned.
This coming autumn it’ll be five years since Apple started shipping its first Apple silicon Macs, and it’s already four years since the first M1 iMac. As prices of used Intel Macs are tumbling, more Apple silicon models are coming onto the used market. With a total of 15 basic M-series chips now available, this article tries to help you decide which new or used Apple silicon model to buy.
CPU cores
With such a wide choice, this is perhaps the most complex feature to understand, and it’s likely to make the biggest difference to what your Mac will do. M-series chips have anything from 2-8 Efficiency (E) cores, and 4-24 Performance (P) cores across four different families.
Although folk are usually more concerned with the number of P cores, E cores are responsible for doing much of the routine work, and shouldn’t be ignored. They run most of the background tasks in macOS, from Time Machine backups to indexing all your images and documents for Spotlight. P cores are largely responsible for running the code in your apps, so determine how fast it feels in use.
Most M-series chips have at least 4 E cores, but two, the M1 Pro and M1 Max, have only 2. They compensate for that by running those E cores at higher frequencies when working on heavy background tasks, but subsequent designs have set the comfortable minimum at 4, and the latest base M4 comes with 6. Of the two core types, E cores are the more versatile, as they can run all types of task, background or user, and when running at their maximum frequency can deliver a high proportion of the processing power of a P core. As an E core’s energy use is much lower than that of a P core, they’re a better option when running a laptop Mac on its battery.
The four E cores in this M4 Pro are kept fully occupied in the minutes after starting up, leaving the P cores free for running apps smoothly.
P and E core performance has increased with each new family. This is illustrated in different types of computation, when running one thread on a single core.
The Y axis here gives loop throughput per second for my four basic in-core performance tests, a tight assembly code integer math loop, another tight assembly code loop of floating point math, NEON vector processor assembly code, and a tight loop calling an Accelerate routine run in the NEON unit. Pale blue bars are results for the M1, purple for the M3, and red for the M4, the higher the bar the faster.
Maximum core frequencies have increased from 3.2 GHz in the M1’s P cores to 4.5 GHz in the M4. One crude comparative measurement of overall computing capacity is to total the maximum frequencies for each of the CPU cores in each chip. Those are shown as Σfn in the table below, and the chart that follows it.
These are also complicated by sub-variants and binned versions, where one or two cores have been disabled by Apple, to produce a cheaper chip.
If you’re looking for CPU performance, the M3 Max, and M4 Pro and Max stand out and approach the performance of Ultra chips. But those assume that the software running is able to make full use of all the cores available. There’s no point in paying for the 32 cores in an M3 Ultra if the app you run most can’t use many of them.
Another detail that’s easily overlooked is the instruction set (ISA) supported, notably that of the M4, which includes new features for accelerated matrix and other computation. In this respect, the M2 family has been underrated, as I’ve explained here.
GPU
For most, the choice of CPU cores determines the GPU provided, and for general use they’re well matched. Exceptions to this are when high GPU performance is essential, and to support external displays. In either case you’ll need to check carefully with Apple’s specifications or Mactracker to ensure support. That’s particularly important when driving multiple high-resolution displays.
Memory
Memory options are determined by the chip, with some starting at only 8 GB, which is insufficient even for the lightest use. There was a myth that the use of Unified memory would result in substantial economy in memory use, but in practice that doesn’t work out, and demand for memory has increased with the introduction of new features such as AI.
The danger with this is that using substantial amounts of swap storage is deceptively fast because of the high speed of the internal SSD. As models with 8 GB memory often have small SSDs as well, this is likely to lead to rapid ‘wear’ of the SSD, and some early adopters saw worryingly rapid changes in wear indicators. Fortunately, Apple has recognised this problem, and all M4 models now come with a minimum of 16 GB.
If you’re interested in buying an older model with only 8 GB, at least check its SSD size and wear indicators before parting with your money. Further information about memory requirements is here.
SSD
While it’s possible to enjoy using an Apple silicon Mac with only 256 GB internal SSD, unless you’re frugal in its use you’ll find yourself buying a more substantial external SSD to supplement that. You can start up an Apple silicon Mac from macOS on an external SSD (or even a hard drive, if you must), but that’s more fussy than with an Intel Mac. If you want to consider relying on external storage, this article explains how best to do that.
For most users, a minimum internal SSD requires 512 GB for comfort and a long life.
Buy to upgrade
Until recently, all Apple silicon Macs have been stuck with the CPU cores, GPU, memory and internal SSD that they came with. That may be changing with some now offering SSD upgrades for the M4 Mac mini. However, those are likely to invalidate your warranty, and aren’t likely to be available for other popular models, apart from the Mac Pro.
Recommendations
Prefer a later Pro or Max chip over an M1 Pro or Max, to get at least 4 E cores.
E cores are more versatile than P cores, and an advantage when a laptop is powered by its battery.
If you need to use external displays, check the model’s support for their number and resolution.
Look for a minimum of 16 GB of memory.
When buying a model with 8 GB of memory, check the wear on its SSD.
Prefer a minimum of 512 GB SSD to avoid relying on external storage.
Don’t rely on upgrading any Apple silicon Mac’s internal hardware.
Until last November, lightweight virtualisation of macOS on Apple silicon Macs had behaved uniformly across M-series families. Although I have heard of one report of problems moving VMs between Macs, those were built with custom kernels. In ordinary experience, VMs running on M1, M2 and M3 chips seemed not to care about the host’s hardware, and most of the time just worked, and updated correctly. There was one unfortunate glitch with shared folders that were lost in macOS 14.2 and 14.2.1, but otherwise VMs largely worked as expected.
Then last November disaster struck those of us who had just started using our new M4 Macs: they couldn’t virtualise any version of macOS before Ventura 13.4. Running a macOS VM for any version before that on an M4 Mac resulted in a black screen, and the VM failed to boot. That was fixed swiftly in macOS 15.2, and we no longer had to keep an older Apple silicon Mac around to be able to run those older versions of macOS in VMs.
Like many who virtualise macOS on Apple silicon, I keep a library of VMs with different versions so I can readily run tests on my apps and other issues. This is one of the great advantages of virtualisation, provided that you don’t rely on being able to run most apps from the App Store. When Apple releases new versions of macOS, once I’ve updated my Mac hosts, I turn to updating VMs. I’m normally cautious when doing this, to avoid trashing the original version. I duplicate the most recent, open it and run Software Update. When I’m happy that has worked correctly, I trash the original and rename the updated VM with its new version number.
That worked fine with Ventura 13.7.4 updating to 13.7.5, and Sonoma going to 14.7.5, but Sequoia 15.3.2 failed with a kernel panic, as I’ve detailed. When several of you kindly pointed out that M1, M2 and M3 Macs had no such problem, I confirmed on my M3 Pro that this is confined to hosts with an M4 family chip.
I have since tried updating my 15.3.2 VM to 15.4.1 on the M4 Pro, a surprisingly large update of over 6 GB, and that continues to result in a kernel panic and failure. I have also tried updating from 15.1 to 15.4.1 with an extraordinarily large download of more than 15 GB, only to see a repeat of the same kernel panic, with an almost identical panic log.
The macOS 15.4 update was particularly large, and some Apple silicon Macs were unable to install it successfully, most commonly on external bootable disks. From your reports, the 15.4.1 update seems to have fixed those problems with real rather than virtualised macOS. However, it hasn’t done anything to solve problems with VMs.
If you have an existing VM running any version of Sequoia prior to 15.4, then you’re unlikely to be successful updating that to 15.4 or later using an M4 host.
In contrast, upgrading a VM currently running Sonoma 14.7.5 completed briskly and without error. To my great surprise, that only requires a download of 8.7 GB, a little over half the size of the update from 15.1 to 15.4.1, which seems to be the wrong way round. The snag with upgrading from a previous major version of macOS to 15.x is that VM will never be able to use one of the most attractive features of Sequoia, iCloud Drive. If you want support for that, you’ll have to build a fresh VM using a Sequoia IPSW image file.
So for the time being, M4 hosts have a barrier between 15.3.2 and 15.4 that they can’t cross with an update. If you want a VM running 15.4 or later, then you’ll have to build a new one, or update 15.4 or later.
I don’t know and probably wouldn’t understand what changed in the 15.4 update, but it has certainly upset a lot of apple carts and VMs. And if you’d like a little homework, can you please explain:
Update 15.1 to 15.4.1, download 15 GB, failure.
Upgrade 14.7.5 to 15.4.1, download 8.7 GB, success.
For at least the last decade you’ve been able to discover why a Mac last shut down by finding the cause code written in its log. Last week I finally got round to updating the old information given here about how to read that shutdown cause code in the log. It wasn’t a feature that I’d looked at yet in Apple silicon Macs, where I was disappointed to find no trace of them.
The explanation for this difference from Intel Macs hinges on understanding the origin of those cause codes, as revealed in the log. They come from the System Management Controller, according to their log entry with AppleSMC as the senderImagePath, in Unified log terminology. As it’s responsible for managing Intel Mac hardware, it makes good sense that it should keep track of events such as shutdown and sleep, and have a good idea of why they should have happened. It has thus been puzzling that all those years Apple has never seen fit to acknowledge the existence of the SMC’s cause codes and provide a list of them.
One of the more subtle changes in Apple silicon chips is that they use completely different SMCs, embedded within the chip itself. While I’m sure they too know what’s going on with such major system events, they don’t appear to breathe a word about them in the log. Despite searching through log entries from and about these new SMCs, nowhere did they mention the cause of the last shutdown, even by giving an inscrutable code.
Looking in the most obvious places, such as System Information and NVRAM, drew a blank. Instead, by comparing logs between restarts following a kernel panic in a Virtual Machine with those from normal boots of the host Mac, I was able to discover signs of whether a panic had been responsible for that restart:
Look for /var/db/com.apple.DumpPanic.panicLogPathBreadcrumb. If that file exists, drag-copy it to your Documents folder and open it with a text or property list editor. It should contain a single dictionary, with a UUID key and a string. If that’s empty, there’s no panic log, otherwise it may give you a further clue as to where the log might have been saved.
Look for the word paniclog in the eventMessage field for log entries in the minute or two after the Mac restarts. If that extract reads failed to map memory for paniclog output - 0x3 then there’s likely to be a panic log somewhere.
Browse log entries from the subsystem com.apple.DumpPanic in the minute or so after startup. That subsystem handles generation of the panic log, makes it clear whether there is one, and even reveals its opening line.
While those should be useful for determining whether the last shutdown and subsequent restart were the result of a kernel panic, they still won’t tell you the cause of other shutdowns, for example because of power or other hardware problems.
Since then I have been following another lead, this time in the information provided by sysctl. Although that can be complicated to obtain from the command line, there’s easy access offered in Mints. What I don’t know yet is how consistent or reliable those entries are in Apple silicon Macs, but after a normal shutdown and Power button startup they read: kern.bootreason: pwrbtn
kern.shutdownreason: wdog,reset_in_1 rst_in,reset_in_1_deassert target_off_restart ap_shutdown
My panic-to-order Virtual Machine doesn’t offer such useful information in sysctl, probably because it only has a virtual SMC.
Another line might have been to read the SMC’s own log using pmset -g log
or in the Logs item in System Information. Although that provides lots of undoubtedly fascinating information about what it’s up to, there seems to be nothing about reasons for shutdown or startup.
For the time being, at least, Apple silicon Macs don’t seem to provide any equivalent to the shutdown cause code found in the log of Intel Macs. Perhaps it’s time to file a Feedback request for the return of the lost cause code, or would that in itself be a lost cause?
Recent updates to macOS Sequoia 15.4, Sonoma 14.7.5 and Ventura 13.7.5 brought firmware updates for some Macs, but not others. As I have now analysed those, and they’re reflected in the databases accessed by SilentKnight, and in my reference articles here (listed at the end), this article explains which are still being maintained by Apple.
Intel Macs without T2 chips
There are only two models of Mac without a T2 or Apple silicon chip whose firmware is still supported for updates: the iMac19,1 and 19,2, respectively the 2019 Retina 5K 27-inch and Retina 4K 21.5-inch. In this round of updates, they moved up to an EFI version of 2075.100.3.0.3, dated as recently as 3 March 2025. As they can run Sequoia, they’re expected to have continuing macOS security updates until at least the summer of 2027.
Older models of iMacs, MacBook Pros, and a single MacBook, remain with EFI firmware that was last updated in June 2024, and is unlikely ever to be updated any further. macOS support for them is expected to end when security updates for Ventura are discontinued at the end of the summer this year.
T2 Macs
For the 20 days between the release of 15.3.2 and 15.4, Intel Macs with T2 chips that were running Sequoia had a slightly more recent release of iBridge firmware. In 15.3.1, 14.7.4 and 13.7.4, that was 22.16.13051.0.0,0, but 15.3.2 brought version 22.16.13060.0.0,0. This is one of very few occasions in which T2 Macs running supported versions of macOS have had different firmware versions installed.
Thankfully, this last round of updates has rectified that, and all Macs with T2 chips should now be running 2075.101.2.0.0 (iBridge 22.16.14248.0.0,0). This is encouraging, not only for simplicity, but because it demonstrates that Apple is continuing to support not only the ‘Bridge’ Arm chip, but EFI as well. How much longer that will continue depends on whether there is Intel support in macOS 16, expected to be announced at WWDC in early June, and released in September or October this year.
At a minimum, macOS support for T2 Macs should last at least until summer 2027, and that should be extended to the following year if macOS 16 comes with Intel support.
Apple silicon Macs
All Apple silicon Macs should now be using iBoot version 11881.101.1, which was installed with these updates. The most recent MacBook Air and Mac Studio models with M4 family (or M3 Ultra) chips had their own update to 15.3.2, but 15.4 covers all current models in the single distribution, with the same firmware version.
There’s a growing number of reports of Apple silicon Macs experiencing problems updating to Sequoia 15.4, either on their internal SSD or on bootable external disks. This seems most likely in models with M1 family chips, and suggests that changes made in the installer might be responsible. As this doesn’t appear to affect 14.7.5 or 13.7.5 updates, it’s unlikely to lie in the firmware. There are several strategies you can adopt to work around this, including:
Try updating in Safe mode. This is a longstanding function of Safe mode, described here.
Start up in the correct paired Recovery system, and install Sequoia there. This should be attempted conservatively, without creating a fresh Data volume, but you must ensure that you have at least one complete backup ready in case anything goes wrong and the whole boot volume group has to be replaced.
Provided the Mac is already running at Full Security, there shouldn’t be any value in changing that. Performing a full Restore in DFU Mode isn’t as daunting as it might seem, but is a drastic solution requiring a recent second Mac, and full restore from your backup. If you’re getting to that stage, contact Apple Support who hopefully will now be only too familiar with these problems.
Summary
Intel Macs without T2 chips: iMac19,1 and 19,2: EFI 2075.100.3.0.3; no change in other models.
Intel Macs with T2 chips: 2075.101.2.0.0 (iBridge 22.16.14248.0.0,0).
Have you been able to update an existing lightweight macOS Virtual Machine on Apple silicon to Sequoia 15.4? So far, I’ve had three failures ending in kernel panics, and no successes. Maybe I’m holding it wrong?
Good news …
I’ve had no problems updating VMs from Sonoma 14.7.4 to 14.7.5, or Ventura 13.7.4 to 13.7.5. Those updates went quickly and without a glitch, but Sequoia has been another matter.
… bad news
I’ve now tried to update from Sequoia 15.x to 15.4 with three different VMs:
freshly installed 15.2
freshly installed 15.3.2
lightly used 15.3.2.
None of them had iCloud enabled, but they were each fairly standard in other respects, and all running in Full Security mode, in my virtualisers Vimy and Viable.
Each has failed early, just a minute or two after the update started to install. That was terminated, and the VM briskly rebooted back into its existing version of Sequoia. Shortly after logging back in, they displayed the panic alert.
One VM was so sick at that stage it couldn’t go any further, so had to be humanely destroyed. However, I managed to capture panic logs for the other two. In both cases, the panicked task was com.apple.Mobile, with com.apple.iokit.AppleVirtIOStorage(1.0) at the top of the kernel extensions in the backtrace. The panic occurred on different cores, and its cause was given as “Kernel data abort”.
And a more innocent bug
In the course of looking at this, I happened to notice that creation dates of files in Shared Folders were all incorrect, giving a standard date of Monday, 1 January 2001 at 00:00. All other creation dates in VM folders, the SSV, and even in iCloud Drive folders, were as expected, but none of those in Shared Folders.
However, when any of those mis-dated files or apps were copied into the VM’s local storage, the expected date of creation returned like magic.
I have checked this in VMs running 15.2, 15.3.2, 15.4, 14.7.5 and 13.7.5, and it’s identical in every one. I suspect this may have been going on for some time. Am I holding this one wrong too?
Over to you
Have you been able to update a Sequoia VM to 15.4?
Are file creation dates wrong in your VM’s Shared Folders?
Postscript
Thank you all for your responses. I’ve now confirmed that failure to update to 15.4 appears confined to M4 models, and doesn’t afflict my MBP M3 Pro at all. However, the shared folder creation date bug seems just the same there.
Most modern Macs start up from their internal SSD, and have a single bootable system installed. Although its structure has changed considerably over recent years, and differs between Intel and Apple silicon Macs, they are generally reliable, and knowledge of their structure and function is seldom required.
Those who need to start their Mac up from two or more versions of macOS, or who do so from an external disk, may be able to get by without deeper understanding, but the moment there’s a problem can become confused, and end up having to install macOS from scratch.
Intel T2 and Apple silicon
Both types of Mac are designed to support Secure Boot, but because of the reliance of Intel Macs on UEFI firmware, they can only boot securely from their internal SSD. Enabling an Intel T2 Mac to start up from an external disk thus requires its boot security to be reduced by changing that in Startup Security Utility, in Recovery mode. Booting from an external system is then straightforward, and doesn’t require additional security measures as used in Apple silicon.
Apple silicon Macs have been designed from the outset to support Secure Boot when starting up from both internal and external disks, and don’t require any reduction in their boot security to be able to start up from multiple systems on external SSDs. It’s a common misunderstanding that trying to change Boot Security in Startup Security Utility can help solve Apple silicon boot problems, but if anything it only complicates them. Almost the only good reason for reducing boot security of an Apple silicon bootable system is when third-party kernel extensions are required. Otherwise don’t tamper with Startup Security Utility, as it will only confuse, as we’ll see later.
For an Apple silicon Mac to boot from a macOS system, that must have a LocalPolicy created and saved to the internal SSD. LocalPolicy is normally created during macOS installation, or when intending to start up from a suitably installed system. Problems with LocalPolicy have been common when using external disks, and are covered in these articles:
Another significant difference between Intel and Apple silicon Macs is the architecture of their internal SSDs: Apple silicon has two additional partitions (APFS containers), and lacks the traditional EFI partition. However, there are no such differences in the structure of their bootable external disks, and its relevance here is limited, and mainly affects Big Sur as I explain below.
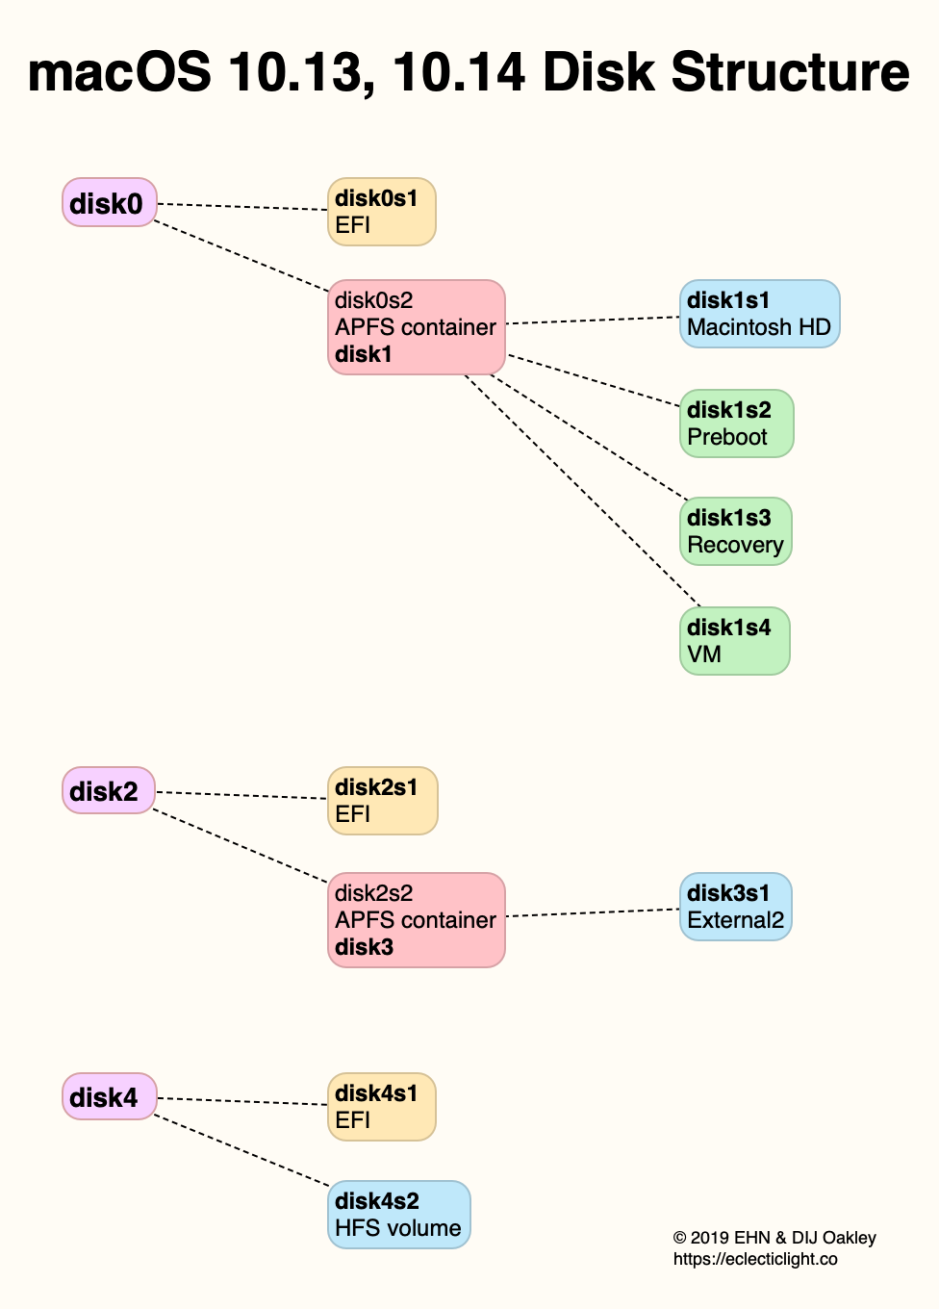
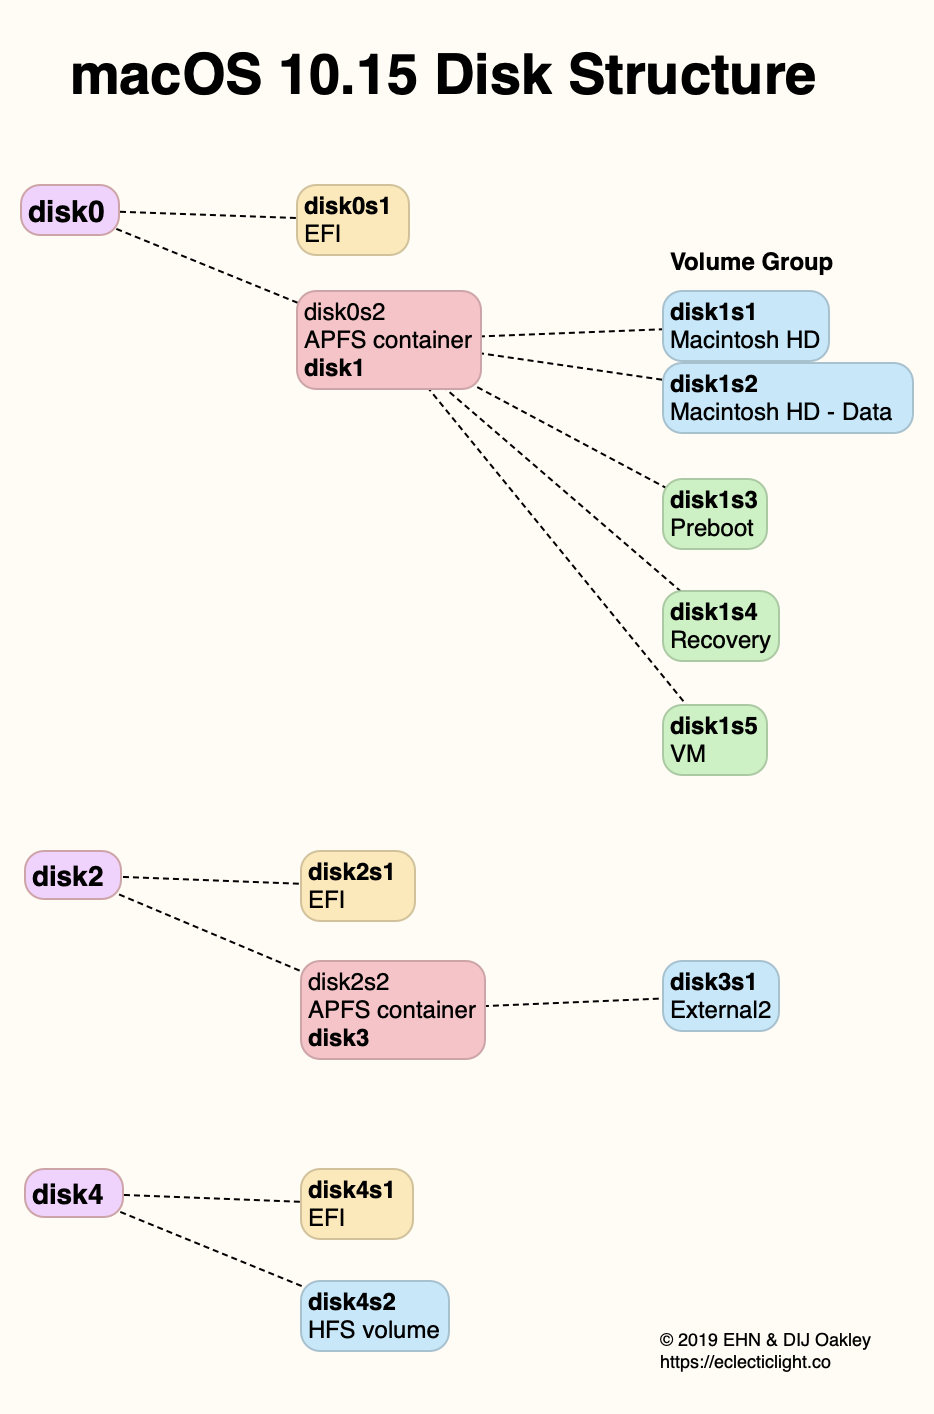
macOS 10.13-10.15
Bootable disks in versions of macOS between High Sierra and Mojave (above) are based on their single boot volume, supplemented by hidden Preboot, Recovery and VM volumes. macOS 10.15 Catalina (below) divided that boot volume into a Boot Volume Group, consisting of paired System and Data volumes, in addition to the same three hidden volumes.
Basic support for volume roles was introduced in the first release version of APFS in macOS 10.13, and was extended to cover further roles in 10.15. Thus versions of APFS prior to 1412.x.x don’t understand volume roles used by subsequent systems. From Catalina onwards you can use the command diskutil apfs listVolumeGroups
to see paired System and Data volumes, for example +-- Container disk5 5BA1AAC8-3AD4-4594-AF01-7C0AA75CABAD
| |
| +-> Volume Group 68627CBB-D774-444E-97C6-F9511B5030F3
| =================================================
| APFS Volume Disk (Role): disk5s1 (Data)
| Name: Macintosh HD - Data
| Volume UUID: 68627CBB-D774-444E-97C6-F9511B5030F3
| Capacity Consumed: 580769214464 B (580.8 GB)
| -------------------------------------------------
| APFS Volume Disk (Role): disk5s5 (System)
| Name: Macintosh HD
| Volume UUID: 8B9FF440-75C8-4F7F-B09E-9222D44A2276
| Capacity Consumed: 11239186432 B (11.2 GB)
Note that each volume group has its own UUID, which is normally the same as that of the Data volume in the pair. Identification of volumes, containers and other structures in APFS is dependent on these UUIDs, which are an essential part of the GUID Partition Table scheme used to partition disks.
Catalina’s System volume is mounted read-only, but macOS is booted from that volume rather than the Signed System Volume snapshot introduced in Big Sur.
macOS 11
Although the structure of Big Sur internal SSDs in Apple silicon Macs has two additional partitions (APFS containers), Apple_APFS_ISC containing three volumes, and Apple_APFS_Recovery containing two volumes, bootable external disks have the same structure as the internal SSD in Intel Macs.
One important functional difference, which remains relevant to Big Sur boot disks, is that Apple silicon Macs don’t use the paired Recovery volume as their primary Recovery system: booting an Apple silicon Mac running Big Sur into Recovery should instead use the Recovery system installed in their internal SSD, in the Apple_APFS_Recovery partition. In subsequent versions of macOS, that’s used instead for secondary or Fallback Recovery. Thus Big Sur can be a problem when it comes to Recovery, and for this reason is best avoided on Apple silicon Macs. If it’s essential to install a copy of Big Sur, then be prepared for problems with Recovery mode.
macOS 11 also established the architecture for dual-boot partitions, with two or more Boot Volume Groups.
Although the Boot Volume Group has only ever referred to paired System and Data volumes, within each partition/container the group also requires three or four additional volumes, for Preboot, Recovery, VM and (apparently in Big Sur only) Update. How those work with multiple Boot Volume Groups is explained below. Once way to avoid the inevitable complexities is to install each Boot Volume Group into a separate partition/container, which provides each with its own suite of Preboot, Recovery and VM volumes.
As the Signed System Volume (SSV) was introduced in macOS 11, versions of APFS prior to 1677.x.x shouldn’t be expected to understand SSVs.
macOS 12-15
The next significant architectural changes in Apple silicon Macs were the introduction of paired Recovery volumes in macOS 12 Monterey, and of cryptexes in macOS 13 Ventura.
In macOS 11 and 12, Safari, its supporting components, and some other parts of macOS are installed to the Data volume for ease of maintenance. Apple replaced that with separate secure disk images termed cryptexes, loaded from the Preboot volume during the boot process and grafted into the root file system. As a single Preboot volume can be shared by more than one Boot Volume Group, bundled cryptexes must be provided to the correct group, and I suspect that’s accomplished by associating them with their Volume Group UUID. If that becomes confused in any way, cryptexes could be incorrectly associated or missing altogether, something that’s almost certainly fatal to the boot process.
Above is the current layout of a partition/container containing a single bootable system for a Mac running Sequoia. Device names given are illustrative, although their numbering is typical of that seen for external bootable volumes. In this instance, the base name for the Boot Volume Group is External, and the External System volume is unmounted as usual.
Below is a typical partition/container containing two bootable systems named ExternalA and ExternalB. This has two Boot Volume Groups, each consisting of a System volume with its SSV, and a Data volume, to which are added their three common volumes, Preboot, Recovery and VM.
Management
Creation
The most reliable tools for creating and working with Boot Volume Groups and other system components are those in macOS installer apps, and even they can have their moments and bugs. It’s usually possible to ‘clone’ groups using the asr command tool, a feature that’s offered in some third-party utilities including Carbon Copy Cloner and SuperDuper. However, Apple has made it clear that given a choice between supporting asr and addressing boot security, it gives the latter absolute priority. asr has suffered some serious bugs since the SSV was introduced in Big Sur, and shouldn’t be relied on.
asr is careful to ensure that, when cloning Boot Volume Groups, UUIDs are changed so that it doesn’t end up with volumes or groups with the same UUID. That may not be the case when using some other tools such as dd for duplication. If you prefer a simple and stress-free life, it’s better to put your trust in a macOS installer rather than try crafting your own Boot Volume Groups.
Apple’s own tools such as Disk Utility now try to steer the user away from making mistakes, such as deleting just one of a Boot Volume Group, leaving the other orphaned with its firmlinks broken.
Firmware
Firmware is another source of confusion. That installed in the Mac, using its internal storage, should always reflect the firmware that has been included in the most recent version of macOS installed or updated on that Mac, whether that was installed to the internal SSD or to an external disk. The only exception to this is when installing or updating macOS in a Virtual Machine, which can’t affect the host’s firmware.
What may appear more puzzling are the versions reported in System Information: that given as System Firmware should be the iBoot version for the main Mac, and the most recent. The OS Loader, though, varies with the Boot Volume Group, and in older macOS is likely to be earlier than the iBoot version of the main Mac.
Recovery
Recovery system versions are even more complex. When everything works as it should, the version installed in any paired Recovery volume should be the newest of the Boot Volume Groups that it’s paired with, in the same partition/container. If a Mac running 15.3 from its internal SSD has a bootable external disk with a single container with two Boot Volume Groups for 13.7 and 14.7, then the Recovery system for the internal SSD should be 15.3, while that shared by the two systems on the external disk should be 14.7. It’s likely that Fallback Recovery on the internal SSD will be from an earlier version of macOS 15, but that’s less predictable, and there’s no separate Fallback Recovery in external systems.
Switching between systems and their Boot Volume Groups is normally performed using Startup Disk in General settings, or its equivalent in System Preferences. Those record the chosen Boot Volume Group in NVRAM, from where it’s used during the next boot.
That setting is used to determine which Recovery system is used if the next boot is performed with the Power button pressed to enter Recovery mode. That in turn determines what can be performed in Recovery. This is most critical for determining how Startup Security Utility works, as that can only change boot security settings for the chosen Boot Volume Group saved in NVRAM.
For example, in the dual-boot container shown above, selecting ExternalB as the Startup Disk, shutting down, then starting up into Recovery mode should enable Startup Security Utility to control boot security for ExternalB but not ExternalA, nor the system installed on the internal SSD. This can be used to discover which Recovery system is running: open Startup Security Utility and the only boot system that can be changed there is the current default boot system.
APFS
Although APFS should be backward compatible, making it relatively safe to make changes to an older version of APFS from a newer system, forward compatibility is more limited. Using older versions of Disk Utility or tools like fsck on newer versions of APFS risks errors, failure and at worst damage. The Appendix at the end of this article summarises version numbering in APFS and major changes to beware of. Although not easy to discover the version of APFS used to create or modify any given volume, one way is to use fsck_apfs -n -S [device]
giving the volume’s device name. The report should then be prefaced by a statement such as The volume [volume name] was formatted by diskmanagementd (1412.141.1) and last modified by apfs_kext (945.250.134).
telling you that volume was created by macOS 10.15, and was last changed by macOS 10.14.
Troubleshooting
The first and fundamental step in trying to diagnose the cause of problems with multiple Boot Volume Groups or bootable external disks is to examine their container and volume structure using two diskutil commands: diskutil apfs list
lists all APFS volumes by container and gives key information about each, including role and UUID, and diskutil apfs listVolumeGroups
lists all recognised Boot Volume Groups, which you can tally against the first. Pipe these to text files so you can study and refer back to them.
Those should enable you to verify that the structure is as intended, and to establish the relationships between systems and paired Recovery volumes. From there you should be able to focus on the Boot Volume Group that’s misbehaving, ensuring that its Data volume has been backed up. If necessary, that can be used as a migration source if that group needs to be deleted and reinstalled.
Tips & tricks
The host Mac must be capable of running that version of macOS.
macOS installers are the most reliable means of creating and installing Boot Volume Groups.
During macOS installation, an external disk must be connected to a port other than the DFU port, as listed here and in Mactracker.
When installing an older major version of macOS, perform this from an external bootable HFS+ volume as detailed by Apple.
Use an HFS+J partition on an external SSD rather than a USB ‘thumb’ drive.
Boot from an installer volume through Recovery mode.
When using a laptop Mac, run it from mains power throughout macOS installation.
Apple silicon Macs boot from external disks in Full Security, and reducing that doesn’t solve any problems.
Each container with one or more Boot Volume Groups contains one set of Preboot, Recovery and VM volumes shared between them.
If you’re unsure which Recovery system you’re using, open Startup Security Utility, as the only group it can change settings for is the one it’s booted into.
Big Sur doesn’t support paired Recovery on Apple silicon, and that can cause problems.
The version of Recovery installed in any paired Recovery volume should be that of the newest of the Boot Volume Groups that it’s paired with.
Use fsck_apfs -n -S [device] to discover the APFS version.
Use diskutil apfs list and diskutil apfs listVolumeGroups to discover volume structure.
Try using a Virtual Machine instead, if you don’t need to be able to run software from the App Store.
Appendix: APFS version numbers
APFS major version numbers change with major version of macOS:
macOS 10.12 has APFS version 0.3 or 249.x.x, which shouldn’t be used at all.
10.13 has 748.x.x, which doesn’t support Fusion Drives, but has basic support for volume roles.
10.14 has 945.x.x, the first version to support Fusion Drives.
10.15 has 1412.x.x, the first version to support the multi-volume boot group, and introduces extended support for volume roles, including Data, Backup and Prelogin.
11 has 1677.x.x, the first version to support the SSV, and Apple silicon. On M1 Macs, it doesn’t support the paired Recovery volume.
12 has 1933.x.x until 12.2, thereafter 1934.x.x, which support the paired Recovery volume on Apple silicon.
13 has 2142.x.x, and is probably the first to support trimming of UDRW disk images and their storage as sparse files.
14 has 2235.x.x, until 14.3, thereafter 2236.x.x.
15 has 2313.x.x until 15.2, thereafter 2317.x.x until 15.4, thereafter 2332.x.x.
Installing macOS on external bootable disks connected to Apple silicon Macs has been one of the most frustrating experiences of my life, and has driven some more experienced than me to abandon their attempts altogether. The latest bug in this was reported by Michael Tsai earlier this week, and can prevent you from installing any version of macOS prior to Sequoia, on an external disk connected to an Apple silicon Mac running macOS 15.3.2, and likely earlier versions of Sequoia.
To reproduce this, I partitioned an external 2 TB SSD connected to my MacBook Pro M3 Pro, which originally shipped with Sonoma 14.1. I have on many occasions installed macOS on that SSD for use with Apple silicon Macs, and hadn’t had a failure with it. To ensure favourable winds, I connected the SSD to the USB-C port at the right of the left side of the case, which isn’t the designated DFU port.
Apple disables installers for previous major versions of macOS from running in more recent versions. Trying to run a Sonoma installer in Sequoia is therefore doomed to fail. Instead, the installer has to be converted into a bootable installer volume, and the Mac booted from that to perform the installation. Although you can use a USB ‘thumb’ drive for that purpose, I prefer to use a 100 GB partition on a convenient external disk, in this case the same SSD on which macOS was to be installed. One of the quirks of bootable installers is that they must still use HFS+ rather than APFS, hence they get a partition of their own.
The three partitions I created were:
APFS container with two APFS case-insensitive unencrypted APFS volumes in 900 GB
APFS container with one APFS case-insensitive unencrypted APFS volume in 1 TB
HFS+ Journaled volume in 100 GB.
I used two Sonoma full installer apps, one for 14.6.1 taken from my library, the other for 14.7.4 freshly downloaded from Apple, both installed from InstallAssistant packages into /Applications. Each was successfully installed individually into the HFS+ volume on the external SSD following the instructions given by Apple.
In each test, I entered the external installer from Recovery mode as detailed by Apple, and started installation to one of the two APFS volumes in the first APFS container on the external SSD. After long periods attempting the installations, both failed with exactly the same error reported by Michael Tsai: com.apple.OSinstallerSetup.error error 702
Between the two attempted installations, both the HFS+ volume and the destination APFS container were erased and set up again. Following those two failures, I successfully installed macOS 15.2 and 15.3.2 direct to the three APFS volumes on the external SSD without any problems, and verified that all three Sequoia installations had been completely successful.
I therefore conclude that, in Sequoia 15.3.2 at least, it’s not possible to install any version of macOS prior to Sequoia 15.0 on an external SSD connected to an Apple silicon Mac. If your experience differs, then please let me know how you did it.
Michael Tsai appears to have been successful only when running the installation from Sonoma. If you do need access to a non-virtualised installation of Sonoma or earlier, it appears the only way you’re likely to succeed is from Sonoma, which would require you to perform a full DFU Restore to revert the Mac to macOS 14.
Useful tricks
The Mac must be capable of running that version of macOS.
The external disk must be connected to a port other than the DFU port.
When installing an older major version of macOS, perform this from an external bootable HFS+ volume as detailed by Apple.
Use an HFS+J partition on an external SSD rather than a USB ‘thumb’ drive.
Boot from the installer volume through Recovery mode.
When using a laptop model, run it from mains power throughout macOS installation.
If essential, you can revert the Mac’s internal SSD to an older version of macOS and firmware using a full DFU Restore with an appropriate IPSW image file.
Use a Virtual Machine instead, if you don’t need to be able to run software from the App Store.