Reading view

There are new articles available, click to refresh the page.

How to recognise a genuine password request

One of the primary aims of most malware is to trick you into giving it your password. Armed with that, there’s little to stop it gathering up your secrets and sending them off to your attacker’s servers. One of your key defences against that is to know when a password request is genuine, and when it’s bogus. By far the best way to authenticate now is using Touch ID, but many Macs don’t support it, either because they can’t, or because their keyboard doesn’t, and there are still occasions when a genuine request may not offer it. This article looks at the anatomy of a range of genuine password requests. Note that these dialogs aren’t generated by the app, but come from the macOS security system, hence their consistency.

Traditional, no Touch ID

keychain

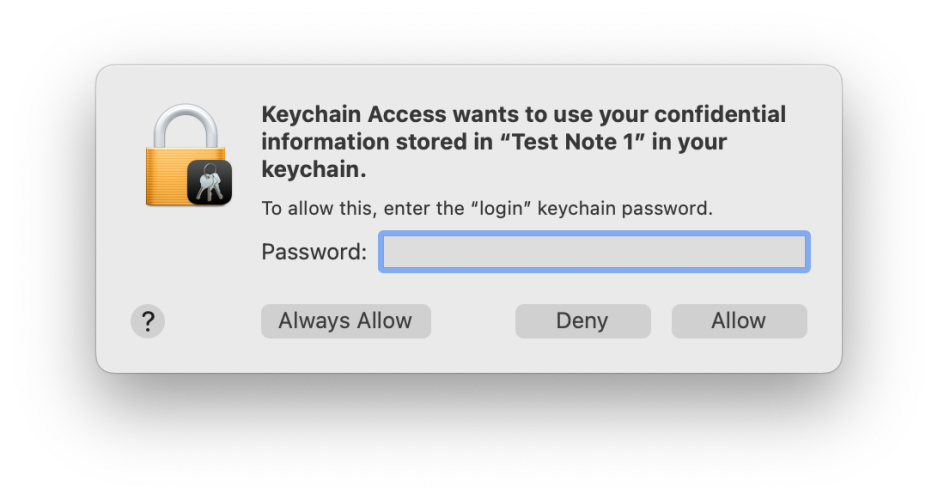
This authentication dialog is very important: although malware might try to forge it, it contains distinctive features you should always look for:

  • The icon consists of a locked padlock, on which is superimposed a miniature icon representing the app or component that has asked to access the keychain.
  • The bold text names the app or component that has called for keychain access, and states which item it’s asking to access: here, a named secure note.
  • The smaller lettering specifies that it’s asking for the keychain password, that is the password used to unlock the named keychain, not that for your Apple Account or any other password.
  • If you’re in any doubt about its authenticity, click on the Deny button and the request will be denied.
  • If you’re in any doubt about its authenticity, open Keychain Access, lock the keychain there, and repeat the action while watching the keychain to ensure that it’s unlocked and handled correctly.

Note this doesn’t provide or ask for your user name, only the password for that keychain.

Vertical, no Touch ID

keychain03

This newer vertical format should contain the following:

  • The icon consists of a locked padlock, on which is superimposed a miniature icon representing the app or component that is asking for your password.
  • Bold text names the app making the request.
  • Below that is a general indication of the purpose of the request.
  • Below that is the instruction to Enter your password to allow this.
  • There are two text boxes, to contain your user name (already completed) and password.
  • There are only two buttons, one of which may be OK or something more specific, and the other is Cancel.

If you’re in any doubt as to its authenticity, click on the Cancel button to deny the request, and consult the app’s documentation.

Here’s a similar version from Sequoia, seen in Dark Mode, with the same key features.

Touch ID

If your Mac supports Touch ID (all Intel Macs with T2 chips, and all Apple silicon Macs), and currently has a keyboard connected to it with support for Touch ID (Intel laptops and Apple silicon Macs only), macOS should offer you the biometric version of that authentication dialog.

passwordeg3

This should contain the following:

  • The icon consists of a Touch ID fingerprint, on which is superimposed a miniature icon representing the app or component that is asking for your password.
  • Bold text names the app making the request.
  • Below that is a general indication of the purpose of the request.
  • Below that is the instruction to Touch ID or enter your password to allow this.
  • There are only two buttons, the upper being Use Password…, and the lower is Cancel.
  • If you’re in any doubt as to its authenticity, click on the Cancel button to deny the request, and consult the app’s documentation.

This dialog has distinctive behaviour that’s difficult to forge. When you place your fingertip on the Touch ID button on the keyboard, it will either authenticate successfully, so dismissing the dialog, or the dialog shakes to indicate you should try placing your fingertip on the button again.

Here’s a more recent version from Tahoe, with the icon and text left-justified.

You will also see the icon with its fingerprint whorls filled in colour.

pwordprompt1

If Touch ID authentication fails, or you click on the button to Use Password…, the dialog expands to resemble the non-biometric version above, with the following two important differences:

  • The icon still consists of a Touch ID fingerprint, with a superimposed miniature icon representing the app or component.
  • The instruction remains to Touch ID or enter your password to allow this.

Terminal

Authenticating in Terminal, typically when using sudo, has less scope for distinctive detail, and might appear simpler to forge. However, macOS has a couple of tricks up its sleeve that are difficult to fake.

This contains the following:

  • The prompt consists of the single word ending with a colon, Password: Other words, such as System password, are fakes.
  • Immediately after the colon is a distinctive icon of a vertical white key on a grey rectangle. The closest you’ll see in standard Unicode is the Squared Key character ⚿ which is obviously different.
  • As you type in your password, not only are the characters not shown, but the same key icon remains where it is, and there’s no indication on screen that you’re typing anything in until you press Return. Fakes usually display characters as you type them in.

Again, if you’re in any doubt, simply press Return and exit without giving any characters of your password away.

Finally, no matter how rushed you might be, or sick to death of repeated authentication requests, check every one carefully before typing anything in, as if your Mac’s security depended on it. Because it does.

How online search and AI can install malware

Google is so helpful now when you ask it to solve a problem, such as how to free up space on your Mac. Not only can it make its own suggestions, but it can tap into those from AIs like ChatGPT and Grok. This article shows how that can bring you malware, thanks to the recent research of Stuart Ashenbrenner and Jonathan Semon at Huntress.

Please don’t try anything you see in this article, unless you want AMOS stealer malware on your Mac.

I started by entering a common search request, clear disk space on macOS, the sort of thing many Mac users might ask.

At the top of Google’s sponsored results is an answer from ChatGPT, giving its trusted web address. When I clicked on that, it took me to ChatGPT, where there’s a nice clear set of instructions, described impeccably just as you’d expect from AI.

This helpfully tells me how to open Terminal using Spotlight, very professional.

It then provides me with a command I can copy with a single click, and paste straight into Terminal. It even explains what that does.

When I press Return, I’m prompted for my password, which I enter.

Although I was a bit surprised to see this prompt, it looks genuine, so I allowed it.

Far from clearing space on my Mac, the malware, an AMOS stealer, has gone to work, saving a copy of the password I gave it, in the /tmp folder, and installing its payload named update.

Scripts like .agent are installed in my Home folder, and my (virtual) Mac is now well and truly owned by its attacker.

Full technical details are given in this post from Huntress.

As Ashenbrenner and Semon point out, this marks a new and deeply disturbing change, that we’re going to see much more of. We have learned to trust many of the steps that here turn out to lead us into trouble, and there’s precious little that macOS can do to protect us. This exploit relies almost entirely on our human weakness to put trust in what’s inherently dangerous.

First, distrust everything you see in search engines. Assess what they return critically, particularly anything that’s promoted. It’s promoted for a reason, and that’s money, so before you click on any link ask how that’s trying to make money from you. If that’s associated with AI, then be even more suspicious, and disbelieve everything it tells you or offers. Assume that it’s a hallucination (more bluntly, a lie), or has been manipulated to trap you.

Next, check the provenance and authenticity of where that click takes you. In this case, it was to a ChatGPT conversation that had been poisoned to trick you. When you’re looking for advice, look for a URL that’s part of a site you recognise as a reputable Mac specialist. Never follow a shortened link without unshortening it using a utility like Link Unshortener from the App Store, rather than one of the potentially malicious sites that claims to perform that service.

When you think you’ve found a solution, don’t follow it blindly, be critical. Never run any command in Terminal unless it comes from a reputable source that explains it fully, and you have satisfied yourself that you understand exactly what it does. In this case the command provided was obfuscated to hide its true action, and should have rung alarm bells as soon as you saw it. If you were to spare a few moments to read what it contains, you would have seen the command curl, which is commonly used by malware to fetch their payloads without any quarantine xattr being attached to them. Even though the rest of the script had been concealed by base-64 encoding, that stands out.

If you did get as far as running the malicious script, then there was another good clue that it wasn’t up to anything good: it prompted you for a System Password:. The correct prompt should just be Password:, and immediately following that should be a distinctive key character that’s generated by macOS for this purpose. Then as you typed your password in, no characters should appear, whereas this malware showed them in plain text as you entered them, because it was actually running a script to steal your password.

Why can’t macOS protect you from this? Because at each step you have been tricked into bypassing its protections. Terminal isn’t intended to be a place for the innocent to paste obfuscated commands inviting you to surrender your password and download executable code to exploit your Mac. curl isn’t intended to allow malware to arrive without being put into quarantine. And ad hoc signatures aren’t intended to allow that malicious code to be executed.

As I was preparing this article Google search ceased offering the malicious sponsored links, but I expect they’ll be back another time.

AI is certainly transforming our Macs, in this case by luring us to give away our most precious secrets. This isn’t a one-off, and we should expect to see more, and more sophisticated, attacks in the future. Now is the time to replace trust with suspicion, and be determined not to fall victim.

Apple has released updates to XProtect and XProtect Remediator

Apple has just released an update to XProtect for all versions of macOS, bringing it to version 5322. At the same time there’s an update to XProtect Remediator for Catalina and later, bringing that to version 156. As usual, it doesn’t release information about what security issues these updates might add or change.

This version of XProtect adds one new rule to its main Yara file, for MACOS.TIMELYTURTLE.DYCAOC, and amends the existing rule for MACOS.SOMA.OCENA. It also adds a new XPScripts.yr file containing two rules using an osascript (AppleScript) interpreter, MACOS.OSASCRIPT.COTABR and MACOS.OSASCRIPT.COTAWA.

XProtect Remediator 156, which follows version 153, adds one new scanning module, XProtectRemediatorConductor. It will be interesting to see whether this refers to a new codename, or its role among other scanning modules.

The XProtect Behavioural or Bastion rules embedded in XProtect Remediator 156 amend Rule 22, but don’t add any further rules.

You can check whether these updates have been installed by opening System Information via About This Mac, and selecting the Installations item under Software.

A full listing of security data file versions is given by SilentKnight and SystHist for El Capitan to Tahoe available from their product page. If your Mac hasn’t yet installed this update, you can force it using SilentKnight or at the command line.

If you want to install these as a named updates in SilentKnight, their labels are XProtectPlistConfigData_10_15-5322 and XProtectPayloads_10_15-156

Sequoia and Tahoe systems only

This XProtect update has finally been released for Sequoia and Tahoe via iCloud. If you want to check it manually, use the Terminal command
sudo xprotect check
then enter your admin password. If that returns version 5322 but your Mac still reports an older version is installed, you should be able to force the update using
sudo xprotect update

Update: the iCloud update was finally made available after 22:00 GMT on 5 November, over 24 hours after the release of this new version of XProtect.

❌