Apple has just released its weekly update to XProtect for all supported versions of macOS, bringing it to version 5313. As usual, Apple doesn’t release information about what security issues this update might add or change.
This version adds 4 new rules for components of MACOS.MISOMESA and 7 for MACOS.MISOMAGIC, both new codenames in the Yara file, it also adds a new rule for MACOS.SOMA.AUENC, another Soma/Amos component, and amends the existing detection rule for MACOS.DUBROBBER.CHBI.
You can check whether this update has been installed by opening System Information via About This Mac, and selecting the Installations item under Software.
A full listing of security data file versions is given by SilentKnight and SystHist for El Capitan to Tahoe available from their product page. If your Mac hasn’t yet installed this update, you can force it using SilentKnight or at the command line.
If you want to install this as a named update in SilentKnight, its label is XProtectPlistConfigData_10_15-5313
Sequoia and Tahoe systems only
This update has now been released for Sequoia and Tahoe via iCloud. If you want to check it manually, use the Terminal command sudo xprotect check
then enter your admin password. If that returns version 5313 but your Mac still reports an older version is installed, you may be able to force the update using sudo xprotect update
There are many more powerful PDF and image editors, yet plenty of us use Preview for those basic little tasks, where we don’t need the complications of a heavyweight. Preview isn’t without its faults, though. It can mutilate PDF annotations made by other apps, and sometimes unexpected things happen. To deal with those it has one feature that’s almost unique among PDF and image editors: it automatically saves versions using the macOS versioning system. This article explains how to make use of that.
Ask to save changes when closing documents
One important control over the behaviour of Preview and many other apps that you may not be aware of is this in the Windows section of Desktop & Dock settings. When combined with apps that use the macOS versioning system its effects are significant.
Ignoring versioning for the moment, when this setting is turned on, if you go to close an open document that has unsaved changes, before it’s closed you’ll be asked whether you want to save that changed document. This is a long-standing safety net that continues to protect us from losing lots of work by accident.
When this setting is turned off, apps may still ask you whether you want to save unsaved changes before closing a document unless the app uses the macOS versioning system. In that case, the app automatically saves a new version without offering any option. This might appear inappropriate, but as that’s non-destructive, it avoids interrupting your workflow: you can always revert to the previous version of that document, provided that you’re aware that it has been saved automatically.
If you’re not aware of what’s going on here, and how the versioning system works, this can cause odd effects you can demonstrate using Preview.
Preview’s saving grace
To see how Preview handles versions and the effect of that setting, find a copy of a suitable PDF or image file and duplicate it in the Finder. Name one copy something like testSavesOff, and the other testSavesOn. Set Ask to save changes when closing documentsoff to begin with, and open testSavesOff in Preview.
Now perform some destructive editing on that document without saving it, here a radical crop.
Leave it a couple of minutes before closing the document. Following that setting, Preview shouldn’t ask you whether to save the changed document, but will simply close it. Then quit Preview.
Now set Ask to save changes when closing documentson, and repeat the same sequence with testSavesOn instead. When you try to close that document, Preview should now ask you whether you want to save the changed document, to which you should click on Revert Changes to set the document back to its previous state instead.
Inspect the two documents using Quick Look and you’ll see that testSavesOn hasn’t changed, but testSavesOff has, although in neither case did you save those changes yourself.
All in the versions
Although you can see what has happened using Preview’s Revert To menu command, the clearest way to see what has happened to those two documents is to open them using my free Revisionist, which shows their saved versions.
testSavesOn has three saved versions. The current one is the same as the original, but the second version shows the destructive edit that you didn’t save.
testSavesOff has two saved versions, the original, and the current version is that after the destructive edit, which you also didn’t save.
Thanks to Preview’s use of the macOS versioning system, either way you’ve still got access to both versions of that document.
One point to note, though, is that the versioning system doesn’t automatically clean up old versions for you. When you’ve finished editing a document in Preview and don’t want to retain its old versions, delete them either using Revert To in Preview, or with Revisionist. Versions are only retained for the original document as long as it’s stored on the same volume. So you can also wipe old versions by duplicating a document and trashing the original, or copying it to another volume. Once they’re gone, you can’t restore them, as not even Time Machine can back up versions.
Look in the log, and Visual Look Up (VLU) on an Apple silicon Mac apparently involves a great deal of work, in both CPU cores and the neural engine (ANE). This article reports a first attempt to estimate power and energy use for a single VLU on an image.
To estimate this, I measured CPU, GPU and ANE power in sampling periods of 100 ms using powermetrics, and correlated events seen there with those recorded in a log extract over the same period, obtained using LogUI. The test was performed on a Mac mini M4 Pro running macOS 15.6.1, using Preview to perform the VLU on a single image showing a small group of cattle in an upland field. Power measurements were collected from a moment immediately before opening the image, and ceased several seconds after VLU was complete.
When used like this, powermetrics imposes remarkably little overhead on the CPU cores, but its sampling periods are neither exact nor identical. This makes it difficult to correlate log entries and their precise timestamps with sampling periods. While powermetrics gives power use in mW, those measurements aren’t calibrated and making assumptions about their accuracy is hazardous. Nevertheless, they remain the best estimates available.
Log narrative
The first step in log analysis was to identify the starting time of powermetrics sampling periods. Although execution of that command left no trace in its entries, as it has to be run with elevated privileges using sudo, its approval was obvious in entries concluding 30.677182 com.apple.opendirectoryd ODRecordVerifyPassword completed
A subsequent entry at 30.688828 seconds was thus chosen as the start time for sampling periods, and all times given below as given in seconds after that time zero.
The following relevant events were identified in the log extract at elapsed times given in seconds:
1.4 ANE started and an ObjectDetectionModel run for 0.2 s
1.6 ANE activity and a NatureWorldModel run for 0.25 s
2.0 ANE activity for 0.15 s
2.4 ANE activity for 0.1 s
8.1 ANE activity and a UnifiedModel run for 0.01 s
8.1 PegasusKit queried Apple’s SMOOT service, the external connection used to populate the VLU window.
Thus, the ANE was run almost continuously from 1.4-2.2 seconds after the start of sampling, otherwise was used little over the total period of about 9 seconds. Over that period of activity, an initial model used to detect objects was succeeded by a later model to identify objects in a ‘nature world’.
Power and energy estimates
From the log record, it was deduced that the VLU was started in powermetrics sample 10 (1.0 seconds elapsed), and essentially complete by sample 75 (7.5 seconds elapsed), a period of approximately 6.5 seconds, following which power use was low until the end of the sampling periods. All subsequent calculations refer to that series of samples and period of time.
Sums, averages and maxima of power measurements for that period of 6.5 seconds are:
CPU 64,289 mW total, 989 mW average, 7,083 mW maximum (10 P cores)
total 68,991 mW total, 1,061 mW average, 7,083 mW maximum.
Thus for the whole VLU, 93% of power was used by the CPU, 4.6% by the GPU, and only 2.2% by the ANE.
For comparison, in the M4 Pro chip running maximal in-core loads, each P core can use 1.3 W running floating point code, and 3 W running NEON code. The chip’s 20-core GPU was previously measured as using a steady maximum power of 20 W, with peaks at 25 W.
As each power sample covers 0.1 seconds, energy used during each sampling period is power/0.1, thus the total energy used over the 6.5 second period of VLU is:
CPU 6.4 J
GPU 0.3 J
ANE 0.2 J
total 6.9 J.
Those are small compared to the test threads used previously, which cost 3-8 J for each P core used.
Power over time
Power used in each 100 ms sampling period varied considerably over the whole 10 seconds. The chart below shows total power for the CPU.
Highest power was recorded between samples 10-25, corresponding to 1.0-2.5 seconds elapsed since the start of measurements, and most events identified in the log. Later bursts of power use occurred at about 4.2 seconds, and between 6.6-7.1 seconds, which most probably corresponded to opening the info window and performing the selected look-up.
Almost all power use by the neural engine occurred between 1.5-2.1 seconds, correlating well with the period in which substantial models were being run.
Peak GPU power use occurred around 1.0-1.5 seconds when the image was first displayed, at 3.1-3.2 seconds, and between 6.5-7.4 seconds. It’s not known whether any of those were the result of image processing for VLU as GPU-related log entries are unusual.
Composite total power use demonstrates how small and infrequent ANE and GPU use was in comparison to that of the CPU.
Conclusions
Given the limitations of this single set of measurements, I suggest that, on Apple silicon Macs
power and energy cost of VLU is remarkably low;
the great majority of work done in VLU is performed in the CPU;
although use of the neural engine may result in substantial performance improvements, VLU doesn’t make heavy demands on the neural engine in terms of power or energy use;
VLU may appear impressive, but it’s not actually that demanding on the capability of the hardware.
At first sight, this might seem a simple question to answer. Allow me to demonstrate that it’s more complex, has changed over time, and still hasn’t been resolved.
Before 1984
Although there were exceptions, before the Mac most file systems that we were likely to encounter were simple. Each file consisted of stored data, together with a small entry in the file system’s metadata containing information such as the file’s name and its time and date of creation. By convention, as that’s not stored with the file’s data, that isn’t included in its size.
The only complication here was that storage is divided up into blocks, so in addition to the file’s actual size, we’d also want to know the total size taken by the storage blocks it used, as any given block couldn’t be shared between files, a figure often known as size on disk, and dependent on the size of those blocks. If the block size is 4,096 bytes, then any file whose data was equal to or smaller than that had a size on disk of 4,096 bytes, 4 KiB or 4.096 KB. (There are 1,000 bytes in a KB, but 1,024 bytes in a KiB.)
Classic Mac OS
One of the many innovations in the first Mac was its file system MFS, in which every file has two forks, one the traditional data fork, the other a resource fork for storing structured blobs of data termed resources. As MFS was replaced by HFS and eventually HFS+, those resource forks continued.
Resource forks often reached considerable sizes, and although they are stored separately from data forks in HFS+, Apple usually gave the sizes of the two forks, as shown in this dialog, where the size of the resource fork is 117,836 bytes, almost as large as the file’s 144,788 bytes of data. Information about the size of that file’s entry in the file system data, its attributes, wasn’t given, though.
HFS+ in Mac OS X
In the early years of Mac OS X, there was controversy as to whether it should continue supporting the use of resource forks, and most of their uses were replaced by flattened data files arranged in bundles. Nevertheless, in Mac OS X 10.4, HFS+ became multi-forked with what were dubbed extended attributes or xattrs, one type being com.apple.ResourceFork, the classic resource fork. However, the practice of giving separate sizes for the data fork and other forks died.
APFS
When APFS was released in 2017, it changed the way in which xattrs are stored, as explained here. Now, each file can consist of:
file system attributes, stored in the file system metadata structures;
small xattrs of up to 3,804 bytes, stored separately from its attributes, but in file system metadata;
large xattrs over 3,804 bytes, typically including any com.apple.ResourceFork, stored as data streams with separate records;
data, stored in storage blocks as set out in their file extents.
As demonstrated using crafted files, initially the Finder ignored items 1-3 in stating file size, and just gave that of 4, the data, although it could instead still have been including resource forks, of course.
The size of this text file is given as 391 bytes in the Finder’s Get Info in High Sierra, but as you’ll see below it contains over 90,000 bytes of extended attributes that figure simply ignores.
macOS Sequoia
Here are the sizes given for another of my specially crafted demonstration files, for APFS in macOS 15.6.1 Sequoia.
According to the Finder’s Get Info dialog, this file contains 263,195 bytes and occupies 266 KB on disk. On an SSD with the standard 4 KiB block size, that should be 65 blocks, or 266,240 bytes, as given correctly. There’s something amiss with that file, though, as it claims to be a Zip archive but has an image thumbnail.
Listing its xattrs using xattred reveals no less than 14, including two of 80 KB each. xattred claims it has a data fork size of 183,136 bytes and 161,406 bytes in xattrs, making a total size of 344,542 bytes, which is nowhere near that given by the Finder. (It’s the com.apple.ResourceFork xattr, a classic resource fork, that contains the image thumbnail displayed by QuickLook instead of the normal Zip file icon.)
To discover how the Finder arrives at a size of 263,195 bytes, we need to subtract the data size from that, making 80,059 bytes, the size of the file’s resource fork or com.apple.ResourceFork xattr. So, without being explicit about forks, it’s behaving the same as in Classic Mac OS. You might find that puzzling, given that there’s another xattr of the same size that it’s ignoring, and a dozen more that don’t get a look-in. As the use of com.apple.ResourceFork xattrs has long been discouraged if not deprecated, isn’t that a strange behaviour? The more so when modern xattrs that Apple has introduced relatively recently, such as com.apple.quarantine, com.apple.macl and com.apple.provenance, are ignored.
The deeper you look into this, the more puzzling it becomes. Here are the same file’s figures as shown in Precize.
Sizes are given a few lines down, from two sources, URL Keys and the file system (FileManager), and they also differ. There’s a list of xattrs given at the foot of this window, but that only gives 12 and ignores com.apple.ResourceFork and com.apple.FinderInfo.
In the macOS API, code can obtain values for file sizes from its URL. Two keys are available, fileSizeKey and totalFileSizeKey. The first gives the data size, and the second is the same ‘total’ as that shown by the Finder, i.e. data + com.apple.ResourceFork xattr, but excluding all other xattrs. Apple’s documentation explains those as:
fileSize is “the total file size, in bytes”
totalFileSize is “the total displayable size of the file, in bytes. The allocated size in bytes may include space used by metadata.”
FileManager also gives the data size in its FileAttributeKey.size, but doesn’t give any for xattrs, even com.apple.ResourceFork. The size of the Metadata shown for the File system is instead calculated by totalling the individual sizes of all its xattrs, including com.apple.ResourceFork and com.apple.FinderInfo.
This may appear to be nit-picking, but data sizes are given to the exact number of bytes, and the size on disk for non-sparse files should always be within 4,095 bytes of the data size. Yet accounting for xattrs remains rooted in Classic Mac OS from 25 years ago and still pretends that xattrs either don’t exist, or don’t take any space.
Authoritarians have long feared and suppressed science as a rival for social influence. Experts see President Trump as borrowing some of their tactics.
Unlike Apple’s bundled apps in macOS, the great majority of third-party software needs to run on more than just the latest version of macOS. This is a challenge when there’s a major redesign of the interface, as there is in macOS Tahoe. While OS 26 may bring greater consistency across platforms, it’s also important to developers and users that it doesn’t sacrifice consistency between, say, Sequoia and Tahoe.
As I showed recently in my simple little utility DropSum, at times the appearance of windows can be very different between macOS 15 Sequoia and 26 Tahoe. DropSum uses AppKit rather than SwiftUI, and is a little unusual in applying colour to its window. This is used in a popular mechanism to indicate when that window is ready to receive a file being held over it, by changing the view colour from systemOrange to systemGreen. As that coloured view extends over the controls in the window, I have had to be careful to ensure those controls remain readable in both appearance modes, with the Reduce transparency and Increase contrast settings in Accessibility settings, and across recent versions of macOS. That hasn’t proved easy, so what you see below appears to be the best compromise I can achieve. DropSum doesn’t alter its settings or behaviour between different versions of macOS, instead relies on the host API’s appearance modes and Accessibility settings.
Although I have confirmed the observations below on individual systems, to make comparison easier here each screenshot shows two DropSum windows. The upper is running in a Tahoe beta 7 VM (where the window title is left-aligned), and the lower in Sequoia 15.6.1 on the host (where the window title is centred).
Light mode
In both light appearance modes, all boxed text is displayed in black on a white background, making their contents and controls clear. There are marked differences in the hues seen, though, with both systemOrange and systemIndigo (chosen for better contrast in labels) being more intense in Tahoe than Sequoia. As expected, Tahoe’s controls are slightly larger, and the corners of all four text boxes are rounded rather than square.
Reducing transparency made little difference in either rendering, merely whitening the window title bar.
Increasing contrast changes the intensity of some colours. In Sequoia, systemOrange is lightened, and in both windows the traffic light buttons at the top left, and the Clear button, are darkened. Otherwise the most obvious effect is the outlining of all components, including each of the controls.
Apps built to support macOS 26 thus appear consistent between macOS 15 and 26 when used in light mode.
Dark mode
Most apparent here are the contrasting effects of dark mode on the background of the four text boxes. In Sequoia, their background is the systemOrange of the coloured view, but in Tahoe it’s black. The latter makes the text contents more readable, while unselected text in Sequoia is more difficult to read.
Increasing contrast has different effects on colours when in dark mode. In Sequoia all colours including the systemOrange view become slightly lighter, whereas in Tahoe the contrast of some is enhanced, with black becoming blacker and white whiter, but there’s little discernible change in systemOrange, which remains significantly more intense than in Sequoia. systemIndigo is rendered lighter though, making it more difficult to read against the systemOrange background.
Reduce transparency
Apple describes this effect as replacing “the transparent effect used on some backgrounds in macOS with a solid background to improve contrast and readability.” In both Sequoia and Tahoe, and in both appearance modes, the only effect observed is a lightening of the window title bar, as the rest of the window is already opaque.
Increase contrast
Apple describes this as increasing “the contrast of items on the screen (such as borders around buttons or boxes) without changing the contrast of the screen itself.” Although the borders are the most prominent effect in both versions of macOS and both appearance modes, there are also colour changes that aren’t consistent between Sequoia and Tahoe.
Conclusions
Appearance modes in Tahoe exhibit different behaviours from those in Sequoia, most markedly in dark mode. In this example, Tahoe has the effect of enhancing readability in dark mode.
Colour rendering of systemOrange also differs between Tahoe and Sequoia.
Reduce transparency has little effect other than making transparent views opaque.
Increase contrast primarily adds black (light mode) or white (dark mode) borders to controls, but its small colour changes, as seen here in Tahoe, may impair readability.
Designing an interface that behaves consistently in both macOS Tahoe and older versions of macOS is a challenge that may not always work out. Developers need to assess their app’s human interface thoroughly in multiple macOS, appearance modes and Accessibility settings.
Inside every Intel Mac with a T2 chip, and every Apple silicon Mac, is a secure enclave, originally referred to as its security enclave. The subject of a flurry of Apple’s patents from 2012 onwards, this was introduced in the A7 chip inside the iPhone 5s and iPad mini 3, 12 years ago in September 2013, where it brought biometric authentication in Touch ID.
iPhone 5s
Protecting the most important secrets in a computer is a great challenge. No matter how secure you try to make the main processor and memory, as they’re exposed to direct attack, isolation can only be relative and temporary. An alternative approach is to move the most secure data and its processing into a secure enclave and its processor, and that’s the architectural solution chosen by Apple in what it patented as a security enclave, filed in September 2012, a year before its release in the iPhone 5s. Engineers credited for that patent are Manu Gulati, Michael J Smith and Shu-Yi Yu.
Successive iPhone chips steadily improved their secure enclaves, and by the time the iPhone 7 was introduced in September 2016, with its A10 Fusion chip, its secure enclave was handling encryption and authentication but not replay prevention. It also had EEPROM secure storage, and an AES engine with DPA protection and lockable seed bits. When the first Intel Mac with a T1 chip was released a couple of months later, that was based not on the A10 but the S2 used in the Apple Watch Series 2. The T1 thus doesn’t really have a secure enclave as such, although it supports Touch ID.
An early and thorough account of these secure enclaves was presented by Tarjei Mandt, Mathew Soling and David Wang at Black Hat USA in 2016. This appears to be the only such account apart from the section in Apple’s Platform Security Guide, most recently updated in December 2024. Apple’s engineers continued to gain new patents, covering trust zone support (filed in 2012), key management (filed in 2014), and most relevant to Macs, Pierre Olivier Martel, Arthur Mesh and Wade Benson’s patent for multi-user storage volume encryption, filed in 2020.
T2 chip
The first Macs with a true secure enclave are those with a T2 chip, starting with the iMac Pro in December 2017. Those are based on the same A10 Fusion chip from the previous year, and were already lagging the iPhone 8 in this respect.
The T2 secure enclave is another co-processor system, run by a Secure Enclave Processor (SEP), a 32-bit ARM CPU running its own operating system, sepOS, based on a specialised L4 microkernel completely different from those used by Macs and Apple’s devices. It has its own secure storage (EEPROM), and a Public Key Accelerator for signing and encryption/decryption using RSA and ECC methods. Outside the enclave is a dedicated AES256 encryption/decryption engine built into the data transfer path between the internal SSD and main system memory.
M-series chips
The big leap forward for Macs was the release of the first models featuring M1 chips, which caught up with the features of late versions (after autumn 2020) of the A12 and A13, with Apple’s second generation Secure Storage Component.
Perhaps the most significant of its improvements are measures to prevent replay attacks. Those are best illustrated with FileVault. Let’s say that you didn’t enable FileVault at first, but left your Apple silicon Mac to handle the encryption of its internal Data volume without the added protection of your password. That would mean that its volume encryption key (VEK) was generated internally by the Secure Enclave, and stored there. If you then turned FileVault on, the VEK would be encrypted using your password and the hardware key. In the T2 chip, it might be possible to use the old VEK to decrypt the volume. In the secure enclave of an M-series chip, that type of replay attack is prevented by the revocation of all previous events and records.
Other improvements include the use of second generation secure storage incorporating counter lockboxes to enforce limits on the number of passcode attempts allowed, instead of an EEPROM, and a better Public Key Accelerator.
Currently, the secure enclave is known to protect the following:
encryption keys for Touch ID, FileVault, and the Data Protection (iCloud) keychain (but not file-based keychains);
that Mac’s Unique ID (UID) and Group ID (GID);
Touch ID control, and (on older devices not Macs) Face ID using a secure neural engine; in recent devices and M-series chips, that’s implemented as a secure mode in the main neural engine (ANE);
Apple Pay handling;
Activation Lock, through the Owner and User Identity Keys;
signing and verification of LocalPolicy for boot environments (Apple silicon).
Communication between the CPU and SEP is performed using a dedicated mailbox whose function is detailed in Apple’s patents. Further information is also provided in the Platform Security Guide.
FileVault encryption
It has been stated widely (even here) that the secure enclave in T2 and Apple silicon chips contains a hardware encryption/decryption unit and acts as the internal SSD’s storage controller. In fact, as shown in the original patent of Martel and others, and now in the Platform Security Guide, the AES engine responsible is located outside the secure enclave, together with the Flash controller, and has a secure link to the enclave.
During SEP boot, it generates an ephemeral key to wrap keys to be used by the AES engine for encryption and decryption. That key is sent from the secure enclave to the AES engine over the dedicated connection between them, then used to protect keys transferred from the enclave to the AES engine. That ensures an unprotected key is never exposed outside the enclave and AES engine.
The Apple silicon secure enclave is by no means unique. ARM TrustZone, other Trusted Execution Environments, and Trusted Platform Modules offer similar features and facilities. However, the secure enclave is unusual because it has been integrated into all Macs with T2 or Apple silicon chips, and all Apple’s recent devices, and can’t be disabled or bypassed.
References
Manu Gulati, Michael J Smith and Shu-Yi Yu, US Patent 8,832,465 B2, Security enclave processor for a system on a chip, filed 25 September 2012, granted 9 September 2014.
R Stephen Polzin, James B Keller, Gerard R Williams, US Patent 8,775,757 B2, Trust zone support in system on a chip having security enclave processor, filed 25 September 2012, granted 8 July 2014.
R Stephen Polzin, Fabrice L Gautier, Mitchell D Adler, Conrad Sauerwald and Michael LH Brouwer, US Patent 9,419,794 B2, Key management using security enclave processor, filed 23 September 2014, granted 16 August 2016.
Pierre Olivier Martel, Arthur Mesh and Wade Benson, US Patent 11,455,432 B1, Multi-user storage volume encryption via secure processor, filed 8 June 2020, granted 27 September 2022.
Tarjei Mandt, Mathew Soling and David Wang (2016), Demystifying the Secure Enclave Processor, Black Hat USA 16 (PDF)
Apple, Platform Security Guide
Wikipedia’s overview of Apple silicon chips.
With careful observation and a little knowledge of the startup sequence of an Apple silicon Mac, you can learn a lot about what can and can’t happen during that sequence. This article explains how, with examples from the log of a Mac mini M4 Pro.
In broad terms, startup of an Apple silicon Mac consists of the following sequence of events:
Boot ROM, which ends in DFU mode if there’s a problem, otherwise it hands on to
the Low-Level Bootloader (LLB) and iBoot (Stage 2), the firmware, that should end in validating and running
the kernel, which initially runs on a single CPU core before starting others up and launching launchd, and later
unlocking and accessing the Data volume, and progressing to
userspace.
The opening entry in the log is the boot announcement of === system boot:
followed by the boot UUID. There’s then a gap of 5 seconds or more before the next entry, which marks the start of kernel boot. Those seconds are the silent phase during which the LLB and iBoot are doing their thing. They don’t write to the Unified log, but leave fragments of cryptic information known as breadcrumbs, which you can’t make use of. The kernel then writes its usual welcome of kprintf initialized
and the following four seconds or so are filled by log entries from the kernel.
Wallclock adjustment
During this phase, the system clock is synchronised, and wallclock time adjusted, usually twice in rapid succession. This is obvious by step changes in timestamp, usually putting the clock back by several seconds in the first sync, then putting it forward slightly in the second. These play havoc with the timestamps, as you can have two or even more instances of the same time being recorded in the log. Beware of the entries === system wallclock time adjusted
Early during the kernel phase, it starts up all the other CPU cores in the chip, and records that in the log. Entries become progressively more varied after launchd is loaded, and this first userspace boot (without Data volume access).
Data volume unlock
With FileVault enabled, by this stage macOS still doesn’t have access to the Data volume. That means all the code run so far, and almost all the data, are immutable, locked in the firmware or the Signed System Volume (SSV). The firmware does access LocalPolicy from another container in the internal SSD, and there’s always the NVRAM, but there’s no access to anything in /Library, including the many property lists there. This also means that processes running before the Data volume is unlocked and mounted can’t write to storage.
Around 10-15 seconds after the start of booting, the login window is displayed, ready for the user to enter their password. Once that has been entered, there’s a watershed moment: 30.845097 com.apple.loginwindow Attempting to unlock the data volume <LFVolume: 0x6000001b8e40: [UUID]: Data>
30.883172 "AppleSEPKeyStore":3814:0: Sending notification for volume [UUID] unlocked (action 1, handle -842987934)
30.885459 com.apple.login volume <LFVolume: 0x6000001b8e40: [UUID]: Data> was unlocked
30.886129 com.apple.loginwindow Unlocked data volume <LFVolume: 0x6000001b8e40: [UUID]: Data>
30.886154 com.apple.loginwindow FileVault volume unlocked, allow authorization
30.887562 com.apple.loginwindowLite -[LWLSystemUnlock unlockSystem]:439: Authorization was successful
30.887587 com.apple.loginwindowLite -[LWLSystemUnlock unlockSystem]:447: logging in user hoakley
The times on those entries were deliberately delayed, as I pressed the Return key for password entry after 30 seconds had elapsed, a good 10 seconds later than I could have done so.
Shortly after that, the kernel manager shuts down, a great many kernel space processes are handed over to continue in userspace, and you’ll then see the kernel report userspace boot
Before the Data volume is unlocked, log entries are frequent, but hardly a torrent, at around 1,000 per second, and more than 25% of them are written by the kernel. Once the kernel has booted userspace and the Data volume is accessible, log entries are written far more frequently, at an average rate of 5,000 per second, often even higher, with less than 10% of them coming from the kernel.
Phase summary
Boot ROM, entering DFU mode or handing over to
Low-Level Bootloader (LLB) and iBoot (Stage 2) firmware, without log entries, handing over to
Local Spotlight search problems appear common, and are all too often tackled blindly by forcing a volume’s indexes to be rebuilt. Although that can sometimes resolve the problem, without knowing what its cause is, it can just waste time and effort. Indeed, in some cases rebuilding the indexes can worsen the problem, at least temporarily. This article explains how you can use SpotTest 1.1 to perform systematic testing and arrive at a diagnosis before hazarding a guess at what the treatment should be.
1. Spotlight settings
Before opening SpotTest, check that Spotlight settings are in order, and don’t exclude the volume or folder you’re trying to search, or the document type you’re looking for. Then open Activity Monitor and watch its CPU % listing to verify that Spotlight isn’t currently in the process of reindexing or performing other maintenance to its indexes. If it is, delay testing until those have completed. Searching using Spotlight while it’s actively working on its indexes will give odd results, or none at all.
If you’re going to use SpotTest on any location with privacy control, such as your Home Documents folder, or an external disk, consider adding the app to the Full Disk Access list in Privacy & Security settings, before opening it.
2. Home folder test
Even if your interest is in a different volume, you should perform a basic test of a new test folder in your current Home folder, to establish a baseline and confirm that Spotlight is working there.
Open SpotTest and set it to defaults, with a Term of cattle, a Scope of [Home], and both Search Keywords and Search EXIF ticked.
Click the Create Tests tool (the leftmost of the tools) to create the folder of test files at the top level of your Home folder. Make a note of the time you do this to the second.
About 10-15 seconds after that, click either the Run NSMetadata test or Run mdfind test tool. You should then see a list of files found, including those in the test folder ~/0_SpotTestFiles, including A, B, C, D, E, F, G, K, L, M
If you don’t see those listed, open Mints and use the Log Window button in its Spotlight section to obtain a log extract from the time the test files were created, or use LogUI to do the same. You’ll then need to look at that log extract to see if there are clues as to why indexing didn’t take place in the period.
Leave the test folder where it is, and anything from 1 hour to 2 days later, repeat the search using either or both of those tools. Once additional indexing has been undertaken:
NSMetadata should now find A, B, C, D, E, F, G, I, K, L, M but not H
mdfind should now find A, B, C, D, E, F, G, H, I, K, L, M.
I is found by the Live Text process, and H by Visual Look Up, the latter only being found by the mdfind search.
These tests have demonstrated:
mdworker and mds indexing of files supported by system mdimporters;
delayed background mediaanalysisd image analysis and mds indexing of Live Text and Visual Look Up content.
To match test files with their importers, click the Check importers tool. Note that file L doesn’t use a plugin, and N uses a plugin but can’t be found because the search term is inside an image in the PDF document, which currently isn’t recoverable content.
3. Custom mdimporter
Many apps come with their own custom mdimporter that provides Spotlight indexing support for document types not supported by macOS. In the past, these were normally installed in /Library/Spotlight, but more recent apps typically keep them inside the app bundle in Library/Spotlight. These can be tested easily.
Create and save one of those custom document types, so that it contains the word cattle in a way that should be searchable by Spotlight. Copy that document to the ~/0_SpotTestFiles folder, wait 10-15 seconds, then repeat the test search. You may well notice that NSMetadata search doesn’t find your custom test document, but mdfind does. This is because of the difference in the search criteria they use.
You should also click the Check importers tool to check that the correct mdimporter was recognised and used for the custom document type.
4. Volume test
If Spotlight works correctly with the test folder in your Home folder, you may wish to progress to testing a different volume or location. Having created its test folder in ~/0_SpotTestFiles, copy that to the other location. Before you try to change the Scope of the search, click on the button to list available volumes, then select the volume containing the copied test folder in the Scope menu.
When you perform the two types of search on that volume, the same rules should apply as to which will be found. Note though that finding files I and H can take much longer, or they may not appear at all.
5. Search term test
When you’re confident that a search term of cattle can be found reliably, you may wish to extend your testing to other terms. Take care when choosing custom terms, as you want to be confident that they should be found, but not in such numbers that the results are overwhelming. You will also need to create your own test files containing the custom term.
Diagnosis
SpotTest can thus provide key information on:
delay or absence of find following creation of test files. If no indexing activity is seen in the log, that suggests indexing failure. If the test files are indexed promptly, it suggests search failure;
delay or absence in finding files H and I, indicating an indexing failure;
failure of a custom mdimporter to index a custom document type;
failure to index another volume.
Those should fit in with the overall scheme used by Spotlight, as shown below.
DropSum is my simple drag-and-drop utility for checking MD5 and SHA256 hashes, and using them to compare pairs of files to see if they’re identical.
This new version brings two changes:
Text entered in its two text boxes, where you paste hashes, is now cleaned of any spaces and hyphens, and set in lower case, before being used as a hash, although it’s not altered in the text box. This should save you having to edit what you paste there. Thanks to Panda for requesting that.
I have tried to improve readability when in dark mode in Sequoia and earlier. Thanks to EcleX for requesting this.
That said, the window’s appearance is a compromise between what looks best in Sequoia, and that in Tahoe. To see what I mean, here’s the same app, in its new version 1.2, in two versions of macOS, both in dark mode with Reduce Transparency enabled.
In macOS Tahoe there’s strong contrast throughout, and all text is readable, as it is in light mode.
Yet in macOS Sequoia, white text in unselected text boxes is shown against its orange background, rather than grey or black.
I have a feeling we’re in for an autumn of similar visual discrepancies appearing in other apps, whether or not they’ve been built for compatibility with Tahoe.
DropSum 1.2 for Big Sur and later, including Tahoe, is now available from here: dropsum12
from Downloads above, and from its Product Page.
Its MD5 hash is 9370f006d65eb3f6f65ab97dc78ce345
and SHA256 is f898b580138dc05d273c8b7f16321ad6d6754d76ecabf1c49fcac1d32bc156e6
Apple has just released its weekly update to XProtect for all supported versions of macOS, bringing it to version 5312. As usual, Apple doesn’t release information about what security issues this update might add or change.
This version adds three new detection rules: MACOS.SOMA.AUENB augmenting rules for the Soma/Amos family, MACOS.DUBROBBER.CHBI for another Dubrobber variant, and MACOS.ODYSSEY.LELI for an additional Odyssey variant.
You can check whether this update has been installed by opening System Information via About This Mac, and selecting the Installations item under Software.
A full listing of security data file versions is given by SilentKnight and SystHist for El Capitan to Tahoe available from their product page. If your Mac hasn’t yet installed this update, you can force it using SilentKnight or at the command line.
If you want to install this as a named update in SilentKnight, its label is XProtectPlistConfigData_10_15-5312
Sequoia and Tahoe systems only
This update has now been released for Sequoia via iCloud. If you want to check it manually, use the Terminal command sudo xprotect check
then enter your admin password. If that returns version 5312 but your Mac still reports an older version is installed, you may be able to force the update using sudo xprotect update
In the last few months I have had reports from several whose Macs have experienced a “SEP Panic” rather than a regular kernel panic. Although the immediate effects are the same, and my previous advice on how to deal with a kernel panic still applies, this article looks in more detail at what should be exceedingly rare events.
Essentials
If your Mac restarts or shuts down spontaneously, or ‘freezes’ for you to force it to shut down, chances are that was a kernel panic. When it starts up again, look out for the dialog inviting you to send a report to Apple. Expand that so you can see the panic log, copy and paste that into a text document, and save it. That’s the only record you have of that report, and that provides valuable clues as to what went wrong and how you might go about fixing it.
Apple will not contact you in response to sending the panic log. If you want advice or assistance about your Mac, contact Apple Support, and ensure you have your copy of the panic log ready, as they’ll need to see it.
Secure enclave
No matter how secure you try to make an operating system, if its most precious secrets are being processed by the main CPU cores, an attacker will find a way to access them. The proven solution to this is to build in a separate part of the chip with its own processor, and isolate that from everything else – a secure enclave, with its own secure enclave processor, SEP, as patented by Apple 13 years ago.
Two Mac architectures have secure enclaves and SEPs: Intel Macs with T2 (and T1) chips, where the SEP is in the T2/T1, and Apple silicon Macs, where the SEP is an integral part of the chip. These handle several different security features, including biometrics in Touch ID, management of secure encryption keys including those for FileVault, and performing encryption and decryption for the internal SSD.
The SEP runs its own operating system, sepOS, thought to be a derivative of L4, and communicates with the rest of the chip using mailboxes. When the CPU needs something from the SEP, it posts a message in the SEP mailbox, then retrieves the response when the SEP has processed that request.
What could possibly go wrong?
Like all processors, the SEP can hit problems that it can only manage by a reset, and those will result in it panicking, which in turn provokes the kernel running on the CPU to panic. Those problems can result from anything from a hardware fault to a bug in sepOS.
The SEP in a T2 chip is also known to be vulnerable to some exploits including blackbird, which can be used to ‘jailbreak’ a device using checkra1n or with malicious intent.
Reading the SEP panic log
When a kernel panic is the result of a SEP panic, the panic log is different from normal, and contains considerable detail about the SEP and what went wrong with it. As usual, though, much of that information is cryptic to say the least.
The first line in the panic log confirms that the panic originated in the SEP panic(cpu 1 caller 0xfffffe001f55e344): SEP Panic: […]
You’re then given the version of sepOS Root task vers: AppleSEPOS-2772.140.4
Unfortunately, further down it disclaims knowledge of that Firmware type: UNKNOWN SEPOS
The status of the SEP’s mailboxes are given Mailbox status:
IDLE_STATUS: 0x00000008
INBOX0_CTRL: 0x00105601
OUTBOX0_CTRL: 0x00023301
and Mailbox entries:
Unavailable
Mailbox queue pointers: […]
This is confirmed as a panic Debugger message: panic
The version of macOS is given by build number, with details of the kernel running on the CPU OS version: 24G90
Kernel version: Darwin Kernel Version 24.6.0: Mon Jul 14 11:30:29 PDT 2025; root:xnu-11417.140.69~1/RELEASE_ARM64_T6000
For a T2 chip, the kernel version given should be for a T8010 root:xnu-11417.140.69~1/RELEASE_ARM64_T8010
Apple silicon Macs should then confirm their iBoot versions, first the LLB (Stage 1) then iBoot Stage 2, and whether Secure Boot was used iBoot version: iBoot-11881.140.96
iBoot Stage 2 version: iBoot-11881.140.96
secure boot?: YES
T2 SEPs don’t normally give an iBoot Stage 2 version, but provide information about the Intel (x86) host iBoot Stage 2 version:
secure boot?: YES
roots installed: 0
x86 EFI Boot State: 0xe
x86 System State: 0x0
x86 Power State: 0x0
x86 Shutdown Cause: 0x5
x86 Previous Power Transitions: 0x20002000200
PCIeUp link state: 0x94721611
Information is provided about the task running on the CPU, which should normally be the kernel Panicked task 0xfffffe1fb0037248: 0 pages, 654 threads: pid 0: kernel_task
Towards the end of the panic log are details about kernel extensions. In SEP panics, that includes the SEP Manager Kernel Extensions in backtrace:
com.apple.driver.AppleSEPManager(1.0.1)[UUID]@0xfffffe001f5366e0->0xfffffe001f566a63
and last started kext at 242997189818: com.apple.iokit.SCSITaskUserClient 500.120.2 (addr 0xfffffe001ce0f6a0, size 2206)
loaded kexts:
In the list of loaded kernel extensions that follows, ensure there are no third-party entries, unless your Mac is expected to load them.
Actions
Although you should take a SEP panic seriously, there’s no need to panic yourself. This doesn’t mean that your Mac’s SEP has died, has been attacked by malware, or has released all the secrets it protects. A single panic in isolation could well just be chance, and not indicative of anything serious.
Provided that your Mac starts up correctly and then runs normally, your only essential task is to ensure that you capture and keep a copy of the panic log. If you wish, you can run hardware Diagnostics, but I doubt whether that performs any specific test intended to detect problems in the SEP. If you have potentially problematic peripherals, or any third-party kernel extensions, then you should take the hint and try to eliminate them.
If your Mac suffers any further kernel panics, capture their panic logs, and contact Apple Support with those to hand. Alternatively, book your Mac into an Apple store or authorised service provider for them to check it out for you.
Summary
SEP panics are exceedingly rare, but are readily identified from the first line of the panic log.
Ensure you copy and save a copy of the panic log.
Much of the panic log will appear meaningless, but there is some information about version numbers and kernel extensions that may be helpful.
Follow the normal recommendations, considering hardware diagnostics, and updating/removing potentially troublesome peripherals and third-party kernel extensions.
If there are any further panics, capture those and obtain support from Apple.
I hope that you enjoyed Saturday’s Mac Riddles, episode 322. Here are my solutions to them.
1: It’s about evolution, and open source for 25 years.
Click for a solution
Darwin
It’s about evolution (when Steve Jobs announced Darwin as open source in 1999, he said this to link it with Charles Darwin), and open source for 25 years (first released as open source in 2000, and still being posted on GitHub). (Darwin consists of the open source components in macOS, and includes its kernel.)
2: If the kernel isn’t Unix, this is it.
Click for a solution
XNU
If the kernel isn’t Unix, this is it (XNU is the open source kernel within Darwin, and is available as part of the GitHub distribution. Its name is an abbreviation for X isn’t Unix).
3: Mud puddles in Pittsburgh misheard as the basis for 2.
Click for a solution
Mach
Mud puddles in Pittsburgh misheard (it was originally intended to be called Muck in honour of these, but was misheard and incorrectly written down as Mach) as the basis for 2 (the Mach microkernel, developed by Richard Rashid and Avie Tevanian, formed the basis of XNU. Tevanian went on to work at Apple, then NeXT, where he designed NeXTSTEP).
As promised, this new version of my Spotlight indexing and search utility SpotTest extends its reach beyond the user’s Home folder, and can now test and search any regular volume that’s connected to your Mac and mounted in /Volumes.
By default, its searches remain restricted to the user’s Home folder, where SpotTest’s folder of crafted test files is installed. That applies whether you opt to use the search using its NSMetadataQuery tool, or the much faster option of the mdfind tool instead. If you want to search another mounted volume, click on the button for the app to check which volumes are available, then select one from its new Scope menu items. Volumes listed there exclude Time Machine backups and any hidden volumes whose names start with a dot, which will in any case be excluded from Spotlight indexing as they’re hidden.
This new version also fixes a weird bug that you’re unlikely to encounter in the previous version, but in rare circumstances could be infuriating. When searching using the NSMetadataQuery tool, if you had two windows open both with results from that tool, both would be updated with the same search results, and the time taken in them could rise to the absurd. This occurred because both windows were being updated with the data returned from the most recent search, as the NSMetadataQuery is shared in the app’s MainActor. After some fraught debugging, windows in this version ignore any search result updates initiated by other windows. I hope!
Volumes set in the Scope menu only affect search scope. Test folders are created in and removed from the user’s Home folder, and mdimporters are checked there as well. If you want to investigate indexing and search performance on other volumes, then you should manually create your own test folders as necessary. One quick and simple approach is to create a standard test folder in the Home folder, and copy that onto the volume(s) you want to test. A little later this week I’ll illustrate this in an article explaining how to get the best out of SpotTest and how it can help diagnose Spotlight problems.
I have taken the opportunity to improve SpotTest’s reporting of errors, such as trying to remove a test folder that doesn’t exist. I have also thoroughly revised the Help book, and added a page about search scopes.
SpotTest version 1.1 for macOS 14.6 and later, including Tahoe, is now available from here: spottest11
from Downloads above, and from its Product Page.
As we near the end of Tahoe’s incubation period, and Apple’s engineers code its last fixes and tweaks ready for its launch in just a few weeks, I’d like to reflect on what macOS 26 has to offer beyond its marketing headlines.
While there are several worthwhile new features such as the Phone app, Magnifier, and live translation, there’s nothing to compare with the fundamental changes in recent versions of macOS that brought the SSV, Shortcuts, System Settings and Apple Intelligence. Instead Tahoe is overwhelmingly about its human interface.
Every new design of the Mac’s operating systems that I can recall has elicited outcry from many. Understandably, the majority almost invariably want constancy, the same Finder and app icons that we’ve become so familiar with. It’s only human. It’s also a sure route to what others will condemn as stale, as it hasn’t been refreshed for so many years.
Personally, I don’t like to see a design on my Mac. If I notice it, then it’s a distraction. I’d much prefer to have an interface as clean as the whistles of the late Classic Mac OS period: lean, purposeful and lacking in visual trickery or frippery. But I accept that, without all the adornments and animations, many today would wonder why their Mac needed a GPU. I confess that I was never a fan of the original Aqua interface either. Given that its declared goal was to “incorporate colour, depth, translucence, and complex textures into a visually appealing interface”, I wonder whether much the same could be said of Tahoe.
Perhaps the most striking feature of this redesign is its lack of contrast between elements and tools in window controls and their contents, whether its appearance is set to light or dark mode, or one of its new in-between variants. You can see this clearly in most screenshots of Tahoe, such as those posted by Apple, and as far as I can see it hasn’t improved during beta-testing. This is also universal, and isn’t confined to apps using the more novel SwiftUI, although I have to keep pinching my thigh to remind myself that SwiftUI is now six years old, only two years younger than APFS. The contrast in stability and maturity between the two couldn’t be greater.
You can of course ‘improve’ contrast by enabling Reduce Transparency in Accessibility settings, but in doing so you lose most if not all of Tahoe’s Liquid Glass effects, as they depend on the transparency you’ve just turned off.
Transparency is a good example of design being given priority over readability or content. Because the appearance of the upper layer containing controls or content depends on what is underneath, it’s down to chance whether the greyed text you’re struggling to read happens to be over a background that further reduces its contrast. In the worst case, you could find yourself having to move a window so you can read part of it clearly, not a sign of a good human interface.
My other major concern with Tahoe’s new look is that it seems not to recognise the differences between Macs, iPads and iPhones, in terms of displays, input controls, and apps. Rather than sameness, I’d much rather have consistency that recognises the difference between manipulating Xcode’s compound windows containing dense structured text on a 27-inch display, and checking a family photo filling the 6.1-inch display of an iPhone.
One of my favourite controls in macOS is the Combo Box, a versatile and elegant hybrid of the popup/dropdown/pulldown menu/button and a text entry box. I can’t recall seeing one used in iOS, as it would be clumsy and inappropriate. It’s well supported for macOS in AppKit but hasn’t yet been implemented in SwiftUI. If controls are going to be common across all Apple’s operating systems, then macOS is about to lose one of its best.
It seemed only appropriate that, in the weeks before Apple releases OS 26 across Macs and devices, Tim Cook should go to the White House to pay its corporate tribute in a block of materialised Liquid Glass mounted on pure bling. But the image that I keep thinking of in fear, is that of Elon Musk demonstrating the resilience of his Cybertruck’s window by throwing a metal ball at it, in November 2019. I just hope Tahoe’s Liquid Glass doesn’t go the same way.
When Mac OS X 10.0 was released in March 2001, privileges, permissions and security adopted a conventional model based on BSD and Unix. Those sufficed for 15 years until the release of OS X 10.11 El Capitan in September 2015, when System Integrity Protection, SIP, was introduced. This article outlines its history over the last decade.
2015 Introduction
The first public account of SIP was presented by Pierre-Olivier Martel at WWDC 2015 in June, and documented in Apple’s System Integrity Protection Guide that September, which hasn’t been revised since. These changes were justified as adding a further layer of security protection to prevent attackers from gaining full control by escalating privileges to root.
Three types of protection were promised:
file system protections, so that system files could only be modified by processes signed by Apple;
prevention of runtime attachment, code injection, or modification of system binaries, with modifications only permitted by Apple’s installers and updaters;
kernel extensions (kexts) had to be signed using special certificates granted by Apple.
Each Mac’s SIP configuration was stored in NVRAM, and controlled by the csrutil command used in Recovery mode.
When released, the csrutil command provided some degree of separate control over six groups of features: file system protections, debugging protection, DTrace protection, kext signing requirement, NVRAM and ‘Apple internal’ protection. One immediate beneficial side-effect was that SIP prevented permissions being changed for system files, and that made the practice of repairing permissions on them unnecessary, allowing removal of support for that procedure from Disk Utility.
2015 Conflicts
Press reviews of the SIP feature were divided, with some claiming it was a sign that OS X was being closed down and moved to the iOS security model, while others considered that few users would notice much difference.
Problems resulting from SIP were reported soon after El Capitan’s release. For example, some older Mac models intentionally prevented their use with Apple USB SuperDrives. One workaround to address that had been to modify one of the files now protected by SIP, which consequently required the user to disable SIP to make that change.
As kernel extensions hadn’t previously been required to be signed at all, other early casualties were all older unsigned kexts, making some apps unusable unless a new version was provided with a correctly signed kext.
2016 Error
Late in 2016, it became clear that Apple had shipped a substantial batch of new MacBook Pro systems with SIP disabled. At that time, System Information was unable to report SIP status, and the only way to enable protection was to start that Mac up in Recovery mode and use the csrutil command in the Terminal app there. That applied to macOS Sierra 10.12 to 10.12.1.
To make this easier, Apple changed csrutil so that it could enable SIP when invoked in normal running mode, provided it was run with elevated privileges obtained using sudo. Despite that, some of those affected MacBook Pro models didn’t have SIP enabled correctly for several months.
2017-18 Problems
Over the following years, SIP continued to cause irritations that infuriated some users.
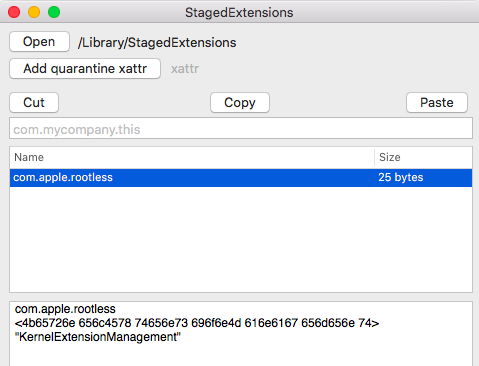
Bundled apps in the main Applications folder were protected by SIP, and that prevented the user from modifying them. As the handling of kexts changed, it was discovered that SIP made it awkward to remove old kexts the user had installed. That was because the folder /Library/StagedExtensions was put under the protection of SIP by attaching a com.apple.rootless extended attribute to it.
One reading of that extended attribute is that only Apple’s KernelExtensionManagement service can give permission for changes to be made within that folder, and the folders within it.
2020 Extended attributes
Apple later used SIP to lock down individual extended attributes (xattrs) attached to regular unprotected files. The first example of this was the undocumented com.apple.macl xattr that macOS started to attach widely to all user documents. Presence of that xattr was implicated in some problems in which those documents became locked down and unable to save changes, despite permissions and other visible attributes showing that the user had full ownership of the file. The only workaround for this has been to copy the file to another volume, where the xattr no longer has the protection of SIP, and can be stripped.
When Apple later introduced another undocumented xattr com.apple.provenance, that too was sometimes but not always protected by SIP, although that hasn’t been implicated in problems visible to the user.
2022 Launch constraints
Launch constraints were introduced in macOS 13 Ventura and iOS 16 in 2022. Every executable binary in the system now has a set of rules determining the requirements for that binary to be launched. These include self constraints that the binary itself must meet, parent constraints that must be met by its parent process, and responsible constraints that must be met by the process requesting the launch. Together these form that code’s launch constraints. To make those constraints simpler, they come in different categories, ranging from 0, in which there are no constraints at all, to combinations that prevent launch by processes that aren’t themselves part of the system and require the code itself to be on the System volume.
Although Apple has documented these for developers, they can cause unexpected behaviour for users, who haven’t been given any explanation. Testing has demonstrated that launch constraints are dependent on SIP, so must be assumed to have been added to its list of protections.
2024 Malware scans
Many users have reported slowing app launch times in recent versions of macOS. In February 2024, Jeff Johnson investigated these, and concluded that the cause was the macOS security system repeatedly performed malware scans against a growing set of Yara rules. These stopped when SIP was disabled, implying that this is yet another protection that has been added to those controlled by SIP.
2024 Current protections
Current user documentation for SIP explains only its file system protection, csrutil‘s man page refers to its usage information, but from that and XNU it’s possible to separate out its controls to include the following, at least:
Filesystem Protections, disabled by CSR_ALLOW_UNRESTRICTED_FS, abbreviated to fs
Debugging Restrictions, disabled by CSR_ALLOW_KERNEL_DEBUGGER and CSR_ALLOW_TASK_FOR_PID, abbreviated to debug
DTrace Restrictions, disabled by CSR_ALLOW_UNRESTRICTED_DTRACE, abbreviated to dtrace
Kext Signing, disabled by CSR_ALLOW_UNAPPROVED_KEXTS, abbreviated in csrutil to kext
NVRAM Protections, disabled by CSR_ALLOW_UNRESTRICTED_NVRAM, abbreviated to nvram
Apple Internal, disabled in XNU by CSR_ALLOW_APPLE_INTERNAL, and only disabled when SIP is fully disabled
BaseSystem Verification, abbreviated to basesystem
Boot-arg Restrictions, disabled with nvram
Kernel Integrity Protections, disabled with kext
Authenticated Root Requirement, disabled by CSR_ALLOW_UNAUTHENTICATED_ROOT, managed separately using csrutil authenticated-root disable and enable
Additional configuration flags available in XNU that don’t appear to be directly supported by csrutil include: CSR_ALLOW_TASK_FOR_PID, CSR_ALLOW_DEVICE_CONFIGURATION, CSR_ALLOW_ANY_RECOVERY_OS and CSR_ALLOW_EXECUTABLE_POLICY_OVERRIDE. Those should be disabled when SIP is fully disabled.
2015-2025 Vulnerabilities
Over the last decade, many vulnerabilities have been discovered in SIP that have allowed parts of its protections to be bypassed. Among the most recent is CVE-2024-44243 discovered by Jonathan Bar Or (@yo_yo_yo_jbo) of Microsoft Threat Intelligence and Mickey Jin (@patch1t), and fixed in the update to macOS 15.2 Sequoia. However, this wasn’t fixed in Sonoma until the following round of updates (14.7.3), and appears to remain unpatched in Ventura 13.7.8.
Microsoft’s report explains how bypassing just one of SIP’s many protections can give access to bypasses of more or all of SIP’s other protections. Note also how Apple’s description of the vulnerability in its security release notes refers to StorageKit but doesn’t reveal that this affected SIP.
Over the last decade, SIP has grown like Topsy from three protections that seemed worthwhile and simple, into a protean collection of many parts that remain largely undocumented and pervade much of modern macOS security.
Sometimes even the best-kept Macs start acting strangely, and no matter what you try, you can’t put your finger on the problem, and can’t make it go away. This article suggests some potentially radical solutions that should address the most intransigent of problems in Apple silicon Macs.
Hardware?
If the problem lies in a peripheral, or the Mac’s hardware, then everything else is doomed to fail. Start by disconnecting all non-essential peripherals, and if that doesn’t help, run hardware diagnostics from Recovery mode. Those don’t always catch problems, particularly in their early stages, so if you’re not convinced that your Mac is sound and healthy, book it in for your nearest Apple store or authorised service provider to run their more extensive tests.
To run hardware diagnostics in an Apple silicon Mac, start it up in Recovery by pressing its Power button until it displays that it’s loading options, then in the initial Options screen, hold Command-D until the Diagnostics Loader starts. This may require download of the disk image from Apple’s servers before testing can proceed, so a good Wi-Fi connection is important. Once loaded, there’s a hidden option for extended diagnostics that can be triggered by holding the Command-E key combination.
What to reinstall?
At this stage with an Intel Mac, you’d be considering performing a clean reinstall of macOS, maybe even trying to revert to an older version that didn’t show the problem. Although you can still try that in Recovery mode, Apple silicon Macs have a better and more thorough option, to Restore the whole of your Mac’s firmware and macOS. This is performed by putting it into DFU mode, connected to another Mac (either architecture) running a recent version of macOS, and performing the Restore from there.
Apple provides detailed instructions for you to do this yourself, provided you have the necessary second Mac and cable. If you don’t have those, you should be able to get this performed free of charge at an Apple store, or by an authorised service provider.
The cable used mustn’t be Thunderbolt, but plain USB-C. That’s because DFU mode doesn’t support Thunderbolt or its cable. Connect that to the designated DFU port on the Mac you’re going to Restore. That can be found in Apple’s note, or in Mactracker.
You used to have to run Apple Configurator on the second Mac, but this can now be handled through the Finder, where it’s usually the more reliable. Follow Apple’s instructions to Restore the current version of the firmware and macOS, or you can download an IPSW image file for most previous versions through the links on Mr. Macintosh’s site.
Before performing this, you must make a full backup of your Mac’s internal storage, as the Restore process wipes it clean, and you’ll want to restore from that backup afterwards. As this process is going to wipe your Mac, you’ll also want to check through third-party apps and subscriptions that need to be signed out or transferred. Check carefully through the Applications folder to ensure that you haven’t forgotten any that are still valid. Among those is the need to deauthorise your old Mac for Apple media, something you should do using one of its media apps such as Music or TV.
Revive or Restore?
Apple advises trying to revive your Mac first, as it’s a briefer procedure and doesn’t wipe the whole of the Mac’s internal storage. However, if you’re trying to fix a deep-seated problem, only a full Restore will do.
What does a Restore do?
Internal storage in Apple silicon Macs contains additional partitions/containers to those found in Intel Macs or on external boot disks. These store the firmware and other components used early during the boot process, as part of Secure Boot. A ‘clean’ reinstall only replaces the boot volume group, the Signed System Volume (SSV) and Data volume, while a Restore in DFU mode wipes everything including the firmware, and replaces it with fresh copies from the IPSW file.
The end result is that your Mac is running the firmware to match the version of macOS installed, just as it would have been from the factory. It then has to be personalised and reconfigured from scratch once it’s started up. Nothing from its old firmware, macOS or Data volume is left, even the NVRAM, stored in NOR Flash memory, is reset.
There are so many controls in macOS that sometimes you can’t see the wood for the trees. This can leave uncertainty over essentials, such as whether your Apple silicon Mac really is properly secure, or maybe there’s something sinister going on with it? This is a question I’m asked not infrequently, usually when someone has been spreading disinformation or FUD (fear, uncertainty, doubt). So how can you check that your Mac is properly locked down and boots securely?
Quick checks
There are two quick checks that cover the essentials. First, open System Information and select the Controller section in Hardware.
This provides a brief summary of your Mac’s boot security, which should read as shown above. If you still need to use a kernel extension or similar, your Mac might show Reduced Security with Allow All Kernel Extensions enabled, but you should do everything you can to avoid that.
Secure Boot is controlled using Startup Security Utility in Recovery mode, and if you care to start up in that mode, you can confirm or correct its settings there.
Back in normal user mode, open Privacy & Security settings and ensure you have FileVault enabled there.
SilentKnight also checks that XProtect/Gatekeeper checks are enabled, and that security data are up to date, giving you complete confidence.
Details
Although those should be sufficient for most, some want to go further and verify that their Mac’s boot process and security systems are also working correctly. To do that, shut your Mac down, wait ten seconds or so, and start up normally with the startup chime sounding at a known time. Enter your password, wait a few seconds for the Finder to get set up and running, and open LogUI. Set its time to that of the startup chime, and get the first 10 seconds or 10,000 log entries. You may need to adjust the seconds to capture the full boot sequence. When you have, look through the log and identify the following waypoints.
In each of these log entries, I have emboldened a word or two that you can copy from here and paste into LogUI’s Search box, then press Return. That will display the log entry, and sometimes others you might find relevant. Times are given here in seconds, with the startup chime occurring at about 37 seconds. Version numbers shown are those for macOS 15.6.
The start of boot is recorded as 37.562774 === system boot: [UUID]
and a little while after that, the kernel declares its version details 42.759300 Darwin Kernel Version 24.6.0: Mon Jul 14 11:30:40 PDT 2025; root:xnu-11417.140.69~1/RELEASE_ARM64_T6041
for macOS 15.6.
Further down you’ll come across more information about key security components, including the Trusted Execution Monitor 43.060422 [Log]: Code Signing Monitor Image4 Module Version 7.0.0: Fri Jul 11 16:51:29 PDT 2025; root:AppleImage4_txm-320.100.22~1090
43.060447 [Log]: build variant: txm.macosx.release.TrustedExecutionMonitor_Guarded-135.100.37
Then the iBoot firmware version 43.061758 iBoot version: iBoot-11881.140.96
43.061760 iBoot Stage 2 version: iBoot-11881.140.96
CoreCrypto support is vital, and another Image4 extension 43.137635 FIPSPOST_KEXT [133796636] fipspost_post:154: [FIPSPOST][Module-ID] Apple corecrypto Module v18.3 [Apple silicon, Kernel, Software, SL1]
43.242334 Darwin Image4 Extension Version 7.0.0: Mon Jul 14 11:23:46 PDT 2025; root:AppleImage4-320.100.22~2585/AppleImage4/RELEASE_ARM64E
You should see entries reporting the loading of security policy components 43.242343 Security policy loaded: AppleImage4 hooks (AppleImage4)
43.242961 Security policy loaded: Apple Mobile File Integrity (AMFI)
43.243092 Security policy loaded: Seatbelt sandbox policy (Sandbox)
The Secure Enclave Processor or SEP is another key component that has to be started up 43.264594 "AppleSEPKeyStore":326:0: starting (BUILT: Jul 14 2025 23:34:10) ("normal" variant 🌽 , 1827.120.2)
43.264639 "AppleSEPKeyStore":471:0: _sep_enabled = 1
Apple System Policy should follow a bit later 43.760156 Security policy loaded: Apple System Policy (ASP)
43.760188 AppleSystemPolicy has been successfully started
The root of the file system is then identified in two entries whose origins go right back to the start of Mac OS X 43.940643 BSD root: disk3s1
43.940644 , major 1, minor 13
And APFS mounts the root file system, using the SSV snapshot 43.941048 apfs_vfsop_mountroot:2984: apfs: mountroot called!
44.034685 apfs_vfsop_mount:2763: disk3s1 Rooting from snapshot with xid 1724240.
One of the most important entries comes shortly after that, where successful validation of the SSV’s root hash is reported 44.038830 authenticate_root_hash:642: disk3s1 successfully validated on-disk root hash
It’s now time to start user space processes, and for that launchd must be loaded so it can launch everything else 44.103761 load_init_program: attempting to load /sbin/launchd
How Secure Boot works
Apple silicon Macs have a small ROM to support DFU mode in case a full Restore is required, and to check and load the first stage of the ‘firmware’, the Low-Level Bootloader or LLB. Only if that matches its signature will the ROM firmware hand over to it and proceed with the boot process. The LLB in turn performs the same checks on the second stage ‘firmware’, iBoot proper. That goes on to check the kernel, before loading that and handing over for kernel boot to take over.
iBoot ‘firmware’ doesn’t write anything in the log, but once the kernel takes over its log entries provide a detailed account of its progress. The great majority of its log entries are unintelligible to anyone outside Apple, but the waypoints I have given above identify some of the most important steps it takes. When it’s ready, the kernel validates the root hash for the SSV snapshot, as noted above, enabling the boot process to proceed to load and run other parts of macOS. The remaining hash checking of the SSV, to confirm that it’s exactly as Apple intends, proceeds in a ‘lazy’ fashion, as access is needed to its contents.
This chain of validation before loading the next stage ensures that nothing in the boot process can be tampered with or changed, and the boot is secure throughout. Apple provides further details in its Platform Security Guide.
Apple has just released urgent security updates to bring macOS Sequoia to 15.6.1, Sonoma to 14.7.8, and Ventura to 13.7.8.
Security release notes for these are already available, for 15.6.1, 14.7.8 and 13.7.8 Each refers to the same single vulnerability in ImageIO, which is apparently being exploited “in an extremely sophisticated attack against specific targeted individuals” using a crafted image file.
The download for 15.6.1 is about 1.56 GB for an Apple silicon Mac, and should be well under 1 GB for Intel. Time to update!
Security utilities that detect known malicious software do so using sets of detection rules. Since their introduction by Victor Alvarez of VirusTotal 12 years ago, the most common method of expressing these rules is in a text file with the extension .yara. Apparently YARA stands for either YARA: Another Recursive Acronym, or Yet Another Ridiculous Acronym.
Yara rules are used extensively in macOS by both the original XProtect and its sibling XProtect Remediator. Those of XProtect are found in the XProtect.yara file in XProtect.bundle, in /Library/Apple/System/Library/CoreServices and its additional location in /private/var/protected/xprotect in Sequoia and later. Further Yara rules are also encrypted and embedded in XProtect Remediator’s scanning modules, as detailed by Koh M. Nakagawa in the FFRI Security GitHub.
As used by Apple, each rule can consist of up to three sections:
meta, containing the rule’s metadata including a description and in more recent cases a UUID for the rule.
strings, specifying some of the content of the file, typically in the form of hexadecimal strings such as { A0 6B }.
condition, a logical expression that, when satisfied, meets the requirements of that rule, so identifying it as malicious.
I’ll exemplify these using Yara rules used in XProtect version 5310.
Private rules
At the start of the Yara file are any private rules. These are a bit like macros, in that they define properties that are then used in multiple rules later. Laid out in compact form, an example reads:
private rule Shebang

{ meta:

description = "private rule to match shell scripts by shebang (!#)"
condition:

uint16(0) == 0x2123

}
This starts with description metadata for this private rule, then states the condition for satisfying this rule, that the first 16-bit unsigned integer in the file contains the hex 0x2123, the UTF-8 characters 0x21 or ! and 0x23 or #. In the reverse order of #! they’re known as the shebang, and the opening characters of many shell scripts, but in this rule they are given the other way around because of the byte order used in the 16-bit integer.
This defines what’s required of a Shebang, and can be included in the conditions of other Yara rules. Instead of having to redefine the same feature in every rule, they can simply include that Shebang rule in their condition.
Regular rules
After 3-5 private rules, the XProtect Yara file goes on to enumerate 372 normal rules, including this one:
This rule has its internal code name as its description, and has been assigned the UUID shown. It then defines two binary strings, a0 and a1, the former containing ‘wild’ values expressed using the question mark ?. The condition for satisfying the rule is that the file must:
There are standard implementations that can check files against custom sets of Yara rules. Rules are normally compiled into binary form from their text originals before use. Full details are given on VirusTotal.
Apple’s use of Yara files is mysterious, as for some years all the descriptions used arbitrary code names as obfuscation. When the source of all the rules is given in plain text, it’s hard to see what purpose that served, and it meant that users were told that MACOS.0e32a32 had been detected in an XProtect scan, for instance. Thankfully, Apple has more recently replaced most of those with more meaningful names.
I’m grateful to Duncan for asking me to explain this, and hope I have been successful. I’m also grateful to isometry and an anonymous commenter for straightening out the confusion over the Shebang.
Apple has just released an update to XProtect for all supported versions of macOS, bringing it to version 5311. As usual, Apple doesn’t release information about what security issues this update might add or change.
This version adds eight new detection rules, for MACOS.BANSHEE.MA, MACOS.BANSHEE.MA2, MACOS.SOMA.GEGO, MACOS.POSEIDON.B, MACOS.TIMELYTURTLE.FUNA, MACOS.TIMELYTURTLE, MACOS.TIMELYTURTLE.INDRBYSE and MACOS.TIMELYTURTLE.INDR. Banshee, Poseidon and TimelyTurtle are new names in XProtect’s Yara rules.
You can check whether this update has been installed by opening System Information via About This Mac, and selecting the Installations item under Software.
A full listing of security data file versions is given by SilentKnight and SystHist for El Capitan to Tahoe available from their product page. If your Mac hasn’t yet installed this update, you can force it using SilentKnight or at the command line.
If you want to install this as a named update in SilentKnight, its label is XProtectPlistConfigData_10_15-5311
Sequoia and Tahoe systems only
This update has already been released for Sequoia via iCloud. If you want to check it manually, use the Terminal command sudo xprotect check
then enter your admin password. If that returns version 5311 but your Mac still reports an older version is installed, you may be able to force the update using sudo xprotect update
For many of us, Live Text and Visual Look Up are real boons, making it simple to copy text from images, to perform Optical Character Recognition (OCR) on images of text, and to identify objects of interest. They are also used by the mediaanalysisd service to extract text and object identifications for indexing by Spotlight, making those image contents searchable. Although the latter can be disabled generally or for specific folders in Spotlight settings, there appears to be only one control over Live Text, and none for Visual Look Up. This article examines what that single control does, using log extracts obtained from a Mac mini M4 Pro running macOS Sequoia 15.6. It follows my recent article on how these features work.
Setting
Live Text, which is enabled by default, can be disabled in Language & Region settings. When that is turned off, opening an image containing text in Preview no longer makes any text selectable. However, Visual Look Up still works as normal.
Textual images
When an image containing recognisable text but no other objects is opened in Preview, the VisionKit subsystem is still activated soon after the image is loaded. VisionKit initially reports that the “device” supports analysis, but immediately clarifies that to Device does not support image analysis, but does support Visual Search, limiting to just Visual Search.
It then starts a VKImageAnalyzerProcessRequestEvent with a MAD parse request. That leads to a Visual Search Gating Task being run, and the Apple Neural Engine (ANE) and all CPU P cores are prepared for that.
Less than 0.1 second later, the end of the VKImageAnalyzerProcessRequestEvent is reported, and VisionKit returns an analysis that no image segments merits further analysis. Preview’s ⓘ Info button remains in its normal state, and clicking on that doesn’t alter the image displayed.
Images with other objects
An image containing potentially recognisable objects doesn’t stop there. If VisionKit returns an analysis indicating Visual Search could extract objects from the image, the ⓘ Info button adds stars and waits for the user to open the Info window.
VisionKit reports in the log Setting Active Interaction Types: [private], [private]
then that it DidShowVisualSearchHints with invocationType: VisualSearchHintsActivated, id: 1
When one of those Visual Search Hints is clicked, the Lookup View is prepared, followed by a notice from LookupViewService that it’s Changing state from LVSDisplayStateConfigured to LVSDisplayStateSearching. That leads to VisionKit making a Visual Search request from mediaanalysisd.
After the Apple Neural Engine (ANE) is run to progress that, successful search results in PegasusKit making its internet connection to identify the object, exactly as it does when Live Text is enabled and text has been recovered from the image: Querying https: // api-glb-aeuw1b.smoot.apple.com/apple.parsec.visualsearch.v2.VisualSearch/VisualSearch with request (requestId: [UUID]) : (headers: ["Content-Type": "application/grpc+proto", "grpc-encoding": "gzip", "grpc-accept-encoding": "gzip", "grpc-message-type": "apple.parsec.visualsearch.v2.VisualSearchRequest", "X-Apple-RequestId": "[UUID]", "User-Agent": "PegasusKit/1 (Mac16,11; macOS 15.6 24G84) visualintelligence/1", "grpc-timeout": "10S"]) [private]
The ANE is finally cleaned up and shut down as the search results are displayed in the Lookup View.
Conclusions
When Live Text is disabled in Language & Region settings, images are still analysed when they are opened, to determine if they’re likely to contain objects that can be recognised in Visual Search for Visual Look Up.
If there are no such objects detected, VisionKit proceeds no further.
If there are suitable objects, mediaanalysisd and VisionKit proceed to identify them using Visual Search Hints, as normal.
If the user clicks on a Visual Search Hint, PegasusKit connects to Apple’s servers to identify that object and provide information for display in the Lookup View.
Although there is less extensive use of the ANE and CPU cores than when Live Text is enabled, neural networks are still run locally to perform a more limited image analysis.
I’m very grateful to Benjamin for pointing out this control over Live Text.
I hope that you enjoyed Saturday’s Mac Riddles, episode 321. Here are my solutions to them.
1: Where to sell an image of the Knolls in a two-year exclusive.
Click for a solution
Photoshop
Where to sell (a shop) an image (a photo) of the Knolls (originally developed by brothers Thomas and John Knoll, and licensed by Adobe) in a two-year exclusive (from February 1990 until its release on Windows in November 1992, it was exclusive to Mac).
2: Rembrandt, Claude Monet, JMW Turner and Corel.
Click for a solution
Painter
Rembrandt, Claude Monet, JMW Turner (all three were painters) and Corel (originally released in 1991 by Fractal Design, Painter was eventually bought by Corel).
3: One of the first two, it could be beige acrylic and written by Bill.
Click for a solution
MacPaint
One of the first two (together with MacWrite, it was one of the two apps bundled with the 128K Mac), it could be beige acrylic (paint the same colour as the 128K Mac) and written by Bill (Atkinson, 1951-2025, who wrote the app).
The common factor
Click for a solution
They have all been major raster graphics editors on the Mac.
There are some topics that invariably generate comments from those who have either abandoned a major feature in macOS, or are struggling with it. Some of the most persistent are problems with Spotlight, particularly with its local search of files on your Mac. To help grapple with those, four years ago I added some Spotlight tests to Mints that can be used to work out where those problems are occurring. I’m delighted now to offer an extension to those in a whole new app, perhaps predictably named SpotTest.
Spotlight is so substantial, almost silent in the log, and impenetrable that the best approach to diagnosing its problems is to test it out in a controlled way. Mints has been doing that by creating a folder of files containing an unusual word, then searching for that. Although that’s still useful for a quick test, we need something more focused and flexible, and that’s what SpotTest aims to deliver.
Following deep dives into how Spotlight indexes and searches metadata and contents of files, and how it can search text extracted from images and the results of image analysis, I’ve realised that different test files are required, together with alternative means of search. For example, the standard approach used in compiled apps, with NSMetadataQuery, is incapable of finding content tags obtained using Visual Look Up, which only appear when using the mdfind command. SpotTest takes these into account.
There are now 15 carefully crafted test files, of which one cannot currently be found, no matter what method of search you try.
A perfect 13/15 result from NSMetadataQuery is only possible after waiting a day or more for background mediaanalysisd processing to recognise and extract the text in file I, a PNG image. The other 12 here should all be found when running this test a few seconds after the test files have been created. They rely on a range of mdimporter modules bundled in macOS, apart from file L, an XML property list.
Another of SpotTest’s tools will list the mdimporters used for each of the test files.
Run the search using the mdfind command within SpotTest and, once mediaanalysisd has done its image recognition, you should get a perfect 14/15.
The only current limitation of SpotTest version 1.0 is that it can only run tests on the Data volume that your Mac started up from, using a folder at the top level of your Home folder. A future version will let you test other volumes as well. Its Help book runs to nine pages: please read them, as its test might seem deceptively simple but provide a lot of useful information about how Spotlight local search is functioning. Coupled with log extracts using LogUI it should shine light in the darkness.
SpotTest 1.0, which requires macOS 14.6 or later, is now available from here: spottest10
and from its new place in its Product Page.


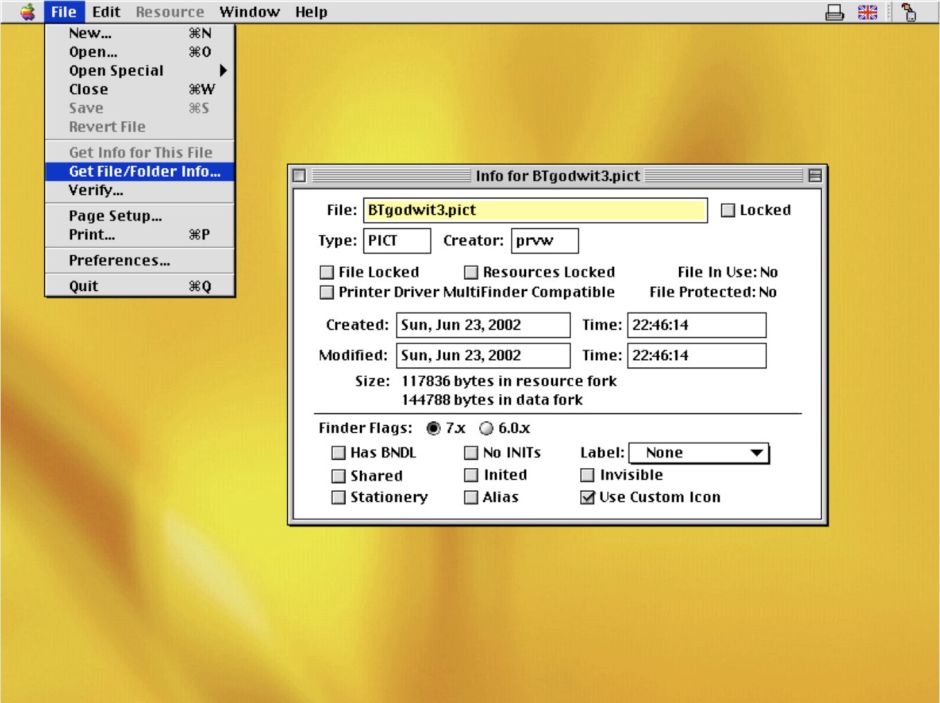
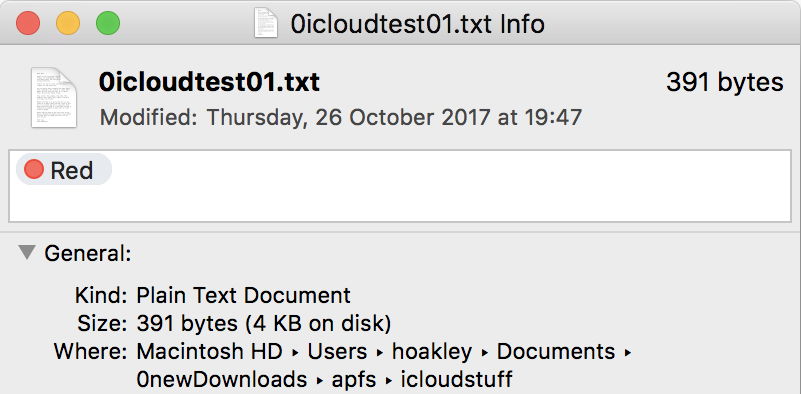
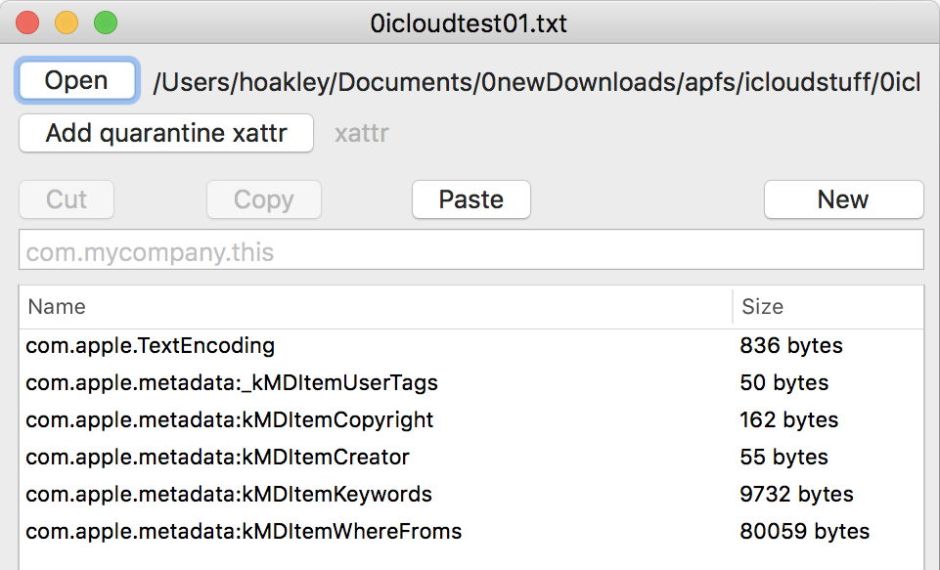


 button to list available volumes, then select the volume containing the copied test folder in the Scope menu.