shortcuts 是什么进程?占用 cpu 90%以上
leon912:
26 系统,关闭了 iCloud 中的快捷指令同步,也没有在 mac 上建立快捷指令。 在系统进程中,就会出来一个进程是 shortcuts ,并且 cpu 占用率很高,90%以上。 手动杀掉以后还会出来。 请问下大家,这个进程如何关闭呢?
26 系统,关闭了 iCloud 中的快捷指令同步,也没有在 mac 上建立快捷指令。 在系统进程中,就会出来一个进程是 shortcuts ,并且 cpu 占用率很高,90%以上。 手动杀掉以后还会出来。 请问下大家,这个进程如何关闭呢?
Apple has just released its weekly update to XProtect, bringing it to version 5319. As usual, it doesn’t release information about what security issues this update might add or change.
This version adds three new Yara rules. MACOS.SOMA.OCENA is yet another for the vast Soma/Amos family, and there are two for the far newer MACOS.ODYSSEY group, MACOS.ODYSSEY.SOCGO and MACOS.ODYSSEY.SEENA.
You can check whether this update has been installed by opening System Information via About This Mac, and selecting the Installations item under Software.
A full listing of security data file versions is given by SilentKnight and SystHist for El Capitan to Tahoe available from their product page. If your Mac hasn’t yet installed this update, you can force it using SilentKnight or at the command line.
If you want to install this as a named update in SilentKnight, its label is XProtectPlistConfigData_10_15-5319
This update has already been released for Sequoia and Tahoe via iCloud. If you want to check it manually, use the Terminal commandsudo xprotect check
then enter your admin password. If that returns version 5319 but your Mac still reports an older version is installed, you should be able to force the update usingsudo xprotect update

进入十月份的苹果动作频频。
前两天库克还在亲自下场,在 Apple Store 抖音直播间宣发国行 iPhone Air,这不,就在刚刚,苹果又直接在官网上架了今年的新款 MacBook——
搭载 M5 处理器的 MacBook Pro,「真的快,不是梦」:

只不过特别的是,往年的 Apple Silicon 处理器 Mac 都是全系列同时发布,但今年苹果的步调发生了一些变化——
在本次的 MacBook Pro 上,我们没有见到 M5 Pro 或者 M5 Max,而是只有 10+10 核规格的基础版 M5 处理器。
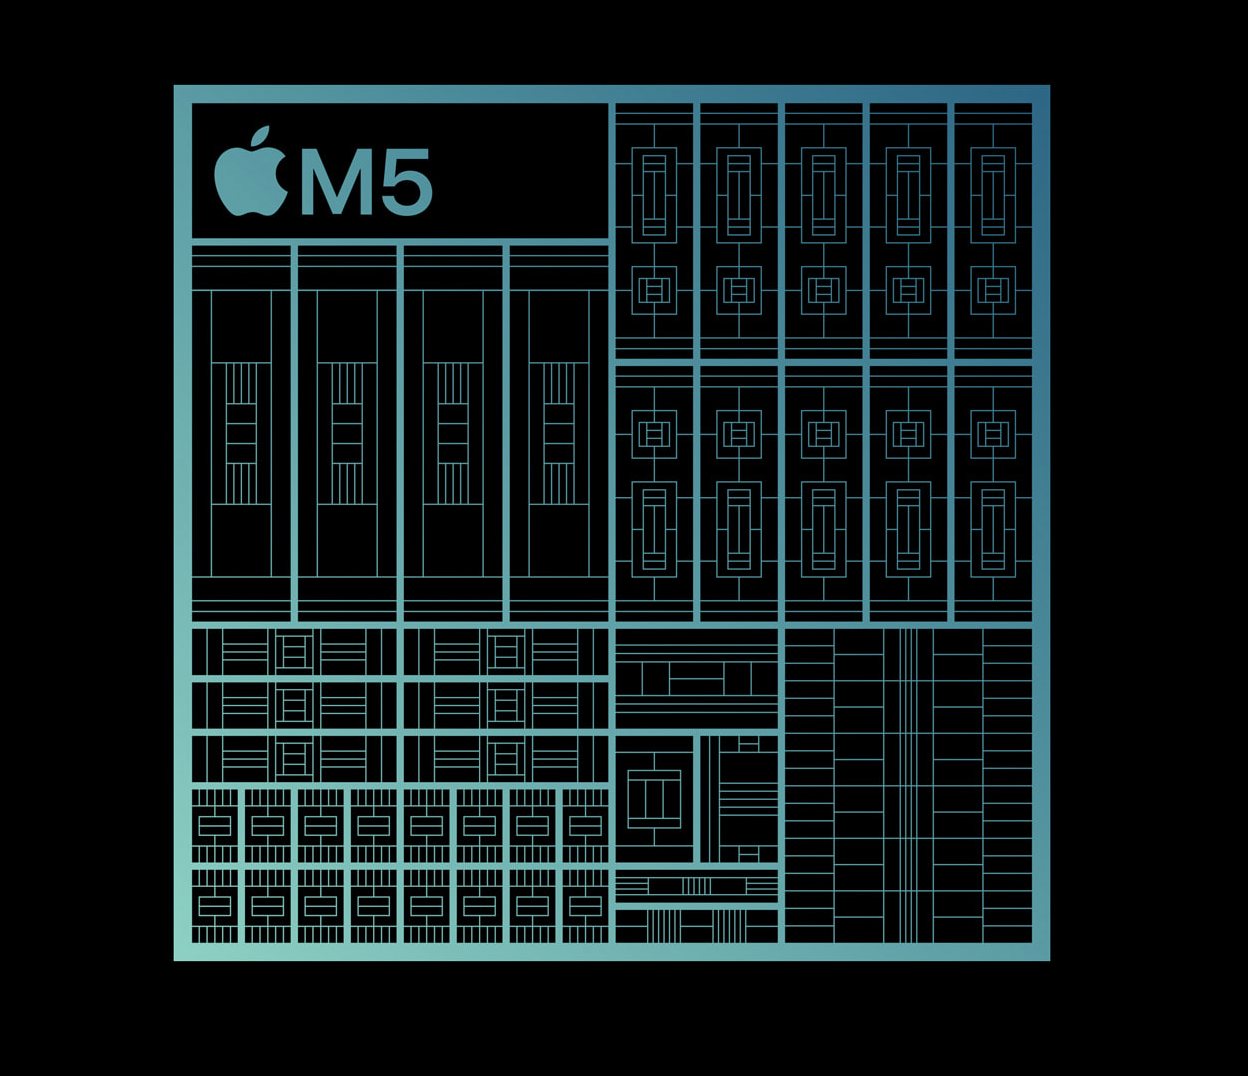
与前期的预测一致,M5 处理器基于 3nm 的台积电工艺打造,与今年能效提升明显的 A19 Pro 处理器属于同代制程,工艺红利明显。
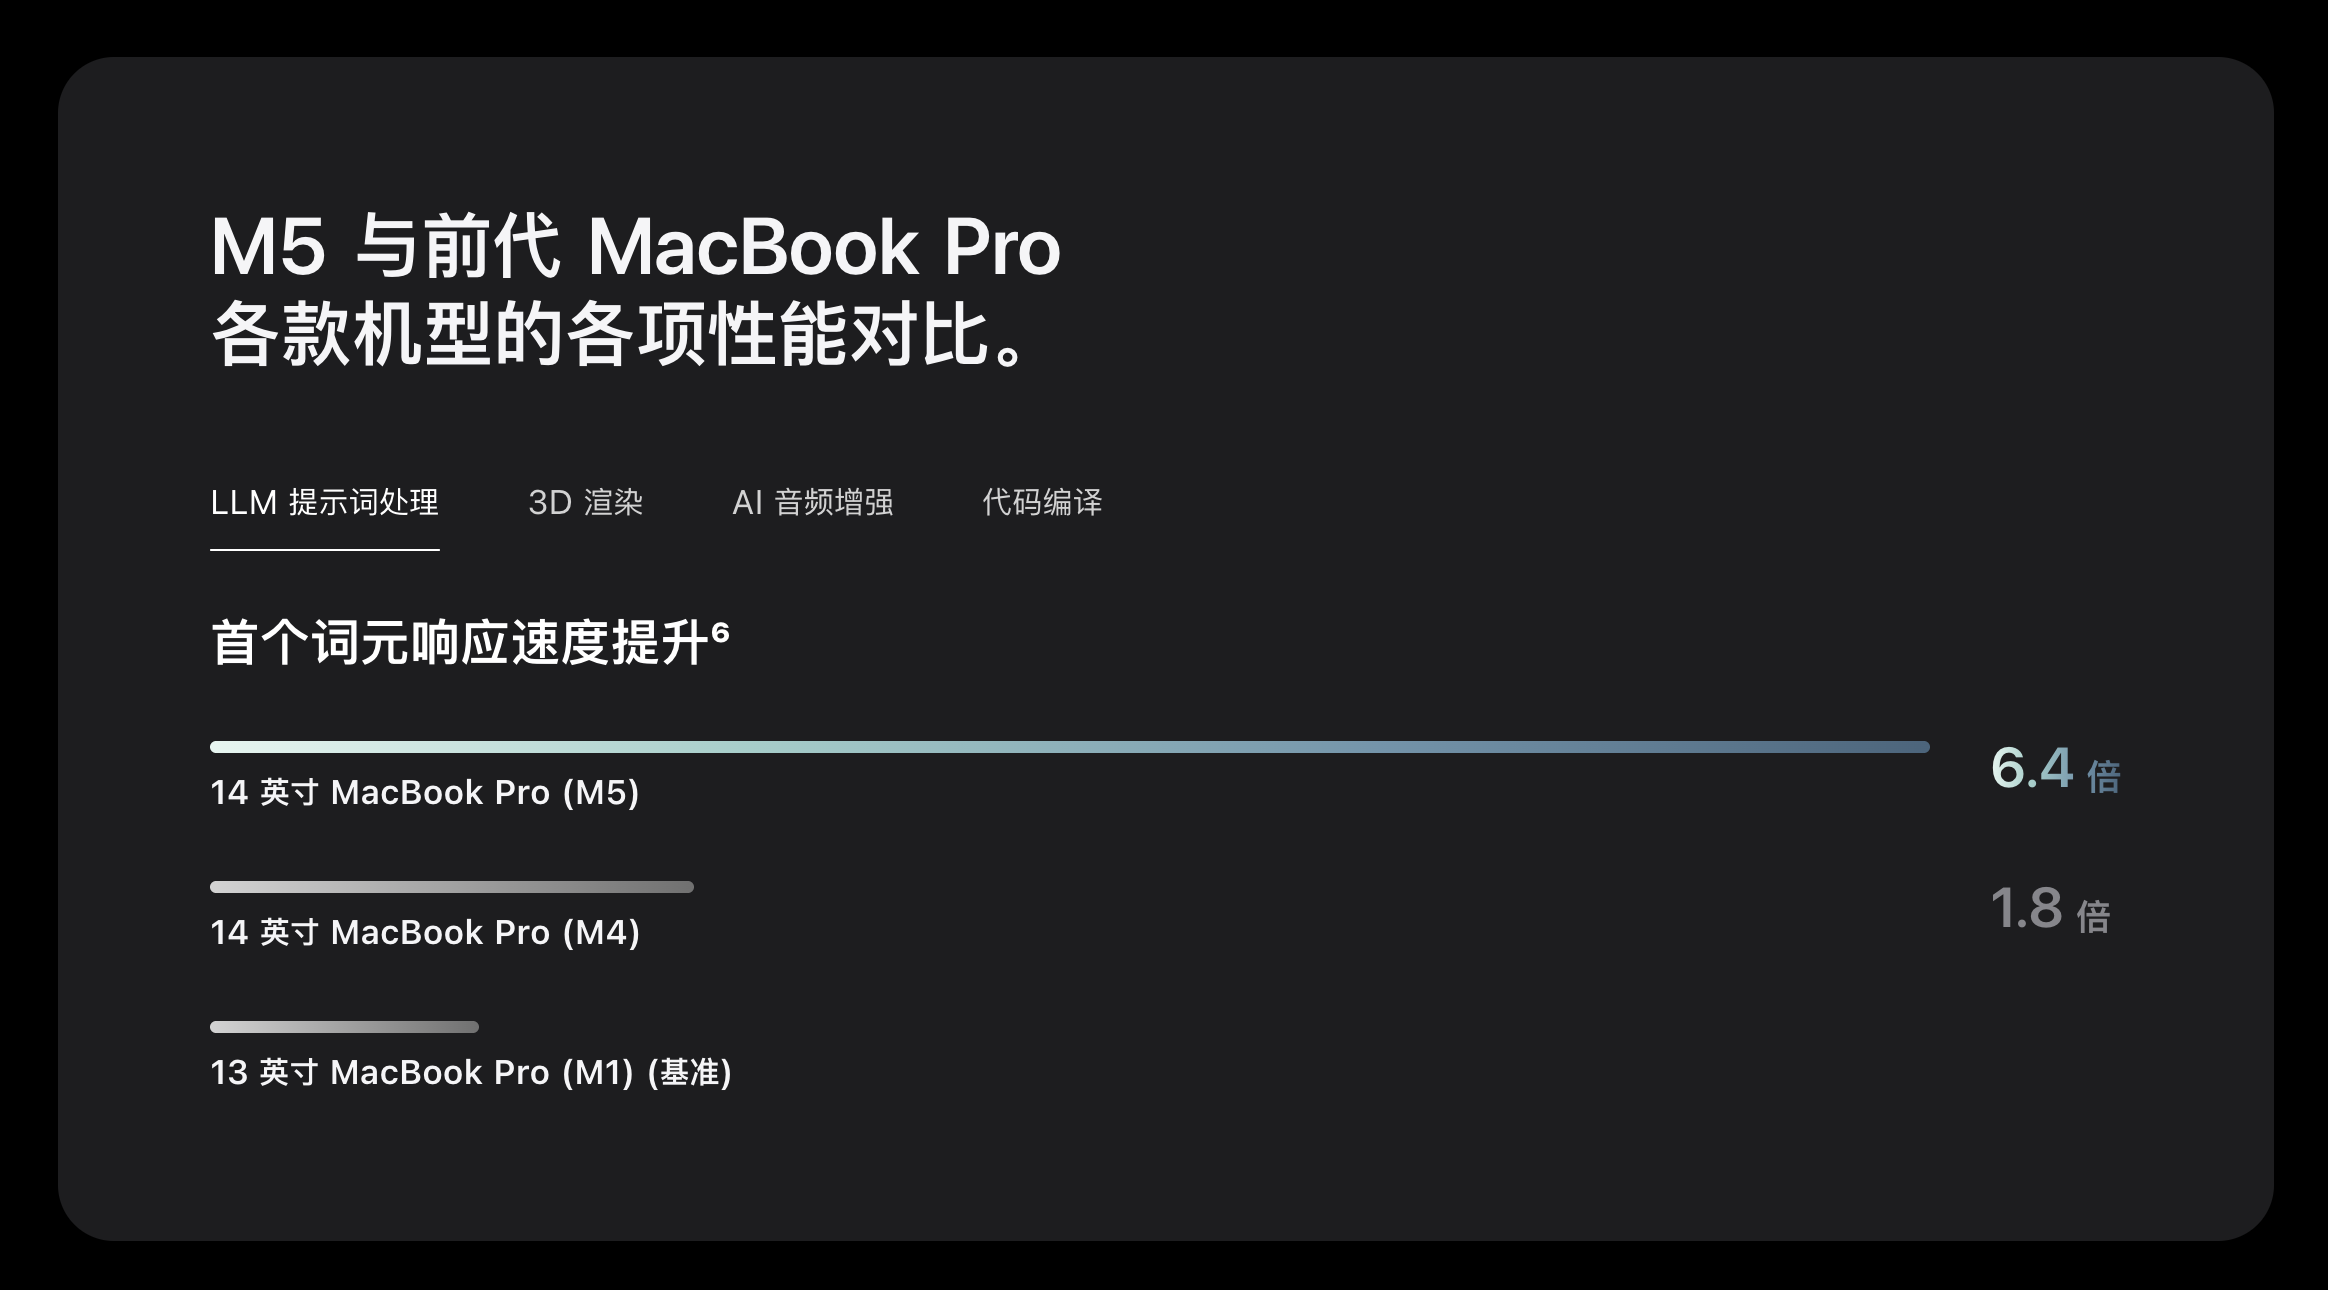
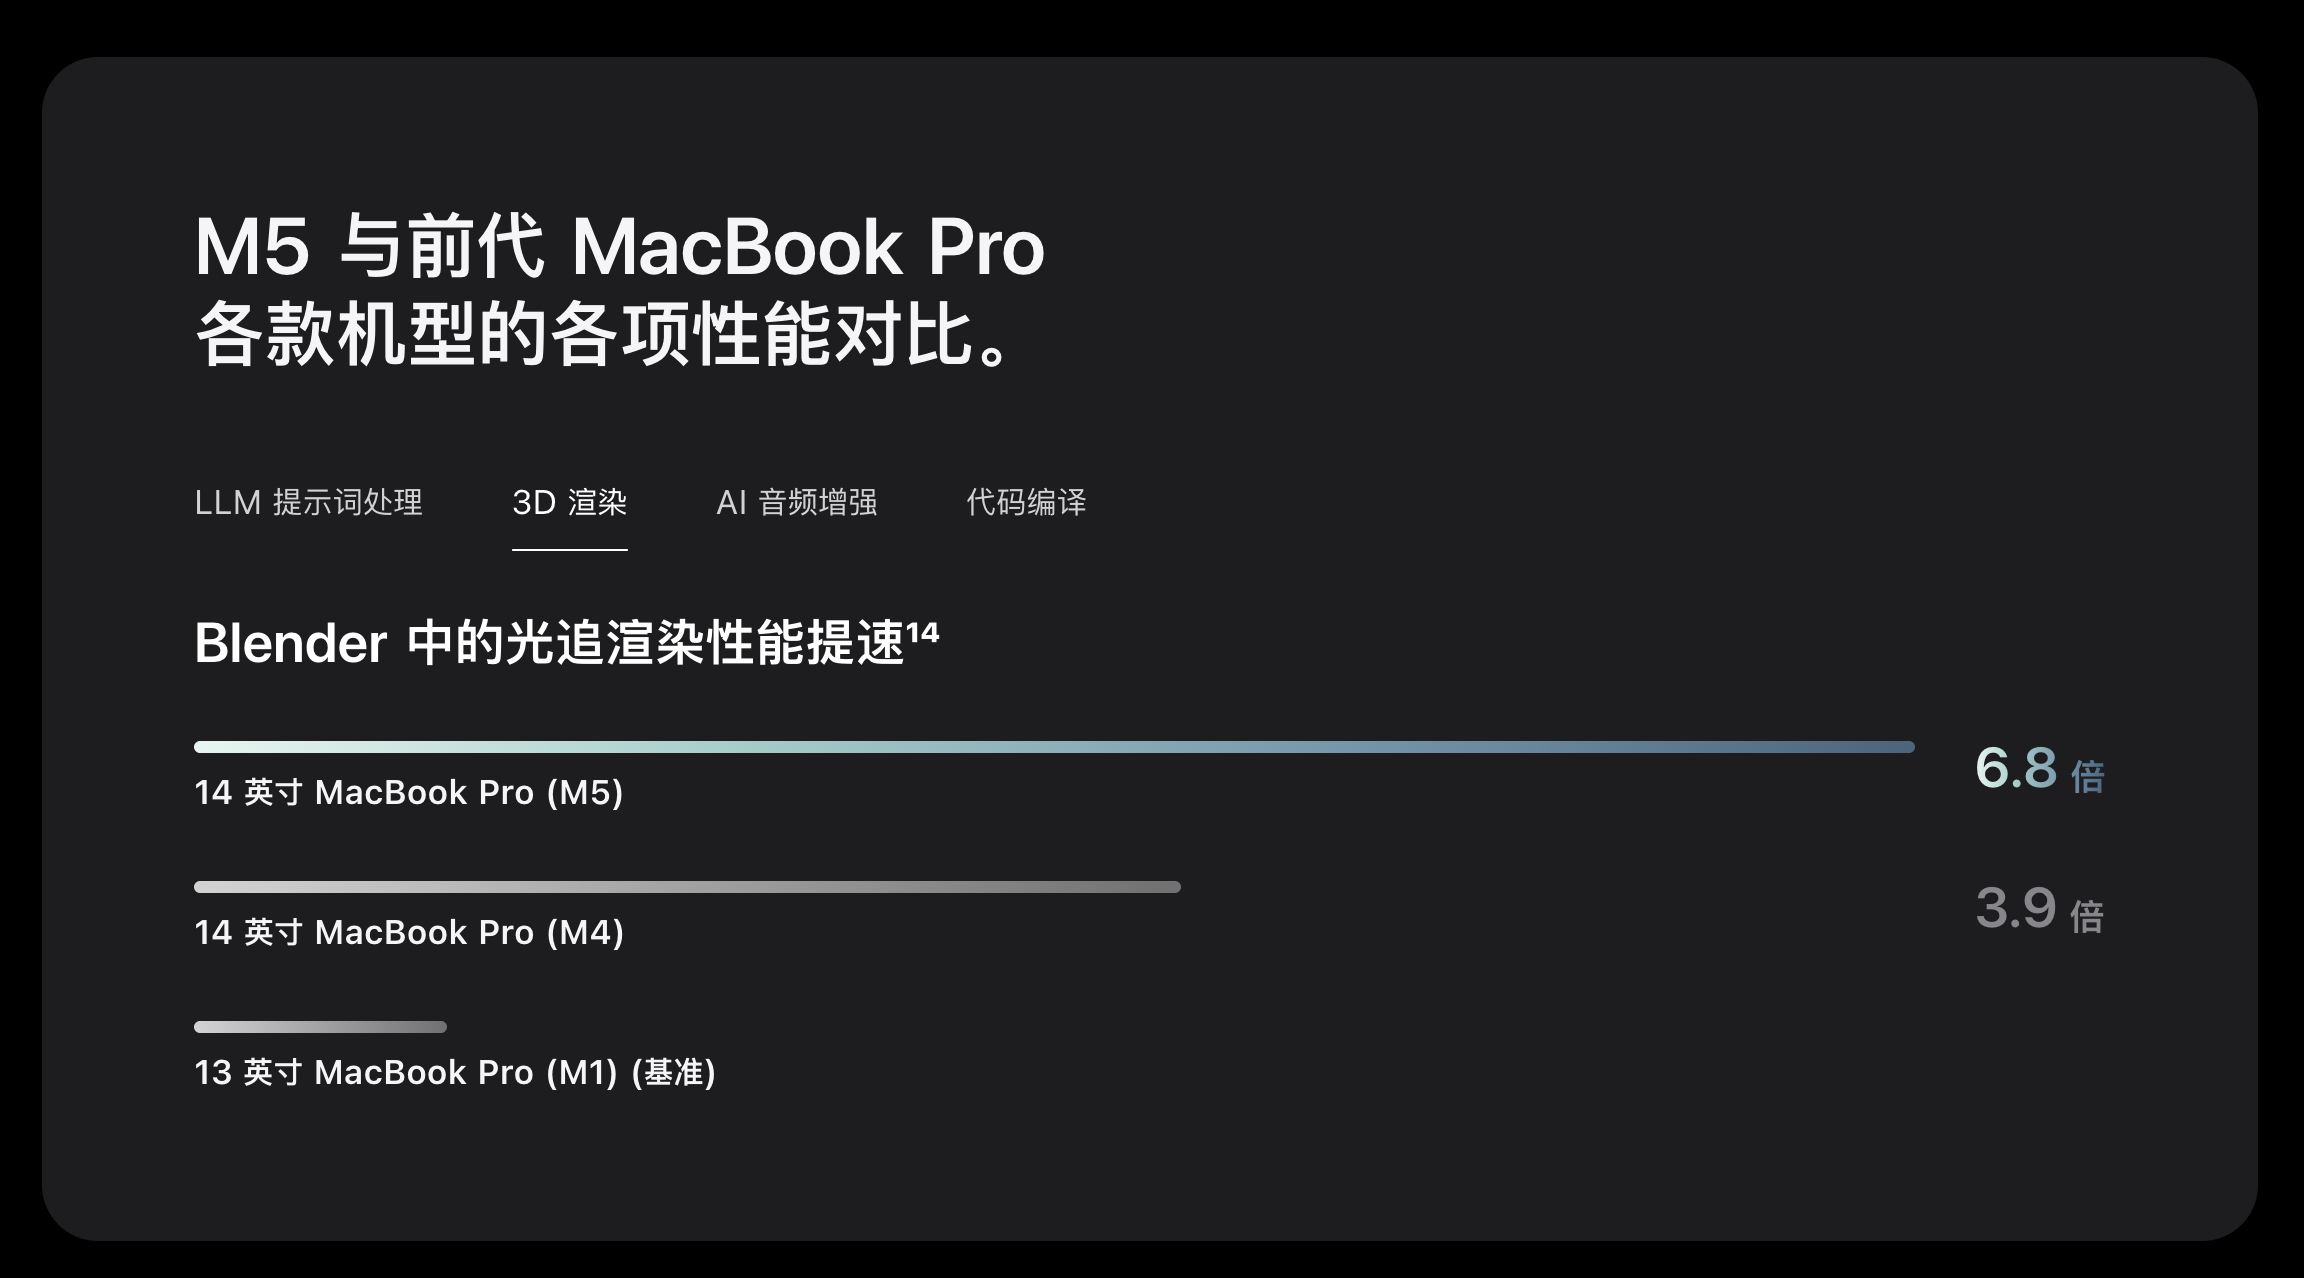
M5 的架构也保持了 10 核心 CPU、10 核心 GPU 的组合。根据苹果官网的图表,今年 M5 的 LLM 提示词处理性能为 M1 的 6.4 倍、3D 渲染性能为 M1 的 6.8 倍:
这样的进步幅度,与更早期爆料出的 M5 iPad Pro 跑分之间相互印证——
是的,那个前阵子被俄罗斯老哥开盒的 M5 iPad Pro 也在今晚发布了,售价 8999 元起,而配置拉满的 2TB 版本售价则来到了让人咋舌的 22499 元。
总的来看,可以看到苹果自研的 GPU 在这一代得到了非常明显的提升,编辑部那个喜欢用 MacBook 玩 2077 的同事估计要坐不住了。

只不过在外观方面,M5 MacBook Pro 就完全没有什么惊喜了——
依然是这个从 2021 年开始陪伴我们的刘海屏模具,依然是 14 或 16 寸的 miniLED 屏幕,HDR 峰值亮度 1600 尼特,并且可以选配抗眩光的纳米纹理玻璃版本。

和 M4 时代的限制一样,这一次的 M5 MacBook Pro 仍然有 16/24/32GB 三档内存可选,最大可选的硬盘则升级到了 4TB。
这样选配下来,起步 16+512GB 的 14 寸 M5 MacBook Pro 售价仍然为 12999 人民币,各项配置全部拉满之后,售价最高可以顶到 2.6 万元——
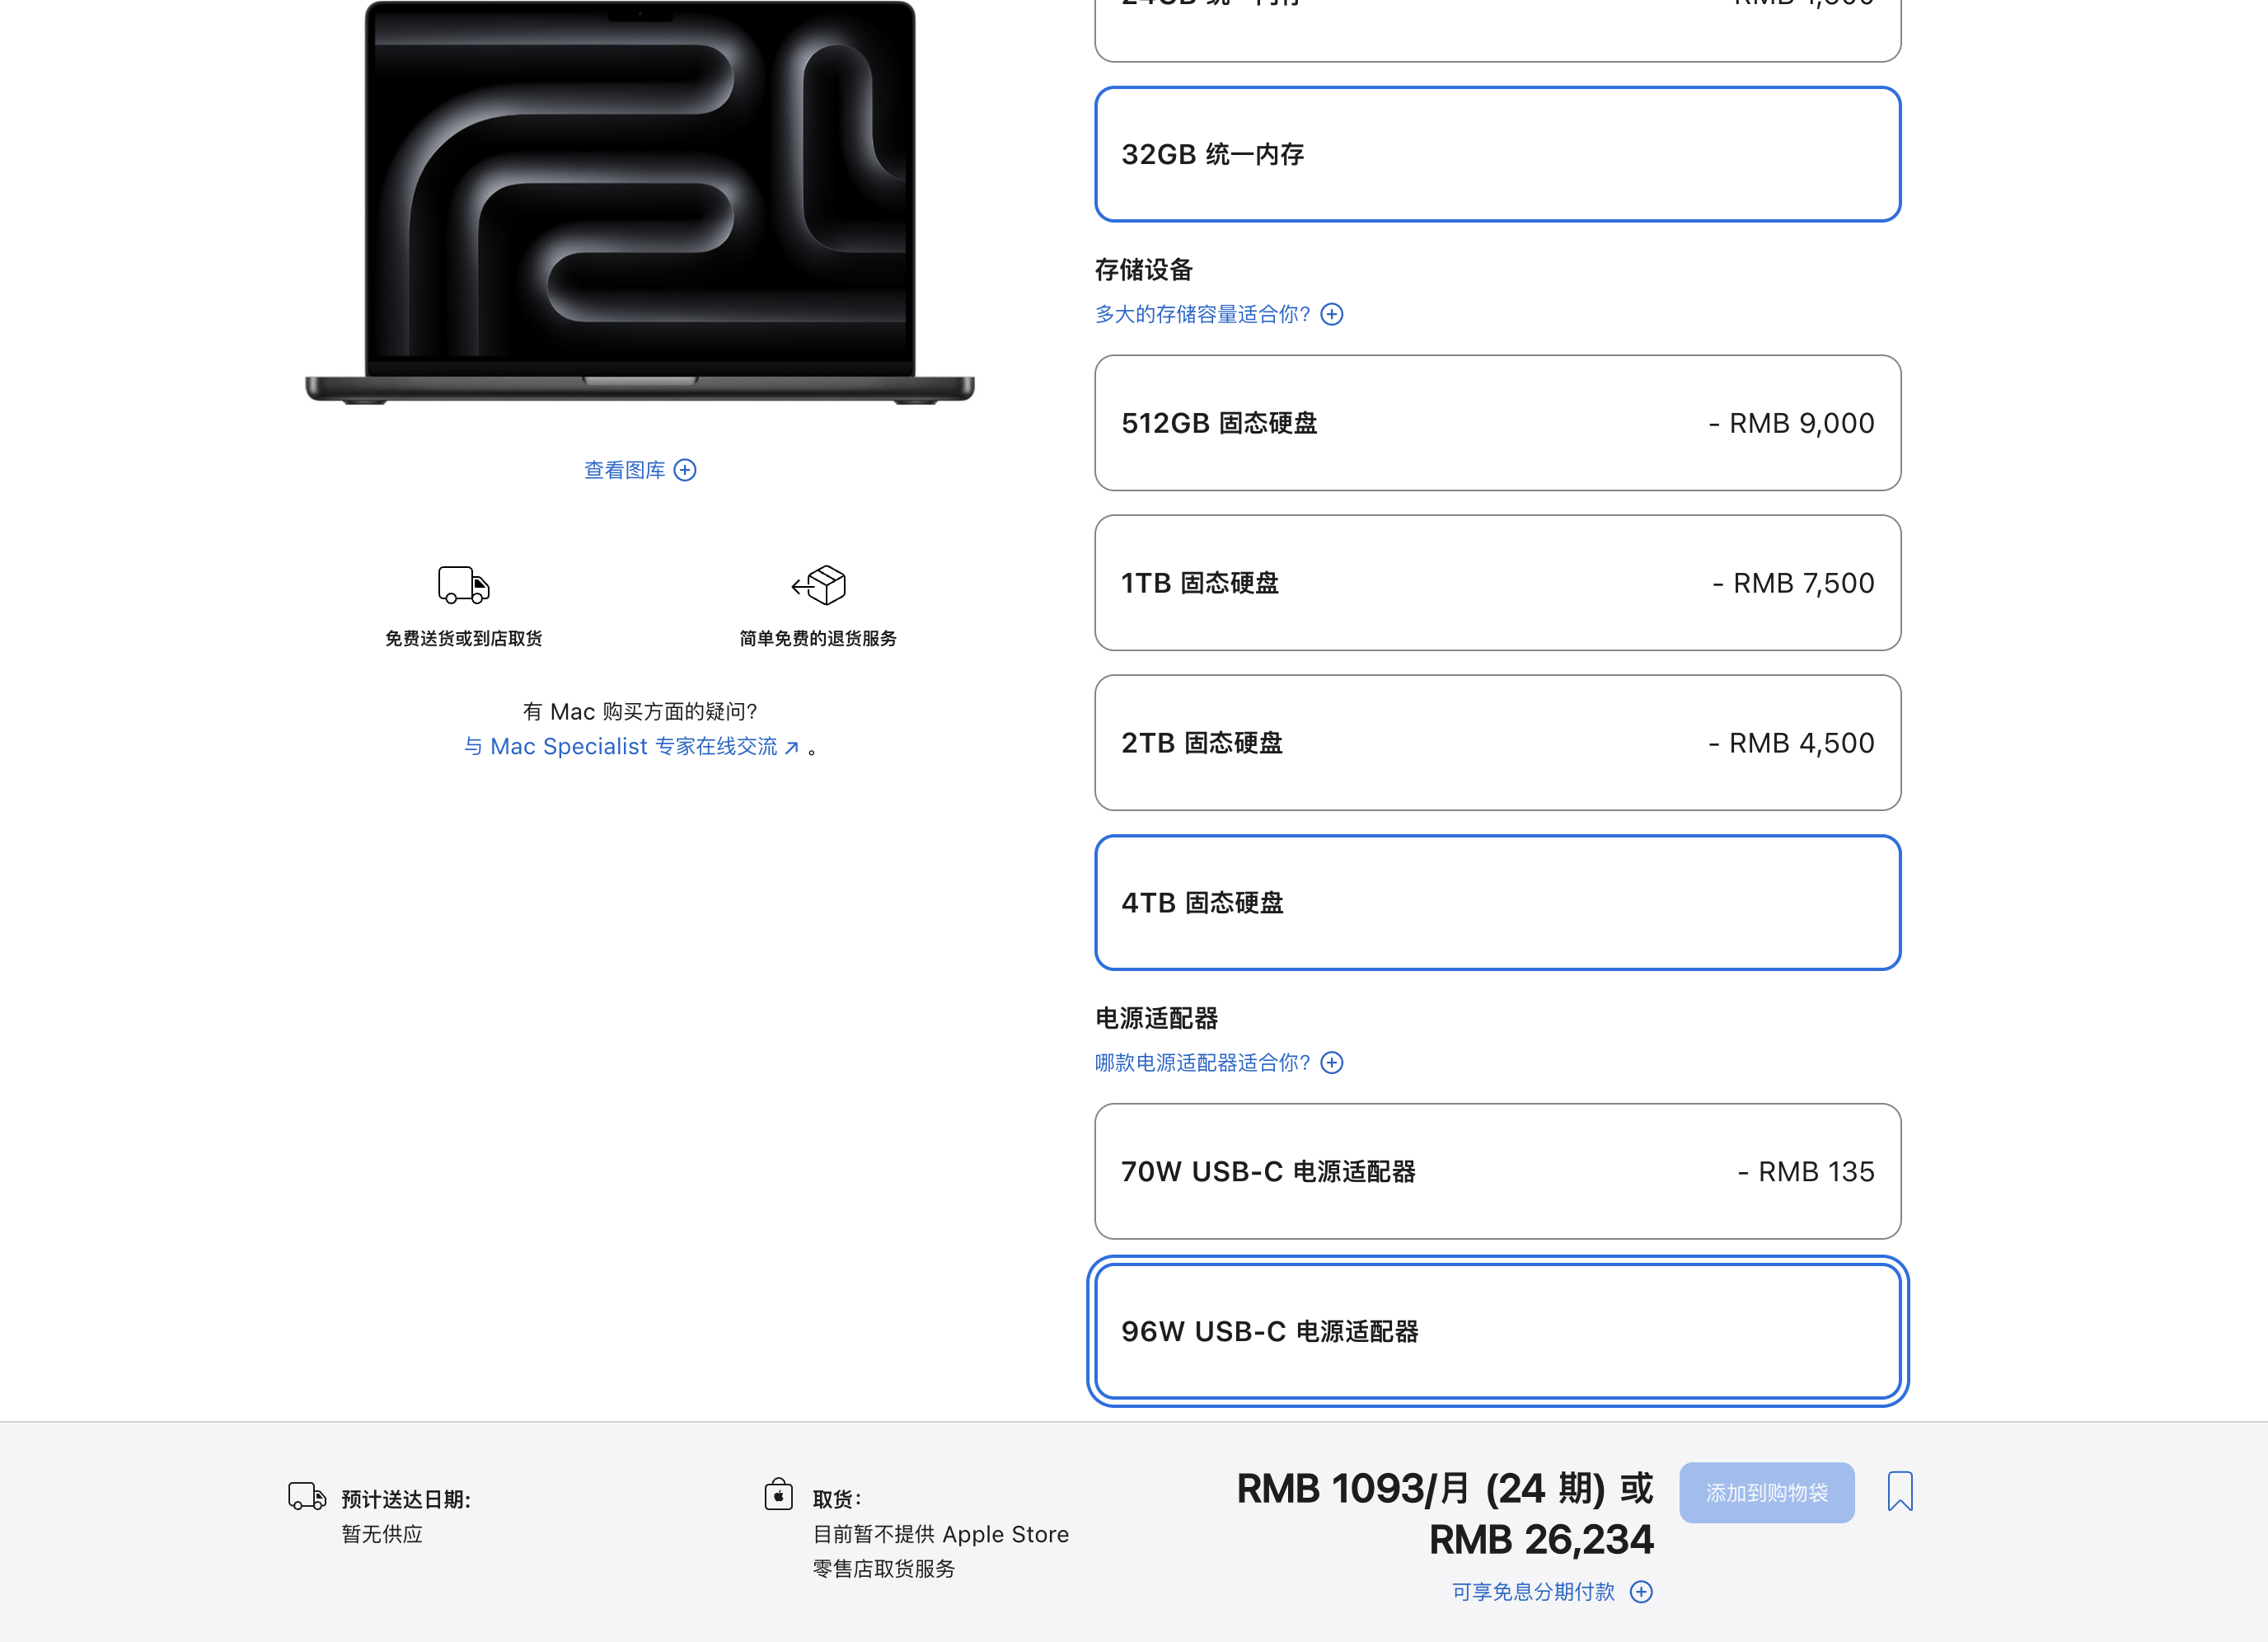
虽然起步价格和 M4 版本的 MacBook Pro 一致,最重要的处理器升级相当于白送。但仔细想想,这仍然是一个相当让人肉疼的价格,仅凭 Apple Silicon 并不能摊平 miniLED 显示屏等等主要零件的成本。
我们可以看到的是,苹果为了维持 M 系列处理器的更新升级,投入了巨大研发经费。
除了依靠 iPad 去走量之外,就只能通过让 M 系列处理器共享近似制程这种方式,来尽量摊平前期的投入——

目前看来,今年的 M5 MacBook Pro 虽然在 GPU 和 NPU 性能上得到了大跃进,可以毫无疑问地加冕目前最强苹果游戏本,但它距离我们期待中的无刘海触屏 OLED 屏幕 MacBook Pro 仍然有着距离。
不过对于的国补大背景来说,「买新不买旧」依然是选购 Mac 时的金科玉律。
M5 的 MacBook Pro 虽然看上去强势,但下单时要为屏幕等等外围硬件付出很多额外成本,但是别忘了——
过不了多久,我们就可以等到 GPU 大进步、能效比更出色的 M5 MacBook Air 和 Mac mini 了。
除了 MacBook Pro 和 iPad Pro 之外,同样用上了 M5 处理器的,还有 2025 款 Apple Vision Pro:

搭配前文提到的 M5 处理器 GPU 性能大进步,今年的 M5 Vision Pro 虽然外形没有什么变化,但是「可提供更快的性能、更清晰的整个系统细节以及更长的电池续航时间」。

根据苹果 Newsroom 的介绍,使用 M5 处理器的 Vision Pro 可以在屏幕上渲染比上一代多 10% 的像素数量、实现 120Hz 的刷新率以及最低 12ms 的视频延迟,真实性更上一层楼。
苹果还宣称:M5 内部的 16 核神经网络引擎可以让 AI 功能在系统体验上的运行速度提升高达 50%(比如转换空间照片),第三方 app 的运行速度也有显著提升:

此外,M5 优秀的能效比也让 Vision Pro 的普通使用续航来到了 2.5 小时,纯视频播放则可以坚持 3 小时,让你能够沉浸在虚拟世界的时间更长了——
比如 Spectrum SportsNet 就借助 visionOS 的 Apple Immersive,将 NBA 赛场上的沉浸式空间视频带到了 Vision Pro 上。
并且不止 NBA,根据苹果宣布,包括棒球、MotoGP,甚至是奥迪 F1 和红牛的新影片都将在未来几个月上线 Apple Immersive,让 Vision Pro 的内容消费能力值回票价:

搭载 M5 芯片的 Vision Pro 将于 10 月 17 日接受预订、10 月 22 日起发售,起步的 256GB 机型售价仍为 29999 元人民币。
#欢迎关注爱范儿官方微信公众号:爱范儿(微信号:ifanr),更多精彩内容第一时间为您奉上。
I hope that you enjoyed Saturday’s Mac Riddles, episode 329. Here are my solutions to them.
Two credentials (two-factor authentication uses two secrets, such as a password and a PIN code sent separately) or 762 (0x2FA in decimal) should be superseded by passkeys (a modern and more secure replacement).
Notably from Autodesk (vendors of AutoCAD and other computer-aided design software) but once by Claris (ClarisCAD, 1989-1991), it’s 3,245 (0xCAD in decimal).
From the Mac II (Apple Desktop Bus, introduced as the peripheral interface for Mac II and SE) until replaced by USB (it was, with the iMac), 2,779 (0xADB in decimal) was quite enough (it didn’t support hot-swapping, which could result in electrical damage).
They are all hexadecimal numbers as well as abbreviations.
I look forward to your putting alternative cases.
![]()
![]()

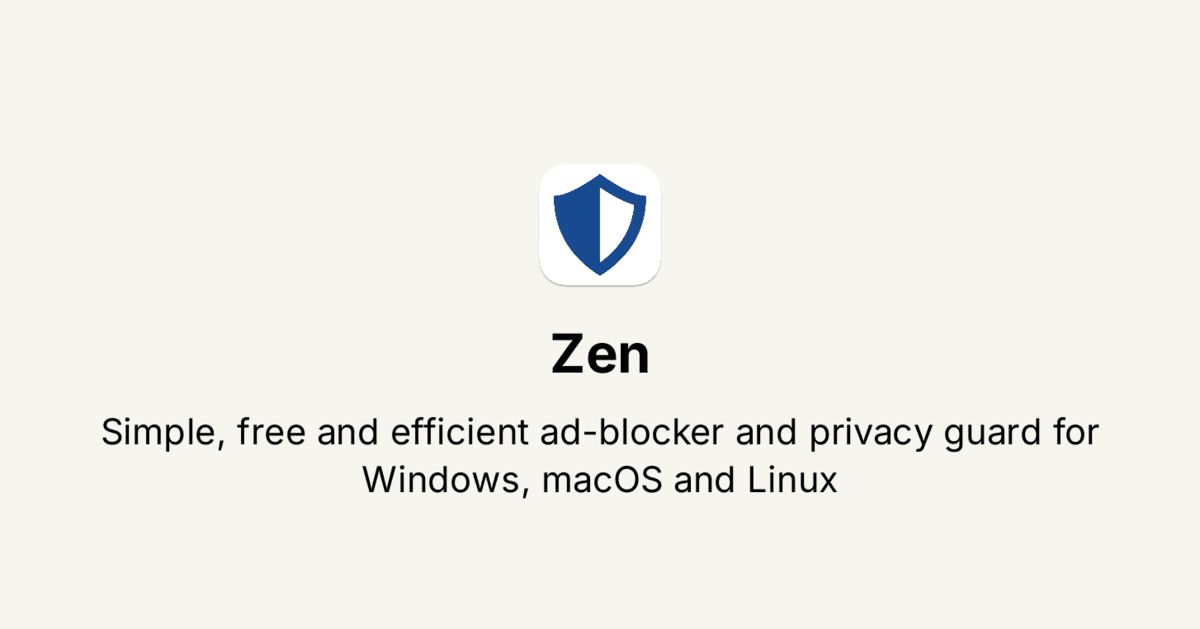
近期发现一款免费、开源的广告屏蔽软件「Zen」,和 Zen Browser 网页浏览器同名,不过是完全不一样的工具。
Zen 更像是知名软件 AdGuard 免费替代方案,两者运作方式很类似,不仅仅在浏览器屏蔽广告,任何会通过网络连接的应用程序都能经由 Zen 进行广告屏蔽,随时保护用户免于安全和隐私的侵扰。
Zen 是强大的桌面应用程序,在用户浏览网络时自动屏蔽广告、追踪器或任何隐藏的威胁,本身相当快速、轻量化、无任何干扰,不用再去寻找各种浏览器扩展,只要 Zen 就能轻松做到!
如同 AdGaurd 它也自带强大的过滤器,支持各种类型的屏蔽规则,例如广告、隐私、恶意软件、36 个地区的屏蔽列表和设置清单等,也能将自己惯用的屏蔽清单加入设置规则,Zen 具有中文在内等多国语言,设计很简单,没有太多复杂或难懂的技术性选项。
依照网站说明,Zen 来自一个小团队,尊重用户隐私,不追踪或是收集任何资料,如果你正在寻找「系统层级」的广告屏蔽工具,它就是可以考虑的选择。
网站名称:Zen
网站链接:https://zenprivacy.net/ 〔GitHub〕
进入 Zen 官方网站后往下找到「下载」链接,可以找到 Windows、macOS 和 Linux 版本,分别支持 x64、ARM64 两种不同的处理器类型。

举例来说我下载的是 Zen for macOS〔ARM64〕,下载、运行后将它拖曳到应用程序资料夹即可使用。

进入 Zen 主画面看起来像下图,点击下方「Start」按钮启动保护。

要注意的是第一次使用 Zen 会要求安装根证书〔Root Certificate〕,这是让 Zen 拦截、修改 HTTPS 请求的必须项目,证书是在本机生成,不会离开用户设备,大家熟悉的 AdGuard 也是使用相同机制。

接着先切换到「设置」页面后将语言调整为中文,有兴趣的朋友也可以去协助翻译一下。

在过滤列表可以启用、停止指定的过滤器,包含各种类型,包括通用、广告、隐私、恶意软件、地区性和设置等,没有特别的需求就直接维持默认值即可,若有需要启动或是停用过滤器必须先将 Zen 防护功能关闭〔点击下方停止〕才能继续。

想从其他广告屏蔽工具转换到 Zen 也可以将设置规则导入,非常方便。

从 Zen「主页」就能看到网络流量被屏蔽、封锁的情形,包括存取方法、网址、来源、过滤器名称和规则等,当使用上有发现任何问题时也可以从这里找到过滤器,将指定的封锁路径关掉。

虽然说 Zen 是免费、开源广告屏蔽工具,完全不用花费任何一毛钱就能使用,而且也自带不少筛选器规则,在系统端进行过滤、屏蔽的好处是不用再寻找各种广告屏蔽扩展,只要一个应用程序就能搞定!除了浏览器以外,其他软件也都能有效。
Here are this weekend’s Mac riddles to entertain you through family time, shopping and recreation.
1: Two credentials or 762 should be superseded by passkeys.
2: Notably from Autodesk but once by Claris, it’s 3,245.
3: From the Mac II until replaced by USB, 2,779 was quite enough.
To help you cross-check your solutions, or confuse you further, there’s a common factor between them.
I’ll post my solutions first thing on Monday morning.
Please don’t post your solutions as comments here: it spoils it for others.
Apple has released its weekly update to XProtect, bringing it to version 5318. As usual, it doesn’t release information about what security issues this update might add or change.
This version makes several changes to the Yara definition for MACOS.COMPLIANTPIRATE.DEFU, but doesn’t add any new detection rules.
You can check whether this update has been installed by opening System Information via About This Mac, and selecting the Installations item under Software.
A full listing of security data file versions is given by SilentKnight and SystHist for El Capitan to Tahoe available from their product page. If your Mac hasn’t yet installed this update, you can force it using SilentKnight or at the command line.
If you want to install this as a named update in SilentKnight, its label is XProtectPlistConfigData_10_15-5318
This update has now been released for Sequoia and Tahoe via iCloud. If you want to check it manually, use the Terminal commandsudo xprotect check
then enter your admin password. If that returns version 5318 but your Mac still reports an older version is installed, you should be able to force the update usingsudo xprotect update
However, if the regular update has been installed in the old location, XProtect is likely to update its new location from that. There’s nothing you can do to force that, but it may well explain why your Mac seems to have updated itself.
Updated 0450GMT 9 October 2025.
You’ve just run First Aid in Disk Utility, or fsck_apfs, and that reports warnings or errors. What should you do next?
By far the most frequent error encountered in Disk Utility’s checks results from its inability to unmount a volume before it can start testing. While this is reported as an error, and it prevents the checks from running, it can sometimes be solved by manually unmounting the volume in question. It normally doesn’t indicate anything sinister, and is simply frustrating.
If the warnings or errors were reported on your current boot Data volume and you ran that check in normal user mode, consider starting your Mac up in Recovery mode to repeat the check there.
Although macOS does an impressive job of performing checks on a live volume, it’s more reliable and more likely to be able to perform any repairs needed in Recovery mode, when the Data volume isn’t mounted and live. When there, if you prefer, you can still use fsck_apfs in Terminal.


The other case where checks may be best made in Recovery are those on an active Time Machine backup volume. That’s because those can be difficult to unmount before running the checks, although that is possible as long as a backup isn’t being made at the time, or Spotlight indexing taking place. The sure way to avoid those is to do so in Recovery mode.
Any remarks about problems or irregularities encountered during checks should make explicit whether they are warnings or errors, and it’s essential to make a clear distinction between them.
Warnings are observations that could have significance, or might be perfectly normal in the circumstances. Only an APFS engineer is likely to be able to tell the difference. Among the commonest are those reporting missing xattrs for compressed files:warning: inode (id 113812826): Resource Fork xattr is missing for compressed file
Experience is that those aren’t related to any consequent errors, and you should be able to leave those alone.
Errors are abnormalities that do have more significance, and might have the potential to cause further problems. Where possible, First Aid or fsck_apfs should attempt to repair those, most probably by performing “deferred repairs”. Those are normally minor errors that it already has plans to attend to when that volume is next mounted, the time that APFS normally performs its routine maintenance.
These are read-only copies of the file system metadata at a previous instant in time, and are associated with retained storage blocks. They aren’t part of the active volume, and their metadata are separate. As they’re read-only, any warnings or errors are most unlikely to be fixed, so you have a choice of leaving that snapshot to be deleted routinely by age, or deleting it early yourself.
Snapshots are made by backup utilities including Time Machine, which are required by Apple to have a mechanism that will delete them automatically after a set period. In the case of Time Machine, that’s when the snapshot is over 24 hours old. Snapshots aren’t backups, but augment regular backups, and stand in for them when backup storage isn’t available. In general, there seems little point in deleting a snapshot early just because there’s a reported warning or error for it, as that won’t affect the health of the active volume.
Warnings and errors related to specific files or directories are normally given with an item id, which should be their inode number. To go any further, you’ll need to convert that to a path and file/directory name. You should therefore copy and paste all reports into a separate file as reference. Resolving an inode to a path and item name is detailed in this article.
In many cases involving items that can be resolved to an existing path, the faulty item is in one of the hidden folders such as .Spotlight-V100 for Spotlight indexes, or .DocumentRevisions-V100 for the document version database. In the former, rebuilding Spotlight’s indexes may resolve the problem, but you’re unlikely to be able to do anything about the latter.
If the inode resolves to a regular file, deleting that can remove the problem, but when you try restoring that file from a backup you may discover the backup has the same problem. Getting to the bottom of a recurrent file system error might require the knowledge and skills of an Apple engineer. Consider reporting this using Feedback, as it should then help iron out any remaining bugs in APFS.
You should also consider whether your Mac might be running old third-party software that is causing recurrent errors. Normally, products should work at a higher level that isolates them from the file system itself, but there are some surprising exceptions. If you can identify a cause, please inform the developers of that software so that it can be fixed.
One potentially dangerous practice occurs when an older version of APFS changes a newer file system. APFS back in High Sierra and Mojave knew nothing of boot volume groups, firmlinks, or many of the features of more modern versions of APFS. If you really must run different versions of macOS on the same Mac, or shared external storage, avoid such version conflicts, and never run an older version of Disk Utility or fsck_apfs on a newer APFS container or volume.
I hope that you enjoyed Saturday’s Mac Riddles, episode 328. Here are my solutions to them.

Schwabe’s painting shows a chain of angels emerging from a belfry.

Doré’s engraving shows The Demons Threaten Virgil, from his illustrations to Dante’s Inferno.
They are each (secret) agents: James Bond from Ian Fleming, Jason Bourne from Robert Ludlum, George Smiley from John le Carré, and Modesty Blaise from Peter O’Donnell.
They are each run by launchd from property lists in folders titled LaunchAngels (new in Tahoe), LaunchDaemons and LaunchAgents.
I look forward to your putting alternative cases.
For many years, I believed what the log command told me, that log entries could contain any of the 26 or more fields available, although they didn’t. It was only as I was developing utilities like LogUI that I discovered that log entries come in (at least) four types, each with its own format and set of fields. This article is a guide to those, and how they are displayed in LogUI.
Those available in the OSLog API are fewer in number than appear in log command output, and include some of limited interest. Those not exposed in LogUI include:
LogUI displays each entry using the same order of fields and colour-coding. Although they can’t all be seen together in any single log entry, the overall sequence is:

Standard levels are given as text, and chosen from one of the following: fault, error, notice, info, debug, undefined. These are only used with Regular log entries, not other types. LogUI always includes debug level entries when they’re available.
The four types of entry are:
These are normally by far the most common, and are seen throughout the processes and subsystems writing log entries. They normally contain up to the following fields:
datestamp, [1], activity ID, category, level, sender, process, process ID, subsystem, thread ID, message
![]()
These examples include:
datestamp, 1, activity ID, category, level, sender, process, process ID, subsystem, thread ID, message
which is fairly normal.
These mark specific activities, and vary according to the process and subsystem. Some are valuable waypoints, and all are recognisably shorter than most regular entries, containing only the following fields:
datestamp, [2], activity ID, parent activity ID, sender, process, process ID, thread ID, message

These are examples of one of the most valuable activities reported, indicating a mouse-click or tap. They’re also complete, as they consist of:
datestamp, 2, activity ID, parent activity ID, sender, process, process ID, thread ID, message
These are rare but instantly recognisable because of their brevity. They consist of just three fields:
datestamp,[3], message
Two of the most important are the announcement of the start of kernel boot:
![]()
and adjustment of the internal clock:

These are also easy to search for, as their message contains the distinctive === string.
By default, LogUI extracts omit Signposts, but if you tick the Show Signposts box before loading log entries, they will also be displayed. In parts, they can outnumber regular entries, and are unlikely to provide you with meaningful information unless you know internal details of their process. Each Signpost adds three type-specific fields, shown after the process ID:
datestamp, [4], activity ID, category, sender, process, process ID, signpost ID, signpost name, signpost type, subsystem, thread ID
![]()
These examples come from the most prolific user of Signposts, SkyLight for WindowServer, and contain
datestamp, 4, activity ID, category, sender, process, process ID, signpost ID, signpost name, signpost type, subsystem, thread ID
Note there’s no message field, as their meaning is determined by the signpost fields.
The OSLog API doesn’t currently give access to Mach times, only to opaque Date variables. From those, LogUI’s datestamps give:
year–month–day hour:minute:second.microsecond+timezone
All times and time zones given are those current when LogUI obtains that extract, not when that entry was written. This can become extremely confusing when clocks change to and from {summer time, daylight time, daylight saving time, daylight savings time, DST}, and when passing through time zones, and great care is required when reading logs containing such corrections. LogUI tries to make this easier, but care is still required.
If you have used the log command, you may be aware that can return Mach times as ticks, offering precision down to the nanosecond. This currently isn’t possible when using the OSLog API, but given the relatively slow clock of Apple silicon Macs, it’s no longer as useful as it used to be with Intel’s nanosecond Mach ticks.
By default, all data in message fields is censored to protect the privacy of the user. This replaces chunks of text with the dreaded <private>, and can render many entries devoid of any useful information. In recent versions of macOS log privacy can be removed by installing a profile. However, that doesn’t apply retrospectively, only to log entries collected after the profile has been installed.
Removing privacy also increases the size in storage of log entries, and may reveal sensitive information. As soon as you have completed acquisition of the logs you need with privacy removed, you should therefore remove the profile, to allow normal censorship to resume.
A suitably signed profile is here: enablelogprivatedata
To install the profile, unzip the archive into a convenient folder and double-click it. You’ll be informed by a notification that you need to review the profile to install it. Open System Settings and select Device Management in its View menu, or search for it. Follow the instructions given there to install and activate it.
Sadly, this doesn’t cover all censorship. Some systems require additional configuration changes, for example CFNetwork diagnostic logging. Jeff Johnson explained how to enable that, but Apple has since blocked that, and I don’t know of a practical alternative. In some cases, additional detail can be obtained by adjusting log settings.
A short practical summary of LogUI’s log entries is provided in its Help book.
Here are this weekend’s Mac riddles to entertain you through family time, shopping and recreation.
3: James Bond, Jason Bourne, George Smiley, Modesty Blaise.
To help you cross-check your solutions, or confuse you further, there’s a common factor between them.
I’ll post my solutions first thing on Monday morning.
Please don’t post your solutions as comments here: it spoils it for others.
Apple has released its weekly update to XProtect, bringing it to version 5317. As usual, it doesn’t release information about what security issues this update might add or change.
This version adds five new detection signatures to its Yara file. These include another newcomer with four signatures, MACOS.DAILYDUMPLING, and MACOS.SOMA.SEEND to add to the large Amos/Soma family.
You can check whether this update has been installed by opening System Information via About This Mac, and selecting the Installations item under Software.
A full listing of security data file versions is given by SilentKnight and SystHist for El Capitan to Tahoe available from their product page. If your Mac hasn’t yet installed this update, you can force it using SilentKnight or at the command line.
If you want to install this as a named update in SilentKnight, its label is XProtectPlistConfigData_10_15-5317
I apologise for the late announcement of this update, which seems to have been released after 22:00 GMT on 30 September, but was still incomplete here through the whole of today, 1 October.
This update has already been released for Sequoia and Tahoe via iCloud. If you want to check it manually, use the Terminal commandsudo xprotect check
then enter your admin password. If that returns version 5317 but your Mac still reports an older version is installed, you should be able to force the update usingsudo xprotect update
I hope that you enjoyed Saturday’s Mac Riddles, episode 327. Here are my solutions to them.
Lost (it has been removed from Tahoe) rocket platform (a launchpad) as an app for your apps (what it was, an app for launching other apps).
Burning (fire) telegraph (wire) and lynx (Texas Instruments’ name for FireWire, IEEE 1394) now disconnected (support has been dropped from Tahoe, although oddly its kernel extensions are still present).
Happy Christmas 2017 (although announced the previous June, it shipped in December 2017) is sad September 2025 (it’s one of the T2 models dropped from Tahoe) for the most powerful Mac (when introduced, it was described as “the most powerful Mac ever made”, at least until the Mac Pro 2019).
They have all been dropped from Tahoe.
I look forward to your putting alternative cases.
By far the most common problem experienced with the Unified log isn’t its large number of entries, but a lack of entries. You go to check your Mac’s security using SilentKnight, or Skint runs its automatic daily check, and they can’t find any log entries recording XProtect Remediator scans. Since those are obtained by analysing the log for the previous 36 hours, when your Mac’s logs only go back 8-12 hours, entries for the last set of scans are likely to be missing. This article looks at why that happens, and how macOS maintains its log.
Traditional Unix-style logs are maintained according to their age. Every 24 hours, routine housekeeping procedures delete log files over a certain age, typically five days, in the process of rolling the log. Because the Unified log could over that five-day period have swallowed many GB of storage, its maintenance service logd deletes log records according to multiple criteria including the space they occupy, their age, and the type of entry. This is considerably more complex, and occurs in three phases, according to where the entry is stored.
Log entries are initially written to memory, before logd writes most of them to permanent storage on disk.

The first substantial purging of entries thus occurs when logd decides which are ephemeral and won’t be written to disk. This can be seen by following the number of entries in a short period of high activity in the log, over time, and is shown in the chart below for a sample period of 3 seconds.

When fetched from the log within a minute of the entries being written, a total of 22,783 entries were recovered. Five minutes later there were only 82% (18,655) of those remaining. Attrition of entries then continued more slowly, leaving 80% (18,309) after 8 hours. Analysis suggests that over this period in which there were about 6,100 log entries per second written to disk, approximately 1,700 log entries per second were only kept in memory and never written to disk. That suggests about 22% were ephemeral, a proportion that’s likely to vary according to the origin and nature of log entries.
The great majority of log entries that survive to be written to permanent storage are kept in the tracev3 files in /private/var/db/diagnostics/Persist, where logd maintains them according to the total size of that folder, with a target of 520-530 MB. As each tracev3 file is up to 10.5 MB in size, that results in logd retaining about 50 files in that folder, although some are smaller than the maximum.
Two of my apps currently provide the datestamp of the start of the current collection of Persist log files as an indicator of the oldest log entry available from them: XProCheck, and Mints with its Logs button. This is a feature I intend adding shortly to LogUI.
However, not all log entries are stored in those Persist files. Looking back in time at total log entries available for a set ten minute period each day, you might see totals like:
Those for the last 3 days are almost all Persist entries, but older entries are those retained in tracev3 files in the Special folder.
Fault and Error log entries are normally written to the tracev3 files in the Special folder, and may contain additional message content kept in the warren of folders and files inside /private/var/db/uuidtext. logd purges entries from Special files separately, and apparently on the basis of their type and content rather than size. As a result, the Special folder can contain many tracev3 files of sizes ranging from over 2 MB to just a few KB, with their size tending to reduce with age. Any log entries recovered from dates before the oldest Persist file thus must have come from Special files.
Although files stored in the uuidtext folder are small, there can be a great many of them, and total size of that folder can exceed 1 GB. Those too are maintained by logd.
tracev3 files stored in the Signpost folder contain only Signpost log entries used for performance assessment, and are purged at a slower rate than Persist files, but not retained as long as Special files. The High Volume folder appears seldom if ever used. The timesync folder contains time synchronisation data, small files that normally cover the whole period of Special files.
The /private/var/db/diagnostics folder contains several other files, including the logs of logd and logd_helper, and most significantly pairs of statistical summaries written during log maintenance, named logdata.statistics.[n] where n is a number starting from 0, in both .txt and .jsonl (JSON) format.
Each time logd performs maintenance on a tracev3 file, or on associated uuidtext files, it records data about the files in the current logdata.statistics files, both as plain text and in JSON format. The most useful of these records occurs when a Persist tracev3 file is rotated from being the file into which new log entries are written, to being retained without further additions. That entry records:
For example, in that tracev3 file containing a total of 42,365,476 entries, the kernel might have written 13,095,296 entries, 30.9%, and be top of the list, while runningboardd might only have written 1,223,157 or 2.9%. These statistics can be valuable in drawing attention to periods when there were problems, and for discovering which entries are limiting the coverage of Persist files, making it impossible for apps to recover entries for XProtect Remediator scans, for example.
Statistics entries for memory rollovers can also be useful, as are those for Special file rotation, although the latter contain fewer entries than Persist files.
Currently, there doesn’t appear to be any way to set logd‘s size allowance for Persist files. When the Unified log was first introduced, it wasn’t unusual for that setting to preserve full log records covering a period of up to 20 days. As more processes now write copious entries in the log, a Mac that’s left awake and running at all times may only retain the last 20 hours of Persist entries, or even less.
Macs that don’t need to be awake and running at all times can extend their log coverage by sleeping or being shut down, when of course no entries can be written. If that isn’t possible, you can write your own XML property lists to /Library/Preferences/Logging to limit the retention of specific categories of entry. However, experience shows that only achieves small extensions to time coverage. It’s also worth bearing in mind that disabling privacy protection in the log will increase the size taken by most log entries, so shortening time covered by the retained logs.
Perhaps the wisest and most effective way to extend the time coverage of logs is to discover the causes of excess entries and address those, although that’s inevitably the most difficult solution.
One little-used technique is to turn log records in backups into logarchives, enabling old log entries to be accessed days or even years after they have been written. As an example of what can be achieved, the log entries below were written eight years ago, on 26 September 2017, saved in a logarchive, and browsed using LogUI on 26 September 2025.

I will explain how to do this in a future article in this series.
Here are this weekend’s Mac riddles to entertain you through family time, shopping and recreation.
1: Lost rocket platform as an app for your apps.
2: Burning telegraph and lynx now disconnected.
3: Happy Christmas 2017 is sad September 2025 for the most powerful Mac.
To help you cross-check your solutions, or confuse you further, there’s a common factor between them.
I’ll post my solutions first thing on Monday morning.
Please don’t post your solutions as comments here: it spoils it for others.
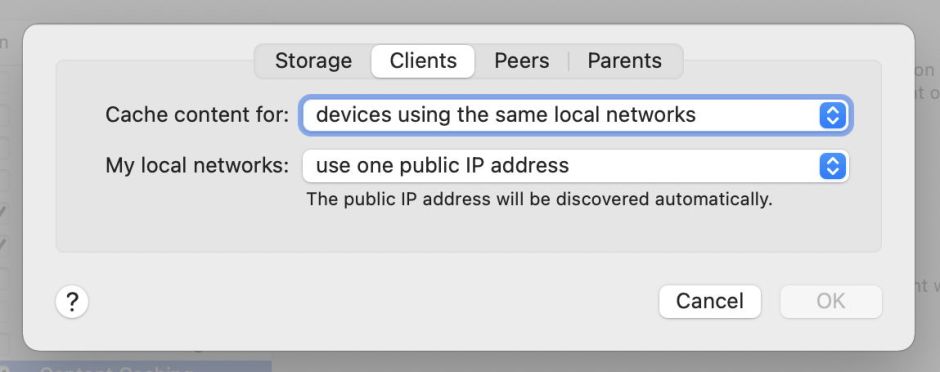
One of the many fine details in macOS is its built-in support for a content caching service, both as server and client. This can be used for local distribution of macOS and other system updates, App Store updates, Apple media content such as Music and movie purchases, and iCloud content.
This appears to have originated as one of the new services added to Mac OS X Server 10.4 Tiger in April 2005, initially confined to a Software Update server. Apple’s online services were growing rapidly at the time, with the iTunes Store opening in 2003, and the first of its App Stores for iOS launching in 2008. Those were followed by the iCloud service in 2011. To cater for those, Apple added a separate Content Caching server by OS X Server 2 in 2012.

This shows the Software Update service in OS X Server 2 in 2012, with a list of some of the updates it had in its cache at the time.
At that time, a client Mac’s Software Update pane in System Preferences had to be pointed at the local server for that to be used instead of Apple’s. However, that didn’t work with App Store caching, for which the /Library/Preferences/com.apple.SoftwareUpdate.plist file had to be edited manually on each client to add a new property specifying the IP address of the local server.
macOS Server 5 in 2015 extended this further.

Features of the Software Update server then included the ability to limit the server’s bandwidth in its link back to Apple’s servers, and to control local network bandwidth used to transfer updates from the server to clients.
Amazingly, its original documentation is still available online here, and instructions for setting up clients remain here.

The Caching service worked with all content and apps provided by the Mac App and iTunes Stores, which of course included OS X updates, and is explained here. By this time, Macs and iOS devices connected to the local network would automatically find a server when it was running; there was minimal configuration for the server, and none for the clients.
When macOS 10.13 High Sierra was released in 2017, that brought update and content caching services to client Macs, and no longer required macOS Server, which was already in its terminal decline. These were configured in a new Content Caching feature added to the Sharing pane in System Preferences.
In essence, you designated one or more Macs as ‘parents’, to serve their cached content to ‘children’, which can themselves host caching services, to allow tiered setups. Initially, parents also needed to share their internet connection, required a minimum of iOS 10.3 for iOS devices, required a wired Ethernet connection to your router, and couldn’t sleep, so had to be run on mains power.
Although the content caching service has become quite widely used since, it’s never been as popular as it deserves. It remains remarkably simple to set up, as seen in these screenshots from 2020.

Clicking on the Options button let you set the cache location and its size.

Tabs were made available if you held the Option key before clicking the Options button, which then became Advanced Options. That let you set up clients, as well as other servers functioning as peers or parents, on more extensive networks.
These remain essentially the same today in Tahoe.
When Apple changed macOS updates in Big Sur, life became more complicated. When updating Apple silicon Macs, the first GB of macOS updates had to be downloaded direct from Apple’s servers, and it was only after that the remainder of the update could be obtained from a local caching server.
Apple has further extended the types of content that can be cached locally, to include
softwareupdate;Most recently Rosetta 2, screen savers, wallpaper and AI models have been added to the list. Apple’s reference document is here.
Advanced server configurations are catered for by the command tool AssetCacheManagerUtil which can also provide performance information, and there are two additional tools available, AssetCacheLocatorUtil and AssetCacheTetheratorUtil. On the server, performance information is most readily accessed in Activity Monitor’s Cache view, which provides summary statistics for the local cache.

This includes the total size of data served for the last hour, 24 hours, 7 days, and 30 days. To view those graphically, the time period for the charts at the foot can be changed by using it as a popup menu.


These show what happened on my content caching server during the macOS 11.4 update in 2021, for which almost 30 GB still had to be downloaded from Apple’s servers, while just over 20 GB was served from its cache.
Over the last 20 years or so, Software Update and Content Caching services have been remarkably reliable, but in June 2022 there was a period during which updates to XProtect and XProtect Remediator failed to install correctly when attempted through a content caching server. Apple never explained what the cause of that was, but it was eventually fixed and hasn’t recurred since.
Then, out of the blue, iOS and iPadOS 26 introduced a new feature to identify and test a connected caching server.

To access this, in Settings > Wi-Fi tap the ⓘ button on your current active network, scroll to the bottom and tap Content Caches. Tap the active cache to see full details, together with a download test. Don’t bother looking for an equivalent feature in macOS 26 Tahoe, though, as it isn’t available yet. How odd.
![]()
![]()

简单来说,问题出在 macOS Tahoe 的窗口管理器 WindowServer 上。
它在渲染某些应用(特别是基于 Electron 框架的应用)的窗口阴影时,会消耗巨量 GPU 资源,导致占用率飙升到 80% 以上,从而引发卡顿和发热。
你可以通过「活动监视器」的 GPU 栏确认这一点:当应用窗口在前台时 WindowServer 占用率暴涨,最小化或全屏后则恢复正常。
在苹果官方发布系统更新修复之前,可以试试下面这两种方法绕过这个问题。
这个方法通过一条命令暂时改变系统的渲染方式,对所有相关应用都有效。
在「终端」里运行:
执行后,需要重启一下正在运行的 Electron 应用才能生效。缺点是,电脑每次重启后都需要重新运行一次这条命令。
这个方法是直接修改应用本身,禁用它的窗口阴影。效果更持久,但只对单个应用生效。
修改 VS Code:sed -i '' 's/experimentalDarkMode:!0}/experimentalDarkMode:!0,hasShadow:false}/g' /Applications/Visual\ Studio\ Code.app/Contents/Resources/app/out/main.js
修改 Cursor:sed -i '' 's/experimentalDarkMode:!0}/experimentalDarkMode:!0,hasShadow:false}/g' /Applications/Cursor.app/Contents/Resources/app/out/main.js
这个修改在系统重启后依然有效。但缺点是,每次应用自身版本更新后,这个修改就会被覆盖,需要重新运行一次命令。
Apple has just released its weekly update to XProtect, bringing it to version 5316. As usual, it doesn’t release information about what security issues this update might add or change.
This version adds nine new detection signatures to its Yara file. These include five with novel names:
together with MACOS.ODYSSEY.SOBGO for the recently added Odyssey, and MACOS.SOMA.SEENB, MACOS.SOMA.SEENC and MACOS.SOMA.INGOBA for the prolific Amos/Soma family.
You can check whether this update has been installed by opening System Information via About This Mac, and selecting the Installations item under Software.
A full listing of security data file versions is given by SilentKnight and SystHist for El Capitan to Tahoe available from their product page. If your Mac hasn’t yet installed this update, you can force it using SilentKnight or at the command line.
If you want to install this as a named update in SilentKnight, its label is XProtectPlistConfigData_10_15-5316
This update has already been released for Sequoia and Tahoe via iCloud. If you want to check it manually, use the Terminal commandsudo xprotect check
then enter your admin password. If that returns version 5316 but your Mac still reports an older version is installed, you may be able to force the update usingsudo xprotect update
I hope that you enjoyed Saturday’s Mac Riddles, episode 326. Here are my solutions to them.
Melody (an air) containing cocoa (pods) plugs the ears (what they do).
Confident bearing (an air) of attached label (a tag) to track your stuff (what it does).
Breeze (an air) reduction (a drop) moves files wirelessly (what it does).
They are each prefixed by Air, and work wirelessly.
I look forward to your putting alternative cases.
Here are this weekend’s Mac riddles to entertain you through family time, shopping and recreation.
1: Melody containing cocoa plugs the ears.
2: Confident bearing of attached label to track your stuff.
3: Breeze reduction moves files wirelessly.
To help you cross-check your solutions, or confuse you further, there’s a common factor between them.
I’ll post my solutions first thing on Monday morning.
Please don’t post your solutions as comments here: it spoils it for others.
Apple has just released its weekly update to XProtect for all supported versions of macOS, bringing it to version 5315. As usual, Apple doesn’t release information about what security issues this update might add or change.
This version adds three new detection signatures to its Yara file, two for a new entry named Zuru as MACOS.ZURU.LOAD and MACOS.ZURU.BEACON, and the third as another Soma/Amos component named MACOS.SOMA.SEENA.
You can check whether this update has been installed by opening System Information via About This Mac, and selecting the Installations item under Software.
A full listing of security data file versions is given by SilentKnight and SystHist for El Capitan to Tahoe available from their product page. If your Mac hasn’t yet installed this update, you can force it using SilentKnight or at the command line.
If you want to install this as a named update in SilentKnight, its label is XProtectPlistConfigData_10_15-5315
This update has finally been released for Sequoia and Tahoe via iCloud. If you want to check it manually, use the Terminal commandsudo xprotect check
then enter your admin password. If that returns version 5315 but your Mac still reports an older version is installed, you should be able to force the update usingsudo xprotect update
Update: as of 1100 GMT 17 September 2025, Apple still hasn’t released this via iCloud for Sequoia and Tahoe systems.
Further update: Sequoia and Tahoe systems are now receiving the 5315 update silently, without any change in the version reported by the xprotect tool. So don’t be surprised if your Mac gets updated without the xprotect tool knowing anything about it.
Further further update: over 24 hours after release of this update for older macOS, it has now been made available via iCloud, and the xprotect commands now work, for those Macs that still haven’t updated themselves.
I hope that you enjoyed Saturday’s Mac Riddles, episode 325. Here are my solutions to them.
Not quite a dogcow (the name has an uncanny resemblance to Clarus the Dogcow) functions (works) in six modules (what it contained) from 1991 (when it was first released for the Mac).
Suite in three movements (Pages, Keynote and Numbers) replacing 1 from 2004 (when Apple started replacing AppleWorks, successor to ClarisWorks, with iWork).
Yoga position (lotus) with syncopated music (jazz), but it wasn’t the sequel to 1-2-3 (an early attempt from Lotus to reproduce the success it had with Lotus 1-2-3 for PCs on the Mac, it flopped badly).
They were each ‘office’ suites for Mac OS.
I look forward to your putting alternative cases.
Here are this weekend’s Mac riddles to entertain you through family time, shopping and recreation.
1: Not quite a dogcow functions in six modules from 1991.
2: Suite in three movements replacing 1 from 2004.
3: Yoga position with syncopated music, but it wasn’t the sequel to 1-2-3.
To help you cross-check your solutions, or confuse you further, there’s a common factor between them.
I’ll post my solutions first thing on Monday morning.
Please don’t post your solutions as comments here: it spoils it for others.
In recent discussions here about the version system built into macOS, two potential problems were raised: first that a file’s versions don’t go with it wherever the file goes, and second that versions wouldn’t preserve datestamps. This article demonstrates how you can easily work around the first, and how the second isn’t correct.
The tools I use here are admittedly my own, but they’re free, and available from this Product Page. They’re also compatible with all versions of macOS from Big Sur (or earlier), and should work perfectly next week when Tahoe is released.
To pose my apps a challenge, I deliberately picked one of my source code files (for LogUI) that I can’t afford to move out of its current folder. This has a total of 230 versions tracking that file’s changing contents, and the development of that app, from its inception last year. Of course, as this is in Xcode I could have used a Git server for full version control, but versioning can do everything I want without going to that trouble.

These are the last few versions shown in Revisionist, simply by dragging and dropping the original file onto it. For each saved version, this displays its datestamp and size in bytes. To preview any of those, just double-click its entry and it will be opened as a QuickLook preview.
With the file open in Revisionist, I could click on the Archive button to save all its 230 versions to their own folder. However, if you just want to archive or move the file with all those versions, that’s quickest using the drag and drop feature in Versatility. Drop the original file on its window, then find the right location to save its versions in their own folder.

This is the result: the top of that folder of 230 versions, each numbered in sequence. QuickLook any of those and you’ll not only see their contents, but the datestamps on each version are those for that original saved (version) file. This original version was created on 7 July 2024, and last saved the following day.
You can now compress that folder of versions and move it wherever you want. I dropped mine onto my drag-and-drop compression utility Cormorant to turn the folder into a 16 KB Apple Archive, just 1.6 KB larger than the current version of that document. I have thought about building that option into Versatility, but you’ll probably prefer to use your own compressor like Keka.
If you wished, you could discard unwanted versions from that folder, because Revisionist and Versatility will reassemble the versions in order, and don’t notice if some of the numbers are missing. If you really wanted to, you could reorder the numbers, but that would be extremely confusing. The version system doesn’t rely on differences between versions, as it stores each version complete.
Once you’ve got your version archive where you want it, decompress it back to a folder, and drag and drop that onto Versatility. Save the file where you want it, and every one of those 230 versions is back inside it, just as they were in the original.

Here’s the copy I made earlier, seen in Revisionist, with the very first version previewed in QuickLook.
There are some relevant notes:
Apple has announced that macOS 26 Tahoe will be released on Monday 15 September, slightly earlier than had been speculated. Even if you’re not intending to upgrade to that, you might instead be looking at moving from Sonoma to Sequoia, or perhaps dragging your feet and considering Sonoma as it enters its final year of support. This article considers what you should do when preparing to upgrade macOS.
One of the surgeons I worked for in my first internship in hospital taught me an important lesson in life: when considering the outcome of anything that could go wrong, assume that it will go wrong, and prepare for that. When it actually works out better than you planned for, you can enjoy your success.
The worst case is that your Mac dies during the upgrade. Although that’s also the least likely, you need to think through your disaster plan. I ensure that all my most essential files and data are shared or copied up to iCloud so that I could get by for a day or three without that Mac. A recent full backup is also essential: if your Mac needs to go away to be resuscitated, one way or another that’s what you’ll be restoring from.
Upgrades do bring a tiny but significant risk of bricking your Mac in a way that only a full Restore will recover it. Although this can apply to Intel Macs with T2 chips if a T2 firmware update goes wrong, this is more the preserve of Apple silicon Macs. I’ve recently stepped through your options with full details here. Your first DFU Restore is daunting, but once you’ve done one, you’ll realise that they’re not that challenging if you have the right cable and DFU port. When you’ve restored firmware and macOS, you’ll then be restoring from that last backup, emphasising its importance.
In the days before the SSV, when there was only one boot volume and that could so readily be corrupted during upgrades, you also needed to have an emergency toolkit handy to repair an upgrade that went wrong. These days, the whole of the System in the SSV is either perfect, or macOS has to be reinstalled. Minor glitches are almost invariably corrected by restarting after the upgrade has completed, or starting up in Safe mode (remember on Apple silicon Macs that’s performed from Recovery).
The other possibility that you should plan for is beating a hasty retreat and reverting to an older version of macOS. Provided that you’re fully aware of the changes to the macOS interface brought in Tahoe, I think this is less likely for those upgrading from Sequoia, but if you’re skipping a version or two you could still find yourself unable to use a vital peripheral or one of your key apps, leaving you with reversion as your only option.
I’m sometimes asked by eternal optimists whether you can revert to your previous macOS simply by using its SSV snapshot. Sadly, snapshots are of no help: the only way back is to wipe and reinstall that macOS.
On Intel Macs, you’ll need to do this when booted from an external bootable installer, which doesn’t have to be on a USB ‘thumb’ drive, but does still require its own HFS+ volume to work. Apple explains this here, and Mr. Macintosh has links to all available installer apps.
Although you can do that with an Apple silicon Mac, if you have a second Mac and the right USB-C cable, it’s usually quicker and simpler to do this by restoring from the appropriate IPSW file in DFU mode, then restoring your files from your latest backup, as explained here. This is particularly valuable, as it also restores the original firmware, which may be the root of your problems. Unfortunately, that doesn’t seem possible with Intel Macs. Once their firmware has been upgraded, the user isn’t able to downgrade it.
Whatever you choose to do, I wish you success, and hope that your preparations prove completely unnecessary.
Apple has just released its weekly update to XProtect for all supported versions of macOS, bringing it to version 5314. As usual, Apple doesn’t release information about what security issues this update might add or change.
This version brings no changes in its text data files, specifically its Yara rules. Wondering if I might be missing something, I have also compared the general release XProtect files with those for Sequoia and Tahoe (delivered by iCloud), and they are identical too.
You can check whether this update has been installed by opening System Information via About This Mac, and selecting the Installations item under Software.
A full listing of security data file versions is given by SilentKnight and SystHist for El Capitan to Tahoe available from their product page. If your Mac hasn’t yet installed this update, you can force it using SilentKnight or at the command line.
If you want to install this as a named update in SilentKnight, its label is XProtectPlistConfigData_10_15-5314
This update has already been released for Sequoia and Tahoe via iCloud. If you want to check it manually, use the Terminal commandsudo xprotect check
then enter your admin password. If that returns version 5314 but your Mac still reports an older version is installed, you may be able to force the update usingsudo xprotect update
I hope that you enjoyed Saturday’s Mac Riddles, episode 324. Here are my solutions to them.
Last (final) edit (cut) from KeyGrip (its original name when it was being developed by Macromedia) but not for the amateur (pro).
Movement (motion) to accompany 1 (it’s part of the suite) for its titles and effects (what it’s used for).
Opening (an aperture) that closed for your photos a decade ago (it was Apple’s equivalent of Adobe Photoshop Lightroom, but was discontinued in 2015).
They have each been among Apple’s ‘pro’ apps for those working with still and moving images, and competitors for Adobe Premiere, Adobe After Effects, and Adobe Photoshop Lightroom.
I look forward to your putting alternative cases.