The first thing I discovered when I started hunting provenance extended attributes (xattr) was a bug in my free utility xattred. This can result in the app crashing when using its Crawler to explore xattrs on items in a folder. I have fixed that in this new version 1.7, available below.
My hunt was by and large successful, with a great many com.apple.provenance xattrs caught. There are some interesting problems, though.
Looking through the contents of the main Applications folder, there are three groups of apps:
Those with Apple certificates, including bundled apps and those delivered through the App Store (which are all signed by Apple, not their developer), which have no provenance xattr as they don’t register with provenance tracking.
Apps with third-party certificates that have been installed simply, which have a single provenance xattr on the app bundle containing that app’s provenance ID.
Apps with third-party certificates that have been installed or updated using a third-party app such as their Sparkle update mechanism, whose entire contents have provenance xattrs attached by the installer/updater, so not bearing the app’s provenance ID.
Examining files in the ~/Documents folder, there are plenty with provenance xattrs, and a great many with quarantine xattrs bearing information about their history including origin. Although some of the provenance IDs on them don’t match with those of apps, there’s sufficient to provide useful information about many without accessing the ExecPolicy database’s Provenance Tracking table. Therefore I will proceed to code up Providable over the next couple of weeks.
This new version of xattred should fix that crashing bug in its Crawler feature, that enables you to scan folders for information about their xattrs.
I have also looked at an issue that I’ve experienced when editing some xattrs such as the new com.apple.icon.folder type used in Tahoe to customise the appearance of folders. When editing them, some of the double-quotation marks used in text content can become changed to ‘smart’ quotes, which isn’t in the least bit smart, as it prevents that xattr from functioning correctly. Although that feature is disabled for that text view, macOS seems to be ignoring its setting and substituting smart quotes regardless. Provided that you’re aware of this danger and take care to ensure that all quotation marks are non-smart, you can edit xattrs successfully. Hopefully this will be improved in the future.
xattred version 1.7 for macOS 11.5 or later is available from here: xattred17
from Downloads above, from its Product Page, and via its auto-update mechanism.
The Achilles heel of T2 Macs is booting from external storage. Although it’s simple to create a bootable external disk for a T2 Mac, to boot from it you have to allow the Mac to boot from any external disk, removing much of its boot security. Apple silicon Macs were designed to boot almost as securely from external disks as they do from the internal SSD, and that makes setting up a bootable external disk more complicated. This article explains how you can do that for macOS 26 Tahoe.
In this respect, Apple silicon Macs have two central principles:
They always start the boot process from their internal SSD. If that’s not functioning correctly, then they can’t boot at all.
They will only transfer the boot process to an external system when the user has access to a private key making them an Owner of that system, through the Mac’s LocalPolicy system. That’s the part that can cause problems.
Planning
There are alternatives to booting from external storage. If there’s sufficient space, you can install multiple versions of macOS on the internal SSD, or you can run macOS as a guest operating system in a virtual machine (VM). VMs are limited in some important respects, though, as they can’t run most apps from the App Store or use AI, although they can now access iCloud and iCloud Drive.
Like any other Mac, Apple silicon models can only boot from versions of macOS they’re compatible with. You can check which your Mac can run using Mactracker. A VM is the only solution for running older and incompatible versions of macOS, and it gets messy installing versions that are compatible but older than the currently installed major version of macOS. This is because its installer may be blocked by the more recent macOS, for which you’ll need to create a bootable installer disk and run the installation from that. Apple describes how to do that in this support article. For the remainder of this article, I assume that you’re installing a second or subsequent copy of the current version of macOS to an external disk.
Connect and prepare the external disk
First catch your disk, and connect it to one of the non-DFU ports on your Mac. For example, on my Mac mini M4, that’s either the left or right Thunderbolt port, as the middle one is its DFU port. On all other Apple silicon Mac minis, that’s either the centre or right port as you look from the rear, as their DFU port is the one on the left. If you try to install macOS to a drive connected to an Apple silicon Mac’s DFU port, then it’s doomed to fail, and that’s the most common cause of failure. More information on the DFU port is here.
Reformat that disk as you want to use it, with at least one APFS container containing a single APFS volume in regular APFS format, not encrypted.
Download and run the installer
Next catch your installer. Oddly, Apple seems to have stopped providing the current release of macOS through the App Store, so the simplest way to download it in the GUI is from the links provided by Mr. Macintosh, and there are many alternatives. You want a regular installer, not an IPSW image file that you might use to create virtual machines.
Run the installer app from your main Applications folder.
When it asks you whether you want to install macOS on your current system, click on Show All Disks…
Select your external disk from the list and click Continue. If your disk isn’t recognised or listed there, reformat it and start again.
Ownership
This is the important part of the installation; if it fails, the external disk won’t be bootable.
For the macOS system on your external disk to be bootable, it needs a LocalPolicy created for it on your Mac’s internal SSD. To ensure that only fully authorised users can configure and change LocalPolicy, those Image4 files are signed, and an Owner Identity Certificate (OIC) is attached to them. Creating and maintaining LocalPolicies requires a user to have access to the private Owner Identity Key (OIK) in the Secure Enclave, making that user an Owner.
Any user with access to the Volume Encryption Key for the internal storage also has access to the OIK, and has Ownership. By default, that includes all users added after FileVault encryption is enabled on a Data volume, for example. To be able to boot from that second OS, it requires a LocalPolicy with an OIC attached, and Ownership has to be handed off to an Install User created when that OS is installed.
Handing off Ownership to the Install User is more of a problem, as users are only created when the installation is complete. To accommodate that, macOS offers to copy a user from the current boot system as the Install User, and the primary admin user, on the second OS. Provided that you agree to that, the Install User created is actually a Key Encryption Key (KEK) for your password and hardware keys, which is then used to encrypt the OIK as it’s handed over to the new copy of macOS on the external disk. Thus, the installer requests that user’s password to gain access to the OIK for the new macOS in the Secure Enclave.
Following these steps should ensure that works correctly.
When prompted to select the user to be owner of the new boot volume group, pick the current admin user, and tick to copy their account settings.
You’ll then be prompted to enter that user’s password to authenticate as the owner.
Completing installation
Installation follows, and is (as ever) highly non-linear, and may even appear to stall. Persevere, and it will then close apps and restart to complete.
When you’re eventually prompted to Create a Computer Account, it’s simplest to create a local admin account for the owner. The new copy of macOS will then take you through personalising your new system, and, if you’ve added support for your Apple Account, it will do the 2FA dance for iCloud and Apple Account, and so on.
Once configured, you can share that external disk between Macs, but each time you boot from it on a different Mac, you can expect to repeat the 2FA dance for iCloud and Apple Account.
Updates
Once installed, you’ll almost certainly want to keep that external system up to date. To do that, start up from that disk, and use Software Update as normal. Although you could download that latest macOS installer and run that, that’s a much larger download and there’s always the risk it might run a clean install, forcing you to restore from your latest backup. Apple no longer provides downloadable updaters for macOS.
When you update macOS on that Mac, the firmware in it will be updated by the most recent version of macOS you have installed or updated it to, whether that’s on the internal or external disk. To update firmware, you have to install the appropriate macOS update on that Mac. If you update your external disk using another Mac, then that won’t update the firmware in your Mac. That can only be done by performing that update on that Mac.
Key steps
Consider alternatives, including an additional system on the internal SSD, or using a VM instead.
Connect the external storage to a non-DFU port and format it in APFS, not encrypted.
Download and run the appropriate full macOS installer. macOS Tahoe isn’t currently available from the App Store, though.
Select the external disk as the installation target.
Select the current admin user to be Owner of the new system, copy their account settings, and authenticate with that user’s password.
Create a local admin account for that user, if possible.
Complete 2FA to connect to the Apple Account, as necessary.
Update the external system when booted from it, using Software Update.
Quarantine extended attributes, xattrs named com.apple.quarantine, aren’t attached to all files downloaded to Macs. Although once described as a voluntary scheme, putting files into quarantine is determined by a set of rules. This article explains how those rules work in macOS 26 Tahoe.
The default rule for apps that don’t run in a sandbox is that all new files they create don’t have a quarantine xattr attached to them. This is simple to verify by creating a new file using an app that hasn’t been obtained from the App Store, and isn’t one of Apple’s. Although it’s likely to get a MACL xattr attached, no quarantine xattr should accompany that. The same should also apply to files created by sandboxed apps, including TextEdit.
Info.plist
Although some processes and apps may explicitly attach quarantine xattrs, for example in AirDrop, this is a behaviour normally delegated to macOS by a setting in the app’s Info.plist, LSFileQuarantineEnabled. When that’s set to true, all files created by that app should bear the xattr. You can verify that by inspecting the Info.plist file in apps that download items from the internet, such as Safari, where it’s normally listed immediately below the app’s LSApplicationCategoryType.
No changes can be made to the Info.plist in a signed app, as those would break its signature.
CoreTypes.bundle
If that setting in Info.plist is false, or it doesn’t appear in the Info.plist, then there are additional and overriding settings contained in Exceptions.plist in the CoreTypes bundle, at /System/Library/CoreServices/CoreTypes.bundle/Contents/Resources. That long list contains five dictionaries:
Additions, which assigns a lot of app categories, sets Java version requirements, and determines default settings for quarantine on files created by apps.
AppNapOverrides, which sets App Nap behaviours.
HighResolutionOverrides, which overrides High Res options for apps.
LaunchOverrides, which can disable specific version ranges of apps from being launched; these prevent older apps from being run.
MergeDocumentTypes, which merges some document types such as doc and docx for specific apps.
Overrides, which can override other settings.
Included in the Additions dictionary you should find overriding settings for the popular BitTorrent client Transmission, reading: <key>org.m0k.transmission</key>
<dict>
<key>LSApplicationCategoryType</key>
<string>public-category.internet</string>
<key>LSFileQuarantineEnabled</key>
<true/>
</dict>
Referring to the app by its ID of org.m0k.transmission, the first of those assigns the app to an app category of public-category.internet, then sets the app to attach the quarantine xattr to all documents that it creates, including everything that it downloads.
Among the existing overrides in Tahoe, for example, are org.pythonmac.unspecified.BitTorrent and org.xlife.Xtorrent, to ensure that Transmission, Xtorrent and PythonMac BitTorrent clients should write quarantine xattrs to all their downloaded files. Although this Exceptions property list doesn’t cover every client, it should ensure that most do protect their downloads by attaching a quarantine xattr.
The CoreTypes bundle isn’t in the Signed System Volume of macOS, but is protected from change. Thus, there’s no way the user can alter which apps add the quarantine xattr to new files they create.
Mach-O binaries
I don’t know how this system works with command tools, which are single file executables. They can have an Info.plist embedded in the executable, but this is rare unless they need to be notarized. The most popular tool for downloading files from the internet must be curl, used in commands of the form curl [URL] -o [localfile]
to download the file named in the URL to a local file named localfile. It’s simple to demonstrate that the download then doesn’t have any quarantine xattr attached to it, and those don’t gain the xattr when extracted from archives either.
While this does offer the user a way to download files that don’t have any quarantine xattr attached, it’s also almost universally used for the same purpose by malicious software.
Summary
By default, apps don’t normally attach the quarantine xattr to files they create.
Most apps that can download files from the internet opt to attach the xattr by setting LSFileQuarantineEnabled to true in their Info.plist.
Some of those that don’t, have that overridden in the Additions dictionary of Exceptions.plist in CoreTypes.bundle.
One notable exemption is the command tool curl, which is also used by malware to escape quarantine.
This week brought a timely revisit to remind myself just how common the three security extended attributes (xattr) have become, and to see whether we can make use of any of them for our own purposes.
How common?
Checking through one of my ~/Documents folders containing a modest 57,884 files, nearly 60% of them have at least one xattr. By far the most common is com.apple.quarantine on 48%, followed by com.apple.provenance at 14%. Some way behind those, but still one of the most frequent, is com.apple.macl on 2.8%.
Having explained what I think macOS does with all those xattrs, the next step is to ask whether we can use them for our direct benefit. Of the three, quarantine seems least useful to anything beyond Gatekeeper. MACL is like a boil on the bum, and the only time you’ll notice it is when it gets in your way. I can’t make sense from its contents either, but as it’s protected by SIP, there’s little a utility could do to alleviate our suffering, so we just have to learn to live with it. I’m surprised how uncommon it is in comparison with the nuisance it can cause.
Promising provenance
It’s the provenance xattr that looks most promising, and Koh M. Nakagawa has followed up his recent research into its function with an open-source command toolShowProvenanceInfo that can look up provenance IDs found on files, in the ExecPolicy database’s Provenance Tracking table, although that requires root privileges for access.
Apps and executable code signed by third-parties rather than Apple are added to that table when they’ve successfully completed their first run. Each is given a unique provenance ID number that is attached to them in a com.apple.provenance xattr. When they then perform any of 11 types of file operation, such as creating a file or opening one in write mode, that app’s provenance ID is attached to the file in its own provenance xattr.
As apps and other executables that have been entered into that table have their own provenance xattrs, it shouldn’t be too much of a burden to build an independent database from those, together with other information about the executable with that provenance ID. That can then be used to examine provenance xattrs on arbitrary files, to identify which app last worked with that file, the primary task of a new GUI utility I’ve already dubbed Providable.
In addition to telling you which app with a provenance ID last changed a document, there are other functions that Providable could perform. Those property lists forming the basis for Background Items listed in Login Items & Extensions settings are normally created and changed by their owning app. When a third-party app with a provenance ID does that, the property list gains a provenance xattr that can be used to identify the app responsible. That can in turn provide information that’s often sadly lacking from the list of extensions, including the location of the app rather than that of the property list.
One obvious hole in this plan is the fact that apps that are signed by Apple, including those bundled in macOS and everything installed from the App Store, don’t get assigned provenance IDs. They therefore can’t be traced and identified from the files they create or change, as they operate outside the provenance tracking system.
Providable
My outline design for Providable is therefore to inspect provenance IDs saved as xattrs to the apps in the Data volume, and to display their details in a list you can refer to. Alongside that, a window lets you drop files on it for checking. Each will be examined for a provenance xattr, and those that have one will then be associated with the app in the list, providing its path and other details.
Provenance IDs can also be assigned to command tools and other executables, and a later version will allow you to check those in popular locations, and add them to the database so files can be matched to them as well. I don’t currently know how useful that might be, but we should get a better idea once the first version of Providable is in use.
I invite your ideas and comments, please, before I start coding.
Numbers – as in maths, not Apple’s spreadsheet – were there at the dawn of computing, and have played a major part in hardware, system software and apps ever since. This article explains some of the numeric types used by your Mac, and how they can catch you out.
Numbers in computing fall into two broad classes: those represented exactly, which are mainly integers, and those normally approximated, including most floating point numbers.
Integers
These are the simplest to represent in binary and hexadecimal, and those that play the fewest tricks. They come in several varieties, determined by their size in bytes, and whether they can be negative rather than only positive. Some of us still remember when the standard integer was represented in just eight bits. The largest unsigned integer is then 1111 1111 in binary, or FF in hexadecimal, that’s 255 in regular decimal notation. If one of those bits is used to indicate whether they include negative values, they can only lie between -127 and +127.
Soon integers grew to 16 bits, then 32, and now the standard length of 64 bits, offering a range of numbers beyond our comprehension, or even the largest of distributed file systems.
Most problems that arise in integers do so from any of five causes:
the order of bytes, which can be ‘big-endian’ or ‘little-endian’ according to processor type and setting;
conversion between different lengths;
whether signed or unsigned;
overflow, in which the product of two integers requires a number larger than the maximum for their length;
arithmetic operations such as division, when performed by zero.
Together, these can result in quite complex errors. For example, suitably misinterpreted as a signed integer using the wrong byte order, the 32-bit unsigned integer for 65,535 (0000 FFFF) can become -2,147,418,112 (FFFF 0000).
Floating point numbers
Integers are fine for counting integral objects such as people and file sizes, but in the real world most things have to be measured in floating point or decimal numbers like 3.14159. In maths, those numbers come from a continuous range that has to include extremely large positive and negative values, and many very close to zero. They’re most familiar to us from engineering or scientific notation expressing them in terms of a number from 1.0 to almost 10.0, multiplied by a power of ten, e.g. 1.68301 x 10e-6, which is just above zero at 0.00000168301.
The most widely used form of floating point number in macOS is the Double, which uses 64 bits to encode a number using similar principles to engineering/scientific notation, only the powers used aren’t decimal but binary, making them more difficult to read and understand. In decimal notation, with the radix 10, 0.00000168301 has the significand of 1.68301 and the exponent of -6, making it 1.68301 x 10e-6. As a computer Double, the radix is 2 (binary), so it has a significand of 1.76476389376 and an exponent of -20, making it 1.76476389376e-20.
Some Doubles are exact expressions of the number they’re trying to represent. An obvious example is 1.0, represented as 1.0e0, but even fairly simple numbers like 71.3927 are confusing, with a representation of 1.1155109375e6 (radix 2). To convert between regular decimal floating point and 32- and 64-bit floating point numbers, and their hex representations, my free Mints has a Floating Point Explorer window. This is explained here.
Unlike mathematical numbers, there’s a finite number of different Doubles, and their distribution is far from even. The same Double representing 71.39270000000000 also represents 71.39270000000001, and all the numbers in between them, all but one of which is only an approximation. Around those numbers, there are roughly 70 trillion different floating point numbers per unit (1.0) step in number. These become more dense around zero, and less dense at the extreme ends of the number line. As Doubles become larger in absolute value (disregarding their sign), so they become less precise in absolute but not relative terms.
Errors
Because they’re only approximations, Doubles suffer several problems that can adversely affect calculating with them. These include rounding and cancellation errors.
Rounding errors occur because Doubles have fixed length, so the last place has to be rounded up or down to give the best approximation to the real number. The standard for floating point (IEEE 754) specifies no less than five different rounding functions, that can result in a Double being rounded up or down. Although the relative errors from rounding should be small, they can accumulate in long series of calculations to the point where they affect overall accuracy.
Cancellation errors can be very large, even when only the result of a single operation. This term refers to potentially highly inaccurate results from subtracting numbers that are very close in value. When almost all the digits of the result are lost, these errors can be catastrophic, and may cause the order of calculations to determine the result.
These can be illustrated by two simple calculations, each of which should return a result of exactly 0.0: ((10000000.001 - 10000000.000) - 0.001) * 1.0e8
and (10000000.001 - (10000000.000 + 0.001)) * 1.0e8
Yet using Swift Doubles, the first returns the incorrect result of 0.016391277311150754.
With a whole IEEE standard to themselves, floating point numbers have grown their own subdivision of errors and non-errors. The most commonly encountered of these is the NaN, Not a Number, which used to puzzle those plugging through spreadsheets when a formula attempted a heinous crime such as division by zero. The joy of NaNs is their propagation: once a NaN creeps into a calculation, it’s likely to turn the whole thing NaN. Then there are two different signed zeroes, +0 and -0, or if you really want a choice, why not have an unsigned zero too, and then decide whether you want all three to be equal or not.
Others
Some systems also support extended precision beyond Doubles. One of the advances brought by the first widely used maths coprocessor, Intel’s 8087, was the availability of 80-bit Extended calculations. Although valuable for some, in general, mixing precisions leads to further strange errors that can prove hard to trace. macOS tries to avoid those, and ARM processors don’t have any Extended features, which have to be implemented in additional libraries for those that need them.
Most recently, to accommodate AI using neural networks, smaller floating point numbers have become popular. bfloat16 numbers use only 16 bits of storage, but cover the same range as 32-bit floating point numbers with reduced precision. These promise huge gains in speed by allowing arithmetic instructions on twice the numbers at once, and are supported in CPUs in Apple’s M2 and later chips, and in GPUs.
You will occasionally come across other numeric formats, including fixed point and arbitrary precision. These don’t normally have any direct support in general purpose processors, but are implemented in libraries, making them considerably slower and non-transferable. And then there are arrays of numbers in vectors and matrices, complex numbers, and everything else that mathematicians have devised. There is no end.
Further reading
Start with Jean-Michel Muller et al (2018), Handbook of Floating-Point Arithmetic, 2nd ed, Birkhäuser, ISBN 978 3 319 76525 9. Then progress to Peter Kornerup and David W Matula (2010), Finite Precision Number Systems and Arithmetic, Cambridge UP, ISBN 978 0 521 76135 2. Complete the basics with Jean-Michel Muller (2006), Elementary Functions, Algorithms and Implementation, 3rd ed, Birkhäuser, ISBN 978 1 4899 7981 0. You can then progress to matrices, for which there is a huge literature.
Over the last few years, files and apps on our Macs have started to bristle with unfamiliar extended attributes (xattr). The oldest is the quarantine xattr, containing the quarantine flag, dating back to the introduction of Gatekeeper in 2012. Although its primary purpose is to determine which apps should undergo first run checks, it’s also to be found on many files. Then in macOS Catalina, the MACL xattr appeared and now seems to get attached to pretty well everything, no matter where it has come from. It was joined by the provenance xattr in macOS Ventura, and that too is spreading like wildfire on both apps and files. This article reviews why they’re there, and what you can do about them.
Quarantine
Since its introduction, Gatekeeper has drawn a distinction between apps that originated outside the Mac, and those that can be fully trusted, when performing security assessments on the first occasion. To enable that, apps that download items from the internet, or transfer them from another system on the same network, attach a quarantine xattr to every file that arrives on your Mac. When archives are decompressed, for example, the quarantine xattr is propagated to every file they contain. Gatekeeper then performs full first run checks on those apps, and in the right circumstances they may be run in translocation.
This com.apple.quarantine xattr is also attached to non-executable files, where its role isn’t clear, as they aren’t checked by Gatekeeper, and their quarantine flag isn’t cleared after they have been opened for the first time. However, you’ll find them on all items that have been downloaded by an app or tool that attaches them. As this xattr isn’t protected in any way, it’s straightforward to remove, although you should avoid doing so for apps whose origins could be suspicious, as that would prevent Gatekeeper from running its additional checks.
MACL
This is thought to be an abbreviation for Mandatory Access Control List, and might be intended to preserve privacy while allowing the user to open files. The com.apple.macl xattr is now probably the most common of all, as these get attached to any and every file, including apps, even if they were created on that Mac and never left its local storage.
This xattr contains 72 bytes of what could be two UUIDs, or just binary data. However, it’s protected by SIP, preventing any user from stripping it. This can be responsible for problems, for example files that can’t be opened in their default editor app, and some that can’t be saved. In the past one way of triggering this blocking behaviour was to set a document to be opened by default using an app other than its normal app, then saving it from that app before trying to open it again.
Perhaps the simplest way to remove this xattr is to copy the file to another volume, where the xattr is no longer protected by SIP, stripping it using my free editor xattred or the xattr command tool, then copying that back to its original location. Although it’s likely to be given another MACL xattr shortly, that should be less prone to cause problems.
Provenance
Most recent versions of macOS have what’s known as a Provenance Sandbox that enables the security system to track the origins of files, and trace which app has altered them. This has recently been detailed in full in Koh M. Nakagawa’s account of XProtect Remediator. It operates quite differently from the regular app sandbox, and doesn’t appear to impose any restrictions.
Apps that aren’t signed by Apple are assigned an 11-byte integer when they first clear Gatekeeper’s checks, and those are entered into the Provenance Tracking table in the ExecPolicy database, and attached to the app in the com.apple.provenance xattr. When that app performs operations like opening a file in write mode, or creating a new one, the same xattr with that app’s provenance ID is attached to the file. Thus, by checking the provenance ID on any file with the xattr, the app that last wrote to the file can be identified.
Provenance IDs and xattrs aren’t assigned to Apple’s own apps, or those installed from the App Store, but they are to apps that are signed using certificates other than Apple’s, and those that are notarised. When a file is created or changed by an app without a provenance ID, no xattr is attached to that file, and any existing xattr is left unchanged.
This is a powerful tool in gathering security intelligence. For example, suppose a Mac has just installed previously unknown malware that started to write files in one of the locations watched by behavioural XProtect under one of its Bastion rules. Those could be inspected, perhaps by one of the scanning modules in XProtect Remediator, the provenance ID checked against details in the Provenance Tracking table, and information forwarded to Apple for further investigation.
Evidence so far suggests that you don’t want to try to tamper with the provenance xattr, as it doesn’t appear to have any role in blocking access to files, and is working on our side. Like the MACL xattr, it’s now normally protected by SIP, so can’t be removed directly.
Summary
com.apple.quarantine is likely to be found on any app or file downloaded or transferred from another system, but appears harmless.
com.apple.macl is likely to be attached to most apps and files, even those that have remained local at all times. It can sometimes cause problems including blocking the file from being opened or saved, but is hard to remove as it’s protected by SIP.
com.apple.provenance is used to track which app has created or modified files. This can be important in security intelligence, so shouldn’t be removed, although it appears harmless and is working for our benefit.
Programs running in windowing environments, applications as we used to know them, have more complicated requirements than those run from a command line. Rather than embed all the resources they require for windows, menus and the rest in a single file, Mac OS broke new ground by putting those into resources stored in the app’s resource fork.
This is QuarkXPress version 4.11 from around 2000, with its resources displayed in the resource editor ResEdit. Executable code was also stored in CODE resources, and every file contained type and creator information to support the illusions created by the Finder.
Mac OS X
When Mac OS X was designed, it switched to the bundle structure inherited from NeXTSTEP. Instead of this multitude of resources, apps consisted of a hierarchy of directories containing files of executable code, and those with what had in Mac OS been supporting resources. Those app bundles came to adopt a standard form, shown below.
The bundle name has the extension .app, and contains a single directory Contents. Within that, the executable code is in the MacOS directory, which may contain both the main executable for the GUI app and any bundled command tools provided. Another directory contains Resources, including the app’s custom icon, and components of its GUI. In some apps, there’s another directory of Frameworks containing dylibs (libraries).
There are also two important files, Info.plist and PkgInfo. The latter contains the same type and creator information inherited from Classic Mac OS, and apparently isn’t mandatory although it appears universal. The information property list is essential, as it specifies the names of the executable and its icon file in Resources, the minimum version of macOS required, type declarations of the app’s documents, version numbers, and more.
When running a command tool in macOS, its Mach-O executable is launched by launchd, whose purpose is to run code. Launching an app is more demanding, although the app’s executable is still launched by launchd. Before that can happen, macOS starts the launch process using LaunchServices and RunningBoard, which rely on information obtained from Info.plist and other components in the app bundle.
macOS
This structure remained stable until the introduction of code signatures in Mac OS X 10.5 Leopard in 2007. Accommodating those added a directory named _CodeSignature containing the signature in a CodeResources file. That includes code directory hashes (CDHashes) to check the integrity of the contents of the app bundle. Apps distributed by the App Store include a store receipt in another directory, _MASReceipt. Since 2018, when Apple introduced notarization, the ‘ticket’ issued by Apple can be ‘stapled’ into the app bundle as the file CodeResources.
Many apps come with additional items that might in the past have been installed by them in their Library/Application Support folders and elsewhere, but are now included in the app bundle. These can include the following directories:
Library, containing folders of LaunchDaemons and LoginItems that would previously have been installed in either the main Library folder, or that in the user’s Home folder;
XPCServices, for executable code that the app uses to provide specific services;
Plugins, for some types of app extension (Appex);
Extensions, for other types of app extension, including app intents.
You may also come across other components, including a version.plist in Apple’s apps.
This centralisation of components in the app bundle has brought several benefits. Being self-contained, apps are easier to install and update, and cleaner to remove. Their components are less likely to go missing, and most of all they’re held within the protection of the app’s signature and notarisation, an important improvement in security.
Assembling these into a diagram shows how the anatomy of an app has grown over the last few years.
Components shown in pale yellow are either mandatory or essentially universal. Those shown in green are found in apps distributed through the App Store, while that shown in blue is the stapled notarisation ticket (optional). You will also see additional folders and components such as Automator workflows, scripts, and others.
There is no difference in structure between apps built for current Intel and Arm architectures. That’s because binaries in the MacOS folder (and executable code in other directories like Frameworks, XPCServices and Plugins) contain platform-specific code in a single Mach-O executable. Thus, an app that’s Universal and runs native on both architectures includes code for both in its single ‘fat’ code file, and they even have separate signatures stored within common files.
Many apps now use helpers and services to handle some of their work. Good reasons for this include needing to perform a task at a higher level of privilege, and for utilities installed into the menu bar. Background helpers can then be run as root, or provide a periodic service, split out from the main app. You manage them in System Settings, in the Login Items & Extensions part of General settings. This article looks at those set there to Open at Login, and others listed in App Background Activity. I’ll keep Extensions for another occasion.
Login Items
These are normally apps intended to be opened automatically when you log into your Mac, and most can be opened manually if you prefer. To add an app or remove it, use the + and – buttons.
To log in without any of those Login Items being started automatically, press and hold the Shift key when you click on the Log In button (at the right end of your password), and keep it held until the Dock appears. You may be asked to enter your password a second time, in which case once you have done that, press and hold the shift key again while clicking on the Log In button. Existing login items won’t then be opened until you log in again.
Background Items
Background items aren’t normally apps as such, but usually small binaries run by launchd as LaunchAgents or LaunchDaemons, in accordance with their property lists. Your control over them is limited: all you can do is turn them off and on.
If you try disabling some of them, you may see that they’re automatically re-enabled. Many appear unidentifiable, and a few have ⓘ Info buttons, to reveal where their property list is on your Mac, but many don’t. One useful piece of information given for some is whether that item affects all users, in other words is installed in a folder outside your Home folder, including the main Library and Applications folders.
Apple maintains a preference file containing details of many helpers and other executables used by major third-party apps. This may help you identify those that appear in LogIn and Background Items. This can be found at /System/Library/PrivateFrameworks/BackgroundTaskManagement.framework/Versions/A/Resources/attributions.plist
Safe mode
Diagnosing problems with helpers and services is extremely difficult, and made harder by the fact that most are now XPC services and only revealed by their entry in Activity Monitor’s lists. When they’re in trouble, they can cause almost anything, including:
unexpected or abnormal behaviour,
their entry in Activity Monitor can take high CPU and/or memory,
spinning beachballs and sluggish performance,
general instability.
The most important test to establish whether any such behaviour is likely to be the result of a third-party helper or service is to start up in Safe mode and demonstrate that the problem disappears then. This is because Safe mode blocks these helper apps and services from being launched. Unfortunately, Safe mode doesn’t help you establish the cause, nor what you should do about it.
Which Library?
In the past, most helper apps and services have been run by launchd on the basis of property lists in LaunchDaemons and LaunchAgents folders in the main Library folder, or in ~/Library/LaunchAgents. One good way to distinguish these is to create a new user account and see if the problem affects that too: if it doesn’t, then it’s more likely that helper or service is being launched from the Library folder in your Home folder rather than the main Library, in other words that the problem lies somewhere in your Home folder.
BTM dump
A better and more systematic approach is to obtain a detailed listing of all those Background Items, and uninstall or delete those you no longer need, or are just old and unnecessary. For this, you need a BTM dump, using an undocumented option to the sfltool command: sudo sfltool dumpbtm > ~/Documents/btmdump.text
to write it to the text file btmdump.text in your Documents folder. This file is also invaluable if you’re going to nuke Login Items in a reset, as it provides a record of what you might need to restore afterwards. This uses a command tool originally intended to manage the Shared File List, which has gained additional features covering Service Management, although its man page hasn’t caught up yet and the most help you’ll get is from its usage info.
This lists full Service Management information for every item currently being managed, by user ID. Normally, the two important user IDs would be 0 for root and 501 for the primary admin user, but here the first list, with a UID of -2, appears to be a composite covering most Background Items. You should also check those for the current user, such as 501. A typical entry might be: UUID: 9A087CA1-250D-4FA6-B00A-67086509C958
Name: Alfred 5.app
Developer Name: (null)
Team Identifier: XZZXE9SED4
Type: app (0x2)
Flags: [ ] (0)
Disposition: [enabled, allowed, not notified] (0x3)
Identifier: 2.com.runningwithcrayons.Alfred
URL: file:///Applications/Alfred%205.app/
Generation: 0
Bundle Identifier: com.runningwithcrayons.Alfred
This gives the location of the executable that is loaded. The Developer Name given is taken from the code signing certificate. The Disposition field is probably most relevant to identifying those causing problems, as it should reflect the status of that entry in the Login Items list, and whether the user has been notified. There’s currently no way to change or correct those, at least using the tools available.
BTM reset
The nuclear solution is to blow the whole lot away, and start from scratch, but if you don’t then delete old apps and their components, including property lists and support files tucked away in Application Support, LaunchAgents and LaunchDaemons folders, then many will return to haunt you. To remove all third-party Login Items and reset those and Background Items to installation defaults, you can use the undocumented command sudo sfltool resetbtm
following which you should restart the Mac.
Summary
Login Items are apps opened automatically when you log in, and are managed in Open at Login in Login Items & Extensions settings.
Background Items are small binaries run by launchd as LaunchAgents or LaunchDaemons, controlled in App Background Activity.
Hold the Shift key when clicking the Log In button to temporarily disable all Login Items.
Safe mode disables both Login and Background Items.
Use sudo sfltool dumpbtm to obtain a BTM dump detailing them all.
To blow them all away, perform a BTM reset using sudo sfltool resetbtm then restarting.
Most problems with Spotlight are assumed to be the result of it failing to index correctly. I’ve recently detailed how you can diagnose those, and explained why blindly rebuilding its indexes is often a waste of time and effort. Problems that aren’t the result of failed indexing are harder to diagnose and fix. This article describes one approach that doesn’t appear to have been used previously: restarting Spotlight.
Relaunch Spotlight
It turns out that it’s quick and easy to restart Spotlight without having to log out and back in. Open the Finder’s Settings, select the Advanced tool and toggle Show all filename extensions off and on (or on and off). While you’re doing that, watch the Spotlight icon at the right end of the menu bar, and you’ll see it vanish and reappear as Spotlight is relaunched.
This may seem strange, but is clear from the log entries. 0.727612 Finder sendAction:
marks when the checkbox was toggled by the user. Within 0.01 second, Spotlight announces it’s relaunching 0.733710 com.apple.spotlight Relaunching Spotlight to respond to user show extensions change.
Then follow log entries detailing Spotlight being shut down 0.741258 gui/501/com.apple.Spotlight [1183] exited due to exit(255), ran for 60931ms
0.741307 gui/501 [100019] service inactive: com.apple.Spotlight
0.742190 com.apple.launchservices DEATH: Received pid death for 1183, found application App:"Spotlight" asn:0x0-39039 pid:1183 refs=5 @ 0x8d0ef9080 in session "LSSession:id=100019 @ 0x102a996e0 Apps:43 ", which was not a LS launched process, so removing it.
This also takes out the StocksKit service, responsible for providing currency conversion rates and more 0.743045 pid/1183 [Spotlight] removing active service: com.apple.StocksKitService
and the Spotlight icon is removed from the menu bar 0.744222 com.apple.controlcenter Removing ephemeral displayable instance DisplayableId(4C3DBA87) from menu bar. No corresponding host (bid:com.apple.Spotlight-Item-0)
Almost immediately, a new Spotlight service is started up to replace that 0.751631 gui/501/com.apple.Spotlight [1185] service state: running
0.751651 gui/501/com.apple.Spotlight [1185] Successfully spawned Spotlight[1185] because semaphore
and its preferences are loaded ready 0.774661 Loading Preferences From User CFPrefsD
0.784283 com.apple.runningboard [osservice<com.apple.Spotlight(501)>:1185] reported to RB as running
following which there are many entries detailing Spotlight services being reinstated, and StocksKit reloading currency conversion rates.
Quite why Spotlight needs to be relaunched when you change the Show all filename extensions setting in the Finder is a mystery, but the same appears to happen in all versions of macOS from Ventura and probably earlier.
Errors
The reason I discovered this is that Adam Engst of TidBITS informed me that he sees an error message when that Finder setting is changed if Spotlight settings are also open. I’ve been unable to reproduce that, but think I can explain it, and why restarting Spotlight can be useful.
When Spotlight starts up again, it may encounter a problem with a Spotlight extension, something you’re unlikely to come across when logging in normally. That can be aided when Spotlight settings are open. If you see an error, open General settings, and Login Items & Extensions within that. At the foot of that, list Extensions By Category rather than By App, and you’ll see at the very end of the list the item named Spotlight.
Click on the ⓘ by that and review the Spotlight extensions your Mac can load. Turn off those you don’t need, click Done, then restart Spotlight again using the Finder’s Settings. That may help you to identify an extension that needs to be updated.
Summary
You can restart Spotlight by toggling Show all filename extensions in the Finder’s Settings.
This could resolve Spotlight problems that aren’t the result of indexing failure.
This could also help you identify incompatible Spotlight extensions.
Let me know if you find this useful, or just a curious quirk.
I hope that you enjoyed Saturday’s Mac Riddles, episode 336. Here are my solutions to them.
1: Interchange of wealthy words but not plain.
Click for a solution
rich text
Interchange (the format was intended for interchange of documents) of wealthy (rich) words (text) but not plain (not plain text).
2: Microsoft’s proprietary medical practitioner from 1983 until 2007.
Click for a solution
doc
Microsoft’s proprietary (although it has been reversed, it remains proprietary) medical practitioner (a doc) from 1983 until 2007 (although it has changed substantially over that period, it came with Word for MS-DOS in 1983, and was replaced by docx in Word 2007).
3: 2003-2007 = 1,050 afterword.
Click for a solution
WordML
2003-2007 (it was introduced in Microsoft Word 2003, and superseded by Office Open XML in Microsoft Word 2007) = 1,050 (ML in Roman numerals) afterword (after ‘Word’).
As promised last week, I have now produced a new version of Textovert that can extract text from PDF files and convert that to any of the nine formats supported by the app. Testing here suggests this could be generally useful, as the quality of output files appears good, and worth the small effort in conversion.
This new version offers the same conversions as the first, using textutil, but handles PDF files with a .pdf extension (case-insensitive) differently. When converting them to plain text, it loads the PDF and uses Quartz 2D’s PDF engine to extract the text for saving as a text file. When the output format is set to Rich Text (RTF), it uses the same engine to extract styled text and saves that as an RTF file. Note that doesn’t include layout information, but is generally a fairly faithful representation of the styles used in the original.
For the seven other output formats, Textovert first extracts styled text into a temporary RTF file, then hands that over to textutil to convert it to the selected output format.
Each PDF conversion is handled in a separate thread running at a high QoS in the background, to avoid blocking the main thread. As large conversions can take many seconds or even minutes to complete, Textovert’s window tracks how many are running at the moment. That’s most useful when converting batches of PDFs, when it’s easy to forget the last one or two that are still in progress.
Because each conversion gets its own thread, multiple simultaneous conversions will occupy as many CPU cores as are available, as shown in this CPU History for my seven heavyweight test PDFs. At the left of each chart the CPU % rises rapidly as all seven conversion threads are active. As those complete, the bursts of CPU activity diminish until they are from the single thread converting the largest of the PDFs.
To give you an idea of the quality of output, this is a tiny excerpt of the last of those in its original PDF:
And this is the webarchive output from Textovert viewed in Safari:
Converting PDFs does require significantly more memory than those performed by textutil alone. For most documents of more modest size, 100-500 MB is usual, but my monster test PDFs usually rise toward 5 GB during their conversion. I have checked this version for memory leaks, and although it can hold onto some memory longer than I would have expected, that doesn’t continue to rise, and no leak is apparent.
Because PDF conversions are more intricate, I have added extensive error-reporting. For example, if you try to convert a PDF containing scanned images without any recognised text, that won’t have any recoverable text available, as will be reported in the main window. Once conversion is complete, Textovert tries to delete the intermediate RTF file from temporary storage, and if that fails, you’ll be warned.
Textovert version 1.1 for macOS 14.6 and later is now available from here: textovert11
from Downloads above, and from its Product Page.
Cast your mind back to when you learned to drive, ride a bike, speak a foreign language, perform a tracheostomy, or acquire any other skill. Wasn’t confidence the key to your success? Whatever we do in life, confidence is always critical. If you run a business, one of the metrics that are likely to be collected is confidence in your business, as that’s such an important economic indicator. Confidence is every bit as important in computing.
Over the last few weeks I’ve been discovering problems that have been eroding confidence in macOS. From text files that simply won’t show up in Spotlight search, to Clock timers that are blank and don’t function, there’s one common feature: macOS encounters an error or fault, but doesn’t report that to the user, instead just burying it deep in the log.
When you can spare the time, the next step is to contact Apple Support, who seem equally puzzled. You’re eventually advised to reinstall macOS or, in the worst case, to wipe a fairly new Apple silicon Mac and restore it in DFU mode, but have no reason to believe that will stop the problem from recurring. You know that Apple Support doesn’t understand what’s going wrong, and despite the involvement of support engineers, they seem as perplexed as you.
One reason for this is that macOS so seldom reports errors, and when it does, it’s uninformative if not downright misleading. Here’s a small gallery of examples I’ve encountered over the last few years, to bring back unhappy memories.
Maybe you saved an important webpage in Safari 26.1 using its Web Archive format, then a couple of days later discovered you couldn’t open it. There’s no error message, just a blank window, so you try again with the same result. Another site shows the same problem, forcing you to conclude that it’s a bug in Safari. Are you now going to devote your time to obtaining sufficient information to report that to Apple using Feedback? Or to contact Apple Support and pursue its escalation to an engineer who might fortuitously discover the cause?
Silent failures like these are least likely to be reported to Apple. In most cases, we find ourselves a workaround, here to abandon Web Archives and switch to saving webpages as PDF instead. When someone else mentions they too have the same problem, we advise them that Web Archives are broken, and our loss of confidence spreads by contagion.
Honest and understandable error reporting is essential to confidence. It enables us to tackle problems rather than just giving up in frustration, assuming that it’s yet another feature we used to rely on that has succumbed in the rush to get the next version of macOS out of the door.
Eroding confidence is also a problem that the vendors of AI appear to have overlooked, or at least seriously underestimated. It’s all very well using the euphemism of hallucination to play down the severity of errors generated by LLMs. But those can only cause users to lose confidence, no matter how ‘intelligent’ you might think your AI is becoming. Go talk to the lawyers who have been caught out by courts submitting AI fabrications whether they still have full confidence in your product.
Yesterday’s explainer covered a range of text formats, but stopped short of one of the most popular formats for text documents, Adobe’s Portable Document Format, PDF. Its origins are as old as the Mac, and it hasn’t changed much since the start of this century, so PDF is very different from the more recent file formats, and from its antecedent PostScript.
PostScript
PostScript files, with the extension .ps, start with a prologue containing metadata such as %!PS-Adobe-3.0
%%Title: c:\output\online.dvi
%%Creator: DVIPSONE 0.8 1991 Nov 30 16:22:12 SN 102
%%CreationDate: 1992 Mar 26 10:04:36
They then largely consist of dictionaries of PostScript programs, instructions that are to be used to construct the page being described, such as %%Page: 3 4
dvidict begin bp % [3]
38811402 d U
-34996224 d u
-1582039 d U
29614244 r
f2(3)s O o
34996224 d u
-34340864 d u
8708260 r(of)s
185088 W(abstractions,)s
191757 X(such)S(as)S(\\mixed)S(blessing")S(and)S(\\retaliation,")T(in)S
(semantic)S(nets)S(that)s o
and so on. These place each item of text and graphics on that page. PDF is completely different in that it consists of a tree of objects, sometimes many hundreds or thousands of them.
PDF
To be recognised as a PDF file, the first line must start with the ‘magic’ characters and give the version used: %PDF-1.3
followed by a short line of non-ASCII bytes. It may appear surprising that macOS still writes a version that was defined in 1999, when the current version is 1.7 (before ISO standardisation) or 2.0 (standardised), and the Quartz 2D PDF engine may also report version 1.4. At least these ensure wide compatibility.
Then follows the main data, as a series of objects arranged in a flattened tree structure, starting like 3 0 obj
<< /Filter /FlateDecode /Length 158 >>
[…stream length 158…]
with a binary stream of data, which is here compressed using the Flate method (an improvement on LZW), terminated by endobj
which defines object number 3.
Some objects consist of code or definitions, such as 1 0 obj
<< /Type /Page /Parent 2 0 R /Resources 4 0 R /Contents 3 0 R /MediaBox [0 0 595 842]
>>
endobj
which is a Page dictionary.
Somewhere towards the end of the file, you’re likely to find an object containing metadata, such as details of the PDF engine that built the file: 11 0 obj
<< /Title (Untitled) /Producer (macOS Version 26.1 \(Build 25B78\) Quartz PDFContext)
/Creator (DelightEd) /CreationDate (D:20251126211410Z00'00') /ModDate (D:20251126211410Z00'00')
>>
endobj
Right at the end of the PDF file comes the cross reference, which starts like xref
0 12
0000000000 65535 f
0000000252 00000 n
and ends with a trailer trailer
<< /Size 12 /Root 8 0 R /Info 11 0 R /ID [
] >>
startxref
8785
%%EOF
and that EOF marker ends the PDF file.
Problems
Objects, as elements on the page, can be laid out almost randomly, something that often makes converting laid-out columns of text so infuriating. PDF can just drop in blocks of text and images in whatever order they come, which often doesn’t coincide with the original flow in the text. As a PDF file proceeds one page at a time, multiple columns laid out over several pages can be particularly disastrous to extract as text, or to reconstitute in any other way.
PDF files are extremely verbose, and their contents are now largely unreadable due to the extensive use of binary streams of data, and all their supporting information. A document containing a single character may thus result in a PDF file of 160 lines, making even expansive XML files look concise in comparison. The example file used in yesterday’s article takes 9 KB in storage, for a total of only 11 PDF objects.
When a PDF file is changed by annotation, the contents of each annotation are added to the file as further objects. To save apps from having to rewrite the whole PDF file every time a change is made, changes can be appended to the end of the main file contents. Those can then be incorporated into the body by rewriting the file in ‘flattened’ form.
It’s also important to remember how old the roots of PDF are. The first volume of the Unicode standard 1.0 wasn’t published until 1991, and its introduction into Mac OS was long delayed after that. Consequently, PDF remains based on 8-bit extended ASCII text, with the main characters in a PDF file still being original 7-bit ASCII. Handling characters is generally accomplished by specifying individual characters in a specific font. This is why font substitution in PDF documents so commonly results in incorrect characters being displayed, with characters outside the extended ASCII set being most vulnerable. In worst cases, this mojibake can render entire documents incomprehensible.
textutil, and Textovert its wrapper, convert between nine different formats, most of them in widespread use for documents that are largely based on text. This article explains a little about each of them, and its sequel tomorrow looks at how PDF differs. In each case, I give an example file size for a document containing the words This is a test.
in a total of 15 characters.
Plain text
Conventionally, plain text files in macOS are most usually encoded using Unicode UTF-8, requiring just 15 bytes for the hex bytes
54 68 69 73 20 69 73 20 61 20 74 65 73 74 2e. Of course that contains no font or layout information, just the raw content.
Rich Text (RTF)
This was introduced and its specification developed by Microsoft during the late 1980s and 90s, for cross-platform interchange, primarily between its own products. Support for this in Mac OS X came in Cocoa and its rich text editor TextEdit, inherited from NeXTSTEP. The format contains two main groups of features, styled text with fonts, and simple layout that has been extended to include the embedding of images and other non-text content.
RTF files consist of text, originally ASCII but now with Unicode support. Although not actually a mark-up language, its source code appears similar.
Each RTF file opens with the ‘magic’ characters {\rtf introducing information about conformity of the code. Following that is a preamble that is likely to contain platform-specific information, a font table and colour tables. The latter should include an expanded colour table for macOS. Then follows content, typically setting the font and size, with the paragraph content. For the example file, size is 378 bytes.
RTFD
RTF has several shortcomings, particularly in handling embedded images, so NeXTSTEP extended it to a bundle format, Rich Text Format Directory, RTFD, that transferred to Mac OS X. RTF content of a document is stored in a file named TXT.rtf, alongside separate files containing scalable images that can include PDF, and the whole directory is treated as if it was a single file. Although this works well in macOS, it never caught on in Windows, so hasn’t achieved the popularity it deserved. As the example file doesn’t have any images, its size as RTFD is also 378 bytes.
Microsoft Word
From its inception in 1983 until it switched to docx, Microsoft Word’s native file format has had the extension .doc. This is a binary format that has been successfully reversed for OpenOffice and LibreOffice open source, so incorporated into many products, including Cocoa and macOS.
From 2002, Microsoft Word has used a series of XML-based formats, since 2006 conforming to standards published first by Ecma then ISO/IEC, using the extension .docx, and known as Office Open XML. Support has been incorporated into macOS.
The .doc version of the example file requires 19 KB, while the .docx version takes only 4 KB.
HTML
This has evolved through a series of versions since its release in 1993, and is the markup language that dominates the web. Its structure should be well-known, and consists of an opening document type declaration followed by tagged elements containing metadata and content. Support for writing HTML is built into the Cocoa HTML Writer in macOS. This uses CSS to define styles in the header that are then applied to sections of the content, for example <body>
<p class="p1">This is a test.</p>
</body>
The example requires only 538 bytes of HTML.
webarchive
This format is proprietary to Apple and its Safari browser, and when viewed in a capable text editor such as BBEdit, is shown as consisting of the serialised contents of a displayed web page, in XML format. In fact, as fds corrects me below, “a .webarchive is better described as a collection of web resources serialized via NSKeyedArchiver into binary plist format, bundled together into a single file in yet another property list, also saved in the binary property list format.”
When viewed in an editor such as BBEdit, after its opening XML and document type declaration as a property list, this consists of a dictionary of key-value pairs, themselves including sub-dictionaries of Web Resources. The content of each, its WebResourceData, is encoded in Base-64, making it impossible to read in a text editor. Although these can be large, for the example only 778 bytes of storage is required, showing the efficiency of the binary property list format.
WordML
Between the original .doc and the Ecma .docx formats, Microsoft Word used an intermediate WordProcessingML (or WordML) format in XML. After a standard XML header, this declares
<?mso-application progid=”Word.Document”?>
followed by a list of schemas. Although of largely historical interest now, some old Word documents may remain in this format. The example file requires 1 KB of storage.
ODT
This is OpenDocument Text, another XML-based format that was developed around the same time as WordML, and supported by many free apps and ‘office’ suites. Its opening structure is similar to that of WordML, but references oasis and OpenDocument sources. The example here requires 2 KB of storage.
Pages
One significant omission from the list of text formats supported by textutil is that used by Apple’s own Pages. This proprietary format changed significantly in 2009. Currently, a .pages document is a Zipped bundle containing thumbnail JPEG previews of the document, and two folders of files. Content appears to be saved in Apple iWork Archive files with the .iwa extension, and quite unlike RTFD.
When I was developing my PDF reader Podofyllin, one of my goals was for it to be able to export from PDF to Rich Text Format. I never managed to get that to work, but in the light of your comments about supporting PDF as one of the convertible formats in Textovert, I revisited Podofyllin yesterday with the aim of adding that feature. And to my amazement it seems to work.
Before implementing any PDF conversions in Textovert, I’d be very grateful if you could test and comment on a beta of Podofyllin, which does now export PDF to RTF. If that code does a good enough job, then in the coming couple of weeks I will add PDF as one of the supported formats in Textovert, although that won’t rely so much on textutil as on my own code, and Quartz 2D support in macOS.
Podofyllin version 1.5 beta, build 38, adds a new command to its File menu to Export Rich Text. It also has printing disabled, as that has stopped working in recent versions of macOS, and needs repairs. I have disabled its update checking mechanism, so you won’t be pestered to ‘upgrade’ to version 1.4 when using this beta. Otherwise it retains all the features of version 1.4, and still has that Help book.
From my initial testing here the only significant oddity with the RTFs it writes may be small font sizes. There may be the occasional inappropriate use of a font, such as a line set in Courier in the midst of a paragraph in Helvetica, but those should be straightforward to correct. For small font sizes, I have simply selected all and used the Bigger font command to enlarge them all.
Podofyllin 1.5 beta, build 38, is now available from here: podofyllin15b
but not from anywhere else, for the time being. It requires macOS 11.5 or later.
Making the big presumption that PDF to RTF conversion proves worthwhile, this would make it possible to include PDF as one of the supported formats in Textovert. The snag is that would require the whole of any PDF document to be read into memory, before it could be converted to another format, in contrast to other formats where I suspect that textutil streams the input file during conversion. I don’t think there is any way to do that with PDF, because of its complex data structure.
So, if you think that this beta’s conversion of PDF to plain text and RTF is good enough to be useful, please let me know whether you want it built into Textovert, together with PDF to the other supported formats, or left in Podofyllin.
I wish you all a happy Thanksgiving, and thank you for your friendship, contributions and engagement.
One of the most common reasons for looking in the log is when an error occurs and isn’t reported sufficiently. It’s also probably the most common reason for frustration with the log, when you can’t identify the error you were looking for. This article explains why the log may not be a good place to identify the cause of errors.
Claude conned
Perhaps the best illustration of the difficulties faced by those using the log to investigate errors is in Claude’s attempt to diagnose problems with the Clock app.
First, it came across what it classed as a memory allocation error in the entry 00.968273 error com.apple.runningboard [app[application.com.apple.clock.1152921500311884024.1152921500311884029(501)]:1921] Memorystatus failed with unexpected error: Invalid argument (22)
Then it found and misinterpreted a cryptic entry from the kernel that also referred to memory 10.891949 kernel Clock[19237] triggered unnest of range 0x1e8000000->0x1ea000000 of DYLD shared region in VM map 0x5c946da0d472dbbf. While not abnormal for debuggers, this increases system memory footprint until the target exits.
It continued by misreading perfectly normal sequences of entries made by RunningBoard and FrontBoard, involving jargon such as assertion, as pathological cycles. Like someone who had skimmed quickly through a complex detective novel, Claude then jumped to the wrong conclusions.
Riddled with errors
Perfectly normal logs are full of errors, the great majority being expected or benign, and surprisingly few turn out to be reflected in what actually occurs. To demonstrate this, I took a log extract with a total of 25,159 entries excluding Signposts and found that 820 of them contained the word error in their message. So you can expect around 3% of all log entries to mention errors.
This is reversed when you look for entries classed as Error or Fault, which are usually rare and seldom contain information relevant to a problem you’re investigating. This is because many significant abnormal conditions and events are reported in entries that aren’t classified as Error or Fault, and often don’t include the word error in the message.
Process killed
The real error that Claude didn’t find (possibly because it wasn’t included in the submitted log extract) occurred when a key process, mobiletimerd, exceeded its memory allowance, so was killed. The diagnostic sequence of log entries for that ran: 03.099138 kernel process mobiletimerd [19118] crossed memory high watermark (15 MB); EXC_RESOURCE
03.099148 kernel memorystatus: mobiletimerd [19118] exceeded mem limit: InactiveHard 15 MB (fatal)
03.100180 kernel mobiletimerd[19118] Corpse allowed 1 of 5
03.100567 kernel 54578.846 memorystatus: killing_specific_process pid 19118 [mobiletimerd] (per-process-limit 0 0s rf:- type:daemon) 15360KB - memorystatus_available_pages: 1327431
03.100665 com.apple.opendirectoryd PID: 19118, Client: 'mobiletimerd', exited with 0 session(s), 0 node(s) and 0 active request(s)
03.100679 gui/501/com.apple.mobiletimerd [19118] exited with exit reason (namespace: 1 code: 0x7) - JETSAM_REASON_MEMORY_PERPROCESSLIMIT, ran for 110ms
03.100708 gui/501 [100015] service inactive: com.apple.mobiletimerd
To the knowledgeable human, that reads clearly, but doesn’t include general terms like error, so could well be lost on AI.
Process failed
This example should be more readily accessible in the log, but could be overlooked. This occurred when a Spotlight service tried to extract content from a text file that started with certain characters such as LG, resulting in an indexing failure: 30.946740 mdwrite Decoding error: Error Domain=NSCocoaErrorDomain Code=4864 UserInfo={NSDebugDescription=[private]} for [private]
30.951004 mds Decoding error: Error Domain=NSCocoaErrorDomain Code=4864 UserInfo={NSDebugDescription=[private]} for [private]
Error code 4864 is NSCoderReadCorruptError, implying that the presence of characters at the start of a text file may be triggering a bug in RichText.mdimporter, the importer module shipped in macOS that’s responsible for indexing plain text files.
Process halted
My third and final example comes from an examination of why Safari was failing to load and display a webarchive, and illustrates how macOS privacy and security features can halt a process that would otherwise complete successfully.
For Safari to load the main frame, it needed to obtain PolicyForNavigationAction approval. What happened is: 01.154639 com.apple.WebKit Loading Safari WebKit 0x14c19b818 - [pageProxyID=21, webPageID=22, PID=596] WebPageProxy::decidePolicyForNavigationAction: listener called: frameID=24, isMainFrame=1, navigationID=26, policyAction=0, safeBrowsingWarning=0, isAppBoundDomain=0, wasNavigationIntercepted=0
01.154642 com.apple.WebKit Loading Safari WebKit 0x14c19b818 - [pageProxyID=21, webPageID=22, PID=596] WebPageProxy::receivedNavigationActionPolicyDecision: frameID=24, isMainFrame=1, navigationID=26, policyAction=0
01.154666 com.apple.WebKit Loading Safari WebKit 0x14c19b818 - [pageProxyID=21, webPageID=22, PID=596] WebPageProxy::isQuarantinedAndNotUserApproved: failed to initialize quarantine file with path.
01.154666 com.apple.WebKit Loading Safari WebKit 0x14c19b818 - [pageProxyID=21, webPageID=22, PID=596] WebPageProxy::receivedNavigationActionPolicyDecision: file cannot be opened because it is from an unidentified developer.
01.154799 Error Safari Safari Web view (pid: 596) did fail provisional navigation (Error Domain=NSURLErrorDomain Code=-999 "(null)")
What should have happened instead is that the decision was approval: 00.740168 com.apple.WebKit 0xa4bda0718 - [pageProxyID=19, webPageID=20, PID=1035] WebPageProxy::decidePolicyForNavigationAction: listener called: frameID=4294967298, isMainFrame=1, navigationID=25, policyAction=Use, isAppBoundDomain=0, wasNavigationIntercepted=0
00.740172 com.apple.WebKit 0xa4bda0718 - [pageProxyID=19, webPageID=20, PID=1035] WebPageProxy::receivedNavigationActionPolicyDecision: frameID=4294967298, isMainFrame=1, navigationID=25, policyAction=Use
00.740233 com.apple.WebKit 0xa4bda0718 - [pageProxyID=19, webPageID=20, PID=1035] WebPageProxy::receivedNavigationActionPolicyDecision: Swapping in non-persistent websiteDataStore for web archive.
Although reported in an entry classed as Error for once, its consequences aren’t made clear in subsequent log entries.
Error reporting in macOS
When Apple replaced traditional logs with the Unified log in macOS Sierra, it made it clear that the new log wasn’t intended for advanced users or system administrators, but primarily for engineers. However, no provision was made for significant errors to be reported in any more accessible form. None of my three examples were reported directly to the user, who was left unaware of what had happened, and why.
This failure to report errors to users has only led to more bugs being ill-defined and unreported, and has done Mac users a great disservice by eroding confidence.
Strategy
Identifying the cause of an error using the log has similarities with solving a ‘whodunnit’ detective novel. There’s usually no shortage of suspects and clues, although many of those may prove misleading. Tracing a suspect’s whereabouts can often prove decisive in determining whether they were in the right place at the right time, and sometimes establishing how the crime happened is essential to its solution.
One big difference from detective fiction is being able to establish what is normal, and drawing comparison between a normal record of what should happen for comparison against an abnormal extract can be valuable.
Suggestions:
Obtain a complete log record, without the use of predicates, saved either as a logarchive or a LogUI JSON file. Although you’ll find it easier to work with filtered versions, only a complete record has all the entries you might need.
When possible, compare a ‘normal’ sequence of events with the abnormal record.
Identify and trace subsystems and processes specific to the malfunctioning component(s).
Identify and trace subsystems and processes with controlling roles, including LaunchServices, RunningBoard, TCC and security.
Process IDs can be invaluable when tracing.
Turn detective.
AI future
The Unified log might appear an ideal opportunity for AI approaches, but the reality is that we’re still a long way from achieving reliable interpretation by AI.
One severe limitation that’s often overlooked is that current techniques don’t fare well at the scale required. Analysing even a modest log extract involves well over 250,000 tokens, comparable to assessments made by NovelQA. Whereas human performance with those models exceeds 90%, few AI systems can attain more than 70%, and in some cases fail to reach even 50%.
Maybe one day, but for the moment at least humans are likely to remain best at using the log to identify the cause of errors.
Yesterday I sang the praises of the little-known command tool textutil for converting text content between nine different formats. As I promised, today I offer a small wrapper app to make those conversions more convenient: Textovert.
textutil provides three features: general document information, text format conversion, and document concatenation. The first of those is probably best left to editors, and the last requires a document layout editor, so I chickened out of those for the time being. Textovert version 1.0 runs commands of the form textutil -convert format filename1 -output filename2
where format is the format of the output file, filename1 is the input, and filename2 the output file.
You select the output format from the nine options in the window’s dropdown menu, before dropping any files onto that window. If you want to perform multiple conversions at the same time, you can open two or more windows and set each to its own output format.
Then drag and drop files to be converted onto the window. This version of Textovert only accepts files (and document bundles like RTFD), not folders, as they present several problems I’d rather not go into just yet. Textovert will then work through all the files one at a time and prompt you to select a filename and location for the converted file to be saved. For those converting just one or a handful of files at a time, this gives you fine control.
For those who have just dropped a batch of dozens of files onto the window, Textovert’s default behaviour is to save the converted files in the same location as the originals, with the same filename but the new extension. Thus, converting ~/Documents/Project/Meeting.doc to RTF will default to saving that converted file as ~/Documents/Project/Meeting.rtf. If you’re happy with that, you can click your way through saving each document without checking further.
As each converted file is saved, Textovert writes a simple one-line report to its window, giving the original filename, to mark success, and the converted file’s extension. You can select and copy those from its window if you want to keep a record.
That screenshot was taken during testing, and shows two unsuccessful conversions, marked with a red exclamation mark. Hopefully you won’t encounter any of those.
You should be able to convert pretty well any file, although how much text will be recovered depends on textutil‘s skills, not mine. The app comes with its own short Help book, accessible through the Help menu, and provided separately as well. It requires a minimum of Sonoma 14.6 to support its SwiftUI interface.
I hope that you enjoyed Saturday’s Mac Riddles, episode 335. Here are my solutions to them.
1: Xeon and the first T2 made this the most costly of its line.
Click for a solution
iMac Pro
Xeon (it has an Intel Xeon W processor) and the first T2 (it was the first model to include the T2 chip) made this the most costly of its line (it remains the most expensive iMac).
2: The first laptop with Intel, M1 and M5, it has never quite reached 18 inches.
Click for a solution
MacBook Pro
The first laptop with Intel (Core Duo, 2006), M1 (2020, alongside MacBook Air) and M5 (2025), it has never quite reached 18 inches (the largest has been 17 inches).
3: Last incision went from KeyGrip to Women of Wrestling.
Click for a solution
Final Cut Pro
Last (final) incision (cut) went from KeyGrip (its original name, before it was bought by Apple from Macromedia) to Women of Wrestling (the first full broadcast quality widely distributed TV show produced using FCP, in 2000).
QuickLook makes it easy to preview most files, and TextEdit will display the text content of many formats. There are times, though, when it’s more convenient to extract the text content and save it in a different format, for example turning a Safari Web Archive or Word document into Rich Text. Thankfully, there’s a tool to do that in Terminal, textutil.
textutil is one of the older command tools, and was introduced in Mac OS X 10.4 Tiger twenty years ago. Despite that, it remains one of the most underused in modern macOS. It works by tapping into the macOS text system, using any of the following nine formats:
plain text (txt)
HTML (html)
Rich Text, RTF (rtf)
RTFD (rtfd)
Microsoft Word .doc and .docx (doc, docx)
Wordprocessing Markup Language, WordML (wordml)
OpenDocument Text, ODT (odt)
Safari Web Archive, webarchive (webarchive).
The name given in parentheses is that used in these commands.
The quality of format conversions is high, essentially the same as you’ll see in Apple’s apps. For example, here’s an original Word .doc file:
and here is a conversion to RTF using textutil:
If the original file contains embedded images or other non-textual content, though, those aren’t included in the output.
Display information
This is the simplest option, used as textutil -info filename
where filename is the path and file name.
This displays basic information about the file, including its word count, and any metadata.
Format conversion
This extracts the text content of a file in one of its supported formats, and writes that out in a different format, as in textutil -convert rtf filename
where filename is the path and file name. The output file will then have its extension replaced appropriately, for example textutil -convert rtf myfile.html
will create the file myfile.rtf containing a Rich Text representation of the HTML file myfile.html. If you want to create a different output file, use a command like textutil -convert rtf filename -output filename2.rtf
Only text content is written to the output file.
Joining files
textutil‘s other main feature is joining text-based files together to form a single file consisting of the input files concatenated together, as in textutil -cat rtf -output filename.rtf -- file1.rtf file2.rtf file3.rtf
concatenates the three files file1.rtf file2.rtf file3.rtf into the single file filename.rtf in Rich Text format. You can also include implicit conversions such as textutil -cat rtf -output filename.rtf -- file1.html file2.rtf file3.html
where the first and last parts of the single output file filename.rtf are converted to RTF before concatenation. Note the -- before the list of input files consists of two hyphen characters, not a dash.
Further options
Advanced options detailed in man textutil and textutil -help include:
change text encoding from the default of Unicode UTF-8,
change font and size,
exclude HTML elements,
specify metadata.
In macOS Tahoe you may also encounter warnings relating to font availability and substitution.
It’s both a joy and a curse that so many tell me of bugs they encounter. The joy is that it enables me to investigate and report them here, but the curse is when I can’t reproduce the problem. This week’s curse has been Safari’s webarchives, a topic that I had wisely avoided for several years. Search this blog using the tool at the top right of any page and you’ll see just four articles here that mention webarchives, and this is now the second in the last ten days.
While I’m writing about searching this blog, I should point out that tool doesn’t take you out to Google or any general search engine, but confines its scope to articles published here. Although precious few seem to use it, I find it invaluable when preparing articles, and strongly recommend it.
Not only had I avoided tackling this topic, but I see from my own local search that I have seldom used webarchives myself, although not as a result of any unreliability.
In principle, Safari’s webarchives should rarely cause a problem. They’re written by converting what Safari already holds in memory for a webpage into an XML property list, a process termed serialisation, and used effectively by a great many apps in more challenging circumstances. There may be occasions when this doesn’t quite work right, and it does require Safari to retain backward compatibility to ensure it can load and display property lists written some years ago. But by and large it should prove robust.
In practice, there are quite a few who appear unable to get this to work with many versions of Safari, yet I can’t repeat that here. For one reader, the most recent version of Safari that can reliably open their webarchives is 18.6, which is the only version I have experienced problems with. Running in macOS Ventura 13.7.8 here, that version appears unable to open the webarchives it creates, or those from later versions of Safari. Meanwhile Safari 26.1 running in macOS 26.1 has no trouble opening any webarchive I’ve tried from 2009 onwards.
For the last three years, Safari and its supporting libraries including WebKit have been provided to macOS in a cryptex, where they can’t be modified. The only way the user can go beyond Safari’s settings to change its behaviour is using Safari Extensions, which are controlled by Apple. There doesn’t appear to be any way for the user to prevent WebKit and Safari from loading webarchives correctly, intentionally or inadvertently.
Cursed by my inability to reproduce the problems reported, I have immersed myself in a couple of lengthy log extracts. One documents Safari 18.6 failing to open a webarchive it created, the other shows Safari 26.1 successfully opening the same webarchive.
Safari 18.6 seems to have been making good progress opening the webarchive until it came to loading the main frame. It then needed PolicyForNavigationAction before it could go any further: 01.154639 com.apple.WebKit Loading Safari WebKit 0x14c19b818 - [pageProxyID=21, webPageID=22, PID=596] WebPageProxy::decidePolicyForNavigationAction: listener called: frameID=24, isMainFrame=1, navigationID=26, policyAction=0, safeBrowsingWarning=0, isAppBoundDomain=0, wasNavigationIntercepted=0
01.154642 com.apple.WebKit Loading Safari WebKit 0x14c19b818 - [pageProxyID=21, webPageID=22, PID=596] WebPageProxy::receivedNavigationActionPolicyDecision: frameID=24, isMainFrame=1, navigationID=26, policyAction=0
01.154666 com.apple.WebKit Loading Safari WebKit 0x14c19b818 - [pageProxyID=21, webPageID=22, PID=596] WebPageProxy::isQuarantinedAndNotUserApproved: failed to initialize quarantine file with path.
01.154666 com.apple.WebKit Loading Safari WebKit 0x14c19b818 - [pageProxyID=21, webPageID=22, PID=596] WebPageProxy::receivedNavigationActionPolicyDecision: file cannot be opened because it is from an unidentified developer.
01.154799 Error Safari Safari Web view (pid: 596) did fail provisional navigation (Error Domain=NSURLErrorDomain Code=-999 "(null)")
So loading the main frame was halted with those chilling words “file cannot be opened because it is from an unidentified developer”, with which we’re only too familiar. The webarchive was in quarantine, it seems, and that put a stop to its loading. Only that isn’t quite accurate: there was no com.apple.quarantine xattr present, but one of those ubiquitous com.apple.macl xattrs instead. Safari had been stopped by its own security, didn’t even have the courtesy to inform us, and just sat there with an empty window going nowhere.
Safari 26.1 shows how it should have been done: 00.740168 com.apple.WebKit 0xa4bda0718 - [pageProxyID=19, webPageID=20, PID=1035] WebPageProxy::decidePolicyForNavigationAction: listener called: frameID=4294967298, isMainFrame=1, navigationID=25, policyAction=Use, isAppBoundDomain=0, wasNavigationIntercepted=0
00.740172 com.apple.WebKit 0xa4bda0718 - [pageProxyID=19, webPageID=20, PID=1035] WebPageProxy::receivedNavigationActionPolicyDecision: frameID=4294967298, isMainFrame=1, navigationID=25, policyAction=Use
00.740233 com.apple.WebKit 0xa4bda0718 - [pageProxyID=19, webPageID=20, PID=1035] WebPageProxy::receivedNavigationActionPolicyDecision: Swapping in non-persistent websiteDataStore for web archive.
From then, WebKit moves apace and the archived webpage is soon displayed.
This doesn’t of course mean that Safari’s failures to open and display webarchives successfully are all the result of NavigationActionPolicyDecisions that the webarchive can’t be opened because of this security problem, but I suspect this isn’t the only time this has occurred. The vagaries of com.apple.macl xattrs are well known, and their propensity to cause other innocent actions to be blocked is only too familiar. Unfortunately, the only reliable workaround is to knock a hole through macOS security by disabling SIP. But for this to happen without any information being displayed to the user is unforgivable.
Other apps that access Safari’s webarchives don’t appear tainted by this behaviour. Michael Tsai of C-Command Software tells me that his EagleFiler app hasn’t had such problems since its introduction in 2006. If you’ve been struggling to open webarchives in Safari, you might like to consider whether that could address those problems. In the meantime, I can see what I’ll be doing over Christmas.
I’m very grateful to Michael Tsai of C-Command Software for information and discussion.
Files, documents and everything else we store on our Macs consist of data. For an image, those are the pixels that have to be displayed for that image, for an illustrated book it’s the laid-out pages of text and pictures.
Associated with each of those is additional information about what’s in the data, such as the datestamp of its creation both as data and as that file, details of its creator, and about how it was created, such as the camera used. Those are data about its data, thus metadata.
Until 1984 and the first Mac, it was almost universal that most metadata was contained in the same file as the data, although some, such as a file’s datestamps, were stored separately in that file’s record in the file system, in its attributes. The Mac tried to change that by introducing a second fork to files, their resource fork, intended to contain metadata. Unfortunately, while that became standard on Macs, dominant operating systems like MS-DOS didn’t change, and continued to embed data and metadata together in flat files.
A lot has changed over the nearly 42 years since the first Mac, and now macOS has multiple sources of metadata for its files.
File attributes
APFS file records contain an extensive set of attributes, including
time of creation
time of modification of data
time of attribute modification
time of access
file name
owner, group and permissions.
These are largely common to other modern file systems.
Extended attributes
Mac OS X brought the extension of classic resource forks to other metadata objects, as extended attributes (xattr), named using a reverse-URL scheme, such as com.apple.FinderInfo containing metadata for the Finder. In this scheme, the traditional resource fork becomes a xattr of type com.apple.ResourceFork. Many of these are now used by macOS for security and privacy protection, but the user can add xattrs containing copyright information, names of creators, an arbitrary description, a text headline, and others. Anyone can define their own type of xattr, and some apps make good use of them for storing metadata.
Their main disadvantages are:
Xattrs rarely transfer to other platforms, making most Mac-only.
They’re commonly stripped when transferred even between Macs, or when shared in iCloud Drive. Apple has a system of tags to determine which xattrs should be stripped and which retained, but those aren’t as widely used as they deserve.
Most xattrs aren’t shown by the Finder, either in Preview panes or in Get Info dialogs.
For largely historical reasons, even Apple doesn’t take fullest advantage of xattrs. For example, Finder Comments, which are shown in Get Info, are primarily stored in a folder’s hidden .DS_Store file and only secondarily in a com.apple.metadata:kMDItemFinderComment xattr.
Embedded metadata
Because so few file systems use extended attributes or their equivalents, most file-specific metadata is now embedded in file data. For some file formats, such as those widely used by word processors and spreadsheets, this is relatively straightforward, particularly when using XML-based formats.
It becomes more complicated and less reliable when used with images, as in Exchangeable Image File Format, EXIF. Although usually treated as a metadata standard, in fact EXIF encompasses both data and metadata formats embedded in a single file for convenience.
EXIF metadata can include camera settings such as aperture and shutter speed, image metrics such as colourspace, date and time of creation, location and copyright information, and a thumbnail version of the image (which is arguably data rather than metadata). How the metadata is embedded with data is determined by the format of the image data. For JPEG data, EXIF metadata is stored in an Application Segment of the image, but for TIFF data there’s a sub-image file directory that can spread the metadata anywhere within the data.
The danger is that apps that edit data can inadvertently damage or remove the EXIF metadata, and that’s all too common among image editors that may need to rewrite the whole of the data when saving an edited image. Fortunately macOS relies on its own QuickLook thumbnails rather than embedded EXIF thumbnails, as some image editors don’t update the latter reliably.
There are more subtle disadvantages to embedding metadata with data. In Apple’s preferred model, there are separate datestamps in file attributes for saved changes to data and extended attributes, allowing them to be distinguished.
Summary
In macOS, metadata can be stored
in the file system as attributes,
as extended attributes,
embedded with the file data.
It’s hardly surprising how often it goes missing, or is overlooked.
Earlier this week, when I considered how best to save websites using Safari, I pointed out that the PDFs it saves aren’t intended to be in archival format, using one of the PDF/A standards. As some of you pointed out, Preview has an option to export PDFs in “PDF/A” format. This article examines whether those are suitable for archiving.
PDF/A
PDF is a generic document type and includes a multiplicity of different standards. Standard PDF generated by the Quartz 2D engine should comply with PDF version 1.4, from 2001, although the first open ISO standard of 2008 was based on version 1.7, and the current ISO standard is version 2.0. There are also five specialised subsets of PDF, among them PDF/A intended for archival purposes, each with their own families of ISO standards.
PDF/A was originally based on PDF version 1.4, but more recently has adopted 1.7. Its standards impose additional restrictions on core features, such as requiring all fonts to be embedded, and forbidding the use of encryption and LZW compression. Its standards are based on three levels of conformance: basic (B), accessible (A), and full Unicode text (U). The two standards and levels in most common use are PDF/A-2A (accessible) and PDF/A-2B (basic). A more detailed account is given in Wikipedia’s article.
Although Preview claims to export PDF documents in PDF/A format, I’ve been unable to discover which standard or level those are intended to comply with. However, each of the test documents is reported by Adobe Acrobat CC (Pro) as claiming compliance with PDF/A-2B in ISO 19005-2.
Conformance
Three test PDF documents were used, two saved from Safari 26.1 (macOS 26.1) as detailed previously, and the Help book for LogUI, written by Nisus Writer Pro. All three were opened in Preview 11.0 (1113.2.5) and Exported As PDF/A, with just the Create PDF/A option ticked in the File Save dialog.
All three exported PDFs were then opened in Adobe Acrobat ‘Pro’ version 2025.001.20841. That reported that each claimed “compliance with the PDF/A standard”, so opened them read-only to ensure they couldn’t be modified. When each was verified against PDF/A-2B, that failed.
Details of the compliance failures were then obtained using Acrobat’s Preflight feature. In each there were multiple errors, such as those shown below.
To assess what changes were required to make the LogUI help book compliant with the standard, Acrobat then performed the conversion. Corrections it made are shown below.
Although those were quick and simple, without them the file exported from Preview wasn’t considered by Acrobat to comply with the standard.
When do you need to use PDF/A?
Although I’m confident that PDF documents created using the engine in Quartz 2D in macOS Tahoe will remain fully accessible for at least the next 20 years or more, looking 50 or 100 years ahead the use of a major open standard intended and widely used for archives becomes more important. Whether the imperfect PDF/A exported by Preview would make any difference to that is unclear.
If you intend any PDF documents created on Macs to be true archives that should stand the test of long times, then you should convert them into PDF/A-2B or another appropriate standard before committing them to archival storage. Otherwise, it’s moot whether Preview’s conversion is a good investment of your time.
Summary
According to Adobe Acrobat, the ‘PDF/A’ format exported by Preview doesn’t comply with its claimed standard of PDF/A-2B. Thus the answer to the question posed by the title is no, not quite.
If a PDF is intended to be accessible for decades into the future, it should be converted to a recognised PDF/A standard such as PDF/A-2B using Adobe Acrobat or an equivalent.
Other PDFs may as well be left in their original format, which should ensure their accessibility for at least the next 20 years or more.
Spotlight local search problems are common, and are all too often tackled blindly by forcing a volume’s indexes to be rebuilt. Although that can sometimes resolve the problem, without knowing its cause, it can just waste time and effort. In some cases rebuilding the indexes can worsen the problem, at least temporarily. This article explains how to use SpotTest and other tools to perform systematic testing and arrive at a diagnosis before hazarding a guess at its treatment.
1. Setting up
Before going any further, check that Spotlight settings are in order, and don’t exclude the volume or folder you’re trying to search, or the document type you’re looking for. In Spotlight settings,
check all Results from System are turned on, particularly Files and Folders,
click on Search Privacy… and remove any locations you want to include in search.
Then open Activity Monitor and watch its CPU % listing to verify that Spotlight isn’t currently in the process of reindexing or performing other maintenance to its indexes. If it is, delay testing until those have completed. Searching using Spotlight while it’s actively working on its indexes will give odd results, or none at all.
If you’re going to use SpotTest on any location with privacy control, such as your Home Documents folder or an external disk, add the app to the Full Disk Access list in Privacy & Security settings, before opening it.
2. Home folder test
Even if your interest is in a different volume, perform a basic test of a new test folder in your current Home folder, to establish a baseline and confirm that Spotlight is working there.
Open SpotTest and set it to defaults, with a Term of cattle, a Scope of [Home], and both Search Keywords and Search EXIF ticked.
Click the Create Tests tool (the leftmost of the tools) to create the folder of test files at the top level of your Home folder. Make a note of the time to the second that you do this.
About 10 seconds after that, click either the Run NSMetadata test or Run mdfind test tool. You should then see a list of files found, including those in the test folder ~/0_SpotTestFiles, including A, B, C, D, E, F, G, K, L, M.
If you don’t see those listed, open Mints and use the Log Window button in its Spotlight section to obtain a log extract from the time the test files were created, or use LogUI to do the same. You’ll then need to look at that log extract to see if there are clues as to why indexing didn’t take place in that period.
Leave the test folder where it is, and anything from 1 hour to 5 days later, repeat the search using either or both of those tools. Once additional indexing has been undertaken:
NSMetadata should now find A, B, C, D, E, F, G, I, K, L, M but not H
mdfind should now find A, B, C, D, E, F, G, H, I, K, L, M.
I is found using Live Text, and H by Visual Look Up, the latter only being found by the mdfind search.
These tests have demonstrated:
mdworker and mds indexing of files supported by system mdimporters;
delayed background mediaanalysisd image analysis and mds indexing of Live Text and Visual Look Up content.
To match test files with their importers, click the Check importers tool. Note that file L doesn’t use a plugin, and N uses a plugin but can’t be found because the search term is inside an image in the PDF document, which currently isn’t recoverable content.
3. Metadata indexing
If that test isn’t fully successful, or you’re uncertain whether indexing is complete, inspect the metadata of the test files. Open a Finder window on the contents of ~/0_SpotTestFiles, set it to Column View, and widen the window to provide a suitable Preview pane within it. Select each of three files in turn and confirm their metadata are shown correctly. To inspect all available metadata, click on any Show More text.
SpotTestC.pdf will have different datestamps, but the seven fields of metadata below those should be identical to those shown above.
SpotTestK.jpg will also have different datestamps, but the five fields below should be identical to those above.
SpotTestM.txt should include a final line of Keywords one, cattle, three.
You can also check all indexed metadata for those files in Terminal using the commands mdls ~/0_SpotTestFiles/SpotTestC.pdf
mdls ~/0_SpotTestFiles/SpotTestK.jpg
mdls ~/0_SpotTestFiles/SpotTestM.txt
Missing metadata on those three files demonstrates that the test folder hasn’t been indexed correctly. You can try restarting your Mac, leaving it a few minutes to update its Spotlight indexes, then repeating the tests using SpotTest.
4. Custom mdimporter
Many apps come with their own custom mdimporter that provides Spotlight indexing support for document types not supported by macOS. In the past, these were normally installed in /Library/Spotlight, but more recent apps typically keep them inside the app bundle in Library/Spotlight. These can be tested easily.
Create and save one of those custom document types, so that it contains the word cattle in a way that should be searchable by Spotlight. Copy that document to the ~/0_SpotTestFiles folder, wait about 10 seconds, then repeat the test search. You may well notice that NSMetadata search doesn’t find your custom test document, but mdfind does, because of the difference in the search criteria they use.
You should also click the Check importers tool to check that the correct mdimporter was recognised and used for the custom document type.
5. Volume test
If Spotlight works correctly with the test folder in your Home folder, you may wish to progress to testing a different volume or location. Having created its test folder in ~/0_SpotTestFiles, copy that to the other location. Before you change the Scope of the search, click on the button to list available volumes, then select the volume containing the copied test folder in the Scope menu.
When you perform the two types of search on that volume, the same rules should apply as to which will be found. Note though that finding files I and H can take much longer, or they may not appear at all.
6. Search term test
When you’re confident that a search term of cattle can be found reliably, you may wish to extend your testing to other terms. Take care when choosing custom terms, as you want to be confident that they should be found, but not in such numbers that the results are overwhelming. You will also need to create your own test files containing the custom term.
Diagnosis
SpotTest can thus provide key information on:
Delay or absence of find following creation of test files. If no indexing activity is seen in the log, that indicates indexing failure. If the test files are indexed promptly, it indicates search failure.
Delay or absence in finding files H and I, indicating an indexing failure.
Failure of a custom mdimporter to index a custom document type.
Failure to index another volume.
Those should fit in with the overall scheme used by Spotlight, as shown below.
The Finder can display more information about files than their size and datestamps, and for some types of file can extend to a lot of useful metadata. These are shown in the Preview pane containing the file’s QuickLook thumbnail, in the Get Info dialog, and some can be added to the columns shown in List View. This article explains where those come from, and how you can customise what the Finder displays.
Metadata collection
Within a second or two of a new file being created, or an existing file being saved, Spotlight’s indexing services analyse that file and extract both metadata and, where possible, content to be added to that volume’s indexes. Metadata that is common to most or all files, including datestamps, and the contents of any extended attributes, that might include titles and keywords, is indexed separately from that extracted from a file’s contents.
In between those are metadata embedded in file data. They’re specific to certain types of file, for example EXIF metadata that is commonly included in images, so are extracted by the specialist mdimporter for that file type, then incorporated into the indexes on that volume.
Finder display
When you select an item in a Finder window showing the Preview pane (typically in Column View), two chains of processes are started. One calls on QuickLook to return the thumbnail to be displayed in the upper section of the Preview pane, the other starts a metadata query at a high Quality of Service (25, userInitiated), which is passed to SpotlightServer, and access to that data is checked by TCC. Once approved, the metadata is returned from Spotlight to the Finder to populate the Information section below the thumbnail.
Information displayed in the Preview pane depends on that available in the indexes, the type of file, whether the list is set to show more or less, and the Finder’s settings in its Show Preview Options command in the View menu. That displayed in a Get Info dialog undergoes similar processing, to populate its More Info section in particular, although those don’t appear to come with any options.
Preview Options
To a degree, the user determines which fields are displayed in the Information shown in the Preview pane, although Apple doesn’t mention the key setting involved. Select the file, ensure the blue text to the right of Information is set to Show Less, then open its Preview Options using the Finder’s View menu.
Here are my current Preview Options for all Image files, which only include a single item from EXIF metadata, the Content Creator (which is duplicated in the list of options). While that window is open, those are the only items shown in the Preview pane.
When that Preview Options window is closed, the Finder immediately reverts to its comprehensive list, including many of those in the EXIF metadata, until you click on Show Less.
It’s only when the Preview pane is showing less information that your Preview Options are applied, and they’re now used the same for all types of Image.
These are the extensive Preview Options for this CorelDRAW document with a cdr extension, although here they’re claimed to be for a file archive because of a clash in extensions. This list is derived from the mdimporter provided, and correct for CorelDRAW files. Unfortunately, this window is too tall to be accommodated on the display, and doesn’t scroll.
When set to show more information, all non-empty fields appear in the list.
With less information showing, the list conforms to that set in its Preview Options.
To confirm the list of metadata, we can usually inspect what Spotlight should have indexed from that file.
Discovering metadata
In Terminal there are two ways to list the metadata for a file. The first is to interrogate Spotlight with the command mdls filename
which should list all attributes with their values, except indexed content such as text tokens.
The other method using mdimport does something subtly different. Enter the command mdimport -t -d2 filename
for a file with the path and name filename, and you’ll either see a long list of all its Spotlight metadata, or the command will crash. Although it’s easy to mistake this for the metadata stored in Spotlight’s indexes, it’s actually what should be stored there when that file is processed by the mdimporter named in the output. Its occasional crashes are a mystery, though, as it used to be reliable up to and including macOS Sonoma.
If there are metadata missing from mdls and mdimport‘s output and not shown in the Preview Pane when listing more information, you can only presume that they’re missing from Spotlight’s indexes, so won’t be discoverable in a Spotlight search.
Conclusions
The Finder populates the information in its Preview pane from the file’s metadata in that volume’s Spotlight indexes.
When showing more information, the list should include all non-empty metadata appropriate to that type of file.
The Finder’s View Options customise what’s shown for all files of that type when there’s less information being shown.
Use mdls to check those against metadata stored in Spotlight’s indexes, and mdimport is also helpful, if it doesn’t crash.
If metadata are missing from the Preview pane, mdls and mdimport, they’re likely to be missing from Spotlight’s indexes as well, and are unlikely to be discovered by Spotlight search.
Support in macOS for file systems has continued to change over the last couple of years. This article summarises support available for local file systems, in attached rather than network or cloud storage, in macOS 26.1 Tahoe.
APFS
This is the default file system for Macs and Apple’s devices, although macOS has standardised on its case-insensitive variant for general use, while iOS and other OSes use case-sensitive. The one common exception is with Time Machine backup storage, which requires case-sensitivity. The only situation in which HFS+ is still expected is for bootable macOS installers.
The most significant feature of HFS+ that is missing in APFS is directory hard links, a key feature of Time Machine backups made to HFS+ storage.
Multiple APFS volumes can share the same APFS partition (container), in contrast to other file systems supported by macOS, in which each partition is also a volume.
As universal as APFS is on modern Macs, it’s very rarely available on other computer systems, and the only support for other platforms is from Paragon for Windows or for Linux.
HFS+
The Macintosh Extended file system HFS+ is the predecessor to APFS and is still fully supported in macOS. It comes from an era of hard disks rather than SSDs and may still be preferred for use on hard disks. Early versions were prone to cumulative errors, particularly when crashes or kernel panics occurred. Those risks were mitigated with the introduction of journalling, and HFS+ should only be used with journalling enabled. Currently supported versions of macOS no longer support its HFS predecessor, though, as that was dropped in 2019.
The only remaining situation in which HFS+ is still required is for bootable macOS installers, as detailed here.
HFS+ lacks many of the modern features of APFS, including snapshots, sparse files, clone files, and firmlinks used to join System and Data volumes. Because support for encryption was implemented late, in Core Storage logical volume management, recent macOS doesn’t support encrypted HFS+. However, like APFS, HFS+ is capable of supporting Trim on SSDs. Each HFS+ volume is a partition, thus has fixed size, in contrast to APFS partitions (containers) which can contain multiple volumes.
ExFAT, FAT32
These are two of a family of file systems introduced for MS-DOS and Windows. Although the older FAT formats are now antiquated, ExFAT remains the most commonly encountered format for USB flash drives (thumb drives, memory sticks) and SD cards, where it’s the default format for SDXC and SDUC cards larger than 32 GB. Unlike FAT32, ExFAT supports massive volumes and file sizes, and was optimised for use in flash memory. However, its implementation in macOS doesn’t support Trim.
These formats have relatively basic features, and lack encryption. Used from a Mac, they don’t have support for document versions, and may encounter indexing problems with Spotlight. They do, though, support extended attributes by using AppleDouble file format, in which those are saved in shadow files with names starting with ._ (dot – underscore). While those shadow files preserve extended attributes for use with macOS, they can confuse Windows users, for whom they can be deleted, for example using Ross Tulloch’s BlueHarvest.
In recent versions of macOS, these file systems are implemented in user-space using FSKit.
NTFS
Although you won’t find any mention of it in Disk Utility, macOS includes read-only support for NTFS, enabling the one-way transfer of files from Windows. There are third-party products to extend that with write support, including an implementation from Paragon. NTFS is significant for its support of extended attributes as Alternate Data Streams (ADS).
Available formats
Disk Utility version 22.7 in macOS 26.1 Tahoe can format the following file systems using a GUID Partition Map:
APFS, unencrypted case-insensitive
APFS, encrypted case-insensitive
APFS, unencrypted case-sensitive
APFS, encrypted case-sensitive
HFS+ journalled case-insensitive (JHFS+)
HFS+ journalled case-sensitive
ExFAT
MS-DOS (FAT32).
The command tool diskutil additionally offers FAT, FAT12, FAT16, and HFS+ without journalling.
ZFS
The only other major file system that can be supported by Macs is ZFS, available as OpenZFS on OS X. That isn’t a trivial undertaking, and is dependent on a kernel extension.
Linux file systems
There doesn’t appear to be native support for Btrfs, which is best accessed through Linux virtualisation when needed. While you can use a VM for ext4 and its predecessors, Paragon also offers support for them that is claimed to be compatible with macOS Tahoe.
MacFUSE
Traditionally, native file systems are implemented in kernel-space, requiring a kernel extension for macOS. This remains the case for those used by the operating system and for performance-critical tasks. In other cases, it’s possible to implement a file system in user-space without the need for a kernel extension. This has been the goal of the FUSE project, and with the introduction of FSKit support for user-space file systems in macOS, the MacFUSE implementation now runs without any kext. It’s hoped that will open up access to more file systems in the future.
I’m very grateful to Robert for pointing out Paragon’s support for Linux Ext file systems.


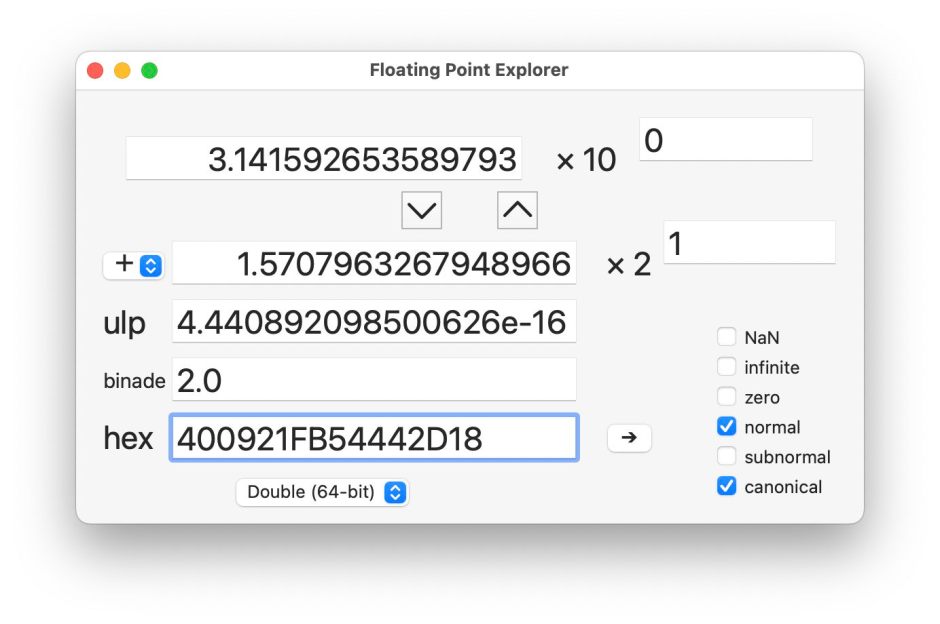


 to mark success, and the converted file’s extension. You can select and copy those from its window if you want to keep a record.


 tool at the top right of any page and you’ll see just four articles here that mention webarchives, and this is now the second in the last ten days.


 button to list available volumes, then select the volume containing the copied test folder in the Scope menu.


