President Trump’s speech in Pennsylvania was meant to alleviate concerns about affordability. But he kept wandering off script and dwelling on his favorite targets, like immigration.
He was both the first Black person and the first educator to hold the cabinet position, but resigned amid discord over George W. Bush’s No Child Left Behind.
President Trump vacillated between demonizing immigrants and assuring a crowd of his supporters that life was better than ever under his administration.
Officials initially weighed sending survivors of U.S. attacks on boats suspected of drug smuggling to a notorious prison in El Salvador, to keep them away from American courts.
Defense Secretary Pete Hegseth briefed congressional leaders on Tuesday about the monthslong military campaign targeting people suspected of being drug traffickers at sea.
Mr. Miller, one of President Trump’s top advisers, sold shares in the mining company MP Materials following a lucrative deal between the company and the government.
Stephen Miller, one of the president’s top advisers, sold shares of a mining company after it had begun negotiations with the government, raising concerns among ethics experts.
The two countries, which criminalize homosexuality and impose severe punishments for it, were picked to play on a day celebrating L.G.B.T.Q. communities.
The birds lingered for days at a Catholic school near Cincinnati as agencies haggled over who was responsible for removing them. Officials said the public health risk was low.
Brigitte Macron used a slur to criticize protesters who had interrupted a show by a French comedian accused of rape in 2021, in a case that was dismissed.
Brigitte Macron, wife of President Emmanuel Macron of France, jokingly vowed to protect the comedian from the protesters, and used a slur, a video showed.
The Kremlin says any peace deal must cede to Russia the entire eastern Donbas region, including territory Ukraine still controls — a nonstarter for Kyiv.
Born into an aristocratic British family, he turned his empathy and knowledge of the world’s largest land mammals to the cause of saving them from poachers.
The president seemed poised for a big Supreme Court win letting him remove officials without cause. But the justices appeared to struggle with how to insulate the Federal Reserve from politics.
President Trump has mused about trying to fire Jerome H. Powell, the Fed chair, but he has not followed through. Indeed, no president has sought to remove a member of the Fed board without cause.
Centuries of experience with painting using oil paints have proved the importance of a robust support and a ground that isolates the paint layer from its support. Older use of wood panels with a gesso ground consisting largely of gypsum or chalk ensured the paint layer wouldn’t be subjected to mechanical stress, and would remain isolated from the underlying wood. Canvases became popular because of their relative lightness particularly in larger sizes, but still require an isolating ground layer both to protect the canvas from damage by the paint, and to prevent discolouration of the paint.
When sketching in oils in front of the motif became increasingly popular in the late eighteenth century, those paintings weren’t intended for public view, but as an aid for the artist when composing finished paintings in the studio. Rather than gather hundreds of small oil sketched on canvas or panels, the first plein air painters usually used paper or cardboard as support and ground. Subsequently, when their studios were sold off following their death, surviving oil sketches were usually laid on canvas for preservation and display.
Although he probably wasn’t the first to compile a library of oil sketches, those gathered by Pierre-Henri de Valenciennes when he was painting in the Roman Campagna in the 1780s are among the most brilliant. This untitled view of the countryside near Rome is thought to have been painted in about 1783.
Thomas Jones (1742-1803), A Wall in Naples (c 1782), oil on paper laid on canvas, 11.4 x 16 cm, National Gallery, London. Wikimedia Commons.
At about the same time, the Welsh painter Thomas Jones was doing the same thing in and around Naples as well. This tiny view of A Wall in Naples was painted in about 1782, and is now one of the gems in London’s National Gallery. Below is a detail.
Thomas Jones (1742-1803), A Wall in Naples (detail) (c 1782), oil on paper laid on canvas, 11.4 x 16 cm, National Gallery, London. Wikimedia Commons.Thomas Jones (1742-1803), The Capella Nuova outside the Porta di Chiaja, Naples (1782), oil on paper, 20 x 23.2 cm, Tate Britain, London. Wikimedia Commons.
Jones was taught by the Welsh artist Richard Wilson, but none of his oil sketches have survived. Jones’ Capella Nuova outside the Porta di Chiaja, Naples is another example that’s significantly larger, and now in the Tate Gallery.
Valenciennes went on to assemble a large library of his oil sketches that he used for his studio paintings following his return to Paris. He was admitted to the Academy in 1787, published an influential manual of perspective and painting in 1799, and became Professor of Perspective at l’École des Beaux-Arts in Paris in 1812.
Among the aspiring young landscape painters who followed in the footsteps of Valenciennes was Camille Corot, who was taught by Achille Etna Michallon, who in turn had been taught by Valenciennes. Corot painted in the Roman Campagna between 1825-28, using the same techniques of applying his oil paint direct to sheets of paper.
Jean-Baptiste-Camille Corot (1796-1875), View of Rome: The Bridge and Castel Sant’Angelo with the Cupola of St. Peter’s (1826-7), oil on paper on canvas, 26.7 x 43.2 cm, Fine Arts Museums of San Francisco. WikiArt.
Corot painted this View of Rome: The Bridge and Castel Sant’Angelo with the Cupola of St. Peter’s in 1826-27. This is one of the best-known bridges over the River Tiber, and not far from the centre of the city. The view is taken from the north-east of the bridge, on the ‘left’ bank, probably close to the Piazza di Ponte Umberto I, looking towards the south-west (‘right’ bank). The painting is sketchy rather than finely finished, and appears to have been painted en plein air onto a sheet of paper that has subsequently been laid on canvas.
Jean-Baptiste-Camille Corot (1796-1875), View of the Convent of S. Onofrio on the Janiculum, Rome (1826), oil on paper mounted on canvas, 22 x 33 cm, Fitzwilliam Museum, Cambridge, England. WikiArt.
This View of the Convent of S. Onofrio on the Janiculum, Rome is another from Corot’s first campaign in Rome.
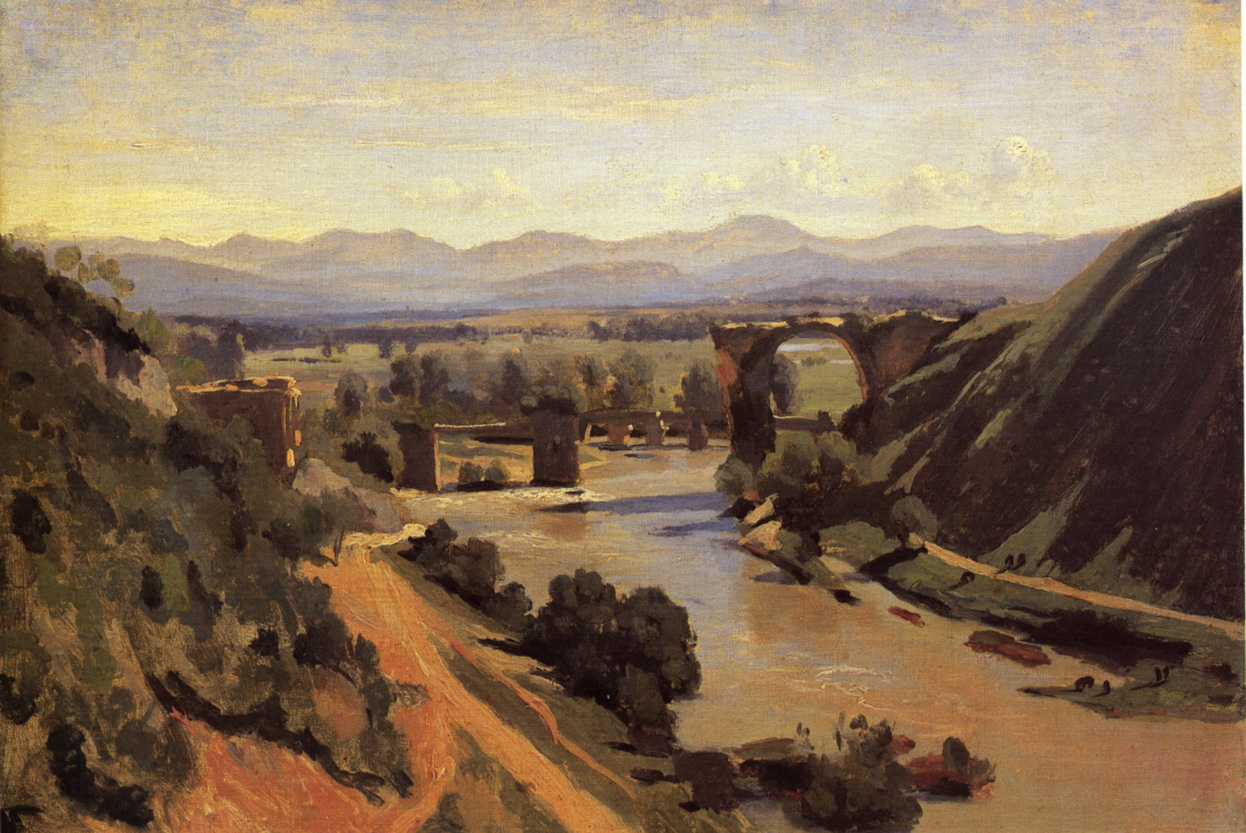
Jean-Baptiste-Camille Corot (1796-1875), The Bridge at Narni (1826), oil on paper, 34 x 48 cm, Musée du Louvre, Paris. WikiArt.
Corot’s years in Italy were formative in his own development, and one of the key elements he put in place to hand on to Camille Pissarro and other Impressionists. The Bridge at Narni is one of his finest oil sketches.
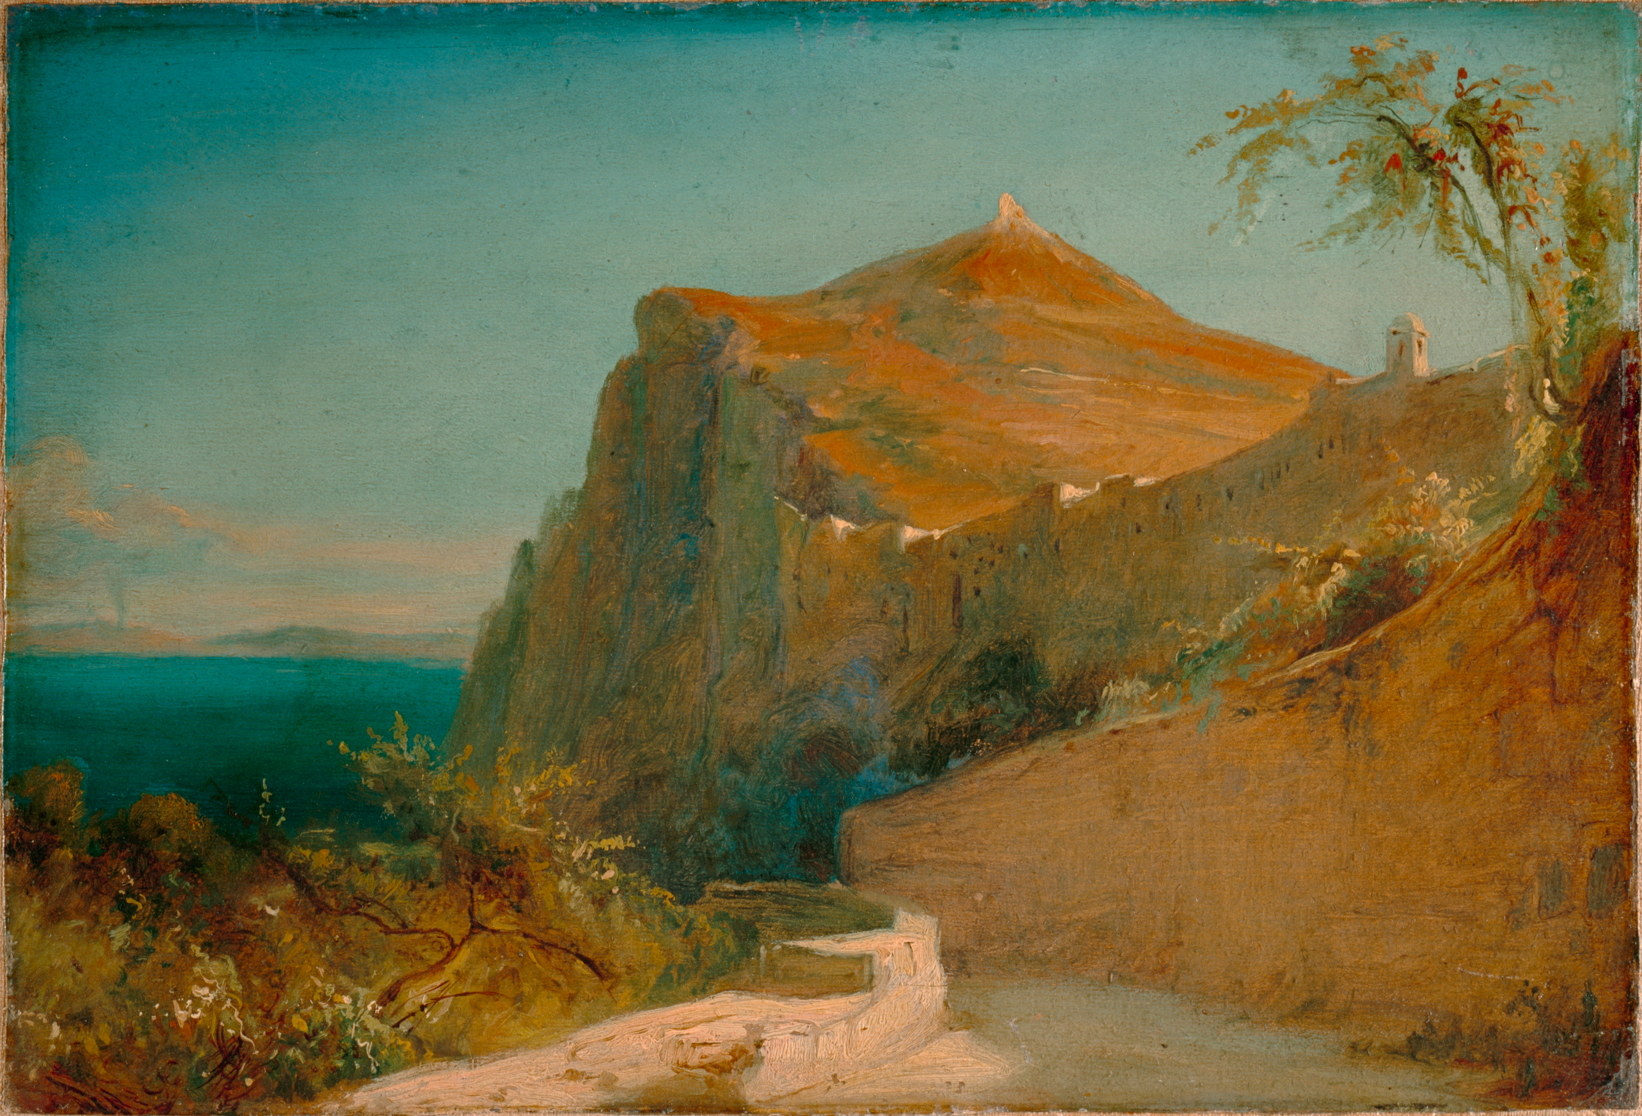
Carl Eduard Ferdinand Blechen (1798-1840), Tiberiusfelsen auf Capri (Tiberius Rocks, Capri) (1828-9), oil on paper mounted on canvas, 20.5 x 30 cm, Lower Saxony State Museum, Hanover. Wikimedia Commons.
Others followed Valenciennes’ instructions, among them Carl Blechen, a brilliant German landscape painter who sketched the Tiberius Rocks, Capri during a visit in 1828-29, again on paper.
Carl Eduard Ferdinand Blechen, (1798-1840) Galgenberg bei Gewitterstimmung (A Scaffold in a Storm) (c 1835), oil on paper mounted on board, 29.5 x 46 cm, New Masters Gallery, Dresden. Wikimedia Commons.
Blechen’s late oil sketch of A Scaffold in a Storm was painted in about 1835, shortly before he succumbed to severe depression. This anticipates many elements of Impressionism: it appears to have been executed rapidly in front of the motif (although a view from his studio over Berlin and Brandenburg), with many brush-strokes plainly visible; details are composed of stylised marks; it is an everyday if not banal subject, with an informal composition.
However, the French Impressionists seldom if ever sketched in oils on paper, as their paintings made in front of the motif were intended to be sold to and viewed by the public, for which paper wasn’t considered suitable. Times had changed.
The president seemed poised for a big Supreme Court win letting him remove officials without cause. But the justices appeared to struggle with how to insulate the Federal Reserve from politics.
President Trump has mused about trying to fire Jerome H. Powell, the Fed chair, but he has not followed through. Indeed, no president has sought to remove a member of the Fed board without cause.
Looking to shake off Moscow’s cultural influences, Kyiv has been seeking to highlight the Ukrainian roots of Kazimir Malevich, a renowned avant-garde painter.
The Achilles heel of T2 Macs is booting from external storage. Although it’s simple to create a bootable external disk for a T2 Mac, to boot from it you have to allow the Mac to boot from any external disk, removing much of its boot security. Apple silicon Macs were designed to boot almost as securely from external disks as they do from the internal SSD, and that makes setting up a bootable external disk more complicated. This article explains how you can do that for macOS 26 Tahoe.
In this respect, Apple silicon Macs have two central principles:
They always start the boot process from their internal SSD. If that’s not functioning correctly, then they can’t boot at all.
They will only transfer the boot process to an external system when the user has access to a private key making them an Owner of that system, through the Mac’s LocalPolicy system. That’s the part that can cause problems.
Planning
There are alternatives to booting from external storage. If there’s sufficient space, you can install multiple versions of macOS on the internal SSD, or you can run macOS as a guest operating system in a virtual machine (VM). VMs are limited in some important respects, though, as they can’t run most apps from the App Store or use AI, although they can now access iCloud and iCloud Drive.
Like any other Mac, Apple silicon models can only boot from versions of macOS they’re compatible with. You can check which your Mac can run using Mactracker. A VM is the only solution for running older and incompatible versions of macOS, and it gets messy installing versions that are compatible but older than the currently installed major version of macOS. This is because its installer may be blocked by the more recent macOS, for which you’ll need to create a bootable installer disk and run the installation from that. Apple describes how to do that in this support article. For the remainder of this article, I assume that you’re installing a second or subsequent copy of the current version of macOS to an external disk.
Connect and prepare the external disk
First catch your disk, and connect it to one of the non-DFU ports on your Mac. For example, on my Mac mini M4, that’s either the left or right Thunderbolt port, as the middle one is its DFU port. On all other Apple silicon Mac minis, that’s either the centre or right port as you look from the rear, as their DFU port is the one on the left. If you try to install macOS to a drive connected to an Apple silicon Mac’s DFU port, then it’s doomed to fail, and that’s the most common cause of failure. More information on the DFU port is here.
Reformat that disk as you want to use it, with at least one APFS container containing a single APFS volume in regular APFS format, not encrypted.
Download and run the installer
Next catch your installer. Oddly, Apple seems to have stopped providing the current release of macOS through the App Store, so the simplest way to download it in the GUI is from the links provided by Mr. Macintosh, and there are many alternatives. You want a regular installer, not an IPSW image file that you might use to create virtual machines.
Run the installer app from your main Applications folder.
When it asks you whether you want to install macOS on your current system, click on Show All Disks…
Select your external disk from the list and click Continue. If your disk isn’t recognised or listed there, reformat it and start again.
Ownership
This is the important part of the installation; if it fails, the external disk won’t be bootable.
For the macOS system on your external disk to be bootable, it needs a LocalPolicy created for it on your Mac’s internal SSD. To ensure that only fully authorised users can configure and change LocalPolicy, those Image4 files are signed, and an Owner Identity Certificate (OIC) is attached to them. Creating and maintaining LocalPolicies requires a user to have access to the private Owner Identity Key (OIK) in the Secure Enclave, making that user an Owner.
Any user with access to the Volume Encryption Key for the internal storage also has access to the OIK, and has Ownership. By default, that includes all users added after FileVault encryption is enabled on a Data volume, for example. To be able to boot from that second OS, it requires a LocalPolicy with an OIC attached, and Ownership has to be handed off to an Install User created when that OS is installed.
Handing off Ownership to the Install User is more of a problem, as users are only created when the installation is complete. To accommodate that, macOS offers to copy a user from the current boot system as the Install User, and the primary admin user, on the second OS. Provided that you agree to that, the Install User created is actually a Key Encryption Key (KEK) for your password and hardware keys, which is then used to encrypt the OIK as it’s handed over to the new copy of macOS on the external disk. Thus, the installer requests that user’s password to gain access to the OIK for the new macOS in the Secure Enclave.
Following these steps should ensure that works correctly.
When prompted to select the user to be owner of the new boot volume group, pick the current admin user, and tick to copy their account settings.
You’ll then be prompted to enter that user’s password to authenticate as the owner.
Completing installation
Installation follows, and is (as ever) highly non-linear, and may even appear to stall. Persevere, and it will then close apps and restart to complete.
When you’re eventually prompted to Create a Computer Account, it’s simplest to create a local admin account for the owner. The new copy of macOS will then take you through personalising your new system, and, if you’ve added support for your Apple Account, it will do the 2FA dance for iCloud and Apple Account, and so on.
Once configured, you can share that external disk between Macs, but each time you boot from it on a different Mac, you can expect to repeat the 2FA dance for iCloud and Apple Account.
Updates
Once installed, you’ll almost certainly want to keep that external system up to date. To do that, start up from that disk, and use Software Update as normal. Although you could download that latest macOS installer and run that, that’s a much larger download and there’s always the risk it might run a clean install, forcing you to restore from your latest backup. Apple no longer provides downloadable updaters for macOS.
When you update macOS on that Mac, the firmware in it will be updated by the most recent version of macOS you have installed or updated it to, whether that’s on the internal or external disk. To update firmware, you have to install the appropriate macOS update on that Mac. If you update your external disk using another Mac, then that won’t update the firmware in your Mac. That can only be done by performing that update on that Mac.
Key steps
Consider alternatives, including an additional system on the internal SSD, or using a VM instead.
Connect the external storage to a non-DFU port and format it in APFS, not encrypted.
Download and run the appropriate full macOS installer. macOS Tahoe isn’t currently available from the App Store, though.
Select the external disk as the installation target.
Select the current admin user to be Owner of the new system, copy their account settings, and authenticate with that user’s password.
Create a local admin account for that user, if possible.
Complete 2FA to connect to the Apple Account, as necessary.
Update the external system when booted from it, using Software Update.