Apple has just released its regular weekly update to XProtect, bringing it to version 5336. As usual it doesn’t release information about what security issues this update might address.
This version adds two new rules for MACOS.WANNABEWALLABY.IMA and MACOS.WANNABEWALLABY.STA, amends rules for MACOS.TIMELYTURTLE.DYHEOC, MACOS.SOMA.MAENA, and MACOS.SOMA.MAENB, and changes some rule UUIDs. In the Osascript rules in XPScripts.yr, it amends the rule for MACOS.OSASCRIPT.SYPR.
You can check whether this update has been installed by opening System Information via About This Mac, and selecting the Installations item under Software.
A full listing of security data file versions is given by SilentKnight and SystHist for El Capitan to Tahoe available from their product page. If your Mac hasn’t yet installed this update, you can force it using SilentKnight or at the command line.
If you want to install this as a named update in SilentKnight, its label is XProtectPlistConfigData_10_15-5336
Sequoia and Tahoe systems only
This update hasn’t yet been released for Sequoia and Tahoe via iCloud. If you want to check it manually, use the Terminal command sudo xprotect check
then enter your admin password. If that returns version 5336 but your Mac still reports an older version is installed, you should be able to force the update using sudo xprotect update
I hope you enjoyed Saturday’s Mac Riddles, episode 353. Here are my solutions to them.
1: The future was here 25 years ago when the fastest land animal arrived.
Click for a solution
Cheetah (Mac OS X 10.0)
The future was here (launched under the tagline of ‘the future is here’) 25 years ago (released on 24 March 2001) when the fastest land animal (a cheetah, despite Mac OS X 10.0 being far from the fastest) arrived.
2: This atelier came with more than a marathon four years ago.
Click for a solution
Mac Studio M1
This atelier (a studio) came with more than a marathon (the first Apple silicon Mac to feature an M1 Ultra chip) four years ago (announced 8 March and released 18 March 2022).
3: Wicked fast at 40 MHz, its special effects impressed 36 years ago.
Click for a solution
Macintosh IIfx
Wicked fast (it was dubbed ‘wicked fast’) at 40 MHz (the clock speed of its 68030 CPU and bus), its special effects (FX) impressed 36 years ago (released 19 March 1990).
The common factor
Click for a solution
They each celebrated their anniversaries this month.
Updating macOS is a far more complex series of processes than it used to be, and the progress bar displayed in Software Update settings is complicated as a result. To capture all the phases that precede installation of an update, the progress bar moves through a series of stages, only one of which is downloading. This article identifies and explains them.
Start
When the Software Update pane offers a macOS update, it has already done a lot of the preliminary work, in fetching the catalogue of updates, checking through them to determine which could be installed, and working out what that would require. This enables it to provide a first estimate of how much needs to be downloaded. Note this is only an estimate at this stage, and may not include additional components such as an update to Rosetta 2.
Once you’ve agreed to install the update now, the progress bar is displayed.
Progress shown here covers many different processes, of which the most substantial are the download and preparation phases. Although progress shown during the download will vary depending on the speed of your Mac’s connection with Pallas, Apple’s software update servers, other sections are determined by the completion of tasks required for the installation, and may proceed in fits and starts.
Before the download can begin, softwareupdated has initial preparations to make, including reloading and downloading the Update Brain responsible for much of the task of installation. Following that are extensive preflight checks, and together those account for the first 15% of the progress bar shown. On a fast Apple silicon Mac, the progress bar may jump straight to that 15%.
Download
This starts at that arbitrary 15%, and is completed when the bar reaches 55%. In between those it should progress according to download speed, but that can be highly non-linear.
This displays a more accurate total size for the download, and the current amount that has already been downloaded. In this case, the bulk of this update is coming over the network from my Content Caching server, so its initial estimate is for a brief period of just 2 minutes. The progress bar then moves in proportion to the amount downloaded, not the time.
Although most of the download can be cached, for Apple silicon Macs the last 1 GB or so has to be obtained for each update from Pallas. As a result, the progress bar suddenly slows as it’s approaching 55%, and the estimated time remaining increases before decreasing again.
Preparing
As soon as the download is complete, there’s another preflight phase lasting from 55%-60%, then the downloads are prepared for installation. This phase doesn’t apparently involve their decompression, which is largely performed on the download stream during the download phase.
Preparations are arbitrarily assigned a period of 30 minutes to complete, but now seldom if ever require that long. As they’re allocated to the last 40% of the progress bar, this phase usually completes much quicker than the times given.
The final 5 minutes are often the slowest, and can take a few minutes longer than that, as the files for installation are gathered into a ‘stash’ ready for the Update Brain to install. Because the progress bar tends to jump straight from 95% complete to 100% this can make it look as if the update has frozen.
Installing
As soon as preparations are complete and reach 100% on the progress bar, the Mac prepares to restart into the installation phase, for which you’re given a 1 minute countdown before the screen goes black and installation happens.
Progress bar key phases
0-15% preparation, preflight; usually brief
15-55% download; on Apple silicon Macs, last 1 GB usually can’t be cached, so slower
55-60% preflight; brief
60-100% preparing; last 5 minutes may be longest.
I hope this helps you make sense of what you see during macOS updates, at least until the screen goes black and the installation starts.
Apple has just released its regular weekly update to XProtect, bringing it to version 5335. As usual it doesn’t release information about what security issues this update might address.
This version adds two new Yara rules for MACOS.TIMELYTURTLE.OBDR and MACOS.SOMA.MAENB, and amends the existing rule for MACOS.SOMA.BYTE.SEQUENCE.B. In the Osascript rules in XPScripts.yr, it relocates those for TABUPA, REBUPA, DUVAST, DUCUHA and DUSTCO.
You can check whether this update has been installed by opening System Information via About This Mac, and selecting the Installations item under Software.
A full listing of security data file versions is given by SilentKnight and SystHist for El Capitan to Tahoe available from their product page. If your Mac hasn’t yet installed this update, you can force it using SilentKnight or at the command line.
If you want to install this as a named update in SilentKnight, its label is XProtectPlistConfigData_10_15-5335
Sequoia and Tahoe systems only
This update has already been released for Sequoia and Tahoe via iCloud. If you want to check it manually, use the Terminal command sudo xprotect check
then enter your admin password. If that returns version 5335 but your Mac still reports an older version is installed, you should be able to force the update using sudo xprotect update
I hope you enjoyed Saturday’s Mac Riddles, episode 352. Here are my solutions to them.
1: British sister of ANSI is Tahoe’s child of RSR.
Click for a solution
BSI
British sister of ANSI (The British Standards Institution, or BSI, is the UK equivalent of the American National Standards Institute) is Tahoe’s child of RSR (it’s the macOS 26 reimplementation of Rapid Security Responses from Ventura).
2: Puzzle vault in the Da Vinci code contains Safari.
Click for a solution
Cryptex
Puzzle vault in the Da Vinci code (in Dan Brown’s novel ‘The Da Vinci Code’, it’s a portable cylindrical vault resembling a combination lock, used to contain secret messages or precious objects) contains Safari (recent versions of macOS include two cryptexes, the App cryptex containing Safari, and the OS cryptex containing dyld caches).
3: The sound of a liquid hitting a surface could be 1 or its parent.
Click for a solution
Splat
The sound of a liquid hitting a surface (a splat) could be 1 or its parent (it’s Apple’s internal name for the cryptex updates in RSRs and BSIs).
The common factor
Click for a solution
They all refer to the sealed disk images used by recent versions of macOS.
Apple has just released its regular weekly update to XProtect, bringing it to version 5334. As usual it doesn’t release information about what security issues this update might address.
This version makes no changes to its main Yara rules. Changes to the OSASCRIPT rules in XPScripts.yr include amendments to more than a dozen of them, and two new rules are added for MACOS.OSASCRIPT.GEPEPA and MACOS.OSASCRIPT.TAPEPA. Several rules that previously added the property wide to their text now have wide ascii instead.
You can check whether this update has been installed by opening System Information via About This Mac, and selecting the Installations item under Software.
A full listing of security data file versions is given by SilentKnight and SystHist for El Capitan to Tahoe available from their product page. If your Mac hasn’t yet installed this update, you can force it using SilentKnight or at the command line.
If you want to install this as a named update in SilentKnight, its label is XProtectPlistConfigData_10_15-5334
Sequoia and Tahoe systems only
This update has now been released for Sequoia and Tahoe via iCloud. If you want to check it manually, use the Terminal command sudo xprotect check
then enter your admin password. If that returns version 5334 but your Mac still reports an older version is installed, you should be able to force the update using sudo xprotect update
I hope you enjoyed Saturday’s Mac Riddles, episode 351. Here are my solutions to them.
1: Show for recording or art, it isn’t as recent as you might think.
Click for a solution
Studio Display
Show (a display) for recording (a recording studio) or art (an art studio), it isn’t as recent as you might think (most recently 27-inch 5120 x 2880 from 2022, but an earlier series of models between 1998-2004).
2: Theatre exhibition was originally the largest of its kind.
Click for a solution
Apple Cinema Display
Theatre (a cinema) exhibition (a display) was originally the largest of its kind (the original model was the largest flat panel display on the market when it was launched in 1999, 22-inch, up to 1600 x 1024).
3: Gallery for pictures of the famous in greyscale only.
Click for a solution
Macintosh Portrait Display
Gallery (a display) for pictures of the famous (portraits) in greyscale only (available between 1989-1992, 15-inch with 640 x 870 in 256 shades of grey).
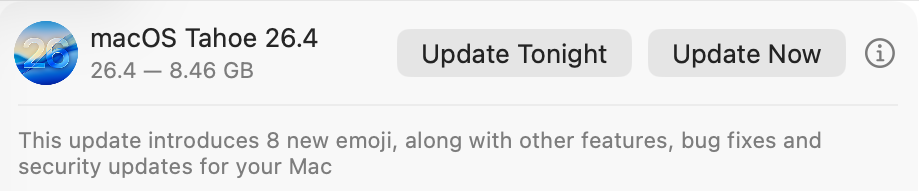
One of the new features coming in the next update to Tahoe, taking it to macOS 26.4, is a Rosetta warning. When you run Intel code on an Apple silicon Mac, macOS will start warning you that you won’t be able to do that in the future. At first, those will be infrequent, but as time passes their cadence will increase. This article explains why, and what you can do about it.
Virtualisation, emulation and translation
Although we’d all love to be able to run only native apps on Apple silicon, that isn’t always possible. Sometimes the app we need to use is only available for another platform, most commonly Intel. You can’t run code for a different processor in a virtual machine, though. VMs run at near-native speed only because the instructions they’re running are for the same processor. What they’re virtualising are the operating system calls, which are passed through to the host.
The traditional way to run code on a different processor is by emulation in a software engine that converts from one instruction set to another. That’s comparatively slow even on modern high-speed processors, so Rosetta 2 opts for a different approach that proved highly successful in the transition from PowerPC to Intel processors from 2006: it translates the code before running it natively. Rosetta 2 does this so well that the translated code often runs almost as fast as it would on the original processor.
Problems
One of the most common reasons for still requiring to run Intel code on Apple silicon stems from the fact that you can’t mix Arm and Intel code in the same process. Although an app might be Universal, and can run entirely on Arm, if it needs to load code modules that are still only available for Intel, then the whole app must be run for Intel, and be translated by Rosetta.
There are also two no-go areas that can’t be addressed by Rosetta: kernel extensions, and virtual machines running an operating systems for a different architecture. If you wanted to run an Intel version of Windows or Linux on your Apple silicon Macs, then you’d have to use emulation. Although this has been done for older Intel-only versions of macOS, it’s painfully slow and fragile.
One less common limitation of Rosetta 2 is that it doesn’t support AVX512 vector instructions, although it does support AVX and AVX2 instructions; that should affect very few apps.
Timescale
To help in forward planning, Apple has already set out its intentions:
Fall 2026, just 6 months away now, macOS 27 will run only on Apple silicon Macs, but will continue to enjoy full Rosetta 2 support. Security-only support will continue for Sequoia and Tahoe.
Fall 2027, macOS 28 will lose full Rosetta 2 support, although it will retain “a subset of Rosetta functionality aimed at supporting older unmaintained gaming titles, that rely on Intel-based frameworks”. Security-only support will continue for Tahoe.
Fall 2028, all support will cease for Intel versions of macOS.
Running Intel code in the future
If you do still depend on running Intel code, the best solution will be to replace that with an update that will run native on Arm. Apple’s increasing Rosetta warnings are intended to nudge us, and the few developers who haven’t yet produced Universal versions of apps, plug-ins, etc., to do so.
The most intractable problems are with code from developers who either can’t or won’t support Apple silicon. If their code is tied to hardware products that may never be addressed, and you may find the only solution is to keep some Intel Macs in service. But for most other situations, you should be able to continue running Intel code in a macOS virtual machine.
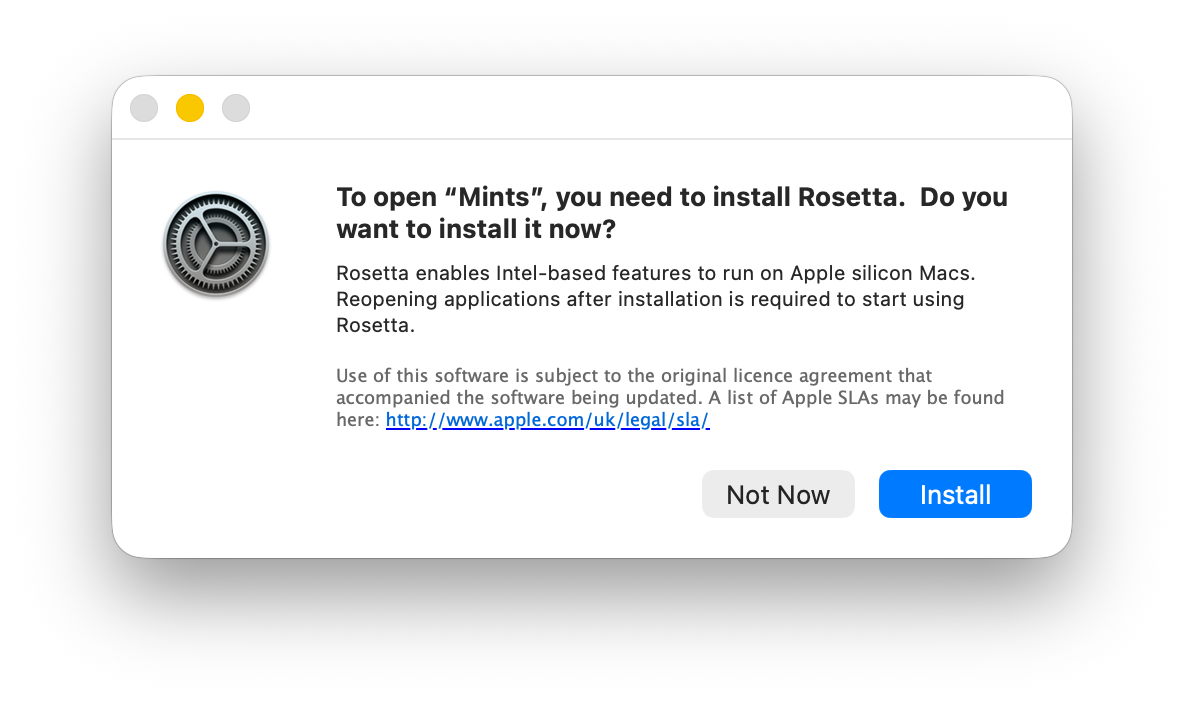
You can test this now using your favourite virtualisation app. Set up a suitable VM and install your app in it. In this example I opted to run my utility Mints using Rosetta rather than natively.
Just as in the host, when you first try to run the app, Rosetta will intervene and offer to translate it for you. The first time you do that, Rosetta will need to be downloaded first.
I chose Mints for this demonstration, as its Mach Absolute Time feature runs in Intel mode when Mints has been translated by Rosetta, as shown here.
Virtualising earlier versions of macOS doesn’t offer as wide a range of features, but if you can run your Intel-only app in Sonoma or later, using Rosetta translation, it should run very well in a VM of the same version of macOS, on a host running macOS 28 after full Rosetta support has been removed. And that should continue to work until a future version of macOS is no longer able to run such an old VM. Hopefully that will be long after 2028, but now is the time to try it.
Apple has just released its regular weekly update to XProtect, bringing it to version 5333. As usual it doesn’t release information about what security issues this update might address.
This version changes the rules named InstallImitatorC to XProtect_MACOS_INSTALLIMITATOR_C, XProtect_snowdrift to XProtect_MACOS_SNOWDRIFT, and XProtect_MACOS_ADLOAD_INTRIN to XProtect_MACOS_ADLOAD_IN, and adds one new Yara rule for MACOS.SOMA.MAENA.
Changes to the OSASCRIPT rules in XPScripts.yr include the amendment of 9 existing rules by adding the property wide to their text, and the addition of one new rule for MACOS.OSASCRIPT.TABUPA.
You can check whether this update has been installed by opening System Information via About This Mac, and selecting the Installations item under Software.
A full listing of security data file versions is given by SilentKnight and SystHist for El Capitan to Tahoe available from their product page. If your Mac hasn’t yet installed this update, you can force it using SilentKnight or at the command line.
If you want to install this as a named update in SilentKnight, its label is XProtectPlistConfigData_10_15-5333
Sequoia and Tahoe systems only
This update has now been released for Sequoia and Tahoe via iCloud. If you want to check it manually, use the Terminal command sudo xprotect check
then enter your admin password. If that returns version 5333 but your Mac still reports an older version is installed, you should be able to force the update using sudo xprotect update
I hope you enjoyed Saturday’s Mac Riddles, episode 350. Here are my solutions to them.
1: Novel in four colours delivers next week.
Click for a solution
MacBook Neo
Novel (a book, new, and neo-) in four colours (silver, blush, citrus and indigo) delivers next week (it’s available from 11 March).
2: First airport with a handle from 1999.
Click for a solution
iBook
First airport (it was the first model with built-in AirPort networking) with a handle (it’s the only Mac portable with a built-in handle) from 1999 (it was introduced in July 1999).
3: Friend and assistant with a real keyboard for Isaac.
Click for a solution
eMate
Friend (a mate) and assistant (it’s a personal digital assistant or PDA) with a real keyboard (the only Newton with a built-in keyboard) for Isaac (Newton).
The common factor
Click for a solution
They’re each innovative low-end portables aimed at education and consumer markets.
Overnight, Apple released an update to XProtect, bringing it to version 5332. As usual, it doesn’t release information about what security issues this update might address.
This version adds one new Yara rule for MACOS.OSB and makes no changes to the OSASCRIPT rules in XPScripts.yr.
You can check whether this update has been installed by opening System Information via About This Mac, and selecting the Installations item under Software.
A full listing of security data file versions is given by SilentKnight and SystHist for El Capitan to Tahoe available from their product page. If your Mac hasn’t yet installed this update, you can force it using SilentKnight or at the command line.
If you want to install this as a named update in SilentKnight, its label is XProtectPlistConfigData_10_15-5332
Sequoia and Tahoe systems only
This update has already been released for Sequoia and Tahoe via iCloud. If you want to check it manually, use the Terminal command sudo xprotect check
then enter your admin password. If that returns version 5332 but your Mac still reports an older version is installed, you should be able to force the update using sudo xprotect update
这意味着想让模型以及模型驱动的功能运行在 Windows AI PC 上,在推理后端方面的工作会更加复杂。微软有 ONNX Runtime 和 DirectML(已进入续命状态)作为统一抽象层,但统一的代价是牺牲各厂商的峰值性能。苹果是目前唯一一家为自家 PC 硬件专门开发并持续维护 LLM 推理框架的 PC 厂商,这个框架就是 MLX。
在 Hugging Face 等开源模型平台上,你会很容易找到大量采用 MLX 框架的模型,只要带有 MLX 后缀,并且内存/处理器允许,可以直接「开箱即用」。
Script-based updaters were underpowered and too unreliable to build the Signed System Volume and other components of macOS in Big Sur and beyond. When Apple was designing the software update subsystem to be used for its new Macs, it chose to develop a modern design from scratch, built around finite state machines. The end result is seen today in the log entries made when updating macOS.
At first sight those appear to be examples of everything the Unified log shouldn’t be. From the initial entries reporting the softwareupdated service is checking for updates, there’s a succession of huge and apparently incomprehensible entries in the log that surely belong somewhere else. In fact we’re given a remarkable step-by-step account of some of the most elegant and successful engineering design in macOS that reveals its inner workings. It also shows how Apple is now able to detect and fix update problems in real-time.
Finite state machine
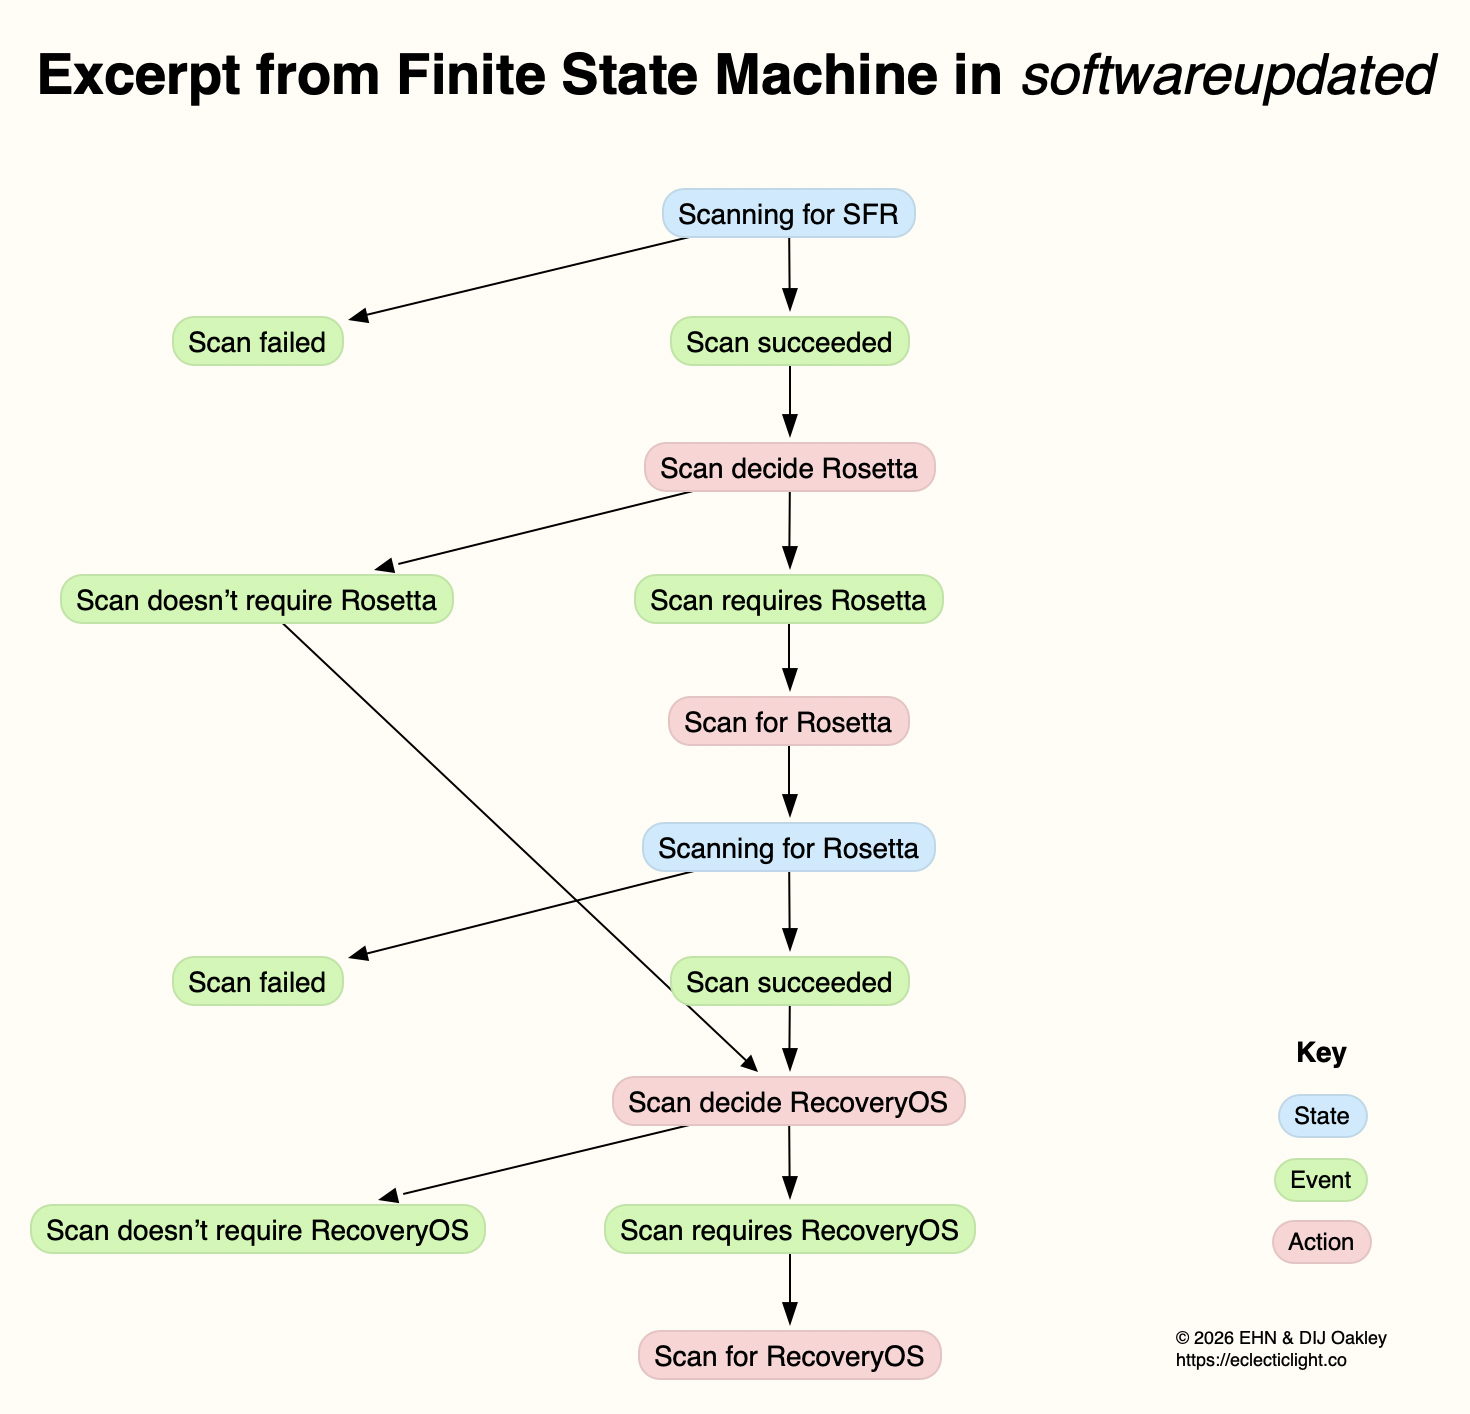
This is a formal model used widely in computing to design, describe and implement a machine or automaton that can only exist in one of a finite number of states. Its state changes in response to defined events, which result in actions that in turn determine its transition to its next state. Although some FSMs are non-deterministic and subject to chance, those in softwareupdated are governed by deterministic rules. This is illustrated in the excerpt below, extracted from a sequence of log entries for one of the FSMs run by softwareupdated when it’s working out what updates are required, early during macOS updating.
This FSM starts here in the top state shown in blue, where it’s scanning for an SFR update. If that’s successful (the event), its next action is to decide whether the update requires an update to Rosetta 2. If it does (the next event), then its action is to scan for Rosetta updates, and it then transitions to its next state of scanning for Rosetta. If that’s followed by the event that the scan succeeds, the next action is to decide whether an update to RecoveryOS is required, and so the FSM proceeds to work out what updates are required before starting to download and prepare them for installation.
This may appear long-winded, but FSMs can be described formally and from there implemented in code that is robust and correct, fundamental requirements for macOS updates. It also builds in flexibility to tailor each update to what that Mac requires.
Log documentation
The unified log is used by softwareupdated to document the operation of the several FSMs it runs. If an error occurs during software update, this enables its origin and causation to be established, one of the primary purposes of the log. Full detail has to be captured in entries at the time the FSM is running, as they can’t be recreated in retrospect.
As a result, every state transition, each event, and all actions are entered in full detail. The message field in those log entries identifies the FSM involved, reports its current state (S), the event (E), its action (A), and then provides full information about its current data. Those must enable the FSM to be recreated and run in the event that something goes wrong, to investigate and fix malfunction or failure.
Although those large and copious log entries are a challenge to browse, the architecture of the Unified log is designed to cope with them. Such long messages are stored separately in the warren of directories inside /var/db/uuidtext, and don’t burden the main log’s tracev3 log files.
FSMs
When softwareupdated checks for, discovers, downloads and prepares the macOS update from 26.2 to 26.3, the following named FSMs are identifiable in log entries:
SUMacControllerScanManager
scan[UUID]
SUMacControllerRecoveryOSManagerScan
update_downloader
SUMacControllerStateMachine
update[UUID]
SUMacControllerScanManager (again)
scan[UUID] (again)
SUMacControllerRecoveryOSManagerScan (again)
in the order in which they appear. In some cases, before the FSM is run, it’s loaded with Events that are detailed in the log, and provide further insight into what that FSM does.
The UUID used for FSMs and throughout softwareupdated is allocated at the start of these processes, before scanning for software updates. It’s referred to as “the SUCore SoftwareUpdate UUID”, and doesn’t appear to be the same as well-known UUIDs used elsewhere. However, as it’s a version 5 UUID it probably doesn’t contain any randomly generated content. This is worth bearing in mind, as it’s this UUID that is attached to Event Reports.
Real-time reporting
Many of us can recall macOS updates that have gone badly wrong, and some that had to be withdrawn or replaced because of their problems. Apple tackles that now using an event reporting system that provides real-time information about how every Mac being updated is progressing. This is anonymised, the only identifier being the UUID allocated to that software update by softwareupdated before starting to scan for updates.
At frequent stages during software update, softwareupdated updates its Event Report to reflect progress, and that’s automatically uploaded to Apple’s servers at an HTTPS address starting with xp.apple.com/report/ Although typically only just over 500 bytes in length, a typical Event Report contains the following named fields:
UUID, audienceType, batteryIsCharging, batteryLevel, currentBaseOSVersion, currentOSType, currentOSVersion, currentProductVersionExtra, dataFsCapacity, dataFsFree, deviceClass, deviceModel, event, eventTime, lowPowerMode, macPlatform, mandatoryUpdateEligible, mandatoryUpdateOptional, preSUStagingEnabled, preSUStagingMaxSize, preSUStagingOptionalSize, preSUStagingRequiredSize, preferredType, rampEnabled, rapidSecurityResponseCombo, rapidSecurityResponseInstalled, rapidSecurityResponseSemiSplat, reportVersion, result, storageCapacity, ucoreVersion, systemFsCapacity, systemFsFree, targetOSVersion, totalRequiredFreeSpace, updateType.
Most should be fairly self-explanatory, and in this case the event field was set to SUCoreOTAPreSUStagingDetermineStarted.
The first of these is sent less than one second after starting to scan for updates, when policy and sizing for the updates to be downloaded have just been determined, and that’s repeated after each significant stage until the Mac is rebooted to apply the update. I suspect there’s also a final Event Report sent once the Mac has booted into the updated macOS.
Apple is thus able to track progress for each UUID during the software update process. Should it detect a problem, for example a required component being unavailable, it should be able to take immediate action to address that, rather than having to wait for individual users to report errors or failures long after they occurred.
Summary
From Big Sur, software update uses a modern design based on finite state machines, completely replacing its old script-based system.
FSMs bring the greatly improved reliability necessary to install and build the Signed System Volume and other components of macOS.
The log contains detailed accounts of FSMs as they are run to accomplish the many phases of these complex software updates.
Those log entries could be used to recreate the FSM in the event of failure or error, e.g. as provided in a sysdiagnose.
Bulky message content in log entries is stored outside log files, in the /var/db/uuidtext directory.
Each software update is given its own UUID.
Update progress is reported to Apple frequently in Event Reports.
Event Reports can enable real-time detection and correction of problems in software updates.
I hope you enjoyed Saturday’s Mac Riddles, episode 349. Here are my solutions to them.
1: A snack or bay for 8.
Click for a solution
byte
A snack (a bite to eat) or bay (a bight) for 8 (there are 8 bits in one byte).
2: Drill head in a horses’s mouth for 1.
Click for a solution
bit
Drill head (a bit) in a horses’s mouth (where a bit goes) for 1 (a single bit).
3: A quiet or pass for 4-64.
Click for a solution
word
A quiet (a quiet word) or pass (a password) for 4-64 (the Intel 4004 of 1971 had 4-bit words, and the ILLIAC IV of 1975 was the first with 64-bit words, now the standard in most modern processors).
If you keep your Mac up to date with the current version of macOS, at least half a dozen times a year you’ll install an update to bring it to the latest version. This article explains how those updates have worked in recent years.
Before Big Sur
Before we upgraded to Big Sur, macOS updates were relatively simple and based on Installer packages, structured collections of files that are copied to the boot volume in accordance with scripts, run by the Installer app. Once that copying is complete and the boot volume contains the files forming the new version of macOS, the Mac can be rebooted from those.
This system update in Mac OS X 10.1.3 in March 2002 was installed by the Installer app following authentication.
This became more complex with macOS 10.15 Catalina, as that was the first to divide what had previously been a single boot volume into two, System and Data. The diagram below shows in miniature what happened during the course of Catalina’s first two minor updates, as an example.
Upgrading from Mojave to Catalina 10.15.0 was performed using Installer packages that completely replaced everything in its system, created in a new System volume, as shown at the top. This was referred to as an upgrade, as the whole system was installed afresh.
Then (skipping a Supplemental Update) came the first minor update to 10.15.1 on 29 October 2019. For the sake of this example, consider that includes a new version of the cat command tool. Rather than that update containing the whole system all over again, it only contains and installs what has changed, including that new cat binary.
Then on 10 December 2019 Apple released the update to 10.15.2, containing another set of changed files, this time perhaps replacing the cp command tool. There are two ways to install that update, either as a delta update or a Combo. The delta update contains the changes from 10.15.1, here cp; the Combo update contains everything that has changed since 10.15.0, both that in 10.15.1, here cat, and in 10.15.2 with cp.
Combo updates tackled what was then a not uncommon problem, when a previous update hadn’t been installed correctly. If the update to 10.15.1 didn’t actually install the new cat and we then installed the delta update for 10.15.2, the latter may not have worked properly. As there was limited error checking in those old updaters, we would then be using a flawed installation of macOS. By installing the 10.15.2 Combo updater instead of the delta, the chance of errors like that were significantly reduced.
Because updates, whether delta or Combo, were Installer packages, Apple not only supplied and installed them using Software Update and its command tool equivalent softwareupdate, but they were also provided for download from webpages in Apple’s Support site. If you had more than one Mac to update, it made sense to download and use the update package.
Big Sur and the SSV
Catalina’s novel boot volume group, with its separate System and Data volumes, was only an intermediate step to Big Sur, which brought the greatest structural change in Mac operating systems since the introduction of Mac OS X twenty years earlier. The great majority of macOS now runs from a mounted snapshot with a read-only file system separate from that of user files on the paired Data volume, and requires a fundamentally different method of installation and updating.
In addition to updating the contents of the system, from Big Sur onwards installers and updaters have considerably more to do. Those tasks include creating the new snapshot to contain the bootable copy of the system, firmlinking that System snapshot with its paired Data volume, building a tree of cryptographic hashes so that the snapshot can be sealed, and verifying the signature of its seal against Apple’s requirement.
These changes can be seen by following Big Sur’s first couple of updates. On 14 December 2020, the update to 11.1.0 might have gone through similar changes to Catalina, with the replacement of its cat command tool. Once that had been installed on the System volume, a snapshot was made of that System volume, hashes were computed for all its contents, and assembled into a tree. At the top of the tree, a hash of all the hashes in the next layer down forms its seal, which is then hashed again to form the signature of the Signed System Volume (SSV). This signature is compared against that set by Apple for the whole volume, and only if they’re identical is the System snapshot accepted for use. There’s no room here for the slightest error if the signature on the SSV is going to match its requirement.
When that was updated again to 11.2.0 on 1 February 2021, perhaps with a new version of the cp tool, the new installer repeats this process of creating a new snapshot, building its tree of hashes, sealing them, creating the signature, and comparing that with Apple’s signature. This means that each and every update is verified to be perfect, and no errors are tolerated.
Safari and dyld caches
Not all the system is installed in the SSV. Apart from some separately updatable components such as XProtect, Apple decided to make Safari and its supporting WebKit components capable of being updated without going through the process of building a new SSV, so in Big Sur and Monterey they were installed on the Data volume. Accompanying those were large dyld caches containing frameworks and more. That changed in macOS Ventura, since when they have been delivered as cryptexes, sealed disk images that APFS can graft into the file system. Apple also used the same mechanism to deliver a few Rapid Security Responses (RSR), before discontinuing them.
dyld caches are one of the few parts of macOS that is single-platform. While Intel Macs are only provided with an Intel version, those on Apple silicon Macs include both architectures, to support Intel-only apps running in translation by Rosetta 2. The second set is largely responsible for the fact that Apple silicon Mac updates are invariably larger than those for Intel Macs.
Apple has since redeveloped its RSR mechanism, and has introduced them as Background Security Improvements (BSI) in Tahoe, although none has yet been released to the public.
Upgrades and updates
Installing a new major version of macOS to go from 10.13 to 10.14, for example, had been accomplished by Software Update downloading a full Installer app, which then replaced the whole of the old system with the new one. From macOS 12.3 that changed, and whenever possible macOS now effectively performs an update by replacing only changed files before it builds the new SSV. This has reduced both the download time required and that needed to decompress and prepare the update.
This has had the side-effect that ordinary non-admin users can now upgrade macOS from one major version to a later one, an action that previously required admin privileges.
Combo updates
In the new system from Big Sur onwards, Apple only provides Combo updates for those updating from versions of macOS older than the previous version, and only when required. If you were to update straight from 15.0 to 15.2, then your Mac downloads all that it requires for that update. If your Mac is already running 15.1, there’s no option to install the changes in 15.1 again, nor should you need to, as its installation in 15.1 has already been verified as being identical to Apple’s reference.
If you felt that wasn’t adequate, then the only option is to install the whole of 15.2 from scratch by running the Sequoia 15.2 Installer app. More recent installers are more likely to complete this without disturbing the Data volume, and requiring its migration from a backup.
Although these complexities may seem bewildering, macOS updates conceal all of this from the user and most commonly work transparently. However, it can explain why some updates can turn out to be significantly larger than expected.
We don’t always notice something is wrong within a few hours of the event that caused a problem. Sometimes it can take days or weeks before we realise that we need to check something in the log. By that time all trace has vanished, as the active log will have rolled those log entries long before we go looking for them. This article shows how to recover and analyse events from the more distant past, using a Time Machine backup and my free utilities LogUI and Logistician. My target is the macOS 26.3 Tahoe update installed on my Mac mini M4 Pro on 11 February, and I performed this analysis 11 days later, on 22 February.
When was the event?
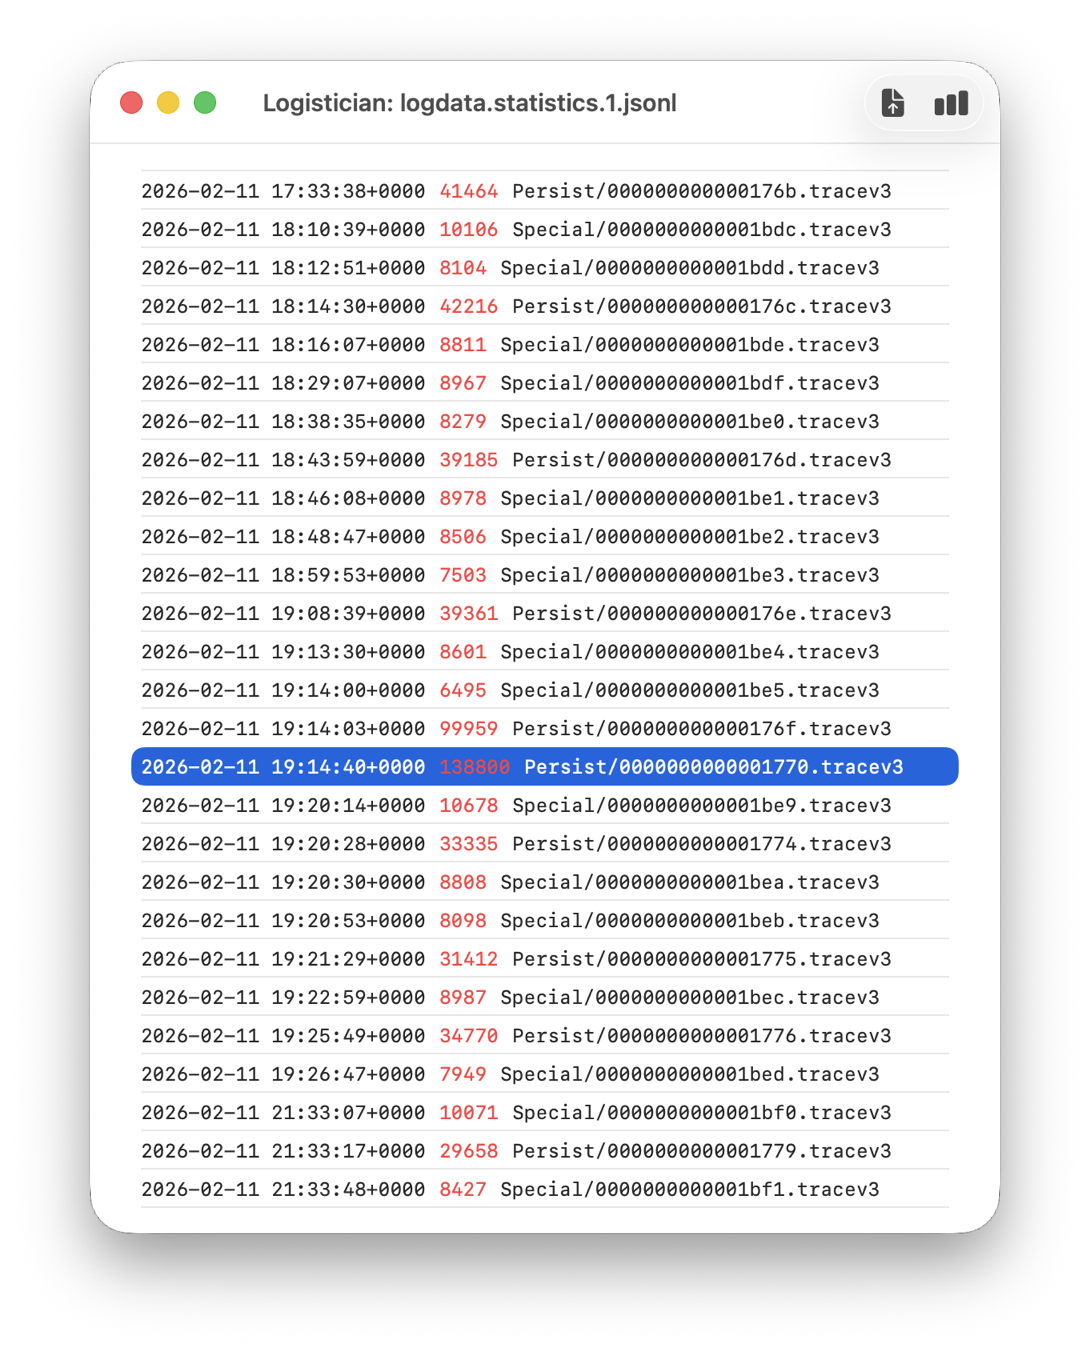
In this case I remember updating at around 18:30-19:30 on 11 February, but I don’t even need to recall the date. I first copied the logdata.statistics.1.jsonl file from my active log in /var/db/diagnostics to a working folder in ~/Documents, then opened it using Logistician.
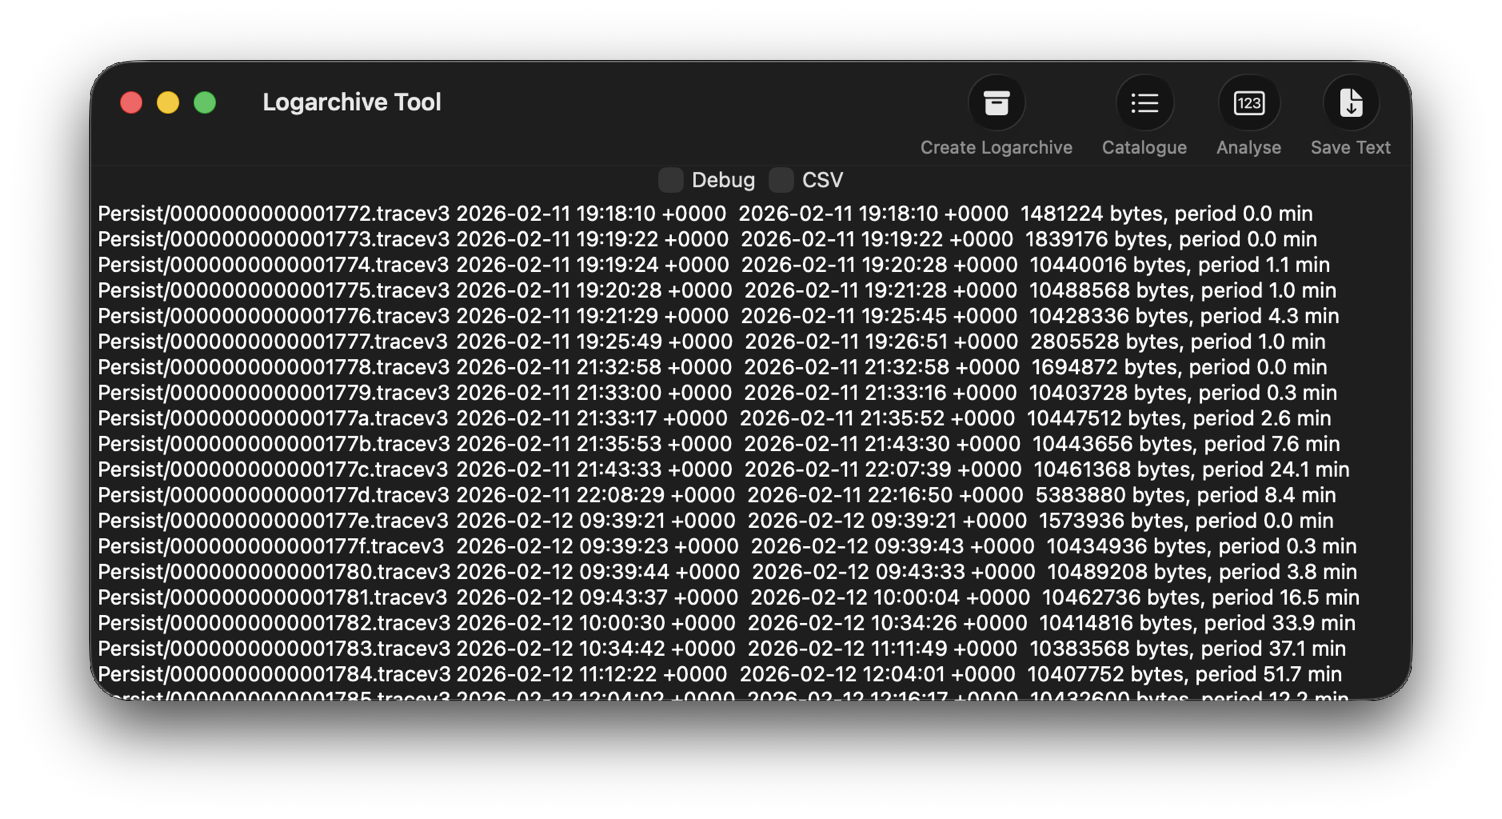
The log file listing between 18:10:39 and 19:26:47 on 11 February 2026 shows a remarkably rapid turnover of log files that’s an obvious marker of that update. Highlighted here is a Persist file that’s exceptionally large at 139 MB of log entries for a collection period of just 37 seconds, although like other tracev3 log files in the Persist folder that only takes 10.5 MB of disk space.
Retrieve the log
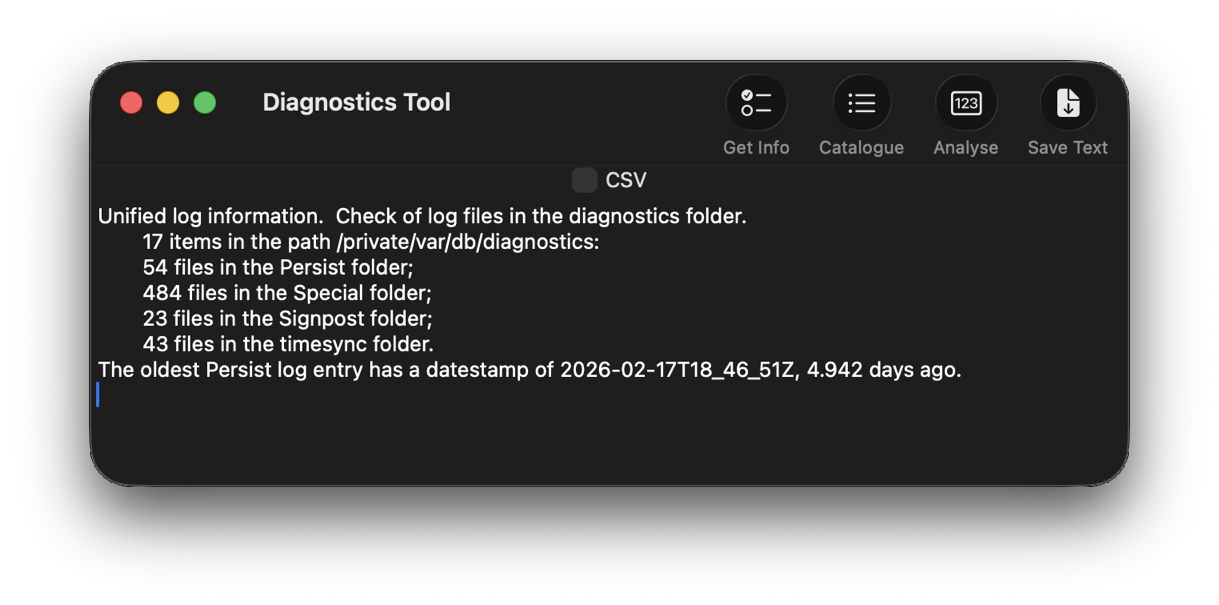
Although I’m confident those logs were removed many days ago, I open LogUI, then select its Diagnostics Tool from the Window menu. I click the Get Info tool and select my active log in /var/db/diagnostics. That tells me that the oldest log entry there dates from 17 February, so there’s no point in trying to find those entries in that log.
Like all good backup utilities, Time Machine also backs up the whole of the log folders, and I can use those to create a logarchive file for analysis. I therefore locate the next backup made after those log entries were written, on 12 February, and copy the /var/db/diagnostics and /var/db/uuidtext folders into a new folder in my working folder, ready to turn them into a logarchive.
In LogUI, I open its Logarchive Tool from the Window menu and use that to turn those folders into a logarchive I can access using LogUI. I check that freshly created logarchive using the Catalogue tool to confirm that it contains the log files I want to browse.
Identify the event
With the historical log safely preserved in a logarchive and a defined time of interest, my next task is to identify the event I want to investigate. In this case, I could probably go straight ahead and look at all entries for a few seconds, but in other circumstances you may need to know which entries to look for.
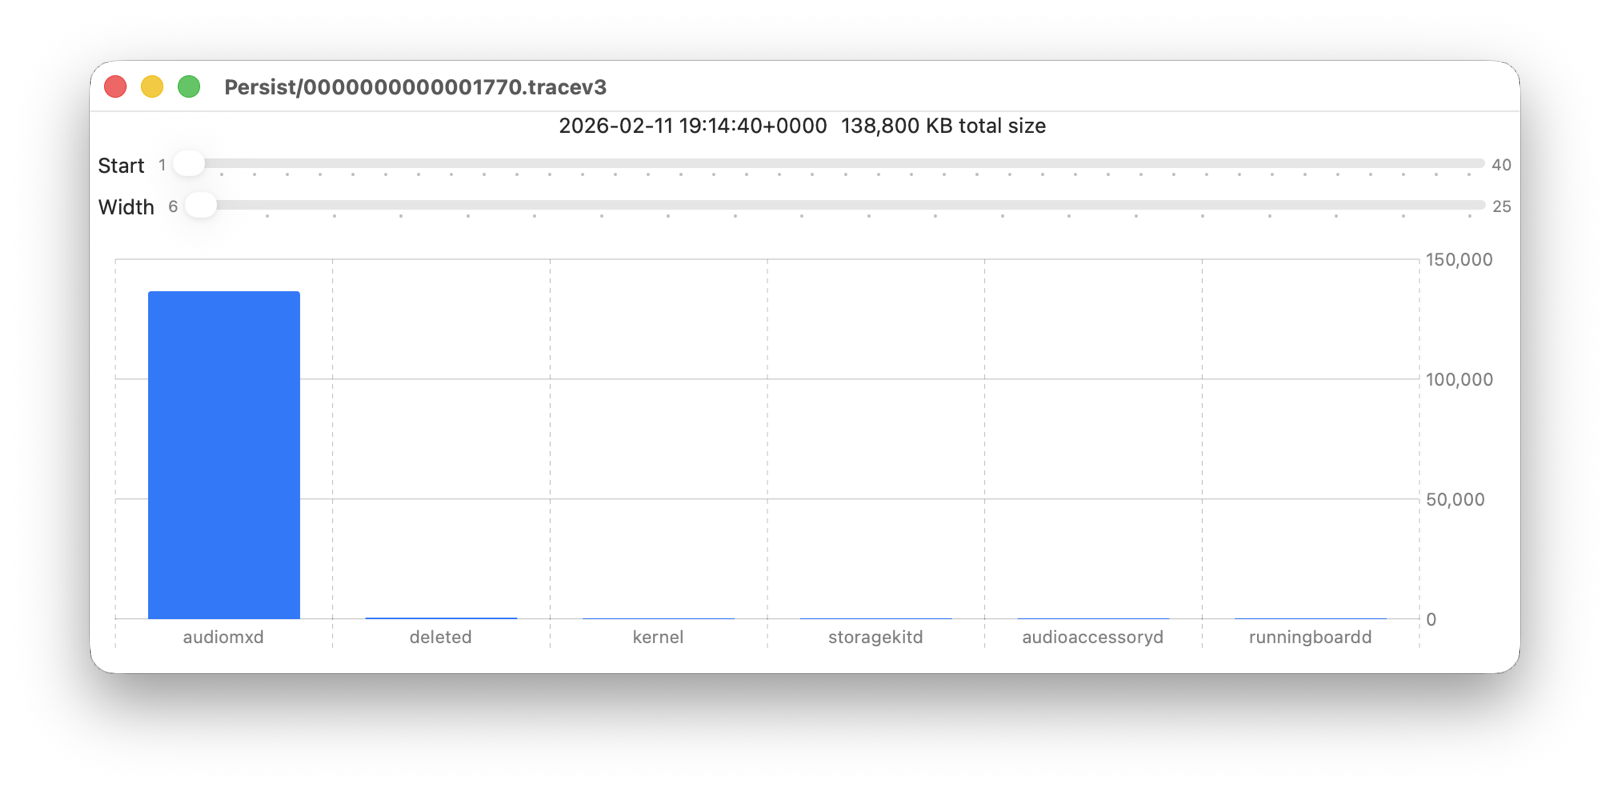
Back in Logistician, I select that extraordinary Persist log file and view it in a Chart. Most of the other log files over this period look like this:
with large quantities of entries from softwareupdated, com.apple.MobileSoftwareUpdate and similar processes. But the huge Persist file that filled in only 37 seconds is exceptional.
Almost all its entries are from audiomxd, and all other entries are dwarfed by its size.
Browse the event
By default when you click on LogUI’s Get Log tool it will fetch those log entries from the active log. To switch that source to my logarchive file, I click on the Use Logarchive tool and select the logarchive I just created in my Documents folder. To remind me that it’s no longer looking in the active log, that window then displays a red-letter caution of !! Logarchive to the left of the Start control. That also reminds me to use dates and times within the range covered by that logarchive.
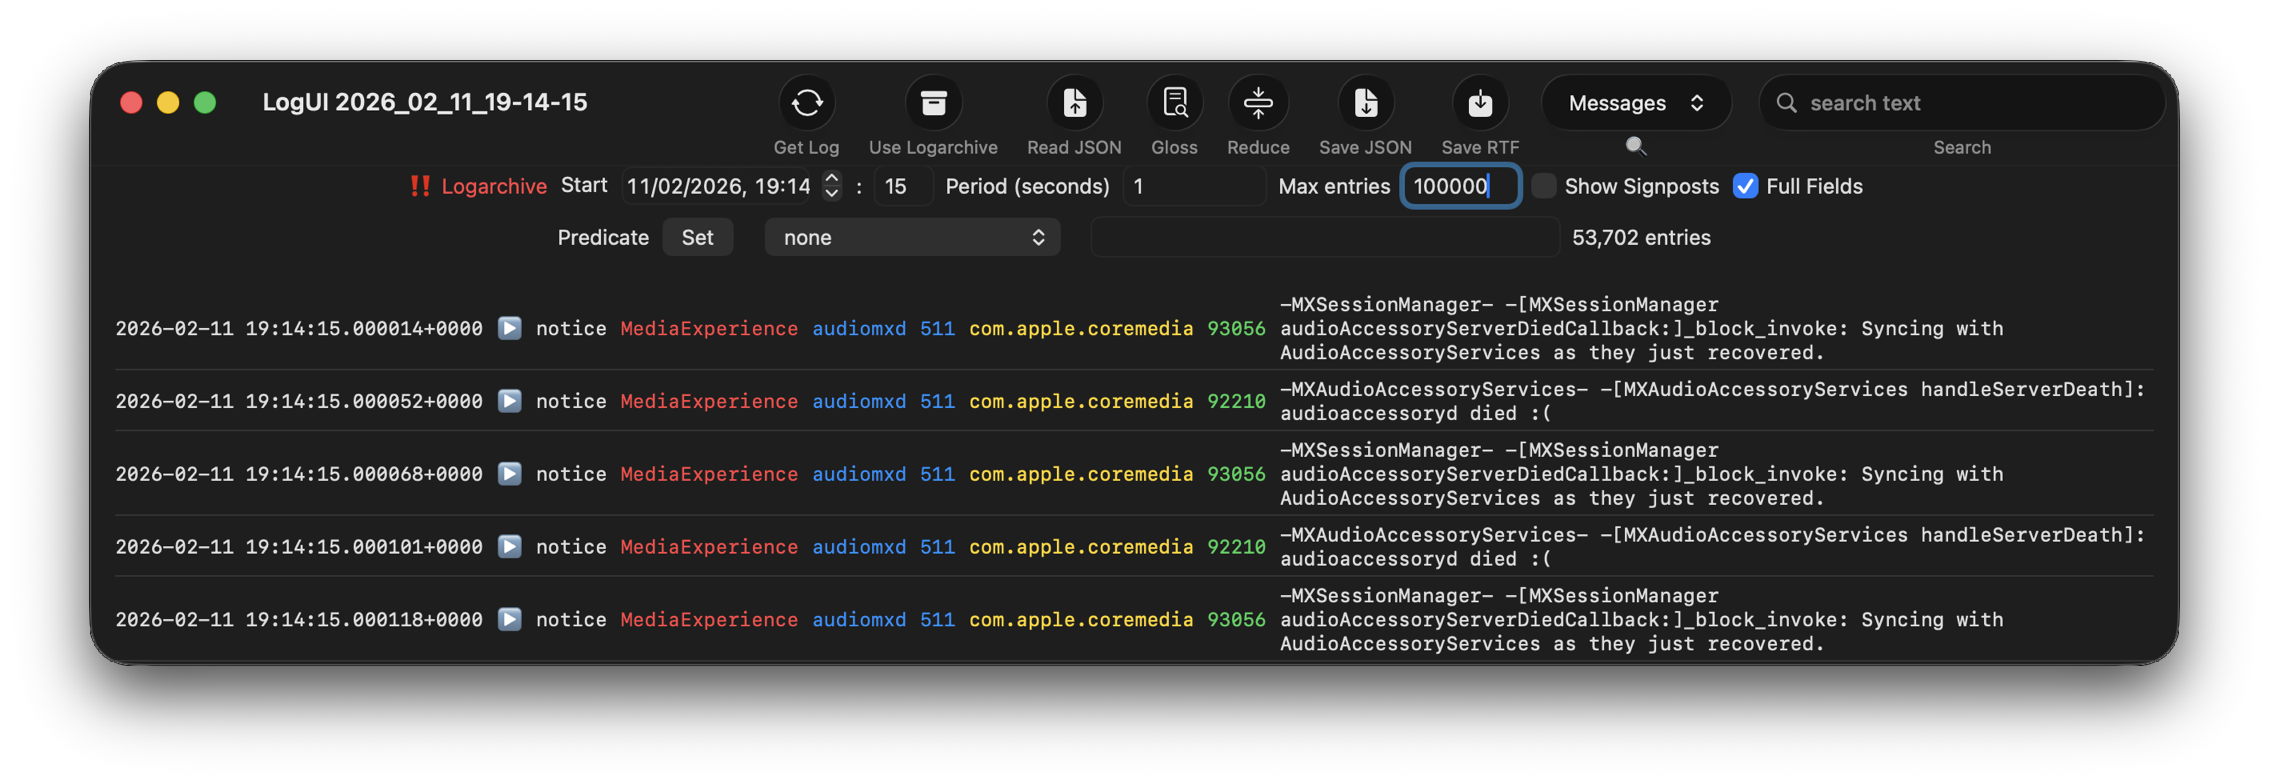
I set the Start to ten seconds into the collection period of that large Persist file, a period of 1 second, and the maximum number of entries to 100,000, then click on the Get Log tool.
This is one of the most remarkable log extracts I have ever seen: in this 1 second period, the audiomxd process in com.apple.coremedia wrote about 53,000 entries to the log. Over the 37 seconds of log records in that single Persist file, audiomxd must have written at least 1.5 million log entries. These are all apparently the result of the ‘death’ of the AudioAccessory service audioaccessoryd, and its recovery after updating macOS.
Summary
Identify approximate time of event from /var/db/diagnostics/logdata.statistics.1.jsonl using Logistician.
Check in LogUI whether that falls within the period of the active log.
If not, retrieve /var/db/diagnostics and /var/db/uuidtext from the next backup made after the event.
Convert those folders into a logarchive using LogUI’s Logarchive tool, and check it contains the period of the event.
Identify the processes involved using Logistician’s chart.
Set LogUI to use that logarchive, enter the correct date and time, and get log entries for the required processes.
Apple has just released an update to XProtect, bringing it to version 5331. As usual, it doesn’t release information about what security issues this update might address.
This version adds two new Yara rules for additional SOMA/AMOS variants, MACOS.SOMA.FEENA and MACOS.SOMA.FEENB, and adds two more OSASCRIPT rules to XPScripts.yr, bringing its total to 19.
You can check whether this update has been installed by opening System Information via About This Mac, and selecting the Installations item under Software.
A full listing of security data file versions is given by SilentKnight and SystHist for El Capitan to Tahoe available from their product page. If your Mac hasn’t yet installed this update, you can force it using SilentKnight or at the command line.
If you want to install this as a named update in SilentKnight, its label is XProtectPlistConfigData_10_15-5331
Sequoia and Tahoe systems only
This update has already been released for Sequoia and Tahoe via iCloud. If you want to check it manually, use the Terminal command sudo xprotect check
then enter your admin password. If that returns version 5331 but your Mac still reports an older version is installed, you should be able to force the update using sudo xprotect update
Finally, for those testing macOS 26.4 beta 2, I am aware that SilentKnight currently crashes on launch, thanks to several of you who have been kind enough to email me. I can’t find an explanation for this in my code, so am hoping it will resolve in beta 3.
Most recently, I have learned of a shocking error in the beta 2 build that may well account for this. If you’re running beta 2, try checking the iBoot version in System Information, and you may be in for a big surprise!
I hope you enjoyed Saturday’s Mac Riddles, episode 348. Here are my solutions to them.
1: The next real-estate catalogue went binary in 2002.
Click for a solution
Property list
The next (it originated in NeXTSTEP) real-estate (property) catalogue (a list) went binary in 2002 (it was available in binary format in Mac OS X 10.2 in 2002, and that’s now standard).
2: Punctuating a short pause to break data for spreadsheets and more.
Click for a solution
CSV
Punctuating a short pause (a comma) to break (separate) data (value) for spreadsheets and more (commonly used to move data between spreadsheets and more).
3: In a quest for a golden fleece, Douglas Crockford brought it from ECMAScript.
Click for a solution
JSON
In a quest for a golden fleece (the mythical Jason), Douglas Crockford (its inventor in 2000-01) brought it from ECMAScript (the official name of the standardised version of JavaScript, the origin of JSON, JavaScript Object Notation).
The common factor
Click for a solution
They’re all data exchange formats, specifically those used for serialisation.
One of the mysteries of the Unified log since its introduction almost ten years ago in macOS Sierra has been how it keeps such extensive records of what happens between the start of kernel boot and the user logging in. This must have been sufficiently challenging before Catalina, but since then the separate Data volume, where log files are stored, has been locked away by FileVault until the user’s password enables it to be accessed.
Log entries are initially stored in memory, and from there most are written to tracev3 files in their respective directories in /var/db/diagnostics. logd is responsible for that, and for maintaining the contents of that directory. Ironically, logd maintains its own old-style log in text files inside that directory, but its terse entries there reveal little about how it does its job. What they do reveal is that logd has an assistant, logd_helper, with its own old-style text logs that are a bit more informative.
In Apple silicon Macs, logd_helper apparently connects every few minutes to five coprocessors, SMC (System Management Controller), AOP (Always-On Processor), DCPEXT0, DCPEXT1 and DCPEXT2 (Display Co-Processors). There appears to be nothing equivalent in Intel Macs. It also conducts ‘harvests’ shortly after it has started up, so solving the mystery of where all the log entries are saved prior to unlocking the Data volume.
Soon after the start of kernel boot, once the Preboot volume is generally accessible and logd is running, logd starts writing log entries to temporary storage in the Preboot volume. You can see that in the path /System/Volumes/Preboot/[UUID]/PreLoginData, where there’s a complete diagnostics directory, and one to store longer log entries in the warren of directories in uuidtext. Those are identical in layout to permanent log storage in /var/db.
Shortly after user login, with the Data volume unlocked at last, logd_helper is started, and it merges log files from Preboot/[UUID]/PreLoginData/diagnostics and those files in Preboot/[UUID]/PreLoginData/uuidtext into permanent log storage in the Data volume in /var/db/diagnostics and /var/db/uuidtext, a process it refers to as harvesting.logd_helper can also harvest from entries stored in memory.
Once this merger has been completed, log directories in Preboot/[UUID]/PreLoginData/diagnostics are left empty, as are logdata.statistics files there, making the log record of kernel boot complete, right up to unlocking of the Data volume.
That explains how tens of thousands of log entries can still be recorded faithfully in a Data volume that can’t be unlocked for some time yet.
Once normal logging to /var/db/diagnostics is running, logd maintains the tracev3 files containing log entries there. Its goals appear to be:
in the Persist folder, file size is normally 10.4-10.5 MB, although it may be smaller when truncated by shutdown;
Persist files are removed with age to maintain a typical total size for that folder of just under 530 MB in just over 50 files, bringing the size of the whole diagnostics folder to between 1-2 GB;
in Special and Signpost, log file size is normally 2.0-2.1 MB when closed, but entries are weeded progressively until each file is empty and can be deleted;
timesync files are less than 1 KB;
HighVolume is seldom if ever used.
The overall effect on historical log entries is that those in Persist files are rate-sensitive and removed sooner when log entries are written more frequently. However, selected entries in Special files may last considerably longer, but become less frequent with age. A few of those may be retained for hours or days longer than the oldest in Persist files. I have no insight into the rules that logd follows when deciding when to weed entries from Special files.
Extended entries stored in the warren of folders in /var/db/uuidtext are purged periodically on request from CacheDelete, as with other purgeable storage, at least once a day. That should ensure that the contents are only retained while they’re still referred to by entries in the log files.
As far as I’m aware, the user gets no say in the size limits imposed on log storage, and there’s no option to increase them to allow logs to be retained for longer. However, as both /var/db/diagnostics and /var/db/uuidtext folders should be backed up by Time Machine and most third-party utilities, you can always analyse those backups when you need to check older log entries.
If you don’t know exactly what you’re looking for, and when it happened, the log has been a hostile place. Doom-scrolling through tens of thousands of log entries in the hope of stumbling across a clue is tedious, and the odds have been stacked against you. So last week I’ve been doing something to redress the balance and shorten those odds, and I’m delighted to offer its first version in Logistician. This has nothing to do with logistics, but is all about log statistics.
Alongside folders containing your Mac’s Unified log files, in /var/db/diagnostics, you’ll see files with names starting with logdata.statistics. A couple are text files that only go back a day or two, and others have the extension jsonl. If you were privileged to test some beta-releases of macOS Tahoe, you may have some database files as well, but here it’s those jsonl files I’m concerned with.
Inside them are basic statistical summaries of every log file that’s been saved in your Mac for the last few weeks or months. Even though the original log files have long since been deleted, summaries of their contents are still available in files like logdata.statistics.1.jsonl, and those are opened up by Logistician.
As the files in /var/db/diagnostics are still live, and may be changed as logd does its housekeeping, copy those jsonl files to somewhere in your Home folder, like a folder in ~/Documents. Open Logistician, click on its Read JSONL tool, select one of those copies and open it.
Logistician’s window displays the file’s contents in a list, with the oldest at the top. It gives the date and time that file was saved, just after the last log entry was written to it, its size in KB, whether it was a Persist (regular log), Special (longer supplementary log entries) or Signpost (performance measurements) collection, and the name of the file.
Select one of those file entries and click on the Chart selection tool at the top right to see its data plotted out in the Chart view.
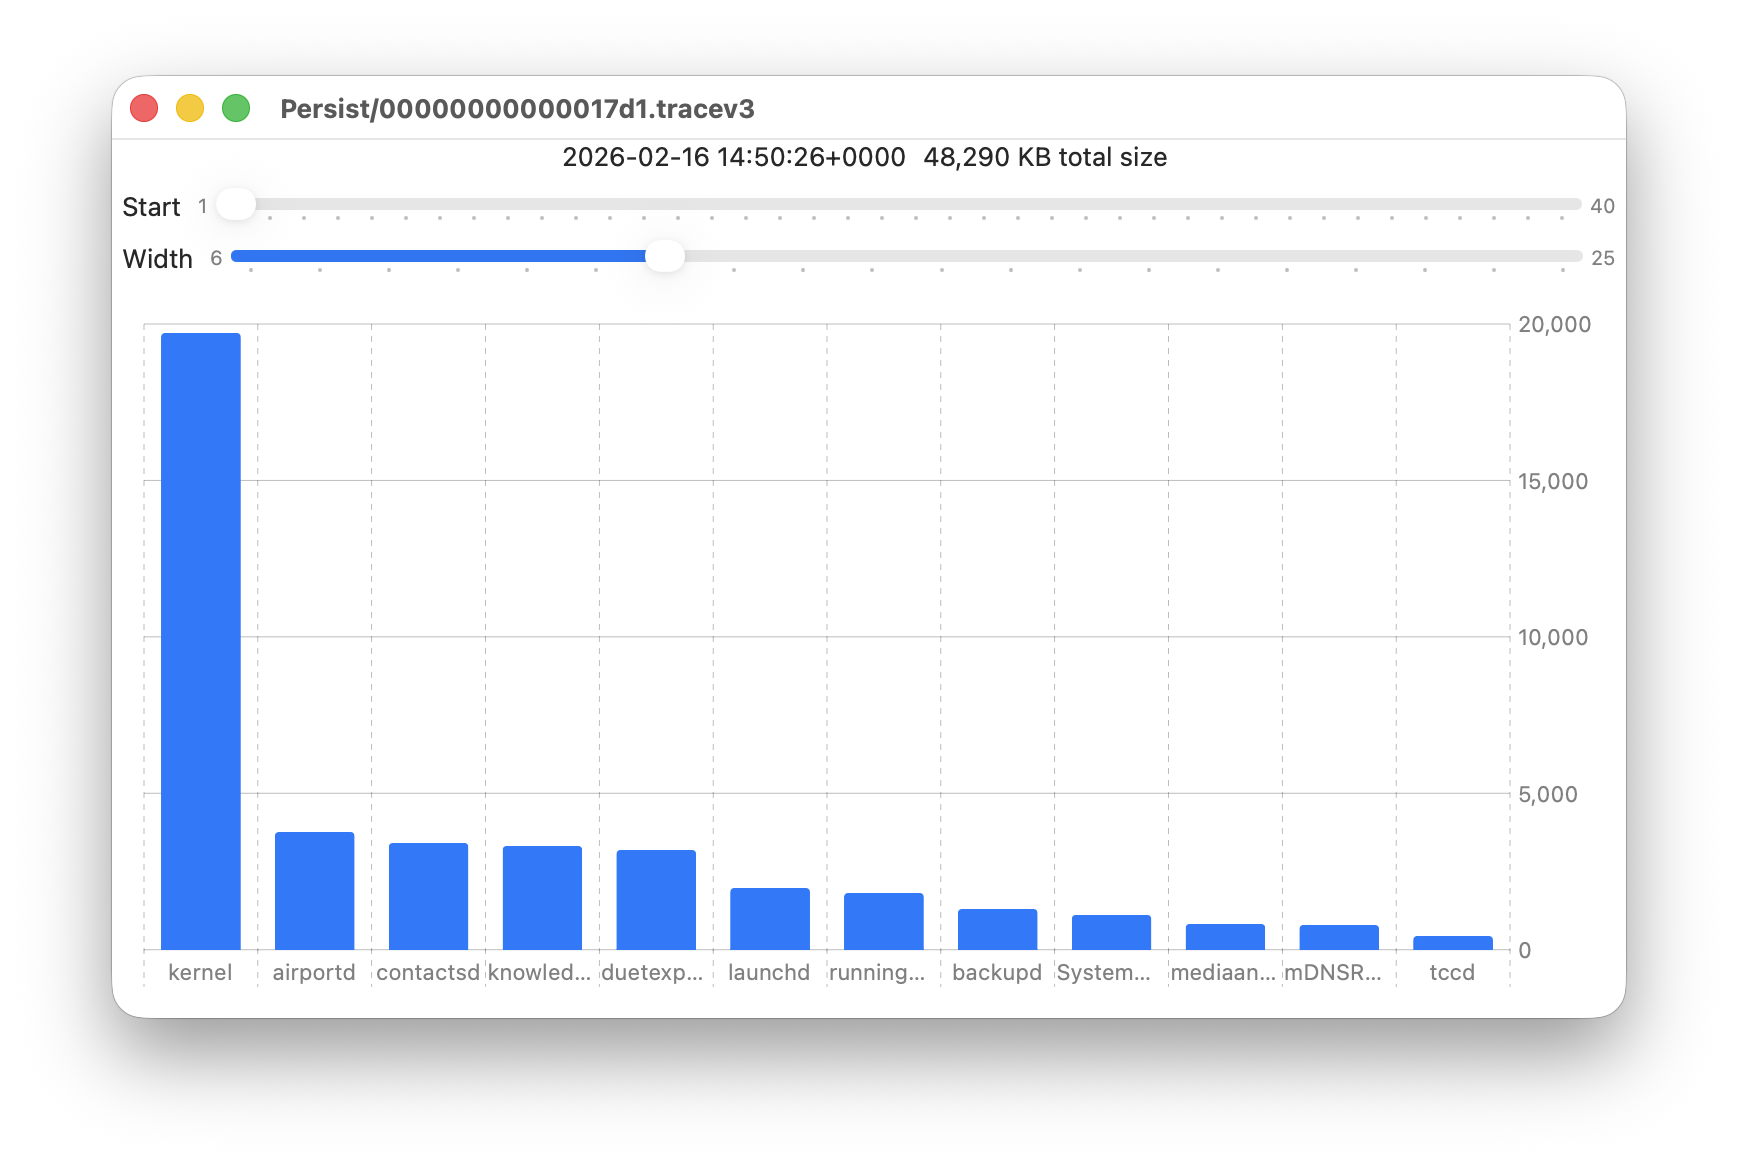
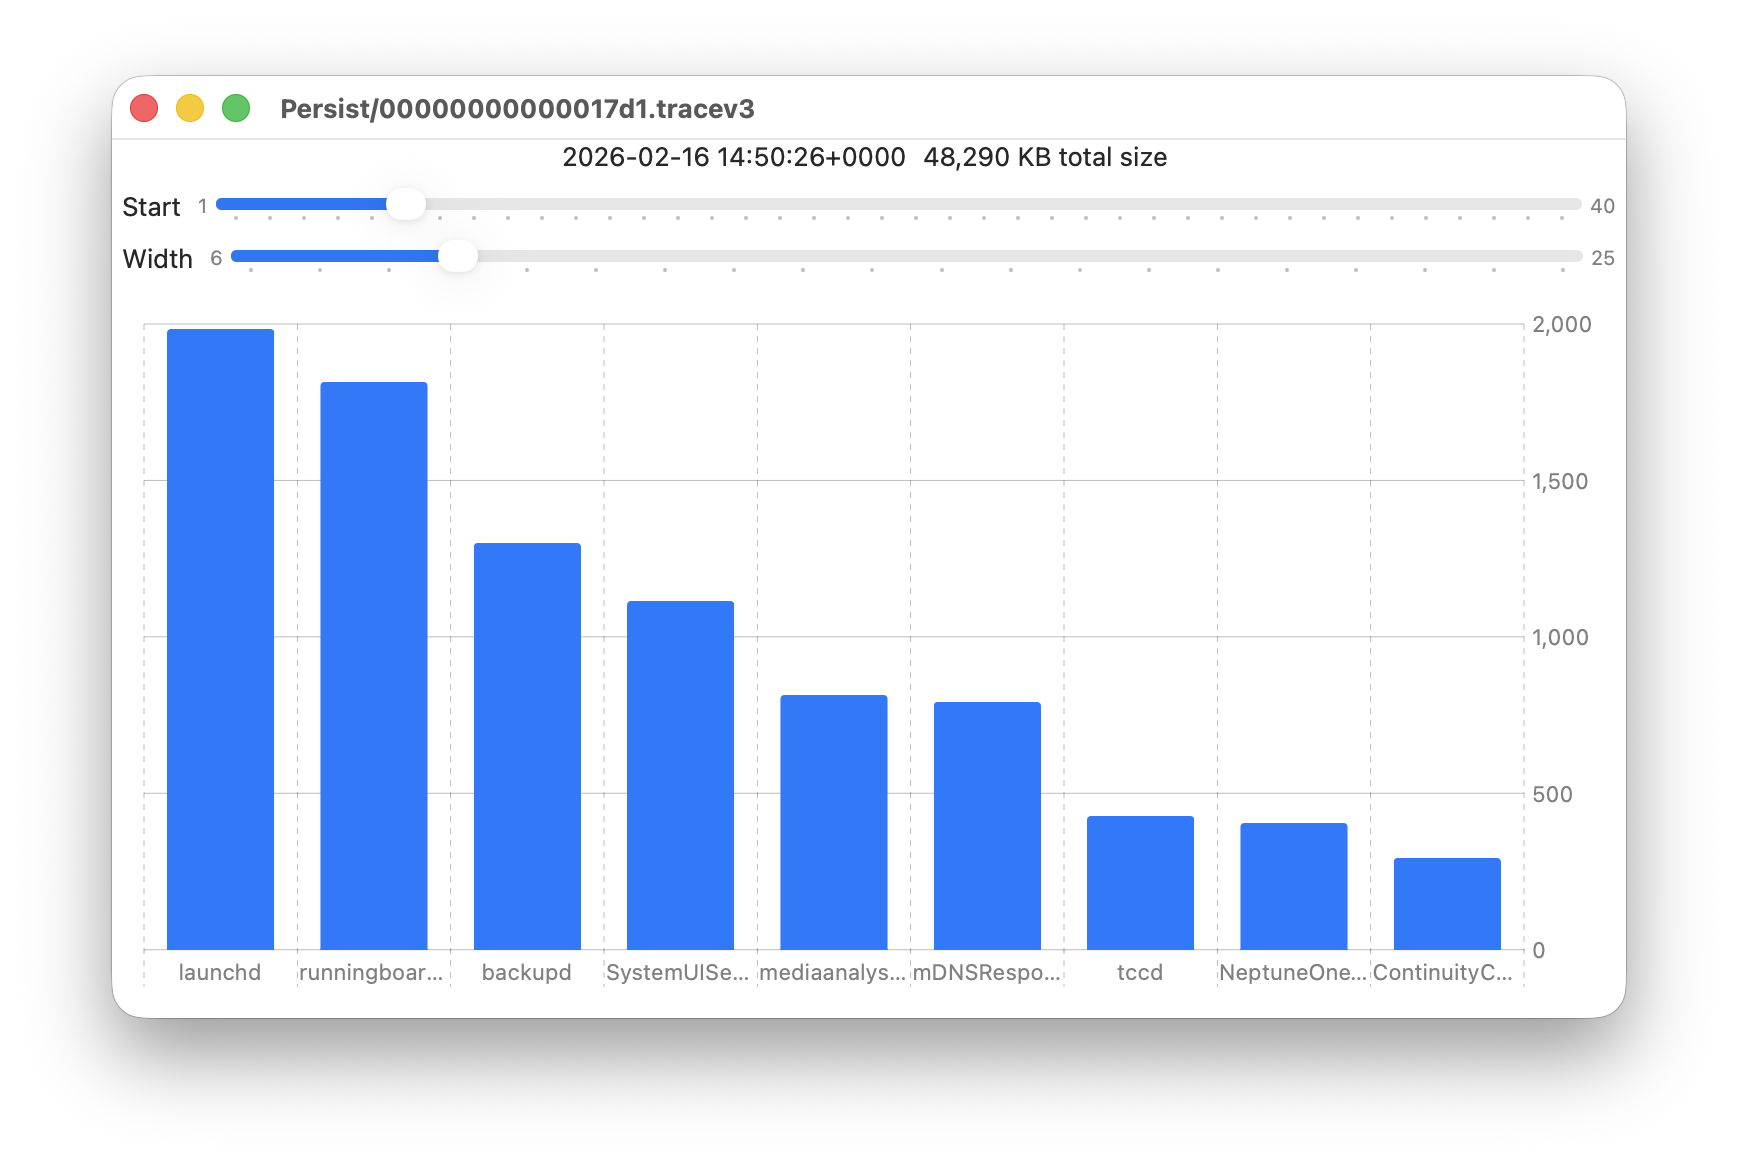
Data provided for each log file listed includes a breakdown of the total size of log entries from that process or subsystem, and Logistician’s Chart view displays those data as a bar chart. The height of each bar represents the total size in KB of log entries made by that process in that specific log file. As there are a 50 bars available, two sliders set the size and location of that window on the data:
Start sets the number of the first bar on the left, beginning at 1 for the greatest size, usually the kernel, and increasing to 40 for a process with very few log entries, just ten from the smallest.
Width sets the number of bars to display, ranging from 6 to 25. The more shown, the harder it is to read the names of processes at the foot of each bar, and the less precisely you can read the size of their log data at the right.
These sliders are set to show 9 bars from number 6 at the left (the sixth highest log data, written by launchd) to number 14 at the right (14th highest, written by ContinuityCaptureAgent). Of interest here are around 400 KB of log entries from NeptuneOneWallpaper.
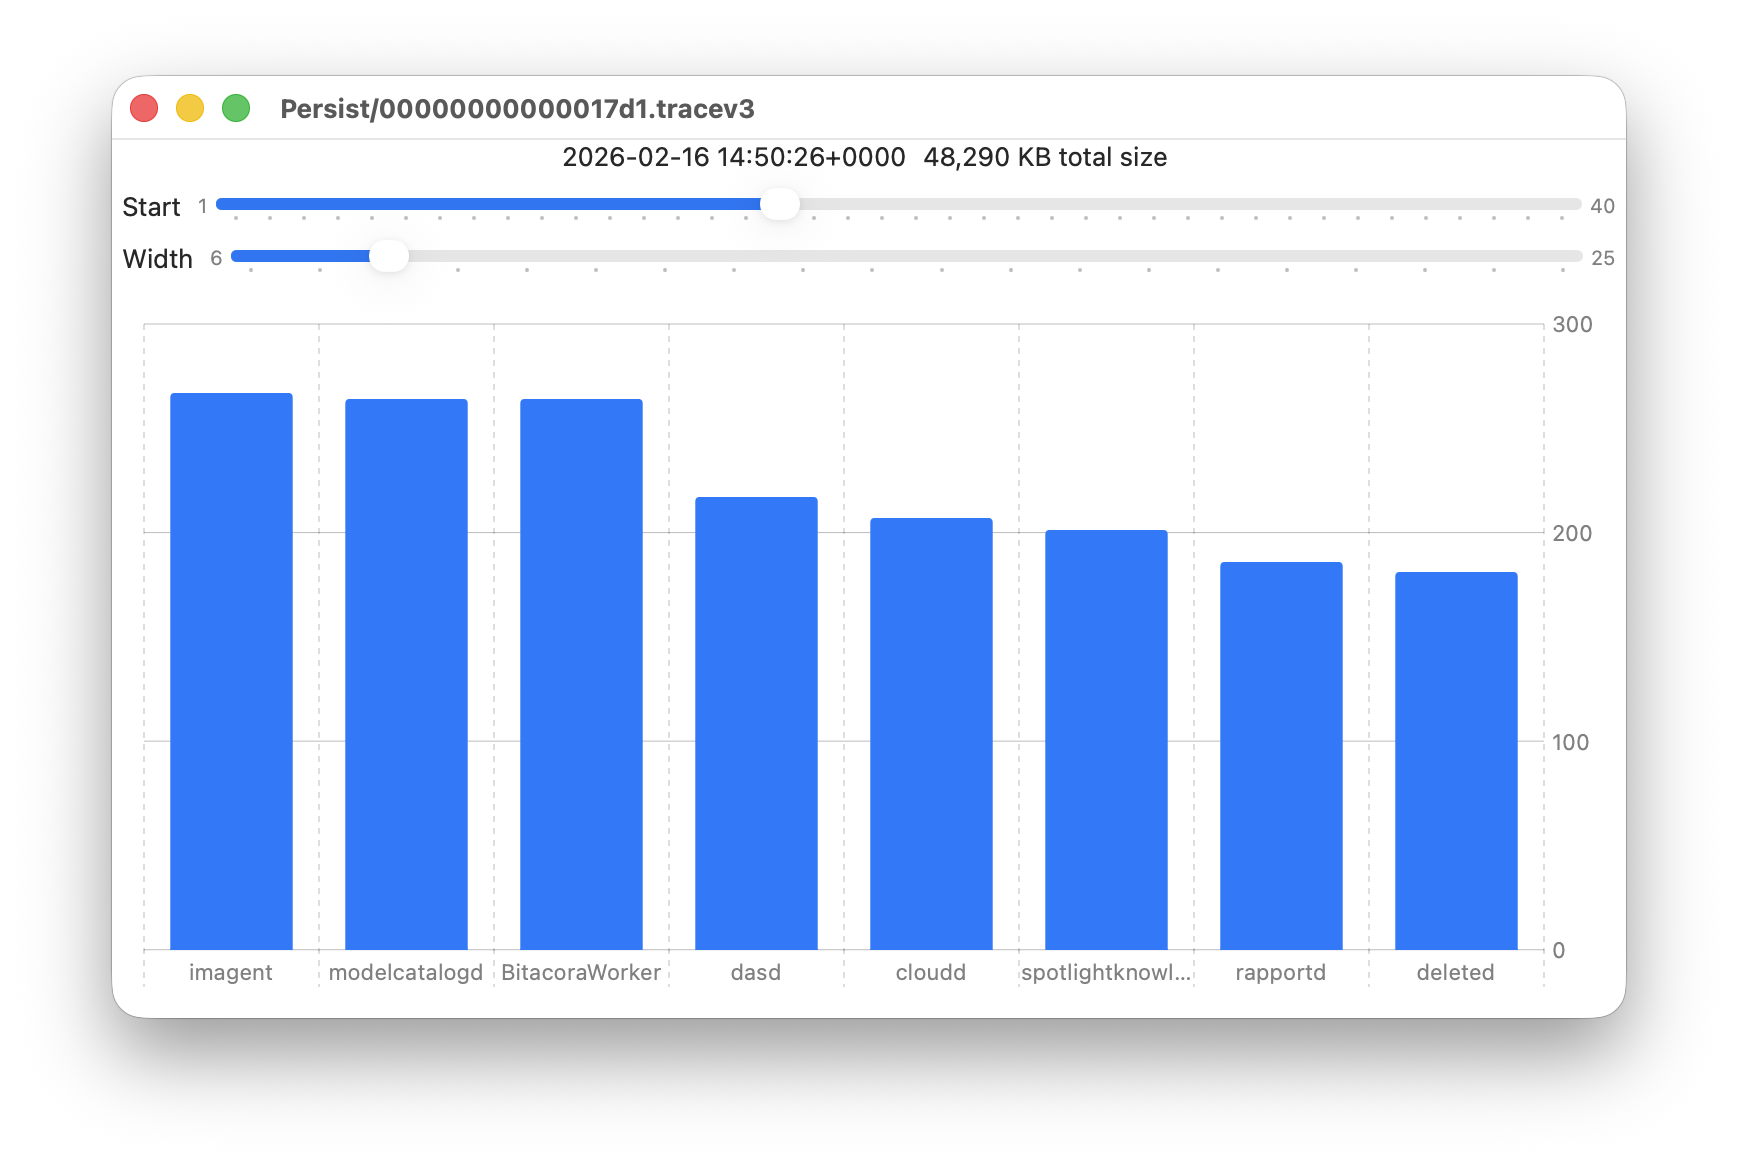
Here are 8 bars from 17 to 24, with smaller quantities written to the log of around 200 KB each. They include the DAS service dasd and cloudd for iCloud.
It’s easy to flip quickly through a series of log files: click on the next file you want to view in the main list, click on the Chart selection tool and values will be displayed immediately.
Fascinating though that might be, it doesn’t in itself answer many questions. Add a log browser like LogUI, though, and the combination helps you locate and identify unusual activity, problems, and specific events.
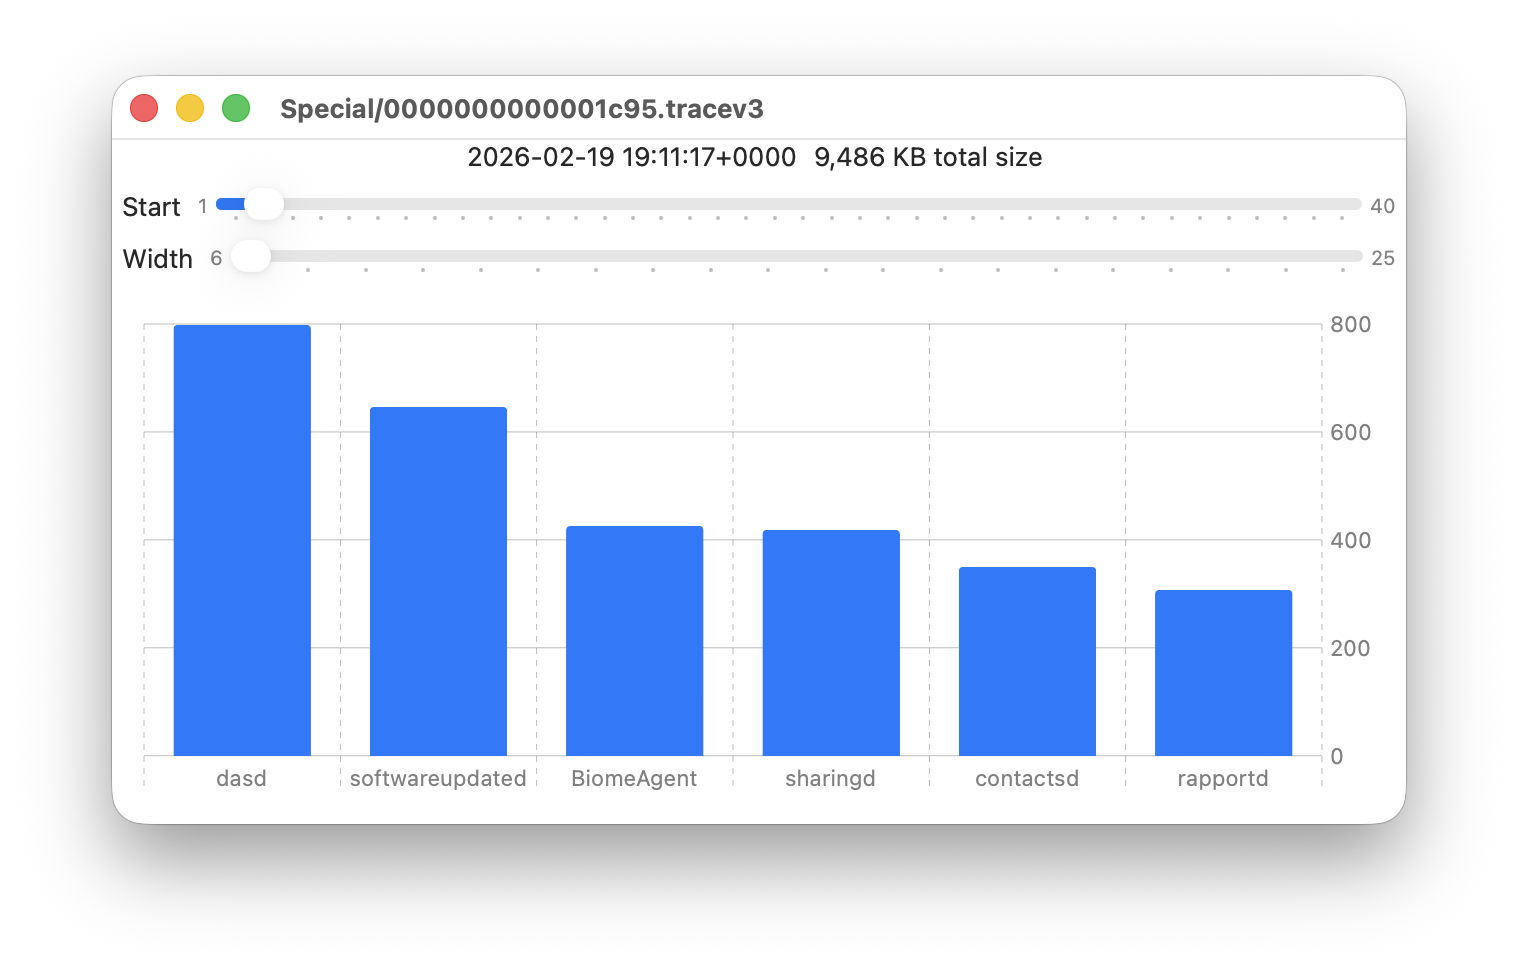
I happened to notice one Special log file that was closed at 19:11:17 on 19 February has high log data from softwareupdated. The previous Special log file was closed at 18:20:04, so somewhere between those times my Mac checked for software updates.
To ensure the full entries were still available in the log, I opened LogUI’s Diagnostics Tool to confirm that its earliest entries were a couple of days earlier.
I then set LogUI to a Start time of 18:20:04 with a Period of 600 seconds, and a Predicate set to a processImagePath of softwareupdated, to look for entries from that process. My first check located all the softwareupdated entries around 18:29:25, when I had apparently run SilentKnight. As a bonus, I discovered from those that SilentKnight was stuck in app translocation, so have been able to fix that (again).
Logistician version 1.0 build 7 for macOS Sonoma and later is now available from here: logistician106
I will add it to other pages here when I’m more confident that this initial version is stable and does what it claims in its detailed Help book.
Processes and their threads running in the background can be hard to identify. When they’re having problems, or you just want to discover what WardaSynthesizer is, it can be frustrating trying to obtain more information. In some cases you’ll end up referring to the list of background items in Login Items & Extensions, in General settings. Many of its entries should be self-explanatory, or aided by the information revealed in their button, but some cryptically refer to Item from unidentified developer, for example.
This article suggests where to go next, and where to look when a background process doesn’t appear in that list.
Activity Monitor
Switch Activity Monitor’s view to CPU, ensure the View menu is set to show All Processes, then locate and select the process you’re interested in. Click the ⓘ button in the toolbar to see the path to the executable, its parent process and other useful information.
However, Activity Monitor only lists active processes, and those that have quit won’t appear until they’re active again.
BTM dump
Many background processes, including those listed in Login Items & Extensions, are now managed by macOS Background Task Management (BTM), which maintains a detailed list of them in its store in /var/db/com.apple.backgroundtaskmanagement/BackgroundItems-v16.btm. Although not documented in any man page, you can obtain that as a BTM dump, using the command sudo sfltool dumpbtm > ~/Documents/btmdump.text
to write it to the text file btmdump.text in your Documents folder. This uses sfltool, originally intended to manage the Shared File List (hence the sfl), that has gained additional features covering Service Management, although its man page hasn’t caught up yet and the most help you’ll get is from Apple’s account in its Platform Deployment Guide.
The BTM dump lists full Service Management information for every item currently being managed, by user ID. Normally, the two important user IDs would be 0 for root and 501 for the primary admin user, but here the first list, with a UID of -2, appears to be a composite covering most Background Items. You should also check those for the current user, such as 501. A typical entry might be: UUID: 9A087CA1-250D-4FA6-B00A-67086509C958
Name: Alfred 5.app
Developer Name: (null)
Team Identifier: XZZXE9SED4
Type: app (0x2)
Flags: [ ] (0)
Disposition: [enabled, allowed, not notified] (0x3)
Identifier: 2.com.runningwithcrayons.Alfred
URL: file:///Applications/Alfred%205.app/
Generation: 0
Bundle Identifier: com.runningwithcrayons.Alfred
This gives the location of the executable that is loaded. The Developer Name given is taken from its code signing certificate. The Disposition field is probably most relevant to identifying those causing problems, as it should reflect the status of that entry in the Login Items list, and whether the user has been notified.
BTM attributions
Apple also maintains a property list containing details of many helpers and other executables used by major third-party apps. This can be found at /System/Library/PrivateFrameworks/BackgroundTaskManagement.framework/Versions/A/Resources/attributions.plist
In nearly 4,000 lines of dictionaries, Apple lists many of the more common background and helper apps you’re likely to encounter, from Adobe Creative Cloud services to ZoomDaemon. Among the useful information given about each are its associated bundle identifiers, the path to its executable, and the developer’s Team Identifier for their signing certificate. Although the identities of most of those should be obvious, if you’re confronted by the sort of fragmentary information that System Settings can offer, this can be a great help.
Log entries
The BTM subsystem is identified in the log as com.apple.backgroundtaskmanagement. One simple way to observe its activity is to obtain a full log extract for a period of interest using LogUI, then set the popup to the left of its search box to Subsystems, enter com.apple.background in the search box and press Return.
Key points
In Activity Monitor select the process and press the ⓘ button;
sudo sfltool dumpbtm for a BTM dump;
attributions.plist in /System/Library/PrivateFrameworks/BackgroundTaskManagement.framework;
Erasing the contents of the internal SSD in an Apple silicon Mac might seem a simple task, until you consider what’s on it in addition to the user files in its Data volume. Not only is that paired with the System volume, a mounted snapshot, but there are two additional containers that you don’t normally see.
This article explains how you can erase the following:
the Data volume, shown in blue
the Boot Volume Group, consisting of the Data and System (pink), and their accessory volumes (green)
all volumes in the Apple_APFS container (red)
the entire SSD, including the other two containers (pale yellow).
Assuming that you’re going to install something in their place, it’s up to you to choose, and that will in turn determine how you can install macOS and anything else required to allow your Mac to start up and run again.
Before you try any of these, you should de-authorise that computer in one of Apple’s media apps, and ensure you have a thorough and reliable backup of all the user files.
Data volume
Erase the Data volume by destroying its encryption key using EACAS, Erase All Content and Settings. This doesn’t so much delete anything, as render it inaccessible, so is most economical on SSD use, and quickest without compromising on security. This affects all user accounts with Home folders stored on the internal SSD.
Open System Settings, General, Transfer or Reset, and click Erase All Content and Settings.
If you continue, you should see one final warning before the contents of the Data volume are blown away into the great bit-bucket in the sky.
When that has completed, your Mac will start up for personalisation, configuration, and creation of its new primary admin user, just as it did when it was new. However, it will still be running the same macOS installation as before you used EACAS.
Boot Volume Group
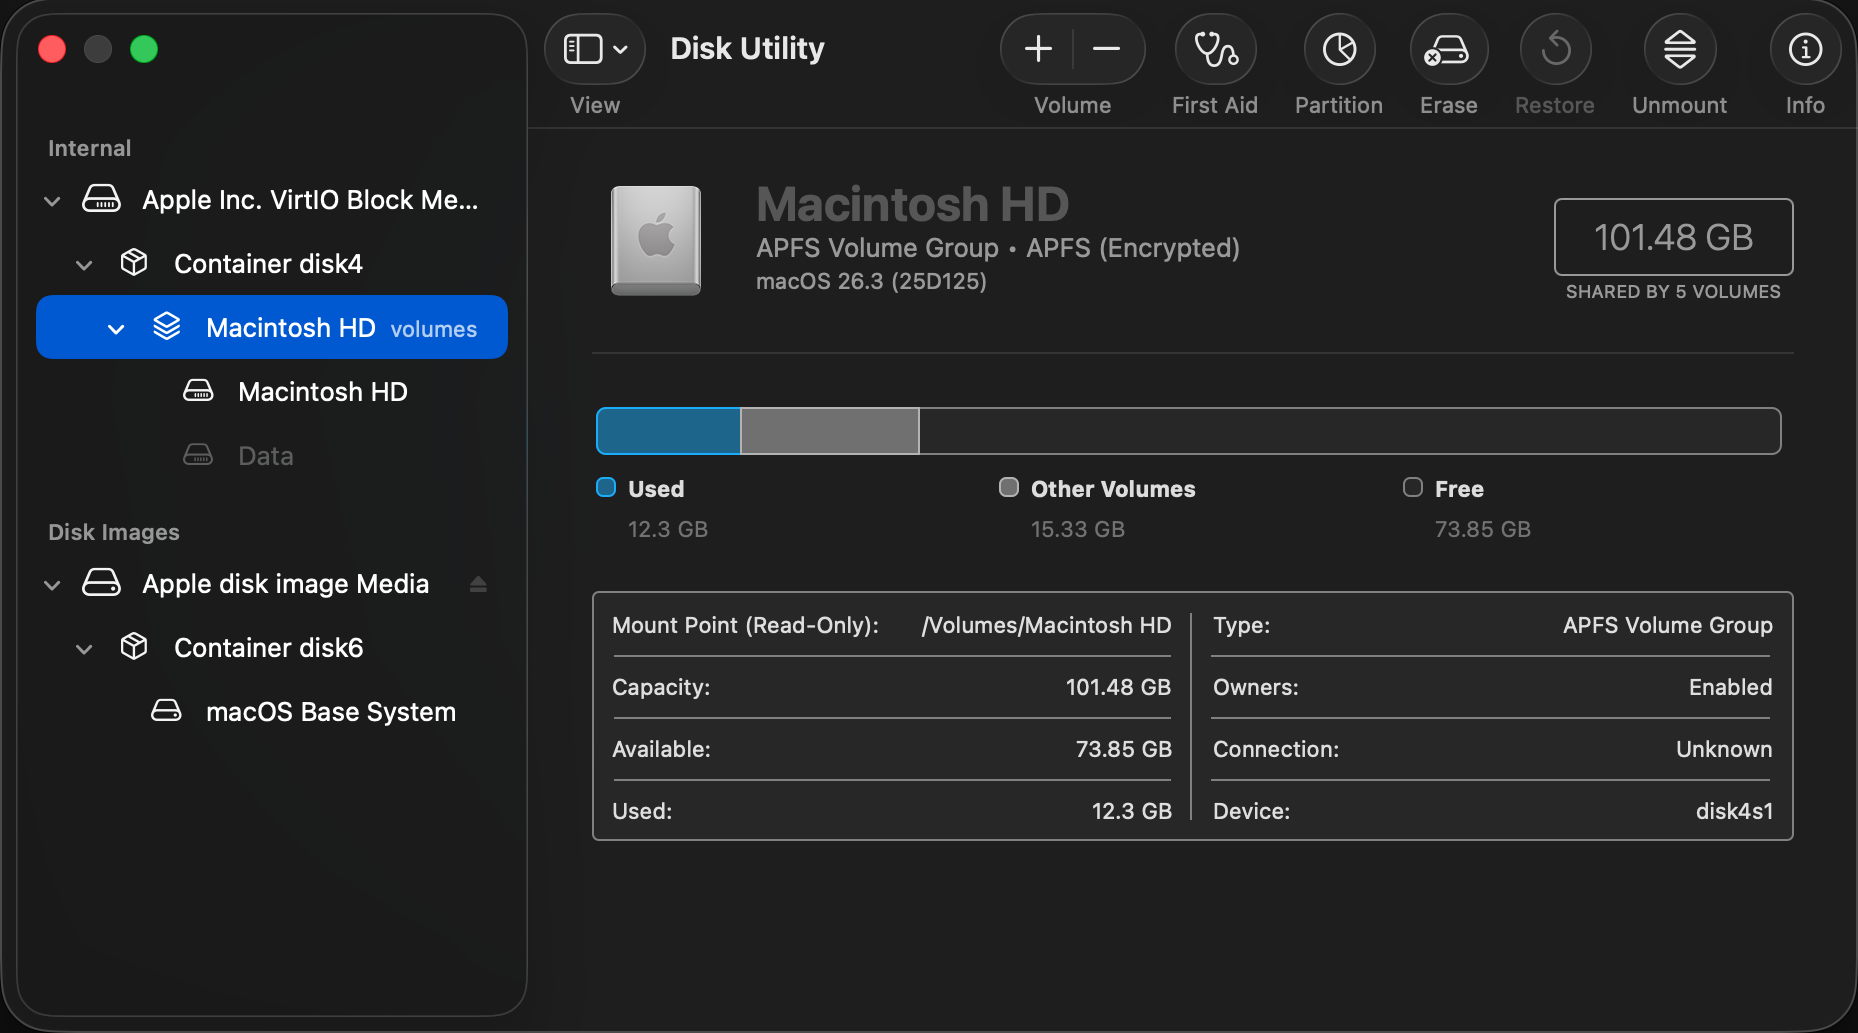
Erase the current Boot Volume Group using Disk Utility in Recovery. Put your Mac into Recovery by starting it up with the Power button held, select Options, select a user and authenticate as that user to display the Recovery window. There select Disk Utility and click Continue.
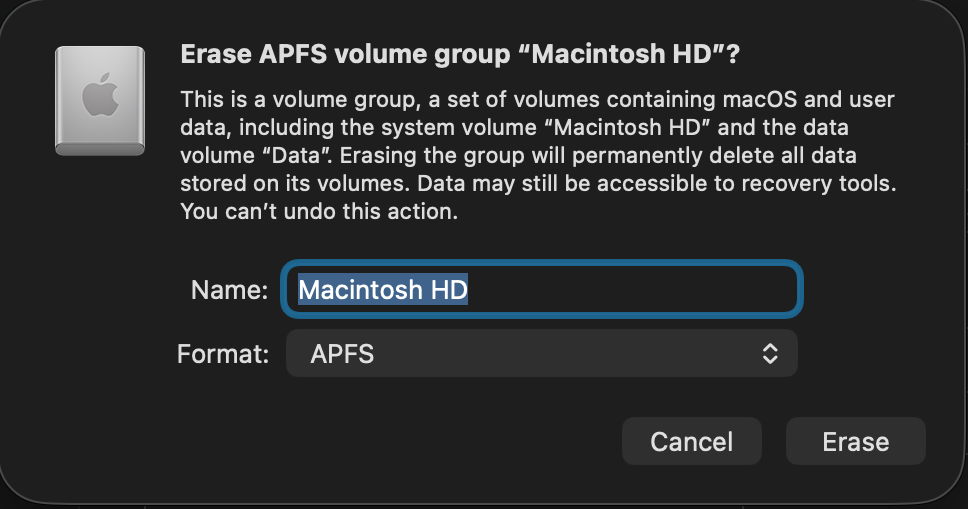
Select Macintosh HD at the left and click the Erase tool at the top of the window. Enter a name for the volume such as Macintosh HD, select APFS as the format, and click the Erase or Erase Volume Group button.
You might be asked to Erase and Restart, which will lead to a restart and following that your Mac will try to activate over a network.
On completion, quit Disk Utility, select Reinstall macOS if necessary, click Continue and follow the instructions to download and install fresh macOS. Note this procedure doesn’t wipe and reinstall the Preboot or Recovery volumes in the Boot Volume Group.
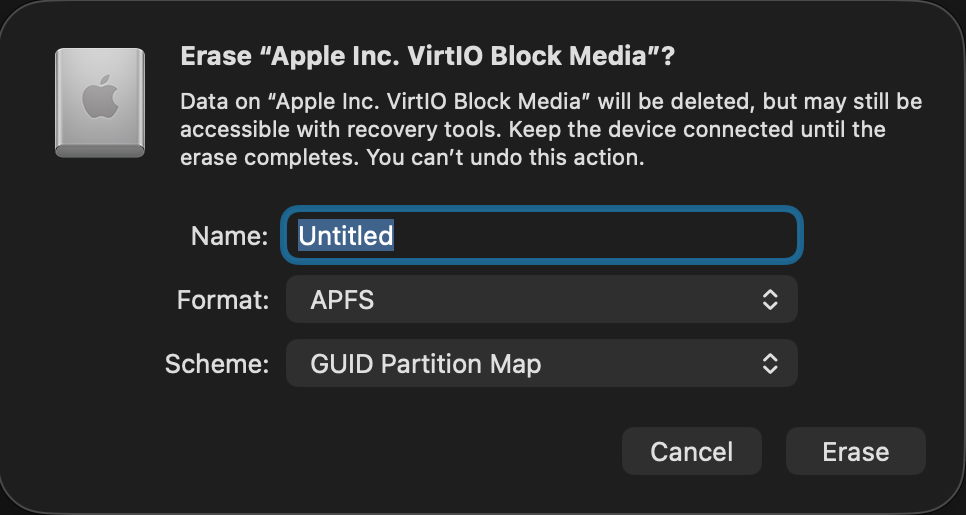
Some instead select the disk at the top of the list at the left, here named Apple Inc. VirtIO Block Media because it’s running in a VM. In theory that should completely reformat the internal SSD, wiping all three of its containers, and so require a more extensive reinstallation. In many cases, it’s preferable to Restore in DFU mode, to ensure the whole of the firmware is replaced at the same time.
Apple_APFS container
Erase the whole of the Apple_APFS container using Erase Mac in Recovery, which should erase all Boot Volume Groups within that container.
Enter Recovery as normal using the Power button, select Options, and click Continue. Then instead of selecting a known user, use the Erase Mac command in the Recovery Assistant menu. This completely erases all Boot Volume Groups in the Mac’s internal SSD, ready to reinstall macOS, for which it requires an internet connection.
This has the advantage that it can be performed when you don’t know the password to unlock the Data volume (FileVault).
Entire SSD
Erase the entire contents of the internal SSD by formatting it and installing its contents afresh from another Mac, using Restore in DFU mode.
This is described here. Apple has improved that from Sonoma onwards, as it’s no longer necessary to use Apple Configurator 2 on the Mac that’s performing this, but it can all be done in the Finder. To do that, you’ll need another Mac to perform the restore process, and a USB-C data cable to connect the two of them. Don’t try using a Thunderbolt cable, though, as it won’t work. Another secret for success is to plug that cable into the target Mac’s DFU port, that designated to support DFU connections, as detailed here.
Restoring in DFU mode replaces the Mac’s firmware, erases the boot volume group, and installs the bundled version of macOS, leaving that Mac in the same condition in which it was delivered to its first user, with a fresh copy of macOS ready to be personalised and set up. Although that part of the process is fairly quick, full migration is then required before user applications and documents are available. The great advantage of restoring is that you can pick which version of macOS and its firmware are installed.
Which version of macOS will be installed?
When restoring in DFU mode, you can choose which version of macOS will be installed according to the IPSW image you use, making it the method of choice when you intend downgrading that Mac to an older version of macOS.
Methods that obtain new macOS from Apple should install:
the current version of the most recently installed major version of macOS
if you have just upgraded macOS, then erased the Boot Volume Group in Recovery, Apple warns that “you may get” the version of macOS that was running before that upgrade.


 (Abstract)新款M5 24G内存+512G 硬盘比老款 M4 便宜


 button, but some cryptically refer to Item from unidentified developer, for example.