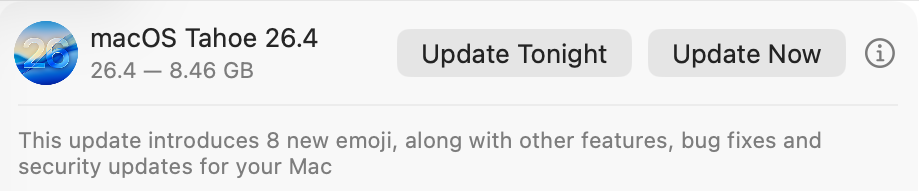
Updating macOS is a far more complex series of processes than it used to be, and the progress bar displayed in Software Update settings is complicated as a result. To capture all the phases that precede installation of an update, the progress bar moves through a series of stages, only one of which is downloading. This article identifies and explains them.
Start
When the Software Update pane offers a macOS update, it has already done a lot of the preliminary work, in fetching the catalogue of updates, checking through them to determine which could be installed, and working out what that would require. This enables it to provide a first estimate of how much needs to be downloaded. Note this is only an estimate at this stage, and may not include additional components such as an update to Rosetta 2.
Once you’ve agreed to install the update now, the progress bar is displayed.
Progress shown here covers many different processes, of which the most substantial are the download and preparation phases. Although progress shown during the download will vary depending on the speed of your Mac’s connection with Pallas, Apple’s software update servers, other sections are determined by the completion of tasks required for the installation, and may proceed in fits and starts.
Before the download can begin, softwareupdated has initial preparations to make, including reloading and downloading the Update Brain responsible for much of the task of installation. Following that are extensive preflight checks, and together those account for the first 15% of the progress bar shown. On a fast Apple silicon Mac, the progress bar may jump straight to that 15%.
Download
This starts at that arbitrary 15%, and is completed when the bar reaches 55%. In between those it should progress according to download speed, but that can be highly non-linear.
This displays a more accurate total size for the download, and the current amount that has already been downloaded. In this case, the bulk of this update is coming over the network from my Content Caching server, so its initial estimate is for a brief period of just 2 minutes. The progress bar then moves in proportion to the amount downloaded, not the time.
Although most of the download can be cached, for Apple silicon Macs the last 1 GB or so has to be obtained for each update from Pallas. As a result, the progress bar suddenly slows as it’s approaching 55%, and the estimated time remaining increases before decreasing again.
Preparing
As soon as the download is complete, there’s another preflight phase lasting from 55%-60%, then the downloads are prepared for installation. This phase doesn’t apparently involve their decompression, which is largely performed on the download stream during the download phase.
Preparations are arbitrarily assigned a period of 30 minutes to complete, but now seldom if ever require that long. As they’re allocated to the last 40% of the progress bar, this phase usually completes much quicker than the times given.
The final 5 minutes are often the slowest, and can take a few minutes longer than that, as the files for installation are gathered into a ‘stash’ ready for the Update Brain to install. Because the progress bar tends to jump straight from 95% complete to 100% this can make it look as if the update has frozen.
Installing
As soon as preparations are complete and reach 100% on the progress bar, the Mac prepares to restart into the installation phase, for which you’re given a 1 minute countdown before the screen goes black and installation happens.
Progress bar key phases
0-15% preparation, preflight; usually brief
15-55% download; on Apple silicon Macs, last 1 GB usually can’t be cached, so slower
55-60% preflight; brief
60-100% preparing; last 5 minutes may be longest.
I hope this helps you make sense of what you see during macOS updates, at least until the screen goes black and the installation starts.
Not too long ago, macOS usually only checked for system software updates once a day. If your Mac’s routines didn’t coincide with Apple’s release of updates, they might arrive a day or two late, and sometimes they were left a lot longer. When I started writing this blog over 11 years ago, one of my goals was to spread information about those updates, so we could all have confidence that our Macs were as well protected as possible and got bugs fixed promptly. In those days, those mostly involved vulnerabilities in Java and Adobe Flash Player.
At first, this was all about what Apple has always been worst at, communicating. In spite of the unsung efforts of its engineers, Apple has chosen to remain as silent as possible about bugs and security. The only time I’m aware that its silence was broken was back in July 2019, when it released an update to its Malware Removal Tool MRT to remove a hidden web server installed by Zoom’s installer, and even then the information was passed on furtively.
Just before Christmas 2016, I released the first version of LockRattler to check and report on security systems, among them the installed version of XProtect. That was widened to include firmware version checks in EFIcientC in July 2019, which quickly turned into SilentKnight.
SilentKnight, and its more basic cousin Skint, compare versions of security data installed on your Mac with lists of those current, a simple task until you realise that Apple doesn’t provide any list of current versions of XProtect and others, nor of Mac firmware. Instead of being able to check with Apple, SilentKnight has to look these up in databases that I maintain on my Github.
For example, the most active of those is XProtect, currently updated most weeks. I keep a watch on the availability of its updates using the same tools that you have: SilentKnight, and the xprotect command in Terminal. Rather than running them once a day, I do this whenever I suspect an update is imminent. Some days I only check once, just to be sure a surprise update hasn’t appeared, but when I think we’re due for an update, I may run them every hour or more frequently.
When SilentKnight strikes gold, I first install the update here, and analyse what it changes. This is straightforward for XProtect, which holds its content in five files in the Resources folder inside its bundle. Using BBEdit, I compare the contents of the update with the previous version, and summarise those. This is a little more complex with XProtect Remediator, as that not only contains executable binary scanning modules, but a set of Bastion rules used by the Behavioural XProtect.
Since the release of macOS Tahoe, XProtect has been installed in two locations, the newer of which is updated separately over an iCloud connection, so I now have to check the version available from there.
Once I know that new version is available, I update the skint1 and sysupdates property lists on Github, so your SilentKnight and Skint will know about the update when they next check. I then put together an article announcing the update with the details of what has changed, post it here, and announce that on X (formerly Twitter).
The last step is to add that information to the list of updates on SilentKnight’s product page, and my main page listing all updates, and update version numbers in separate pages for those still using LockRattler, which can’t check my databases.
How quickly that all happens depends on how quickly I can identify the update, and when I can download and analyse it. If Apple releases the update after I have gone to bed, I’m afraid I won’t be able to do that until the following morning, as happened earlier this week. But if you thought my system was run automatically from some database maintained by Apple, I’m afraid that’s not the case, as it’s all down to SilentKnight and me.
If your Mac installs an update before I have updated my databases, SilentKnight will inevitably expect your Mac still to be using the older version, as that’s what’s listed in the database. When it discovers that it’s using a newer version, it will report that as an error. Please bear with it, as I shouldn’t take long to install and analyse the update, and correct the version number in the database.
Checking firmware versions and updates is more complicated again, as I have to maintain separate lists of the latest versions for each model. You can see those in my Github as well.
Is it worth all this effort? If you want to ensure that your Mac is running the current version of its security data such as XProtect, I don’t know of any alternative. If you know, then please tell me, as it could save me and SilentKnight a lot of effort.
Finally, my Github data is open to all. If you want to use it in your own tools, then feel free. However, if you intend using it commercially, thus to make money from my labour, please discuss it with me first.
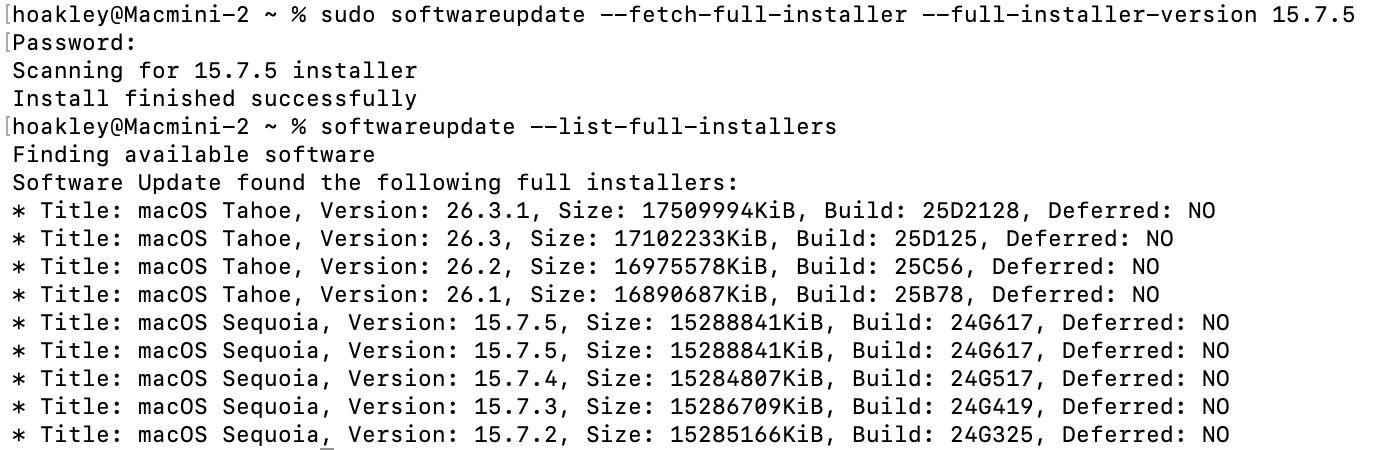
After reading today’s article here about fixing software update problems and the softwareupdate command tool, two eagle-eyed readers, Gurt and upstreamer, insisted that they were being offered two full installers for macOS Sequoia 15.7.5. Although for one of them this might have occurred because of previous membership in a beta-testing programme, that didn’t explain them both. I therefore checked again this evening, and was surprised to see the list of available updates does now offer two apparently identical full installers for macOS Sequoia 15.7.5 Build 24G617.
To find these yourself, simply enter the following in Terminal: softwareupdate --list-full-installers
If you fancy downloading either of them, use the command sudo softwareupdate --fetch-full-installer --full-installer-version 15.7.5
That should download the Installer app into your Applications folder.
Software Update doesn’t offer 15.7.5 as an update for Sequoia 15.7.4. There’s no mention of the release of 15.7.5 anywhere else, in particular Apple’s security release notes page, and I can’t see anyone else mentioning this as a newly released update. Has it been released prematurely by accident, perhaps? Or has someone forgotten to finish a job off?
Postscript
Apple has now rectified what had been an inadvertent public release of a release candidate for 15.7.5. Hopefully the next time it appears, it will be the final release.
What can you do when you know there’s an update available, but your Mac is pretending there isn’t? I’m here referring to those delivered through Software Update, so come from Apple’s software update servers. Although there are several ways to talk to it, all such updates rely on the softwareupdated service, giving you a choice of solutions.
Check the obvious
Before going any further, check that updates aren’t being blocked because there’s insufficient free space on your Mac’s startup disk, and a laptop has ample charge in its battery or is running on mains power.
Restart
Sometimes softwareupdated seems to lapse into a coma, and the best way to wake it up is to restart your Mac. Don’t expect it to jump into action as soon as you’ve logged in, but give it five minutes first.
Safe mode
If a standard restart doesn’t do the trick, start your Mac up in Safe mode, leave it five minutes, and try again. Although Apple no longer includes this as one of the purposes of Safe mode, by disabling third-party extensions it gives softwareupdated every opportunity to do what it’s there for.
SilentKnight
If you haven’t been using my free SilentKnight to check for updates, this is a good time to do so. Because it calls softwareupdated with an undocumented option, that sometimes kicks it into action. If all you want to do is download the latest XProtect or other security data update, SilentKnight can do that for you, even if you don’t want to update macOS.
While you can download and install macOS updates in SilentKnight, that doesn’t display a progress bar and lacks other features found in Software Update in System Settings. If SilentKnight’s checks find a macOS update you want to install, you’re therefore better off opening Software Update and obtaining the update from there.
Where it comes into its own is in dealing with concurrent macOS updates and security data updates, as it makes it easy for you to download and install single updates and leave others alone. That’s explained here.
XProtect in Sequoia and Tahoe
These most recent versions of macOS have to update two copies of XProtect, and inconveniently use different mechanisms for each. Their primary copy relies on the xprotect command tool, whose command sudo xprotect update
should obtain a copy via iCloud and install it in the right place, provided that Apple has released it through iCloud. Their secondary copy is updated in the normal way by SilentKnight, Software Update or softwareupdate.
softwareupdate
This command tool is the most direct interface to softwareupdated, and that used by SilentKnight, but you need to know its secret options if you’re going to get the best out of it.
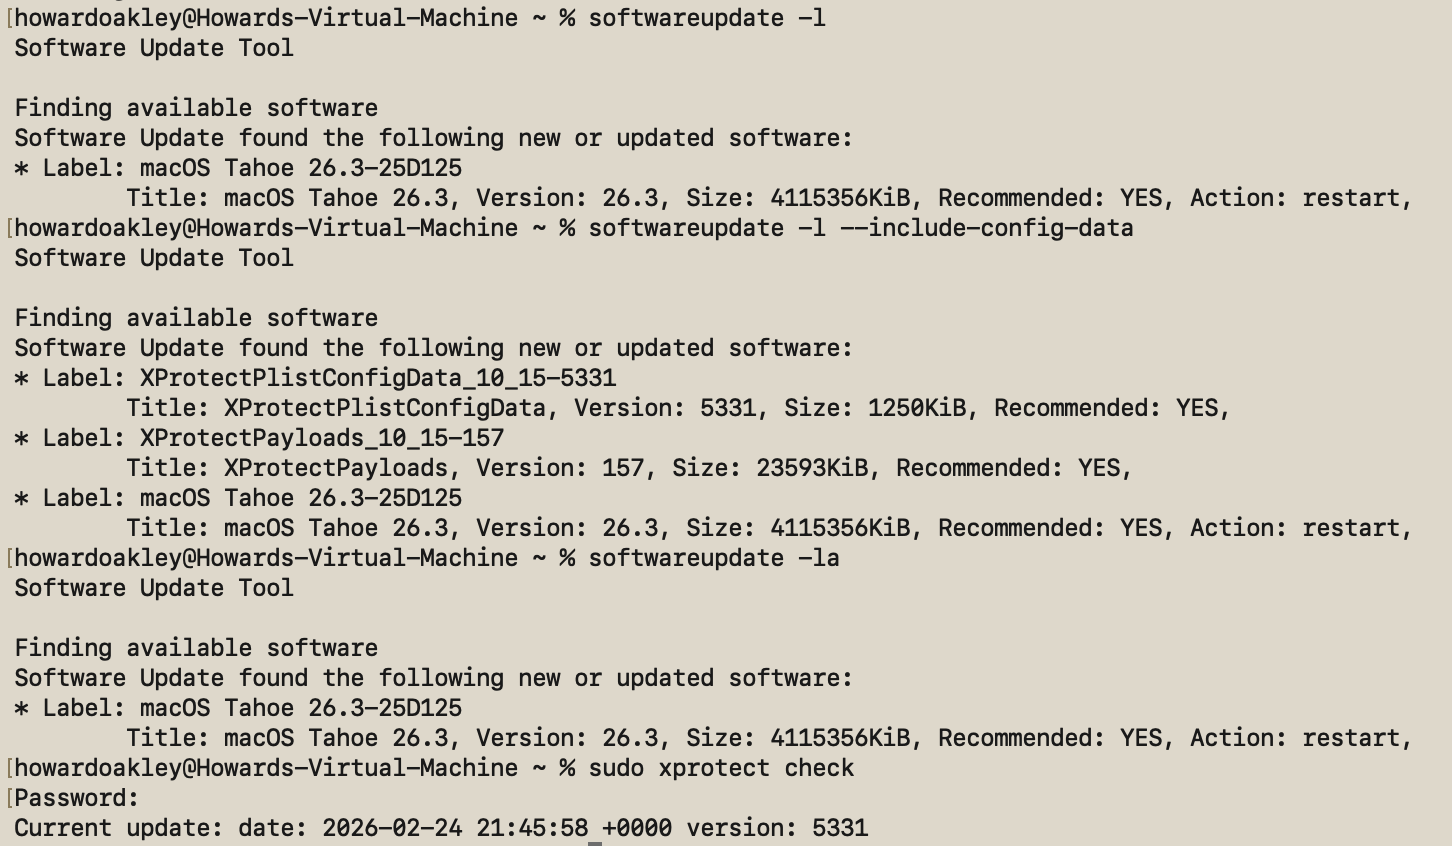
If all you want is a list of available macOS updates, softwareupdate -l
works fine, and using -la does much the same. Neither will display security data updates like those for XProtect or XProtect Remediator, though. To see those, use the undocumented option softwareupdate -l --include-config-data
and that should provide the full list. As you’ll probably want to download them individually, use the command softwareupdate -i --include-config-data updatename
where updatename is the word given as the Label in the listing.
Another invaluable feature of softwareupdate is its list of full installers available for direct download. That’s generated by softwareupdate --list-full-installers
The current list includes:
Tahoe 26.1, 26.2, 26.3
Sequoia 15.7.2, 15.7.3, 15.7.4
Sonoma 14.8.2, 14.8.3, 14.8.4
Ventura 13.7.8
Monterey 12.7.4, 12.7.6
Big Sur 11.7.10, 11.7.11
Catalina 10.15.6, 10.15.7 builds 19H2, 19H15
Mojave 10.14.6
High Sierra 10.13.6
but that given will include only those compatible with the Mac used to obtain the list. When you want to download one of them, use the command sudo softwareupdate --fetch-full-installer --full-installer-version 11.7.11
giving the version you want. If you want a different version, then check with one of the sites that provides links to a fuller list, such as Mr. Macintosh.
Avoid using the option to download but not install updates, based on softwareupdate -d, as downloads can go missing from /Library/Updates where you’d expect them, and this doesn’t work at all for macOS updates.
On Apple silicon Macs only, you can use the command sudo softwareupdate --install-rosetta --agree-to-license
to download and install Rosetta 2 and avoid its normal installation dialog.
Checklist
Check free space and (in laptops) power.
Restart and try again.
Start up in Safe mode and try there.
Try SilentKnight.
In Sequoia and Tahoe, XProtect also needs separate xprotect command.
softwareupdate -l --include-config-data
To install individual update softwareupdate -i --include-config-data updatename
If you keep your Mac up to date with the current version of macOS, at least half a dozen times a year you’ll install an update to bring it to the latest version. This article explains how those updates have worked in recent years.
Before Big Sur
Before we upgraded to Big Sur, macOS updates were relatively simple and based on Installer packages, structured collections of files that are copied to the boot volume in accordance with scripts, run by the Installer app. Once that copying is complete and the boot volume contains the files forming the new version of macOS, the Mac can be rebooted from those.
This system update in Mac OS X 10.1.3 in March 2002 was installed by the Installer app following authentication.
This became more complex with macOS 10.15 Catalina, as that was the first to divide what had previously been a single boot volume into two, System and Data. The diagram below shows in miniature what happened during the course of Catalina’s first two minor updates, as an example.
Upgrading from Mojave to Catalina 10.15.0 was performed using Installer packages that completely replaced everything in its system, created in a new System volume, as shown at the top. This was referred to as an upgrade, as the whole system was installed afresh.
Then (skipping a Supplemental Update) came the first minor update to 10.15.1 on 29 October 2019. For the sake of this example, consider that includes a new version of the cat command tool. Rather than that update containing the whole system all over again, it only contains and installs what has changed, including that new cat binary.
Then on 10 December 2019 Apple released the update to 10.15.2, containing another set of changed files, this time perhaps replacing the cp command tool. There are two ways to install that update, either as a delta update or a Combo. The delta update contains the changes from 10.15.1, here cp; the Combo update contains everything that has changed since 10.15.0, both that in 10.15.1, here cat, and in 10.15.2 with cp.
Combo updates tackled what was then a not uncommon problem, when a previous update hadn’t been installed correctly. If the update to 10.15.1 didn’t actually install the new cat and we then installed the delta update for 10.15.2, the latter may not have worked properly. As there was limited error checking in those old updaters, we would then be using a flawed installation of macOS. By installing the 10.15.2 Combo updater instead of the delta, the chance of errors like that were significantly reduced.
Because updates, whether delta or Combo, were Installer packages, Apple not only supplied and installed them using Software Update and its command tool equivalent softwareupdate, but they were also provided for download from webpages in Apple’s Support site. If you had more than one Mac to update, it made sense to download and use the update package.
Big Sur and the SSV
Catalina’s novel boot volume group, with its separate System and Data volumes, was only an intermediate step to Big Sur, which brought the greatest structural change in Mac operating systems since the introduction of Mac OS X twenty years earlier. The great majority of macOS now runs from a mounted snapshot with a read-only file system separate from that of user files on the paired Data volume, and requires a fundamentally different method of installation and updating.
In addition to updating the contents of the system, from Big Sur onwards installers and updaters have considerably more to do. Those tasks include creating the new snapshot to contain the bootable copy of the system, firmlinking that System snapshot with its paired Data volume, building a tree of cryptographic hashes so that the snapshot can be sealed, and verifying the signature of its seal against Apple’s requirement.
These changes can be seen by following Big Sur’s first couple of updates. On 14 December 2020, the update to 11.1.0 might have gone through similar changes to Catalina, with the replacement of its cat command tool. Once that had been installed on the System volume, a snapshot was made of that System volume, hashes were computed for all its contents, and assembled into a tree. At the top of the tree, a hash of all the hashes in the next layer down forms its seal, which is then hashed again to form the signature of the Signed System Volume (SSV). This signature is compared against that set by Apple for the whole volume, and only if they’re identical is the System snapshot accepted for use. There’s no room here for the slightest error if the signature on the SSV is going to match its requirement.
When that was updated again to 11.2.0 on 1 February 2021, perhaps with a new version of the cp tool, the new installer repeats this process of creating a new snapshot, building its tree of hashes, sealing them, creating the signature, and comparing that with Apple’s signature. This means that each and every update is verified to be perfect, and no errors are tolerated.
Safari and dyld caches
Not all the system is installed in the SSV. Apart from some separately updatable components such as XProtect, Apple decided to make Safari and its supporting WebKit components capable of being updated without going through the process of building a new SSV, so in Big Sur and Monterey they were installed on the Data volume. Accompanying those were large dyld caches containing frameworks and more. That changed in macOS Ventura, since when they have been delivered as cryptexes, sealed disk images that APFS can graft into the file system. Apple also used the same mechanism to deliver a few Rapid Security Responses (RSR), before discontinuing them.
dyld caches are one of the few parts of macOS that is single-platform. While Intel Macs are only provided with an Intel version, those on Apple silicon Macs include both architectures, to support Intel-only apps running in translation by Rosetta 2. The second set is largely responsible for the fact that Apple silicon Mac updates are invariably larger than those for Intel Macs.
Apple has since redeveloped its RSR mechanism, and has introduced them as Background Security Improvements (BSI) in Tahoe, although none has yet been released to the public.
Upgrades and updates
Installing a new major version of macOS to go from 10.13 to 10.14, for example, had been accomplished by Software Update downloading a full Installer app, which then replaced the whole of the old system with the new one. From macOS 12.3 that changed, and whenever possible macOS now effectively performs an update by replacing only changed files before it builds the new SSV. This has reduced both the download time required and that needed to decompress and prepare the update.
This has had the side-effect that ordinary non-admin users can now upgrade macOS from one major version to a later one, an action that previously required admin privileges.
Combo updates
In the new system from Big Sur onwards, Apple only provides Combo updates for those updating from versions of macOS older than the previous version, and only when required. If you were to update straight from 15.0 to 15.2, then your Mac downloads all that it requires for that update. If your Mac is already running 15.1, there’s no option to install the changes in 15.1 again, nor should you need to, as its installation in 15.1 has already been verified as being identical to Apple’s reference.
If you felt that wasn’t adequate, then the only option is to install the whole of 15.2 from scratch by running the Sequoia 15.2 Installer app. More recent installers are more likely to complete this without disturbing the Data volume, and requiring its migration from a backup.
Although these complexities may seem bewildering, macOS updates conceal all of this from the user and most commonly work transparently. However, it can explain why some updates can turn out to be significantly larger than expected.
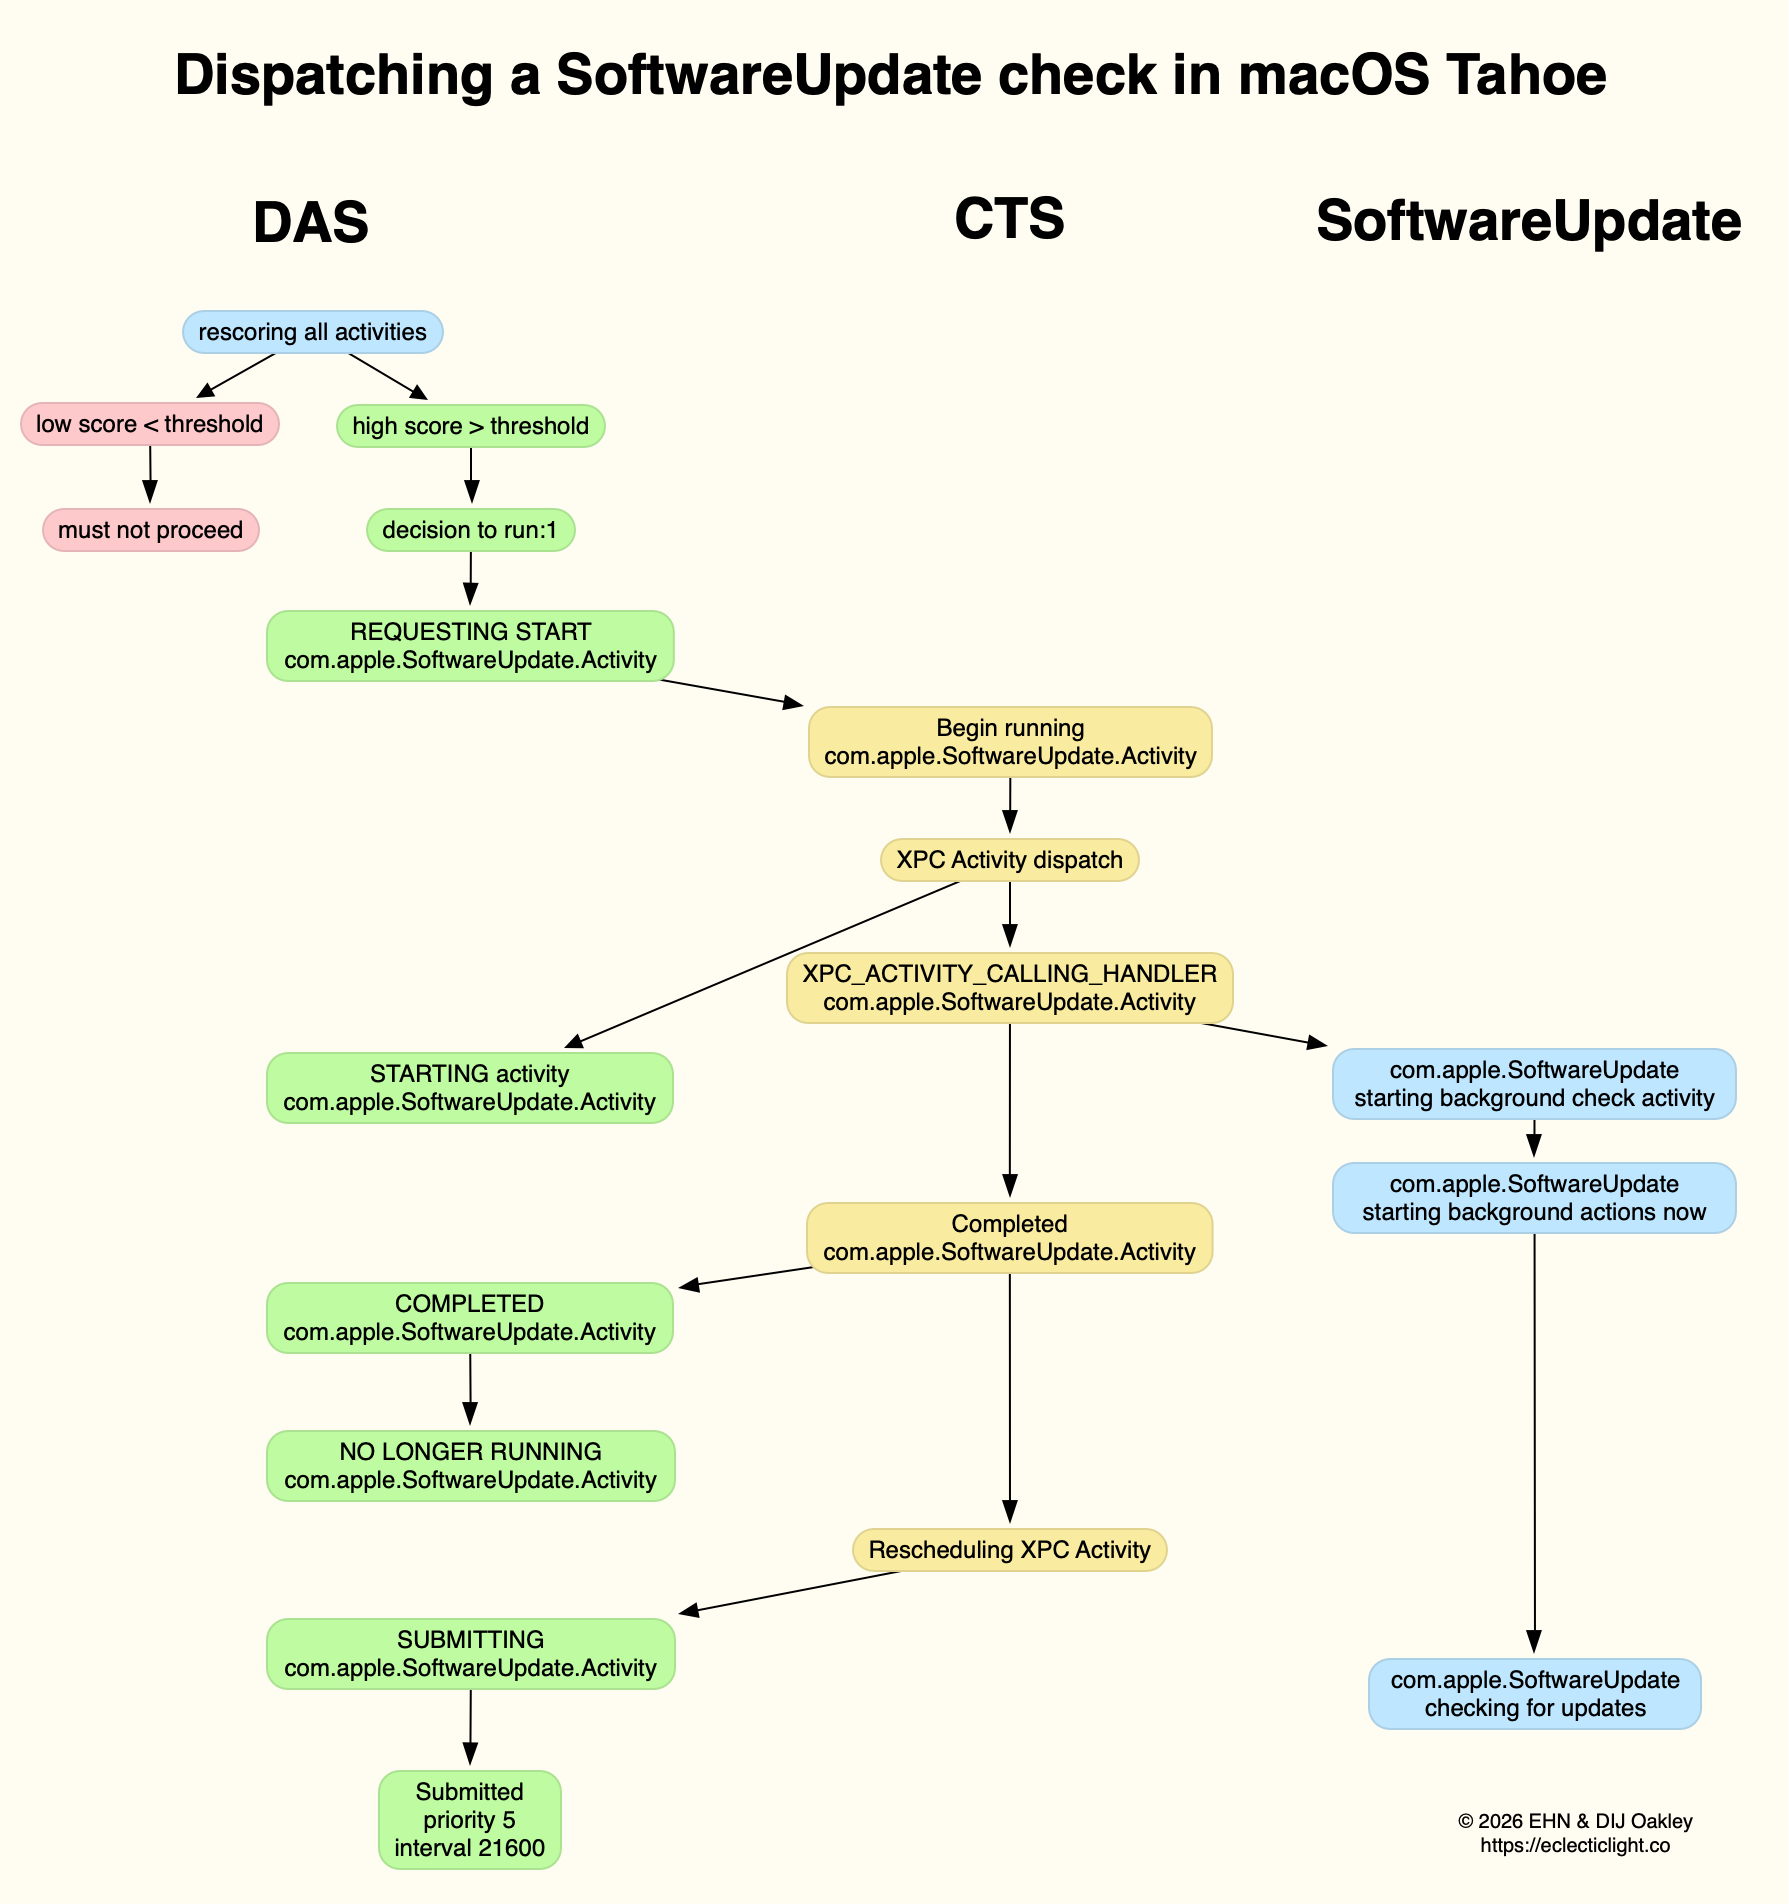
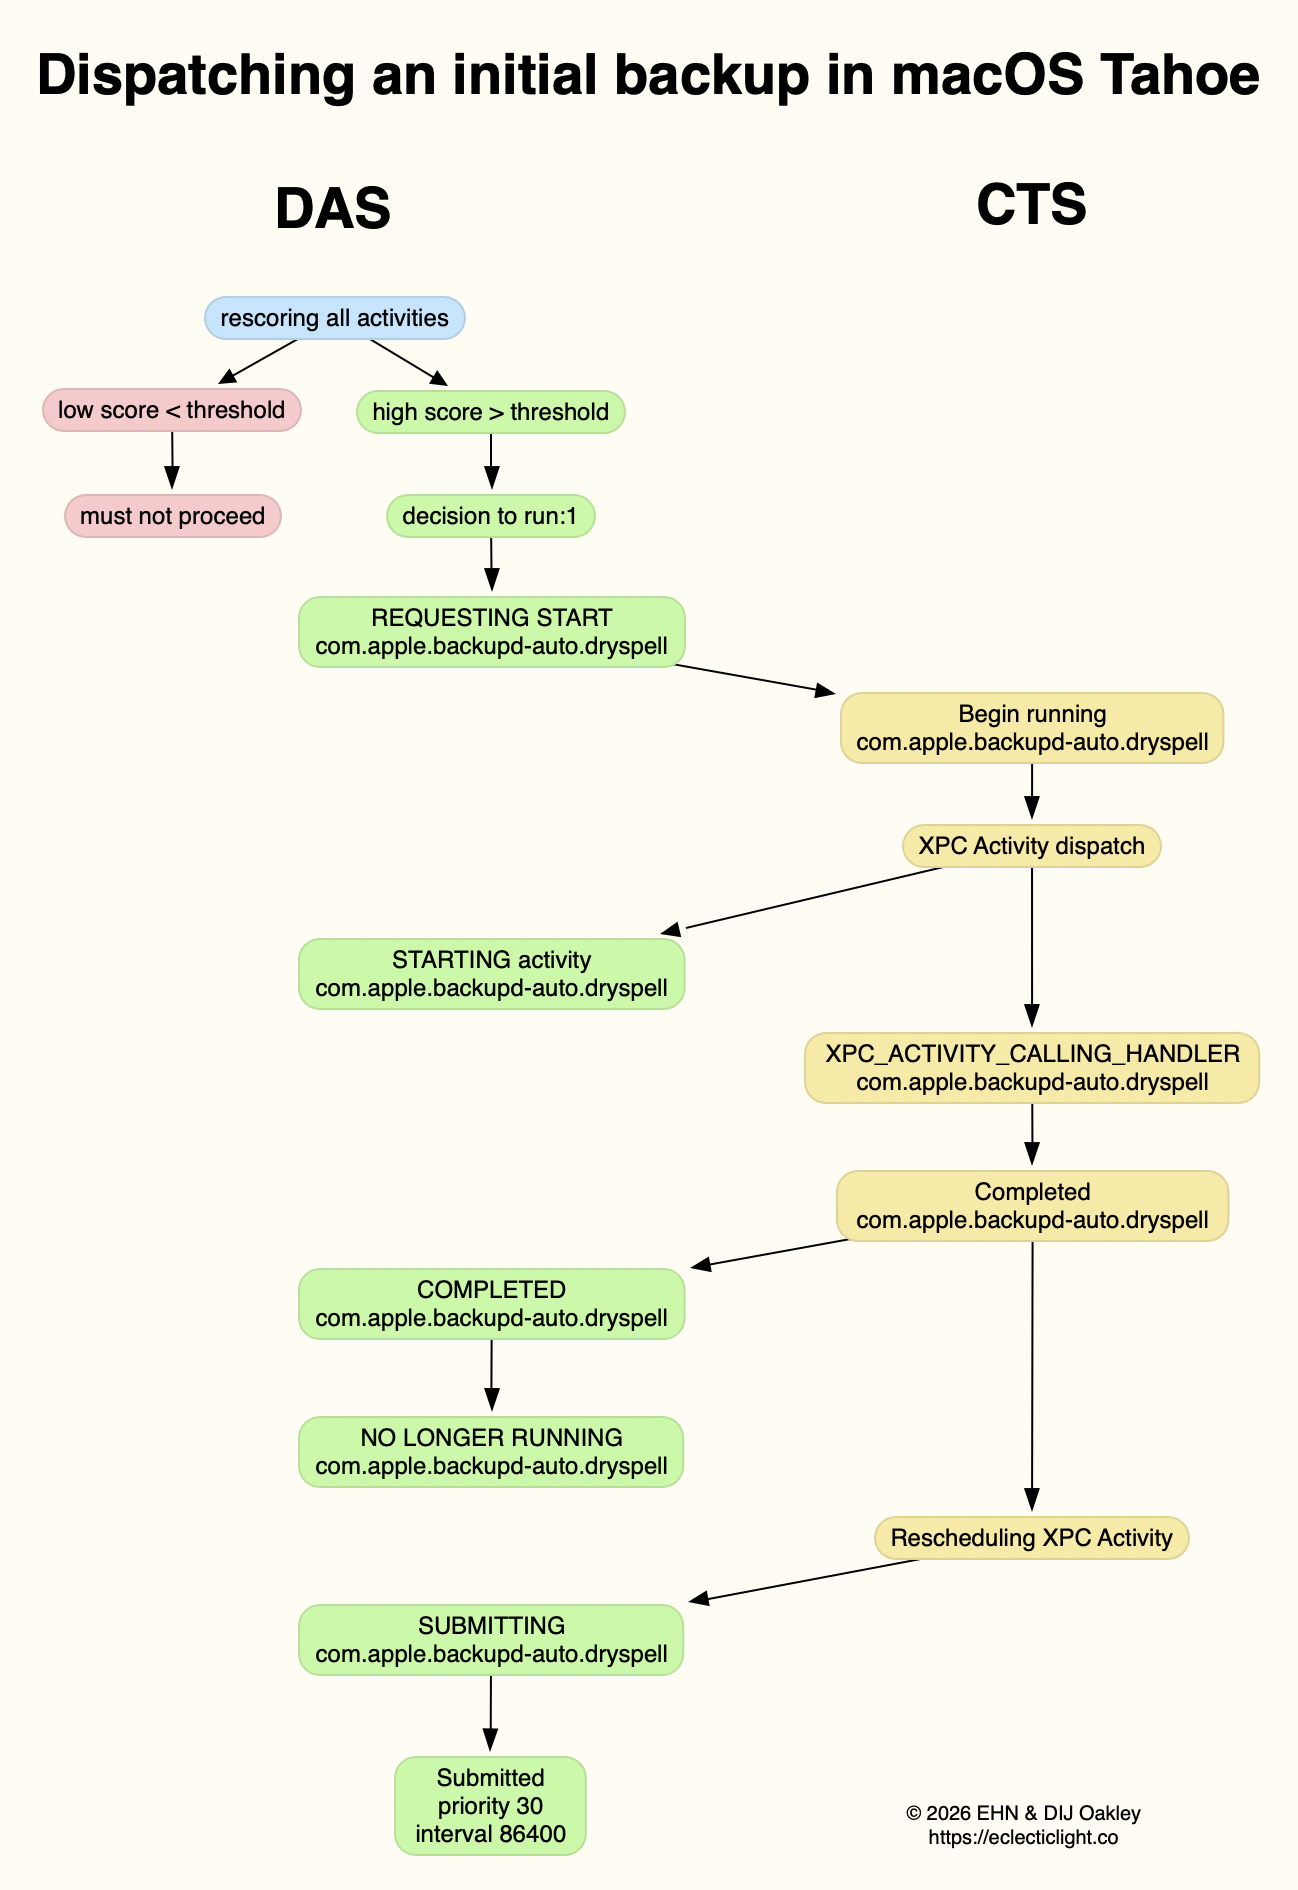
Among the other activities you may see shortly after you’ve logged in to macOS Tahoe are a check for system software updates available from Apple’s servers, an initial Time Machine backup, and sometimes a set of XProtect Remediator scans. This article explains how those are dispatched by Duet Activity Scheduler and Centralised Task Scheduling, the DAS-CTS system.
DAS
Shortly after user login, DAS starts gathering its budgets enabling it to score activities, including thermal policies, shared memory and energy. It then loads saved activities by group, and solicits activities for resubmission and inclusion in its lists to be dispatched and run. It then periodically evaluates the activities in those lists, to determine which should and should not be run at that time.
In the early minutes after login, it may only have around 126 candidates in its lists, some of which it identifies as ‘passengers’, and doesn’t evaluate for the time being. For those activities it does evaluate, it arrives at a score between 0 and 1, and decides which it should dispatch next.
SoftwareUpdate
This normally reaches a score sufficient to be dispatched in the first few minutes after user login. That DecisionToRun is recorded in the log, and DAS requests CTS to start com.apple.SoftwareUpdate.Activity as root via XPC. This starts a dialogue between DAS and CTS, leading to the handler com.apple.SoftwareUpdate being called. That in turn starts its background check, and proceeds to check for updates.
CTS considers that activity is completed, and informs DAS of the fact. The activity is then rescheduled with DAS, in this case with a priority of 5, at an interval of 21,600 seconds, or 6 hours. Thus, SoftwareUpdate should check for new system updates approximately every 6 hours when your Mac is running, although the exact time of its dispatch by DAS will vary according to other activities and general conditions such as temperature and resource availability.
This is summarised in the diagram below.
In practice, the time between DAS deciding to run SoftwareUpdate and it running is likely to be less than 0.1 second, and online checks should be initiated within a further 0.1 second.
Time Machine backup
Automatic backups are normally delayed for the first 5 minutes after startup, and during that time DAS should decide not to proceed to dispatch them. When it does give them the go ahead, the activity dispatched is known as com.apple.backupd-auto.dryspell, indicating that it’s the initial backup made after startup. This too is run as root.
A similar dialogue between DAS and CTS is established, as shown in the diagram below.
What is distinctive here is that com.apple.backupd-auto.dryspell doesn’t result in the immediate initiation of a backup, but instead runs backupd-helper, and that can be delayed significantly before backupd itself is run to perform the backup. Although backupd-helper should be running within 0.2 seconds of DAS deciding to run the sequence, it may be a further 10 seconds before backupd itself is actively backing up. This is presumably because of other sustained and intense activities competing for resources at that time.
Dispatch of com.apple.backupd-auto.dryspell thus differs from the diagram below, showing dispatch of an ordinary automatic backup after the initial one, in macOS Sequoia.
com.apple.backupd-auto.dryspell is rescheduled by DAS at a priority of 30, and an interval of 86,400 seconds, or 24 hours, so it should work neatly for Macs that are powered up each day.
XProtect Remediator
Dispatch of a set of XPR scans is less predictable, as they’re likely to occur at roughly 24 hour intervals, but only when the Mac is running on mains power, and when it’s otherwise lightly loaded. If that happens to be the period of relative calm ten minutes or more after logging in, then background activity will be prolonged as the set of XPR scans is run.
By the time XPR was ready to scan here, DAS had a total of 600 pending activities, of which 254 were considered to be ‘passengers’. It therefore evaluated 74 activities, two of which were com.apple.XProtect.PluginService.daemon.scan, to be run as root, and com.apple.XProtect.PluginService.agent.scan as user. On some occasions, DAS will hold one of those from dispatch until the other is complete, but in this case it approved both to run simultaneously. Those went through a similar dialog between DAS and CTS, resulting in com.apple.XProtectFramework starting both as timed scans with standard priority, within less than 0.2 seconds of the decision by DAS to dispatch them.
As those were both timed scans, when XPR’s timers expired they were cancelled before fully completing. However, once a week XPR scans should be run without that timer, allowing them to finish all their scans.
XPC Activity states
If you follow CTS log entries for XPC activity, you’ll come across numeric states ranging between 0-5, such as 32.474139 com.apple.xpc.activity _xpc_activity_set_state: com.apple.SoftwareUpdate.Activity (0xb8ac3a080), 2
Those are documented in Apple’s source code as:
0 XPC_ACTIVITY_STATE_CHECK_IN, check-in has been completed;
1 XPC_ACTIVITY_STATE_WAIT, waiting to be dispatched and run;
2 XPC_ACTIVITY_STATE_RUN, now eligible to be run;
3 XPC_ACTIVITY_STATE_DEFER, to be placed back in its wait state with unchanged times;
4 XPC_ACTIVITY_STATE_CONTINUE, will continue its operation beyond the return of its handler block, and used to extend an activity to include asynchronous operations;
5 XPC_ACTIVITY_STATE_DONE, the activity has completed.
I hope this had given insight into what your Mac is up to during the first few minutes after you log in, why Apple silicon Macs show such high CPU % for their Efficiency cores, and how this results from important background activities.