Gone are the days when you could pop the hard drive out of a sick Mac and connect it to another to recover its contents. This article explains how you may be able to transfer some or all of the contents of a modern Mac’s internal SSD to another Mac.
Any Mac: Thunderbolt
As long as you can get your Mac up and running, the fastest way to transfer files from its internal storage is back-to-back Thunderbolt networking, easily set up in Network settings. All you need is another Mac with a free Thunderbolt port and a suitable cable to connect them directly.
Apple silicon: Share Disk
If you can get an Apple silicon Mac to start up in Recovery mode, or Fallback Recovery, then you’ve got a good chance of salvaging whatever you need from its internal SSD.
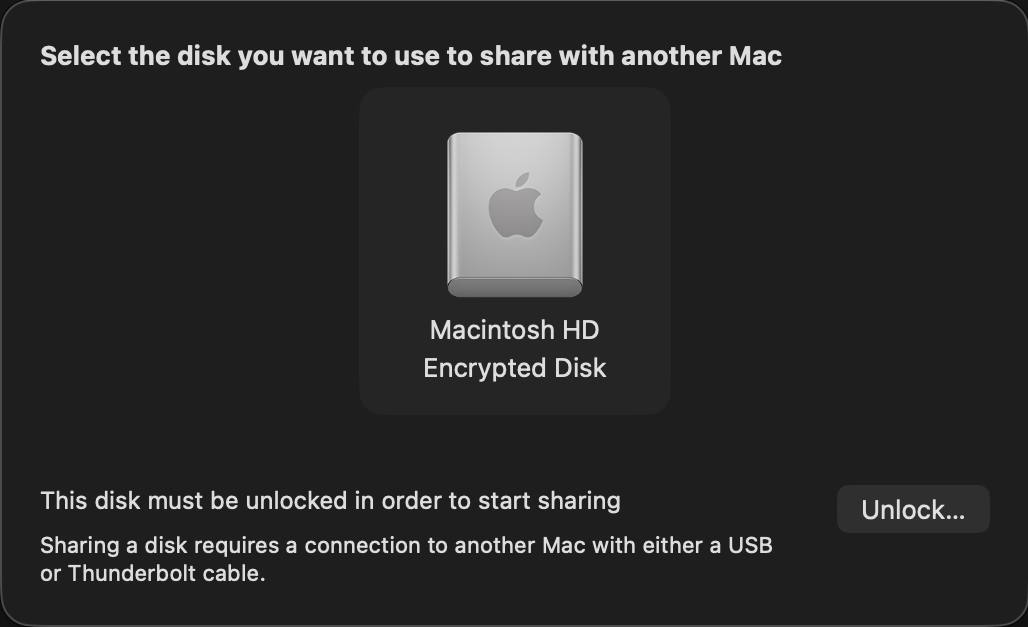
Connect it back-to-back with another Mac using a Thunderbolt 4 (or 3) cable. Start the sick Mac up in Recovery, pass through to Options and authenticate as necessary. In the Utilities menu there select the Share Disk command.
Select the volume you want to share, and when necessary unlock it with the password required for its encryption.
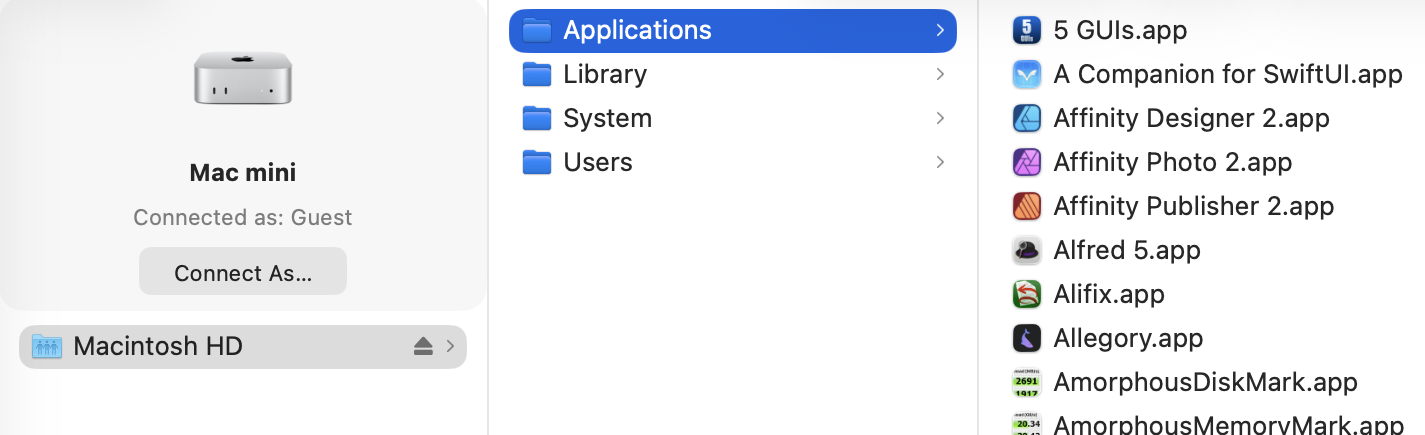
On the other Mac, that shared volume should appear as a networked device, connected as Guest, or on the Desktop. Despite that, you should have full access to its contents. This connection uses SMB, so listing large folders in the Finder will be surprisingly slow.
Now you can copy across all the files you want to your other Mac. That’s impressively quick, and can read them at about 3 GB/s, as you’d expect from a fast locally attached SSD. However, because of the SMB overhead, copying many small files is noticeably slower.
This can also get a bit kludgy when you’ve finished and want to disconnect. Trying to eject the shared volume may not work, and even when you stop sharing on the Mac in Recovery, and disconnect the cable, you may find the other Mac just won’t let go of it.
This only works with a single volume at a time. If you have added volumes to your Mac’s internal SSD, then you’ll have to repeat the process to access files on a different volume. But it does allow you to choose which volume to share.
Apple silicon: DFU mode
If you’re unable to put your sick Mac into Recovery, or Fallback Recovery, it’s still possible it has entered DFU mode, or could do so when started up to engage that mode. This is explored in more detail in this article, but doesn’t give you access to the contents of the Mac’s internal storage. You could try reviving it rather than performing a full Restore, though, as that isn’t destructive of its contents.
Intel T2: Target Disk
There are now two ways to enter Target Disk Mode on an Intel Mac with a T2 chip: if the Mac is already up and running (and not near-dead at all), you can opt for this in System Settings > General > Startup Disk, although I’m not sure why you would want to. If the Target really is sick, the only way you’re likely to engage this mode is to hold the T key during startup until the Thunderbolt symbol appears on its display.
The Target and Host must now be connected using a Thunderbolt 3 or 4 cable, although between Macs that are both running Catalina or earlier, a USB or USB-C cable could be used instead.
Shortly after they’re connected and ready, the Target’s internal Data volume should mount in the Host’s Finder. You should then be prompted for its FileVault password, and gain access to its contents. As with Apple silicon Macs, you can also copy files from the Host to the Target. To disconnect the Host and Target, eject the Target’s volume from the Host, then press and hold the Power button on the Target to shut it down.
Note that Target Disk Mode doesn’t offer a choice of volume.
Any Mac: External Boot Disk
If an Intel Mac with a T2 chip already has its boot security set (using Startup Security Utility) to allow it boot from an external disk, you may be able to get that to work, then mount the internal SSD to allow you to recover its contents to that or another external disk.
This is unlikely to work with an Apple silicon Mac, though, as it must always start the boot process from its internal SSD before it can continue booting from a system installed on an external bootable disk.
Summary
Cable: Thunderbolt 4 (or 3) connecting the two Macs back-to-back.
Apple silicon Mac: Recovery mode, Utilities menu, Share Disk.
Intel T2 Mac: T key held during startup.
Eject the Target’s disk on completion.
Apple silicon Mac: disconnect button, then shut down.
Firmware engineering must be among the least glamorous of the specialities, but it’s literally among the most fundamental. As regular users seldom need to come into contact with firmware and its versions, how those are numbered is kept as a dark secret. This article reveals what I have gathered.
Although you will come across different usage elsewhere, I here draw the distinction between:
True ROM, including Macintosh ROM (Classic Macs) and Apple silicon Boot ROM, is set in the factory and normally can’t be changed;
Firmware that can be updated in place includes Mac OS ROM (PowerPC), EFI Boot ROM or bootloader, and LLB/iBoot (Apple silicon);
The operating system including any kernel, in Mac OS, Mac OS X, OS X and macOS, which are usually updated repeatedly.
PowerPC: Open Firmware
Classic Macs using Motorola 68K processors have their own Macintosh ROM with opaque hexadecimal versions. After the introduction of PowerPC models in 1994, that changed with the Power Macintosh 9500 of 1995 to support Apple’s version of Open Firmware.
Their ROM and firmware version numbering is elaborate, with a ROM revision, here shown as $77D.45F6, a Boot ROM version of $0004.25f1, and a Mac OS ROM file version of 8.4, for this Power Mac G4 running Mac OS 9.2.1 in 2002. Of those, Mac OS ROM file updates were provided as needed, and appear to have followed a plain major and minor numbering system.
Intel: EFI
When Apple transitioned from PowerPC to the Intel architecture in 2006, Open Firmware was replaced by the Extensible Firmware Interface (EFI), already on its way to become Unified as UEFI. Each Intel model thus has an EFI version number, from 1.0 upwards, and a firmware version number such as IM41.0055.B08, that of the early 2006 iMac.
Back in late 2017, this iMac17,1 was reported as running Boot ROM version IM171.0105.B26.
This consists of the following elements:
A model type given as 2-3 letters, such as IM for iMac, MM for Mac mini, MBP for MacBook Pro, or XS for Xserve.
An individual model within that type given as 2-3 decimal digits, here 41 for the two iMac variants introduced in early 2006, while the mid-2006 iMac is 42, and the late-2006 iMac is 51 or 52. Those are commonly combined in a more accessible model identifier, such as iMac4,1 or iMac17,1.
A major version number given as four hexadecimal digits.
A minor version number given as three hexadecimal digits. With High Sierra, Apple ceased using the minor version number, leaving it set to either B00 or 00B.
Just for fun, many models also have a completely different SMC firmware version that was updated separately.
These were replaced in October 2018, in Macs that have been updated to macOS 10.14.1, High Sierra Security Update 2018-002, or Sierra 2018-005. Those updated EFI firmware to use a different version numbering system, with five decimal numbers separated by dots, such as 1037.140.50.0.0. Those differ between individual model types, making conversion from firmware version to model identifier impossible. The only way to determine whether any given firmware version is the most recent for a given model is thus to use a lookup table.
Intel: T2
Apple introduced the first MacBook Pro models with T1 chips in 2016-2017, but it wasn’t until the T2 models at the end of 2017 that there was any change in the format of firmware version numbers. Therefore MacBook Pro models with T1 chips continue to report just a plain EFI firmware version.
Intel Macs with T2 chips report two complete firmware versions, that for their Intel side as an EFI firmware version, and an iBridge or BridgeOS version for the firmware installed in the T2 chip. For example, 1037.147.1.0.0 (iBridge: 17.16.16065.0.0,0) gives 1037.147.1.0.0 as its new-style EFI firmware, and 17.16.16065.0.0,0 as that for the T2. However, in return for that added complexity, all Intel Macs with T2 chips give the same firmware versions when running the same version of macOS, so there’s no need for a model-based lookup table.
At this stage, Intel Macs can have one of three firmware versions:
old-style EFI firmware, such as IM171.0105.B26, when they haven’t had a firmware update from October 2018 or later;
new-style EFI firmware, such as 1037.140.50.0.0, when their firmware dates from October 2018 or later, and they don’t have a T2 chip;
T2 models with EFI and iBridge firmware, such as 1037.147.1.0.0 (iBridge: 17.16.16065.0.0,0).
Apple silicon
Strictly speaking, Apple silicon Macs have two distinct firmware version numbers, one for the Low-Level Bootloader (LLB, stage one) and the other for iBoot (stage two), but I can’t recall ever seeing the two differ in any release version of macOS. Both bring the sanity of a standard numbering system consisting of three numbers [major].[minor].[patch], and so far all models have remained in synchrony with the same numbers for each release of macOS since Big Sur 11.
Version numbers are composed of:
A major version number of 4-5 decimal digits set by the current major macOS. These have been 67xx (macOS 11), 74xx (12), 84xx (13), 10151 (14), 11881 (15), and for macOS 26 it’s currently 13822.
A minor version number in decimal that increments for each minor version of macOS. Although this varies between major versions, a recent sequence might run: 1 (macOS x.0), 41 (x.1), 61 (x.2), 81 (x.3), 101 (x.4), 121 (x.5) and 141 (x.6, if it precedes the next major version of macOS).
A patch version number in decimal that usually varies from 1-10, and has even reached 96.
For example, 13822.81.10 is installed in macOS 26.3, 15.7.4 and 14.8.4, which were released simultaneously.
Most recently, version numbers reported by beta-test releases of 26.4 have been completely different, of the form mBoot-18000.100.10.0.1. It’s not yet known whether this is a bug, or the harbinger of yet another change in firmware version numbering.
What firmware engineers might lack in glamour they seem to compensate for by turning what should be simple and consistent into great complexity.
Of all the important features of Macs, firmware must be among the dullest, although it’s also one of the Mac’s major benefits. Because Mac hardware, firmware, and its operating system are all made by Apple, the firmware in our Macs should always remain secure, robust and up to date.
That wasn’t always the case, though. Older Intel Macs could be difficult and sometimes impossible to update their firmware. Some particular configurations were notorious, and most became unreliable if you replaced their internal storage. After a long campaign with tools like eficheck, switching first to T2 then Apple silicon chips has proved decisive. With firmware updates distributed in and installed by macOS updates and upgrades, it’s almost unheard of now for a recent model to be running out of date firmware, unless it’s also running out of date macOS.
This has been important for system stability, where flaws in firmware can turn the most stable Mac into a series of kernel panics and crashes, and essential for security. All the user has to do to secure their Mac’s firmware is to keep macOS up to date. Vulnerabilities in PC firmware are relatively frequent and notoriously hard to address.
Now that support for Intel Macs is waning, and there are only a couple of iMac variants lacking T2 chips that are still fully supported, keeping track of firmware updates is far simpler. Last week’s release of macOS updates brought firmware updates all round, for the iMac19,1 and iMac19,2, as well as T2 and Apple silicon models.
The iMac19,1 and iMac19,2 (4K and 5K 2019) have firmware updates to take them from 2075.100.3.0.3 to 2094.80.5.0.0, the same EFI version found in T2 models. That’s the first update for them since last Spring (March).
Intel models with T2 chips have the same EFI version update to 2094.80.5.0.0, as well as their iBridge firmware, which changes from 23.16.12048.0.0,0 to 23.16.13120.0.0,0.
Currently all Apple silicon Macs from the first base M1 to those with the latest M4 and M5 chips, run common firmware, and that too has been updated from 13822.61.10 to 13822.81.10.
Version numbering of iBoot in Apple silicon Macs seems to have stabilised, with
A major version number set by the current major macOS. For macOS 14 that was 10151, for macOS 15 it was 11881, and for macOS 26 it’s currently 13822.
A minor version number that increments for each minor version of macOS. This runs in the sequence 1 (macOS x.0), 41 (x.1), 61 (x.2), 81 (x.3), 101 (x.4), 121 (x.5) and 141 (x.6).
A patch version number that varies from 1-10, and has once reached 96.
The iBoot update released with security updates to the older two supported versions of macOS should be the same as that for the current version. Thus, the next iBoot update should bring its version number to 13822.101.x, in macOS 26.4, 15.7.5 and 14.8.5. We’ll see how close that gets.
I maintain separate lists of current firmware versions for all three supported versions of macOS:
The faster and more sophisticated the CPUs in our Macs get, the more anguished we get over their activity and performance. While there are alternatives that can display measurements of CPU activity in the menu bar and elsewhere, the most available tool is Activity Monitor. This article explains what it displays as % CPU, and how that needs careful interpretation.
Activity Monitor
The CPU view in Activity Monitor samples CPU and GPU activity over brief periods of time, displays results for the last sampling period, and updates those every 1-5 seconds. You can change the sampling period used in the Update Frequency section of the View menu, and that should normally be set to Very Often, for a period of 1 second.
This was adequate for many purposes with older M-series chips, but thread mobility in more recent chips can be expected to move threads from core to core, and between whole clusters, at a frequency similar to available sampling periods. That loses detail as to what’s going on in cores and clusters, and may give the false impression that a single thread is running simultaneously on multiple cores.
However, sampling frequency also determines how much % CPU is taken by Activity Monitor itself. While periods of 0.1 second and less are feasible with the command tool powermetrics, in Activity Monitor they would start to affect its results. If you need to see finer details, then you’ll need to use Xcode Instruments or powermetrics instead.
% CPU
The heart of the CPU view is what Activity Monitor refers to as % CPU, defined as the “percentage of CPU capability that’s being used by processes”. As far as I can tell, this is essentially the same as active residency in powermetrics, and it’s central to understanding its strengths and shortcomings.
Take a CPU core that’s running at 1 GHz. Every second it ‘ticks’ forward one billion times. If an instruction were to take just one clock cycle, then it could execute a billion of those every second. In any given second, that core is likely to spend some time idle and not executing any instructions. If it were to execute half a billion instructions in any given second, and spend the other half of the time idle, then it has an idle residency of 50% and an active residency of 50%, and that would be represented by Activity Monitor as 50% CPU. So a CPU core that’s fully occupied executing instructions, and doesn’t idle at all, has an active residency of 100%.
Expressed more formally, residency is the percentage of time a core is in a specific state. Idle residency is thus the percentage of time that core is idle and not processing instructions. Active residency is the percentage of time it isn’t idle, but is actively processing instructions. Down residency, a feature of more recent cores, is the percentage of time the core is shut down. All these are independent of the core’s frequency or clock speed.
To arrive at the % CPU figures shown in Activity Monitor, the active residency of all the CPU cores is added together. If your Mac has four P and four E cores and they’re all fully occupied with 100% active residency each, then the total % CPU shown will be 800%.
Cautions
There are two situations where this can be misleading if you’re not careful.
Intel CPUs feature Hyper-threading, where each physical core acquires a second, virtual core that can also run at another 100% active residency. In the CPU History window those virtual cores are shown with even numbers, and in % CPU they double the total percentage. So an 8-core Intel CPU then has a total of 16 cores, and can reach 1,600% when running flat out with Hyper-threading.
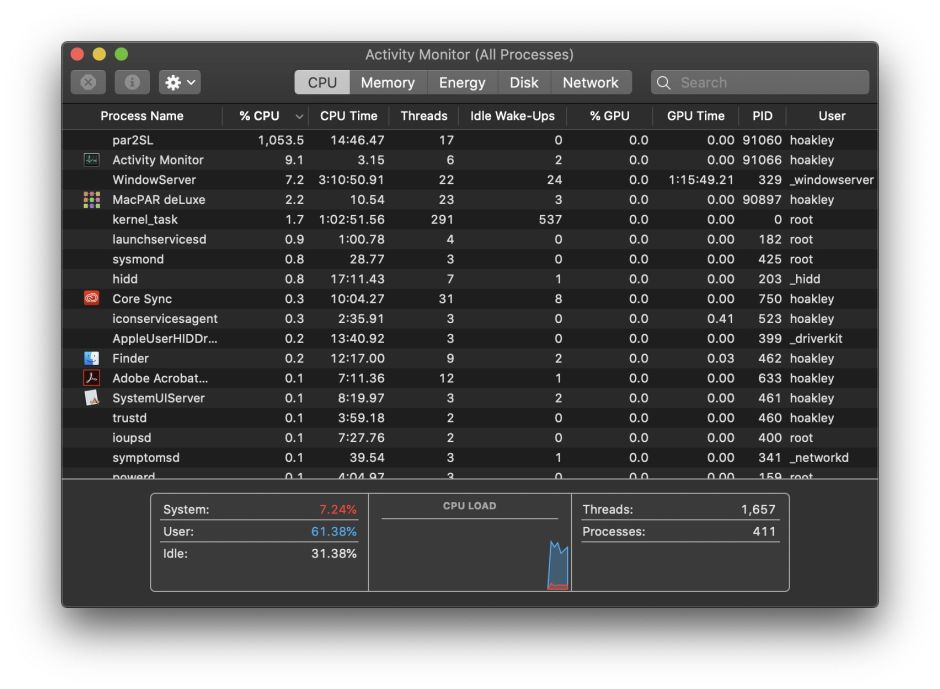
This eight-core Intel Xeon runs a short burst with full Hyper-threading, during which it gains the eight virtual cores seen on the right. According to the % CPU in Activity Monitor shown below, it was then running at over 1,000%.
The other situation affects Apple silicon chips, as their CPU cores can be run at a wide range of different frequencies under the control of macOS. However, Activity Monitor makes no allowance for their frequency. When it shows a core or total % CPU, that could be running at a frequency as low as 600 MHz in the M1, or as high as 4,512 MHz in the M4, nine times as fast. Totalling these percentages also makes no allowance for the different processing capacity of Performance and Efficiency cores.
Thus an M4 chip’s CPU cores could show a total of 400% CPU when all four E cores are running at 1,020 MHz with 100% active residency, or when four of its P cores are running at 4,512 MHz with 100% active residency. Yet the P cores would have an effective throughput of as much as six times that of the E cores. Interpreting % CPU isn’t straightforward, as nowhere does Activity Monitor provide core frequency data.
In this example from an M4 Pro, the left of each trace shows the final few seconds of four test threads running on the E cores, where they took 99 seconds to complete at a frequency of around 1,020 MHz, then in the right exactly the same four test threads completed in 23 seconds on P cores running at nearer 4,000 MHz. Note how lightly loaded the P cores appear, although they’re executing the same code at almost four times the speed.
Threads and more
For most work, you should display all the relevant columns in the CPU view, including Threads and GPU.
Threads are particularly important for processes to be able run on multiple cores simultaneously, as they’re fairly self-contained packages of executable code that macOS can allocate to a core to run. Processes that consist of just a single thread may get shuffled around between different cores, but can’t run on more than one of them at a time.
Another limitation of Activity Monitor is that it can’t tell you which threads are running on each core, or even which type of core they’re running on. When there are no other substantial threads active, you can usually guess which threads are running where by looking in the CPU History window, but when there are many active threads on both E and P cores, you can’t tell which process owns which thread.
Beachballing
A common mistake is to assume that high % CPU is somehow related to the appearance of a spinning beachball pointer. Although they can be related, they tell you different things about threads, processes and apps.
If you look in the Force Quit Applications window when an app is spinning a beachball, it doesn’t tell you anything about how much % CPU the app is taking, merely that the app is unresponsive. The most common cause of that is when the app’s main thread is too busy with a task to check in with macOS periodically.
All apps have a main thread, and many also have additional threads that handle time-consuming or computationally-intensive work. In most cases, well-written apps will avoid the main thread getting bogged down and unresponsive. One of the most common examples of this is with connections to remote sites. If those are handled in the main thread, then the whole app could be waiting for a slow-responding server to deliver its data, during which the app will be unresponsive, and macOS displays the spinning beachball.
The solution there is to handle the Internet connection asynchronously, allowing the main thread to get on with interacting with the user. When a background thread receives its data from the remote server, it can then update the main thread with that information.
Sometimes time-consuming tasks have to be handled in the main thread, and there may be no way to avoid unresponsiveness, but those are unusual if not exceptional now. At the same time, the appearance of the spinning beachball doesn’t mean that app has crashed or frozen, and it may well just be trying to get on with its work as well as it can in the circumstances.
It’s easy for an app to spin the beachball when it’s taking far less than 100% CPU, and many apps that can take over 500% in the right circumstances should remain fully responsive throughout.
Key points
% CPU is the percentage of time that CPU core isn’t idle, but is actively processing instructions. It takes no account of core type or frequency.
Total % CPU is the total of all individual values for CPU cores, and a maximum of 100% times the number of cores. For a chip with 8 cores, maximum total % CPU is 800%.
This can become confused in Intel CPUs with Hyper-threading, as that adds another set of virtual cores.
Apple silicon CPU cores operate at a wide range of frequencies, which aren’t taken into account in % CPU.
High % CPU is completely different from what happens when an app spins the beachball, which is the result of the app’s main thread becoming unresponsive.
An app can spin the beachball when its total % CPU is relatively low, and an app with a high total % CPU may remain highly responsive.
There are two ways to restart a Mac that’s already running: you can either use the Apple menu command Restart (or an equivalent in Terminal), or you can shut it down, leave it a few seconds, and start it up afresh in what’s known as a cold boot. This article examines whether there’s any difference, and which you should prefer.
Differences
When a desktop Mac starts up from cold, its power supply starts providing power to its internal components, and when the boot process starts they are all initialised from their power-off state. There’s one small exception to that in the internal clock, possibly part of the Always On Processor (AOP) in Apple silicon Macs.
It’s commonly held that a regular (or warm) restart doesn’t interrupt the power supplied to internal components, as Intel Macs may not undergo power-on self-testing (POST) when only restarted. That doesn’t appear to be correct, though, as it’s easily demonstrated that Intel Macs with T2 chips do undertake a POST during a restart. Apple silicon Macs don’t appear to perform a similar form of POST. Neither does there appear to be any difference for peripherals, which are shut down before being started up again whether the Mac is booted warm or cold.
It’s also most unusual to attempt a true cold boot, particularly in a laptop. To remove all power from a desktop Mac requires it to be disconnected from its mains power supply, and for a laptop the internal battery also needs to be isolated or removed, something only performed during service by a technician.
What is clear is that the period during which power is turned off is very different: during a warm restart that’s only a second or two.
Received wisdom is that this allows data to be retained in memory through a warm restart, but that it’s wiped clean after a cold boot. This was first documented by Alex Halderman and others, who used it to perform ‘cold boot’ attacks to recover encryption keys. They demonstrated that RAM contents were still recoverable many seconds after shutting down, and could be used to recover encryption keys and other critically secure data. A great deal has changed since that research was undertaken. As far as the protection of secrets is concerned, all modern Macs have secure enclaves and use Extended Anti-Replay Technology (xART) to prevent that.
It’s thus plausible that there could be some differences in hardware between a restart and a cold boot, but careful comparison of log entries during booting from a Mac’s internal SSD fails to reveal any significant differences there.
How long to wait?
There appears to be no useful evidence for recent and current Macs to determine how long you should wait between shutdown and a cold boot. Periods given range widely, from a few seconds to a minute or more.
Experience
There are many reports of cold boots resolving problems that weren’t affected by a warm restart, but those are generally if not exclusively for Intel Macs, and most usually those without T2 chips.
I have only once experienced a problem in an Apple silicon Mac that required a cold boot, and that occurred a couple of years ago with a dual-boot setup that wouldn’t restart into its primary macOS on its internal SSD, but would do so when started up with a cold boot.
Cold booting is sometimes recommended following more severe problems, such as a freeze or kernel panic. As the normal way to recover from a frozen Mac is to force shutdown using the Power button, there is no option other than a cold boot. Kernel panics should normally result in an automatic restart, the behaviour that demonstrates that a panic took place, and only after that restart is the panic confirmed in an alert, from where the panic log can be accessed. There is no option to perform a cold boot until after the restart. Apple silicon Macs are almost invariably cold booted into Recovery or Safe mode, as those require a long hold of the Power button.
Thus the choice between a restart and a cold boot is usually determined by the problem that has occurred.
Summary
Perform a cold boot by shutting down, waiting at least ten seconds, then starting up again.
A cold boot may sometimes be more effective at fixing problems than a restart.
If you have tried restarting your Mac to address a problem and that didn’t help, try a cold boot.
Cold booting may be more effective at addressing problems with external boot disks, or possibly with other peripherals.
We don’t fully understand why a cold boot might differ in effect from a restart, but it could.
There is no evidence that a Mac should always, or usually, be cold-booted rather than restarted.
This year marks the twentieth anniversary of Apple’s announcement of the introduction of code signing, although it wasn’t unleashed until Mac OS X 10.5 Leopard the following year (2007). I doubt whether there’ll be crowds gathering to celebrate the occasion, but 2026 also marks the parting of the ways for Intel and Apple silicon Macs, as Tahoe is the last version of macOS to run on Intel processors. There have already been rumours that will bring changes to code signing and what code will run on Arm cores.
Apple had long maintained that users would remain able to run unsigned code in macOS, but that changed in November 2020 with the first Apple silicon models. Since then, all executable code run on those new Macs has to be signed. What hasn’t been mandatory is the use of a developer certificate for the signature. Instead, all build systems now sign code using an ad hoc signature by default, when no developer certificate is available. This enables ordinary users to build their own apps and command tools locally, and run them on their own Macs, as many continue to do. The same applies to codeless apps such as Web Apps introduced in Sonoma, which are automatically signed ad hoc by macOS.
Those who develop apps and command tools for distribution to others have been told to sign their code using their developer certificate, then to get it notarised by Apple. Although that’s by no means universal, and there are still a few apps that don’t fit the process well, the great majority of those distributed outside the App Store should now come signed with a developer certificate and notarised.
Unlike some other operating systems, the only developer certificates recognised by macOS are those issued by Apple, but they’re provided free as one of the benefits of its $99 annual subscription to be a registered developer, as are unlimited notarisations.
The next concern for many is what happens when a developer certificate expires. On other systems, certificate expiry can result in apps suddenly becoming unusable, but that isn’t the case with macOS. So long as the certificate was valid at the time it was signed, macOS will recognise it as being valid at any time in the future. This isn’t the case, though, with developer installer certificates, used to sign installer packages: those must be valid at the time of installation, and the same applies to Apple’s own macOS and other installers. That continues to catch out both developers and users.
So as far as Intel Macs are concerned, the arrival of macOS 27 this coming autumn/fall won’t affect their access to apps, provided they’re supplied in Universal format, with x86 code. Many major software vendors have aligned their support period with Apple’s, so those apps should remain fully supported on Intel Macs until Apple’s support for macOS 26 ends in the autumn/fall of 2028. The sting here is that depends on upgrading to Tahoe: stick with Sequoia and that support is likely to end a year earlier, in 2027.
If you’ve switched to Apple silicon, you may be concerned as to when macOS will cease providing Rosetta 2 support for the few remaining apps that aren’t already Universal. Apple has stated its intention that full Rosetta translation support will end with macOS 27, although it intends to retain “a subset of Rosetta functionality aimed at supporting older unmaintained gaming titles” beyond that. In practice, that means most x86 apps and command tools will stop working in macOS 28, in the autumn/fall of 2027.
From then on, if you want to be able to run x86 code using Rosetta 2 translation, that will have to be in a virtual machine running macOS 27 or earlier. For once, the continuing inability of macOS VMs to run most App Store apps should have little or no effect. For installers whose installer certificate has expired, this may be a blessing, as it’s easier and less disruptive to set the clock back in a VM.
Apple has given no warnings, yet, of any changes to requirements for developer certificates, notarisation, or ad hoc code signing to come in macOS 27 or beyond. Given the time required for the adoption of code signing and notarisation, those would appear unlikely in the foreseeable future.
Key dates
All events occur with the autumn/fall release of the new version of macOS.
2026 (this year)
Intel Macs: Tahoe enters security-only support; new versions of some 3rd party products may be Arm-only Apple silicon Macs: first single architecture macOS.
2027
Intel Macs: Sequoia becomes unsupported Apple silicon Macs: full Rosetta 2 support ends.
2028
Intel Macs: Tahoe becomes unsupported; major 3rd party products likely to lose support.