Visitors looked at the original copy of the 19th Amendment this week. The document was recently added to the permanent display in the rotunda at the National Archives in Washington.
For those working with Rich Text without embedded images, my free editor DelightEd offers a suite of unique features. I wrote it when macOS Mojave introduced Dark appearance mode, with the primary purpose of composing Rich Text documents that work independent of appearance. For that it can set styled text on a background that ensures perfect readability in both Light and Dark modes.
Since then it has gained other unique features, including support for creating interlinear text, in which different translations or versions of the same document are interleaved line by line. It will also open PDF documents and automatically extract all their text content.
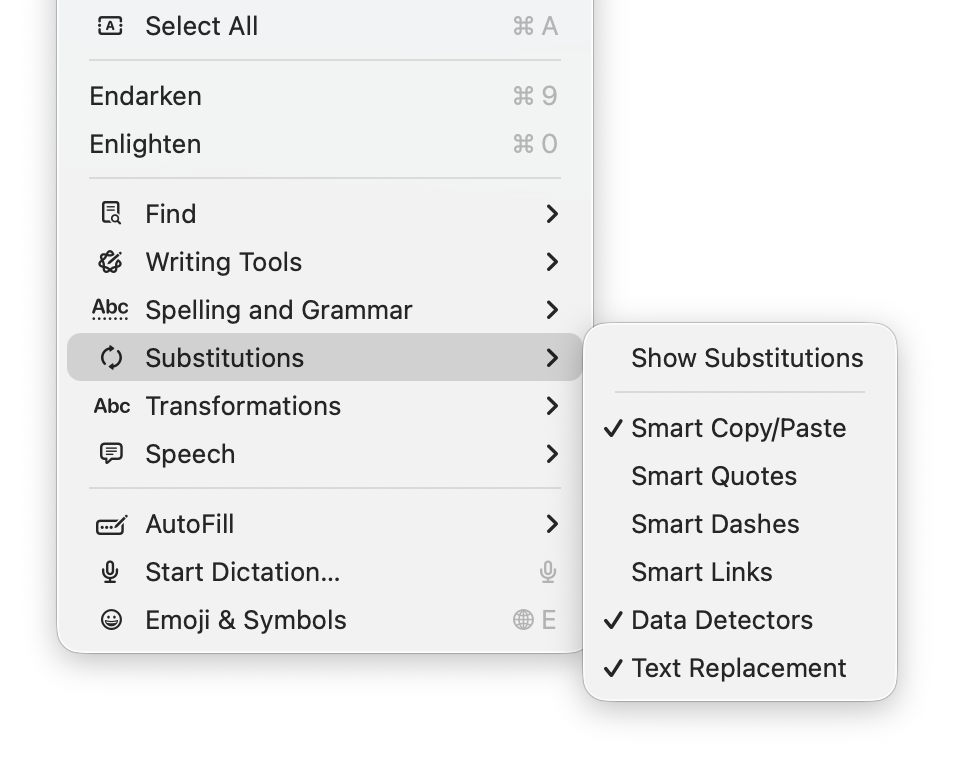
General features supported include Writing Tools (Apple silicon Macs), case transformations, and a full suite of substitutions. However, until this new version of DelightEd, substitution settings haven’t been saved in DelightEd’s app settings. Version 2.5 now puts that right: to set the app’s default substitutions, set them up using the Substitution command in its Edit menu, for instance enabling Smart Links.
Then save those to its settings using the Save Defaults command in the app’s menu. Each time you open DelightEd after that, its substitutions will start from those saved defaults.
DelightEd version 2.5 for macOS 11.5 Big Sur and later, including Tahoe, is now available from here: delighted25
from Downloads above, from its Product Page, and through its auto-update mechanism.
I’m very grateful to Manuel for asking for this to be fixed.
While detaining a CNN crew, a soldier said that Israeli troops were motivated by “revenge” against Palestinians and that all of the West Bank was “for the Jews.”
Many discovered how long 5 minutes could last when they updated from macOS 26.3.1 to 26.4. Right at the end of its Preparation phase, Software Update showed there were only 5 minutes remaining for far longer. This article reveals what went wrong with that update.
My observations come from a Mac mini M4 Pro running a vanilla installation of macOS Tahoe, being updated from 26.3.1 (a) with the BSI installed, to 26.4. Times and details are taken from log extracts covering the final 14 minutes of the update, immediately prior to the reboot for its installation.
Preparation
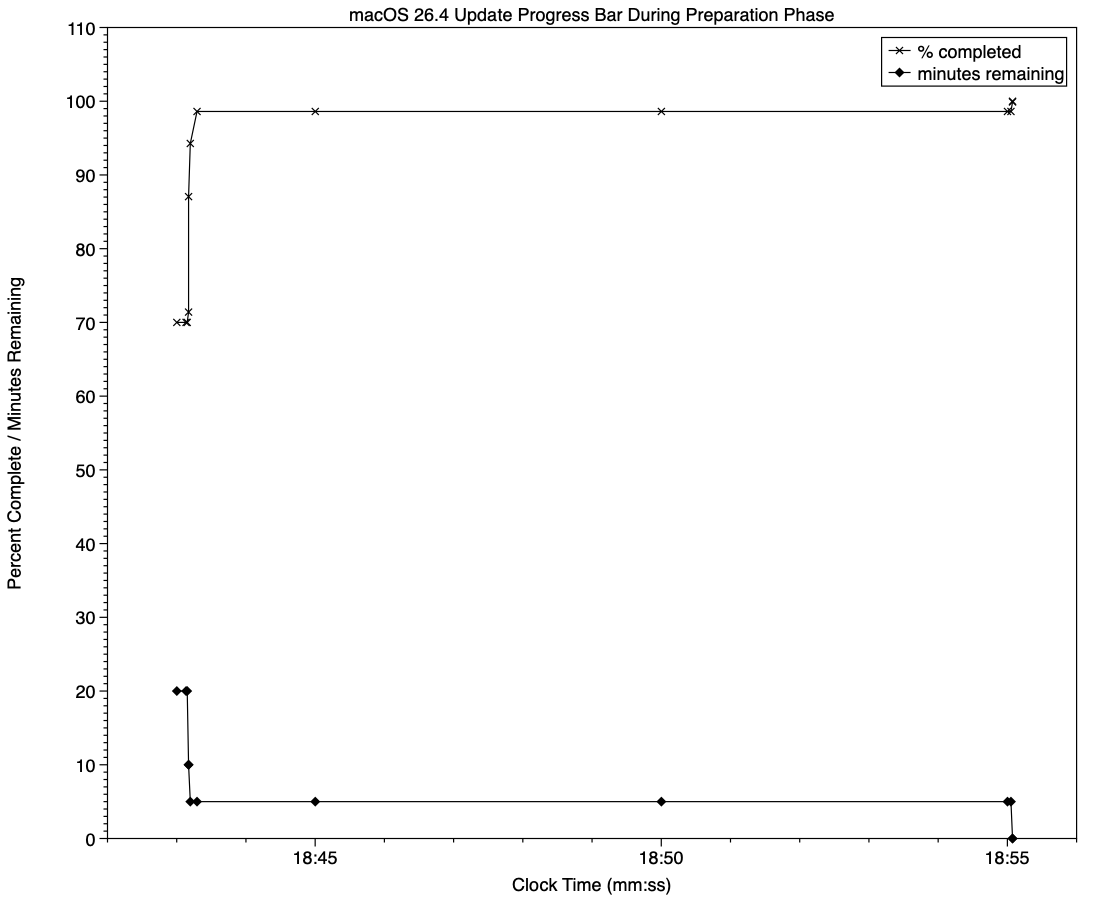
At almost exactly 18:43:00, softwareupdated reported that the PREPARING_UPDATE phase was in progress, with 70% complete on the progress bar, and 20 minutes remaining. Periodic preparation activities were then reported in the log, mainly verifying components to be installed as part of the update. One of the longest of those, /usr/standalone/i386/Firmware.scap, took nearly 6.5 minutes alone, although you might wonder why that’s required on an Apple silicon Mac!
Eleven seconds later, softwareupdated changed the progress bar to display 10 minutes remaining, with 71% completed. Just 1.5 seconds later that changed again to display 5 minutes remaining with 94% complete. Six seconds after that, with 5 minutes still displayed, the log records 98.6% was complete.
The log and progress bar then remained stuck at 5 minutes remaining and 98.6% complete for the next 11 minutes and 47 seconds, before changing to 99.9% complete and no time remaining.
These are plotted in the chart below.
The final 5 minute period started at 18:43:12, and lasted until 18:55:04, as reflected in the long period of 98.6% completion (upper line) and 5 minutes remaining (lower line).
The “5 minutes” remaining actually took 12 minutes and 7 seconds, although log entries make it clear that preparation continued throughout that time, with further verifications and “Preparing system volume…”. Those details were reported as ActionText for progress monitoring, but curiously aren’t accessible to the user at the time.
Log entries record softwareupdated keeping detailed records of progress over this period, though. For example: 18:51:32.924688 softwareupdated PrepareUpdate PROGRESS (Continue) | state:{
ActionText = "Preparing system volume...";
ElapsedTime = 490;
ExpectedTime = 1335505;
PercentBytesComplete = "48.05373989419242";
PercentComplete = "4.701870471432042";
}
But those aren’t reflected in the progress bar.
Once the update had completed that preparation phase, extensive checks were performed to ensure it was correctly configured, and components were moved into place in the ‘stash’ to be used during installation. One second after successful completion, softwareupdated locked the controller state and waited for the reboot to start installation. Rebooting followed less than two minutes later.
What went wrong?
The macOS 26.4 update for Apple silicon Macs was large, and the work required to verify its contents and complete its preparation was incorrectly reported in both percent completion and time remaining. Even in smaller updates, some form of progress needs to be shown in the progress bar during these later stages of preparation, or users may be mislead into thinking the update has frozen or failed, and could for example restart their Mac to try updating again.
What should the user do?
When an update claims there’s only 5 minutes left, that could readily extend to longer, possibly on slower Macs as long as 30 minutes or more. Unless there’s evidence that the update has gone wrong at this stage, you should leave your Mac to complete it, as it almost certainly will. If you’re still in doubt and want to confirm that the update hasn’t frozen, open Activity Monitor and look for around 100% CPU from softwareupdated or related processes, and disk activity.
Unfortunately, there’s nothing the user can do to accelerate macOS updates.
One of the longstanding jokes in computing is how misleading progress indicators can be, and last week most of us had a timely reminder when we updated macOS. However much we might like a perfectly accurate linear indicator for macOS updates, this is one of those situations where the best we can expect is a compromise, as I tried to explain here.
Showing progress
There are two types of progress indicator, determinate and indeterminate, depending on whether the task is quantifiable and progress is measurable. Determinate indicators are always preferred, as they inform the user whether they need only wait only a few moments, or they have time to enjoy a leisurely meal, but that requires quantifiability and measurability.
The simple example is copying a file from one disk to another: although macOS doesn’t know in advance how long that might take, it can quantify the task as the size of the file to be copied, then keep track of how much of that has already been completed. When half the size of the file has been copied, the progress bar can be set to half-way along its total length, so providing an accurate indication of progress.
However, with some copy operations that breaks down: when copying a sparse file between APFS volumes, for example, only the sparse data is copied, not the whole file size. As a result, copying sparse files often results in progress bars that jump from a low point to completion in the twinkling of an eye. This also relies on the quantities involved being linearly proportional to the time required, an assumption that often breaks down when downloading from a remote server.
macOS updates
Updating macOS consists of a series of many tasks (see references at the end), of which only one, downloading, is both quantifiable and has measurable progress, and even that may be far from linear. Apple therefore has a choice of:
Display multiple progress indicators, appropriate to each phase. While that might work well for the download phase, it can’t work for others, including preparation, which is likely to take a period of several minutes at least.
Combine those into a single progress bar, as at present.
Use an indeterminate progress indicator, such as a spinning wheel, which would be reliable but unhelpful.
As downloading is the one task that is quantifiable and its progress is measurable, I’ll start there.
For this, the progress bar starts an an arbitrary 15%, and softwareupdated assumes the total size of that download is the magnitude of that task.
When the download has been completed, the progress bar reaches an arbitrary 55%, and its caption then changes to reporting progress with preparation.
There is a weakness in the assumption that becomes obvious when downloading from a local Content Caching server, as the final 1 GB or so normally isn’t provided from the cache, but has to be freshly downloaded from Apple’s servers. However, that isn’t normally apparent when caching isn’t available and the whole of the download comes from the same remote source.
For the remainder of the progress bar, between 0%-15% and 55%-100%, the task is neither quantifiable nor measurable. Instead, softwareupdated divides it into a series of subtasks, each of which has a fixed progress level. One list of subtasks and levels obtained from the log is given in the Appendix at the end.
The disadvantage of that strategy is that time required by each subtask varies with the update and the Mac being updated. Inevitably, computationally intensive subtasks will proceed more rapidly on newer and faster Macs, while those mainly constrained by disk speed should be more uniform. Large updates should take significantly longer, and that will vary by subtask as well.
The last 5 minutes
A particular problem with some more recent macOS updates, including that from 26.3.1 to 26.4 last week, has been unmarked progress over the final “5 minutes” of preparation. While indeterminate progress indicators continue to move over that period, and reassure the user that the task hasn’t ground to a halt or frozen, the progress bar shown had no intermediate points, making it easy to misinterpret as failure to progress. If this is going to be a feature of future macOS updates, Apple needs to insert some intermediate points to let the user know that the update is still proceeding.
Conclusion
A progress bar that combines different measures of progress, such as download size and substages, can work well, but only if the user is aware of how to read it. As we only update macOS a few times each year, that isn’t sufficient exposure, and how it works needs to be made explicit.
The urgent instructions at the Trump administration’s behest to gather and relay the files on Representative Eric Swalwell have alarmed some career law enforcement officials.
In my account of how Tahoe updates macOS, I had reached the stage when Rosetta and the main update had started downloading from Pallas, Apple’s software update server (see the Appendix at the end for further explanation of terms used).
Download
Currently, the main update download (at least) is compressed using Zip, and is decompressed as a stream during download, so there’s no delay decompressing during the preparation phase later.
In this case, downloading the main update was completed within 8 minutes. The source of the Zip archive was originally given as a path on [https://]updates.cdn-apple.com/2026WinterFCS/patches, and that was written to a local path on /System/Library/AssetsV2/com_apple_MobileAsset_MacSoftwareUpdate/ In my case, though, I have a local Content Caching Server running, and immediately before the download started com.apple.AssetCacheServices substituted a download URL on that server to ensure the update was obtained through the local caching server. At the same time, an Event Report was sent back to Apple, recording the start of download.
Progress was updated every second during the download, and brought the progress bar from 16% to 53.9% over the following 8 minutes, with little other activity taking place.
Preflight
Activity then changed to what is repeatedly referred to as Preflight FDR Recovery, and is the first entry point for the UpdateBrainService, downloaded for MobileSoftwareUpdate rather than softwareupdated.
This runs an Event Recorder and begins to perform preflight checks to “recover FDR SFR”, and to perform a “firmware-only update”. To prepare for that, it retrieves various nonces and their digests for LocalPolicy, RecoveryOS boot policy, and others. Following those is the first of many attempts to determine purgeable space, in preparation for installation of the update. Those are performed by com.apple.cache_delete.
Pallas was then checked to see if there was any more recent version of RecoveryOS UpdateBrain, but there wasn’t. A further check for any newer recoveryOS was also made, before the main macOS update was prepared, at a progress level of 60% as set previously.
Preparation
The first step of the main preparation phase is to purge staged assets with com.apple.cache_delete. With that complete, UpdateBrainService recalculates cryptex size requirement for the update, and the install target prepare size:
cryptex size is 1.2 times the app cryptex size = 60 MB, plus 1.2 times the system cryptex size = 7749 MB, a total of 7809 MB, as previously calculated;
prepare size is the sum of the snapshot installation size of 3785 MB, the cryptex size of 7809 MB, three ‘slack sizes’ for VW, Recovery and Preboot of 2048 + 1024 + 1024 = 4096 MB, the new template size of 991 MB, twice the update partition size totalling 600 MB, less the old template size of 363 MB. The grand total comes to 16,918 MB.
UpdateBrainService then checks volume free sizes, and confirms that they’re sufficient to complete the update. It next creates a ‘stash’, which is protected by keys in the stash keybag, handled by the Secure Enclave Processor. There is then another round of purging with com.apple.cache_delete.
Much of the preparation phase is spent verifying the protection of installation packages, cryptexes, then the contents of /System/Applications and /System/Library. As progress is about 64% complete, System volume preparations are started, and there’s another round of purging by com.apple.cache_delete. There’s surprisingly little log activity as progress passes 70% complete.
With progress reaching 84% complete, UpdateBrainService starts unarchiving files in parallel, taking just under 5 seconds to complete those. Following that, there’s another brief period unarchiving data files in parallel, then working with the contents of /System/Volumes/Update/mnt1/private/var/MobileAsset/PreinstalledAssetsV2 as progress reaches 87% complete.
When there’s 87.5% completed, UpdateBrainService reports it’s creating hard links in parallel, then is searching for new paths and verifying files, such as those in the Ruby framework. The Recovery volume is unmounted, and there’s yet another purge with com.apple.cache_delete. After those, key volume locations are checked.
The high water mark of disk usage during update is prepared. This reveals some of the steps to be undertaken during installation, including:
prepare source package,
patch cryptexes,
patch system volume,
extract to system volume,
install personalised.
There’s a further round of purging with cache_delete before declaring PrepareUpdate as successful, then suspending the update briefly. When update resumes, the Update volume is mounted and prepared, and there’s another round of purging. The System volume is then mounted, checked, and prepared. Progress is now at 98.5% complete, and once 100% is reached, the countdown to restarting the Mac is begun.
Installation
During the download and preparation phases, apart from repeated purging, the log is generally quiet. This changes dramatically once the Mac starts preparing for shutdown and installation. WebKit is cleaned up and shut down, as are many other processes. The ‘stash’ of update components is then committed, and final scans and checks are completed.
The update is then applied, followed by Rosetta, RecoveryOS, UpdateBrain and finally minor documentation. After that period of nearly 20 seconds, this phase is declared complete, and a restart is notified before waiting for the essential reboot.
Reboot
Once rebooting by root has been initiated, the boot chime is muted to ensure the update continues in silence. The last log message is written a few seconds later, and UpdateBrain then runs the update.
Less than 3 minutes later, the system boot is recorded in the log, and kprintf is initialised 5 seconds later. About 3 minutes afterwards softwareupdated is started up, and runs various clean-up routines to complete the update sequence in conjunction with ControllerSetup and a Finite State Machine.
Key points
The main update download is decompressed while streaming, to save preparation time later.
If a local Content Caching Server is connected, AssetCacheServices will substitute its IP address for that of the Pallas server to ensure the download is obtained through the cache.
Following download, extensive preflight checks are performed.
During preparation components are verified, paths checked, and some unarchiving is performed.
Prior to reboot and installation, processes including WebKit are shut down in readiness for reboot and install.
FDR is unknown, but appears associated almost exclusively with a preflight phase.
Pallas is the internal name for Apple’s software update server. This appears throughout log entries, where for example Pallas audience is jargon for the type of user, normally macOS Customer.
RecoveryOS appears to refer to the version of Recovery in the hidden container of the internal SSD, more widely known as Fallback Recovery.
SFR appears to refer to the version of Recovery in the Recovery volume of the active boot volume group, also known as Paired Recovery.
Splat, semi-splat and rollback objects all refer to cryptexes. Splat is the general term, while semi-splat refers to a cryptex-based update that might include rapid security responses (RSR) and background security improvements (BSI) implemented by replacing one or both cryptexes. Rollback objects are older versions of a cryptex that have been saved to allow a newer cryptex to be reverted to that older one, in the event that the newer cryptex causes problems.
UpdateBrain is the executable code supplied as part of an update that prepares and installs that specific update. There’s a separate UpdateBrainService for RecoveryOS.
Following a general outline of what happens during a macOS 26 update, and a more detailed account of how it uses finite state machines and sends progress reports to Apple, this article describes what happens before Software Update downloads the main update. This was started by opening Software Update in System Settings of macOS 26.2 when the update to 26.3 was available, on a Mac mini M4 Pro. The Appendix at the end explains several in-house jargon terms used widely through these log entries.
Check for an update
In this case, checking for an update was instigated by opening Software Update in System Settings. That initiated a series of preliminary checks to:
determine whether that Mac and user are enrolled in a beta-test programme;
obtain the Pallas audience, in this case macOS Customer;
determine the time interval since the last scan for updates, and its result. As that was 632.8 seconds ago and there were no updates reported as being available then, a further scan is deemed acceptable;
set the base URL for Pallas of mesu.apple.com/assets/macos/.
A new scan for updates is started, with a UUID chosen to identify it. The UUID used is version 5, so is expected to be based on a hash of other identifiers, and is unique to this software update. The catalogue is downloaded from Pallas, and analysed for new versions being offered for download.
In this case there are two available:
macOS263Short comes with just an arm64e system cryptex at 6,458 MB, and a download size of 3.68 GB which unarchives to 4.36 GB;
macOS263Long comes with both arm64e and x86_64 system cryptexes at 6,458 + 2,312 MB, and a download size of 17.48 GB which unarchives to 18.14 GB.
Both of those use the Zip compression algorithm, and are designated as being ZipStreamable. macOS263Short is clearly the Delta update from 26.2, whose download size was then displayed in the Software Update panel. macOS263Long appears to be a full upgrade, equivalent to the macOS Installer app in terms of its contents.
A similar sequence of events occurs when you request a list of available macOS installers using the command softwareupdate --list-full-installers
Routine checks
The following checks are repeated at frequent intervals throughout scanning and preparation:
the presence of rollback objects, a rollback copy of cryptex1 in the Preboot volume;
whether semi-splat is active, by comparing the Splat RestoreVersion with the Cryptex1 RestoreVersion;
whether the root volume is sealed;
whether this is an emergency update;
battery level, even in Macs without a battery.
Sizing
Early estimates are made of the size required to prepare and apply the update. Prepare size consists of:
a cryptex size requirement, consisting of the sum of the sizes of the app and system cryptexes, multiplied by 1.2, in this case a total of 7,809 MB;
a snapshot prepare size, consisting of the snapshot installation size of 3,785 MB plus the cryptex size, for a total of 11,595 MB.
These total 11,595 MB when first calculated, but a little later the snapshot installation size was increased to 5,154, for a total of 12,963 MB.
The apply and reserve size consists of twice the update partition size plus the update APFS reserve of 700 MB, plus 231 MiB for volume sealing overhead, giving a total of 931 MB. Presumably any shortfall in free space available would be notified to the user at this stage, and the update cancelled.
The policy for updates is determined in detail, before Pallas is asked for a catalogue of MacSplatSoftwareUpdate, updates using cryptexes, probably including both older RSRs and their successor BSIs. In this case, that catalogue is empty.
Mobile asset catalogues
softwareupdated then takes a back seat for much of the following 15 seconds or so, as mobileassetd determines which mobile assets need to be updated. These are the multitude of components to support Siri, AI and other features. This too is run by a finite state machine, AutoControlManager, which downloads catalogues of these components to assemble its auto-stager. One catalogue alone lists 91 available for update, but thankfully many of those don’t need to be updated.
Once that’s complete, the progress bar is displayed and updated by softwareupdated.
Progress bar
This is divided into zones used for different stages of progress by softwareupdated. These can be summarised as:
0.0-0.9 prepare
1.0-7.0 reloading and downloading Update Brain
7.0-15.0 preflight
15.0-55.0 downloading
55.0-60.0 preflight FDR Recovery
60.0-100.0 preparing update
During the downloading and preparing stages, progress updates are made according to the amount of the stage that has been completed. Otherwise they are made when each stage has been achieved.
In practice, progress is most meaningful during the downloading and preparing stages, between percentages of 15-55 and 60-100. Time estimates are displayed for both of those separately, with download time remaining based on size transferred. Once downloading is complete, the final 40% of the bar is given a fixed period of 30 minutes to complete, although that’s never required now.
Initial preparation
softwareupdated determines and downloads the cryptex updates, any SFR software update, any Rosetta update, any RecoveryOS update and the RecoveryOS update ‘brain’ for that. These are set up with their own finite state machine that downloads the catalogue, determines what should be downloaded, and downloads it. The final phase handles the documentation for the update, in this case consisting of
release notes summary, 1,268 B
release notes, 1,243 B
licence agreement, 97,187 B.
There’s an irony here that the first two are so tiny by comparison with the last.
In this case, downloading the update was completed within 10 minutes of obtaining the first update catalogue from Pallas.
Summary
After preliminary checks on beta enrolment and the period since last check, a catalogue of available updates is obtained from the software update server.
That catalogue offers a short Delta update, and a long full update.
Downloaded updates are compressed using Zip, and decompressed as they are streamed in the download.
Sizes required for preparation and applying the update are checked and adjusted.
mobileassetd determines a potentially long list of mobile assets to be updated.
Progress is displayed according to a combination of downloading between 15-55%, and preparation between 60-100%. Other stages are defined by progress through required steps rather than time.
Appendix: Terms used
Pallas is the internal name for Apple’s software update server. This appears throughout log entries, where for example Pallas audience is jargon for the type of user, normally macOS Customer.
RecoveryOS appears to refer to the version of Recovery in the hidden container of the internal SSD, more widely known as Fallback Recovery.
SFR appears to refer to the version of Recovery in the Recovery volume of the active boot volume group, also known as Paired Recovery.
Splat, semi-splat and rollback objects all refer to cryptexes. Splat is the general term, while semi-splat refers to a cryptex-based update that might include rapid security responses (RSR) and background security improvements (BSI) implemented by replacing one or both cryptexes. Rollback objects are older versions of a cryptex that have been saved to allow a newer cryptex to be reverted to that older one, in the event that the newer cryptex causes problems.
Script-based updaters were underpowered and too unreliable to build the Signed System Volume and other components of macOS in Big Sur and beyond. When Apple was designing the software update subsystem to be used for its new Macs, it chose to develop a modern design from scratch, built around finite state machines. The end result is seen today in the log entries made when updating macOS.
At first sight those appear to be examples of everything the Unified log shouldn’t be. From the initial entries reporting the softwareupdated service is checking for updates, there’s a succession of huge and apparently incomprehensible entries in the log that surely belong somewhere else. In fact we’re given a remarkable step-by-step account of some of the most elegant and successful engineering design in macOS that reveals its inner workings. It also shows how Apple is now able to detect and fix update problems in real-time.
Finite state machine
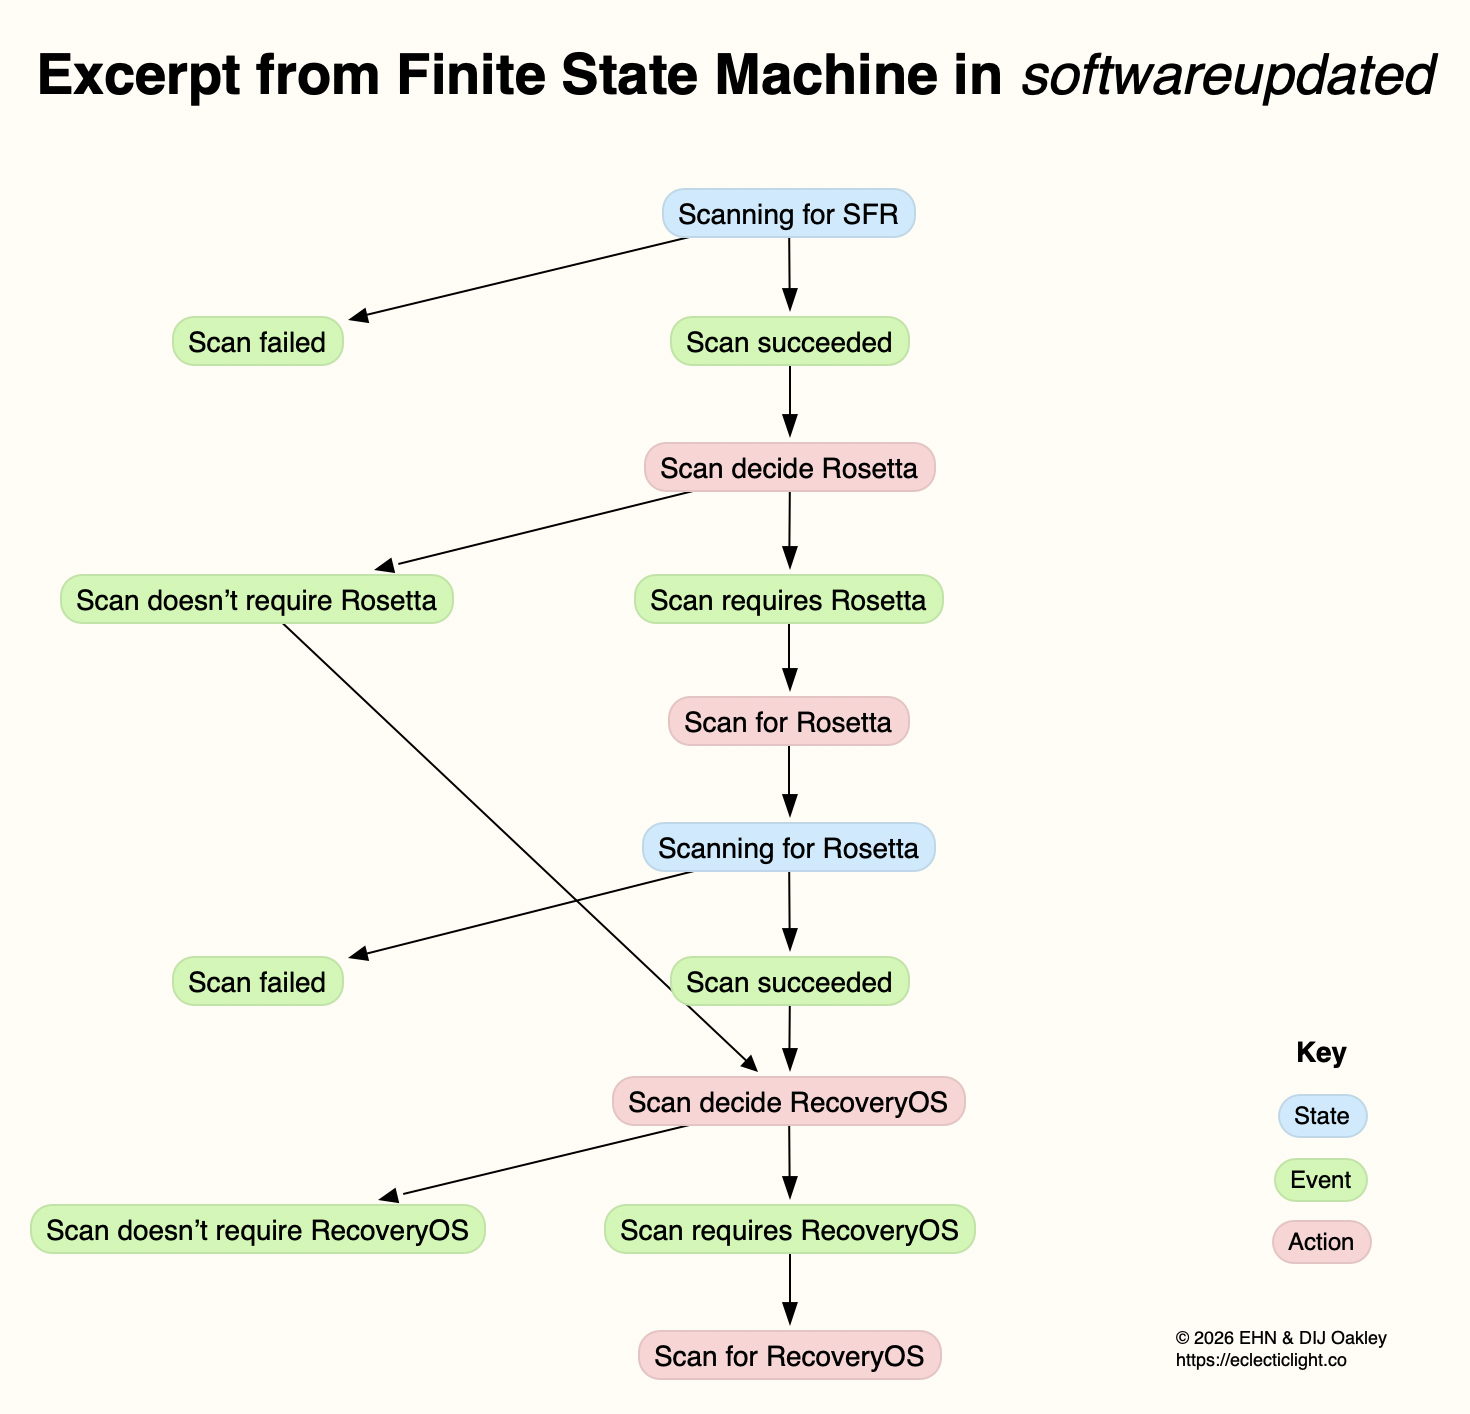
This is a formal model used widely in computing to design, describe and implement a machine or automaton that can only exist in one of a finite number of states. Its state changes in response to defined events, which result in actions that in turn determine its transition to its next state. Although some FSMs are non-deterministic and subject to chance, those in softwareupdated are governed by deterministic rules. This is illustrated in the excerpt below, extracted from a sequence of log entries for one of the FSMs run by softwareupdated when it’s working out what updates are required, early during macOS updating.
This FSM starts here in the top state shown in blue, where it’s scanning for an SFR update. If that’s successful (the event), its next action is to decide whether the update requires an update to Rosetta 2. If it does (the next event), then its action is to scan for Rosetta updates, and it then transitions to its next state of scanning for Rosetta. If that’s followed by the event that the scan succeeds, the next action is to decide whether an update to RecoveryOS is required, and so the FSM proceeds to work out what updates are required before starting to download and prepare them for installation.
This may appear long-winded, but FSMs can be described formally and from there implemented in code that is robust and correct, fundamental requirements for macOS updates. It also builds in flexibility to tailor each update to what that Mac requires.
Log documentation
The unified log is used by softwareupdated to document the operation of the several FSMs it runs. If an error occurs during software update, this enables its origin and causation to be established, one of the primary purposes of the log. Full detail has to be captured in entries at the time the FSM is running, as they can’t be recreated in retrospect.
As a result, every state transition, each event, and all actions are entered in full detail. The message field in those log entries identifies the FSM involved, reports its current state (S), the event (E), its action (A), and then provides full information about its current data. Those must enable the FSM to be recreated and run in the event that something goes wrong, to investigate and fix malfunction or failure.
Although those large and copious log entries are a challenge to browse, the architecture of the Unified log is designed to cope with them. Such long messages are stored separately in the warren of directories inside /var/db/uuidtext, and don’t burden the main log’s tracev3 log files.
FSMs
When softwareupdated checks for, discovers, downloads and prepares the macOS update from 26.2 to 26.3, the following named FSMs are identifiable in log entries:
SUMacControllerScanManager
scan[UUID]
SUMacControllerRecoveryOSManagerScan
update_downloader
SUMacControllerStateMachine
update[UUID]
SUMacControllerScanManager (again)
scan[UUID] (again)
SUMacControllerRecoveryOSManagerScan (again)
in the order in which they appear. In some cases, before the FSM is run, it’s loaded with Events that are detailed in the log, and provide further insight into what that FSM does.
The UUID used for FSMs and throughout softwareupdated is allocated at the start of these processes, before scanning for software updates. It’s referred to as “the SUCore SoftwareUpdate UUID”, and doesn’t appear to be the same as well-known UUIDs used elsewhere. However, as it’s a version 5 UUID it probably doesn’t contain any randomly generated content. This is worth bearing in mind, as it’s this UUID that is attached to Event Reports.
Real-time reporting
Many of us can recall macOS updates that have gone badly wrong, and some that had to be withdrawn or replaced because of their problems. Apple tackles that now using an event reporting system that provides real-time information about how every Mac being updated is progressing. This is anonymised, the only identifier being the UUID allocated to that software update by softwareupdated before starting to scan for updates.
At frequent stages during software update, softwareupdated updates its Event Report to reflect progress, and that’s automatically uploaded to Apple’s servers at an HTTPS address starting with xp.apple.com/report/ Although typically only just over 500 bytes in length, a typical Event Report contains the following named fields:
UUID, audienceType, batteryIsCharging, batteryLevel, currentBaseOSVersion, currentOSType, currentOSVersion, currentProductVersionExtra, dataFsCapacity, dataFsFree, deviceClass, deviceModel, event, eventTime, lowPowerMode, macPlatform, mandatoryUpdateEligible, mandatoryUpdateOptional, preSUStagingEnabled, preSUStagingMaxSize, preSUStagingOptionalSize, preSUStagingRequiredSize, preferredType, rampEnabled, rapidSecurityResponseCombo, rapidSecurityResponseInstalled, rapidSecurityResponseSemiSplat, reportVersion, result, storageCapacity, ucoreVersion, systemFsCapacity, systemFsFree, targetOSVersion, totalRequiredFreeSpace, updateType.
Most should be fairly self-explanatory, and in this case the event field was set to SUCoreOTAPreSUStagingDetermineStarted.
The first of these is sent less than one second after starting to scan for updates, when policy and sizing for the updates to be downloaded have just been determined, and that’s repeated after each significant stage until the Mac is rebooted to apply the update. I suspect there’s also a final Event Report sent once the Mac has booted into the updated macOS.
Apple is thus able to track progress for each UUID during the software update process. Should it detect a problem, for example a required component being unavailable, it should be able to take immediate action to address that, rather than having to wait for individual users to report errors or failures long after they occurred.
Summary
From Big Sur, software update uses a modern design based on finite state machines, completely replacing its old script-based system.
FSMs bring the greatly improved reliability necessary to install and build the Signed System Volume and other components of macOS.
The log contains detailed accounts of FSMs as they are run to accomplish the many phases of these complex software updates.
Those log entries could be used to recreate the FSM in the event of failure or error, e.g. as provided in a sysdiagnose.
Bulky message content in log entries is stored outside log files, in the /var/db/uuidtext directory.
Each software update is given its own UUID.
Update progress is reported to Apple frequently in Event Reports.
Event Reports can enable real-time detection and correction of problems in software updates.
Although the way that macOS updates itself has changed beyond all recognition over the last few years, we tend to assume that it still works much as it did in the past, downloading a single update file, decompressing and installing that. This series of articles takes a deeper dive into what actually happens, and tries to explain how it differs from previous package updates.
This account is primarily based on a detailed analysis of log entries obtained from updating 26.2 to 26.3 on a Mac mini M4 Pro, supported by additional information obtained from updating virtual machines to 26.3. macOS updates have changed considerably even since Big Sur, but I believe that their mechanisms have remained more similar than they differ from those before.
Download size
One of the most basic and striking observations about macOS updates is their variation in size. Although those reported on many Apple silicon Macs making the same single-step update are similar, some are considerably greater. As updates aren’t offered in standalone form, and are only provided via Software Update or its command line equivalent softwareupdate, the only practical way to assess this is to update a range of virtual machines.
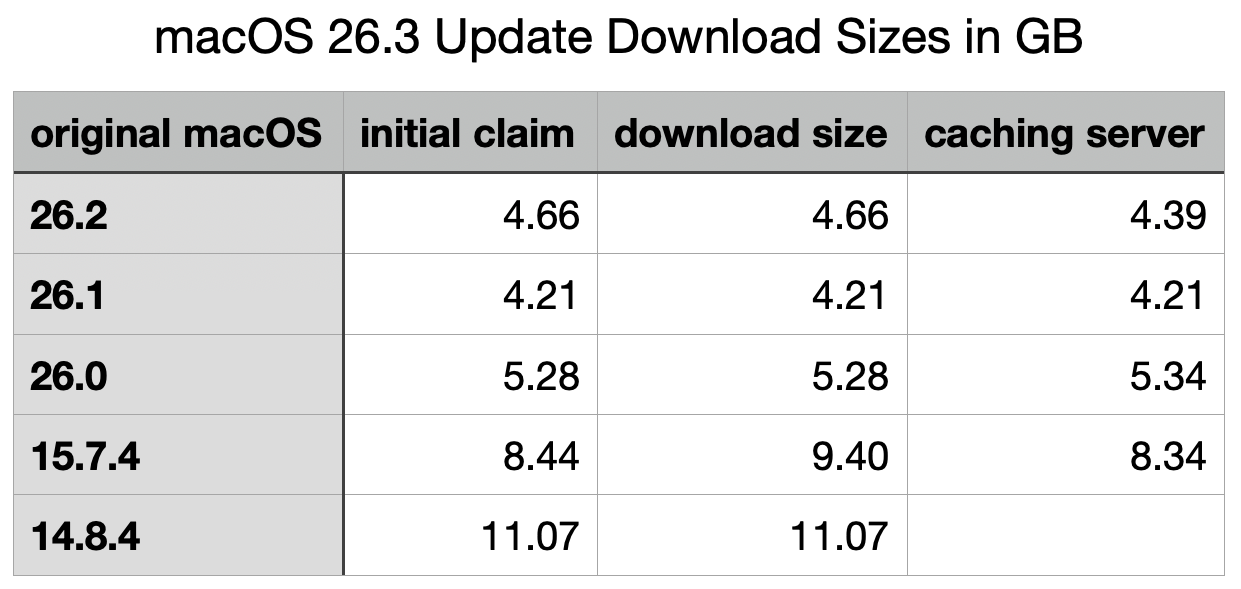
Software Update also reports two update sizes to the user: the first is given as a promise prior to the user initiating the update, the other displayed above the progress bar during downloading, in the progress window. A third figure can also be derived by obtaining the update through a local Content Caching Server. Results obtained for the update to 26.3 are shown in the table below.
When originally performed on the host Mac, the initial claimed and reported download sizes were both smaller at 3.68 GB.
Although sizes for the update from 26.1 to 26.3 are surprisingly slightly less than those from 26.2, these demonstrate that the greater the difference between the original and destination versions, the larger will be the size of the download, as expected. However, there is no evidence that any of these shared the same download size: each is different, as if tailored to the requirements for the original macOS. This is very different from a system offering three types of installer for Delta and Combo updates, and a whole-system Installer for upgrades from an earlier major version.
Installation sizing
Prior to the update being applied, its download and preparation is largely controlled by softwareupdated and its associates. Before any downloading is initiated, that calculates the disk space required to download and prepare each of the components required for the update, a task it refers to as CalculatePrepareSize. This is critical if the update is to ensure that it won’t run out of free space during the update, and is checked repeatedly during the downloading sequence, as individual components are prepared for installation.
CalculatePrepareSize calculates the following values:
Cryptex size requirement, consisting of 60 MB being 1.2 times the size of the app cryptex, and 7,748 MB being 1.2 times the size of the system cryptex, for a total of 7,809 MB.
Snapshot preparation size, consisting of snapshot installation size of 3,785 MB plus the cryptex size, for a total of 11,595 MB.
Snapshot apply size, consisting of twice the update partition size plus the update APFS reserve for 700 MB, plus 231 MiB for sealing, for a total of 931 MB.
Snapshot preparation size, consisting of snapshot installation size of 5,154 MB (a significant increase from previously) plus the cryptex size, for a total of 12,963 MB.
For any given version of macOS (ignoring RSRs and BSIs that may later replace them), each hardware architecture is thought to have its own pair of cryptexes, and they aren’t thought to differ between Macs of the same architecture. Thus, no matter which their original version of macOS, all Apple silicon Macs updating to macOS 26.3 should be provided with the same app and system cryptexes, of the same sizes.
Sizes for snapshot update and installation clearly differ according to the original version of macOS. Although almost self-evident, it’s important to remember that updating macOS from a previous major version will normally require greater free disk space than updating by a single minor or patch version.
Given the sizes above, it’s also obvious that components downloaded for macOS updates are compressed to substantially smaller sizes, so have to be decompressed on the Mac being updated. Thus, the download sizes reported to the user are far smaller than the free disk space required to prepare and install the update.
Main stages
The overall sequence of stages is:
Identify update. Shortly after starting up, and at intervals of approximately 6 hours afterwards, softwareupdated tries to connect to Apple’s software update service to check whether there’s an update available for that Mac. Checks can also be initiated manually, or by apps like SilentKnight. If an update is found, the Mac and its current system are checked to determine whether it meets the requirements for that update.
Check update size. CalculatePrepareSize estimates space required. If free space is insufficient for the calculated requirements, the update is aborted.
Display progress. The progress window is displayed with its bar, and set points are allocated to stages of the finite state machine in softwareupdated to indicate to the user how far update download and preparation have progressed.
Initial preparations. These include detailed identification of components to be downloaded and installed, and preparation of persistent data.
Preflight. Download the ‘update brain’ used to perform the update phase, and perform preflight phases.
Update Rosetta. Download any update for Rosetta 2.
Update Recovery. Download any Recovery update.
Download snapshot update. This takes 38% of the progress bar, and includes streaming decompression of contents, and download and decompression of the two cryptexes.
Preflight Recovery.
Prepare update. This includes many checks, including hashes of firmware updates, cryptexes, and contents of the updates. This takes 39% of the progress bar, but doesn’t appear to involve any decompression.
Apply update. Reboot macOS into the control of the ‘update brain’ to install update including new firmware, create snapshot, build hash tree, seal and sign SSV, then continue the boot process from that.
Kernel boot into updated macOS.
Clean up and check for updates.
Because stage 11, applying the update, is run by the update brain, normal logging doesn’t take place, and no clear account can be made of what happens then.
From Big Sur onwards, the great majority of this is performed in what is effectively a single thread run on CPU Performance cores. This is readily seen when updating a virtual machine, for example. It’s thought that updates are constrained to use the equivalent of just a single P core to enable the user to continue working through a process that could take up to an hour. Thankfully, with the advent of faster models and continued engineering optimisations, this Mac mini took just 18 minutes from requesting the update to 26.3 until it was logged into and fully functional again.
In subsequent articles I will look in more detail at the stages listed above.
Conclusions
The greater the difference between the original and new macOS versions, the larger the update will be to download.
Updates are tailored to the individual requirements of the Mac being updated, and may differ considerably in size.
Detailed installation sizing is performed after the offer of the update, and is considerably larger than download size, as it includes all components after decompression.
Download and preparation account for just under 40% of the progress bar each. More than 20% is accounted for by other stages.
Applying the update is followed by kernel boot from the updated SSV.
President Trump said his planned meeting with President Xi Jinping would be a grand display, but tensions over trade and defense could dampen the mood.
While the vast majority of Canadian exports were exempt from the tariffs now struck down, the ruling does not effect duties harming several key industries.
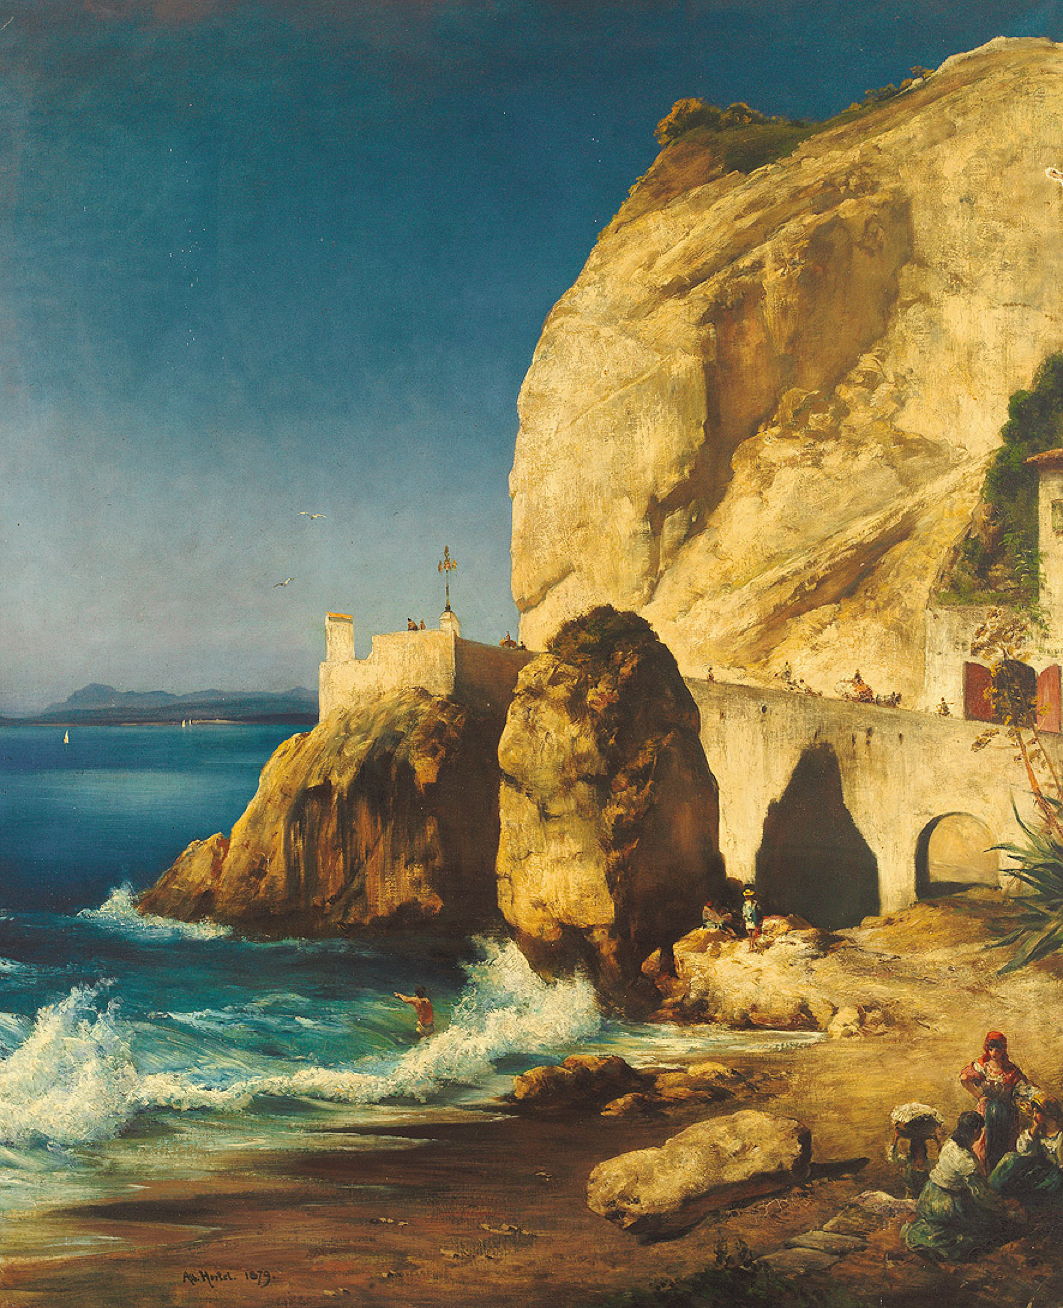
This weekend we’re escaping from the chills of February to travel to Capri, off the coast of southern Italy. From the north coast of this island you can look across the Bay of Naples towards the crowded city to the north. It’s a small island, with two little towns: Capri in the east, spilling down to harbours on the north and south coasts, and Anacapri, nestling in the hills to the west.
Karl Julius Beloch (1854–1929), Map of Capri (1890), from From Karl Julius Beloch: Campanien. Breslau, 1890. Wikimedia Commons.
It’s ruggedly hilly, with spectacular coastal scenery of high sea cliffs, small bays, and plenty of rock. Although only around 6 km (4 miles) long, it rises to nearly 600 metres (2,000 feet) at its highest point, Monte Solaro. It has everything to offer the coastal painter, including a superb climate, and a refuge from the winters of northern Europe.
Among the more famous artists who have stayed on this island are Albert Bierstadt and John Singer Sargent, while Adrian and Marianne Stokes honeymooned there. Although it has been claimed that Capri only became popular with painters in the late nineteenth century, its fame started rather earlier.
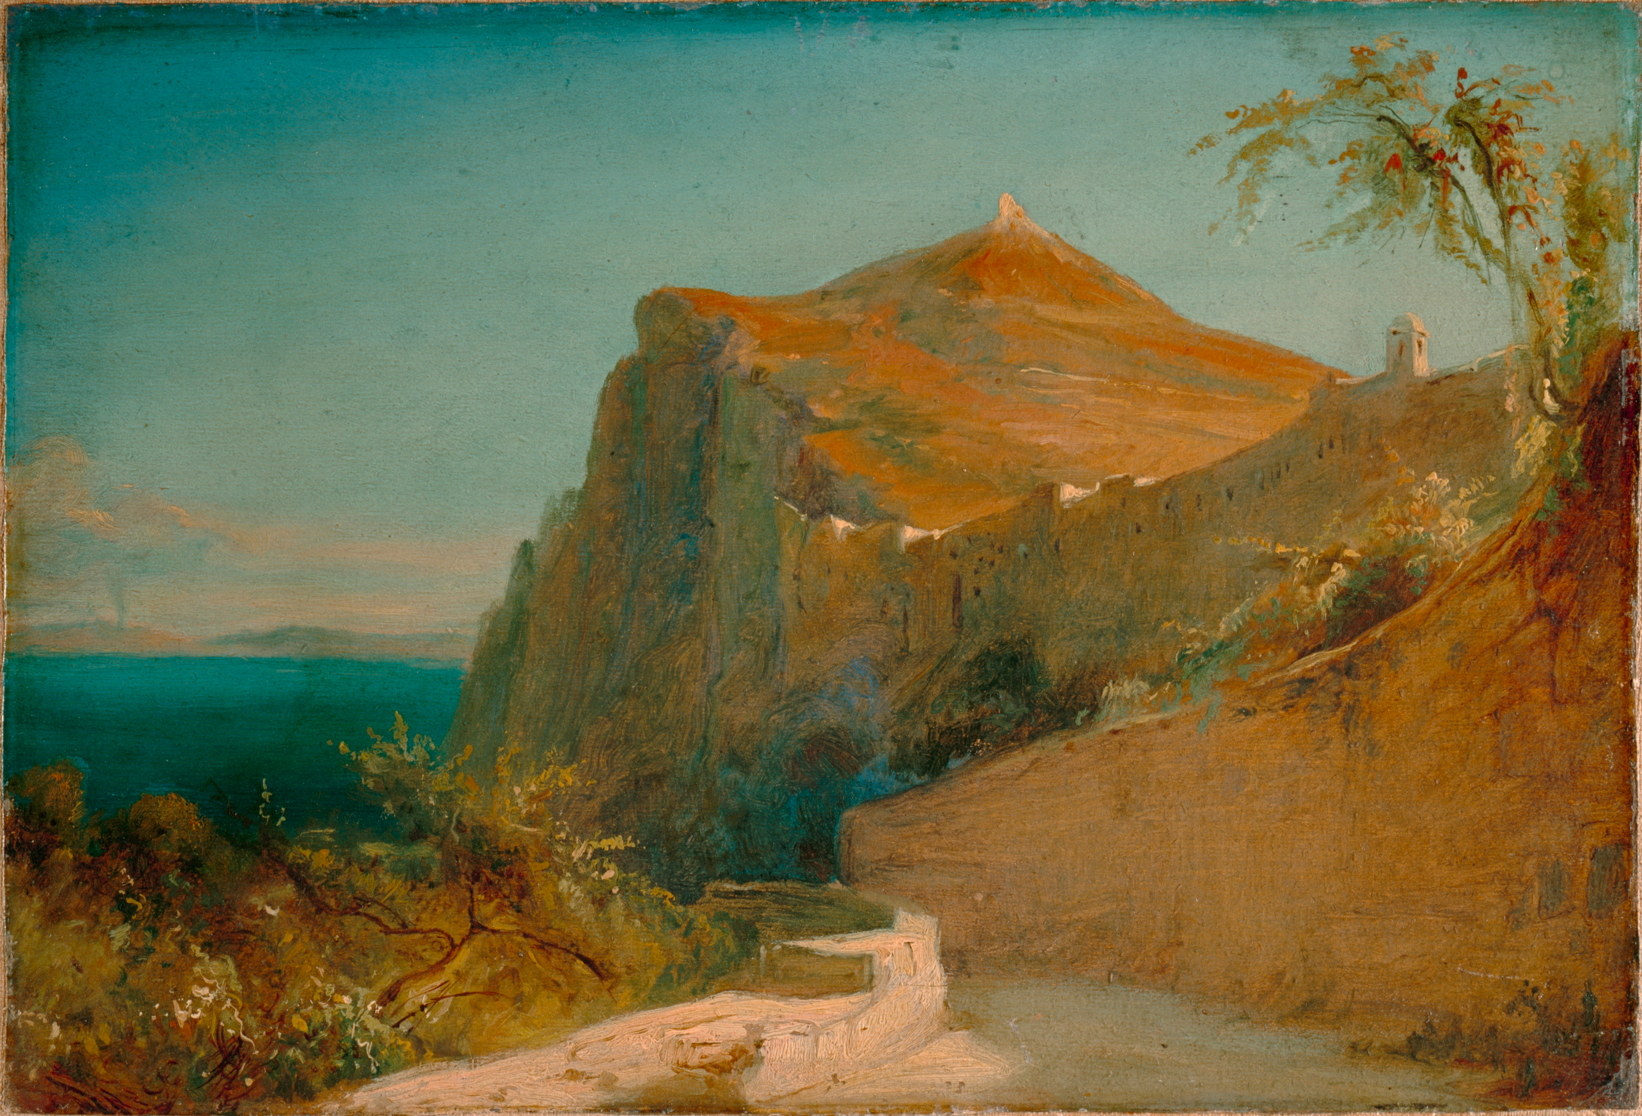
Carl Eduard Ferdinand Blechen (1798–1840), Tiberiusfelsen auf Capri (Tiberius Rocks, Capri) (1828-9), oil on paper mounted on canvas, 20.5 x 30 cm, Lower Saxony State Museum, Hanover. Wikimedia Commons.
Carl Blechen visited the island in 1828, made hundreds of sketches there, and developed some into finished paintings when he was back in his Berlin studio. This painting of Tiberius Rocks, Capri (1828-9) seems to have been at least started en plein air, in oils on paper, although he may have finished it after his return. It shows the north coast, looking east to the peak of Monte Tiberio, with the Bay of Naples in the background.
Carl Eduard Ferdinand Blechen (1798–1840), Marina Grande, Capri (1829), oil on canvas, 90 × 130 cm, Österreichische Galerie Belvedere, Vienna, Austria. Wikimedia Commons.
Blechen’s superb finished painting of Marina Grande, Capri (1829) was made in the studio, though. This shows the north coast again, looking from the west of the Marina Grande towards the east, with the Tiberius Rocks and Monte Tiberio in the distance, and that may well be Vesuvius in the far distance.
Heinrich Jakob Fried (1802-1870), The Blue Grotto, Capri (1835), oil on canvas, 50 × 63 cm, Kunsthalle Bremen, Bremen, Germany. Wikimedia Commons.
Heinrich Jakob Fried’s painting of The Blue Grotto, Capri (1835) shows one of the island’s most famous sights, which has been the motif for many paintings since. This has to be visited by boat, and is at the north-western tip of the island. It features in August Kopisch’s book, published in German in 1838, describing his re-discovery of this cave in 1826, which popularised the island across northern Europe. Fried visited the cave in 1835, and probably painted this in a studio in Naples shortly afterwards, just in time for the book’s publication.
Jakob Alt (1789–1872), Marina Grande, Capri (1836), watercolour, 41.1 x 51.7 cm, Albertina, Vienna, Austria. Wikimedia Commons.
Jakob Alt’s view of Marina Grande, Capri (1836) is an extraordinary watercolour with painstaking detail. His view reverses Blechen’s, looking across the harbour from the east to the west, dropping almost to water level. Alt visited Italy in the mid-1830s, during which he too painted the Blue Grotto.
Marie-Caroline de Bourbon (Princess Caroline of Naples and Sicily) (1798–1870), Brothers in the Carthusian Monastery of San Giacomo, Capri (1842), further details not known. Image by PierreSelim, via Wikimedia Commons.
Marie-Caroline de Bourbon, Princess Caroline of Naples and Sicily, was an enthusiastic painter as well as being an avid collector of landscape paintings. The last serious Bourbon pretender to the crown of France, she visited Capri in the early 1840s, after she had been released from imprisonment in the Château of Blaye, and before moving to a palazzo on the Grand Canal in Venice. Her unusual painting of Brothers in the Carthusian Monastery of San Giacomo, Capri (1842) incorporates a vignette landscape view of the coast, almost in the manner of the Renaissance.
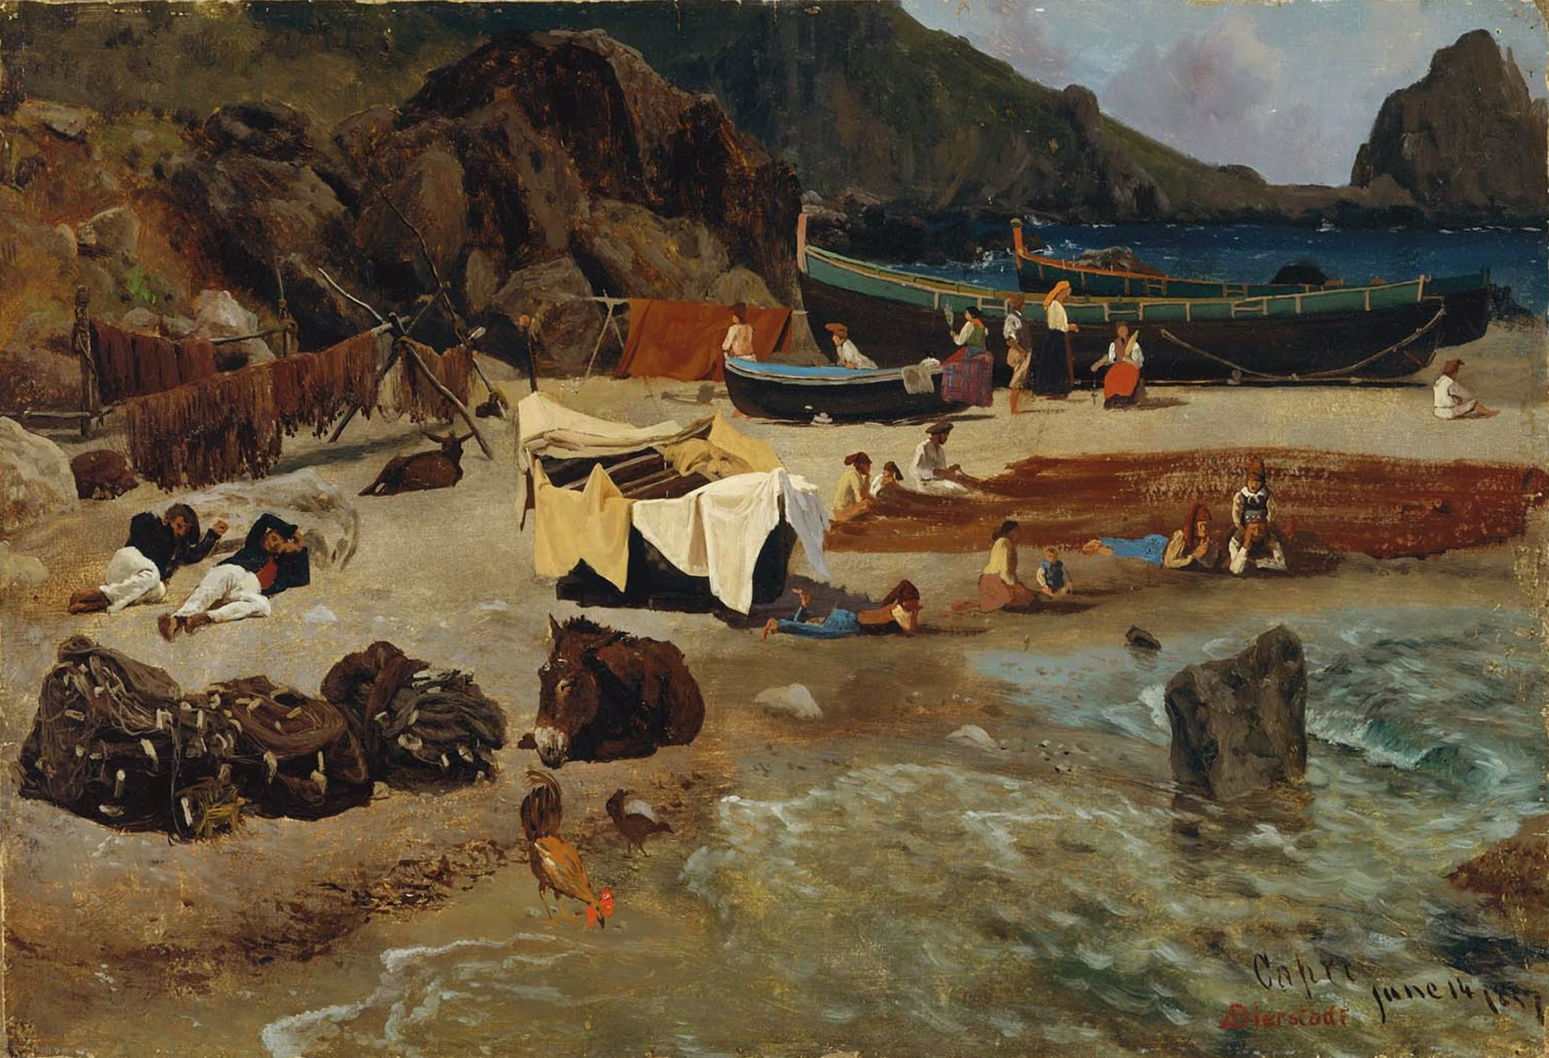
Albert Bierstadt (1830–1902), Fishing Boats at Capri (1857), oil on paper mounted on canvas, 34 × 49.9 cm, Museum of Fine Arts Boston, Boston, MA. Wikimedia Commons.
The great American landscape painter Albert Bierstadt visited Capri on his way back to New Bedford in 1857, following his training in Düsseldorf, Germany, only six years after he had started painting in oils. His Fishing Boats at Capri (1857) is painted in oils on paper, suggesting it may well have been started in front of the motif, and is quite unlike his mature style.
Albert Bierstadt (1830–1902), The Marina Piccola, Capri (1859), oil on canvas, 106.7 × 182.9 cm, Albright-Knox Art Gallery, Buffalo, NY. Wikimedia Commons.
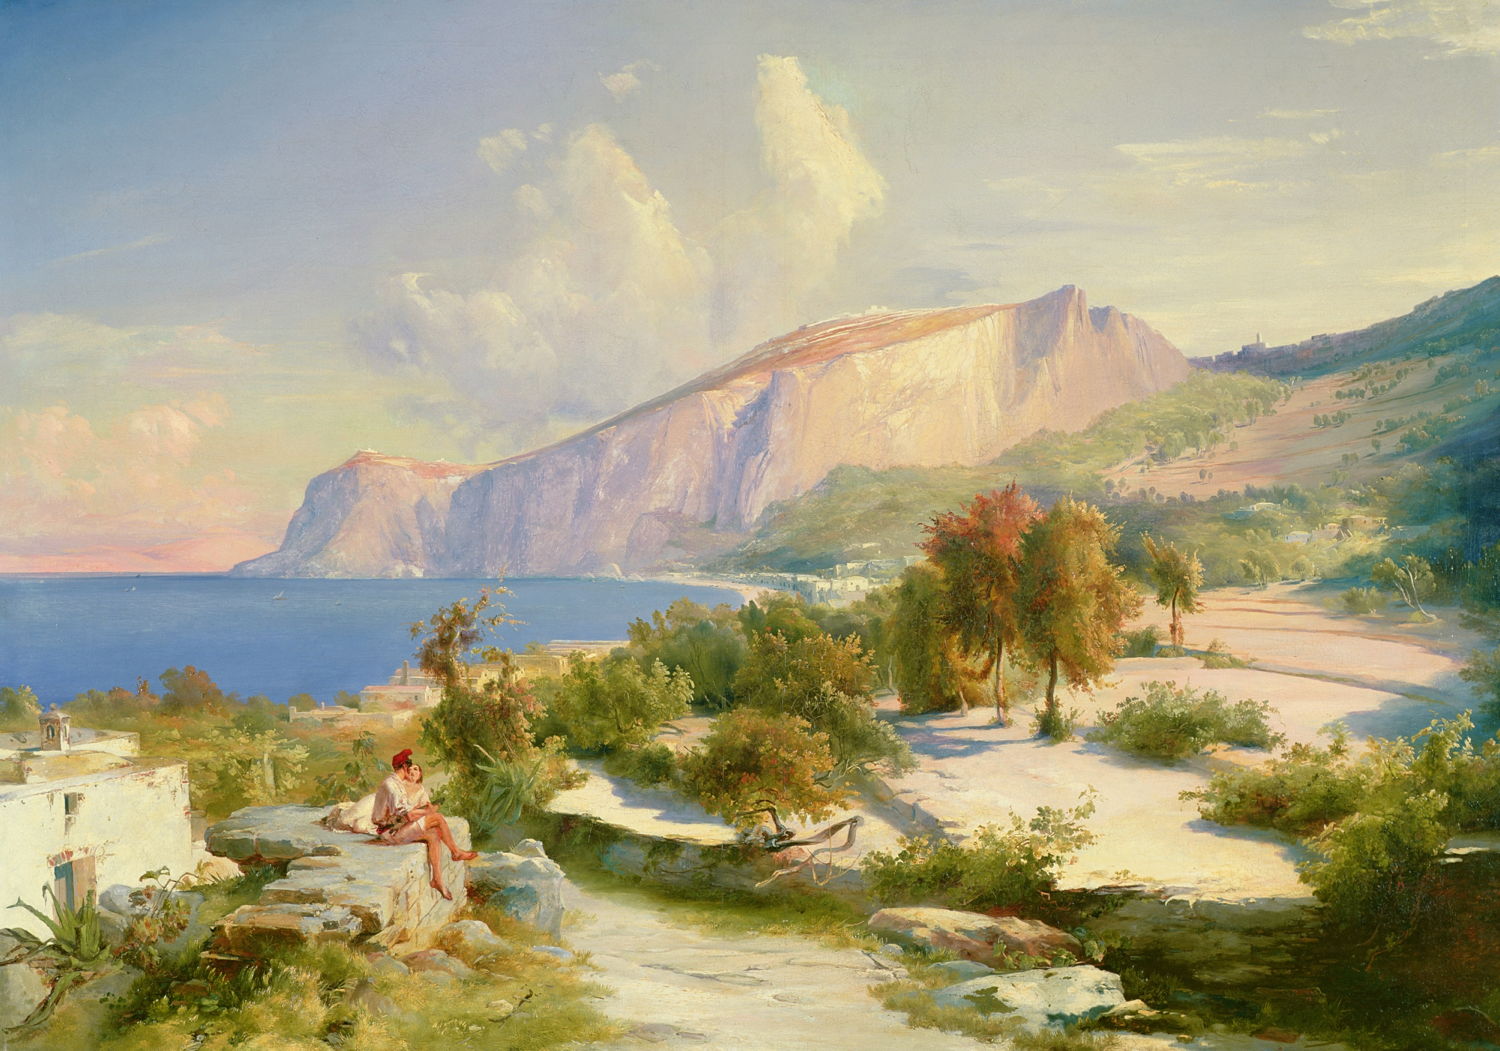
Bierstadt’s The Marina Piccola, Capri was painted on canvas in 1859, when the artist made his first journey westward to sketch American landscapes, and is more typical of the drama of his mature style. This smaller harbour is on the south side of the island, to the south-west of the town of Capri, and this view looks to the east, showing the distant sea stacks of the Faraglioni at the right.
William Stanley Haseltine (1835–1900), Arco Naturale, Capri (c 1870), further details not known. Wikimedia Commons.
William Stanley Haseltine was another great American landscape painter associated with the Hudson River School, and first met Bierstadt in Düsseldorf in the mid 1850s. Haseltine lived in Rome in 1857-58, and drew and painted both the Roman campagna and Capri during that time. Having made his reputation with dramatic depictions of the New England coast, he moved back to Rome in 1867, from where he travelled to paint across Europe. His paintings of Capri from this period proved popular with visiting Americans, and remain among some of the finest realist views of the island. Arco Naturale, Capri from about 1870 shows another of Capri’s famous sights, a natural rock arch on its short eastern coast.
William Stanley Haseltine (1835–1900), Isle of Capri: The Faraglioni (1870s), oil on canvas, 83 x 142 cm, Princeton University Art Museum, Princeton, NJ. Wikimedia Commons.
Haseltine’s Isle of Capri: The Faraglioni, from the 1870s, shows these stacks from the north-east, and was probably painted at the Villa Malparte, to the south of the Arco Naturale. He skilfully suggests scale with the tiny boats shown at their foot, although there may be a little exaggeration.
Alessandro la Volpe (1820–1887), View of Capri (1875), oil on canvas, 52.5 x 106.5 cm, location not known. Wikimedia Commons.
Alessandro la Volpe was an Italian who was born in, and worked from, Naples. His View of Capri (1875) shows the island in a heat haze, from the hills above Sorrento, to the north-east.
Hans Peter Feddersen (1848–1941), Marina Grande, Capri (1877), oil on canvas, dimensions not known, Museumsberg Flensburg, Flensburg, Germany. Image by anagoria, via Wikimedia Commons.
Hans Peter Feddersen was another former student from Düsseldorf, although after Bierstadt and Haseltine. He visited Italy and Capri from April to June 1877, when he painted this view of the Marina Grande, Capri in oils, probably en plein air. Rather than follow early examples, he looks to the north across the harbour, with Vesuvius in the background.
In the summer of 1878, John Singer Sargent had just completed his studies with Carolus-Duran, and had already started to have success at the Salon in Paris. He went off on a working holiday to Capri, staying in the village of Anacapri, as was popular with other artists at the time.
Getting a local model was tricky, because of the warnings that women were given by priests. One local woman, Rosina Ferrara, seemed happy to pose for him, though. She was only 17, and Sargent a mere 22 and just developing his skills in portraiture, following the advice of his teacher Carolus-Duran. Over the course of that summer, Sargent painted at least a dozen works featuring Rosina, who seems to have become an obsession.
John Singer Sargent (1856–1925), Capri Girl (Dans les Oliviers, à Capri) (1878), oil on canvas, 77.5 x 63.5 cm, Private collection. The Athenaeum.
One, Dans les Oliviers, à Capri, he exhibited at the Salon the following year. He sent a near-identical copy back for the annual exhibition of the Society of American Artists in New York, in March 1879.
John Singer Sargent (1856–1925), View of Capri (c 1878), oil on cardboard, 26 x 33.9 cm, Yale University Art Gallery, New Haven, CT. Wikimedia Commons.
Sargent also painted a pair of views of what was probably the roof of his hotel. In View of Capri, above, made on cardboard, Rosina stands looking away, her hands at her hips. In the other, Capri Girl on a Rooftop, below, she dances a tarantella to the beat of a friend’s tambourine.
John Singer Sargent (1856–1925), Capri Girl on a Rooftop (1878), oil on canvas, 50.8 x 63.5 cm, Crystal Bridges Museum of American Art, Bentonville, AR. Wikimedia Commons.Albert Hertel (1843–1912), View of the Shores of Capri with People (1879), oil on canvas, 173 × 143 cm, location not known. Wikimedia Commons.
Albert Hertel trained in Düsseldorf in 1868-69, prior to which he had lived as a student in Rome for several years. He established himself as a landscape painter in Berlin, from where he seems to have returned to Italy and visited Capri in the late 1870s. His View of the Shores of Capri with People (1879) shows a small bay near Punta Carena, at the south-western tip of the island.
The sentence for the media mogul, along with long prison terms for his editors, shows how Hong Kong enforces Xi Jinping’s red lines with a new severity.
Sanae Takaichi, who has proved popular as the first woman to lead Japan as prime minister, was on course for a sweeping mandate after a snap election on Sunday.
In 1657, one of the great scientists of the Dutch Golden Age, Christian Huygens, invented the pendulum clock, the first timekeeping device accurate enough to make a second hand worthwhile, as it typically only lost about 15 seconds per day. It was another century before John Harrison developed his marine chronometer, a clock sufficiently accurate to enable precise determinations of longitude. Another hundred years later, with the coming of railways across Europe, ordinary people started synchronising clocks so they caught their train, and our ancestors soon became the first slaves to time.
I’m beginning to wonder whether Apple intends reversing that history. Have you not noticed something odd about setting times in more recent Mac apps, how few allow you to set the seconds? You can see what has happened over the last few years in my log browsers, Ulbow and LogUI.
Most of Ulbow’s interface was written using AppKit seven years ago, and it uses a standard Date Picker with elements containing the year, month, day, hour, minute and second. Given that you can get more than 10,000 log entries in a second, I would have preferred to offer decimal seconds, but that isn’t possible within the standard AppKit picker.
LogUI was written from the start using Apple’s more recent substitute for AppKit, SwiftUI, eighteen months ago. That doesn’t use the AppKit Date Picker, but has its shiny new DatePicker instead. Components available in macOS are there limited to year, month, day, hour and minute. To be able to include seconds your code must be written for an Apple Watch, as macOS, iOS and iPadOS don’t allow seconds at all. That’s why you have to enter them in a separate TextField, although that could perhaps allow the use of decimal seconds.
When I wanted to obtain higher resolution timestamps for log entries in LogUI, I discovered that standard date formatting in macOS only resolves to milliseconds (10^-3 second), and couldn’t stretch to microseconds (10^-6 second), let alone the nanoseconds (10^-9 second) that can be obtained from Mach absolute time, as used internally in parts of macOS. Even that reference has recently become lower resolution, as each ‘tick’ in Apple silicon Macs occurs every 41.67 nanoseconds, rather than once every nanosecond as in Intel Macs.
There’s another difference between Ulbow and LogUI with regard to timestamps that you’re less likely to be aware of: Ulbow obtains its log records indirectly using the log show command, which can include the Mach absolute time of each entry. Instead, LogUI accesses those entries direct through the more recent OSLog API, which doesn’t currently expose such precise times.
Lest this appear too far removed from the world of the user, look in the menu bar clock’s settings, and you’ll see Display the time with seconds is an option, but not the default. When the clock is shown on the Lock Screen or screensaver, it only displays hours and minutes, never seconds, neither can any of the digital clock widgets supplied with macOS. While the Clock app does support decimal seconds, that’s only permitted in its Stopwatch where hundredths are displayed, as they are on an Apple Watch and other devices.
This becomes stranger still when you consider the methods used to synchronise internal clocks. Since High Sierra, macOS has used its own timed service, which Apple describes as “synchronizing the clock with reference clocks via technologies like NTP”, that’s the Internet service provided by time.apple.com as in Date & Time settings. When accessed over the Internet, it’s generally accepted that NTP should be accurate to within tens of milliseconds, although that can at times worsen to 100 milliseconds or more.
As far as I’m aware, no Mac has ever had a GPS receiver built into it, but every iPhone apart from the earliest, and those iPads with cellular support, include assisted GPS and GLONASS. Those are capable of providing time accurate to about 100 and 200 nanoseconds respectively. Even my 11-year-old car corrects its clock using GPS.
Although our Macs and devices can share almost everything else now, my Macs appear unable to adjust their clocks to the more accurate time that should be available to my iPhone. But as iOS is so shy about displaying seconds anywhere, it makes me wonder whether iPhones make full use of GPS time, or mostly rely on that obtained from the nearest cellular mast.
I’m curious whether this is a deliberate campaign to abolish seconds wherever possible, or just the result of doing what looks sufficient. Maybe I’m a mere slave to time, and the Time Lords in Apple Park are on a mission to cure me by travelling back four centuries.
Anyone familiar with Doctor Who will be aware of the power brought by control over time. Although there have been sporadic reports of problems with Apple silicon Macs keeping good time, and they may not synchronise sufficiently accurately for some purposes, they appear to have generally good control over time.
Last year I explained how macOS now uses the timed service with network time (NTP) to perform adjustments while running. This article looks at what happens before that, during startup, when the Mac has only its own devices to tell the time. Although the user sees little of this period, anyone accessing the log recorded during startup could find the timestamps of entries affected by adjustments. It may also provide insights into how Apple silicon Macs tell the time.
Methods
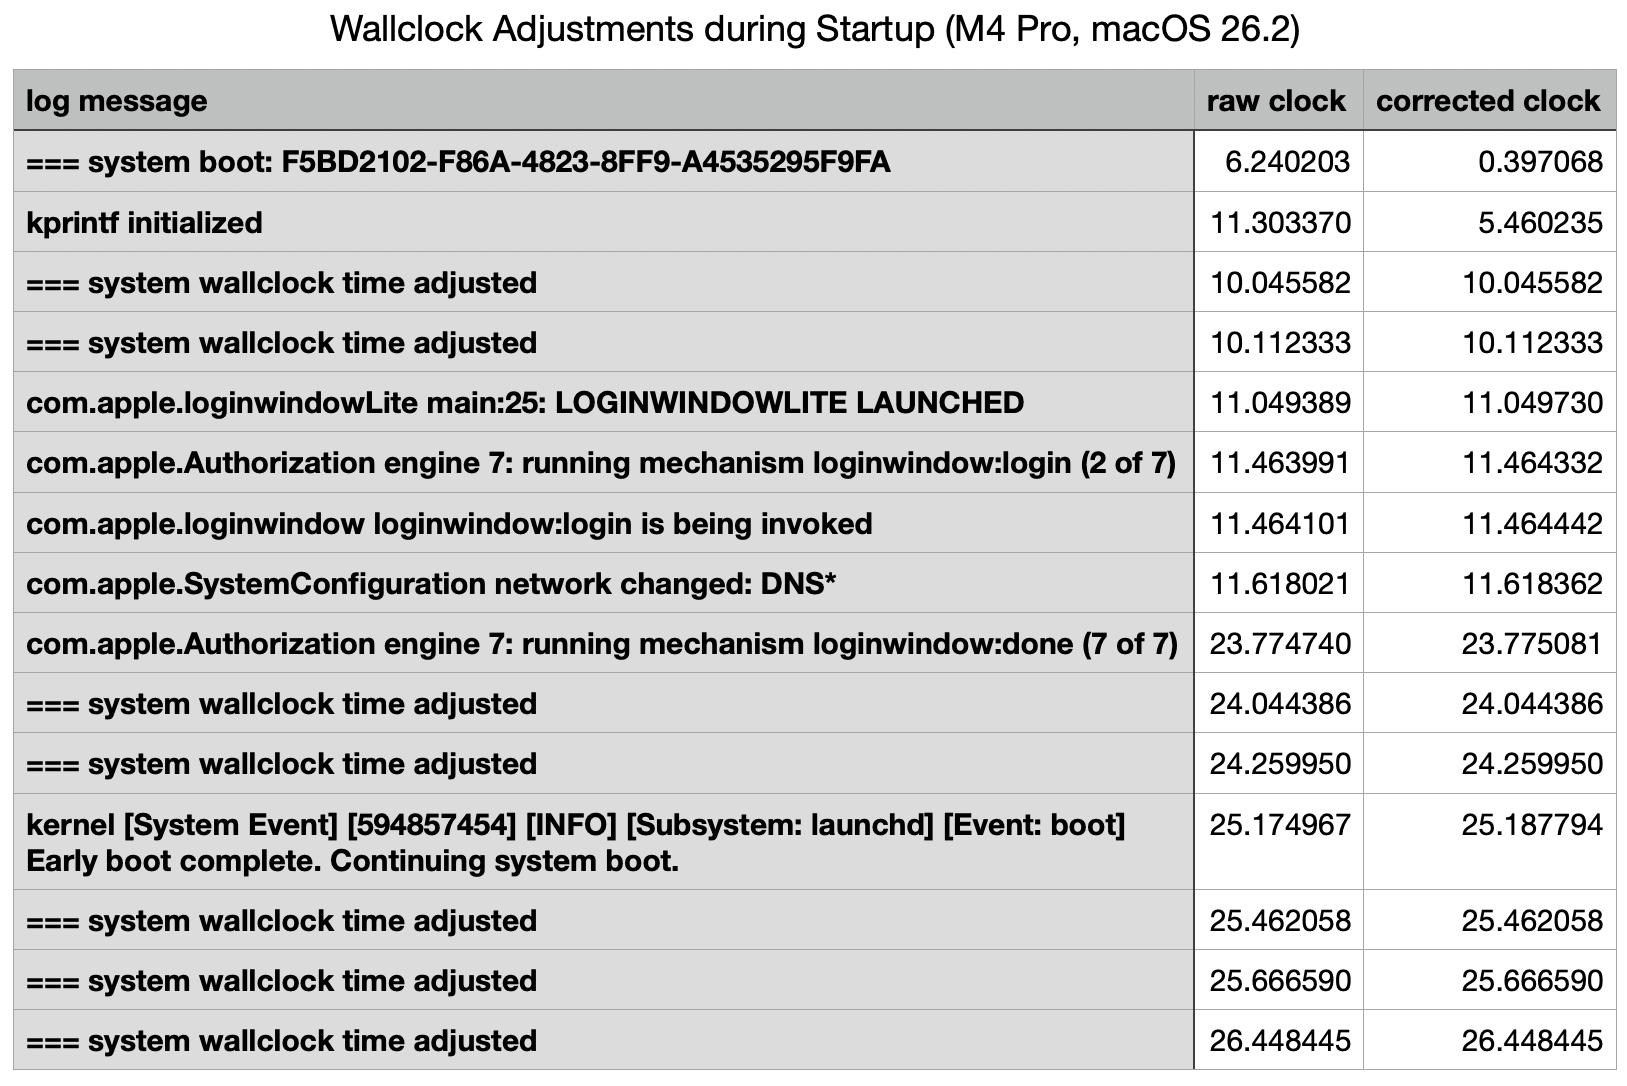
To investigate clock initialisation and adjustment during startup, I analysed approximately 100,000 consecutive log entries freshly recorded in the log of a Mac mini M4 Pro booting cold into macOS 26.2, following a period of about 14 hours shut down. These entries covered the period from the initial boot message for approximately 27 seconds, after I had logged in and the Desktop and Finder were displayed. This Mac is configured to Set time and date automatically from the default source of time.apple.com in Date & Time settings, and has both WiFi and Ethernet connections.
Multiple adjustments to wallclock time were recorded during that period, resulting in significant discontinuities in log timestamps. For example, 11:40:15.888717 void CoreAnalyticsHub::handleNagTimerExpiry(IOTimerEventSource *)::838:messageClients of 37 available events
11:40:10.045582 === system wallclock time adjusted
11:40:10.053309 000009.664065 Sandboxing init issue resolved: "Success"
11:40:10.053447 com.apple.sandbox.reporting Sandbox: wifiFirmwareLoader(49) deny(1) file-read-metadata /Library
11:40:10.112333 === system wallclock time adjusted
11:40:10.127559 com.apple.Installer-Progress Progress UI App Starting
In the first of those adjustments, the wallclock time was retarded by up to 5.84 seconds, and in the second it was advanced by at most 0.0589 seconds.
Because of those wallclock adjustments, times recorded in the log are discontinuous. Although it’s not possible to correct for the adjustments made completely accurately, assuming that each of those adjustments corresponds to standard time (such as UTC), those can be applied backwards through times recorded in the log to bring them closer to that standard. This could result in some brief periods of entries with times earlier than preceding entries, but is as accurate an estimate possible given the data.
Adjustments found
The narrative constructed from the log is summarised in the following table.
This starts with the initial record of the boot process, giving its UUID, within a second of the Power button being pressed (at approximately 0.0 seconds) to initiate the startup. That’s followed by a gap of just over 5 seconds before the second log entry.
The first two wallclock adjustments were made at 10 seconds, before there was any evidence of network connectivity. Those took place one second before the loginwindow was launched.
Two subsequent adjustments were made shortly after 24 seconds, immediately following the removal of the loginwindow after successful authentication. A further three adjustments followed in the 2.5 seconds after the user was logged in, while the Desktop and Finder were being prepared and displayed.
Log entries reporting the timed service was running didn’t occur until shortly before the last of those wallclock adjustments, and that was recorded in the log 0.0003 seconds before timed obtained its first external time.
Multiple internal clocks
A total of seven wallclock time adjustments were made before timed was able to obtain a time from any external reference. Over the first 10 seconds, before the initial wallclock adjustment, those were substantial, amounting to 5.8 seconds. For those changes to be made to wallclock time, there must be another source of time deemed more accurate, against which wallclock time can be compared and adjusted.
I’ve been unable to find any trustworthy information about internal clocks and timekeeping in Apple silicon Macs. It has been suggested (and Google AI is confident) that local reference time is obtained from the Secure Enclave. However, Apple’s only detailed account of features of the Secure Enclave fails to mention this. Initialisation of the Secure Enclave Processor also occurs relatively late during kernel boot, in this case at around the same time as the first two adjustments were made to wallclock time.
Conclusions
Apple silicon Macs may make multiple adjustments to wallclock time during startup, resulting in several discontinuities in log timestamps, which can cause discrepancies in event times.
Several of those can occur before the Mac has access to external time references, and timed is able to obtain an external time against which to adjust wallclock time.
Wallclock time can’t be the only local source of time, and appears to be adjusted against another local source.
A decision in China not to charge a man who fathered children with a woman with a mental illness has set off a debate about consent and the state’s push for babies.
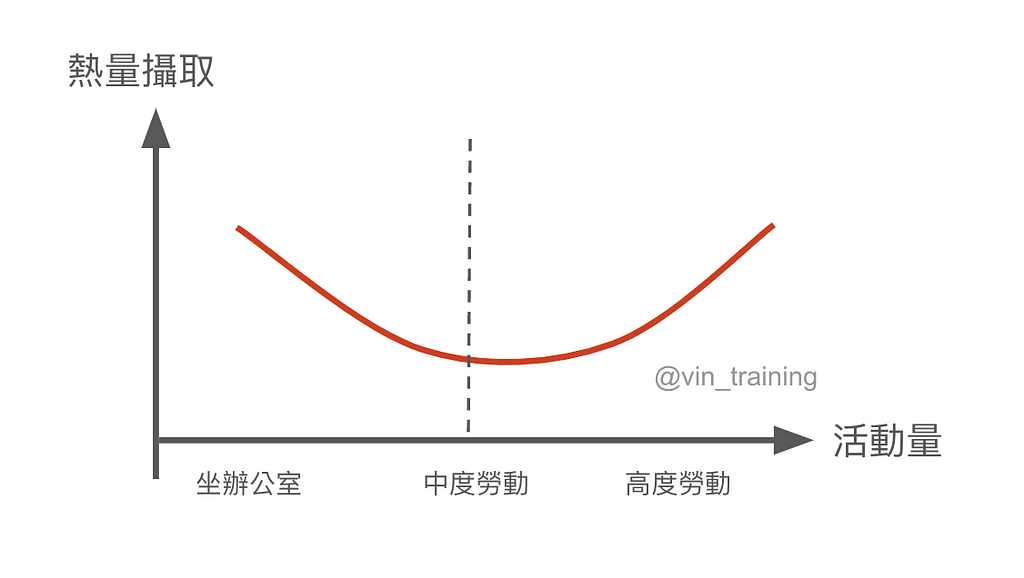
其實,只透過「多活動以增加熱量消耗」來減重並不是容易的事。根據實證指引,對多數人而言,要減重主要還是得靠飲食控制,運動只是輔助。再更進階一點的分析,甚至有所謂的 Constrained Total Energy Expenditure Model(總能量消耗限制模型)表示,超過一定的活動量後,再怎麼運動也不會增加更多熱量消耗;最顯著的例子,就是高活動的原始部落族群,每天的熱量消耗其實跟現代人差不多。(註:這個模型有很多可以討論的,如果現在會覺得奇怪、不合理,是正常的;但本文就先不細述了)
主要參考資料:Melby, C. L., Paris, H. L., Sayer, R. D., Bell, C., & Hill, J. O. (2019). Increasing Energy Flux to Maintain Diet-Induced Weight Loss. Nutrients, 11(10), 2533. https://doi.org/10.3390/nu11102533
若喜歡這種健身科學解說,請追蹤我的 Medium 和 Instagram(@vin_training),才不會錯過最新內容哦!
在这次「封面图事故」之前,我就有换新的的想法了。一方面确实是,在日常写作和新增一些页面时会明显感觉到这种技术上的代际差,只是自己懒得动,能用就不改。我相信大部分程序员也是这么想的,代码屎山不就是这么回事嘛。但如果只是换个模版,其实不用想那么久,所以另一方面更核心的是,我在同时考虑把博客的套餐升级到 Explorer 版,还想提前买下后面几年的域名使用权,因此,在我心里,模版的更新、升级、域名这三件事是合并在一起考虑的。