It’s not that long ago that our Macs came with internal storage that could readily be replaced when it failed. Memories of big hard disks that died almost as soon as their warranty ran out, and of keeping a bootable clone ready in a Mac Pro, aren’t easily forgotten. So isn’t it high risk to buy a modern Mac that won’t even boot if its internal SSD has failed? Are you left wondering whether that SSD will last five years, or even three?
SSDs aren’t like hard disks
Hard disks are amazingly engineered electro-mechanical devices that spin platters at high speeds incredibly close to read-write heads. Before you even consider all the faults that can occur in their magnetic storage, there are many horrible ways they can die through mechanical disaster. Visit a data recovery shop and they’ll show you heads fused to platters, and shards of what had been storing terabytes of data before the platter shattered. And like all mechanical devices they wear out physically, no matter how carefully you care for them.
By comparison, an SSD in a Mac that has good mains power filtering, ideally a proper uninterruptible power supply (UPS), leads a sheltered life. Like other solid-state devices, so long as its power supply is clean and it doesn’t get too hot, it’s most likely to fail in the first few weeks of use, and as it’s reaching the end of its working life, in a U-shaped curve. Modern quality control has greatly reduced the number of early failures, so what we’re most concerned about is how long it will be until it wears out, as it approaches its maximum number of erase-write cycles.
Predicting wear
The theory goes that the memory cells used in SSDs can only work normally for a set number of erase-write cycles. This appears to hold good in practice, although there’s always a small number that suffer unpredictable electronic failure before they reach that. What’s more controversial is how many erase-write cycles each SSD should be capable of. Manufacturers make various claims based on accelerated ageing tests, and I suspect most come with a large dash of marketing sauce. Apple doesn’t offer figures for the SSDs it equips Macs with, but conservative estimates are around 3,000 cycles in recent models.
To work out how long you can expect your Mac’s internal SSD to last before it reaches that cycle limit, all you need do is to measure how much data is written to it, and once that is 3,000 times the capacity of the SSD, you should expect it to fail through wear. Fortunately, SSDs keep track of the amount of data written to them over their lifetime. This can be accessed through better SSD utilities like DriveDx, and I even have a feature in Mints that will do that for most internal SSDs.
Example
My iMac Pro is now well over 7 years old, as it was bought new in December 2018. It has a 1 TB internal SSD (I wanted 2 TB, but couldn’t wait for a BTO), and has run pretty well 24/7 since I got it. As I work every day, even over Christmas, and it has been my main production system, it has probably been in use for over 2,500 days now.
According to the SSD’s records, over that period its 1 TB SSD has written about 150 TB in total, from its total expected lifetime of 3,000 TB, if it reaches 3,000 erase-write cycles. At current usage rates that would take another century, or 133 years if you want to be precise. In reality, it’s generally believed that most SSDs will cease functioning after about 10 years in any case.
It’s worth noting here that, had I got the iMac Pro with my preferred 2 TB SSD, its total expected lifetime would have been 6,000 TB, and instead of lasting a total of 140 years it would in theory have gone twice that period before it wore out.
What wears out SSDs?
For an SSD to wear out when it reaches its limit of erase-write cycles, wear across its memory must be even. If that memory were to be largely full of static data, and the SSD was only able to write to 10% of its memory, then it would wear out ten times quicker than the whole SSD would. To ensure that doesn’t happen, all modern SSDs incorporate wear-levelling, which incurs its own overhead in erase-write cycles, but should ensure that the whole SSD wears out at the same rate. You can help that, and maintain faster write speeds, by keeping ample storage space free. My current target for my iMac Pro is an absolute minimum of 10% free, and 15% as much as possible.
Given that my iMac Pro has averaged about 21 TB written to its SSD each year, that works out at just under 60 GB per day. For those who are worried that the Unified log adds significantly to SSD wear, it’s not hard to estimate that’s only likely to write around 250-500 MB each day even if you leave your Mac awake and running 24/7, less than 1% of my Mac’s daily write load.
Unless you work with huge media files, by far your worst enemy is swap space used for virtual memory. When the first M1 Macs were released, base models with just 8 GB of memory and 128 GB internal SSDs were most readily available, with custom builds following later. As a result, many of those who set out to assess Apple’s new Macs ended up stress-testing those with inadequate memory and storage for the tasks they ran. Many noticed rapid changes in their SSD wear indicators, and some were getting worryingly close to the end of their expected working life after just three years.
So the best way to get a long working life from your Mac’s internal SSD is to ensure that it has sufficient memory as to never use swap space in its VM volume. Although my iMac Pro only has a 1 TB internal SSD, which is more cramped than I’d like, it has 32 GB of memory, and almost never uses swap.
Key points
SSDs wear out differently from hard disks.
Protect your Mac and its internal SSD with good mains power filtering, preferably using a UPS.
Expect modern Mac internal SSDs to wear out after at least 3,000 erase-write cycles.
To monitor wear, measure the total data written to the SSD.
Expect an internal SSD to wear out when that total reaches 3,000 times the total capacity of the SSD.
For a given amount of data written to an SSD, the larger the total capacity of the SSD, the slower it will wear out.
Keep at least 10% of the SSD free at all times, with 15-25% even better.
Ensure your Mac has sufficient memory to never use VM swap space.
Many of us have more USB4 and Thunderbolt devices than our Macs have ports. In my case, I need to have four external NVMe SSDs connected to my Mac mini M4 Pro with its three ports, one of which is already committed to its Studio Display. One solution is a Thunderbolt 4 hub, but those tend to come with only three ports, so I’d need to connect two, either to both the free ports or in a daisychain from one. This article considers an alternative: OWC’s four-bay Express 4M2 enclosure.
The original 4M2 supported Thunderbolt rather than USB4. When used as a RAID array, with SoftRAID, it delivered excellent performance, but as a plain four-bay enclosure for separate disks it was slow and only delivered about 800 MB/s. The current version now supports USB4, and gives each bay a single lane of PCIe 4.0. I have just completed testing my new 4M2 with three Samsung 990 Pro 2 TB SSDs, connected to my Mac mini M4 Pro. Results given here are for the ‘gold standard’ test using Stibium.
Transfer speeds without RAID are limited to just over 1.6 GB/s for both read and write, but are sustained at that even when reading or writing simultaneously to two of its SSDs. Simultaneous transfers to three or four SSDs will reduce, though, as the total then exceeds the 3.2 GB/s available through its single USB4 connection to the host Mac. A future model could perhaps use the full four lanes over Thunderbolt 5, but that’s unlikely this year and will inevitably be more expensive.
The speed of the 4M2 is remarkably consistent compared to those delivered in practice by hubs or docks. At their best they can almost match a direct connection, but sometimes they can be surprisingly slow for no apparent reason.
As expected, the enclosure is beautifully engineered in aluminium, and has internal heat sinks to variable-speed fans that are far more protective than anything available in single-SSD enclosures. Although a little larger than a Mac mini, it isn’t overpowering, and looks petite alongside a Mac Studio.
There’s considerable cost saving to be achieved as well. The 4M2 typically sells for around $/€/£ 240. Single OWC Express 1M2 40G (USB4) enclosures cost half that, so four would come to about $/€/£ 480, to which you’d need to add two TB4/USB4 hubs, for a total of $/€/£ 880.
If you can live with a consistent 1.6 GB/s, or want the substantially better performance available with RAID, the OWC 4M2 is the best choice for connecting multiple NVMe SSDs to the minimum number of ports on your Mac.
Snapshots are a simple concept that only becomes complex when you dig into the detail. One of the fundamental features introduced in APFS, they are now used extensively, to form the System volume for all versions of macOS since Big Sur, and in many backup systems including Time Machine.
As the name implies, a snapshot is a preserved copy of a volume at a moment in time. Creating one is both simple and lightning quick: APFS makes a copy of the file system metadata for that volume, and retains with it all the data of its files. From then on, the working copy of the file system metadata changes as files are modified, created and deleted. But all the original file data at the time the snapshot was made is retained. That enables you to roll back the live volume to the exact state it was in when the snapshot was made. The snapshot itself (its file system metadata) is kept in the same container as the live volume, and their file data overlaps.
Snapshots rely on another fundamental feature of APFS, a scheme called copy on write. When a file is changed, the data for that file isn’t changed in place in the same storage blocks, but written out to new blocks. This enables the snapshot to retain all the original data for its files, while the live volume consists of a mixture of old unchanged data, and replacements for those blocks that have changed since the snapshot was made.
Size
This leads to the biggest disadvantage of snapshots: when first made, the only additional storage space they require is for their copy of the file system metadata, which is relatively small. Over time, though, as more data blocks are changed in the live volume, the size of the data the snapshot must retain grows, and can after a few weeks become enormous, depending on how active the file system is in that volume. What was initially measured in MB quickly becomes GB, and if you forget about that snapshot, it will become hundreds of GB in size.
Management
While some operating systems allow users to create their own snapshots and maintain them, macOS doesn’t: apps that have the restricted entitlement to create snapshots are required by Apple to maintain them as well. That’s why apps that make snapshots are backup utilities, and are required to have a mechanism for automatically deleting their old snapshots to prevent them overwhelming storage.
Creating a snapshot is almost instantaneous, but deleting one is more complex and time-consuming. This is because the file system has to identify all the old retained data blocks that are no longer required, and allow them to be freed up for re-use. When that’s performed across the millions of files that could be in the snapshot’s file system metadata, it will inevitably take time. It’s also not entirely predictable, particularly when there may be multiple snapshots for that volume.
APFS snapshots are always of whole volumes, although some file systems can make snapshots of directory trees within a volume. Unlike Time Machine’s backup exclusions, each snapshot it makes of a volume it’s backing up contains every file in that volume. If you have large database or VM files, although Time Machine and other backup utilities can exclude them from taking up space in their backups, they can’t exclude them from their snapshots. If you do want to keep such large files, it’s usually better to put them in a volume that doesn’t get snapshots made of it.
Snapshots are also read-only, and once one is made, it can’t be changed. This is beneficial, as it ensures nothing can change the old files and their data. However, it also means that if something goes wrong in a snapshot and it starts throwing errors, you effectively can’t repair it. At present, you also can’t copy a snapshot, which makes it impossible to make a copy of your Time Machine backup storage, as that’s composed of snapshots.
Purposes
Your Mac uses snapshots in three ways:
local snapshots, typically made by Time Machine and its equivalents on the volumes they back up. Time Machine only keeps those for 24 hours before automatically deleting them for you, although third-party utilities are usually more flexible. You can normally access these, or roll back to them, by mounting the snapshot as a volume.
backup snapshots, only created by Time Machine and used to store each backup on your Mac’s backup storage. These are created during the backup process by assembling a copy of the local snapshot together with its changed data into a synthetic snapshot, which is how Time Machine makes its backups now.
the Signed System Volume, created during installation and updating of macOS on the System volume of your boot volume group. This is a snapshot of that System volume, and is mounted and used as the macOS system. Unlike all other snapshots, this has a tree of cryptographic hashes added to it, to verify and seal the SSV. If a single bit is changed in that snapshot, then that change propagates to the top of the tree, macOS will detect it, and invalidate that SSV.
Utilities
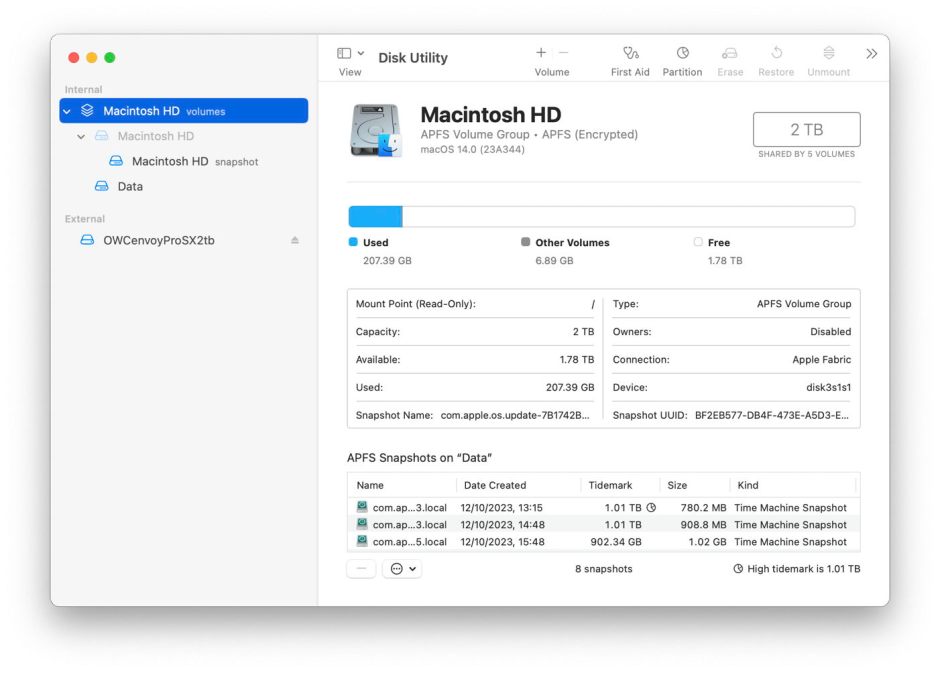
In addition to features provided by third-party backup utilities, you can manage snapshots using Disk Utility. Open its View menu and first enable Show All Devices, then Show APFS Snapshots. Select the Data or Macintosh HD – Data volume in the left of the window, and you’ll see a list of all APFS snapshots for that volume, together with an indication of the size of each.
To delete a snapshot in Disk Utility’s list, select it and use the Delete… command from the contextual menu (Control-click). Be careful, though, as there’s no undo. You can safely remove all Time Machine snapshots from that volume except the most recent, which is also the smallest. That latest snapshot is needed when that volume is next backed up by Time Machine. If you remove that too, then the next backup could be a full backup of everything on that Data volume, something best avoided if possible.