Reading view

There are new articles available, click to refresh the page.

Last Week on My Mac: snapshots, the elephant in APFS

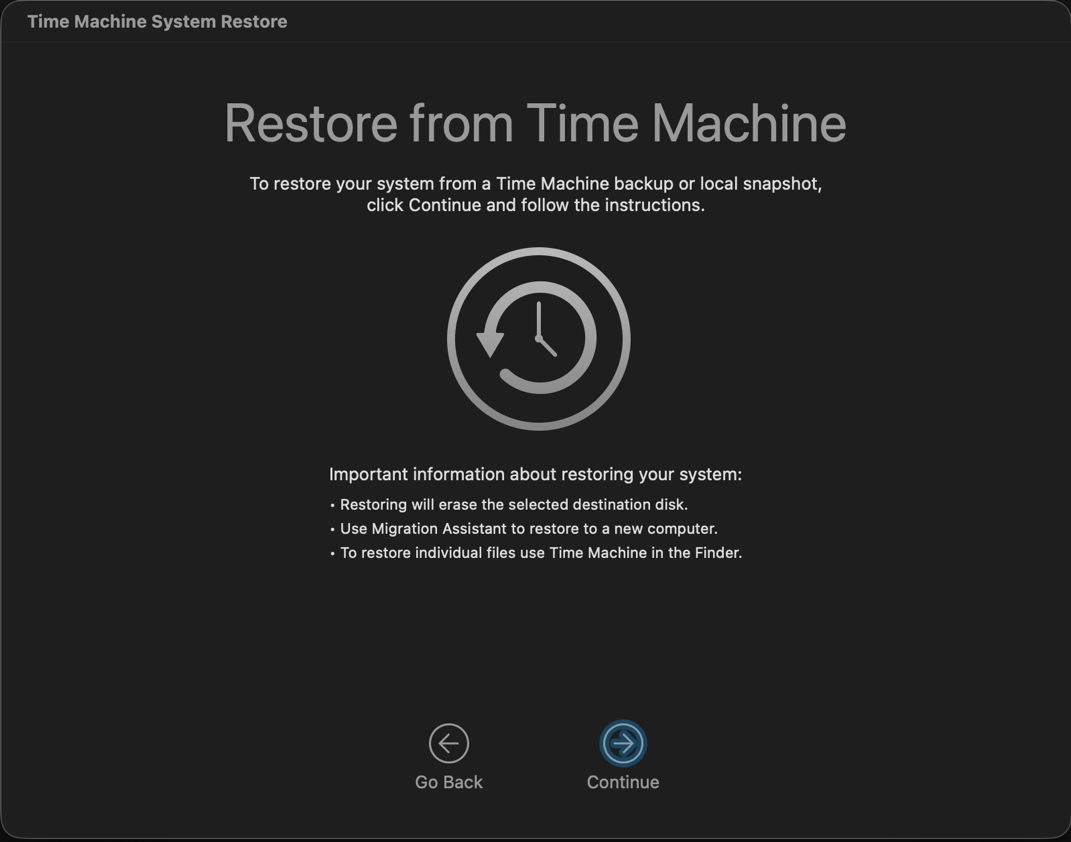
When Apple announced APFS at WWDC ten years ago, snapshots were demonstrated as one of its major features, and intended to form the basis of Time Machine’s backups in the future. Shortly after its initial release in High Sierra, Rich Trouton at Der Flounder documented their use, including how to roll back to a snapshot using Time Machine System Restore in Recovery mode. Apple described this in a support note now replaced by its successor, last revised six months ago, which carefully avoids any mention of rollback.

Snapshots are widely available in modern file systems, in some being referred to as shadow copies, and rolling back to them is a popular if not indispensable feature. Except in APFS, where there appears to be only one supported method, which is severely restricted, as I described last week. That enables you to roll back your Mac’s current Data volume to a snapshot, but doesn’t work for any other volume as far as I can discover.

Disk Utility can display and delete snapshots on any mounted disk, but can’t create or roll back to them. Its command line equivalent diskutil has the same limits (unless you’re ChatGPT). tmutil appears to be the only way to create a snapshot in macOS, but can’t perform that for an arbitrary volume, only the current Data volume and those being backed up by Time Machine.

If I wanted to make a one-off snapshot of a volume on an external SSD, I’d thus have to turn to a third-party utility. Even here I’m up against Apple again, as the API for snapshots is controlled by two restricted entitlements, com.apple.developer.vfs.snapshot for creating and deleting them, and com.apple.private.apfs.revert-to-snapshot for rollback. So far, Apple appears to have approved only apps that make backups and automatically delete their old snapshots to prevent them from overwhelming storage space, and I’m not aware of one with the com.apple.private.apfs.revert-to-snapshot entitlement to allow rollback.

As Adam Leventhal has documented in his open source command tool snaputil, the API call fs_snapshot_revert() is used to perform a rollback, but without the com.apple.private.apfs.revert-to-snapshot entitlement is non-functional.

Having drawn a blank with Apple’s tools, you might feel tempted to ask AI to help. If you’re lucky it might talk you through using Time Machine System Restore in Recovery mode, although as we’ve seen that can’t help with any volume other than the current Data volume.

ChatGPT’s responses to two queries from different people are more concerning, as it repeatedly asserted that you can roll back using a completely imaginary verb with the diskutil command, in one case using a command of the form
diskutil apfs revertToSnapshot -n com.apple.TimeMachine.YYYY-MM-DD-HHMMSS /
or using
diskutil apfs revertToSnapshot disk1s5 -n com.apple.TimeMachine.YYYY-MM-DD-HHMMSS
instead.

I have checked that in normal user mode and in Recovery mode, only to be told the revertToSnapshot verb isn’t recognised. With the aid of virtual machines, I’ve confirmed that as far back as macOS 12 Monterey, and there’s absolutely no sign of it. When challenged, ChatGPT maintained that it was “directionally right” that revert capability exists in APFS, as we already know from Time Machine System Restore, and that Apple’s entitlement structure “proves it”. It’s a shame I had to do so much checking to confirm that ChatGPT was plain wrong, and had apparently made up those commands.

Not being able to make a one-off snapshot of a volume on an external SSD might appear a small if annoying oversight, but it has consequences. Snapshots are not only blazingly quick in rollback, but they are also the only means of restoring some important volume content, such as document versions, which is easily demonstrated.

When files are restored by copying from a mounted snapshot, all their saved versions are lost. They are also lost from Time Machine backups, and in any case would be lost during migration. The only way to preserve those versions would be using a third-party tool such as my Versatility or Revisionist.

Ten years after Apple first promised us snapshots in APFS, we still don’t have access to their full capabilities, and their use remains largely undocumented. Yet they’re readily available in competing operating systems and file systems.
Access and repair a broken disk image

Like any file, a disk image can become corrupt or damaged, and like any mountable disk its file systems can also become corrupt or damaged. Although those should be very infrequent, their results can disastrous, and render the contents of that disk image inaccessible. This article suggests some solutions you can try.

In theory, if the problem is in the image’s file systems, you should be able to mount its volumes and run First Aid in Disk Utility to check and repair them. In practice that seldom works out, as macOS usually refuses to mount the image. Unless you have ready access to a recent backup, all you can do then is resort to Terminal’s command line to attempt a recovery.

Gaining access to the contents of a disk image requires two steps to complete: first the image must be attached as a device, then after probing of the file systems it contains, those can be mounted.

dmgtrouble1

Read-only and compressed disk images have a checksum stored, and this is normally verified against the image file data first. If that proves invalid, then macOS will refuse to go any further.

dmgtrouble2

In the past, records of checksum verifications have been stored in extended attributes such as com.apple.diskimages.recentcksum, and sometimes deleting those, or a record of the file systems being checked using fsck in com.apple.diskimages.fsck, can allow the disk image to mount. More recently those appear to have fallen into disuse.

Next you should try to attach the disk image without verification or mounting. This is best done using a command such as
hdiutil attach -nomount -noverify diskImagePath
where diskImagePath is the full path to the disk image file, such as /Users/hoakley/VMs/myImage.dmg

If this succeeds, you’ll be rewarded with a list of the resulting devices, such as
/dev/disk4 GUID_partition_scheme
/dev/disk4s1 EFI
/dev/disk4s2 Apple_APFS
/dev/disk5 EF57347C-0000-11AA-AA11-0030654
/dev/disk5s1 41504653-0000-11AA-AA11-0030654

The first is the disk device disk4, and is followed by its two standard partitions disk4s1 and disk4s2. The latter is its APFS container disk5 with its single APFS volume disk5s1. You can now check and repair the last two of those, such as
fsck_apfs -y /dev/disk5s1
which should return a blow-by-blow account of the results. If the file system is HFS+ you may also be able to use third-party repair tools such as DiskWarrior.

When you’ve completed the required repairs, detach the disk image with a command like
hdiutil detach /dev/disk4

If that fails to make the disk image mountable, some have claimed success by converting the disk image to a different format, using a command like
hdiutil convert diskImagePath -format Uxxx -o outImagePath
where diskImagePath is the original disk image, outImagePath is the new image to be created, and Uxxx is the name of a disk image type, as listed in the Appendix.

If none of these gives access to the contents you require, then it’s almost certain that the only way ahead is to find the latest backup of that disk image, and use a copy of that.

Appendix: Supported disk image formats

  • UDRW – UDIF read/write, sparse file from macOS 12
  • UDRO – UDIF read-only
  • UDCO – UDIF ADC-compressed
  • UDZO – UDIF zlib-compressed
  • ULFO – UDIF lzfse-compressed (OS X 10.11)
  • ULMO – UDIF lzma-compressed (macOS 10.15)
  • UDTO – DVD/CD-R master for export
  • UDSP – sparse image, grows with content
  • UDSB – sparse bundle, grows with content, bundle-backed, Mac OS X 10.5
  • UFBI – UDIF entire image with MD5 checksum.
  • ASIF – sparse image, grows with content, macOS 15.

Disk image performance: the cost of encryption rises

One of the biggest penalties in using disk images has been their performance, particularly when they’re encrypted. Although no longer offered in Disk Utility, UDSP sparse images encrypted using 256-bit AES typically read and write as slow as 500/100 MB/s when mounted from an SSD delivering 4.7/4.9 GB/s. In contrast, UDSB sparse bundles can achieve close to that native speed.

macOS Sequoia brought a new type of disk image, Apple Sparse Image Format or ASIF, intended to deliver the high performance of sparse bundles, with their efficient use of storage space, in a single file that can be hosted on file systems beyond APFS. As this is now well over 18 months old, this article considers whether it has achieved those goals, and should become the preferred type of disk image.

Methods

Each test image was created using Disk Utility 22.7 (2510) in macOS 26.3.1 (a) running on a Mac mini M4 Pro, on its internal SSD of 2 TB. Performance measurements were made using the ‘gold standard’ method in my free Stibium on disk images of 100 GB nominal size. This writes and reads a total of 53 GB in 160 files ranging in size between 2 MB and 2 GB. As performance is likely to change with use of the disk image, the following sequence of events was used:

  • Create disk image, which is mounted automatically, so unmount.
  • Mount disk image, measure write speed, then unmount.
  • Mount disk image, measure read speed, then delete the last 8 of 10 sets of test files, and unmount.
  • Mount disk image, measure write speed, then unmount.
  • Mount disk image, measure read speed, then delete all test files, and unmount.
  • Mount disk image, measure write speed, then unmount.
  • Mount disk image, measure read speed, and unmount.

These provide three pairs of read/write measurements:

  1. for an empty, unused 100 GB disk image;
  2. for a 100 GB disk image containing over 10 GB of existing files in addition to 53 GB of test files;
  3. for an empty 100 GB disk image that had previously contained about 66 GB of test files that had been deleted.

Disk image sizes were also measured when unmounted, using Precize or the Finder’s Get Info (for sparse bundles).

The three types of disk image tested were RAW (UDRW), UDSB (sparse bundle) and ASIF (sparse image). Each was tested fully when unencrypted, and test 1 was performed on an image encrypted using 256-bit AES.

Results

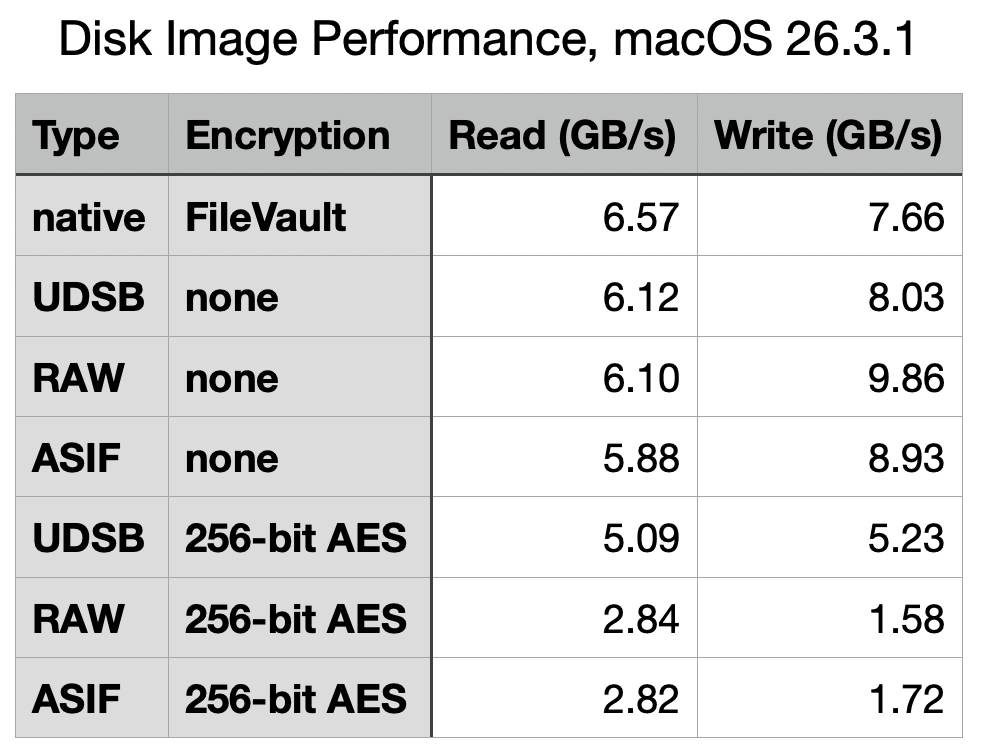
The best and most consistent performance was achieved by UDSB sparse bundles, as expected. Their read speeds were 6.13, 6.12 and 6.19 GB/s, and write 7.62, 8.03 and 7.79 GB/s for the three separate measurements, and 5.09/5.23 GB/s read/write when encrypted. When first created, the sparse bundle only occupied 32 MB on disk, but by the end had grown to 3.99 GB even though empty.

The RAW disk image, formerly known as UDRW, also largely performed as expected. Read speeds were 6.09, 6.10 and 6.08 GB/s, and write 10.11, 9.86 and 10.11 GB/s. Initially it only required 5.78 MB on disk, rising to 621 MB at the end. However, its performance when encrypted was disappointing, at 2.84/1.58 GB/s read/write.

ASIF disk images were good, but also ran into problems when encrypted. Unencrypted read speeds were 5.99, 5.88 and 5.85 GB/s, and write 9.55, 8.93 and 9.64 GB/s. When encrypted, those fell to 2.82/1.72 GB/s read/write, no better than the RAW disk image. The image file size started at 26.8 MB on disk when empty and unused, and returned to 954 MB when empty at the end.

To confirm that ASIF performance when encrypted wasn’t an anomaly, I repeated that pair of tests on a MacBook Pro M3 Pro running 26.3.1 (a), and obtained similar results at 2.63/1.52 GB/s read/write, using a 10 GB ASIF image with one-tenth of the tests, giving 3.32/1.65 GB/s, and using Blackmagic, which gave 2.92/1.15 GB/s read/write. Although there is variation, they appear remarkably similar.

Test 2 results are summarised in the table above, for ease of comparison, and with the earlier results from macOS 26.0 below.

What has gone wrong with encrypted writes?

Although most of the test results in macOS 26.3.1 are very similar to those from 26.0, performance when using 256-bit AES encryption has fallen for all three disk image types, and most significantly in write performance for RAW and ASIF images, which have reduced from 4.3 to 1.58 GB/s (RAW) and from 3.9 to 1.72 GB/s (ASIF). The magnitude of those reductions is sufficient to have obvious impact on their use. Compared to native write performance using FileVault of 7.66 GB/s, those two types of disk image are pedestrian in the extreme, turning that blisteringly fast SSD into the equivalent of 20 Gbps over USB 3.2 Gen 2×2.

It’s possible that this dramatic reduction in encryption performance may have resulted from a change to address a vulnerability, but I’ve been unable to identify an entry in Apple’s security release notes that might correspond to such an event. I will repeat these tests once the update to macOS 26.4 has been released, in the hope it might be reversed.

Which disk image type?

When their folder-based structure is acceptable, UDSB sparse images remain the disk image type of choice, for their consistent high performance even when encrypted.

There is little to choose between RAW and ASIF disk images when a single file solution is required. ASIF images are portable to other file systems that can’t support APFS native sparse files, although curiously they too are flagged in APFS as being sparse files. As their sparseness isn’t dependent on APFS trimming habits, they are now an alternative that can be used on network storage and NAS. However, those able to use sparse bundles should continue to do so, particularly if using encryption.

Explainer: Disk images

A disk image is a file, or a folder containing files, that stores the contents of a physical storage medium. In contemporary usage most can be mounted as a disk or volume, so giving access to their contents. Originally developed to aid the manufacture of floppy disks, they go back long before the Mac, and now see wide use in all parts of macOS and its apps.

Since they were used in Classic Mac OS, they have come in a multitude of different formats and variants, many of which are listed in the Appendix. They’re an essential part of macOS installers, home to Recovery mode, and the basis for cryptexes. They’ve been used to burn and replicate optical disks, to archive disk contents, extensively in network backups, and for the distribution of software.

History

As early as Mac OS 9 in 1999, variants of formats had become complex. Here, Disk Copy is configured to create a read-only compressed .img file containing the contents of a standard 1.4 MB floppy disk. In the upper window, it has completed validating the checksum on a self-mounting .smi disk image that’s part of a DiskSet. Those could also be signed using certificates issued not by Apple but by DigiSign.

Mac OS X 10.1 Puma in 2001 brought a new standard with Universal Disk Image Format (UDIF) used in DMG disk images. Support for compression options in Apple Data Compression (ADC) unified what had previously been two disk image types, and extended support for images larger than a floppy disk. This new format enabled disk images to represent entire storage devices, complete with a partition map and disk-based drivers.

Mac OS X 10.5 Leopard in 2007 introduced the sparse bundle format, with its folder of smaller band files containing data. These enable the image to grow and shrink in size, and became a popular means of storing mountable Mac file systems on servers using different file systems.

Use

In their most common use, Disk Utility or a third-party app such as DropDMG creates and mounts an empty container file, then copies a hierarchy of files and folders into its virtual file system. While the disk image remains mounted, it’s presented as a removable volume, and when unmounted it’s just a regular file that can be moved, copied and backed up like any other.

Its virtual file system can be any supported by macOS, but in recent years is most likely to be APFS. As the disk image can be hosted on a completely different file system, this enables you to store APFS volumes on systems that don’t themselves support APFS. This is essential for networked storage being hosted on a different file system such as Btrfs. SMB can then be used to access the contents of that disk image over the network.

Disk Utility offers a limited range of formats and variants, including RAW images (UDIF), sparse bundles (UDSB), optical disk masters (UDTO), and the new Apple Sparse Image (ASIF). They can be encrypted, and contain file systems in APFS, HFS+, FAT or ExFAT. Two command tools extend those formats and variants, diskutil with its image verb being the equivalent of Disk Utility, and hdiutil providing the most extensive support.

Opening a disk image in the Finder performs two distinct operations: first the file or bundle is attached, much in the way that you might attach physical storage. Once that has occurred, the image is probed by macOS for file structures and systems, and those that can be mounted are mounted as external file systems, normally in the path /Volumes. Cryptexes are an exception to this, as APFS will graft the image’s file system into arbitrary locations in the host file system.

Verification

Two types of verification can be performed during an attach-and-mount procedure. The first can compare the file’s checksum against a stored value to determine if the file has become corrupted, while the second is performed during probing and mounting of file structures and systems within the image. The command tools provide options to attach an image without mounting that can be used to attempt repairs on its file systems, although those seldom seem successful.

This ‘warning’ alert from 2020 illustrates one of the longstanding issues with disk images. Although integrity checking of disk images using checksums has been valuable, when an error is found there’s no possibility of repair or recovery as the image fails to attach, so its file system can’t be made accessible.

Properties

There are two other issues to consider before using disk images, their read-write performance, and use of storage space.

xferdiskimage24

This table summarises read and write performance of the most popular types of disk image prior to macOS Tahoe, and demonstrates how sparse bundles have consistently performed best and most consistently, and sparse images (now dropped from Disk Utility’s options) fare worst, particularly when encrypted.

The introduction of ASIF in Sequoia has added another option, although sparse bundles remain fastest overall. I will be re-examining these in the coming weeks, now that new format has had more time to mature.

Before macOS Monterey, sparse bundles and sparse images were the only formats that made efficient use of disk space, as they grow to accommodate their contents, and should shrink again when some or all of their contents are removed. Monterey is thought to be the first version in which UDIF read/write images (UDRW) have been stored in APFS sparse file format. This has transformed what had previously been space-inefficient disk images that retained empty storage, into a format that can prove almost as space-efficient as sparse bundles.

Summary

  • Disk images of various formats are widely used in macOS, as they are a file or folder containing a removable file system, like an external disk.
  • Basic tools for the most common formats and variants are provided in Disk Utility; third-party utilities such as DropDMG are more versatile. The command tool diskutil with its image verb extends those, and hdiutil is the most comprehensive.
  • Errors can and do occur, and may prevent a disk image from being mounted successfully. Those are hard to repair.
  • Sparse bundles remain fastest, most consistent, and most space-efficient.
  • UDIF read/write images generally perform well, and are now space-efficient too.
  • Experience with more recent ASIF images remains limited, although they show promise in both speed and efficiency.

Appendix: Disk image formats

Supported
  • UDRW – UDIF read/write, sparse file from macOS 12
  • UDRO – UDIF read-only
  • UDCO – UDIF ADC-compressed
  • UDZO – UDIF zlib-compressed
  • ULFO – UDIF lzfse-compressed (OS X 10.11)
  • ULMO – UDIF lzma-compressed (macOS 10.15)
  • UDTO – DVD/CD-R master for export
  • UDSP – sparse image, grows with content
  • UDSB – sparse bundle, grows with content, bundle-backed, Mac OS X 10.5
  • UFBI – UDIF entire image with MD5 checksum.
  • ASIF – sparse image, grows with content, macOS 15.
Unsupported
  • DC42 – Disk Copy 4.2 (Classic)
  • DART – compressed, for Disk Archive/Retrieval Tool (Classic)
  • Rdxx – read-only Disk Copy 6.0 formats
  • NDIF – Disk Copy 6.0, including IMG and self-mounting SMI
  • IDME – ‘Internet enabled’, on downloading post-processed to automatically copy visible contents into a folder, then move the image to the Trash. Now deemed highly insecure.
  • UDBZ – UDIF bzip2-compressed image (deprecated).

What to do with APFS warnings and errors

This article explains how to deal with warnings and errors reported either when you run Disk Utility’s First Aid, or by the command tools fsck or fsck_apfs, on an APFS volume or container.

Keep a record

Even if the item is repaired successfully, it’s essential to keep a record of what happened. In Disk Utility, expand the First Aid window so you can see the full output of fsck_apfs, select its whole contents, copy and paste them into a text document, and save that. Do the same with the output in Terminal if that’s what you used.

You may also find two text log files of potential use: /var/log/fsck_apfs.log and /var/log/fsck_apfs_error.log, both accessible in Console or a text editor. Although errors may also be written to the Unified log, you’ll probably want to avoid going there.

Was this on the Data volume?

First Aid in Disk Utility will check and attempt to repair the current Data volume when running in normal user mode, by effectively freezing the Mac. However, that’s not as reliable as running the same procedure when your Mac is in Recovery mode. If you see warnings or errors reported from the current Data volume in normal user mode, before going any further start your Mac up in Recovery and repeat the checks in Disk Utility (or fsck_apfs) there, to confirm they are real, and give your Mac the best chance of making a successful repair.

diskutil06

This can also sometimes help when checking backup volumes, and any that have proved difficult to check because the volume can’t be unmounted in normal user mode.

Are these just warnings?

Read carefully through your copy of the output of fsck_apfs and check whether the comments there are warnings, or contain specific errors. Warnings aren’t uncommon, and are often of little consequence even when you can understand them. Among the commonest is
Resource Fork xattr is missing for compressed file
As there’s nothing you could or should do about that, keep the record and don’t worry about it.

You’ll occasionally see a report that “deferred repairs” were completed. These appear to be minor fixes that APFS keeps for a convenient moment. Provided they are fixed without further error, you should be able to ignore them safely.

If a line explicitly reports an error, and fsck_apfs was unable to repair it, then it’s something you should take more seriously, and try to pin down the site of the problem.

Identify the item

fsck_apfs identifies items with their inode number, an integer that can be very large. To make any sense of that, you need the volume number as well, and a means of converting the two into a path. My free utility Mints can do that in its inode Resolver window, from the Window/Data/Inode menu command, or you can do it yourself in Terminal with a command like
GetFileInfo /.vol/[volnumber]/[inode]
where volnumber is the volume number, and inode is the number given in the error or warning. This is explained in detail here.

mints1152

Now that you know which file or folder resulted in the error or warning, you need to decide whether you can do anything about it. This is most important when you keep seeing similar errors, so you can prevent them from happening in the first place.

Is the item in a snapshot?

Checking snapshot 2 of 23 (com.apple.TimeMachine.2023-08-27-072736.local)
warning: inode (id 113812826): Resource Fork xattr is missing for compressed file

Snapshots are a special case, as they’re intended to be read-only, so are most unlikely to be repairable. If this is a snapshot on a volume that is backed up by Time Machine or another utility, then the only way you’ll fix this is by deleting that snapshot. Don’t do that, though, if the snapshot is on the volume storing your backups, as you’d be deleting one of those backups.

If this problem recurs in other snapshots, then it most probably reflects a problem in the file in the snapshot. Is it perhaps a large virtual machine (VM) or something similar? Keep your VMs on a separate volume which you exclude from backups, because of the many problems they can cause. The best way to back up a VM is when it’s shut down, as a simple copy to a separate backup storage volume. You can do the same with any other file that seems to be the cause of repeated problems in snapshots: move it to a separate volume that’s in Time Machine’s list of excluded items, and make arrangements for that volume to be backed up separately when the files aren’t in use.

Is the item in a Spotlight index?

Several of those who report repeated warnings or errors in APFS trace them to part of the Spotlight indexes on that volume, which are stored at the top level of all indexed volumes, in the hidden folder .Spotlight-V100. If that’s the case, your next move is to force those indexes to be rebuilt, in the hope that fixes the problem.

To do that, open Spotlight settings, and click the Search Privacy button at the foot of its window. Use the + tool to add the volume on which the problems have been occurring, then close those settings. Leave your Mac for a minute or so, open those settings again, select the volume you just added to the list, and use the – tool to remove it. In the next ten minutes or so, check Activity Monitor’s CPU window, where you should see high levels of activity from indexing processes such as mds and mds_stores, that confirm those indexes are being rebuilt.

Is the item in another special folder?

There are other hidden folders with special roles that appear on volumes and could be the source of APFS errors. These include .DocumentRevisions-V100, containing the document version database. If the problem file is inside that, there isn’t much you can do about it. It may be possible to delete the whole folder, but that will destroy all saved versions of documents on that volume.

It’s just a regular file

If the volfs path resolves to a regular file, then maybe deleting that file will stop the problem from recurring. Don’t expect a backup copy of that file to be any different, though, as any problem with that file could easily recur. Getting to the bottom of a recurrent file system error might require the knowledge and skills of an Apple engineer. Consider reporting this using Feedback, as it should then help iron out any remaining bugs in APFS.

Is your Mac running anything that might break files?

As a final thought, you should consider whether any third-party software might be the root cause of the problem. Normally, such products should work at a higher level that isolates them from the file system itself, but there are some surprising exceptions. If you can identify a cause, please inform the developers of that software so that it can be fixed.

One potentially dangerous practice occurs when an older version of APFS changes a newer file system. APFS back in High Sierra and Mojave knew nothing of boot volume groups, firmlinks, or many of the features of more modern versions of APFS. If you really must run different versions of macOS on the same Mac, or shared external storage, avoid such version conflicts, and never run an older version of Disk Utility or fsck_apfs on a newer APFS container or volume.

❌