U.S. and Iranian officials say they are closing in on the terms of a preliminary agreement. Yet sticking points, particularly over the Strait of Hormuz, remain.
The Trump administration is creating a $1.8 billion fund to compensate people it says were wronged by the federal government, a group that could be largely made up of the president’s allies.
Senators are angry President Trump turned on a respected former leader whom they consider a loyal Republican. Now Mr. Trump faces resistance from his own embittered ranks.
Mr. Allred beat the incumbent, Representative Julie Johnson, and is now favored to win the general election in a heavily Democratic Dallas-based district.
China’s top diplomat also warned against the restarting of hostilities as he met with Iran’s foreign minister. The U.S. has urged China to pressure Iran to reopen the waterway.
One of the design features of macOS is that a file’s metadata can be stored separately from that file’s data. This is normally achieved by extended attributes, xattrs, and to aid that there’s a rich and extendable range of them. This article explains what you can and can’t do with them, as of macOS 26.4.1.
More generally, most metadata are stored within a file’s data, to accommodate operating systems and file systems that don’t have such rich features. Most image formats, for example, incorporate standard collections of metadata such as EXIF information, which are saved with the image data. PDF and Word documents have similar features. These have the disadvantage that changing the metadata results in the file data being altered, and that makes it difficult to track and to guarantee the data’s integrity. This can result in damage or corruption to the data in a PDF file during editing of comment metadata, for example. When possible it’s far better to separate metadata.
Distinguishing between data and metadata can also be tricky at times. This is easiest with non-verbal data like images and audio, where text is clearly separate from data, but it can appear more arbitrary with written documents. Some content such as copyright information or an index is universally accepted as metadata, but abstracts and appendixes may vary. Some types of document, such as official standards, draw explicit distinctions, using qualifiers like normative and informative, to assist.
Finder Comments and Tags
These are the two standard types of metadata currently best supported in macOS, both being readily accessible in the Finder and applicable to any file or folder.
The main problem with Finder Comments is that they are primarily stored separately in the hidden .DS_Store file in the same directory as the item, although a secondary copy is written to a xattr attached to that file/folder. They’re easily accessed in the Finder’s Get Info dialog, and can be shown in List view windows, although that doesn’t work for multi-line comments. On balance, their strange storage makes them fragile and unsuitable for many uses.
Finder Tags are stored properly in a xattr, and are most widely distinguished by the coloured tag displayed. Although they can be repurposed to store text, their main value remains in categorisation. There’s a practical limit of 20-25 characters before their text label is cropped in most views, and labels for multiple items can only be shown in the Finder’s List view layout. For the majority, they are best used for allocating items to a limited number of categories, distinguished foremost by their tag colour, and aren’t suitable for more substantial text like even a brief summary.
Properties
To be generally suitable for storing text metadata for a file or folder in macOS, these should:
be attached to the file or folder as a xattr;
be capable of storing and displaying up to 3,804 bytes of UTF-8 text, the upper limit of data stored alongside the xattr;
be indexed by Spotlight so their contents can be searched;
be preserved in iCloud Drive, and when copied to a different volume;
be displayed and edited easily, ideally in the Finder, without the need for third-party software.
Which xattrs?
Of the dozens of xattrs available, I’m aware of just three that come closest to meeting all those requirements:
com.apple.metadata:kMDItemComment, known in Spotlight search menu as Comment, and different from Spotlight Comment, which is synonymous with Finder Comment;
These are sufficiently persistent as to be preserved in iCloud Drive, and when transferred between Macs using AirDrop. Although they can be displayed in the Finder, they each require third-party software for creation and management. As explained below, this doesn’t apply to image files, which are expected to store their metadata in EXIF information within the file, and not in xattrs.
Management
All three can be created and managed using my free Metamer, as well as with the more extensive features of xattred.
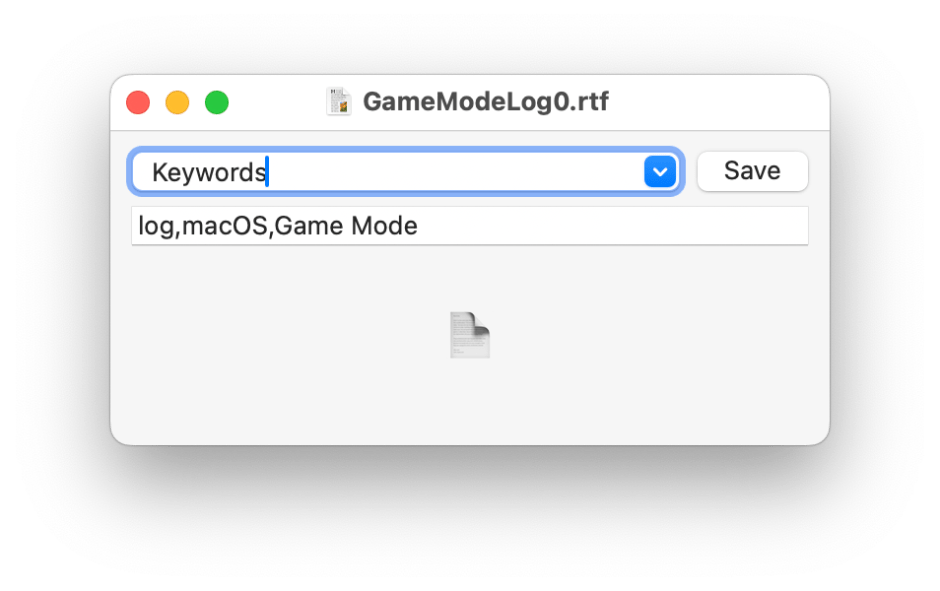
Metamer is a lightweight drag-and-drop utility to create, edit and view many different types of xattr, including the three recommended. It uses a Combo box offering 16 of the most commonly used xattrs, and you can enter the full name of any other if you need. Although it can be used to edit multi-line text, it’s designed to work best with single lines.
xattred is a general xattr editor with more extensive capabilities, and ideal for checking all the xattrs attached to a file or folder. It doesn’t offer the conveniences of Metamer, though.
Display
Each of these three xattrs is displayed in the More Info section of the Get Info dialog, and depending on settings, they can also be shown in the Finder’s preview pane when enabled in Preview Options for that file type. The latter is explained in more detail here, and can appear counter-intuitive at times. However, they can only be added and displayed for supported file types. For example, JPEG and PNG image files can’t display these three xattrs in Get Info dialogs or in the preview pane, but PDF, RTF, text and many other file types can.
None of the three can be listed for multiple files in any of the Finder’s view layouts.
Spotlight
All three are available in the list of search terms available in the Other item at the foot of the search term menu in a Finder Find window, as listed above.
But
When researching this article, I discovered some odd behaviours that render some xattrs both invisible and undiscoverable by Spotlight search. I hope to describe those fully tomorrow if I can get my head around them.
If President Trump flies to China as planned in May, the primary topic will clearly be the rippling economic effects of a war that Beijing has made clear it viewed as unnecessary.
Extended attributes aren’t unique to macOS and Apple’s other OSes, but they have the longest and richest history, going right back to the first versions of Mac OS. Until the advent of Mac OS X they were resource forks, structured metadata that stored everything from executable code to keyboard layouts. After a shaky first four years in early versions of Mac OS X, 10.4 introduced extended attributes, xattrs, that steadily became used more extensively.
All files in HFS+ and APFS (and other file systems) contain a fairly standard set of metadata known as attributes, information about a file such as its name, datestamps and permissions. Xattrs are extensions to those that contain almost any other type of metadata, the first notable xattr coming in Mac OS X 10.5, named com.apple.quarantine. That contains quarantine information for apps and other files downloaded from the internet, in a format so ancient that the quarantine flag is stored not in binary but as text.
The quarantine xattr demonstrates some of the valuable properties of xattrs: it can be attached to any file or folder without changing its data, and isn’t included when calculating CDHashes for code signatures. It can thus be added safely without any danger of altering the app or its code, although it does change the way that macOS handles the code, by triggering security checks used to verify it isn’t malicious. Once those have been run, the flag inside the quarantine xattr can be changed to indicate it has been checked successfully.
Far from being a passing phase, or dying out as some had expected, xattrs have flourished since those early days. This has happened largely unseen by the user: few alter anything revealed in the Finder’s Get Info dialog, although they’re used to store some forms of visible metadata such as Finder tags, and the URL used to download items from the internet.
Xattrs are named using a reverse-URL format like com.mycorp.setting. There’s no official name registry, as that should suffice to ensure each type remains unique. Editing xattrs is normally performed silently: you’re not made aware of changes in the quarantine xattr, and in most cases the only way to manage xattrs is to use the xattr command tool, or one of very few apps like xattred that can edit and manage them.
Storage
Xattrs aren’t stored with a file’s data, nor with its normal attributes.
For smaller extended attributes up to 3,804 bytes, their data is stored alongside the xattr in the file system metadata. Larger extended attributes are stored as data streams, with separate records, but still separate from the file data. Apple doesn’t give a limit on the maximum size of xattrs, but they can certainly exceed 200 KB, and each file and folder can have an effectively unlimited number of them.
Persistence
Metadata varies in its useful lifetime. Some xattrs are intended to have a short life and then either be rewritten or discarded, while others are expected to be more or less permanent. Files that are copied to non-native file systems including FAT and ExFAT volumes can preserve xattrs in hidden shadow files, but those copied to NFS will have all their xattrs stripped.
Moving a file with xattrs within the same volume shouldn’t affect those xattrs, as they remain within the same file system, but copying them to another volume, even if both use APFS, may leave some of them behind if they’re considered to be ephemeral.
At least two xattr types may be protected by System Integrity Protection, SIP, and thus can’t be directly removed by the user. This is most widespread in the MACL xattr, com.apple.macl, but can also be seen sometimes in provenance, com.apple.provenance. The way that works is quite distinctive, in that cutting or deleting the xattr is successful for an instant before macOS adds the xattr back. As SIP protection doesn’t survive copying to another volume, when you need to remove a MACL xattr you can do so on a copy of the file on a different volume.
The most complex situation is when a file with xattrs is moved to iCloud Drive. The Mac that originated that file is likely to retain most if not all of its xattrs, because the local copy remains within the same volume and file system. However, not all xattrs are copied up to iCloud storage, so other Macs accessing that file may only see a small selection of them. The rules for which xattrs are to be preserved during file copying, including in iCloud Drive, are baked into macOS, and are outlined in the Appendix at the end.
In 2013, as part of its enhancements for iCloud in particular, Apple added support for flags on xattrs to indicate how those xattrs should be handled when the file is copied in various ways. Rather than change the file system, Apple opted to append characters to the end of the xattr’s name.
If you work with xattrs, you’ve probably already seen this in those whose name ends with a hash # then one or more characters: those are actually the flags, not part of the name, what Apple refers to as a ‘property list’. To avoid confusion I refer to them as xattr flags. A common example of this is com.apple.lastuseddate#PS, which is seen quite widely.
Appendix: Xattr flags
When first introduced in Mac OS X, no provision was made for xattrs to have type-specific preservation, and that was added later using flags suffixed to the xattr’s name. For example, the com.apple.lastuseddate xattr found commonly on edited files is shown with a full name of com.apple.lastuseddate#PS to assign the two flags P and S to it, and the most recent xattr com.apple.fileprovider.pinned, used to mark files in iCloud Drive that have been pinned, has the two flags P and X assigned to it for a the full name of com.apple.fileprovider.pinned#PX.
This is a kludge, as you normally have to refer to the xattr name including its flags, although the flags aren’t really part of its name. It’s further complicated by a set of system tables for some standard xattr types that don’t have flags suffixed, but are treated as if they do. One notable example of those is the quarantine xattr com.apple.quarantine, which is handled by macOS as if it has the PCS flags attached, although those are never used when referring to it by name.
There are also lower case flags that can be used to override those set in system tables, although those appear to be used exceedingly rarely, and I don’t recall ever coming across them. In theory, if you were using a new type based on the standard com.apple.metadata: family, com.apple.metadata:kMDItemNew, you could alter its behaviour to some similar types with the flags psB, as in com.apple.metadata:kMDItemNew#psB. I have no idea whether that would be respected in practice. For the rest of this article, I will ignore the existence of those lower case flags.
Intents
File operations involving decisions about the preservation of xattrs are simplified into the following intents:
copy – simply copying a file from a source to a destination and preserving its data, such as using cp, is labelled XATTR_OPERATION_INTENT_COPY
save – saving a file when probably changing its content, including performing a ‘safe save’; this may over-write or replace the source with the saved file. Some xattrs shouldn’t be preserved in this process of XATTR_OPERATION_INTENT_SAVE
share – sharing or exporting this file, perhaps as an attachment to email, or placing the file in a public folder. Some sensitive metadata shouldn’t be preserved in XATTR_OPERATION_INTENT_SHARE
sync – syncing the file to a service such as iCloud Drive, in XATTR_OPERATION_INTENT_SYNC
backup – backing the file up, perhaps using Time Machine, in XATTR_OPERATION_INTENT_BACKUP.
Flags
As of macOS 15.0 (including 26.0), the following flags are supported:
C: XATTR_FLAG_CONTENT_DEPENDENT ties the flag with the file contents, so the xattr has to be recreated when the file data changes. This may be appropriate for checksums and hashes, text encoding, and position information. The xattr is then preserved for copy and share, but not in a safe save.
P: XATTR_FLAG_NO_EXPORT doesn’t export or share the xattr, but preserves it during copying.
N: XATTR_FLAG_NEVER_PRESERVE ensures the xattr is never preserved, even when copying the file.
S: XATTR_FLAG_SYNCABLE ensures the xattr is preserved during syncing with services such as iCloud Drive. Default behaviour is for xattrs to be stripped during syncing, to minimise the amount of data to be transferred, but this flag overrides that.
B: XATTR_FLAG_ONLY_BACKUP keeps the xattr only in backups, including Time Machine, where there’s no desire to minimise what’s backed up.
X: XATTR_FLAG_ONLY_SAVING keeps the xattr only when saving and in backups, including Time Machine (macOS 15.0 and later only).
There’s another system limit that must be adhered to: total length of the xattr name including any # and flags cannot exceed a maximum of 127 UTF-8 characters.
System tables
These are hard-coded in source, where * represents a ‘wild card’:
com.apple.quarantine – PCS preserved in copy, sync, backup
com.apple.metadata:kMDItemCollaborationIdentifier – B backup
com.apple.metadata:kMDItemIsShared – B backup
com.apple.metadata:kMDItemSharedItemCurrentUserRole – B backup
com.apple.metadata:kMDItemOwnerName – B backup
com.apple.metadata:kMDItemFavoriteRank – B backup
com.apple.metadata:* (except those above) – PS copy, save, sync, backup
com.apple.security.* – S or N depending on sandboxing, see below
com.apple.ResourceFork – PCS copy, sync, backup
com.apple.FinderInfo – PCS copy, sync, backup
com.apple.root.installed – PC copy, backup.
System defaults for com.apple.security.* depend on whether the app performing the file operation is running in an app sandbox. Non-sandboxed apps apply S to preserve the xattr for copy, save, share, sync, backup; for sandboxed apps N is applied so the xattr is never preserved, even when copying the file.
Flags and intents
We can now revisit the list of intents, and establish the effects of xattr flags on each, as:
XATTR_OPERATION_INTENT_COPY preserves xattrs that don’t have flag N or B or X
XATTR_OPERATION_INTENT_SAVE preserves xattrs that don’t have flag C or N or B
XATTR_OPERATION_INTENT_SHARE preserves xattrs that don’t have flag P or N or B or X
XATTR_OPERATION_INTENT_SYNC preserves xattrs if they have flag S, or have neither N nor B
XATTR_OPERATION_INTENT_BACKUP preserves xattrs that don’t have flag N.
Finally, Apple provides separate information on how xattrs are synced by FileProvider, for iCloud Drive and third-party cloud services using that API. This confirms that the S flag should sync a xattr, but is vague on other flags, simply stating “some older attributes are also synced”. However, a cap is applied on the maximum size of xattrs that are syncable, at “about 32KiB total for each item”. If the xattrs exceed that limit “the system automatically makes some of the attributes nonsyncable.” More puzzlingly, it states “the resource fork is content and isn’t included in the extended attributes dictionary.”
Sources
xattr_flags.h, xattr_flags.c, xattr_properties.h in copyfile source, e.g. at Apple’s OSS Distributions Github
man xattr_name_with_flags(3), included in copyfile source FileProvider (Apple).
For those working with Rich Text without embedded images, my free editor DelightEd offers a suite of unique features. I wrote it when macOS Mojave introduced Dark appearance mode, with the primary purpose of composing Rich Text documents that work independent of appearance. For that it can set styled text on a background that ensures perfect readability in both Light and Dark modes.
Since then it has gained other unique features, including support for creating interlinear text, in which different translations or versions of the same document are interleaved line by line. It will also open PDF documents and automatically extract all their text content.
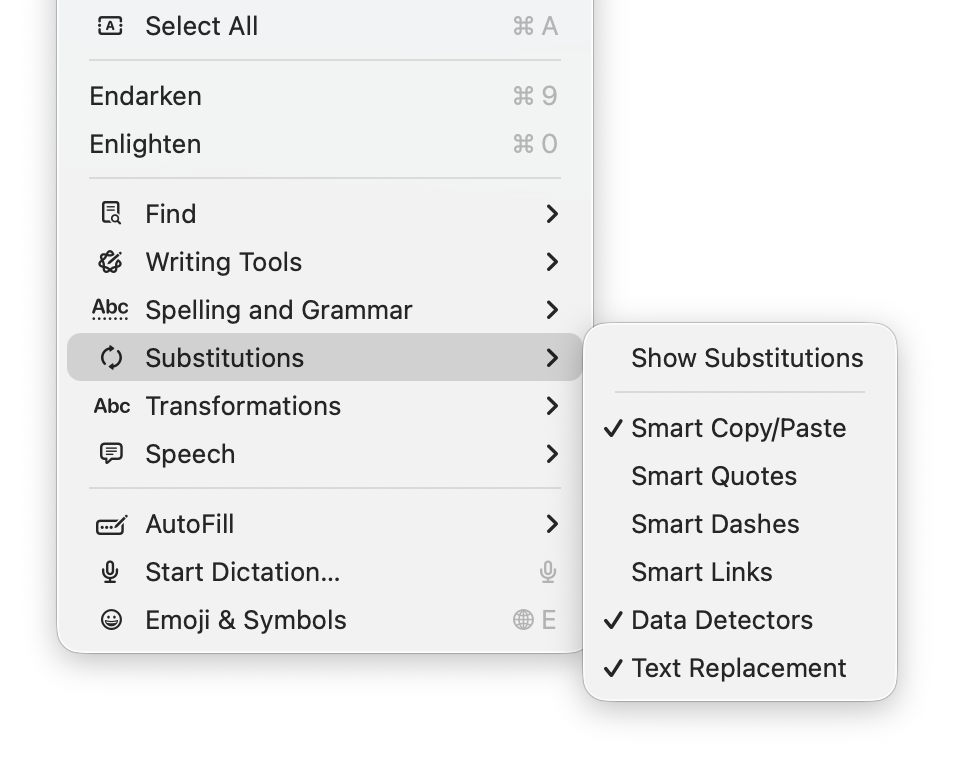
General features supported include Writing Tools (Apple silicon Macs), case transformations, and a full suite of substitutions. However, until this new version of DelightEd, substitution settings haven’t been saved in DelightEd’s app settings. Version 2.5 now puts that right: to set the app’s default substitutions, set them up using the Substitution command in its Edit menu, for instance enabling Smart Links.
Then save those to its settings using the Save Defaults command in the app’s menu. Each time you open DelightEd after that, its substitutions will start from those saved defaults.
DelightEd version 2.5 for macOS 11.5 Big Sur and later, including Tahoe, is now available from here: delighted25
from Downloads above, from its Product Page, and through its auto-update mechanism.
I’m very grateful to Manuel for asking for this to be fixed.
Many discovered how long 5 minutes could last when they updated from macOS 26.3.1 to 26.4. Right at the end of its Preparation phase, Software Update showed there were only 5 minutes remaining for far longer. This article reveals what went wrong with that update.
My observations come from a Mac mini M4 Pro running a vanilla installation of macOS Tahoe, being updated from 26.3.1 (a) with the BSI installed, to 26.4. Times and details are taken from log extracts covering the final 14 minutes of the update, immediately prior to the reboot for its installation.
Preparation
At almost exactly 18:43:00, softwareupdated reported that the PREPARING_UPDATE phase was in progress, with 70% complete on the progress bar, and 20 minutes remaining. Periodic preparation activities were then reported in the log, mainly verifying components to be installed as part of the update. One of the longest of those, /usr/standalone/i386/Firmware.scap, took nearly 6.5 minutes alone, although you might wonder why that’s required on an Apple silicon Mac!
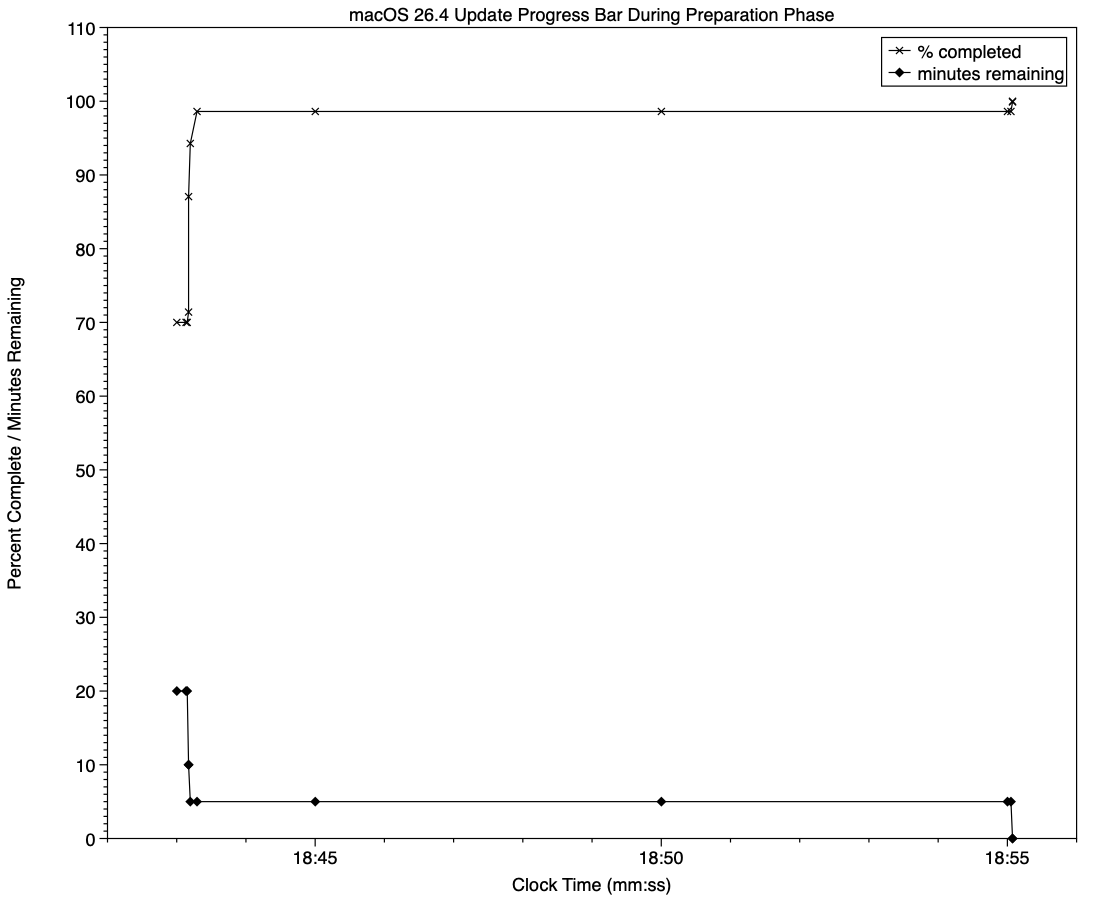
Eleven seconds later, softwareupdated changed the progress bar to display 10 minutes remaining, with 71% completed. Just 1.5 seconds later that changed again to display 5 minutes remaining with 94% complete. Six seconds after that, with 5 minutes still displayed, the log records 98.6% was complete.
The log and progress bar then remained stuck at 5 minutes remaining and 98.6% complete for the next 11 minutes and 47 seconds, before changing to 99.9% complete and no time remaining.
These are plotted in the chart below.
The final 5 minute period started at 18:43:12, and lasted until 18:55:04, as reflected in the long period of 98.6% completion (upper line) and 5 minutes remaining (lower line).
The “5 minutes” remaining actually took 12 minutes and 7 seconds, although log entries make it clear that preparation continued throughout that time, with further verifications and “Preparing system volume…”. Those details were reported as ActionText for progress monitoring, but curiously aren’t accessible to the user at the time.
Log entries record softwareupdated keeping detailed records of progress over this period, though. For example: 18:51:32.924688 softwareupdated PrepareUpdate PROGRESS (Continue) | state:{
ActionText = "Preparing system volume...";
ElapsedTime = 490;
ExpectedTime = 1335505;
PercentBytesComplete = "48.05373989419242";
PercentComplete = "4.701870471432042";
}
But those aren’t reflected in the progress bar.
Once the update had completed that preparation phase, extensive checks were performed to ensure it was correctly configured, and components were moved into place in the ‘stash’ to be used during installation. One second after successful completion, softwareupdated locked the controller state and waited for the reboot to start installation. Rebooting followed less than two minutes later.
What went wrong?
The macOS 26.4 update for Apple silicon Macs was large, and the work required to verify its contents and complete its preparation was incorrectly reported in both percent completion and time remaining. Even in smaller updates, some form of progress needs to be shown in the progress bar during these later stages of preparation, or users may be mislead into thinking the update has frozen or failed, and could for example restart their Mac to try updating again.
What should the user do?
When an update claims there’s only 5 minutes left, that could readily extend to longer, possibly on slower Macs as long as 30 minutes or more. Unless there’s evidence that the update has gone wrong at this stage, you should leave your Mac to complete it, as it almost certainly will. If you’re still in doubt and want to confirm that the update hasn’t frozen, open Activity Monitor and look for around 100% CPU from softwareupdated or related processes, and disk activity.
Unfortunately, there’s nothing the user can do to accelerate macOS updates.
One of the longstanding jokes in computing is how misleading progress indicators can be, and last week most of us had a timely reminder when we updated macOS. However much we might like a perfectly accurate linear indicator for macOS updates, this is one of those situations where the best we can expect is a compromise, as I tried to explain here.
Showing progress
There are two types of progress indicator, determinate and indeterminate, depending on whether the task is quantifiable and progress is measurable. Determinate indicators are always preferred, as they inform the user whether they need only wait only a few moments, or they have time to enjoy a leisurely meal, but that requires quantifiability and measurability.
The simple example is copying a file from one disk to another: although macOS doesn’t know in advance how long that might take, it can quantify the task as the size of the file to be copied, then keep track of how much of that has already been completed. When half the size of the file has been copied, the progress bar can be set to half-way along its total length, so providing an accurate indication of progress.
However, with some copy operations that breaks down: when copying a sparse file between APFS volumes, for example, only the sparse data is copied, not the whole file size. As a result, copying sparse files often results in progress bars that jump from a low point to completion in the twinkling of an eye. This also relies on the quantities involved being linearly proportional to the time required, an assumption that often breaks down when downloading from a remote server.
macOS updates
Updating macOS consists of a series of many tasks (see references at the end), of which only one, downloading, is both quantifiable and has measurable progress, and even that may be far from linear. Apple therefore has a choice of:
Display multiple progress indicators, appropriate to each phase. While that might work well for the download phase, it can’t work for others, including preparation, which is likely to take a period of several minutes at least.
Combine those into a single progress bar, as at present.
Use an indeterminate progress indicator, such as a spinning wheel, which would be reliable but unhelpful.
As downloading is the one task that is quantifiable and its progress is measurable, I’ll start there.
For this, the progress bar starts an an arbitrary 15%, and softwareupdated assumes the total size of that download is the magnitude of that task.
When the download has been completed, the progress bar reaches an arbitrary 55%, and its caption then changes to reporting progress with preparation.
There is a weakness in the assumption that becomes obvious when downloading from a local Content Caching server, as the final 1 GB or so normally isn’t provided from the cache, but has to be freshly downloaded from Apple’s servers. However, that isn’t normally apparent when caching isn’t available and the whole of the download comes from the same remote source.
For the remainder of the progress bar, between 0%-15% and 55%-100%, the task is neither quantifiable nor measurable. Instead, softwareupdated divides it into a series of subtasks, each of which has a fixed progress level. One list of subtasks and levels obtained from the log is given in the Appendix at the end.
The disadvantage of that strategy is that time required by each subtask varies with the update and the Mac being updated. Inevitably, computationally intensive subtasks will proceed more rapidly on newer and faster Macs, while those mainly constrained by disk speed should be more uniform. Large updates should take significantly longer, and that will vary by subtask as well.
The last 5 minutes
A particular problem with some more recent macOS updates, including that from 26.3.1 to 26.4 last week, has been unmarked progress over the final “5 minutes” of preparation. While indeterminate progress indicators continue to move over that period, and reassure the user that the task hasn’t ground to a halt or frozen, the progress bar shown had no intermediate points, making it easy to misinterpret as failure to progress. If this is going to be a feature of future macOS updates, Apple needs to insert some intermediate points to let the user know that the update is still proceeding.
Conclusion
A progress bar that combines different measures of progress, such as download size and substages, can work well, but only if the user is aware of how to read it. As we only update macOS a few times each year, that isn’t sufficient exposure, and how it works needs to be made explicit.
In my account of how Tahoe updates macOS, I had reached the stage when Rosetta and the main update had started downloading from Pallas, Apple’s software update server (see the Appendix at the end for further explanation of terms used).
Download
Currently, the main update download (at least) is compressed using Zip, and is decompressed as a stream during download, so there’s no delay decompressing during the preparation phase later.
In this case, downloading the main update was completed within 8 minutes. The source of the Zip archive was originally given as a path on [https://]updates.cdn-apple.com/2026WinterFCS/patches, and that was written to a local path on /System/Library/AssetsV2/com_apple_MobileAsset_MacSoftwareUpdate/ In my case, though, I have a local Content Caching Server running, and immediately before the download started com.apple.AssetCacheServices substituted a download URL on that server to ensure the update was obtained through the local caching server. At the same time, an Event Report was sent back to Apple, recording the start of download.
Progress was updated every second during the download, and brought the progress bar from 16% to 53.9% over the following 8 minutes, with little other activity taking place.
Preflight
Activity then changed to what is repeatedly referred to as Preflight FDR Recovery, and is the first entry point for the UpdateBrainService, downloaded for MobileSoftwareUpdate rather than softwareupdated.
This runs an Event Recorder and begins to perform preflight checks to “recover FDR SFR”, and to perform a “firmware-only update”. To prepare for that, it retrieves various nonces and their digests for LocalPolicy, RecoveryOS boot policy, and others. Following those is the first of many attempts to determine purgeable space, in preparation for installation of the update. Those are performed by com.apple.cache_delete.
Pallas was then checked to see if there was any more recent version of RecoveryOS UpdateBrain, but there wasn’t. A further check for any newer recoveryOS was also made, before the main macOS update was prepared, at a progress level of 60% as set previously.
Preparation
The first step of the main preparation phase is to purge staged assets with com.apple.cache_delete. With that complete, UpdateBrainService recalculates cryptex size requirement for the update, and the install target prepare size:
cryptex size is 1.2 times the app cryptex size = 60 MB, plus 1.2 times the system cryptex size = 7749 MB, a total of 7809 MB, as previously calculated;
prepare size is the sum of the snapshot installation size of 3785 MB, the cryptex size of 7809 MB, three ‘slack sizes’ for VW, Recovery and Preboot of 2048 + 1024 + 1024 = 4096 MB, the new template size of 991 MB, twice the update partition size totalling 600 MB, less the old template size of 363 MB. The grand total comes to 16,918 MB.
UpdateBrainService then checks volume free sizes, and confirms that they’re sufficient to complete the update. It next creates a ‘stash’, which is protected by keys in the stash keybag, handled by the Secure Enclave Processor. There is then another round of purging with com.apple.cache_delete.
Much of the preparation phase is spent verifying the protection of installation packages, cryptexes, then the contents of /System/Applications and /System/Library. As progress is about 64% complete, System volume preparations are started, and there’s another round of purging by com.apple.cache_delete. There’s surprisingly little log activity as progress passes 70% complete.
With progress reaching 84% complete, UpdateBrainService starts unarchiving files in parallel, taking just under 5 seconds to complete those. Following that, there’s another brief period unarchiving data files in parallel, then working with the contents of /System/Volumes/Update/mnt1/private/var/MobileAsset/PreinstalledAssetsV2 as progress reaches 87% complete.
When there’s 87.5% completed, UpdateBrainService reports it’s creating hard links in parallel, then is searching for new paths and verifying files, such as those in the Ruby framework. The Recovery volume is unmounted, and there’s yet another purge with com.apple.cache_delete. After those, key volume locations are checked.
The high water mark of disk usage during update is prepared. This reveals some of the steps to be undertaken during installation, including:
prepare source package,
patch cryptexes,
patch system volume,
extract to system volume,
install personalised.
There’s a further round of purging with cache_delete before declaring PrepareUpdate as successful, then suspending the update briefly. When update resumes, the Update volume is mounted and prepared, and there’s another round of purging. The System volume is then mounted, checked, and prepared. Progress is now at 98.5% complete, and once 100% is reached, the countdown to restarting the Mac is begun.
Installation
During the download and preparation phases, apart from repeated purging, the log is generally quiet. This changes dramatically once the Mac starts preparing for shutdown and installation. WebKit is cleaned up and shut down, as are many other processes. The ‘stash’ of update components is then committed, and final scans and checks are completed.
The update is then applied, followed by Rosetta, RecoveryOS, UpdateBrain and finally minor documentation. After that period of nearly 20 seconds, this phase is declared complete, and a restart is notified before waiting for the essential reboot.
Reboot
Once rebooting by root has been initiated, the boot chime is muted to ensure the update continues in silence. The last log message is written a few seconds later, and UpdateBrain then runs the update.
Less than 3 minutes later, the system boot is recorded in the log, and kprintf is initialised 5 seconds later. About 3 minutes afterwards softwareupdated is started up, and runs various clean-up routines to complete the update sequence in conjunction with ControllerSetup and a Finite State Machine.
Key points
The main update download is decompressed while streaming, to save preparation time later.
If a local Content Caching Server is connected, AssetCacheServices will substitute its IP address for that of the Pallas server to ensure the download is obtained through the cache.
Following download, extensive preflight checks are performed.
During preparation components are verified, paths checked, and some unarchiving is performed.
Prior to reboot and installation, processes including WebKit are shut down in readiness for reboot and install.
FDR is unknown, but appears associated almost exclusively with a preflight phase.
Pallas is the internal name for Apple’s software update server. This appears throughout log entries, where for example Pallas audience is jargon for the type of user, normally macOS Customer.
RecoveryOS appears to refer to the version of Recovery in the hidden container of the internal SSD, more widely known as Fallback Recovery.
SFR appears to refer to the version of Recovery in the Recovery volume of the active boot volume group, also known as Paired Recovery.
Splat, semi-splat and rollback objects all refer to cryptexes. Splat is the general term, while semi-splat refers to a cryptex-based update that might include rapid security responses (RSR) and background security improvements (BSI) implemented by replacing one or both cryptexes. Rollback objects are older versions of a cryptex that have been saved to allow a newer cryptex to be reverted to that older one, in the event that the newer cryptex causes problems.
UpdateBrain is the executable code supplied as part of an update that prepares and installs that specific update. There’s a separate UpdateBrainService for RecoveryOS.
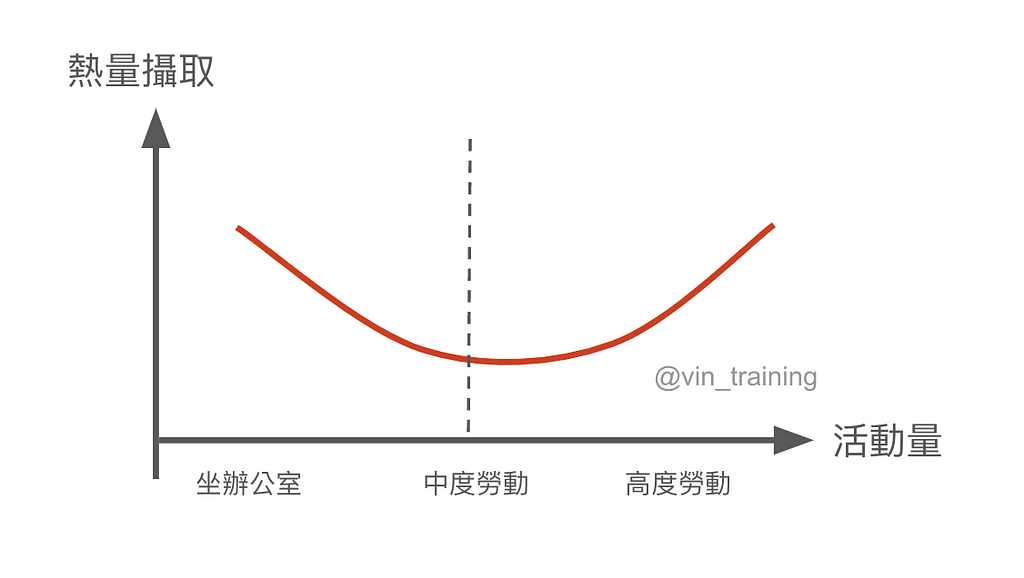
其實,只透過「多活動以增加熱量消耗」來減重並不是容易的事。根據實證指引,對多數人而言,要減重主要還是得靠飲食控制,運動只是輔助。再更進階一點的分析,甚至有所謂的 Constrained Total Energy Expenditure Model(總能量消耗限制模型)表示,超過一定的活動量後,再怎麼運動也不會增加更多熱量消耗;最顯著的例子,就是高活動的原始部落族群,每天的熱量消耗其實跟現代人差不多。(註:這個模型有很多可以討論的,如果現在會覺得奇怪、不合理,是正常的;但本文就先不細述了)
主要參考資料:Melby, C. L., Paris, H. L., Sayer, R. D., Bell, C., & Hill, J. O. (2019). Increasing Energy Flux to Maintain Diet-Induced Weight Loss. Nutrients, 11(10), 2533. https://doi.org/10.3390/nu11102533
若喜歡這種健身科學解說,請追蹤我的 Medium 和 Instagram(@vin_training),才不會錯過最新內容哦!
 Login
Login