The update bringing macOS Tahoe to version 26.5 is modest in size and, apart from its security fixes, seems largely routine maintenance.
The only release notes worth reading are those listing vulnerabilities fixed, available here. Among the 69 listed there are 9 in the kernel, which must be the highest number in any recent macOS update. I wonder whether those have been swelled by AI, and one of the kernel bugs is credited to a researcher “with Claude and Anthropic Research”. There could of course be fixes resulting from early use of Mythos, but they’re unlikely to appear in a public list. None of the fixes listed are reported as being known to exist in the wild.
The new build number for 26.5 is 25F71. Apple silicon Macs have a firmware update bringing them to mBoot 18000.120.36, and Intel Macs with T2 chips are updated to 2103.100.6.0.0 (iBridge 23.16.15067.0.0,0).
Bundled apps have routine increments in version numbers:
Books, from version 8.4 to 8.5
Freeform, 4.4 to 4.5
Music, 1.6.4 to 1.6.5
News, 11.4 to 11.5
Passwords, 2.4 to 2.5
Safari, 26.4 (21624.1.16.11.4) to 26.5 (21624.2.5.11.4)
Stocks, 8.4 to 8.5
TV, 1.6.4 to 1.6.5.
Although there are abundant increments in build numbers reflecting routine maintenance, there are few substantial changes apparent in /System/Library, including:
In kernel extensions, the whole AGX series has a substantial change in version, as does AppleUSBAudio, and smbfs is updated to version 6.0.1
APFS is incremented to version 2811.120.14
There’s a new AppleAccountTransparency in private frameworks.
Apple has released the update to bring macOS Tahoe to version 26.5, and security updates for Sequoia and Sonoma to bring them to 15.7.7 and 14.8.7.
If you were expecting 15.7.6 or 14.8.6, then you’ll be as surprised as I was that Apple appears to have skipped those and gone straight on to x.x.7. I haven’t seen any explanation for this curious change in version numbering.
Download size for the 26.5 update on an Apple silicon Mac is around 3.8 GB, and the last 5 minutes of preparation takes maybe a tad longer than that. Intel Macs should download around 2.9 GB instead.
In Apple silicon Macs, firmware is updated to mBoot 18000.120.36, while Intel firmware is updated to 2103.100.6.0.0 (iBridge 23.16.15067.0.0,0).
Release notes are the bland and unhelpful statement that “This update includes enhancements, bug fixes, and security updates for your Mac.”
Security release notes are here for Tahoe with around 69 vulnerabilities fixed including more kernel bugs than I’ve ever seen in a single update, here for Sequoia with around 45, and here for Sonoma with a mere 43 or so.
Apple still hasn’t posted any enterprise release notes here but might think of something to report later.
In my review of macOS virtualisation on Apple silicon, I quoted performance figures that were obtained some time ago, and didn’t consider minimum specifications for a usable VM. Given current interest in running a VM on a MacBook Neo, I thought it would be worth examining these afresh, from macOS Tahoe.
How fast?
Using the same host, a Mac mini M4 Pro, this time running macOS 26.4.1 on its 14 cores (10 P + 4 E) with 48 GB RAM and a 2 TB internal SSD, Geekbench 6.7.1 scores are slightly faster, on both the host and a guest given 5 virtual cores and 16 GB of virtual RAM:
The last of those gives single precision, half-precision and quantised test results, in that order.
Comparing CPU single-core figures, the VM runs effectively at 98% of the speed of the host. Comparison between the multi-core CPU results is difficult, as the host has more than twice the number of cores, although four of them are E cores. However, given that the host has twice the number of P cores alone, the VM appears to perform rather better than the host on this test.
GPU performance isn’t quite as good, with the VM delivering performance of 95% of that of the host, when the latter isn’t contending for the GPU as well.
The only real disappointment here is the virtual neural engine, which performs far slower than the host on half-precision and quantised tests. We might hope that macOS would process AI tasks using the CPU and GPU rather than the neural engine, when running in a VM.
How small?
With the arrival of the MacBook Neo, some wondered whether it would be able to run VMs. While there’s no doubt it should make a good host for Linux, I doubted whether it would be able to do anything useful with macOS in a VM. I was wrong.
To assess how small a macOS VM could be, I ran the same VM of macOS 26.4.1 on progressively smaller CPU core and memory allocations, using my virtualiser Viable. The VM’s display window was set to a standard 1600 x 1000, and I ran Safari through its paces and performed some lightweight everyday tasks, including Storage analysis in Settings.
Starting with 4 virtual cores and 8 GB vRAM, where the VM ran perfectly briskly with around 5 GB of memory used, I stepped down to 3 cores and 6 GB, to discover that memory usage fell to 3.9 GB and everything worked well. With just 2 cores and 4 GB of memory only 3.1 GB of that was used, and the VM continued to handle those lightweight tasks normally.
The only thing to be careful of when creating VMs on Macs with small internal SSDs is their size. Any macOS VM significantly smaller than 50 GB isn’t going to be able to update its macOS, and for comfort and safety you should aim for at least 60 GB. Fortunately, APFS comes to your aid here, as VMs are stored as sparse files, and a basic 100 GB VM should only require about 54 GB on disk. That would be better accommodated on the MacBook Neo with a 512 GB SSD.
Although not the place to try running your LLM, a macOS VM given only 2 virtual cores and 4 GB of memory, as should be feasible in a MacBook Neo, is thoroughly usable and capable of everyday tasks. Bring on the Neos!
One of the joys of writing here is when I’m wrong, and a feature I thought was lost is just hidden a bit deeper. When I wrote that the Minimise Easter egg was defunct in macOS Tahoe, I was delighted to be corrected, thank you, as it’s still alive and flourishing.
In fact this had been documented just over a year ago by John Gruber on his Daring Fireball blog. I’ve added information from the macOS defaults site, and played around with this in a macOS 26.4.1 virtual machine.
Settings
To enable the Minimise Easter Egg for the Dock, enter the following command in Terminal: defaults write com.apple.dock slow-motion-allowed -bool YES
without that, it simply won’t happen in recent versions of macOS.
To disable it again, you can use either of defaults write com.apple.dock slow-motion-allowed -bool NO
or defaults delete com.apple.dock slow-motion-allowed
macOS Defaults recommends enabling Automatically hide and show the Dock, in Desktop & Dock settings, but that’s optional and not required.
Options
Three different effects are available, two of them offered in the Minimised window animation popup menu in Desktop & Dock settings.
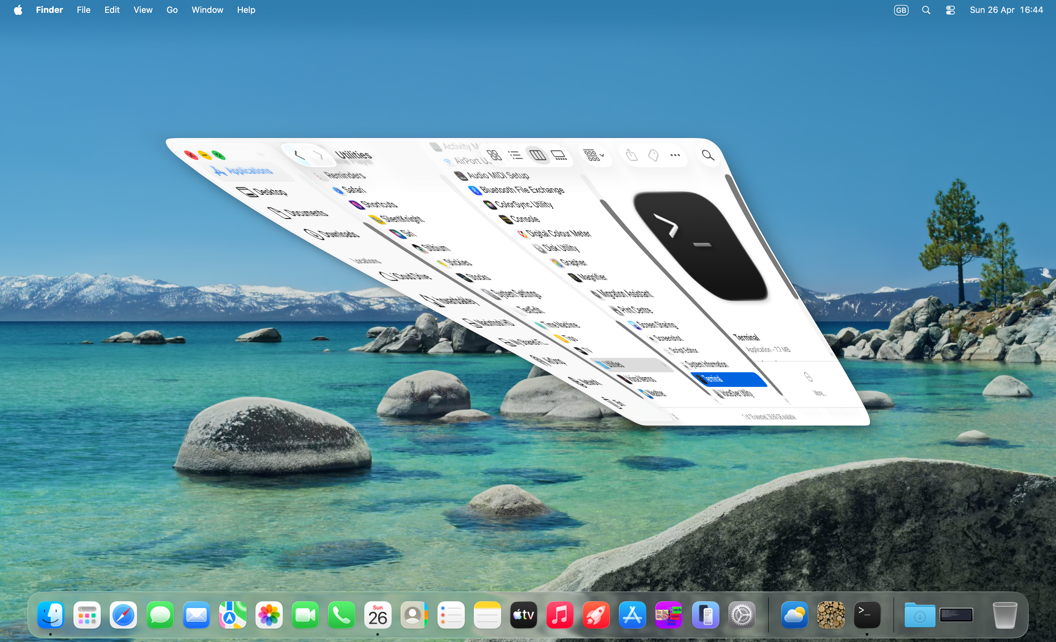
The default is genie, in which the window being minimised reverses the ‘genie’ effect commonly used in animations.
The other choice in Desktop & Dock settings, scale, shrinks the window uniformly as it moves down to the right end of the Dock.
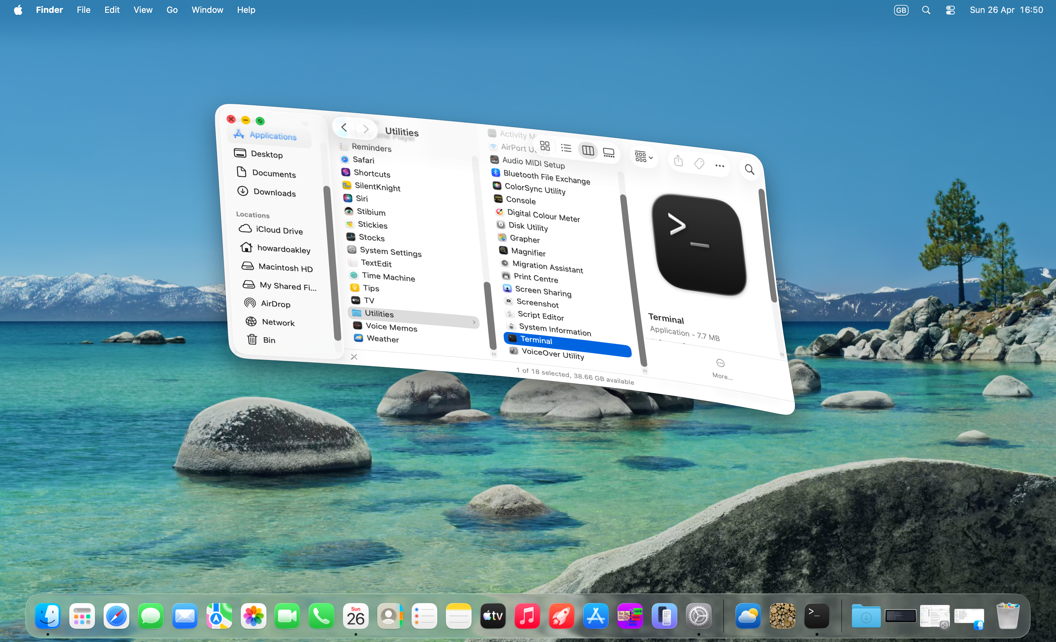
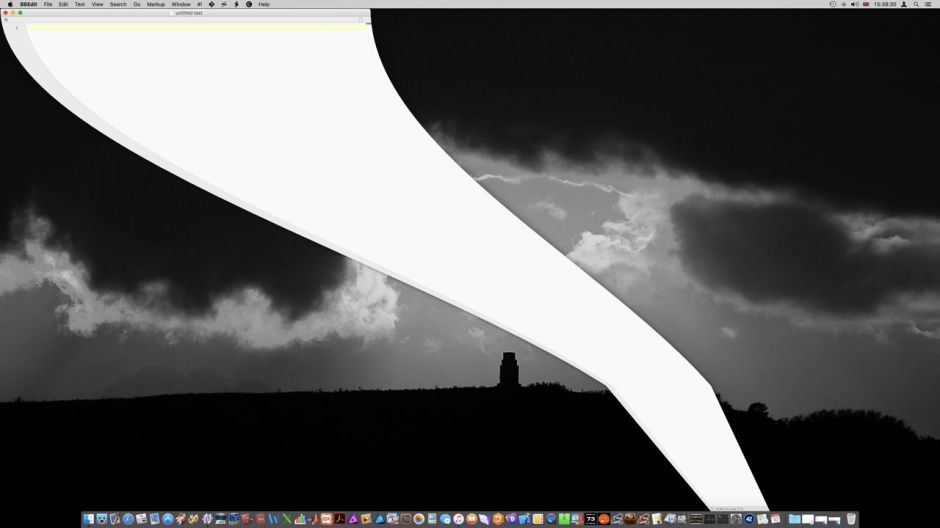
Hidden from there, and only available via Terminal, is the third option, suck, in which the lower right corner of the window is ‘sucked’ down to the right end of the Dock. To opt for that, enter the command defaults write com.apple.dock "mineffect" -string "suck"
and you can use the same command with "genie" or "scale".
Applying settings
Changes made in Desktop & Dock settings are enforced automatically, without further action. Those using defaults in Terminal will only take effect after killing the Dock and allowing it to be restarted, with the command killall Dock
Controls
To see the Minimise effect, use one of the following key combinations when clicking on the yellow Minimise traffic light button at the top left of a window:
no key – full speed
Control – slow
Shift – much slower
Control + Shift – slowest.
You can also use the Shift key for a slowed de-minimise effect when clicking on the minimised window in the Dock. As the Control key already has another meaning there, it won’t have the same effect.
History
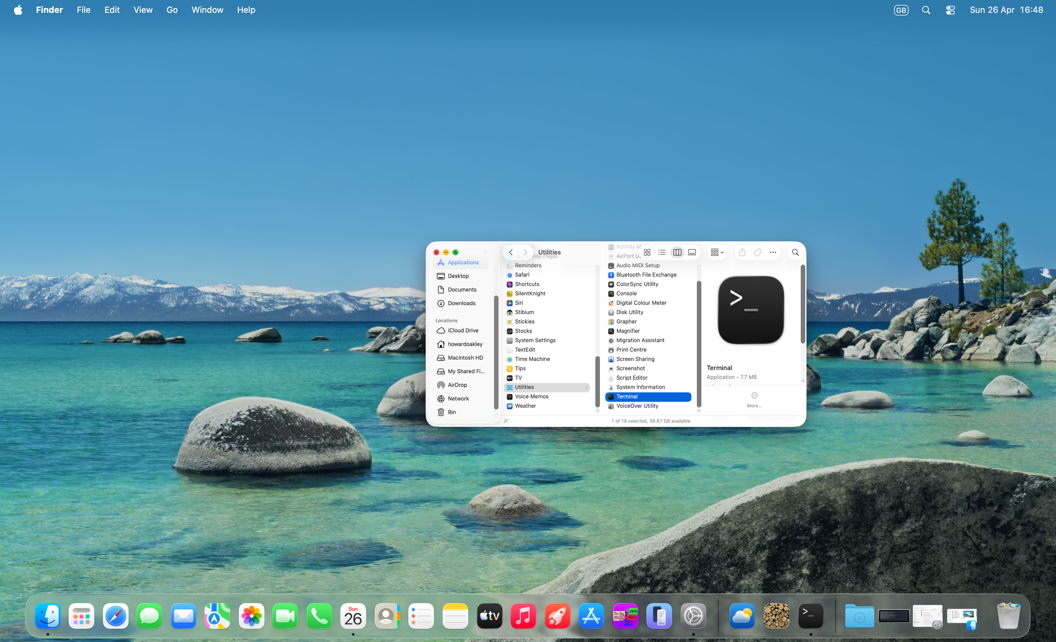
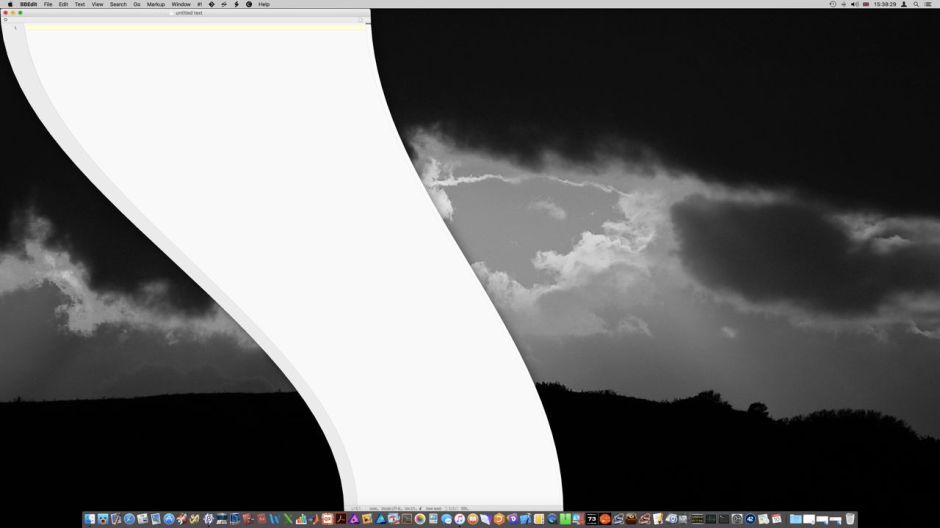
Current effects are very different from those of a decade ago, as shown in the sequence of images below.
Thanks to the Apple engineers who have not only preserved this Easter Egg, but made it even more fun. And fun is really important.
Ten days ago, I drew attention to anomalies in privacy protection of locations that could mislead, in that Privacy & Security settings could claim an app didn’t have access to a protected folder when it did. This article proposes an explanation, and provides further details of protected locations and their behaviour. This is based on my test app Insent version 1.2, which you can use to explore these behaviours in the comfort of your own Mac.
Procedures
For the avoidance of any doubt, Insent is a simple macOS app that doesn’t run in an App Sandbox, doesn’t have any entitlements, but is notarized. Its two features of greatest interest here are Open by consent, and Open from folder buttons:
Open by consent constructs a folder path as a string without involving user action in an Open and Save Panel, then calls FileManager.default.contentsOfDirectory() to list files within that folder. If that’s successful, it randomly selects a text file from those, opens it, and displays the opening part of the text contents. This is opening that file by consent, as the app is given access to that folder by user consent through TCC’s privacy controls, by consenting to the standard dialog.
Open from folder displays an Open and Save Panel (NSOpenPanel) asking the user to select a folder. The URL returned from that is then used to call FileManager.default.contentsOfDirectory() to list files within that folder. If that’s successful, it randomly selects a text file from those, opens it, and displays the opening part of the text contents. This is opening that file by user intent, as the user has chosen that folder to be used. As a result, this doesn’t invoke TCC’s privacy controls.
Consent
The mechanism used to list the contents of a protected folder and open a file from among those is the more obvious, and better documented. Even though the app itself isn’t running in an App Sandbox, the call is intercepted by sandboxd and passed to TCC for it to check whether current privacy policy for that app should allow the request. TCC first checks whether kTCCServiceSystemPolicyAllFiles applies, with the app being given Full Disk Access. If it does, then sandboxd is advised and the call to list the directory proceeds.
If kTCCServiceSystemPolicyAllFiles doesn’t apply, TCC checks for the location-specific service, including
kTCCServiceSystemPolicyDesktopFolder
kTCCServiceSystemPolicyDocumentsFolder
kTCCServiceSystemPolicyDownloadsFolder
kTCCServiceSystemPolicyRemovableVolumes
kTCCServiceSystemPolicyNetworkVolumes
kTCCServiceFileProviderDomain.
If that has been given, sandboxd is advised and the call proceeds.
If neither of those applies, then a standard consent dialog will be displayed. If the user allows that, then the location-specific service is granted, and sandboxd advised to proceed. As these steps are all documented in detail in the log, there’s no difficulty in following them there, and diagnosing their problems.
Intent
Although the log contains details of the use of the Open and Save Panel to select a folder, when a protected folder is listed by intent, there are no informative log entries at all. For example, 0.812549 Insent sendAction:
0.812607 Insent: trying to list files in /Users/hoakley/Desktop
0.813297 Insent: trying to look in /Users/hoakley/Desktop for text files
0.813373 Insent: trying to read from: /Users/hoakley/Desktop/00vlutest1pm.text
1.173727 Insent: read from: /Users/hoakley/Desktop/00vlutest1pm.text
where the first four are written consecutively in the log.
To understand what’s going on here we have to consider how sandbox behaviour might apply. This has been explained clearly for the App Sandbox by Mark Rowe, and the most relevant section there is about Mandatory Access Control in the kernel, towards the end: “The macOS kernel (XNU) provides a Mandatory Access Control Framework (MACF) that exposes around 300 policy hooks that can be used to approve or deny specific operations at a fine-grained level. Most of the policy hooks correspond to specific system calls or operations on the kernel’s file system abstraction (VFS). As the name implies, these policy hooks are mandatory and are applied to all clients that use the system calls or perform file system operations.”
So when Insent calls FileManager.default.contentsOfDirectory() to list files within a folder, its corresponding policy hook is called with a context including the directory and the caller.
This is where the next component comes into play: any com.apple.macl extended attribute saved to that directory. We still know remarkably little about those xattrs, despite them being so common. Here I turn to Adam Chester’s early account of how they’re used for protection by user intent. These Mandatory Access Control Lists (MACL) enable the sandbox to determine whether the request to list the contents of the directory should be approved. Because this all takes place within the kernel and its sandbox extension, no entries appear in the log.
The only evidence of this happening is the MACL xattr saved to the protected directory, and making sense of that isn’t easy. Each MACL is 72 bytes, and multiple MACLs can be concatenated into a single xattr as necessary. They’re protected by SIP, so can’t be stripped in place while that’s enabled.
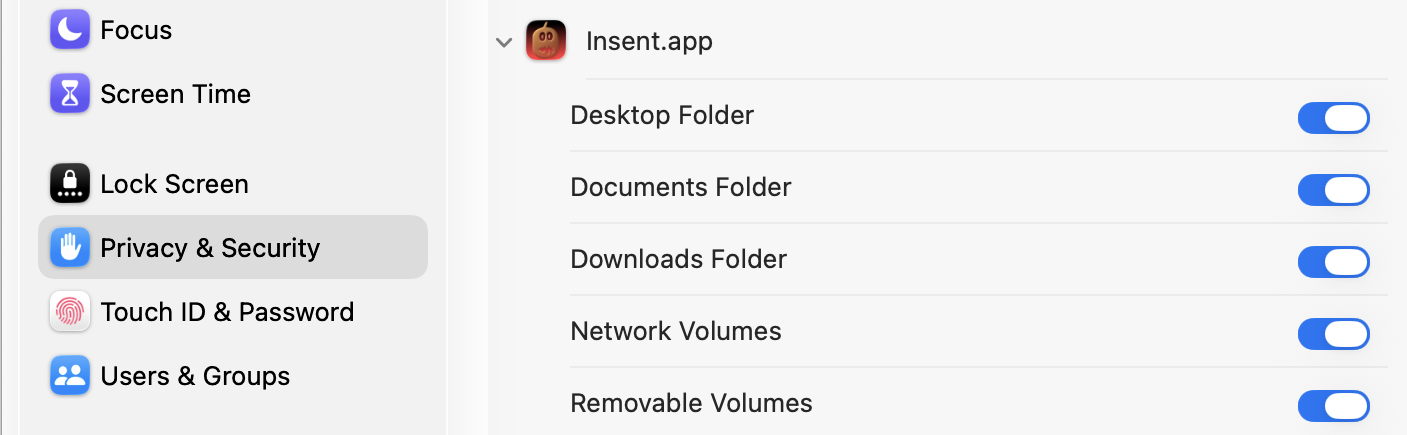
Because this mechanism remains within the kernel and sandbox, it’s invisible to TCC, and to its controls in Privacy & Security. If an app has gained access to a protected location by intent, then that takes precedent over TCC’s controls, and results in the contradiction seen in Files & Folders, whereby access is disabled but still takes place. This isn’t a bug, but a feature of access by intent.
Mechanisms
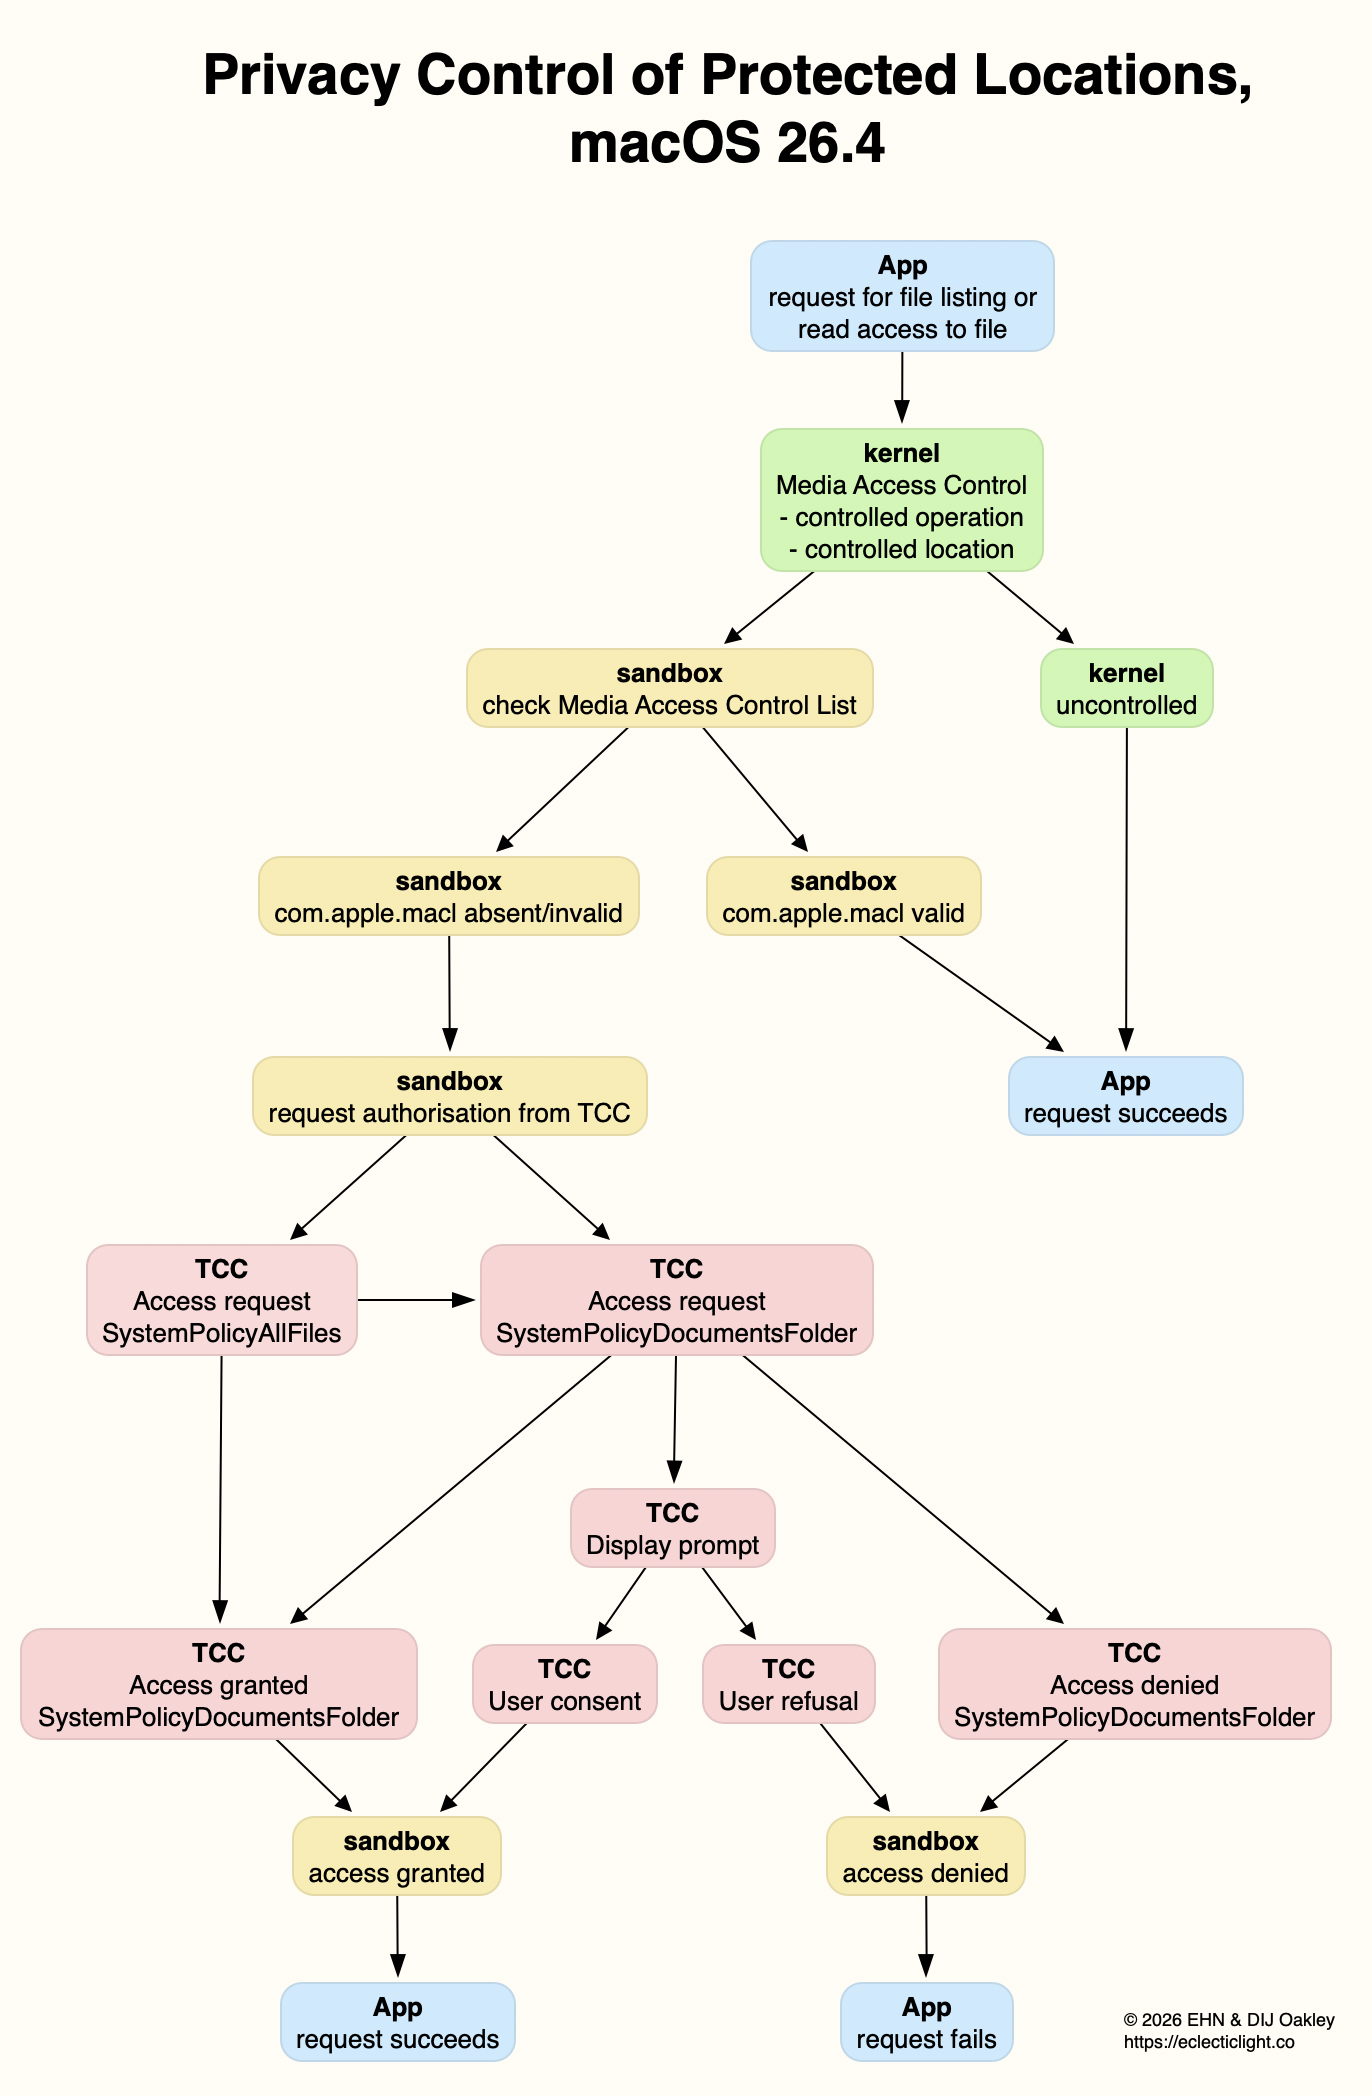
The following diagram summarises how I think these two mechanisms operate.
For the sake of simplicity, I have omitted the final step between access being granted/denied by the sandbox, and the app, where of course it’s the kernel that either permits the app’s request for the operation, or blocks it and returns an error. (I’m grateful to Csaba Fitzl for drawing my attention to that.)
This explains why Apple has been so reluctant to document any of this, and why MACLs are so opaque. If an app were capable of creating its own functional MACLs, they would enable it to bypass TCC’s controls and gain access to any protected location. Unfortunately, the side effect is that TCC isn’t allowed insight into what the sandbox is up to, and there’s no transparency for the user.
Overview
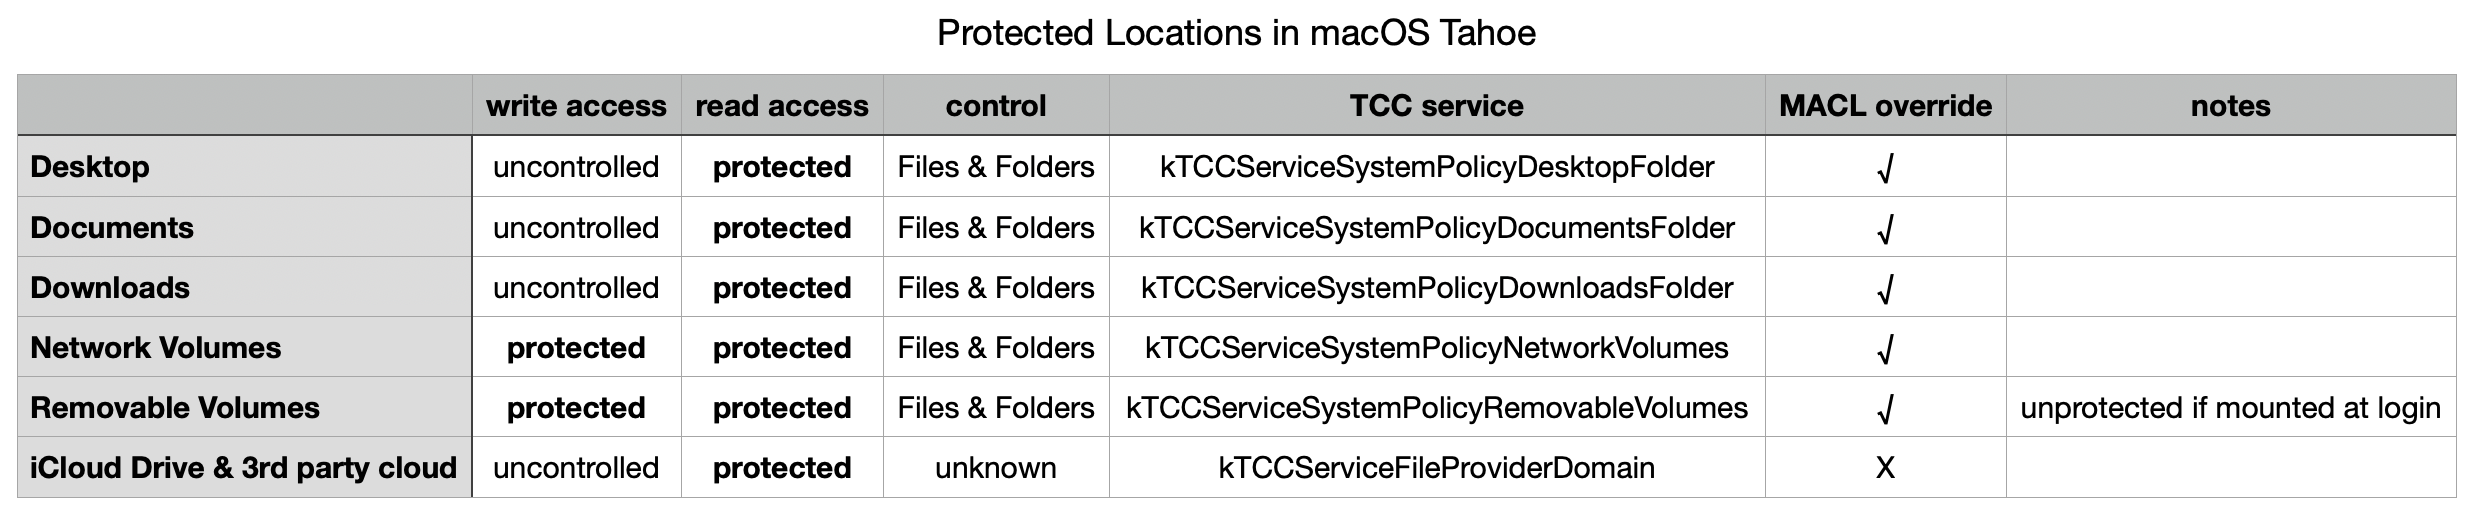
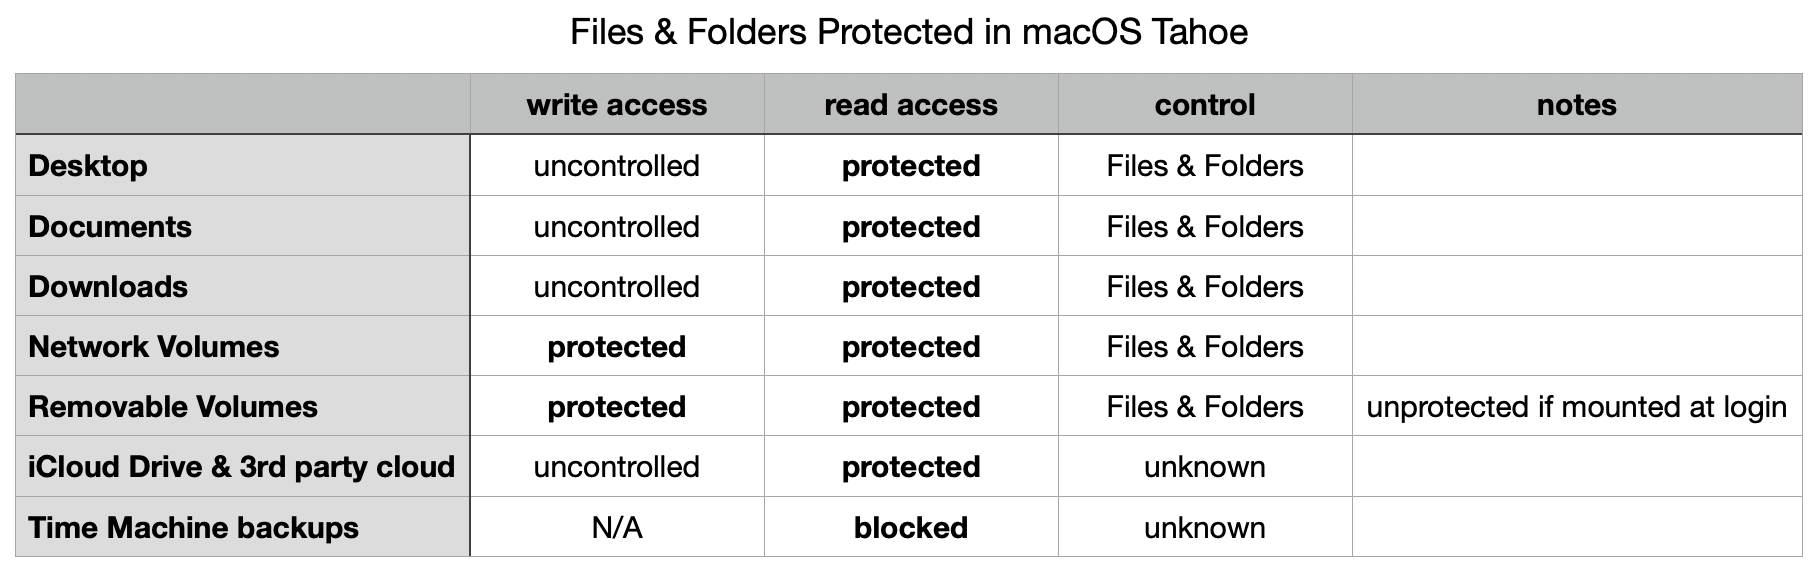
Even using a known and simple app like Insent, behaviours aren’t always consistent, and are susceptible to order effects and maybe even cosmic rays! There are also subtle differences between protected locations that can make generalisation unreliable. However, after extensive checks with Insent the following table gives an overview of protected locations in macOS 26.4.
The three common local folders ~/Desktop, ~/Documents and ~/Downloads are most consistent, with controlled read access, GUI controls in Files & Folders, and can be overridden by intent using MACL xattrs. Network volumes also appear to protect write access.
External volumes that are mounted automatically during startup don’t appear to count as being removable, but any that are mounted later have similar protection for both read and write, and can be overridden by intent using MACLs.
iCloud Drive and third-party cloud storage using the FileProvider API are more difficult to investigate, as I’ve still been unable to find any GUI control. It also doesn’t appear to be overridden by intent using MACLs, although its directories can still have com.apple.macl xattrs attached to them.
In addition to using any controls in Files & Folders, all TCC controls can be reset using tccutil, for example in tccutil reset All co.eclecticlight.Insent
and that takes immediate effect, without a restart.
Restarting may be the best and perhaps only way (without disabling SIP) to reset MACLs. Although they can appear to persist at times, and the xattrs themselves don’t change, Adam Chester points out that tokens used by the sandbox are invalidated on rebooting, so maybe existing MACLs may not remain effective following a restart.
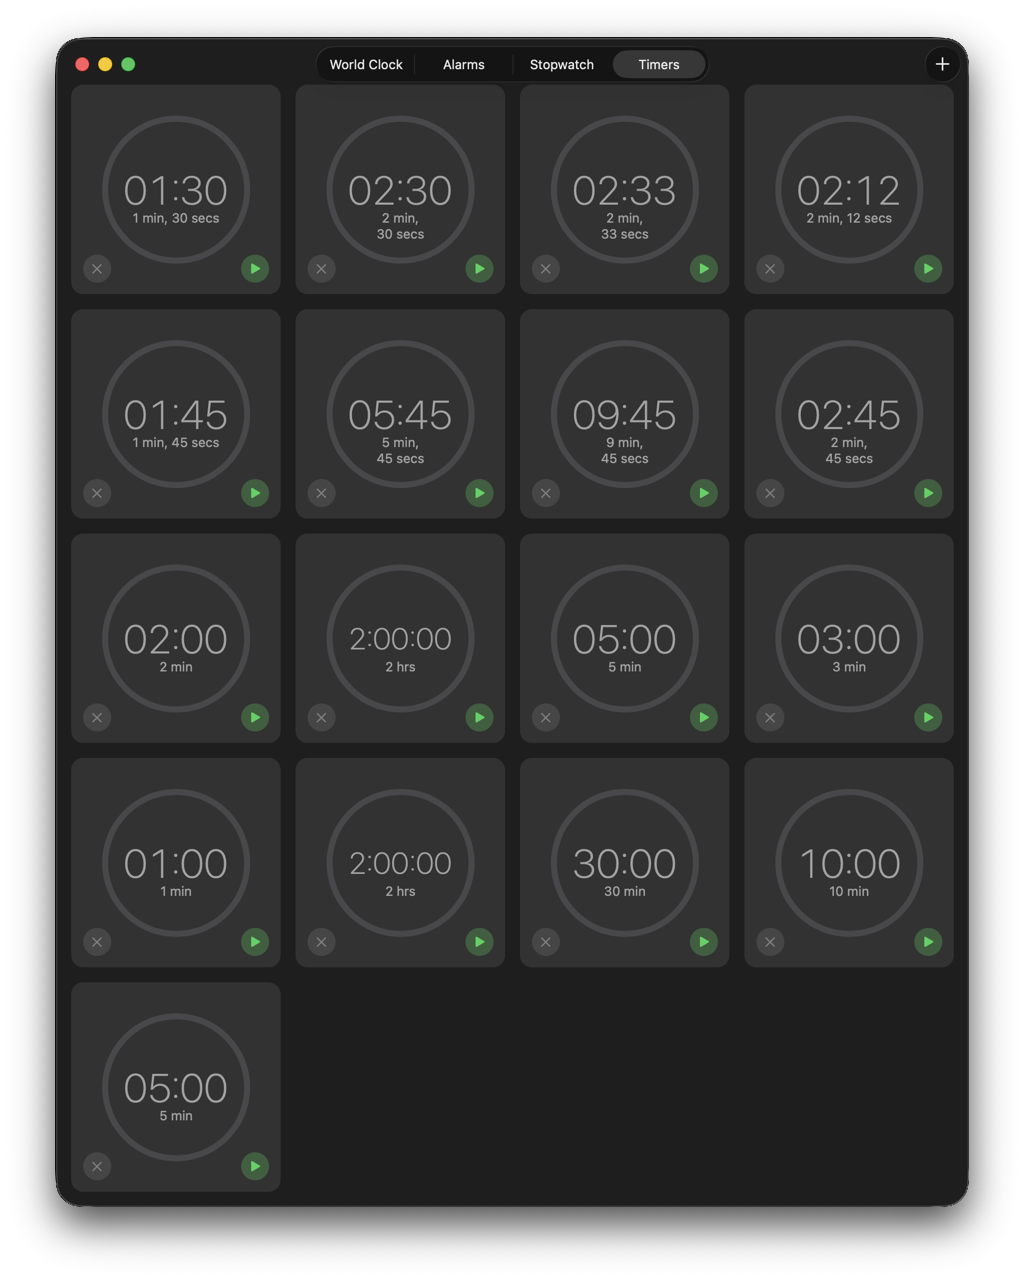
In November last year, I reported that there was a bug in the bundled Clock app that results in its Timers feature failing. Thanks to the persistent work of Michele, we were able to establish its most likely cause was excessive accumulation of old Timer data in its preferences file. This article reports what has happened with this bug over the five updates to macOS Tahoe since: in a word, nothing. The bug is still present and operates the same as it did in macOS 26.1.
Michele used to use the Timers feature in the bundled Clock app frequently, but found it had become increasingly temperamental, and failed to display the contents of that view. Working extensively with Apple Support brought no resolution, except to use Timers from a different user account, which was of no help. One suggestion that did work was to delete its preferences file, com.apple.mobiletimerd.plist in ~/Library/Preferences, but over time the same problem returned and Timers stopped working again.
Using log extracts from Michele’s Mac, we discovered the cause of failure in Timers was termination of the mobiletimerd service when it was trying to start up, because it immediately ran out of memory. The reason for that was the size of com.apple.mobiletimerd.plist, which instead of being a few KB had reached nearly 7 MB, because it was full of a great many old MTTimer settings from previous timers.
Oddly, those many MTTimers weren’t reflected in those offered in the Timers window, nor those in the Start Recent Timer item in its File menu. Those both remained modest in size, although the two lists didn’t match, in that those offered in the menu were a small selection of those shown in the Timers window.
Back in macOS 26.1:
Each time a new timer was created, its settings were written as a new MTTimer to com.apple.mobiletimerd.plist.
As that property list never removed old or duplicate MTTimers, it grew steadily in size.
When the property list was several MB, it caused the mobiletimerd service to run out of memory, and to be terminated.
Without the mobiletimerd service running, the Timers feature was unable to function.
I have now repeated testing of Timers in macOS 26.4.1, and confirmed that this behaviour hasn’t changed in the slightest.
Before using Timers to test this, the com.apple.mobiletimerd.plist settings contained 15 MTTimers all dating from my previous testing last November. After a couple of hours running a succession of timers, there were 43 MTTimers in that file, still dating back to November. Among those were 7 for a duration of 60 seconds and there were many other duplicates.
However, of those saved MTTimers only 17 were offered for re-use in the Timers window.
Just one of those durations was duplicated, for 5 minutes, indicating that the Clock app was making a nearly successful attempt to eliminate duplicates in this list.
The only workaround for those who use timers often is to periodically quit the Clock app and remove ~/Library/Preferences/com.apple.mobiletimerd.plist and so restore normal timer function. Although some of the solutions recommended to Michele would unintentionally have achieved that, they would only have been temporary, as the number of MTTimers would immediately have started to rise again.
It will be interesting to see whether this bug persists into the first beta-release of macOS 27 when it’s released to developers in early June. I have a suspicion that it will remain.
Obtaining a definitive list of locations that are subject to privacy protection in macOS Tahoe 26.4 hasn’t been easy, and I’ve previously relied on information given piecemeal in WWDC sessions. This article reports the results of formal testing using a new version of my test app Insent, and brings some surprises.
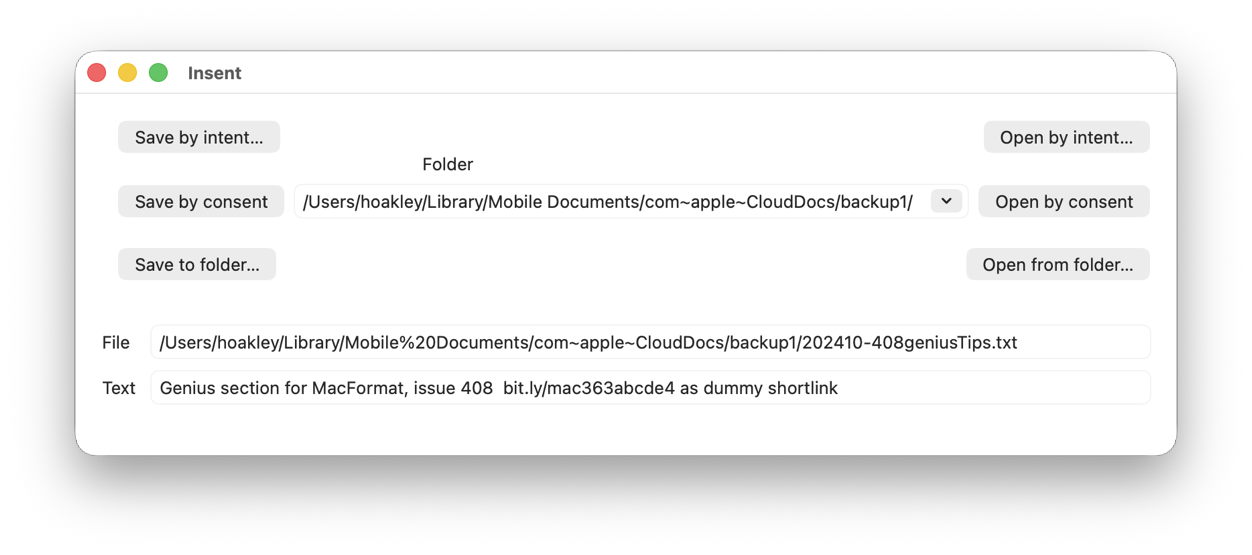
Insent version 1.2 now allows you to set the path to the folder to be used for its Save and Open by consent buttons, using a Combo box. That’s a combination of a popup menu including the three most popular locations, Desktop, Documents and Downloads, and an editable text box into which you can enter a custom folder path.
Save and Open by consent are actions in which the user doesn’t express their intent to write to or read from the protected location, for example in an Open and Save Panel, but the app’s code determines the path and file. Thus, to ensure the app’s access doesn’t compromise the user’s privacy, those actions may be blocked unless the user gives their consent in a dialog presented for TCC, the privacy manager.
In the Save by consent code, all Insent does is construct a URL to a new text file in that folder path, then tries writing a String to that URL using String.write() non-atomically. To open a text file from that folder path, it attempts to enumerate the contents of the directory at that URL using FileManager.default.contentsOfDirectory(), then iterates through the contents until it finds a text file to open. If it does, it tries to read that file using String(contentsOf: url), and displays the start of that String.
Only three locations conform to the standard control:
~/Desktop
~/Documents
~/Downloads
In each case, there is no control over writing to the location, but any attempt to list the contents of that folder elicits a request for consent, and results in an entry for Insent in the Files & Folders list in Privacy & Security settings.
For iCloud Drive, and presumably third-party cloud services with equivalent privacy protection, there is no control over writing to the location, and listing folder contents requires consent, but no entry appears in the Files & Folders list, and I have been unable to discover any equivalent control elsewhere. Thus, once consent has been given, it appears to remain indefinitely, as the user doesn’t have a control to disable that access.
Removable Volumes and Network Volumes differ again, in that both Save and Open by consent require user consent, although giving consent to one action also grants it for the other. However, not all removable volumes are treated as protected. A Time Machine backup drive that is mounted automatically during startup, and has an additional volume not used for backups, wasn’t given any protection, while an SSD connected and mounted well after login was treated as a Removable Volume.
Although often listed as being subject to privacy protection, read access by consent was blocked for Time Machine backups, and they’re read only anyway.
One strange behaviour discovered during testing was the automatic addition of Insent to the Full Disk Access list, rather than individual Files & Folders. However, Full Disk Access hadn’t been granted, and when Insent was removed from that list, individual Files & Folders were shown instead.
There was no evidence of any other special locations among other standard folders in the user’s Home folder, although there are separate controls covering Photos access, and that to app databases, as listed in Privacy & Security settings.
The following table summarises privacy protection for special locations in macOS 26.4.
Insent version 1.2 is now available from here: insent12
Have fun trying to make sense of this protection.
With the continuing reluctance of many to upgrade to macOS Tahoe, some are seeking compromise by retaining access to both macOS 15 Sequoia and 26 Tahoe in a dual-boot system. This article explains how you can do that on an Apple silicon Mac, and choose between
both systems installed in a single container on the internal SSD,
each installed in a separate container on the internal SSD,
one on the internal SSD, the other on an external SSD,
one on the internal SSD, the other in a virtual machine (VM).
These have become more complicated with Apple silicon Macs because, unlike Intel Macs, they’re designed to boot from external disks in full security. To achieve that, they have to start their boot process from their internal SSD, and that stores LocalPolicy files to enable handover to a boot volume group such as that on an external disk. The structure of their internal SSD is also more complex, with two hidden containers, as well as the bootable system in a boot volume group, as shown below.
One common requirement for all except a VM is that the Mac needs to be compatible with both versions of macOS that you intend to run. For example, those models with M5 chips released after Tahoe on 15 September 2025 will never be able to install Sequoia. If you want to run Sequoia on one of those, then your only option is to install it in a VM.
Another general principle is that the closer the two versions of macOS are, the better dual-booting will work. Running Sequoia and Tahoe side by side shouldn’t be a problem, but the combination of Monterey and Tahoe could prove more troublesome.
When setting up any dual-boot Mac, it’s easier to do so when booted from the older version of macOS. This is because the installer for an older version of macOS may be blocked when running a more recent version. If that isn’t possible you’ll almost certainly need to create a bootable installer disk and run the installation from that. Apple describes how to do that in this support article.
Apple’s terse summary is perhaps too generic to be useful.
Single container, internal SSD
This is by far the most straightforward and most popular option for dual-booting, where both versions are installed into the same APFS container on the internal SSD. This has the advantage that each of the volumes in the two boot volume groups shares free space within that single container.
To install the second macOS you’ll need to create a new APFS volume on the internal SSD with the name you want to give that new system, then select that as the destination for the macOS Installer. What you should end up with is complex, as it consists of the standard five (or six) volumes, plus a second pair of System and Data volumes with their own Sealed System Volume (SSV) snapshot, making a total of seven or eight volumes and two SSV snapshots, all in the single container. The two bootable systems should then share a common paired Recovery volume, and Fallback Recovery in its separate container.
Because these volumes all share a single container, any problems that arise could compromise both systems, so maintaining good backups of each is particularly important.
Two containers, internal SSD
Instead of installing both systems into the same container, it’s also possible to repartition the internal SSD to add another container into which you install the second system. If you want to try this, you’ll need to perform that repartitioning before the first macOS has taken up too much space on the internal SSD, or the repartitioning may end up being destructive and require both systems to be installed afresh, which would be even more complex and risky.
For this reason, installing the two systems into separate containers on the internal SSD is seldom attempted, despite its advantage of robustness for the systems. Because they’re in separate containers, each system is independent, and likely to have its own paired Recovery volume. In theory at least, if one container were to run into problems, it may be possible to boot into the other system and attempt to repair the damaged system from there, although I’ve not heard of anyone doing that.
One internal, the other external
This is a popular and more robust alternative, as the two (or more) systems are physically separate. However, the two systems aren’t equals, as all boots must still start from the internal SSD before handing over to the external system. This can’t enable the Mac to boot entirely from the external disk in the way that an Intel Mac can.
There are drawbacks in booting from an external disk. Its speed can’t compare with that of an internal SSD, and it can’t use hardware encryption for FileVault. But external disks are also mobile between Macs, so if you want to be able to boot more than one Mac from the same boot volume group, it has to be installed on an external disk.
I provide detailed instructions for installing the external system in these articles:
If you need more than two versions of macOS, you could install multiple boot volume groups into a single container on the external disk, or separate them into their own containers. This has become popular for those like developers who need access to multiple versions of macOS for testing.
Below is a typical partition/container containing two bootable systems named ExternalA and ExternalB. This has two Boot Volume Groups, each consisting of a System volume with its SSV, and a Data volume, to which are added their three common volumes, Preboot, Recovery and VM.
One internal, the other in a VM
Virtual Machines are the cleanest of all the options, as their boot volume group is installed inside a disk image, and tucked away within a bundle. You can store them where you like, move them between Macs, and do the most horrible things to them with little fear: if anything goes wrong, you can just delete the VM and build yourself a new one.
Ideal for software developers and security researchers, macOS VMs running on Apple silicon Macs perform almost as well as the host they’re running on, and support Rosetta 2 so they can run Intel-only code when needed. However, they can’t run Big Sur or earlier, have limited features for Monterey guests, and only support iCloud access when Sequoia (or later) is running in the guest and host. Most surprisingly, though, they’re unable to run many App Store apps, so before committing to using a VM check that the apps you need can be run inside one.
Tips
General:
The host Mac must be capable of running that version of macOS, unless it’s in a VM.
macOS installers are the most reliable means of creating and installing Boot Volume Groups.
When using a laptop Mac, run it from mains power throughout macOS installation.
Each container with one or more Boot Volume Groups should contain one set of Preboot, Recovery and VM volumes shared between them.
Older macOS:
When installing an older major version of macOS, perform this from an external bootable HFS+ volume as detailed by Apple.
Use an HFS+J partition on an external SSD rather than a USB ‘thumb’ drive.
Boot from the installer volume through Recovery mode.
Bootable external disks:
During macOS installation, an external disk must be connected to a port other than the DFU port, as listed here and in Mactracker.
Apple silicon Macs will boot from external disks in Full Security, and reducing that doesn’t solve any problems.
APFS:
The first and fundamental step in trying to diagnose problems with multiple Boot Volume Groups or bootable external disks is to examine their container and volume structure using two diskutil commands: diskutil apfs list
to list all APFS volumes by container and give key information about each, including their role and UUID, and diskutil apfs listVolumeGroups
to list all recognised Boot Volume Groups, which you can tally against the first. Pipe these to text files so you can study and refer back to them. Example output from the second is: +-- Container disk5 5BA1AAC8-3AD4-4594-AF01-7C0AA75CABAD
| |
| +-> Volume Group 68627CBB-D774-444E-97C6-F9511B5030F3
| =================================================
| APFS Volume Disk (Role): disk5s1 (Data)
| Name: Macintosh HD - Data
| Volume UUID: 68627CBB-D774-444E-97C6-F9511B5030F3
| Capacity Consumed: 580769214464 B (580.8 GB)
| -------------------------------------------------
| APFS Volume Disk (Role): disk5s5 (System)
| Name: Macintosh HD
| Volume UUID: 8B9FF440-75C8-4F7F-B09E-9222D44A2276
| Capacity Consumed: 11239186432 B (11.2 GB)
Apple has just released an update to macOS Tahoe, bringing it to version 26.4.1.
Apple’s Enterprise release notes reveal that this resolves “an issue where MacBook Air with M5 and MacBook Pro with M5 Pro or M5 Max failed to join 802.1X Wi-Fi networks while using content filter extensions.” Otherwise, this update has no published CVE entries, and no general user release notes.
The download is about 2.13 GB for Apple silicon Macs.
The build number is 25E253, just 7 builds since 26.4, and there don’t appear to be any firmware updates.
There are no changes in bundled app version or build numbers, even in Safari, and the only change in /System/Library is in the Private Framework for Icon Services in SwiftUI. I suspect that the bug fixed is in one or more binaries elsewhere in the SSV. However, this may fix more than that single bug, as iOS and iPadOS 26 also had a patch update yesterday for unidentified “bug fixes”.
With macOS Tahoe already more than half way through its cycle, and Apple’s WWDC announced, now is a good time to plan your Mac’s calendar. This article peeks at what lies ahead for macOS over the next six months.
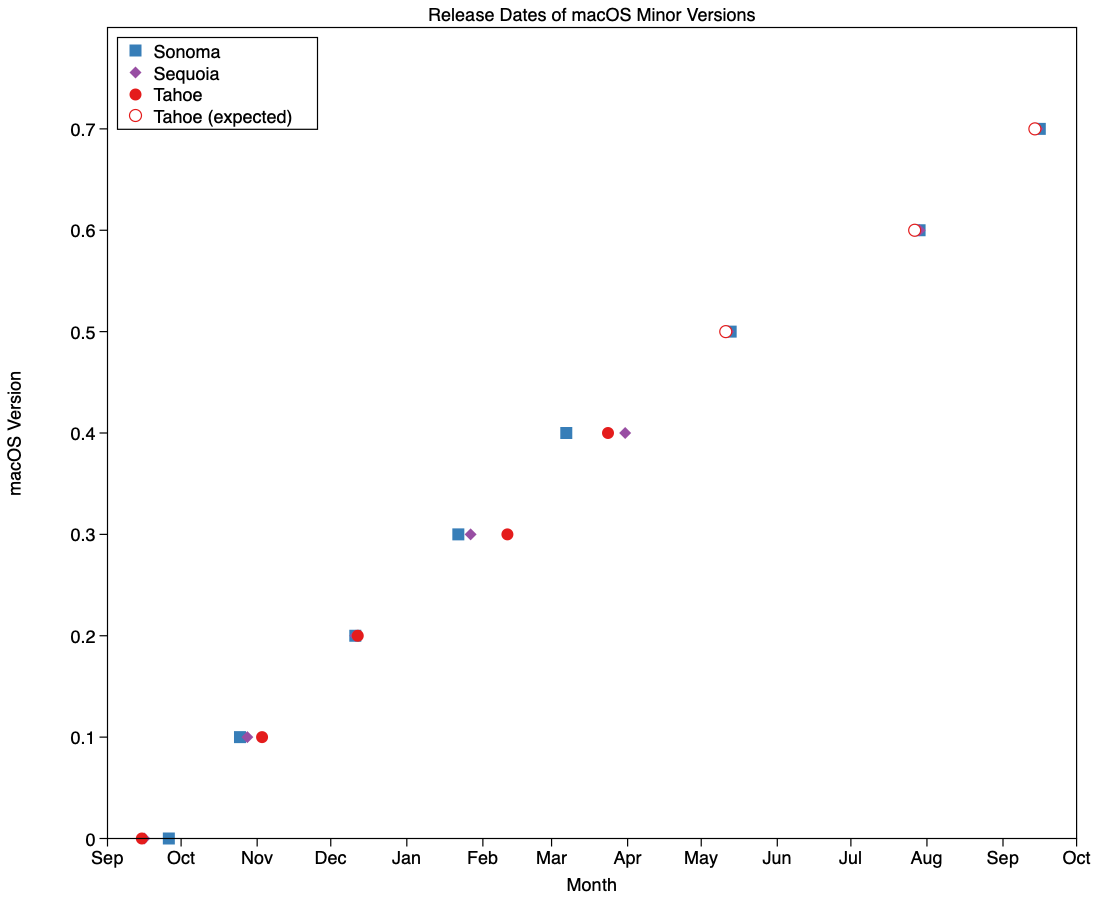
Since the pandemic disruption settled, minor version updates to macOS have become more regular. Looking across Sonoma, Sequoia and Tahoe, greatest variation in their timing has been in their x.3 and x.4 releases, that have varied between 22 Jan – 11 Feb, and 7 – 31 March, respectively. x.5 to x.7 have been more consistent, as they’re more tightly constrained by events including WWDC, the subsequent new beta season, and for some maybe even a vacation.
Those are summarised in the chart above, together with my predictions for the dates we should expect the remaining minor versions of Tahoe. Those should bring its cycle to look like:
26.0 – 15 September 2025
26.1 – 3 November 2025
26.2 – 12 December 2025
26.3 – 11 February 2026
26.4 – 24 March 2026
26.5 – 11 May 2026
26.6 – 27 July 2026
26.7 – 14 September 2026.
Where my forecasts are given in italics. Patch releases, such as 26.3.1, and BSIs occur outside that schedule. While we’re on the topic of BSIs, all indications are that Apple only intends to provide them for the current release of macOS, as it did with RSRs, which means that those Macs staying with Tahoe from 26.7 will no longer get them. It’s unclear how significant a loss that might prove.
WWDC this year is being held between 8-12 June, and will almost certainly bring the first developer beta release of macOS 27.0 (and all Apple’s other OSes). That’s likely to be made available to public beta-testers in early July. This is particularly significant this year, as it will be the first version of macOS to run exclusively on Apple silicon Macs.
For those with Intel Macs, or intending to remain with older versions of macOS, likely dates of release for scheduled security updates to Sonoma and Sequoia are:
15.7.6, 14.8.6 – 11 May 2026
15.7.7, 14.8.7 – 27 July 2026
15.7.8, 14.8.8 – 25 August 2026
15.8 – 14 September 2026.
The date at the end of August is possible, but less likely than the previous two. So far this year, security updates for Sonoma and Sequoia have been keeping reasonably close to those for Tahoe, in terms of vulnerabilities addressed, so the security gap between them has been rather less than in previous cycles.
However, the important message here is that it’s unlikely that Sonoma will receive any further security updates after the end of August this year. If your Mac is capable of being upgraded to Sequoia, now is the time to plan that, or it’ll all too quickly be September and your macOS will have lost its last support.
Similarly, if you’ve been holding back from upgrading to Tahoe in the hope that it will undergo interface improvements, I’m afraid that’s now looking increasingly unlikely. If it’s an Intel Mac capable of running Tahoe, there’s little point in avoiding making that decision any longer. There’s only limited time and scope left for improvement in macOS 26, with most engineers now more focussed on getting macOS 27 ready for WWDC.
Many discovered how long 5 minutes could last when they updated from macOS 26.3.1 to 26.4. Right at the end of its Preparation phase, Software Update showed there were only 5 minutes remaining for far longer. This article reveals what went wrong with that update.
My observations come from a Mac mini M4 Pro running a vanilla installation of macOS Tahoe, being updated from 26.3.1 (a) with the BSI installed, to 26.4. Times and details are taken from log extracts covering the final 14 minutes of the update, immediately prior to the reboot for its installation.
Preparation
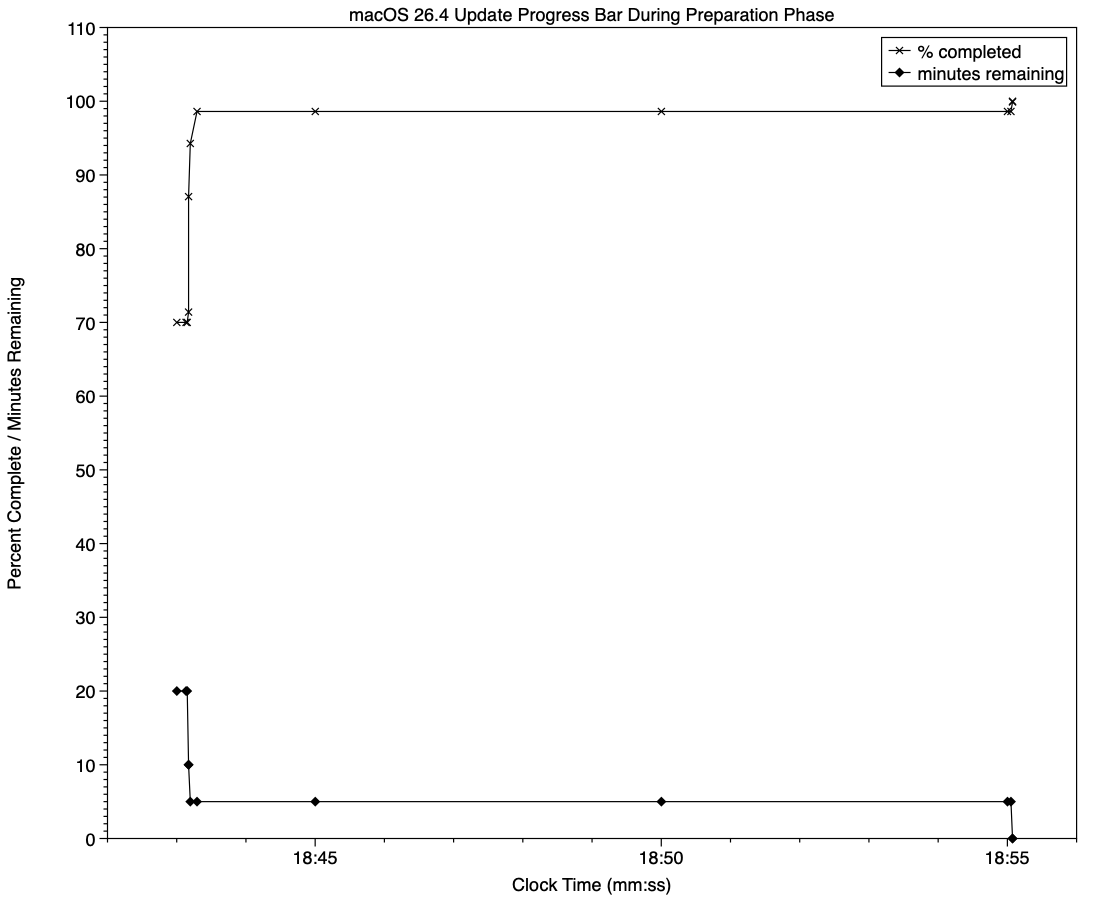
At almost exactly 18:43:00, softwareupdated reported that the PREPARING_UPDATE phase was in progress, with 70% complete on the progress bar, and 20 minutes remaining. Periodic preparation activities were then reported in the log, mainly verifying components to be installed as part of the update. One of the longest of those, /usr/standalone/i386/Firmware.scap, took nearly 6.5 minutes alone, although you might wonder why that’s required on an Apple silicon Mac!
Eleven seconds later, softwareupdated changed the progress bar to display 10 minutes remaining, with 71% completed. Just 1.5 seconds later that changed again to display 5 minutes remaining with 94% complete. Six seconds after that, with 5 minutes still displayed, the log records 98.6% was complete.
The log and progress bar then remained stuck at 5 minutes remaining and 98.6% complete for the next 11 minutes and 47 seconds, before changing to 99.9% complete and no time remaining.
These are plotted in the chart below.
The final 5 minute period started at 18:43:12, and lasted until 18:55:04, as reflected in the long period of 98.6% completion (upper line) and 5 minutes remaining (lower line).
The “5 minutes” remaining actually took 12 minutes and 7 seconds, although log entries make it clear that preparation continued throughout that time, with further verifications and “Preparing system volume…”. Those details were reported as ActionText for progress monitoring, but curiously aren’t accessible to the user at the time.
Log entries record softwareupdated keeping detailed records of progress over this period, though. For example: 18:51:32.924688 softwareupdated PrepareUpdate PROGRESS (Continue) | state:{
ActionText = "Preparing system volume...";
ElapsedTime = 490;
ExpectedTime = 1335505;
PercentBytesComplete = "48.05373989419242";
PercentComplete = "4.701870471432042";
}
But those aren’t reflected in the progress bar.
Once the update had completed that preparation phase, extensive checks were performed to ensure it was correctly configured, and components were moved into place in the ‘stash’ to be used during installation. One second after successful completion, softwareupdated locked the controller state and waited for the reboot to start installation. Rebooting followed less than two minutes later.
What went wrong?
The macOS 26.4 update for Apple silicon Macs was large, and the work required to verify its contents and complete its preparation was incorrectly reported in both percent completion and time remaining. Even in smaller updates, some form of progress needs to be shown in the progress bar during these later stages of preparation, or users may be mislead into thinking the update has frozen or failed, and could for example restart their Mac to try updating again.
What should the user do?
When an update claims there’s only 5 minutes left, that could readily extend to longer, possibly on slower Macs as long as 30 minutes or more. Unless there’s evidence that the update has gone wrong at this stage, you should leave your Mac to complete it, as it almost certainly will. If you’re still in doubt and want to confirm that the update hasn’t frozen, open Activity Monitor and look for around 100% CPU from softwareupdated or related processes, and disk activity.
Unfortunately, there’s nothing the user can do to accelerate macOS updates.
One of the longstanding jokes in computing is how misleading progress indicators can be, and last week most of us had a timely reminder when we updated macOS. However much we might like a perfectly accurate linear indicator for macOS updates, this is one of those situations where the best we can expect is a compromise, as I tried to explain here.
Showing progress
There are two types of progress indicator, determinate and indeterminate, depending on whether the task is quantifiable and progress is measurable. Determinate indicators are always preferred, as they inform the user whether they need only wait only a few moments, or they have time to enjoy a leisurely meal, but that requires quantifiability and measurability.
The simple example is copying a file from one disk to another: although macOS doesn’t know in advance how long that might take, it can quantify the task as the size of the file to be copied, then keep track of how much of that has already been completed. When half the size of the file has been copied, the progress bar can be set to half-way along its total length, so providing an accurate indication of progress.
However, with some copy operations that breaks down: when copying a sparse file between APFS volumes, for example, only the sparse data is copied, not the whole file size. As a result, copying sparse files often results in progress bars that jump from a low point to completion in the twinkling of an eye. This also relies on the quantities involved being linearly proportional to the time required, an assumption that often breaks down when downloading from a remote server.
macOS updates
Updating macOS consists of a series of many tasks (see references at the end), of which only one, downloading, is both quantifiable and has measurable progress, and even that may be far from linear. Apple therefore has a choice of:
Display multiple progress indicators, appropriate to each phase. While that might work well for the download phase, it can’t work for others, including preparation, which is likely to take a period of several minutes at least.
Combine those into a single progress bar, as at present.
Use an indeterminate progress indicator, such as a spinning wheel, which would be reliable but unhelpful.
As downloading is the one task that is quantifiable and its progress is measurable, I’ll start there.
For this, the progress bar starts an an arbitrary 15%, and softwareupdated assumes the total size of that download is the magnitude of that task.
When the download has been completed, the progress bar reaches an arbitrary 55%, and its caption then changes to reporting progress with preparation.
There is a weakness in the assumption that becomes obvious when downloading from a local Content Caching server, as the final 1 GB or so normally isn’t provided from the cache, but has to be freshly downloaded from Apple’s servers. However, that isn’t normally apparent when caching isn’t available and the whole of the download comes from the same remote source.
For the remainder of the progress bar, between 0%-15% and 55%-100%, the task is neither quantifiable nor measurable. Instead, softwareupdated divides it into a series of subtasks, each of which has a fixed progress level. One list of subtasks and levels obtained from the log is given in the Appendix at the end.
The disadvantage of that strategy is that time required by each subtask varies with the update and the Mac being updated. Inevitably, computationally intensive subtasks will proceed more rapidly on newer and faster Macs, while those mainly constrained by disk speed should be more uniform. Large updates should take significantly longer, and that will vary by subtask as well.
The last 5 minutes
A particular problem with some more recent macOS updates, including that from 26.3.1 to 26.4 last week, has been unmarked progress over the final “5 minutes” of preparation. While indeterminate progress indicators continue to move over that period, and reassure the user that the task hasn’t ground to a halt or frozen, the progress bar shown had no intermediate points, making it easy to misinterpret as failure to progress. If this is going to be a feature of future macOS updates, Apple needs to insert some intermediate points to let the user know that the update is still proceeding.
Conclusion
A progress bar that combines different measures of progress, such as download size and substages, can work well, but only if the user is aware of how to read it. As we only update macOS a few times each year, that isn’t sufficient exposure, and how it works needs to be made explicit.
In most respects, lightweight virtualisation of macOS on Apple silicon delivers almost the same performance as running code on the host. That’s the result of having direct access to CPU cores and the GPU. However, earlier implementations in Monterey and Ventura performed poorly when accessing the Data volume in the Virtual Machine, with read/write speeds measured at 4.4/0.7 and 5.4/0.7 GB/s respectively, without FileVault or other encryption. In macOS 26.3.1 both RAW and ASIF encrypted disk images show disappointing performance particularly when writing to them. This article therefore re-evaluates VM disk performance to see if that extends to VMs.
Methods
Tests were performed on two freshly made 100 GB VMs in RAW format using the macOS 26.4 IPSW, running on a Mac mini M4 Pro in macOS 26.4. VMs were given 5 CPU cores and 16 GB memory, didn’t connect to an Apple Account, and were built and run in Viable and Vimy, both of which use the standard macOS API for virtualisation.
Performance was measured using Stibium’s ‘Gold Standard’ with 5 rather than 10 test sets, reading and writing a total of 26 GB in 80 files ranging in size between 2 MB and 2 GB. Following an initial write test, the VM was restarted before performing the read test. The first VM was configured with FileVault enabled, and the second with it disabled. In addition to those, standard read/write performance was measured as before on a 100 GB RAW disk image on the host, and on a 100 GB ASIF image, both being encrypted using 256-bit AES.
Results
Measured read/write speeds were:
Native SSD, FileVault on – 6.57/7.66 GB/s
VM, FileVault off – 6.62/5.91 GB/s
VM, FileVault on – 4.66/3.11 GB/s
RAW disk image, 256-bit AES – 2.82/1.59 GB/s
ASIF disk image, 256-bit AES – 2.85/1.76 GB/s.
With FileVault disabled, performance in the VM was surprisingly close to that of the host’s internal SSD, with a small reduction in write speed from 7.66 to 5.91 GB/s. That’s a huge improvement on previous results, with writes being almost ten times faster.
Enabling FileVault did reduce performance significantly, particularly write speed which fell to about half. However, those are still good enough to be acceptable for most purposes.
No significant change was seen in host disk image performance from those measured in 26.3.1, though, which remains substantially slower than the VM with FileVault enabled.
Conclusions
VMs are vulnerable if they don’t have FileVault enabled. Without encryption, sensitive contents would be relatively easy to access if the VM were to fall into the hands of an attacker. Enabling FileVault is thus potentially more important for a VM.
Thankfully, with such great improvements in VM disk performance, those hosted on an Apple silicon Mac’s internal SSD are unlikely to be slowed much by their disk performance.
This makes it the more puzzling that encrypted RAW and ASIF disk images should perform so poorly, and it’s disappointing to see that continues in macOS 26.4. Over the same period that VM disk performance has increased so impressively, that of disk images has headed in the opposite direction.
VMs and BSIs
If you tried installing the recent Background Security Improvement (BSI) in a macOS 26.3.1 VM, you were probably disappointed. In this respect, the VM didn’t work as expected. I was unable to find the BSI in its section in Privacy & Security settings. What did help was downloading it using SilentKnight, although that can’t install BSIs successfully. Instead, I restarted the VM and Privacy & Security offered to install the BSI at last.
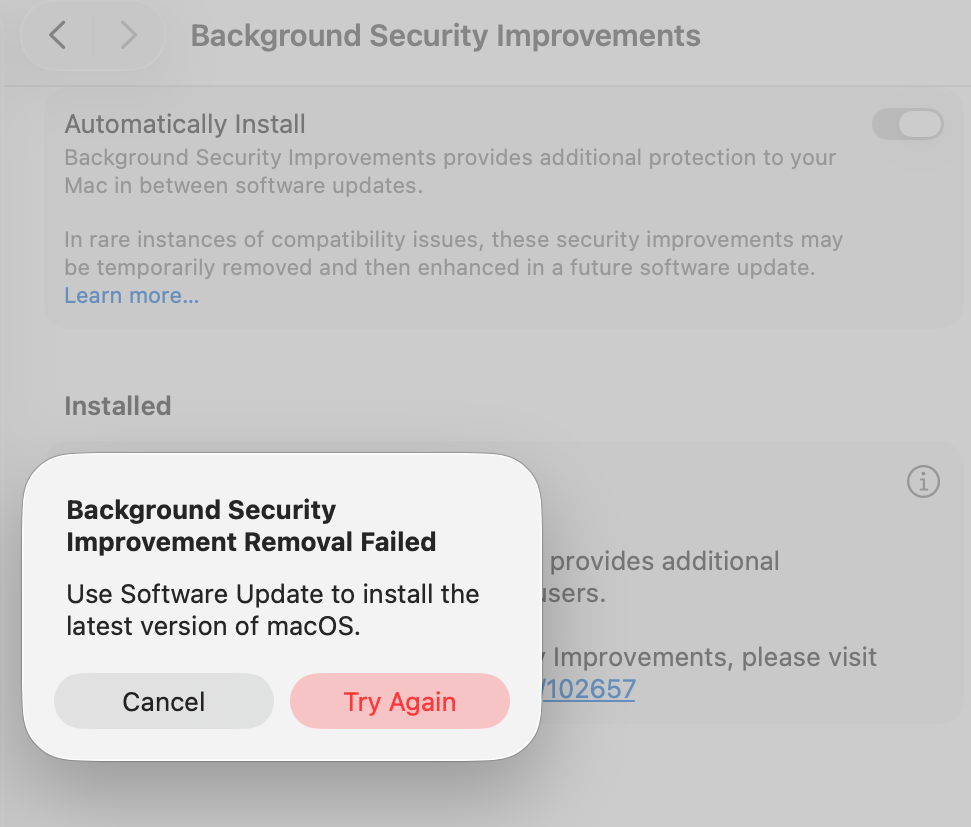
Once installed, Privacy & Security offered to remove the BSI, but failed to do so, with SecurityImprovementsExtension reporting: Rollback failed: Error Domain=SUOSUErrorDomain Code=103 "Unable to remove Background Security Improvement" UserInfo={NSLocalizedDescription=Unable to remove Background Security Improvement, NSLocalizedRecoverySuggestion=Use Software Update to install the latest version of macOS.}
For the time being BSIs appear dysfunctional in VMs.
The update to bring macOS Tahoe up to version 26.4 is hefty at around 7.15 GB (more than double that if you’re unlucky), and reflects a great deal of bug fixes and improvements in almost every subsystem. Apple provides three good sets of release notes:
General release notes include the addition of an option to use compact tabs in Safari, Freeform’s new Creator Studio enhancements, and a facility for Purchase Sharing in Family Sharing. Oh, and the requisite eight new emoji.
Security release notes list over 70 fixes, many of which are significant, but none are reported as being known to be exploited in the wild at present.
The new build number of 26.4 is 25E246. The Darwin Kernel version is 25.4.0, and XNU 12377.101.15~1.
Apple silicon firmware is updated to a completely different version numbering system, and is now reported as mBoot version 18000.101.7. If you’re running SilentKnight older than version 2.14 (71), then it’s likely that it will crash as a result of this change in firmware version. Please use version 2.14 from here.
Firmware in Intel Macs with T2 chips remains with the previous system, and is updated from 2094.80.5.0.0 (iBridge 23.16.13120.0.0,0) to 2103.100.6.0.0 (iBridge 23.16.14242.0.0,0).
Looking through the bundled apps and /System/Library, there are a great many increments in build numbers reflecting the extensive changes made. Here are a few of the more substantial changes found.
In bundled apps:
Books goes from version 8.1 to 8.4
Freeform, version 4.3 to 4.4
iPhone Mirroring, version 1.5 to 1.6
Music, version 1.6.3 to 1.6.4
Safari, version 26.3.1 (21623.2.7.111.2) in BSI (a) to 26.4 (21624.1.16.11.4)
TV, version 1.6.3 to 1.6.4
Audio MIDI Setup, version 3.7 to 3.8
Digital Color Meter, version 6.10 to 6.11
Screen Sharing, version 6.2 (758.1) to 6.1 (760.4), note the reduction in version number.
In /System/Library:
AGX kernel extensions all have build increments
AppleDiskImages2 kext has a build increment
AppleEmbeddedAudio kext and its plugin kexts have build increments
AppleIntel Graphics kexts have version increments
AppleStorageDrivers kext and its plugin kexts have build increments
APFS is updated from 2632.80.1 to 2811.101.1, suggesting a substantial change has been made
new private frameworks include ASMExclaveSupport, AccelerateOpt, AlwaysOnExclavesDaemon, AnteroAgent, AppRemoteAssets, AudioPasscodeDSP, BNNSOdieDelegate, CookingData, CoreTransparency, DynamicPrefetching, InAppFeedback, NanoPassKit, PartnerVisualSearch, a whole family of Unilog frameworks, and a group of iCloudWeb frameworks
mdimporters updated include those for Application, CoreMedia, Mail, Office, iWork but not RichText.
After seeing the new CookingData private framework, I looked out for RecipeKit, but was disappointed not to see it.
This is probably going to be the last such substantial update to macOS Tahoe, as much of Apple’s engineering effort is transferring to make macOS 27 ready for release as a beta at WWDC in early June.
Freeform joins Creator Studio, with advanced tools and a premium content library
Purchase Sharing in Family Sharing
and eight new emoji.
Security release notes for 26.4 list over 70 fixes, those for Sequoia 15.7.5 list about 56, and those for Sonoma 14.8.5 list about 50. None are reported as being known to be exploited in the wild at present.
Firmware in Apple silicon Macs is updated to a new mBoot firmware version numbering system, with the current version given as 18000.101.7. The macOS build number is 25E246, and Safari is version 26.4 (21624.1.16.11.4). Firmware in Intel Macs with T2 chips is updated from 2094.80.5.0.0 (iBridge 23.16.13120.0.0,0) to 2103.100.6.0.0 (iBridge 23.16.14242.0.0,0).
If you’re running SilentKnight older than version 2.14 (71), then it’s likely that it will crash as a result of the change in firmware version. Please use version 2.14 from here.
I’ll be posting an analysis of what has changed later today.
Updated 09:15 25 March 2026 with firmware details for Intel Macs.
One of the biggest penalties in using disk images has been their performance, particularly when they’re encrypted. Although no longer offered in Disk Utility, UDSP sparse images encrypted using 256-bit AES typically read and write as slow as 500/100 MB/s when mounted from an SSD delivering 4.7/4.9 GB/s. In contrast, UDSB sparse bundles can achieve close to that native speed.
macOS Sequoia brought a new type of disk image, Apple Sparse Image Format or ASIF, intended to deliver the high performance of sparse bundles, with their efficient use of storage space, in a single file that can be hosted on file systems beyond APFS. As this is now well over 18 months old, this article considers whether it has achieved those goals, and should become the preferred type of disk image.
Methods
Each test image was created using Disk Utility 22.7 (2510) in macOS 26.3.1 (a) running on a Mac mini M4 Pro, on its internal SSD of 2 TB. Performance measurements were made using the ‘gold standard’ method in my free Stibium on disk images of 100 GB nominal size. This writes and reads a total of 53 GB in 160 files ranging in size between 2 MB and 2 GB. As performance is likely to change with use of the disk image, the following sequence of events was used:
Create disk image, which is mounted automatically, so unmount.
Mount disk image, measure write speed, then unmount.
Mount disk image, measure read speed, then delete the last 8 of 10 sets of test files, and unmount.
Mount disk image, measure write speed, then unmount.
Mount disk image, measure read speed, then delete all test files, and unmount.
Mount disk image, measure write speed, then unmount.
Mount disk image, measure read speed, and unmount.
These provide three pairs of read/write measurements:
for an empty, unused 100 GB disk image;
for a 100 GB disk image containing over 10 GB of existing files in addition to 53 GB of test files;
for an empty 100 GB disk image that had previously contained about 66 GB of test files that had been deleted.
Disk image sizes were also measured when unmounted, using Precize or the Finder’s Get Info (for sparse bundles).
The three types of disk image tested were RAW (UDRW), UDSB (sparse bundle) and ASIF (sparse image). Each was tested fully when unencrypted, and test 1 was performed on an image encrypted using 256-bit AES.
Results
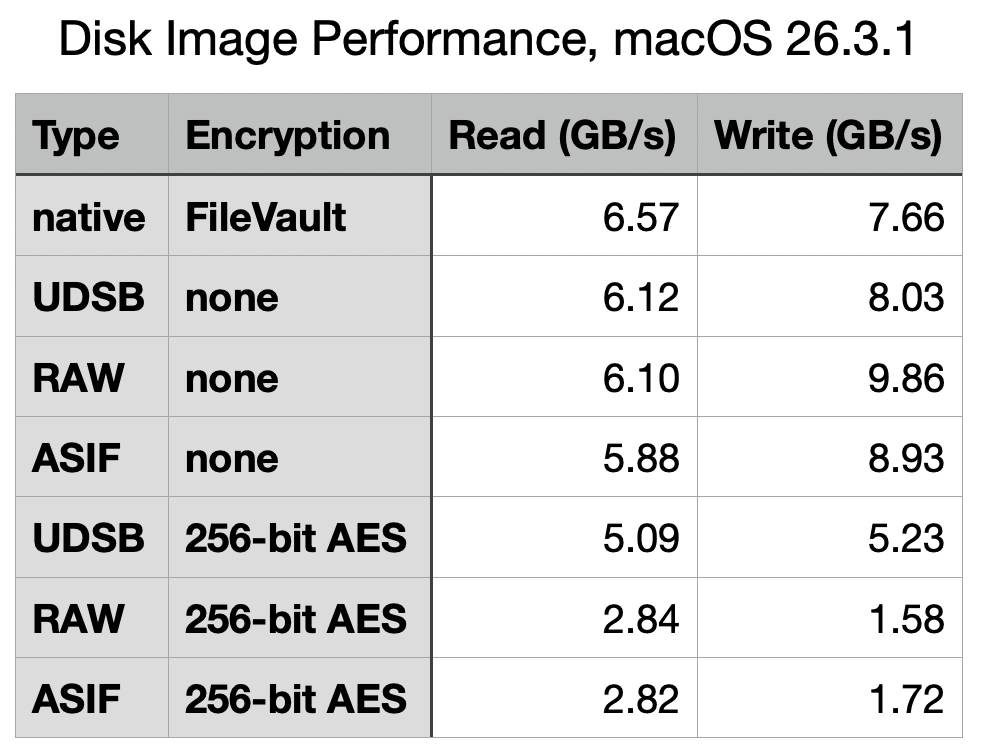
The best and most consistent performance was achieved by UDSB sparse bundles, as expected. Their read speeds were 6.13, 6.12 and 6.19 GB/s, and write 7.62, 8.03 and 7.79 GB/s for the three separate measurements, and 5.09/5.23 GB/s read/write when encrypted. When first created, the sparse bundle only occupied 32 MB on disk, but by the end had grown to 3.99 GB even though empty.
The RAW disk image, formerly known as UDRW, also largely performed as expected. Read speeds were 6.09, 6.10 and 6.08 GB/s, and write 10.11, 9.86 and 10.11 GB/s. Initially it only required 5.78 MB on disk, rising to 621 MB at the end. However, its performance when encrypted was disappointing, at 2.84/1.58 GB/s read/write.
ASIF disk images were good, but also ran into problems when encrypted. Unencrypted read speeds were 5.99, 5.88 and 5.85 GB/s, and write 9.55, 8.93 and 9.64 GB/s. When encrypted, those fell to 2.82/1.72 GB/s read/write, no better than the RAW disk image. The image file size started at 26.8 MB on disk when empty and unused, and returned to 954 MB when empty at the end.
To confirm that ASIF performance when encrypted wasn’t an anomaly, I repeated that pair of tests on a MacBook Pro M3 Pro running 26.3.1 (a), and obtained similar results at 2.63/1.52 GB/s read/write, using a 10 GB ASIF image with one-tenth of the tests, giving 3.32/1.65 GB/s, and using Blackmagic, which gave 2.92/1.15 GB/s read/write. Although there is variation, they appear remarkably similar.
Test 2 results are summarised in the table above, for ease of comparison, and with the earlier results from macOS 26.0 below.
What has gone wrong with encrypted writes?
Although most of the test results in macOS 26.3.1 are very similar to those from 26.0, performance when using 256-bit AES encryption has fallen for all three disk image types, and most significantly in write performance for RAW and ASIF images, which have reduced from 4.3 to 1.58 GB/s (RAW) and from 3.9 to 1.72 GB/s (ASIF). The magnitude of those reductions is sufficient to have obvious impact on their use. Compared to native write performance using FileVault of 7.66 GB/s, those two types of disk image are pedestrian in the extreme, turning that blisteringly fast SSD into the equivalent of 20 Gbps over USB 3.2 Gen 2×2.
It’s possible that this dramatic reduction in encryption performance may have resulted from a change to address a vulnerability, but I’ve been unable to identify an entry in Apple’s security release notes that might correspond to such an event. I will repeat these tests once the update to macOS 26.4 has been released, in the hope it might be reversed.
Which disk image type?
When their folder-based structure is acceptable, UDSB sparse images remain the disk image type of choice, for their consistent high performance even when encrypted.
There is little to choose between RAW and ASIF disk images when a single file solution is required. ASIF images are portable to other file systems that can’t support APFS native sparse files, although curiously they too are flagged in APFS as being sparse files. As their sparseness isn’t dependent on APFS trimming habits, they are now an alternative that can be used on network storage and NAS. However, those able to use sparse bundles should continue to do so, particularly if using encryption.
If there’s one thing I’ll remember macOS Tahoe for it’s brilliant engineering inside a shockingly flawed interface. Last week’s first Background Security Improvement was yet another example of that trend.
I had enthused about its predecessor the RSR three years ago, although it was sent to the naughty corner after an updated version of Safari told Facebook and other popular sites it wasn’t who they expected. After that trauma, most users shunned RSRs, and it seems engineers who dared mention them were strapped to the front of an F1 car and driven round until they recanted.
Thankfully, RSRs were only put on pause before being rebadged as Background Security Improvements or BSIs, an Orwellian turn of phrase that skilfully avoids the word update despite the fact that they’re still discovered, downloaded and installed by softwareupdated. Now I’ve had a chance to give a fair account of the first public BSI, I can consider what’s wrong with their current implementation.
Location
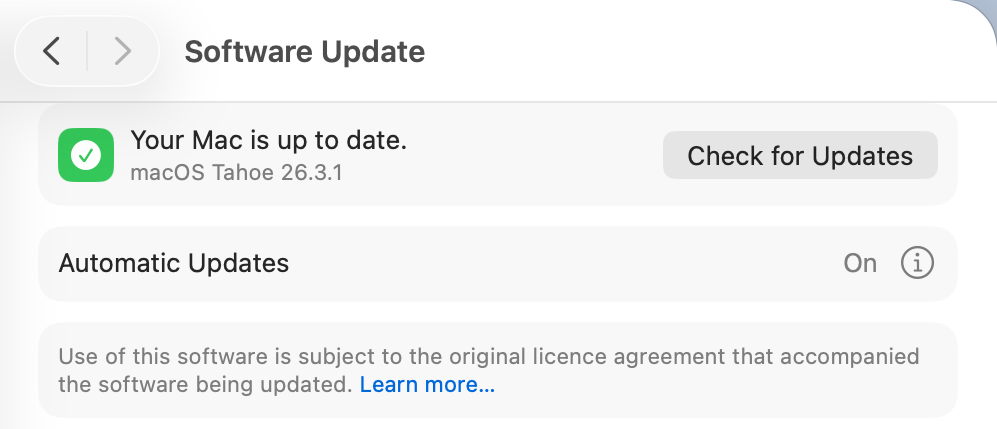
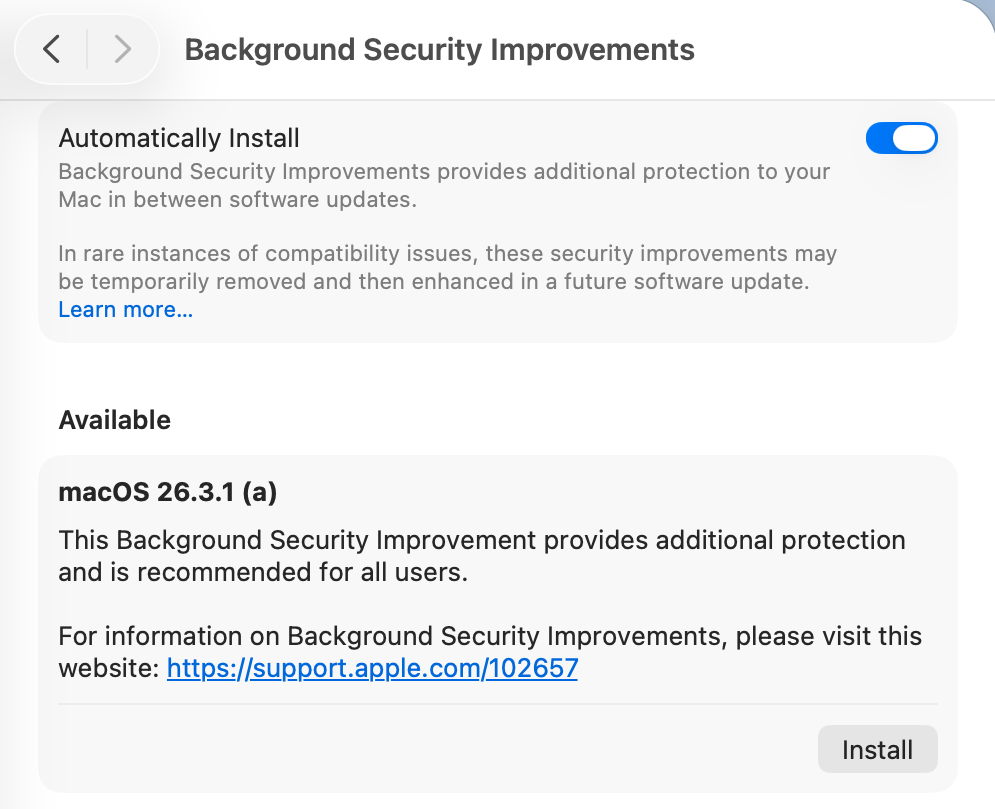
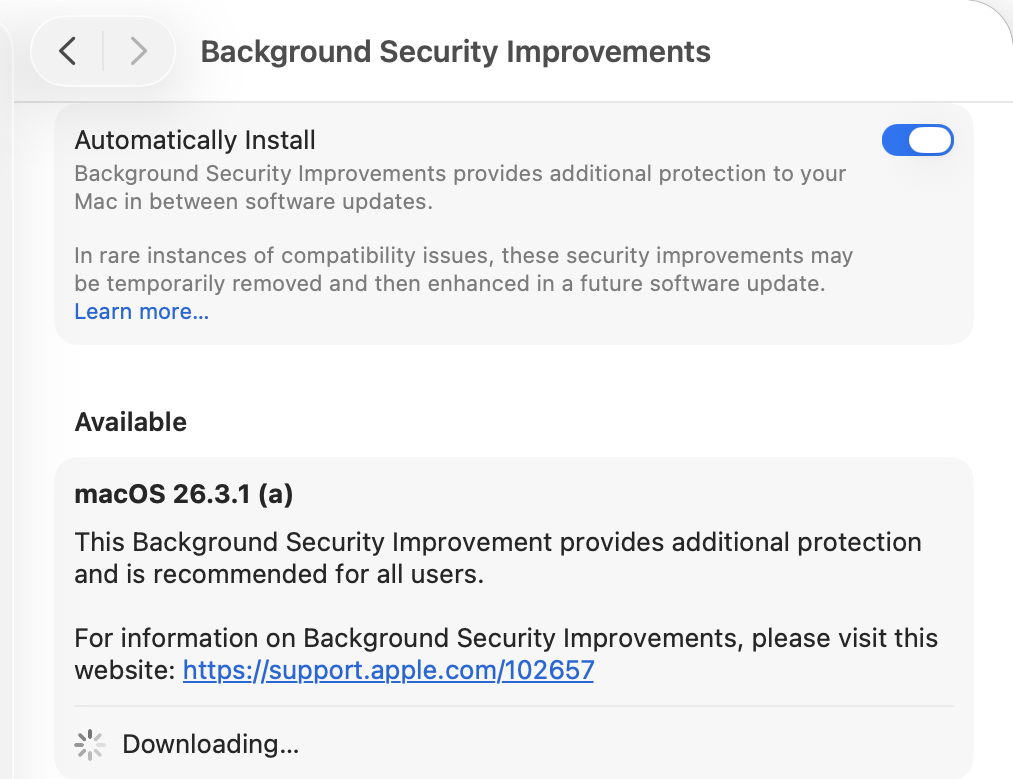
BSIs are controlled not in Software Update settings, but in their own section at the end of Privacy & Security. As such, they are the only macOS update there, and all others remain in Software Update where they belong. This misleads users, and Software Update reports that Your Mac is up to date when it isn’t, because there’s an outstanding BSI available.
Not only that, but users naturally assume that when Software Update settings have Install macOS updates disabled, no macOS updates will be installed automatically. Little do they realise they can still get a BSI without being asked.
BSIs are currently misplaced in System Settings, and their controls should be moved back to Software Update where RSRs were.
I fear the reasoning behind hiding BSIs among strangers in Privacy & Security was to ensure most Mac users would leave BSIs to be installed automatically. It’s no coincidence that, in addition to this hiding, the automatic installation of BSIs was enabled by default when upgrading to macOS Tahoe. This reeks of deliberate deception.
Control
There is a single on-off toggle provided, to Automatically Install BSIs. Apple explains that “if you choose to turn off this setting, your device will not receive these improvements until they’re included in a subsequent software update.” Thus the user is given a forced choice between macOS deciding when to install an available BSI, or not being notified about that BSI at all.
As with other macOS updates, the user must be given the option to be notified when a BSI is available, and to make their own choice whether and when to install it.
The alternative for users is to disable Automatically Install, watch for news of BSI releases, and, if they wish to receive one, to enable that setting, download and install the BSI, then disable the control again. For many Mac users, that appears to be the best option in the absence of better support.
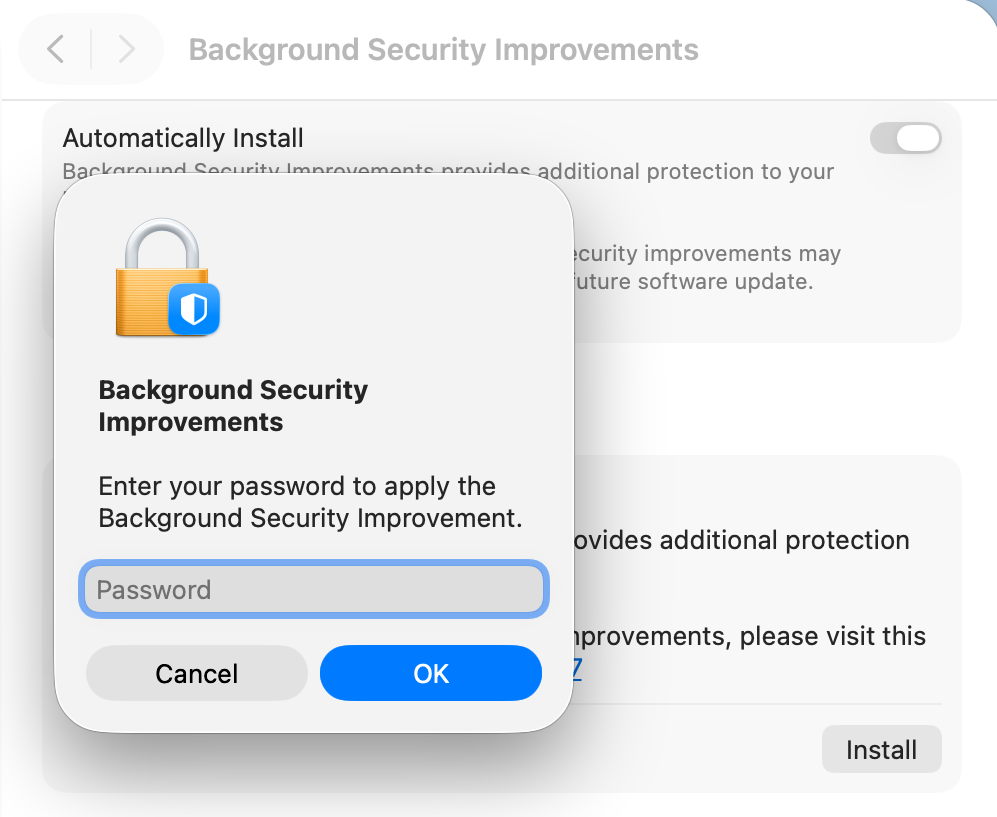
Although the control is titled Automatically Install, its behaviour is different. When a BSI is found to be available, macOS doesn’t automatically download and install it, but waits for the user to click on the Install button, then to authenticate.
However, if the user isn’t aware that BSI is available, or chooses to ignore it, automatic installation does appear to occur without the user being informed until the Mac is just about to restart, and no authentication seems necessary after all.
This behaviour is the greatest deterrent to users, as it effectively means that their Macs could restart unpredictably with almost no warning, resulting in data loss and disruption to their work. That’s completely unacceptable, and will ensure many will disable BSIs as a precaution to avoid the possibility of data loss. This aversion could be addressed simply by allowing the user full manual control over whether and when a BSI will be installed.
Progress
Despite softwareupdated monitoring progress through the download and preparation phases, the user is shown an indeterminate progress spinner, rather than a progress bar, which would at least give better warning of the restart that is coming. Although much briefer than a full macOS update, a progress bar should be displayed for the download and preparation phases of a BSI.
Restart warning
All previous RSRs, and this first BSI, have required restarts to complete the update. Yet at no time during this BSI was the user told that would be necessary. A notification was displayed a few seconds before the restart, but gave insufficient notice for the user to make any preparations.
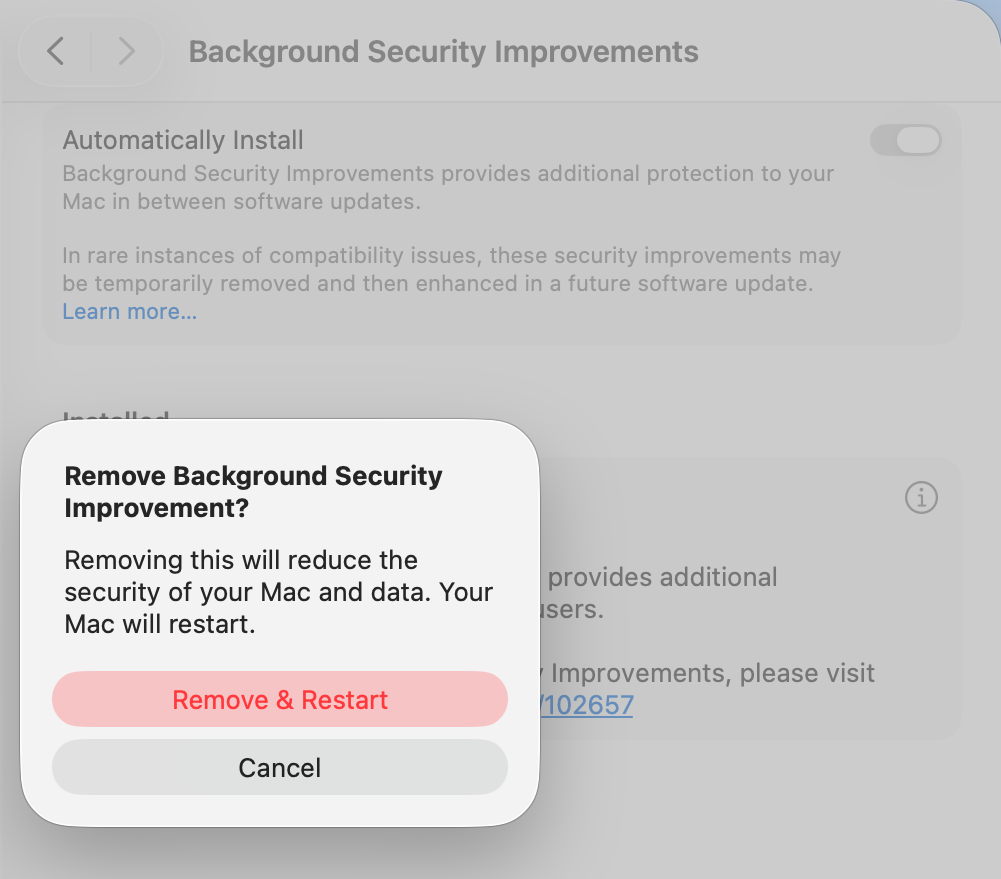
It’s essential that information given about the BSI states clearly if a restart will be necessary, and the user is given the same one-minute countdown provided in macOS updates. Bizarrely, the one place that a restart was mentioned is in the dialog to remove a BSI.
Information
Apple’s current support note on BSIs is woefully inadequate, as is obvious by the content of this article. What would appear to be additional information in the BSI settings, marked with the ⓘ Info button, isn’t informative at all, but provides the means to remove a BSI, which is at least an improvement on RSRs, which unaccountably hid removal in the About settings. A more appropriate button should be provided.
BSIs are also only currently covered in the US English version of Apple’s Platform Security Guide. All other localised versions, including British and Canadian English, still contain the outdated section on RSRs. Fortunately, as their content is almost identical, this is revealing rather than misleading.
Version numbering
Ignoring RSR and BSI version numbering, macOS has in recent years achieved clean and systematic version (and build) numbering, without the excesses of the past. By adopting a parenthesised letter as the identifier of a BSI, comparison is clumsy and prone to error. ProcessInfo.processInfo.operatingSystemVersion doesn’t contain a field for the BSI identifier, which is only offered as part of the full string in ProcessInfo.processInfo.operatingSystemVersionString. Version numbers like 26.3.1 (a) and build numbers of 25D771280a are irregular and unnecessary.
Recommendations
BSI controls should be removed from their hiding place in Privacy & Security and put alongside all other macOS updates in Software Update settings.
An option should be provided so that users are informed of the availability of BSIs without any obligation for them to be installed automatically.
Behaviour of the Automatically Install button should be described explicitly to the user. Does it automatically install, and if so, in what circumstances will the user not be so informed?
BSI download and preparation should be accompanied by a progress bar similar to that for a macOS update.
When a BSI requires a restart to complete its installation, the user must be informed of that before they consent to the BSI being downloaded.
When a BSI install is ready to restart the Mac, one minute’s warning notification should be given, just as in macOS updates.
The BSI support note should provide full details, not a sketchy outline.
The button to remove a BSI shouldn’t use the ⓘ Info symbol, but something more appropriate to its purpose.
Apple’s Platform Security Guide should be updated in all its online versions. Is it really that hard to translate from US English to British English?
Version and build numbering should be redesigned to be more consistent and better accessible in the API.
Despite having over three years to get them right, BSIs are a worse mess than RSRs were in Ventura. This is a great shame as their technology is still brilliant, but their current interface is shockingly flawed in so many respects.
Since the introduction of the Signed System Volume in Big Sur, the great majority of macOS has been strongly protected. So strongly that applying the smallest security patch has required the full might of a macOS update. There are times when something more lightweight enables Apple to promulgate urgent patches swiftly and efficiently, and that’s what a Background Security Improvement or BSI does.
This was set up when macOS Monterey introduced cryptexes to contain Safari, its WebKit supporting library, and the large dyld caches for general support in Frameworks. Cryptexes are cryptographically sealed disk images that aren’t mounted like other volumes, but are grafted into arbitrary locations in the file system. In Ventura they were used for Rapid Security Responses (RSR), in many ways indistinguishable from BSIs.
This week’s first BSI for macOS 26.3.1 is a good example: it fixes one serious vulnerability in WebKit. Rather than building that into a full update to 26.3.2, because it only requires changes in the cryptex containing Safari and WebKit, this BSI swaps out the existing App cryptex and replaces it with a patched one. For those who don’t want to install BSIs, those same vulnerabilities should be fixed in the next set of security updates to macOS.
Controls
Look in Software Update settings, and you’ll see no mention of any BSI, and that will claim your Mac is up to date, even though it’s not.
BSIs are controlled in their section listed close to the foot of Privacy & Security settings. If you want your Mac to be offered BSIs when they’re available, you must enable Automatically Install first. Despite those words, BSIs don’t appear to install in the least bit automatically, and you should be offered those available for the installed version of macOS. When you’ve chosen to download and install one and authenticated, you’ll see a progress spinner rather than a bar.
As soon as downloading and preparation are complete, you should be given a few seconds before your Mac restarts to complete the installation. This is all very brief, but once you’ve authenticated to start the process, it will run through to completion automatically.
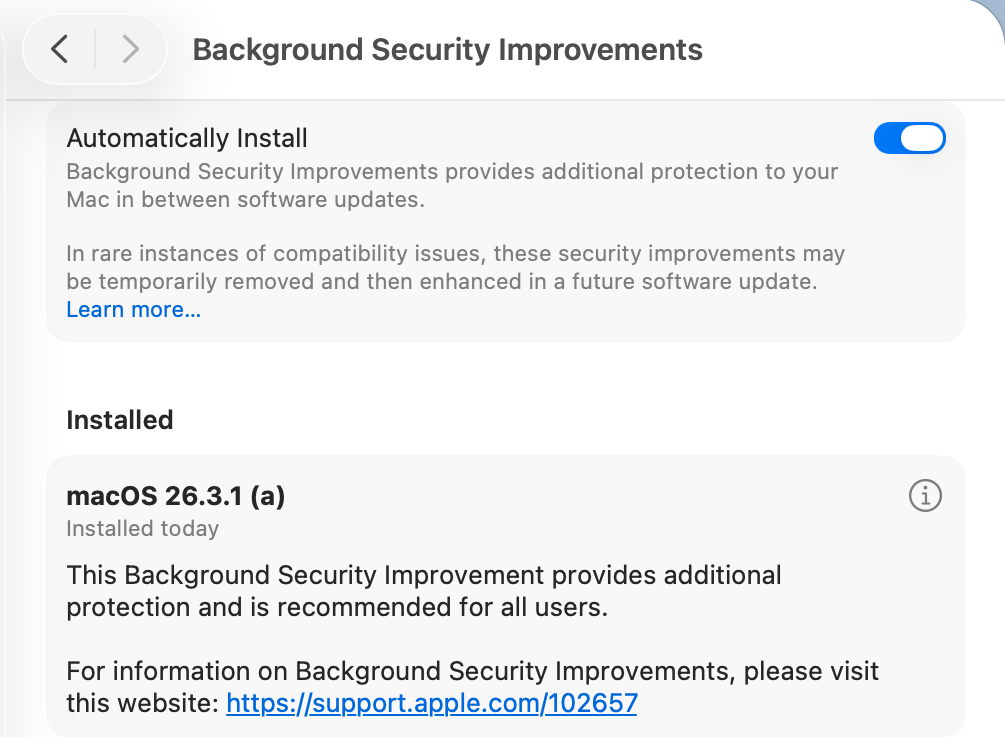
Once your Mac has restarted, you always retain the option to remove any BSI and return to an unpatched cryptex. To see that, click on the ⓘ Info button on the right.
If you decide you want to remove the BSI, your Mac will need to be restarted.
Problems
If you know a BSI is available but Privacy & Security settings appear unable to find it, something I’ve encountered in Virtual Machines, try running SilentKnight. Although BSIs aren’t controlled in Software Update, they do still use the same softwareupdate system used by SilentKnight. Normally you shouldn’t try to install BSIs using SilentKnight, as installation will fail. However, you can turn this to your advantage when a BSI is being elusive.
Once SilentKnight has downloaded and failed to install the BSI, you should be notified of that failure. Restart your Mac, give it a couple of minutes to settle once you’ve logged back in, and open the BSI section in Privacy & Security settings again. The downloaded BSI should now be available, and shouldn’t even need to be downloaded.
If you think a BSI has caused another problem, such as instability in Safari, use the ⓘ Info button to remove that BSI.
Installing a BSI does weird things to the macOS version and build numbers, and those can break scripts and possibly some apps. While ProcessInfo.processInfo.operatingSystemVersion doesn’t contain a field for the BSI letter, ProcessInfo.processInfo.operatingSystemVersionString does return a full version description including the BSI letter and extended build number. In Terminal, sw_vers -productVersion returns the regular version number without BSI, while sw_vers -productVersionExtra returns the BSI designation alone.
Currently, SilentKnight and Skint ignore BSIs, and won’t inform you if you could have one installed except by listing it as an available installation, nor will they check whether your Mac is up to date with the latest BSI. Experience from RSRs in Ventura shows that trying to track lightweight updates like RSRs or BSIs is only going to annoy those who don’t want to install them, and as they can change in a short period, they are hard to track reliably. SilentKnight does report the full version and build number, and SystHist lists details of all BSIs that Mac has installed.
Limitations
Like the RSRs of Ventura, BSIs can only work for a limited range of patches. If a vulnerability needs a fix outside Safari, WebKit, and the dyld caches, then it will require a full macOS update to fix it. BSIs are only ever likely to be provided for the current version of the latest major version of macOS.
From its first account of RSRs, Apple has claimed that some RSRs and BSIs shouldn’t require a restart to apply their patches. However, every RSR and BSI to date has had to be completed by restarting that Mac, which is mildly disruptive and not as lightweight as we’d like.
If you disable Automatically Install in the BSI section of Privacy & Security settings, then your Mac won’t be informed about or have access to any BSIs.
Under the hood
Despite their control being part of Privacy & Security settings, BSIs are managed like all other macOS and related updates by softwareupdated. What is most remarkable about them is their speed of download, preparation and installation compared with macOS updates. From detection of a new BSI to logging back into the restarted Mac can take little more than five minutes.
Apple’s in-house term for BSIs is the same as it used for RSRs, Splat. You’ll also come across Semi-splat, which should be a transient state in which the Splat Restore Version is different from the Cryptex1 Restore Version. That’s normally rectified after the reboot.
softwareupdated checks specifically for BSIs by scanning the update server catalogue for Splat updates. In this case, for an App cryptex, the download size is given as 214 MB. There’s a brief preflight phase, followed by its download. Although no progress indicator is shown in Privacy & Security settings, softwareupdated does record progress, but using similar figures for a full macOS update. Under those, preparing the update is set at 60% progress.
Applying the update takes around 2.5 seconds, at which stage softwareupdated reports that Semi-splat is active because of unequal restore versions, and rollback objects are checked.
Once the Mac has restarted, property list paths are checked for six different Splat versions, enabling the restore versions to be rectified and Semi-splat is no longer active. A brief purge of update assets is performed, and softwareupdated checks once again for any available updates.
Is a BSI just an RSR in disguise?
Apart from the move of its control from Software Update to Privacy & Security settings, there appear to be few if any differences between them. This is even reflected in version numbering. Installing the first RSR for macOS 13.3.1 brought it to version 13.3.1 (a), with a build number of 22E772610a. This first BSI for macOS 26.3.1 brings it to version 26.3.1 (a), with a build number of 25D771280a.
Most telling, though, are the accounts of RSRs and BSIs given in Apple’s Platform Security Guide, which are almost word-for-word identical apart from their names. It seems most likely that a BSI is a rebranded RSR in a bid to move on from the loss of confidence in RSRs following unfortunate errors nearly three years ago.
Key points
If you’re running the current version of the latest major version of macOS, BSIs provide lightweight fixes for some vulnerabilities, including those in Safari and WebKit.
Enable them in Privacy & Security settings, in their section at the foot. If they aren’t enabled there, you won’t be offered them at all.
Control their installation in that section. Once you’ve agreed to install one and have authenticated, your Mac is likely to restart automatically soon after the BSI has been downloaded.
Remove and revert a troublesome BSI using the ⓘ Info button there.
Although the US English version of Apple’s Platform Security Guide has replaced its section on RSRs with an almost identical account of BSIs, most other localised versions of that guide still contain the old RSR version.
Apple silicon Macs are about to undergo change to the numbering of their firmware versions. Accounts from beta-testing of the next minor update to macOS 26 Tahoe, version 26.4, indicate that future firmware will no longer be numbered as iBoot 13822.101.6, but as mBoot 18000.101.6 instead. This has major consequences for my free utility SilentKnight, which checks and reports the version of firmware installed. Version 2.14 should address that change in readiness for the release of the 26.4 update, and is particularly recommended for use on Apple silicon Macs.
This change was first reported in macOS 26.4 beta 2, and has apparently been sustained in the two subsequent beta releases, confirming that it’s an intended change, and not a bug.
There are currently two places in System Information that report a Mac’s firmware version, either the main Hardware section (also accessible in system_profiler SPHardwareDataType), or the Controller item within that section (or system_profiler SPiBridgeDataType).
Intel Macs without a T2 chip don’t report anything for their Controller, but those with T2 or Apple silicon chips reveal that they have a T2 or give an iBoot firmware version there. All three types of Mac also give a System Firmware Version in the Hardware overview.
This can get more confusing if you update or install macOS to an external disk. That will normally update the Mac’s firmware if the version of macOS installed on the external disk comes with more recent firmware. For example, if your Apple silicon Mac is currently running macOS Tahoe 26.3.1, it should have an iBoot firmware version of 13822.81.10. If you were to install Tahoe 26.4 to an external disk, as that has a more recent version of iBoot firmware, that should update the version installed in your Mac, and that remains so even when you start it up from its internal SSD.
As far as I can tell at present, this can result in internally inconsistent reporting. When running 26.3.1 from its internal SSD, that Mac will report its old iBoot version in the Controller section, but its new mBoot version in the Hardware section. Although that could change by 26.4 release, it might remain in all older versions, so providing lasting confusion.
As Apple hasn’t documented this change, I don’t know whether this will apply to all Apple silicon Macs updated to macOS 26.4, or to those updated to the matching versions of Sequoia or Sonoma. Therefore this new version of SilentKnight doesn’t attempt to check these new mBoot versions, and merely reports those found as well as it can. Once I know more, I will endeavour to interpret the results.
SilentKnight version 2.14 for macOS 11.5 and later is now available from here: silentknight214
from Downloads above, from its Product Page, and via its auto-update mechanism.
Please let me know how you get on with these new firmware version numbers.
Note: version 2.14 now fixes a bug that failed to recognise T2 Macs correctly in certain localisations including German. Thanks to Jan for reporting this so promptly.

 Login
Login