Normal view

There are new articles available, click to refresh the page.
Today — 17 December 2025Main stream

大众 ID.Polo 暂无入华计划,起售超 20 万元,没勇气面对国产车?

By: 李华
17 December 2025 at 08:07

当市场还在讨论各种三排大六座的时候,有两辆不太一样的小车突然出现在我们跟前——

大众 ID.Polo 和 smart #2。

放到十年前,这两个名字绝对是车圈的头条。但在 2025 年的当下,大家对小车的关注度似乎只剩下了一个指标:够不够便宜。在当下,尺寸成了衡量价值的绝对标尺,小车要么是用来占号的工具,要么就是单纯的通勤代步,鲜少有人再把它们和「品质」或者「向往」联系在一起。

▲大众 ID.Polo

▲smart #2

但这两款即将问世的新车,值得我们停下来聊一聊。这倒不是因为它们的参数有多惊人,而是大众和 smart 这两家老厂牌,在面对中国这个全球竞争最激烈的电动车市场时,做出了截然相反的选择。

大众选择让曾经的平民神车 Polo 体面地留在欧洲,而 smart 决定把那台注定会被市场冷落的 #2 带到中国。一进一退,这是两种完全不同的生存逻辑。
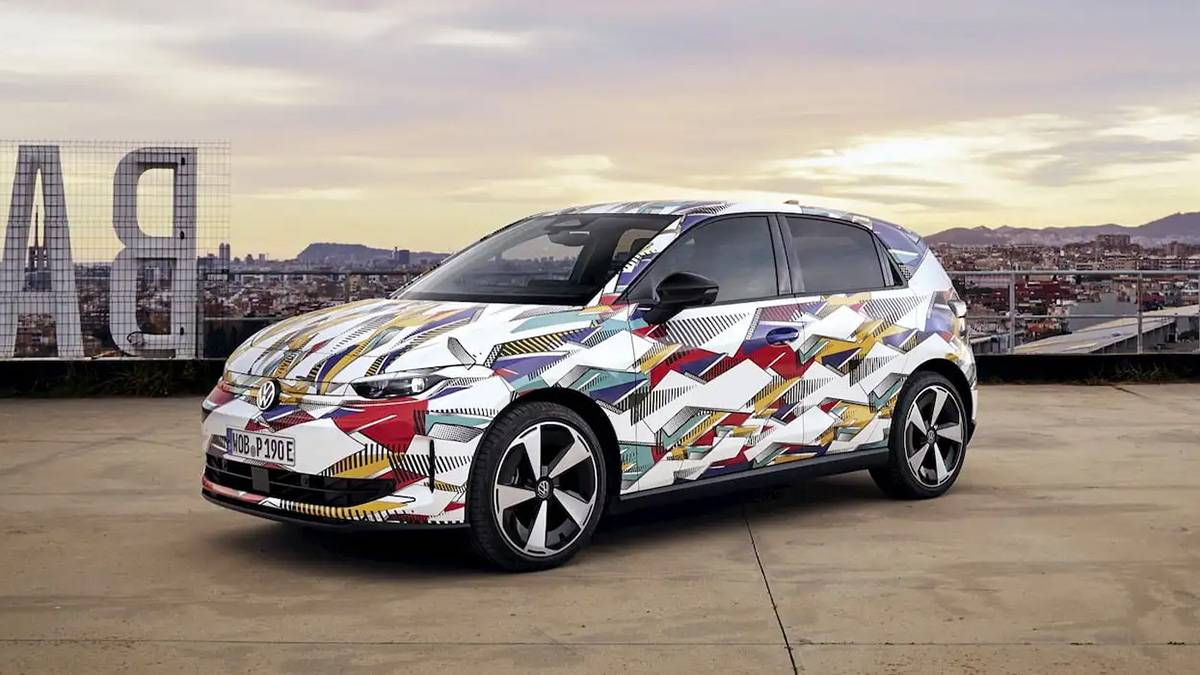
ID.Polo 的体面和大众的算盘

最新的报道证实,大众不再执着于用 ID.2 这样冰冷的代号来教育用户,而是直接把那台计划在 2026 年量产的新车命名为 ID.Polo。

这是一个非常聪明的决定。对于大众来说,Polo 这个名字本身就意味着某种无需解释的信赖感。而且从目前披露的信息来看,这台车的产品力并不弱。基于升级后的 MEB+ 平台打造,车身尺寸维持在 4 米左右,但内部空间利用率提升明显,甚至还会在后续推出拥有 226 马力的 GTI 版本。

▲ID.Polo GTI

如果在十年前,这绝对是一台能在中国市场引发抢购的爆款。然而,大众乘用车品牌 CEO 施文韬却公开表示:ID.Polo 暂时没有进入中国市场的计划。

他对此的解释颇为耐人寻味。施文韬认为中国市场的审美取向与欧洲截然不同,中国消费者更偏好那种前卫且富有张力的设计,言下之意是 ID.Polo 这种传承经典的造型在中国可能吃不开。

▲ID.Polo

这番话听起来非常得体,它把一款车无法引入的原因归结为「文化差异」这种感性的因素。但或许,这背后还有更真实的商业层面的考量——

ID.Polo 在欧洲的起售价定在了 2.5 万欧元,约合人民币 20.6 万元。

在中国当下的市场环境里,这是一个极其尴尬的数字。手握这笔预算的消费者,选择实在太多了。即便它国产后的价格降到 10 万元这个位置,吉利、比亚迪和五菱早就构筑了一道严密的防线。

大众非常清楚,ID.Polo 在欧洲或许能凭借品牌光环维持溢价,但在这个价格战打到白热化的中国市场,它引以为傲的机械素质和经典设计,很难在与国产车型的配置单对决中占到便宜。

与其把这款全球车型引进来然后被迫卷入无休止的价格战,不如索性将其留在欧洲。大众在中国选择了另一条路,那就是依靠「特供」,比如广州车展上的 ID. ERA、ID. AURA。大众现在的思路就是用中国本土的供应链和技术,去造符合中国成本结构的电动车。

▲ 广州车展里的 ID. ERA,采用增程动力

ID.Polo 不错,但它属于欧洲,不属于卷到极致的中国。

比销量更重要的,是品牌

与大众的战略性撤退不同,smart 做了一个看似有些头铁的决定。那台主要由奔驰负责设计、吉利负责生产的 smart #2 已经开始了测试,并且明确会保留双座布局,成为经典车型 ForTwo 的继任者。更重要的是,这台车会进入中国市场。

▲smart #2

很多人可能会觉得 smart #2 在国内的前景并不乐观。毕竟在国内的微型车市场,五菱宏光 MINIEV 和吉利星愿早就把价格门槛拉到了地板上,而作为一台挂着 smart 标的所谓「精品小车」,#2 的定价注定不会便宜。在一个讲究量大管饱的市场里卖这样的一台两座车,听起来就是一笔赔本买卖。

但吉利和奔驰显然算过这笔账。

smart 现在的处境其实挺微妙,不管是已经上市的 #1、#3,还是体型庞大的 #5,以及即将到来的轿车车型 #6,这些车承担的任务是走量,是赚钱,但也让这个品牌变得越来越重,越来越像是一台普通的吉利。

▲刚上工信部公告的 smart #6

而 smart #2 的存在并不是为了刷销量数据,它是这个品牌的锚点。它负责告诉大家,即便为了生存不得不造大车,smart 依旧可以是那个能在城市缝隙里穿梭的精灵。没有 #2 带来的品牌光环,#5 和 #6 就很难讲好故事。

ID.Polo 和 Smart #2 看似南辕北辙,却殊途同归地把国内小车市场的尴尬摊开在了台面上:

在这个市场里,极致好用的代步工具比比皆是,唯独少了那些真正有态度的作品。

回顾这两年的国产小车,吉利星愿也好,比亚迪海鸥也罢,销量确实非常惊人。但这更多是供应链成熟带来的红利。车企把以前不属于这个价位的配置塞进了车里,把彩电、大沙发下放了,让乘坐体验变得更好了。但这并没有改变它们作为「工具车」的属性。

这让我想起了一个很有意思的现象:现在的外卖行业开始卷工服设计了,越来越注重剪裁和品牌表达。

京东和淘宝闪购骑手服的大火,在以往是难以想象的,外卖行业刚兴起,大家关注的是能不能准时吃到饭,只有当「吃饱」不再是问题,行业才开始有余力去关注形象和文化。

国内小车市场也是一样,现在的热销车型,本质上是更好的「雨衣」,而不是表达个性的时装。

两厢车其实是最考验车企态度的品类。在局促的尺寸里,既要保证基本的实用性,又要做出独特的驾驶质感和内外饰巧思,这比造一台堆料的大 SUV 难得多。历史上真正能被记住的小车,无一例外都是有鲜明性格的。

大众因为觉得拼不过「性价比」而带走了 ID.Polo,smart 为了「保住调性」而带回了 #2。留给自主品牌的问题是,当我们把供应链卷到极致之后,谁能率先迈出那一步,去造一台真正属于中国市场的精品小车?

目前看来,蔚来的萤火虫和零跑的 Lafa5 或许值得期待。特别是如果它们能跳出单纯的配置竞赛,去在这类车型最稀缺的「个性」和「设计」上下功夫,那才算是真正接住了这波消费升级的浪潮。

等到消费者意识到小车也可以是一种审美表达时,只有那些提前准备好的品牌,才能接得住这泼天的富贵。

中国车市的一道附加题

比起大热的三排大六座,两厢车市场或许是更得我们观察的行业切片。

大众 ID.Polo 的缺席固然让人觉得有些遗憾,它带走了一种经历了数十年打磨的欧洲造车哲学。但换个角度看,这恰恰给中国车企留出了一块不错的试验田。

很长一段时间里,我们在小车这个领域都在做填空题,什么配置缺了就补什么,哪里空间小了就拉大哪里。这种解题思路在早期非常有效,它迅速填补了市场的空白,让每个人都买得起车。但当所有的空都被填满,当所有的车都变成了性价比极高的六边形战士,市场就会因为过度同质化而变得乏味。

我们期待蔚来的萤火虫,期待零跑的 Lafa5,或者其他还没露面的国产新车,能换一种解题思路。我们希望看到中国车企不再仅仅把小车当作拉低门槛的工具,而是真的把它们当作一个独立的、值得尊重的品类去打磨。

一个成熟的汽车社会,不应该只有一种声音。街道上不应该只有为了生存而奔波的实用工具,也应该有为了悦己而存在的精致玩具。当有一天,我们愿意为了设计、为了驾驶乐趣、为了那一点点与众不同的态度,去为一辆国产小车买单,而不是仅仅因为它可以省下几块钱油费时,中国汽车工业才算真正完成了从大到强的最后一块拼图。

如果大众 ID.Polo 真的不来,那我们希望在 2026 年的街头,能看到足以替代甚至超越它的中国面孔。这不仅是市场的胜利,也是审美的胜利。

带轮子的都关注,欢迎交流。 邮箱:tanjiewen@ifanr.com

#欢迎关注爱范儿官方微信公众号:爱范儿(微信号:ifanr),更多精彩内容第一时间为您奉上。

爱范儿 | 原文链接 · 查看评论 · 新浪微博


Before yesterdayMain stream

实测 GPT-5.2 :价格暴涨能力微涨,凭什么反击 Gemini

By: 张子豪
12 December 2025 at 14:03

要吊打 Gemini 的 GPT 5.2 在今天凌晨正式发布了,向所有用户推出。

上个月刚刚退订掉 ChatGPT Plus,转到 Gemini,这次需要因为 GPT-5.2 再回去吗?

看完下面这些网友真实的体验分享,还有 APPSO 的上手实测,或许能有个答案。

▲这次终于没把表给画错了

GPT 5.2 这次其实是更新了 3 个模型,GPT-5.2 Instant、Thinking、以及 Pro 模型。如果你习惯了 Gemini 3.0 Pro 里,每次问答都会经过思考;那么上手 GPT-5.2 Thinking/Pro 时,你会发现 ChatGPT 思考速度的变慢了,比以往所花的时间要更长。

这也是目前大多数获得提前体验的用户,在社交媒体上分享的心得。即 GPT-5.2 对比 5.1 在各个方面都有了提升,且 GPT-5.2 Pro 非常适合去做一些专业推理工作,需要长时间来完成的任务,但是,就等待结果的过程变得更漫长。

例如有用户分享,输入提示词「帮我绘制一张 HLE 测试成绩的图表」,GPT-5.2 Pro 硬是花了 24 分钟才得出这张表。

▲图片来源:https://x.com/emollick/status/1999185755617300796/photo/1

但好在所有的信息都是准确的,即便图表上最好的结果,显示的还是 Gemini 3.0 Pro。

这也得益于 GPT-5.2 的知识截止日期来到了 2025 年 8 月,要知道 GPT-5.1 的知识截止日期还是 2024 年 9 月,而上个月刚发布的 Gemini 3.0 截止在 2025.1。

当我们使用 GPT-5.2 Thinking,让它生成一张 OpenAI 的模型发布历史的图表,倒没有花太长的时间,信息也比较准确。如果是简单的任务,用 Thinking 模型所花的时间,和用 Pro 模型,差别会非常大。

▲提示词:generate a chart graph of OpenAI model release over time

凭借着「超高强度」的推理,以及最新的世界知识,结合图像的多模态理解和推理能力,GPT 5.2 很快也在大模型竞技场上飙升到第二名。GPT-5.2-High 在 WebDev(网页开发)项目中排名第二,GPT-5.2 排名第六。作为对比,Gemini 3.0 Pro 排名第三,第一仍然是 Claude。

LMArena 官方也给出了一段实测视频,他们使用 GPT-5.2 完成了一系列的 3D 建模工作,完成度非常高。但还是有网友在下面评论说,「现在是还在 2003 年吗?」

▲视频来源:https://x.com/arena/status/1999189215603753445

这种利用 three.js 实现的 3D 效果,非常需要模型的多模态理解和推理能力,以及在编程开发、程序设计上的优化;GPT-5.2 也很对得起这 0.1 的升级。

目前网友分享大量测试,基本上都集中在构建这些完整的 3D 引擎,GPT-5.2 表现的也都很不错。像是也有用 GPT-5.2 Thinking 的高难度推理模式,同样在单页文件里,构建了一个支持交互控制、还可以导出 4K 分辨率的 3D 雪天冰块王国模型。

▲ https://x.com/skirano/status/1999182295685644366

还有使用 GPT-5.2 Pro 实现的 3D 波涛汹涌哥特城市建筑。

▲提示词:create a visually interesting shader that can run in twigl-dot-app make it like an infinite city of neo-gothic towers partially drowned in a stormy ocean with large waves.|来源:https://x.com/emollick/status/1999185085719887978?s=20

关于 3D 理解和推理能力,我们也用了 Ian Goodfellow 上次在 Gemini 3.0 Pro 发布之后使用的提示词,即上传一张图片,然后告诉模型根据这张图片,生成一个漂亮的体素艺术 Three.js 单页程序场景。

▲ 由于 ChatGPT 没有在画布内为我生成,所以复制它在对话框生成的代码,在 HTML View 中打开,如右图所示。

这个差别还是挺明显,ChatGPT 虽然也读取到了上传图片的内容,一棵粉红色的书,一块绿地和灰色的下沉,还有白色的水流,但是它生成的 3D 动画,对比 Gemini 3.0 Pro 是有些简陋了。

我只能说,奥特曼发出这个「红色警报」,说明了 Gemini 的真材实料。

检验编程能力的测试,必然少不了经典的六边形小球物理运动。有博主加大了小球运动的难度,全部使用闪着光的红色 3D 小球。效果看着很酷炫,很多网友都在问这是如何做到的;但也有网友指出来,这些小球,好像并不受重力控制。

接着有网友回复说,这是在模拟太空。

▲视频来源:https://x.com/flavioAd/status/1999183432203567339

还有 SVG 代码测试,骑自行车的鹈鹕。

▲ 图片来源:https://arena.jit.dev/

也有网友分享自己用 GPT-5.2 做了一个森林火灾的模拟器,能够调节速度、片区大小、和火焰燃烧范围等等。

▲图片来源:https://x.com/1littlecoder/status/1999191170581434557?s=20

我们做了一个星球信号的网页,跟这个森林火情可视化的网页,布局是如出一辙,大概就是左边显示的内容,星星点点换成了太空星球。

▲提示词:Create an interactive HTML, CSS, and JavaScript simulation of a satellite system that transmits signals to ground receivers. The simulation should show a satellite orbiting the Earth and periodically sending signals that are received by multiple

我们也用之前 Gemini 3 做的拍立得,来考验一下 GPT-5.2。输入同样的提示词,要它开发一个复古拍立得风格的网页相机应用。

▲提示词:开发一个具有复古拟物风格的单页相机应用。页面背景请设计为软木板或深色木纹材质,左下角固定一个纯 CSS 或 SVG 绘制的拟物化拍立得相机模型,其镜头区域实时显示用户摄像头画面;交互逻辑上,当用户点击快门按钮时,播放快门音效,并让一张带有白色边框的相纸从相机顶部缓慢吐出;请利用 CSS 滤镜让滑出的照片初始状态为高模糊且黑白,在 5 秒内平滑过渡到清晰全彩状态;最后,所有显影完成的照片必须支持自由拖拽,允许用户将其随意摆放在页面任意位置,且照片要有随机的微小旋转角度和阴影,点击某张照片时应将其置顶,从而形成一个逼真的自由照片拼贴墙。

有点意外,一次成型,ChatGPT 也能做拍立得了。

之前我们测试 Gemini 3.0 Pro 时,它最强大的能力一方面是编程,另一方面是不需要我们输入太多的提示词,只是把一个截屏或视频丢给它,告诉它要复刻,Gemini 就能做到。

这次我们同样丢给它一个视频,要求它复刻这个古诗词生成的网页。

▲ https://chatgpt.com/canvas/shared/693b6d1b8fa881919c6298a4aed05581

对比之前 GPT-5.1 完全不知道我上传视频的配色方案,这次它算是学到了。不过,由于 Gemini 生成的网页可以直接添加 AI 功能,通过使用 Gemini 的 API 实现。但是 ChatGPT 还没有把 AI 引入这些生成的网页,所以这里的诗歌,同样只能是已经写好的那几首。

除了经典的编程能力测试,和单纯地做一个单页的 HTML 文件,也有网友用它来编写 Python 代码。

网友输入的提示词是「write a python code that visualizes how a traffic light works in a one way street with cars entering at random rate.」(编写一个 Python 代码,模拟单行道交通灯的工作原理,并可视化随机速率进入的车辆)。

他同时测试了 GPT 5.2 Extended Thinking 和 Claude Opus 4.5,结果显而易见。只能说,经常有读者问我们最好的编程模型是哪个,Claude 能被这么多开发者青睐,并不是没有原因。

▲ 下边是 GPT-5.2,来源:https://x.com/diegocabezas01/status/1999228052379754508

而且,之前 Claude 模型最大的缺点,可能就是贵,Claude Opus 4.5 输入每百万 Token 是 5 美元,输出是 25 美元。现在 GPT-5.2 的价格也跟上来了,对比 GPT-5.1 ,整体基本上贵了 40%,GPT-5.2 Pro 的输入是 21 美元,输出是 168 美元。

在官方的发布博客里面,OpenAI 提到 GPT-5.2 在图像的能力也有了提升。

GPT-5.2 Thinking 是我们迄今为止最强大的视觉模型,在图表推理和软件界面理解方面的错误率降低了大约一半。

并且它给出了一个例子,是给一块看起来很模糊的主板,用 AI 加上一些带有方框的标记;对比 GPT-5.1,GPT-5.2 虽然也会犯错,但是标记了更多的地方。

可是 Nano Banana Pro 呢,有网友用 Nano Banana Pro 去掉了图片上的标注信息,然后重新要求它打上新的目标定位方框,你觉得哪个好。

▲从左到右依次为 GPT-5.1、GPT-5.2、Nano Banana Pro|图片来源:https://x.com/bcaine/status/1999212747213656072

我的感受是,ChatGPT 为什么要在别人擅长的领域上「自取其辱」,Nano Banana 做这些关于图片的工作,现在完全可以说就是断层第一,即便 GPT-5.2 标注的信息更多了,但很多检测框定位都不准确。

编程、图像对比前代 GPT-5.1 有了大幅提升,如果你一直以来都是 ChatGPT 的用户,应该能直接感受升级后带来的差别。但如果和其他模型对比,编程和图像,体验下来,仍然是没有像 Nano Banana 推出时一样,做到遥遥领先。

在关于审美的网页设计上,也有网友分享了他用 GPT-5.2 做的一些前端网页,大家可以看看这次,前端程序员是不是又要被拉出来「杀」一遍。

▲图片来源:https://x.com/secondfret/status/1999235822034547011

和之前烂大街的渐变紫,GPT-5.2 的设计水平确实上来了,但就像博主自己说的一样,GPT-5.2 好像特别喜欢在屏幕上画方框,到处都是层层叠叠的网格。

关于设计能力,也有一个专门的榜单,GPT-5.2 突飞猛进,从之前排在十名开外的 GPT-5.1,一跃来到了第三名,不过得分最高的还是 Gemini 3.0 Pro。

▲ 图片来源:https://www.designarena.ai/leaderboard

我们也给 GPT-5.2 一些要求做出「高大上」的网页,给一家 AI 公司做首页。结果是,GPT-5.2 很喜欢用方框是真的;还有渐变紫怎么又给我碰上了。

▲提示词:You are the top 0.1% designer and developer for the world’s cutting-edge innovation on front-end design and development. You are tasked to create a full landing page with {Dither + Shaders} using {WebGL + ThreeJs} in the styling of an uploaded image for the AI company. – Focus mainly on the design part, not the development. Import all necessary files and libraries: Three.js、WebGL、GSAP、Any other animation libraries related to 3D development.

最后关于写作,根据一些获得超前体验的用户反馈,GPT-5.2 开始有能力,完成一些长篇幅小说的创作。

例如,当 ChatGPT 被要求生成 50 个情节创意时,它会全部完成,而不是像其他模型那样只生成一部分。而被要求写一本 200 页的书时,ChatGPT 也没有直接说做不到,而是真的尝试了,不仅构建了整本书的结构,甚至还生成了 PDF 文件。

网友说,尽管书页本身比较薄弱,篇幅也短……毕竟它目前不可能,一口气写出一本可以出版的小说,但能开始真的去做,给 50 个创意,写 200 页书,说明它有足够的思维深度。

GPT-5.2 最引人注目的地方在于它能够很好地遵循指令……不是基本的按照我说的做,而是真正完成我描述的整个任务。

现在 GPT-5.2 应该已经逐步推送到所有用户了,你的上手实测体验怎么样。

GPT-5.2 的升级,不足以让我从 Gemini 转过来。虽然看着又是刷新了很多榜单,无论是自己发布的榜单,公开的测试,都拿到了不错的成绩。但是具体的上手,在生成 3D 程序那部分,代码报错是常有的事,而整体的审美风格也没能有大的突破,还这么贵。

▲ 网友锐评

Gemini 那边也没有停下来,继续给奥特曼压力。今天凌晨,虽然没有发布新模型,但重新设计了 Gemini Deep Research,并且可以通过 API 来访问它,未来还将 Gemini、Google 搜索、NotebookLM 中升级。

全新的 Gemini 深度研究 Agent 在人类最后的考试(HLE),用 46.4% 击败了刚刚发布的 GPT-5.2 Thinking(45.5%),并且在 Google 自己推出的 DeepSearchQA 测试,和 BrowseComp 测试中取得了不错的结果。

奥特曼的红色警报,大概是还得再亮一阵子了。

#欢迎关注爱范儿官方微信公众号:爱范儿(微信号:ifanr),更多精彩内容第一时间为您奉上。

爱范儿 | 原文链接 · 查看评论 · 新浪微博


Nano Banana终于不是文盲了,但我可能会变「傻」

By: Selina
24 November 2025 at 14:29

过去一个周末 Gemini 3 Pro Image 的能力被反复「折磨」,花样越来越多——噢,你问这是什么,它的另一个名字是 Nano Banana 2。这么跟个恶搞一样的名字,居然被保留下来了。

Nano Banana2 各方面能力超群,甚至是「友商」Sam Altman 也要点头的程度。

▲ 图片来自:The Information

夸夸只是夸夸,Nano Banana 第二阶段,其实标志着 AI 图像生成领域的一个重要转折点:从基于概率的「以此类推」,转向了基于理解的「逻辑构建」。更承载着一个特殊的意义:AI 不再只是冲着你的眼睛去,还冲着你的智商去。

大语言模型不再「文盲」

一直以来 AI 生图都有个绕不过去的问题:才华横溢,信手拈来,但有时候就跟喝高了一样控制不住,这从 Midjourney 时期就开始了,往后走逐渐好转,不过始终存在。

其中最大的 bug 之一就是文字。这导致在很长一段时间里,鉴别一张图是否由 AI 生成,最简单的办法就是看图里的字。

这是基于扩散模型(Diffusion Model)的先天缺陷:它将文字视为一种纹理,而非符号。

Nano Banana 2 最直观的突破,就在于它「识字」了。即所谓的 Text Rendering 文字渲染。

我的随手测试「生成一张复古电影海报,标题是《香蕉的复仇》,副标题用红色衬线体写 2025 年上映。」

如果是在以前尝试这个指令,大概率会得到一张极具艺术感的图「BANANA REVENGE」的某种变体尚且能保持清晰和正常,但小字往往经不住看了,甚至有时候主标题都会拼写成「BANNANA」。但在 Nano Banana 2 里,这些字符被准确、清晰、且符合排版美学地「写」在了画面上。

So what?这仅仅是省去加字的时间吗?

对普通用户来说可能是,而且还是一种「表情包自由」。你终于可以生成一张精准吐槽老板的图,配上精准的文案,不用再单独拉一个文本框。

而对于商业世界,这意味着 AI 图像生成从「素材(Material)」阶段,正式跨入了「成品」(Deliverable)阶段。

▲ 图片来自 X 用户@chumsdock

当 AI 能够准确地处理符号信息,它能交付的成果就更多样也更实用,包括但不限于电商海报、PPT 配图、甚至是数据图表。以前设计师用 AI 只能生成背景底图,关键信息还得自己贴。现在,AI 可以直接生成原型图,乃至带有数据标注的饼状图,或者一张文字完美贴合透视关系的广告。

这是商业交付的「最后一公里」,也是生图模型在信息传递层面的巨大进步。

从「猜概率」到「懂物理」

字渲染的成功是 Nano Banana 2 底层技术跃迁的一个极具代表性的缩影,更深层的变化在于:这只「香蕉」,长了脑子

也就是我们所说的基于「推理」的图像生成。

大模型本质上是一个概率统计机器。当你要求画一只「坐在玻璃桌上的猫」时,模型通过学习数亿张图片,在生成时,它只是重现像素的统计规律。

Nano Banana 2 的不同之处在于,它引入了 Gemini 3 语言模型的推理能力。在生成图像之前,它似乎先在「大脑」里构建了一个物理模型。它知道「猫」下面通常会有模糊的影子,以及玻璃板上、下的物品有不同的光线关系。

在我的另一个随手测试中,当要求它生成「一个复杂的化学实验室,桌子上放着装有蓝色液体的烧杯,背景是黑板上的分子式」时,它表现出了惊人的逻辑性:

烧杯里的液体会有正确的弯液面;玻璃器皿对光线的折射符合物理直觉;最重要的是,背景黑板上的分子式不再是乱画的线条,而是看上去像模像样化学结构的式子(虽然还是有瑕疵)。

当画笔有了「大脑」,交互方式变了

之所以如此强调文字生成这个本领,是因为 Text Rendering 是外在表现,反映的是 Reasoning 作为内在引擎。合在一起, Nano Banana 2 带给用户的最终体验,就是一块「会思考的画布」(The Thinking Canvas)。

Google 将这个模型深度整合进了它的生态系统,不仅仅是生成图片,更是「修改」现实,下一步,就是走进更严肃的领域:信息图、教案、讲解素材,等等等等。

整体上,图像生成往往用户给 20% 的指令,剩下 80% 靠 AI 脑补——以前是靠概率脑补(随机填色)。现在则是靠因果脑补,不仅画出了「结果」,还隐含了「过程」,这能够让画面的叙事性和感染力指数级上升。

它不再只是为了取悦你的眼睛,它开始试图取悦你的智商。像上面这种结构图,虽然吧不敢说 100% 符合机械工程标准,但钉是钉,铆是铆。「逻辑上的正确」,是它推理能力的直接体现。

然而任何事情都是一体两面的,当换一个角度看,这就可能意味着创造力的同质化

当 AI 能够完美地生成「符合商业标准」的图表、海报和插画时,它实际上是在拉平审美的平均线。所有的海报都排版正确、光影完美,但可能也因此失去了曾经设计中那些因为「不完美」而诞生的神来之笔。

▲ 图片来自X用户@dotey

更深层的问题在于真相的消逝。当上面所说的那种逻辑正确、信息「干货」多的内容,可以被批量生产,取悦智商从未如此容易,也从未如此轻飘飘。如果它决定了我从图片信息到文字信息的所有摄入,那……会是怎样的景象?

还有 Deepfake 这个老大难问题,已经是老生常谈了。虽然这次 Google 加上了 SynthID(一种人眼不可见的数字水印)来标记 AI 内容,但在视觉冲击力面前,技术的防伪标签往往是苍白的。制造「真实」变得如此廉价和便捷,我们对「眼见为实」的信仰将被彻底重构。

至于它叫「Nano Banana」还是「Gemini 3 Pro」,其实已经不重要了。重要的是,从这一刻起,我们在屏幕上看到的每一个像素,每一行文字,都可能不再来自人类的手指,而是来自机器的思考。

这既令人兴奋,又让人在某些时刻,感到脊背发凉。

#欢迎关注爱范儿官方微信公众号:爱范儿(微信号:ifanr),更多精彩内容第一时间为您奉上。

爱范儿 | 原文链接 · 查看评论 · 新浪微博


Gemini 3一句话打造拍立得应用刷屏!全网最火8个玩法都在这,看完秒上手

By: 张子豪
20 November 2025 at 17:51

都在说 Gemini 3 这次炸翻天,年度最强,未来模型,除了拿下榜单第一,Gemini 3 到底能做点什么。

体验了一波之后,我发现最大的好处,是不需要到处去问,「你这个的提示词是什么?」

看到好玩的案例,无论是视频还是截图,统统丢给 Gemini 3,加一句「帮我做一个一模一样的出来」,Gemini 3 立刻就能复刻一个同款。提示词的时代,真的慢慢过去了。

就像这个在 X 很火的拍立得相机,它是用 Gemini 3.0 Pro 生成的一个项目,能调用设备的摄像头,然后生成一张拍立得风格的照片,在相纸上印有文案和拍摄日期。

▲ 体验地址:https://www.bubbbly.com/app/retro-camera.html|图片来源:X@ann_nnng

这种能直接和现实生活交互的效果,确实打破了之前 AI 一味的,只知道做一个单页应用的乏味。

当我们把这个视频直接发给 Gemini 3.0 Pro,它竟然也可以很快,就生成一个同款。并且在 Canvas 里面,还支持添加 Gemini 功能,因此我们这个拍立得,还有了 AI 识别摄像头画面,主动生成文案和选择滤镜的功能。

▲我输入的提示词只有让它增加多几种胶片模拟的风格。直接点击右下角的 Gemini,它会自动寻找,可以使用 Gemini 来完成的内容。

还有网友用 Gemini 3 直接做了一个诗歌探索器,让它每天提供一首诗,鼠标悬停时会解释每一行,并提供一些建议问题来进一步探索诗歌。

▲图片来源:X@raizamrtn

我特别喜欢这个简洁大方的设计,同样地,把这个录屏丢给 Gemini,当看到生成的效果时,我觉得 Gemini 3.0 Pro 太酷了。

▲提示词:上传已有视频,并加上「这是一个诗歌探索器,它每天提供一首诗,鼠标悬停时会解释每一行,并提供一些建议问题来进一步探索主题。然后我需要你根据这个视频,参考它的交互逻辑,UI 设计等等,帮我复刻一个同款诗词探索器,不过我要的是中国的古诗文、诗词歌赋。」

打开代码页,你还会惊喜地发现,Gemini 不仅搞定了前端 UI,甚至连调用 API 的系统提示词(System Prompt)都帮我们写好了。

你是一位博学的中国古文学家和美学鉴赏家。你的任务是为用户推荐一首中国古诗词(范围包括唐诗、宋词、元曲、诗经、楚辞、汉乐府等)。请不仅限于最著名的《静夜思》之类,多推荐一些意境深远、耐人寻味的佳作。

在这个过程中我们还可以同步让它进行修改,Gemini Canvas 有一个强大的功能,除了提到的「Add Gemini Feature(添加 Gemini 功能)」,还有一个是「Select and Ask(选择并提问)」,我们可以直接框选预览页面的某个组件元素,然后提问,Gemini 会自动修复这一部分。

这里我们让它添加一个分享生成照片的功能,以及修复之前点击我的收藏没有反应的问题。

▲使用的生图模型是 Imagen 3/4

这已经不是单纯的单页 HTML 文件,它需要 Gemini API 来同步完成诗歌的选择推荐,以及图片内容的生成。我相信这是目前无论哪个 AI 编程工具、或者 ChatGPT,都无法实现的强大功能。

Gemini 3 能创造的东西真的太多了,优雅的前端完全不必多说,这样的诗歌探索网页,色彩的搭配使用,元素的布局,放在哪里都是一流的设计。后端的能力,Gemini 不需要构建繁琐、有限的诗歌数据库,而是直接利用 AI 来获取不同的诗词。

而且,在对话里,我没有提到要求响应式设计,即手机、平板、和 PC 多种显示比例的同步,Gemini 3 还是帮我做到了,我们也可以在手机里直接看古诗文,同样调用 Gemini API。

▲ 手机上同样能点开网页,AI 发现新的诗歌,和生成图片

我们把同样的视频和提示词交给 ChatGPT,严重怀疑 ChatGPT 5.1 根本就没有看视频,而是完全依靠我输入的提示词来完成。无论是整体 UI 的风格,还有提示词里没有提到要写作者简介,ChatGPT 生成的内容就没有作者简介。

更大的问题,这不是一个能直接使用的产品,它生成的数据库里只有《静夜思》和《登鹳雀楼》两首诗,它也没有办法使用 OpenAI API 来完成诗歌的搜索获取。

当我提到「这个诗不应该是放在数据库里的,而是应该用 ChatGPT 自动搜索,不然我每次打开都是那几首诗诶」,整个项目就报错了,因为它需要我填入真实的 API

总而言之,如果用 ChatGPT,一个好的提示词还是少不了。

网上更火的 Gemini 3.0 Pro 测试,是有一个博主,在 Gemini 里面输入一句「Design a Capcut(设计一个剪映)」,然后只花了 239 秒,就复刻了一个能真实使用的剪映。完全不需要我们再打磨提示词,去详细列出应该做哪些功能,交互逻辑是如何,配色方案等;直接一句话搞定。

▲图片来源:X@lepadphone

还有相当一大部分的案例,是网友们都在谈的前端,即 Gemini 3.0 Pro 生成的网页,不仅摆脱了 AI 编程之前常见的渐变紫,还带来了耳目一新的大胆设计,就像是有个设计师在后台帮用户画初稿一样。

▲诸如此类「前端已死」的说法,在 Gemini 3.0 发布之后,X 上随处可见。

下面这些是网上热度比较高,由 Gemini 3.0 Pro 生成的前端页面例子。

一家人工智能公司的完整落地页。

▲提示词:You are the top 0.1% designer and developer for the world’s cutting-edge innovation on front-end design and development. You are tasked to create a full landing page with {Dither + Shaders} using {WebGL + ThreeJs} in the styling of an uploaded image for the AI company. – Focus mainly on the design part, not the development. Import all necessary files and libraries: Three.js、WebGL、GSAP、Any other animation libraries related to 3D development.|图片来源:X@natatatataat

下一代 AI 公司该有的美学追求和品味。

▲ 图片来源:X@eter_inquirer

一个双栏的响应式布局个人首页。

▲提示词:Create a hero section with a two-column responsive layout: left side has a large bold heading with orange accent highlights and star symbols, a tagline row with uppercase tags, and two CTA buttons (primary black, secondary white with border). Right side features a 3D animated orange star using React Three Fiber with slow rotation and float animations, orbit controls, and a subtle background glow. Include a top navigation bar with logo, menu items, and a “Let’s talk” button. Use Tailwind CSS for styling with a light gray background, generous spacing, and smooth hover transitions.|图片来源:X@karaan_dev

这些案例有的分享了提示词,当我们把这些提示词,通过 ChatGPT、Kimi、MiniMax 这些模型来处理时,得到的效果,都还是停留在我们的想象之中。

也有很多网友,趁着大家都在夸 Gemini 3 的前端,把一些自己设计的网页,包含复杂的动画效果和字体设计,也营销称是 Gemini 3 完成的,获得了一波流量之后,再去评论区留言说「没有提示词,这是我们团队手工做的。」

Gemini 3 + 前端,这一波热度谁都想蹭。在这些 Gemini 3.0 Pro 生成的前端精美、设计高级、交互友好的网页里面,大部分都用到了 3D 的效果,即使用 Three.js 库来完成网页设计。

深度学习经典花书的作者,Ian Goodfellow 在 Gemini 3.0 Pro 发布后,也是直接上传一张图片,生成一个 3D 的体素艺术场景,通过 Three.js 来测试它的多模态推理能力。

▲ 提示词:我提供了一张图片。请根据这张图片编写一个漂亮的体素艺术场景。使用 Three.js 编写单页应用程序。体验地址:https://aistudio.google.com/apps/bundled/image_to_voxel

他提到与 Gemini 2.5 的结果相比,Gemini 3 强大的多模态理解,和 3D 推理能力,大幅提升了生成内容的保真度

得益于内容保真度的提高,很多 3D 项目,现在都可以通过 Gemini 3.0 Pro 来完成。像这个完全交互式的 3D 地球仪,我们可以探索和收听,来自世界各地的广播电台。

▲图片来源:X@sahilypatel

眼尖的网友立刻就发现了,这不就是经典的 Radio.Garden 吗?作者也坦言确实在提示词中,提到了这个网站,要求复刻。但让我们惊讶的是,Gemini 3.0 Pro 只靠简单的几句指令,就完美重现了这个复杂的 3D 交互体验。

还有一些经典的 3D 单页项目,例如这个酷炫的 3D 魔方。

▲提示词:make me a spinning rubiks cube in threejs with a dark background. add exquisite amounts of realism and detail.|图片来源:X@aryanvichare10

以及各种需要 3D 图形和动画引擎的小游戏。

▲图片来源:X@TomLikesRobots

现在再看到这些有意思的项目,也不需要愁找不到提示词了,拿起手机录个屏,或者截几张图片,丢给 Gemini,要求它复刻,成功的几率大大提升。

毫不夸张地说,Gemini 3.0 Pro 展现出的能力,已经把其他模型彻底甩开了一个身位。

做程序员,它懂代码;做设计师,它审美时刻在线;做产品经理,它逻辑缜密。从 2D 到 3D,从模仿到创造,现在的 Gemini 3.0 Pro,已经不再需要我们用复杂、冗长的提示词,去引导它理解了,而是通过强大的多模态理解和推理能力,读懂并实现我们的需求。

这种「所见所想就能有所得」的震撼,确实配得上「年度最强」这个称号。

更让人按耐不住的是,据说今晚 nano banana 2、Gemini 3.0 Flash 也要来了。

#欢迎关注爱范儿官方微信公众号:爱范儿(微信号:ifanr),更多精彩内容第一时间为您奉上。

爱范儿 | 原文链接 · 查看评论 · 新浪微博


Sora 想做的 IP 内容生态,这个国产 AI 已经先走了一步

By: 张子豪
19 November 2025 at 17:33

今年不少出圈的 AI 视频,基本都有一个共同点:套了个熟悉的 IP 壳

宫崎骏风格的短片、宝可梦版的日常场景、AI 重制的海贼王和龙珠——只要 IP 够经典,AI 生成的内容就能从「电子垃圾」秒变「同人创作」,评论区瞬间炸开。

Sora 2发布后,Sam Altman 还专门发推说,这些视频应该被理解成「互动式同人小说」。这话说得挺聪明,既规避了版权的坑,也点出了 AI 视频的真实处境。

AI 视频和 IP的结合,现在正卡在一个很微妙的位置:用户想玩,品牌怕乱

这个矛盾不解决,AI+IP 就永远只能是小打小闹。

最近几个月,海螺 AI 和蜜雪冰城、青春有你 3 成员、以及一些原创 IP 的合作,给出了一些不一样的思路。

这些合作有一些共同的底层逻辑:授权是明确的,创作是可控的,用户玩得也确实开心

AI 公司在这里不只是生成工具,它还在同时管授权、引导创作、连接用户和品牌。

用户也不再只是看 IP,而是能进到 IP 里面去玩。这件事如果做成了,IP 的价值可能会被重新定义。

雪王大战东方明珠,我也可以做一个

如果要评一个最愿意把 IP 放到网上乱跑的品牌,蜜雪冰城大概永远不会掉队。前段时间在 B 站霸榜的雪王大战东方明珠,以及一连串雪王防御战、四大门派围攻东方明珠……都是网友随手一玩就能冲上热门的那种内容。

▲ 视频来自百变雪王大赛,创作者@小龙问路

对大多数品牌来说,蜜雪冰城算是最能读懂互联网的那一类。它很知道,雪王这个角色的生命力,不靠广告,不靠代言,靠的就是用户玩出来的那堆梗。而蜜雪冰城 × 海螺 AI 的「百变雪王杯」视频大赛,恰好踩中了这种互联网的创作方式。

海螺没有拍一条雪王广告给你看,而是用 AI 直接把雪王 IP 的「玩法」开放了。你想让雪王去旅游?行。想让它进剧情?也行。想把它变成下一个段子的主角?随便。

换句话说,雪王从一个被展示的角色,变成了一个可以被接着玩的入口

▲ 活动目前在获奖公示阶段,但雪王相关的创作,相关模板可以继续使用

以前买一个雪王手办,我们得到的是所有权。它被放在桌上、玻璃柜里,价值是静止的。现在用海螺的 AI 模板做一个雪王短片,我们获得的变成了参与权。在很多年轻用户的消费账单里,这种能被自己动手改写的体验,往往比实物本身更上头。

而为了让这件事成立,海螺和蜜雪冰城之间的授权方式其实相当克制,给到的是形象图,允许在模版中生成并创作,但整个创作行为都保持在一个清晰、可控的框架里。

例如,在官方发布的联合 PV 里,海螺用自己的 Hailuo02 视频生成模型、首尾帧技术,让雪王形象在任何生成内容中都保持一致性,动作自然、表情真实。

▲ 正值全运会,让雪王来个 109B,向前翻腾四周半屈体,用户可以选择海螺最新的 Hailuo 2.3 视频生成模型;图为海螺 Media Agent 生成页面,支持无限画布

这让品牌放心开放,也让我们放心玩耍。

而海螺 AI 推出的雪王视频模板,本质上是一整套雪王创作工具包。用户每点一次、改一个姿势,都在创造属于自己的数字周边。它的价值,也从普通的视频「被观看」,变成了比买十个雪王手办更能让人上头的「被使用」。

▲ 在海螺 Q版童趣页面,可以直接体验百变雪王模板,体验链接:https://hailuoai.com/generate/ai-agent/436634640615985161

此外还有百变雪王杯创意大赛的线下门店宣传、PV 联合官宣、官方回顾展示……每个环节都在告诉用户,这份创作不是我们的自嗨,是同样值得被留下来的纪念

在这种机制下,IP 不再躺在博物馆里等待被仰望,它像一盒乐高,等待被用户重新拼搭出新的可能性。

过去几年,品牌追求的是调性统一。AI 时代,现在要学会的是容忍一千种民间版本。用户玩出来的梗,有时候比官方物料更有生命力

海螺在这里的角色,就是让这「一千种民间版本」保持在一个健康、合法、可持续的范围里。不侵权、不撞车、不乱、不让用户背锅

在如今的 AIGC 环境里,这四件事都极其稀缺。

追星的终极形态,是被偶像看见

但让用户参与只是第一步。参与要真正变成创作力,需要一个关键动作:用户的作品能被官方看见、被认可、被用起来。

在 11 月初举行的「天天爱白日梦」限定演出,就是海螺 AI 在娱乐领域以及 AI + IP 合作上,一次更激进的实验。

来自综艺青春有你 3 天天组的五位成员,第一次对粉丝的 AI 视频现场 Reaction,全场都炸了。

▲ 来自综艺《青春有你3》的天天组,DayDay 兄弟团,陈俊宇、刘琦、时尚、魏宏宇、杨昊铭,在海螺天天爱白日梦活动现场

如果说雪王杯是让用户的作品进入了公共舞台,那么和艺人的合作,则把用户的 AI 创作第一次推向了商业级的线下场景

以前的追星规则很简单,买票,看人,灯光越好,舞台越大,你离偶像越远。但现在的粉丝,渴望的是另一种关系,不只要看见偶像,更想被偶像看见

这场合作就抓住了这一代粉丝,最细微也最强烈的心愿。粉丝在家用海螺做的 AI 视频,各种离谱剧情、集体跳「明月几时有」的整活、还有「骑牛」的玩梗,最后都被投上了演唱会的大屏,艺人抬头看到自己的二创,观众在下面尖叫。

更让人意外的是,他们还模仿了一遍粉丝视频里的动作和装扮,在台上真人复刻了一遍 AI。那种作品被继续、被回应的瞬间,普通工具给不了,也是传统演出永远给不了的回馈机制。

▲ 粉丝玩了好几年的刘琦「骑牛」梗,通过海螺 AI 生成了视频,投放到大屏,还被正主模仿

而 AI 也成了活动的主角,整个活动现场的视觉全部由 AI 生成,包括活动主视觉、开场视频、每首歌的现场大屏画面,都是通过海螺 AI 生成。艺人方授权形象、声音与 BGM,海螺做一套独家的视频模板。粉丝们则在海螺上,用这些元素创作短视频,就像是和偶像合拍了一支 MV。

就像活动现场那些让人笑出声的整活视频一样,海螺 AI 没打算做太多的限制。不设置所谓的「高级感」门槛,也不限制风格;在这个舞台上,用户的脑洞才是唯一的规则。

▲ 海螺 AI 上艺人全网独家 AI 模板,用户可使用艺人形象和声音,在活动期限内生成 AI 视频,目前活动已结束

这场合作里,AI 已经不是单纯工具的角色。粉丝做视频,艺人能看到;艺人有反应,粉丝能感受到。这条线,以前是断的,现在接上了。

品牌、AI、艺人、粉丝,构成了一个四边形的情感闭环。追星不再是单向的,也不再是遥远的。

当技术超出工具的范畴,开始重塑人和人之间的关系时,粉丝经济的玩法,可能真的要变一变了。

下一个 AI 视频主理人

当用户的表达能力、参与能力被系统性打开之后,下一件自然发生的事情就是:有人开始原创

这类创作者,我们在各个平台都能看到一点影子,他们不满足于做梗图、玩段子,更想把故事讲完整。

而海螺的作用,也从提供参与工具,变成了提供原创孵化的土壤。听上去有点夸张,但这些事确实已经发生了,国风系列短片、短剧《白咒》,就是最典型的两个例子。

▲ 海螺近期的人生电影活动,鼓励用户用 AI 创作自己的电影大片

先说国风系列,国风某种程度上,本身就是一个热门 IP,但能合适的用好国风这个概念并不容易。海螺 AI 视频在这系列有《花木兰》、《聊斋志异:燕赤霞》、以及《聊斋燕赤霞Ⅱ:猫将军》多部短片作品。

其中花木兰,获得北京电影学院动画学院奖评委会特别奖、聊斋燕赤霞也拿到了腾讯视频首届「AI 短片创作大赛」二等奖。

这套作品摆脱了传统的玩梗二创,努力在影像表达上做到一些真正的新原创设计。创作者在海螺 AI 的能力基础上,把构图、灯光、叙述节奏、镜头语言都重新组织了一遍,做出了具有统一审美、统一叙事风格的成片。

▲获奖作品《花木兰》,由海螺 AI 生成,来自光影几何(海螺超创@猫大人爱睡大觉),视频链接

再看短剧《白咒》,这部短片是今年上半年 4 月份发布的,使用的模型还是 Hailuo 1.0 系列,但仍然在社交媒体上引起了大量讨论。AI 视频早期常见的问题,在这个六集短片《白咒》里都有,但创作者的表达欲和风格探索,却在这些限制中显得更突出。

对于这类创作者来说,工具并不是全部。他们需要从能生成,到能发布,能进入更大舞台。海螺在这条链路上,做的是把创作者遇到的阻力降低,从生成工具,到赛事合作,再到寻找商业落地机会。

▲海螺 AI 短剧《白咒》已经在优酷上线

十月份最新发布的 Hailuo 2.3,在肢体动作、风格化、微表情等部分已有明显提升。大模型竞技场文生视频榜单,以及 artificial analysis 的统计,MiniMax 的 Hailuo 02 和 Hailuo 2.3 都保持在国产 Top 3 的行列。

首尾帧、智能分镜、角色一致性……这些原本属于电影工业的能力,现在落在个人创作者手里。当专业创作的门槛被技术拉平,个人作品和商业内容之间的界线,也开始变得模糊。

在这些 IP 合作案例里,海螺不只是帮用户表达一个想法,更像是在帮他们把想法变成作品,把作品变成可以被看见、被记住的东西。

一个创作者,在这里能经历的,是从参与→共创→被认可→原创孵化→作品产品化,这条在 AI 时代才可能走通的路径。

以前 IP 是被品牌方创造出来的,现在可能是被用户玩出来的。海螺在做的,就是把这条路铺得更平一点。

过去十年的内容生态像一座剧场。创作者在台上,观众坐在台下,彼此的距离由生产和消费的分工维持。几乎所有商业模型、平台规则、作品标准,都建立在这条界线上。

但 AI 正在悄悄拆掉这堵墙。

从雪王,到明星演出,再到原创孵化,海螺AI的这些合作案例证明了一件越来越清晰的事:AI 带来的最大机会,不只在于效率,而在于把消费者关系重写一遍。

年轻人要的,不是拥有某样东西,而是进入某件事里。

品牌向用户敞开参与的大门,用户的创造力就能变成品牌资产的一部分。创作者被技术托住,他们的作品就能变成新一代的文化原点。IP 与 AI 的合作不再是冒险,而是在共同完成一场更大的叙事。

这条路能不能走通,现在下结论还早,但至少有像海螺 AI 这些产品开始在试了。

当「参与」本身开始变得比「拥有」更值钱时,整个内容产业的游戏规则,可能真的要变了。

#欢迎关注爱范儿官方微信公众号:爱范儿(微信号:ifanr),更多精彩内容第一时间为您奉上。

爱范儿 | 原文链接 · 查看评论 · 新浪微博


Erase All Content and Settings does what it says

By: hoakley
12 November 2025 at 15:30

Erasing SSDs securely has been a longstanding problem that has been solved in Macs with T2 or Apple silicon chips, with the introduction of Erase All Content and Settings (EACAS) four years ago in macOS Monterey. This article explains how it works, what it does, and when you should use it.

Boot disk

While Intel Macs are simpler, the internal SSD of an Apple silicon Mac is divided into three APFS containers/partitions.

BootDiskStructureMSeq

Intel Macs have the same Apple APFS container with the Boot Volume Group in it, but the other two containers are replaced by a single small EFI partition.

macOS manages and uses the first two containers, ISC and Recovery, and that containing the Boot Volume Group is the one we’re concerned with. That includes the System and Data volumes, the former being made into a read-only snapshot that’s mounted as the Signed System Volume and contains macOS. Everything you install as a user, including apps and your Home folder, is in the Data volume, which is encrypted automatically even if you don’t have FileVault turned on.

Data volume

As the Data volume is invariably encrypted, the best way to securely erase its entire contents is to destroy its encryption key. Provided that can be performed robustly, so the key can never be recovered, no one will be able to decrypt its contents. (There is an expectation that one day it might be possible to break the encryption using quantum computing, but that’s not something you should be concerned with at present.)

The encryption key used to encrypt the Data volume is itself encrypted, and forms part of the mechanism used by FileVault when that’s enabled. To ensure that those encryption keys don’t leave the Secure Enclave, they’re encrypted again, and the key that’s destroyed by EACAS is one of those. macOS also employs anti-replay techniques to ensure that previous keys can’t be reused.

Additional features

In addition to destroying the encryption key for the Data volume, EACAS performs other useful tasks. These include signing out of your Apple Account, including iCloud and iCloud Drive, destroying all fingerprints used for Touch ID, and turning off Location Sharing to disable Find My and Activation Lock.

Although I can’t find any official account of additional data being erased by EACAS, I believe that all LocalPolicy records stored in Apple silicon Macs are also destroyed. LocalPolicy authorises access to external bootable disks, so those who have configured an external disk to boot their Mac are likely to be required to re-authorise it before it will boot that Mac again.

What EACAS doesn’t do, though, is sign you out of third-party cloud or other services such as Adobe’s Creative Cloud, or deauthorise that Mac for Apple media such as Music. Neither will it do anything to your Mac’s SSV: that’s left intact, still running the same version of macOS.

How to use EACAS

Start EACAS from System Settings > General > Transfer or Reset > Erase All Content and Settings…. In older versions of macOS still using System Preferences, open them and it’s offered as a command in the app menu.

eacas

If you continue, you should see one final warning before the contents of the Data volume are blown away into the great bit-bucket in the sky.

What’s left of your Data volume, shown here in Recovery mode, is a mere 300 MB or so.

When to use EACAS

If you want to wipe your Mac’s Data volume so you can reinstall its user(s), EACAS is the simplest and quickest way to do that, and doesn’t require starting up in Recovery. Its additional features ensure that, when you install its new primary user, everything should work properly and you don’t end up with ghost Macs left over from the past.

It’s the method of choice when preparing your Mac for disposal, particularly if you’re passing it on to someone else, as it ensures that no one can recover any of the data stored in your Home folder, or anywhere else on its Data volume. Performing that manually requires you to work through a list of additional procedures, almost all of which are automatic in EACAS.

The only time when you’re likely to prefer a different method is when you want to erase both the Data and System volumes, perhaps to return to an older version of macOS. Although you can do that using Disk Utility in Recovery mode, that doesn’t install the matching firmware. If you really want to return to factory-fresh conditions, the best way is to put that Mac into DFU mode, then restore it from the IPSW image file for that version of macOS. Although that does require a second Mac, it’s quick and comprehensive.

One other caution: never use EACAS on a macOS VM, as it’s unlikely to recover. It makes more sense just to delete the whole VM and be done with it.

Summary

  • EACAS performs a secure erase of the Data volume, as well as some useful extras.
  • It’s the method of choice for preparing your Mac for disposal.
  • It’s also suitable for wiping user data before setting your Mac up afresh, using its existing macOS.
  • If you want to wipe the System volume as well, to reinstall macOS, restore from an IPSW in DFU mode.

Updated CPU core frequencies for all current Apple silicon Macs

By: hoakley
30 October 2025 at 15:30

Thanks to your overwhelming response to my appeal for information about CPU core frequencies in M3 Ultra and M5 base chips, this article updates the data to cover those new models in addition to all previous M-series chips.

Performance (P) and Efficiency (E) CPU cores in Apple silicon Macs are run at a range of different frequencies so they can deliver optimum performance with a minimum power and energy use. Cores are grouped into clusters of 2-6, and macOS sets the frequency of each cluster according to workload, Quality of Service, power mode and thermal status. Maximum frequencies differ according to the family, variant within that family, and between E and P cores. Current values are:

  • M1 E 2064 MHz or 2.1 GHz; P 3228 MHz or 3.2 GHz;
  • M2 E 2424 MHz or 2.4 GHz; P 3696 MHz or 3.7 GHz;
  • M3 E 2748 MHz or 2.7 GHz; P 4056 MHz or 4.1 GHz;
  • M4 E 2892 MHz or 2.9 GHz; P 4512 MHz or 4.5 GHz.
  • M5 E 3048 MHz or 3.0 GHz; P 4608 MHz or 4.6 GHz (base variant only).

As Pro and Max variants may have higher frequencies than base variants, it’s likely that future M5 Pro or M5 Max chips will be able to run their P cores at a higher maximum frequency than today’s base M5 chip.

The full table of frequencies reported by powermetrics is:

This is available for download as a Numbers spreadsheet and in CSV format here: mxfreqs1025

Earlier this year I published a detailed analysis of frequencies in the M1 to M4 families. The only addition to those is the M3 Ultra, whose frequencies are the same as those of the M3 Max, so they haven’t changed. The remainder of this article concentrates on the base variant in each family, from M1 to M5, the chips that power the most popular models and set the standard for what most folk will experience.

Frequency range

Over the last five years and five families of chips, their frequencies have increased steadily, as shown in the charts below. Each bar in those charts spans the range of frequencies from minimum (idle) to maximum, for the base variant in that family.

Idle frequency in E cores has risen from 600 MHz to 972 MHz, a rise of over 60%, and their maximum frequency has risen from 2064 MHz to 3048 MHz, a rise of nearly 50%.

P cores have seen more substantial change. Their idle frequency has risen from 600 MHz to 1308 MHz, a much larger rise of nearly 120%, and their maximum frequency has risen from 3204 MHz to 4608 MHz, just under 50%. The M5 is notable for its greater rise in idle frequency, and lesser rise in maximum frequency.

Frequency steps

Rather than macOS set an arbitrary frequency, it selects one from a list of steps that are distinctive to that family and variant. Looking at the table of frequency steps it might be easy to assume those numbers are chosen arbitrarily, but when expressed appropriately I think you can see there’s more to them.

To look at frequency steps and the frequencies chosen for them, let me explain how I have converted raw frequencies to make them comparable.

First, I work out the steps as evenly spaced points along a line from 0.0, representing idle, to 1.0, representing the core’s maximum frequency. For each of those evenly spaced steps, I calculate a normalised frequency, as
(FmaxFstep)/(FmaxFidle)
where Fidle is the idle (lowest) frequency value, Fmax is the highest, and Fstep is the actual frequency set for that step.

For example, say a core has an idle frequency of 500 MHz, a maximum of 1,500 MHz, and only one step between those. Its steps will be 0.0, 0.5 and 1.0, and if the relationship is linear, then the frequency set by that intermediate step will be 1,000 MHz. If it’s greater than that, the relationship will be non-linear, tending to a higher frequency for that step. The following charts compare those normalised frequencies with steps evenly spaced between idle and maximum frequencies.

This chart shows normalised frequencies and steps for E cores in base M1 and M5 chips, the latter in red. It shows how, over those five years, the number of steps (available frequencies) has increased. In the M1, the frequency selected in the middle of its five steps was half-way between idle and maximum. Not only does the M5 have more intermediate frequencies available, six instead of three, but frequencies used in the upper half of its steps are higher than in the M1 (when normalised).

This tends to boost higher frequencies used for running threads that can’t be accommodated on P cores, while running background threads at slightly lower frequencies than would be expected when at frequencies close to idle, as they are.

These curves have undergone evolution across different families, as shown here in a composite of the curves for all five families. The red curve of the M5 deviates more from the M1’s straight line of identity than any of the others, particularly at the top end.

The equivalent comparison between frequencies of P cores in M1 and M5 chips shows a different picture. The M1 is again the simpler, being linear until it reaches a step of 0.8, while the M5 has higher frequencies in all except the top few values.

Shown here alongside curves for all earlier families, the red curve for the M5 has higher frequencies for every step apart from the last few.

Taken with the trends seen in the frequency ranges (bar charts above), these demonstrate that the M5 is designed to improve performance by increasing the frequencies used to run threads with higher Quality of Service, as opposed to background threads.

Conclusions

  • CPU core frequencies in the M3 Ultra are the same as the M3 Max.
  • The base M5 continues the trend for higher frequencies in both E and P cores, with a marked rise in P core idle frequency.
  • More subtle changes in intermediate frequencies boost them for higher frequencies of E cores, where they’re likely to improve performance of threads overflowed from P cores.
  • Intermediate core frequencies continue to be selected to optimise performance and power use.

Gain access to a locked Mac with Recovery Assistant

By: hoakley
22 October 2025 at 14:30

All of us at some time or other find our mind has gone blank and we can’t remember the password we’ve typed in so often before. Or the person who did know that password may no longer be there to recall it for us. At times like these we may need to gain access to a locked Mac. This article looks at how you can do that in an Intel Mac with a T2 chip, or an Apple silicon Mac, running Big Sur or later, in particular macOS Tahoe. If you want information for an older Mac or macOS, this article should be more helpful.

Keyboard

If you’re certain you entered the correct password but it was refused, check the Caps Lock key isn’t on, and check the Mac is using the correct language keyboard in the menu at the top right.

Firmware password (Intel only)

Intel Macs can be protected using a firmware password set and removed in Recovery, and that can normally only be removed if you know the password. If you don’t, the most reliable way to achieve this is to take the Mac to an Apple store, together with proof of purchase or ownership, and ask them to remove the firmware password.

Further information is in this support note, and in Mr. Macintosh’s article.

Don’t just guess

Trying to guess a Mac’s password is doomed to failure: you only have ten attempts before you have to try in Recovery, and an absolute maximum of fifty attempts in total before access to its Data volume is permanently barred, and that Mac has to be restored in DFU mode. Time intervals are also added between attempts, starting at a minute after the third attempt, and rising to eight hours with the ninth.

Once you realise you don’t know the password, click on the ? to the right of the password entry box. If you keep trying to guess, your attempts will soon be delayed by lock periods that grow up to eight hours.

The Mac will then offer you the best option for resetting the password. If the Mac was opted into iCloud Recovery, you’ll then be asked for details of the Apple Account.

This is now handled by the Recovery Assistant, which also helps you use the Recovery Key if iCloud Recovery wasn’t chosen.

If you don’t have Apple Account details or the Recovery Key, the remaining option is to wipe the Mac. That’s offered in the Erase Mac command in Recovery Assistant’s menu.

For these the Mac needs an internet connection. Further details are in this support article. If you’ve forgotten your Apple Account password, Apple’s support article here should help.

Missing owner

Those methods all assume that you’re the owner/user, have simply forgotten your login password, and can recall your Apple Account details or Recovery Key. If the Mac belonged to someone who’s no longer there, and you don’t have access to their Apple Account, you won’t be able to use those options.

There are two further steps now available that you may find helpful. Provided your Apple Account has two-factor authentication enabled, if you’re unable to sign in or reset your password, you can ask Apple to perform account recovery. This isn’t immediate, but provided you can satisfy Apple that your request is genuine, it should prove possible.

As of macOS 12.1 and iOS/iPadOS 15.2, Apple has supported Legacy Contacts, but those must be set up before you need to use them. The Legacy Contact is then provided with an access key they can use in the event that you can’t because you’re dead. Apple also needs to see a copy of the death certificate before giving full access to the account for a period of three years. Full details are here.

Still no solution

If you want to access the Mac but not its contents, it’s straightforward to return Apple silicon and T2 models to factory condition by putting them into DFU mode and restoring them, as explained here. That may not always be a good step, though: when you try to set that Mac up again, it checks in with Apple. If it has been registered as stolen, you could find it becomes unusable.

If all else fails, get expert advice and help from Apple stores, authorised service providers, and from the many independent Mac technicians around the world who are often only too familiar with these problems.

Virtual machines

Depending on how they’re set up, macOS VMs can now support either iCloud Recovery, or a Recovery Key, provided the guest macOS can.

Explainer: FileVault

By: hoakley
18 October 2025 at 15:00

It has been 22 years since Apple’s first version of FileVault was introduced in Mac OS X 10.3 Panther. Since then it has changed beyond all recognition, and has been transformed from a questionable option to an essential feature of Apple silicon Macs. This article explains those changes, and how enabling FileVault is now a no-brainer.

The past

FileVault 1 was very different. For a start, it didn’t attempt to encrypt whole volumes, as that still isn’t built into HFS+ and only became possible in Mac OS X 10.7 Lion, when Apple added a logical volume manager, Core Storage. So this first effort stored your Home folder in an encrypted disk image, something that also proved easy to crack.

filevault2004

Apple’s second attempt at FileVault proved more successful, with Core Storage handling the encryption of whole HFS+ volumes. This required encryption and decryption to be performed in software, in the days when most CPUs didn’t have instructions to accelerate that. When you first enabled FileVault, macOS had to encrypt the entire contents of the boot volume, which before Catalina included the whole of the system as well as user data. Fortunately, Apple engineered this initial encryption to run in the background while you were still using your Mac. Even so, it could take several days before it was complete and FileVault became active.

filevault03

This improved with time. Intel CPUs gained instructions to accelerate encryption and decryption, storage and processors got faster, and Apple’s new file system APFS has encryption designed into it from the start. What transformed FileVault, though, was the introduction of the T2 chip in 2017.

The T2 chip was designed for FileVault, among its other accomplishments. It contains a Secure Enclave to isolate and protect encryption keys, and a hardware AES encryption/decryption engine that sits between the internal SSD controller and memory. Those ensure that the contents of the internal SSD can be encrypted for FileVault without any detectable overhead. From Big Sur onwards, these are used to encrypt the whole contents of the Data volume when it’s in internal storage, but not the System volume or the SSV from which the Mac boots.

FileVault base encryption

In Macs with T2 or Apple silicon chips when FileVault is disabled, everything in the Data volume stored on their internal SSD is still encrypted, but without any user password.

Generating the key used to encrypt the volume, the Volume Encryption Key or VEK, requires two huge numbers, a hardware key unique to that Mac, and the xART key generated by the Secure Enclave as a random number. The former ties the encryption to that Mac, and the latter ensures that an intruder can’t repeat generation of the same VEK even if it does know the hardware key. When you use Erase All Content and Settings (EACAS), the VEK is securely erased, rendering the encrypted data inaccessible, and there’s no means to either recover or recreate it.

This scheme lets the Mac automatically unlock decryption, but doesn’t put that in the control of the user, who therefore needs to enable FileVault to get full protection.

FileVault full encryption

Rather than trying to incorporate a user password or other key into the VEK, like many other encryption systems FileVault does this by encrypting the VEK using a Key Encryption Key or KEK, a process known as wrapping.

When you enter your FileVault password, that’s passed to the Secure Enclave, where it’s combined with the hardware key to generate the KEK, and that’s then used together with hardware and xART keys to decrypt or unwrap the VEK used for decryption/encryption. This means that the primary user’s FileVault password is the same as their regular login password. It doesn’t have to be long and complicated either, as it’s combined with the hardware key to create the KEK.

This has several important benefits. When you first turn FileVault on, no data encryption is needed, as the VEK remains the same, so FileVault’s protection is effective immediately. Because the KEK can be changed without producing a new VEK, the user password can be changed without the contents of the protected volume having to be fully decrypted and encrypted again.

Recovery keys

It’s also possible to generate multiple KEKs to support the use of recovery keys that can be used to unlock the VEK when the user’s password is lost or forgotten. Institutional keys can be created to unlock multiple KEKs and VEKs where an organisation might need access to protected storage in multiple Macs.

When you enable FileVault, you’re given the option of being provided with a recovery key, which you should keep a copy of in a safe place, or using iCloud recovery if you prefer.

In the recent past, some macOS updates have played games with recovery keys, issuing new ones when they weren’t expected. When you first get your recovery key, and any time it changes, you should check to see if it will work correctly. Once your Mac is running fully, open Terminal and type in the command
sudo fdesetup validaterecovery
After entering your admin password, you’ll then be prompted to enter the recovery key to be checked. Type or paste that in carefully, and you’ll be told whether it’s correct or not. Note that Terminal doesn’t display the key when you type or paste it in, and you’ll have to press Return without being able to see or check what you’ve entered. If that new key fails, repeat the command using your previous recovery key instead.

FileVault on other disks

The Secure Enclave and AES engine are only wired up to protect volumes on your Mac’s internal SSD. You can still enable FileVault on bootable external disks, and even in macOS virtual machines. But in those cases, volumes that are protected use Encrypted APFS in software, which does impose a small overhead. In the case of VMs, FileVault is the only effective way to safeguard data in that VM, and is recommended. For external disks you’ll need to weigh up the pros and cons.

Summary

  • FileVault in modern T2 and Apple silicon Macs is very different from in the past.
  • It now provides excellent cost-free protection to your data when stored on the internal SSD.
  • If you opt for a recovery key, check it then and whenever it has changed.
  • If your T2 or Apple silicon Mac doesn’t have FileVault enabled, why not?

随身听和冰啤酒,流行乐与热咖啡,谁来定义经典设计?非正常读物 vol.4

By: Steven
13 August 2023 at 15:21
🎥 点击封面播放视频,可以优惠价购买这本书

是什么,在炎炎夏日的晚上,让人获得一丝丝清凉与放松的呢?或许,是一段与友人的闲谈,或许是一罐啤酒?可是,你是否想过,为什么,装酒的易拉罐会设计成这样子呢?

🎥 点击播放视频

你可能没有意识到,易拉罐的历史,距今只有短短 61 年。

六十年前,由于消费者需要随身携带开罐器才能打开铝罐,这极大阻碍了初代罐装饮品的推广。自开罐的必要性是显而易见的,但在当时,该领域到处都是失败的原型先例。在一次野餐中,印第安纳州的工具生产商 厄尼 · 弗雷兹 不得不靠着汽车金属杠才打开罐头。经此困扰,他开始着手开发带耳片、可拉开的罐子。他创造了一个跷跷板机制,利用小杠杆,沿着预先半切划线的开口,撬开罐盖。他将小杠杆通过冷焊法固定在罐子的铆钉上,铆钉也使用罐子本身的材料。

他把这个创意,卖给了美国铝业公司。1962年,匹兹堡啤酒公司下了第一笔订单,订购了10万只拉耳罐。许多爱钻研的个人以及公司,继续改进他的发明。1965年,拉耳式开口被拉环取代。1975年,丹尼尔 · 丘德齐克 开发了不必拆卸的拉环装置。打开拉环即可畅饮的易拉罐,撕开了罐装饮料行业的巨大市场,也成为了美国饮品行业的圣杯。

🎥 点击播放视频

方便的工具,总是更受人们的欢迎。尤其是,成瘾性饮料。比起可乐和啤酒,人类更早开始了,对现制咖啡器具的工业化探索。

1933年,意大利人 阿方索·比乐蒂 设计出了摩卡快速咖啡壶。这款炉顶咖啡壶,自1933年首次亮相至今,仍然保持着它的经典设计。

这款壶由3个金属部分组成:用于煮水的底部胆舱,放置咖啡粉的过滤器,以及带有一体式壶嘴的咖啡液收集隔间。煮沸的水穿过咖啡粉,从中间管道顶部如涌泉般流出,一杯富含油脂的咖啡就做好了。

据说,比乐蒂在设计这款咖啡壶的时候,参考了当时的洗衣机。那会儿的洗衣机,由一个锅炉式的底座和顶部的洗涤盆组成。因为铝的导热性能,和多空隙的表面特性,既能快速把水煮开,又能维持住水温,还可以吸收咖啡风味,于是成为了摩卡壶的首选材料。

🎥 点击播放视频

如果说饮料的工业化平权,给人们带去了身体上的享受,那么,随身听播放器则是伴随着流行音乐的黄金年代,给人类带来了空前的精神滋养!

索尼的董事长盛田昭夫认为,人们在任何情况下都需要音乐。这款 1979 年诞生的 TPS-L2,它的外形尺寸仅仅比磁带略大一些,这种便携性,使它超越了不同的市场界限和地域文化影响,大获成功。

德国博朗的设计工作室与日本的极简主义,在索尼身上充分融合。小巧的体型与干净利落的造型,至今仍被津津乐道。

它最初的产品定位是青少年市场,因此在设计上,采用了类似蓝色牛仔布拼接金属色的涂装,并设置了双耳机插孔,以供两人同时靠近彼此。这使得它成为了当时乃至今天许多人心目中,一代经典的流行文化符号。

🎥 点击播放视频

考点众多的设计史,是我读书时期的噩梦。那么多陌生又拗口的人名,我从来都记不住。但是,工作多年以后,我渐渐意识到:

那些经典的设计,都是那个时代下的一次又一次范式革新。

设计史不是设计师史,也不是经典产品史。

当我关注一个设计时,我所关注的是人们如何使用它。人名和产品不是设计史,它们所对应的社会形态、人文环境以及生产技术水平,才是。

设计史是最简便、最低成本的索引目录。

对某个著名设计师的关注,其实远远达不到了解设计。站在宏观的角度去观察,一条已经梳理好的时间轴,就很有帮助。这条时间轴未必符合每个人对历史的认知,但由此发散出来,而关注到的无数分叉,会在日后形成自己的视野有着不可避免的重要性。

任何历史最终都是汇集在一处的。

人类史谈论人类如何进化、如何实用工具、如何创造了古往今来的生活。然而这些生活当中,却也并行着器物进化的历史。这些历史其实是同一部历史,关心设计的历史,就是在关心自己生活在什么样的世界里。

历史是人类的镜子,也是器物的根。

上万年来,人类无数次地重复着同样的错误,然而器物,却一直按照自己的节奏在进化着,从最粗糙的原型里诞生,伴随着人类不断地尝试,衍生出了丰富的世界。

这样的过程,怎么能不迷人呢?

设计史不是人名、地名,不是产品和公司的名字,它是人类和器物之间,相互扶持,纠缠不清的故事,是古往今来的人们,用对生活的热爱,所写下的诗。

在我看来,每一位设计爱好者、在职设计师,我们的案头上都应该至少有一本这样子的书。

做为一本观察世界的魔法目录,它是我们随手可得的一条又一条线索,每一次翻开,都能对我们所处的世界多一份联系和了解。

🌟从视频入口下单,会有观众的福利优惠券!

这次是为 中信出版社 推荐一本新书。这本书由 英国费顿出版社 编著,内容非常丰富。书籍主题专注于探索人类的创造力和想象力,其中包含了许多激发灵感的故事和实用的技巧。无论你是学生、艺术家、工程师还是企业家,这本书都会为你提供独特的思维方式和创造力的启示。通过精心编排的章节,书中详细介绍了各种创造力的来源,从观察自然到探索文化,再到引发思维火花的不同方法。而且,书中还包含了一系列的练习和案例分析,帮助你在实际生活中应用这些创造性思维的技巧。这本书不仅能帮助你在个人生活中拥有更多灵感和创造力,还可以帮助你在工作中更具创新性和竞争力。如果你对提高自己的创造力和想象力感兴趣的话,不妨考虑阅读这本令人兴奋的新书。无论你是专注于艺术、科学、写作还是其他领域,这本书都将成为你的灵感宝库。购买这本书不仅能丰富你的知识,还可以激发你的创造力,并为你的个人和职业发展提供指导和启发。(此段落由 AI 拓展)

🌟从视频入口下单,会有观众的福利优惠券电脑端和手机端都有对应的入口。

🎥点击这里,可播放相关视频

视频下方入口可以优惠价购买这本书。

让 Aria2 启动后自动继续未完成的下载 并清理已删除任务的文件

By: 胡中元
1 March 2018 at 19:23

这个假期,我做的最有趣的一件事就是将路由器改造成了一台稳定的 NAS,其中由 Aria2 实现的离线下载服务器是作为 NAS 的一个核心功能。用着非常方便,然而却有以下几个问题:

  1. 重启机器后,Aria2 在重启后并不会自动继续之前的下载。虽然保存了 sessions,但 Aria2 重启之后会自动将所有任务暂停。这就没法实现挂机下载了。
  2. 删除 Aria2 建立的下载任务后,并不会删除硬盘中对应的文件(包括只下载到一半的破损文件),这很不方便。


重要补充说明

我的代码依赖于 Aria2 编译时的 XML 库依赖,而在某些版本中是不带这个依赖的。所以本篇文章不一定适用于所有情况。

为了解决这 2 个问题,我编写了一个 Python 脚本,完美地解决了困扰。

脚本在 Python3 下运行正常,未对 Python2 测试。不依赖第三方模块。
为了实现 “让暂停的任务继续下载”,需要按照 Aria2 文档来调用 RPC,所以 需要在代码内修改相关的连接地址、密码等信息。

脚本同时会自动读取任务列表,并在下载目录找到所有不属于任务列表中的文件,删除之。
你也可以在 fileWhiteList 变量中设置不想要删除的文件的白名单。

#!/usr/bin/python
# -*- coding: UTF-8 -*-

# 1. start all paused tasks
# 2. delete other files on disk

# API: https://aria2.github.io/manual/en/html/aria2c.html#rpc-interface

from xmlrpc import client as xmlc
import os

rpcUrl = 'http://127.0.0.1:6800/rpc'
rpcToken = 'token:PASSWORD'
downloadPath = '/root/usb/nas/download/'  # same to aria2 config
fileWhiteList = ['/bypy', '/PROTECTED']   # while list for delete


s = xmlc.ServerProxy(rpcUrl)
api = s.aria2
# start all tasks
api.unpauseAll(rpcToken)


tasks = api.tellActive(rpcToken)
tasks += api.tellStopped(rpcToken, 0, 99)
tasks += api.tellWaiting(rpcToken, 0, 99)

for task in tasks:
    # started BT tasks
    if ('bittorrent' in task) and ('info' in task['bittorrent']):
        filename = task['bittorrent']['info']['name']
        fileWhiteList.append(filename)
    # other tasks
    else:
        for file in task['files']:
            path = file['path']
            if path.startswith('[METADATA]'):
                path = path.replace('[METADATA]', '')
            else:
                path = os.path.basename(path)

            fileWhiteList.append(path)

# del same items
fileWhiteList = set(fileWhiteList)

print('fileWhiteList', fileWhiteList)


def isStrContainItemInList(str, list):
    for item in list:
        if item in str:
            return True
    return False


for parent, dirnames, filenames in os.walk(downloadPath, topdown=False):
    for filename in filenames:
        path = os.path.join(parent, filename)
        if not isStrContainItemInList(path, fileWhiteList):
            os.remove(path)
            print('del file: ', filename)
    for dirname in dirnames:
        path = os.path.join(parent, dirname)
        if not isStrContainItemInList(path, fileWhiteList):
            try:
                os.rmdir(path)
                print('del dir:  ', dirname)
            finally:
                pass

一般来说,我们需要这段脚本在开机后自动运行,加入至 /etc/rc.local 即可:

sleep 1m && python /root/aria2/afterRun.py > /var/log/aria2.afterRun.log &

相关推荐

Aria2 bt-tracker 跟踪服务器列表自动更新:https://www.feng.ee/aria2-trackers-auto-update.html

Node-Red使用MQTT协议接收及发送消息到ESP32单片机

By: 小皮子
24 August 2021 at 20:23

以下方法经本人验证通过,环境如下:

Node-RED V0.20.5

ESP32-CAM + HC-SR04 + Arduino IDE

mosquitto version 2.0.11

MatrixDB


前言:Node-RED 是构建物联网(IOT, Internet of Things)应用程序的一个强大工具,而MQTT则是当下使用广泛的物联网通信协议之一,为此我使用一块ESP-32单片机作为客户端,连接HC-SR04超声波测距模块做了两个简单的实验。

  • 实验一:获取物体距离数据,使用MQTT协议发送消息,并在Node-Red端进行接收,将数据保存在MatrixDB数据库中
  • 实验二:Node-Red使用MQTT协议发送消息,ESP32收到消息后对LED灯进行控制

实验中我使用了同一块ESP-32,实际应用中他们既可以是相同的物联网设备,当然也可以是不同的。实验目的是抛砖引玉,实际物联网中各类复杂场景都可以此为基础进行实现。

本实验的环境我在开篇已经列出,对于环境的准备,你可根据自己的情况参考下列文章做出调整:

第一步: 连接HC-SR04超声波测距模块

HC-SR04 有4个针脚,分别是Vcc, Trig, Echo, Gnd。Vcc接5V供电,Trig 和 Echo接IO口,Gnd自然就是接地。我将Trig连接到IO12,Echo连接到IO13,连接示意图如下:

第二步: 编写实验所需的程序,并烧录到ESP32

HC-SR04 的测距原理是向 Trig 口发一个10US 以上的高电平, 模块会发送8 个40khz 的方波并自动检测是否有信号返回,如有就通过 Echo 口输出一高电平,高电平持续的时间就是超声波从发射到返回的时间。

因此我们只需要将连接Trig口的 IO12 设置为OUTPUT,发一个持续时间为10US 的高电平,然后获取连接着Echo 口的 IO13 (设置为INPUT)高电平的持续时间,将取得的持续时间 *声速(340M/S)/2 就得到了距离。

实验中的LED为板载,使用的是IO4,将其设置为OUTPUT,通过高低电平即可控制开启和关闭

MQTT我使用的是PubSubClient库,如果你没安装,可通过库管理器进行安装加载

部分程序代码图如下:

引用的库和部分配置
连接wifi和群晖上的mosquittoMQTT服务
使用HC-SR04计算距离

代码编译通过后烧录到ESP32,上传烧录的方法在 win10利用arduino + esp32-cam搭建网络摄像头 文章中有写,不再啰嗦。

第三步: Node-Red 编写实验流程

实验一:拖入mqtt输入节点,双击,添加mqtt broke服务端

添加后选择该服务端,订阅主题。我在单片机上设置的发送的主题是Distance,因此这里也要输入主题为Distance

接着我们使用节点管理器安装node-red-contrib-postgresql,安装后将postgresql节点拖入

配置MatrixDB数据库

接着在Server中选择配置好的数据库,在Query中编写插入语句(我事前已经在数据库中添加了测试表MQTT_Test,包含payload,msg_time两个字段)

最后将两个节点连接起来,部署即可

实验二:这个比较简单,拖入两个inject节点,一个控制开启LED,一个控制关闭LED。开启的节点设置如下,内容为“ON”,这个是ESP32程序中我设置的命令,当接收到主题为LED的消息,且内容为ON时,开启LED。同理关闭设置内容为“OFF”

接着再拖入一个mqtt输出节点,将它与两个inject连接起来,该节点只需要配置好服务端和主题即可。配置如下:

至此流程编写完毕

导出的流程如下:

[{"id":"81d18949.9b6738","type":"mqtt in","z":"b8dd355c.40cd78","name":"","topic":"Distance","qos":"2","datatype":"auto","broker":"fcb81ef4.a2021","x":520,"y":320,"wires":[["14feeb2c.6dfff5"]]},{"id":"23f6b97e.a38776","type":"comment","z":"b8dd355c.40cd78","name":"实验一:接收MQTT消息,将数据写入数据库","info":"","x":630,"y":260,"wires":[]},{"id":"af6c9b1b.dab788","type":"mqtt out","z":"b8dd355c.40cd78","name":"","topic":"LED","qos":"","retain":"","broker":"fcb81ef4.a2021","x":760,"y":540,"wires":[],"inputLabels":["ON"]},{"id":"4718d956.78af68","type":"inject","z":"b8dd355c.40cd78","name":"开灯","topic":"Test 2.1","payload":"ON","payloadType":"str","repeat":"","crontab":"","once":false,"onceDelay":0.1,"x":530,"y":500,"wires":[["af6c9b1b.dab788"]]},{"id":"2fc63b12.cba2d4","type":"inject","z":"b8dd355c.40cd78","name":"关灯","topic":"Test 2.2","payload":"OFF","payloadType":"str","repeat":"","crontab":"","once":false,"onceDelay":0.1,"x":530,"y":580,"wires":[["af6c9b1b.dab788"]]},{"id":"c3cfd91.f709f28","type":"comment","z":"b8dd355c.40cd78","name":"实验二:发送MQTT消息,控制板载LED","info":"","x":610,"y":440,"wires":[]},{"id":"14feeb2c.6dfff5","type":"postgresql","z":"b8dd355c.40cd78","name":"保存收到消息","query":"INSERT INTO \"MQTT_Test\" (payload,msg_time) VALUES ( '{{{msg.payload}}}' ,now());","postgreSQLConfig":"8e100f3e.01c4b","split":false,"rowsPerMsg":"1","outputs":1,"x":789.1667709350586,"y":317.66671657562256,"wires":[[]]},{"id":"fcb81ef4.a2021","type":"mqtt-broker","z":"","name":"feeus","broker":"10.0.0.2","port":"18831","clientid":"","usetls":false,"compatmode":true,"keepalive":"60","cleansession":true,"birthTopic":"","birthQos":"0","birthPayload":"","closeTopic":"","closeQos":"0","closePayload":"","willTopic":"","willQos":"0","willPayload":""},{"id":"8e100f3e.01c4b","type":"postgreSQLConfig","z":"","name":"MatrixDB","host":"10.0.0.214","hostFieldType":"str","port":"5432","portFieldType":"num","database":"feeus","databaseFieldType":"str","ssl":"false","sslFieldType":"bool","max":"10","maxFieldType":"num","min":"1","minFieldType":"num","idle":"1000","idleFieldType":"num","connectionTimeout":"10000","connectionTimeoutFieldType":"num","user":"mxadmin","userFieldType":"str","password":"feeus.com","passwordFieldType":"str"}]

第四步:验证实验结果


如果您喜欢这篇文章,或者它给您带来了帮助,您可以请我们喝一杯咖啡,我们将非常感谢您的支持!

WIN10 利用Arduino+esp32-cam搭建网络摄像头

By: 小皮子
17 August 2021 at 21:39

以下方法经本人验证通过,环境如下:

Win 10 专业版

Arduino IDE 1.8.15

ESP32-CAM + CP2102


第一步:官网下载并安装Arduino IDE,地址:https://www.arduino.cc/en/software

第二步:打开Arduino,在”文件“菜单打开”首选项“,在附加开发板管理器中添加网址:https://dl.espressif.com/dl/package_esp32_index.json

然后选择”工具“-”开发板“-”开发板管理器“,输入esp32后选择最新版本安装(此处建议科学上网,否则可能安装不成功)

安装后即可在开发板中选择esp32-cam

第三步:使用CP2102 连接 ESP32-CAM 和电脑

https://www.silabs.com/developers/usb-to-uart-bridge-vcp-drivers 下载CP2102驱动后安装

将 CP2102 和 ESP32-CAM 按下图连接起来后接入电脑,注意图中的灰色线,烧录程序时需要将IO0和GND短接

How to Program / Upload Code to ESP32-CAM AI-Thinker (Arduino IDE) | Random  Nerd Tutorials

第四步:新建CameraWebServer项目

打开Arduino,选择 CameraWebServer ,新建一个示例项目

修改项目里面的内容,保留所需的ESP32-CAM模块定义,把其余的注释掉。然后修改SSID和Password为自己的wifi名和密码

第四步:烧录程序到 ESP32-CAM

在“工具”菜单中选择 ESP32-CAM 使用的端口,我这里是COM4

在“项目”菜单中选择“上传”,等待提示上传成功即可

第五步:使用

烧录成功后,去掉IO0和GND的短接,按RST按钮重启

在路由器中会发现一个 名为 esp32-arduino 的设备已接入

在浏览器中输入ip即可打开设置页面,点击Start Stream即可查看视频流,上面有各种设置,比较简单,不再啰嗦

  • 使用时,只需要给ESP32-CAM 提供5V2A的供电即可自动启动项目,实现在内网中实时查看摄像头
  • 等我有空了考虑设计个外壳,用3D打印机打印出来美化一下?

如果您喜欢这篇文章,或者它给您带来了帮助,您可以请我们喝一杯咖啡,我们将非常感谢您的支持!

❌
❌