The Locked or Immutable flag is one of the most underused and readily accessible features in macOS. It can help you avoid deleting important files, and as I’ll show later can form the basis of your own lightweight version management system. However, this all depends on you keeping it well clear of iCloud Drive, which unaccountably can’t cope with it.
Use
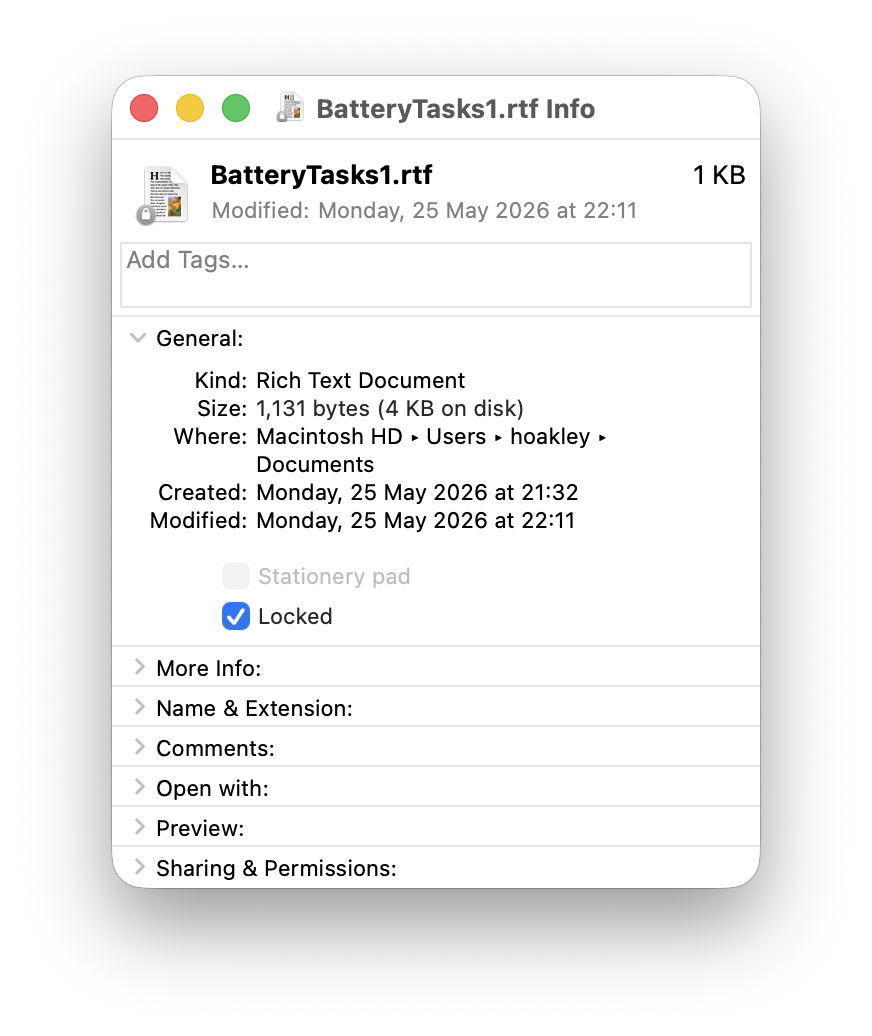
You’ll already be aware that you can lock files in the Finder’s Get Info dialog.
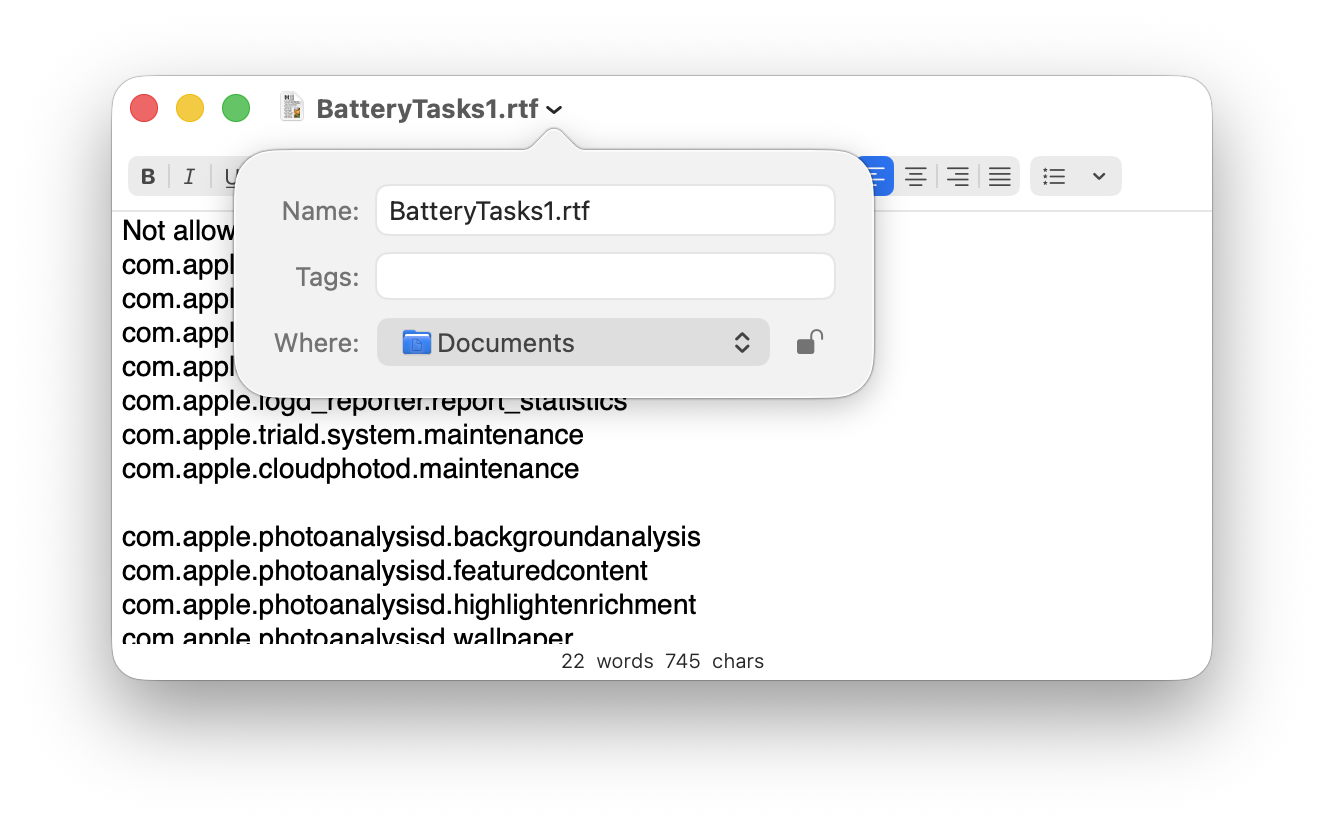
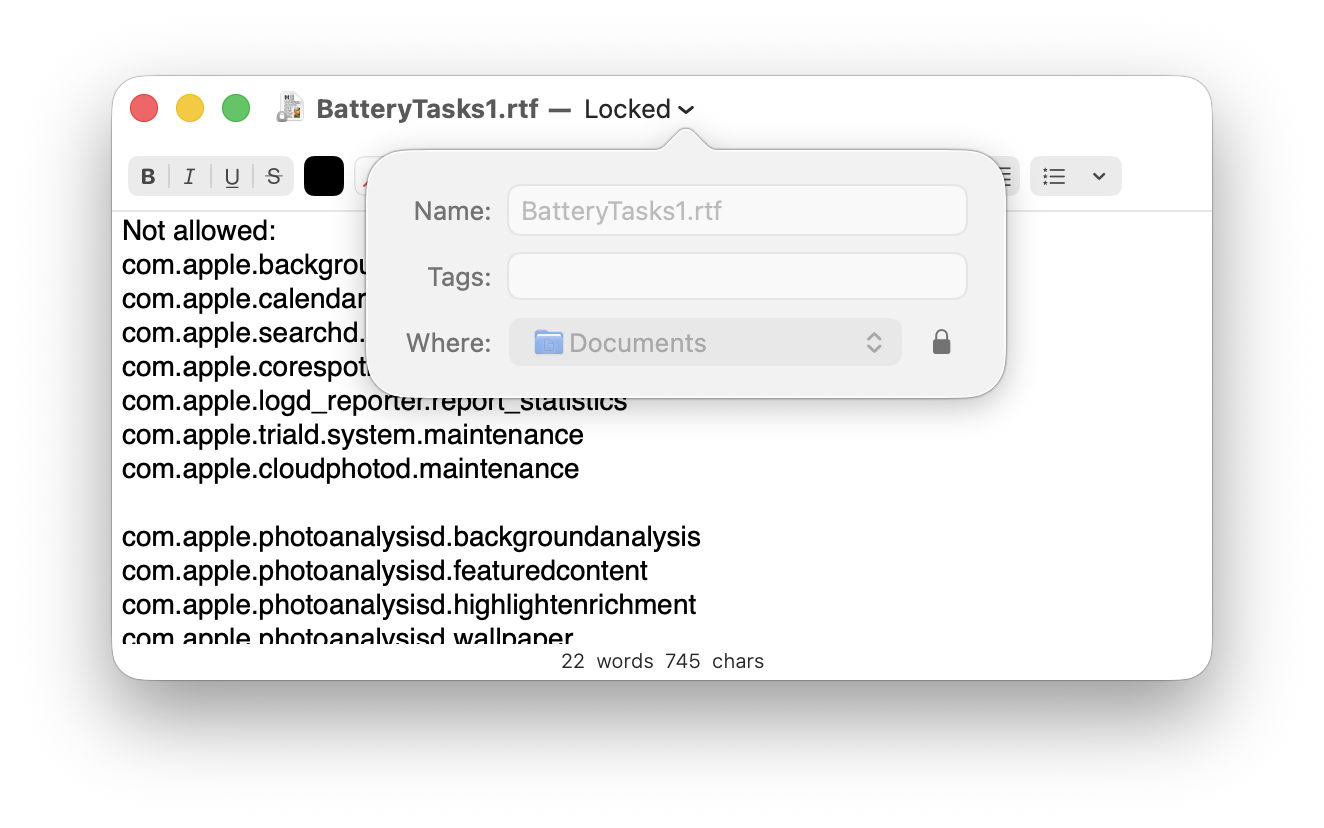
You can also lock an open file inside an app. Click on the down arrow to the right of its name in the title bar to see this pane, then click on the padlock to lock that file.
Sequoia and older versions of macOS show a Locked checkbox rather than a padlock.
In Terminal, use the chflags command in the form chflags uchg filename
to set the user Immutable flag, the same thing as the Finder lock, and use chflags nouchg filename
to unlock it.
Terminal also supports a second flag schg for the system immutable flag, which can only be set or cleared by the super-user, so isn’t recommended for general use. You can check these flags using ls -lO, and full details of this and other flags are given in man chflags.
Effect
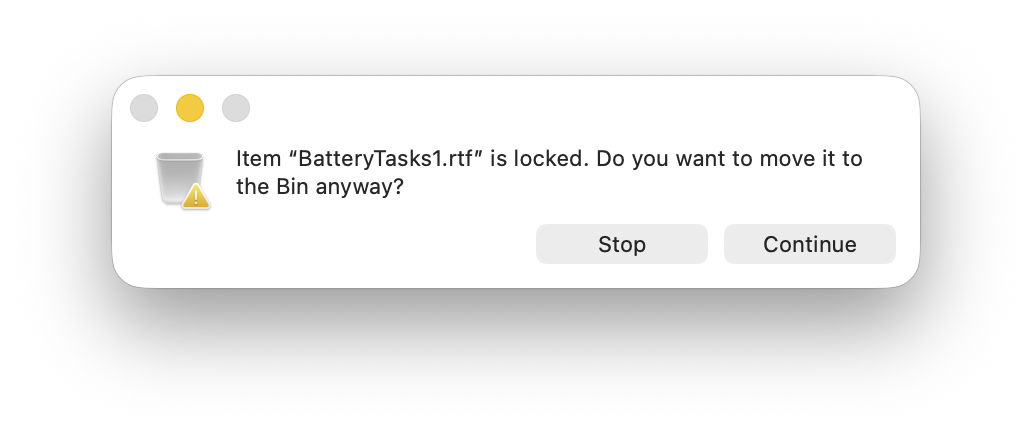
When locked or immutable, you can still delete a file by dragging it to the Trash, but when you do so, the Finder warns you of the presence of the flag.
If you press ahead, you get no second chance when you empty the trash, though, as the locked file will then be deleted immediately.
Retention
The Immutable flag is stored in the file’s attributes, in the bsd_flags value in the file’s inode. It’s therefore generally preserved in local file operations, including
moving the file within a volume,
duplicating or copying the file within a volume,
copying the file to a different local volume,
except with iCloud Drive.
iCloud Drive
iCloud Drive (through the FileProvider framework) doesn’t preserve the Immutable flag as you would have expected, given that it’s a file attribute rather than an extended attribute. Copying an immutable file to an iCloud Drive folder unlocks the file immediately. As if to compensate for this deviant behaviour, the file will be copied to iCloud Drive rather than moved, so leaving the locked original where it is. This is even more confusing as this behaviour is propagated to all other files being moved at the same time. If you move ten files, one of which is locked, all ten are copied rather than moved; if none are locked, then the group is moved rather than copied. This is so bizarre that it can only be a bug.
If you lock the file when it’s in iCloud Drive, the lock isn’t synced through iCloud, so that file isn’t locked on other Macs sharing the same iCloud Drive folder, although it still behaves as expected on the Mac that copied it to iCloud Drive, and will trigger a warning if moved to the Trash, but only on that Mac. Those other Macs can delete that file without any warning of it being locked, indeed they can’t even see that it’s locked on the other Mac.
Locked files in iCloud Drive when operating in non-replicating mode (with Optimise Mac Storage enabled) can’t be evicted from local storage, as that results in the error Unable to Remove Download, Resource busy. They can, though, be pinned locally with the Keep Downloaded setting.
FileProvider doesn’t yet appear to cope with locked files in any consistent way. Given how long Macs have used BSD flags in their file systems, that’s an extraordinary shortcoming.
Versioning with locking
You can use locking and clone files in a lightweight versioning system that achieves good space economy. To do this:
Save the first version of the document, lock it using its titlebar, and close the window.
In the Finder, duplicate that locked first version, unlock the duplicate and edit its name appropriately.
Open that new version of the document (a clone file), edit it until you want to save a new version, then return to 1 above, and repeat.
Note that using Save As to create a new version doesn’t result in a clone file, and the only alternative to protecting old versions is to make them read-only, as does Versatility.
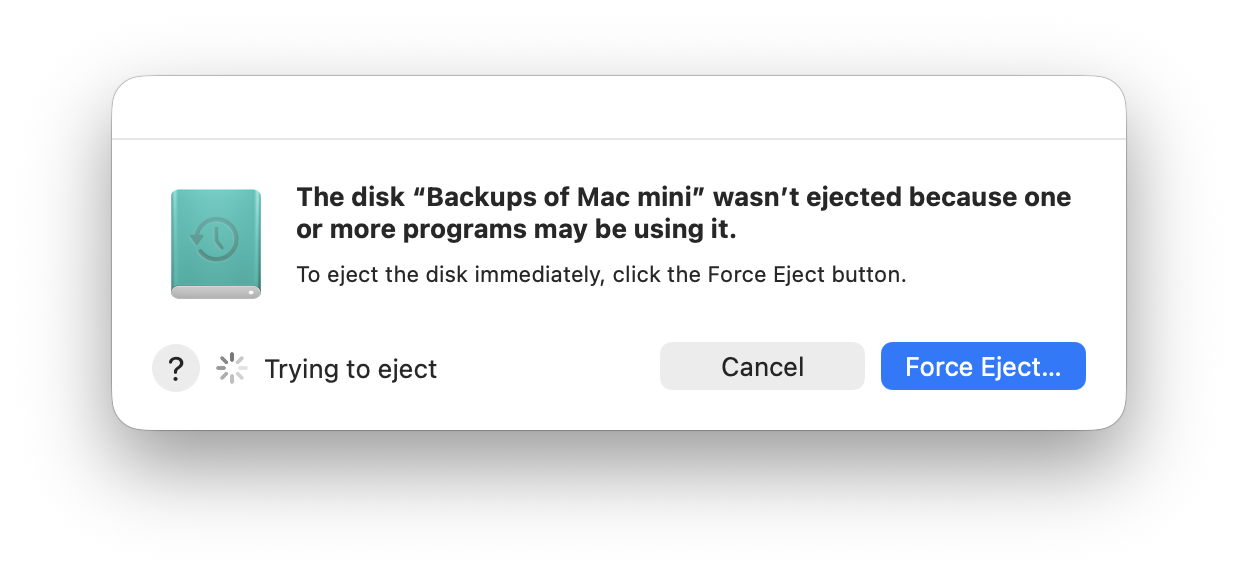
It always happens when you’re in a rush to get your MacBook Pro ready. When you try to eject its external disk, macOS tells you that volume or disk can’t be unmounted or ejected because “one or more programs may be using it”, and asks you whether you want to force it. Should you resort to force, or is there a better way?
Whatever you choose, don’t just disconnect the cable of an external disk. Not only will your Mac complain, but you could end up damaging the contents of its files, or even the file system on that volume. That would only worsen your problem.
Try again or force eject
If every second counts, you can cancel and try again, or go straight to force ejection, if it’s offered. macOS will then try to identify the processes that are still accessing that volume or disk, and kill them, before trying again to eject it. That can take time, and seldom appears successful even if you allow a minute or two for it to complete. However, when it does work, it’s likely to be the fastest solution.
If you encounter this problem when trying to run First Aid on a volume or container in Disk Utility, it’s often best to select the offending volume or container and unmount it using the tool in Disk Utility’s toolbar. You should also double-check that you’re trying the correct volume: if it’s one of the current boot volume group, System or Data, then you’re better off running First Aid in Recovery mode anyway.
Best options
When you have time to address this properly, or all else has failed, there are at least two good options, Jettison and Sloth.
Jettison, $6.95 from St. Clair Software, provides a menu bar control you can use to eject individual or all external disks, and will also do that automatically before sleep or after the display powers off. Every laptop Mac user should have this ready for ejecting external disks.
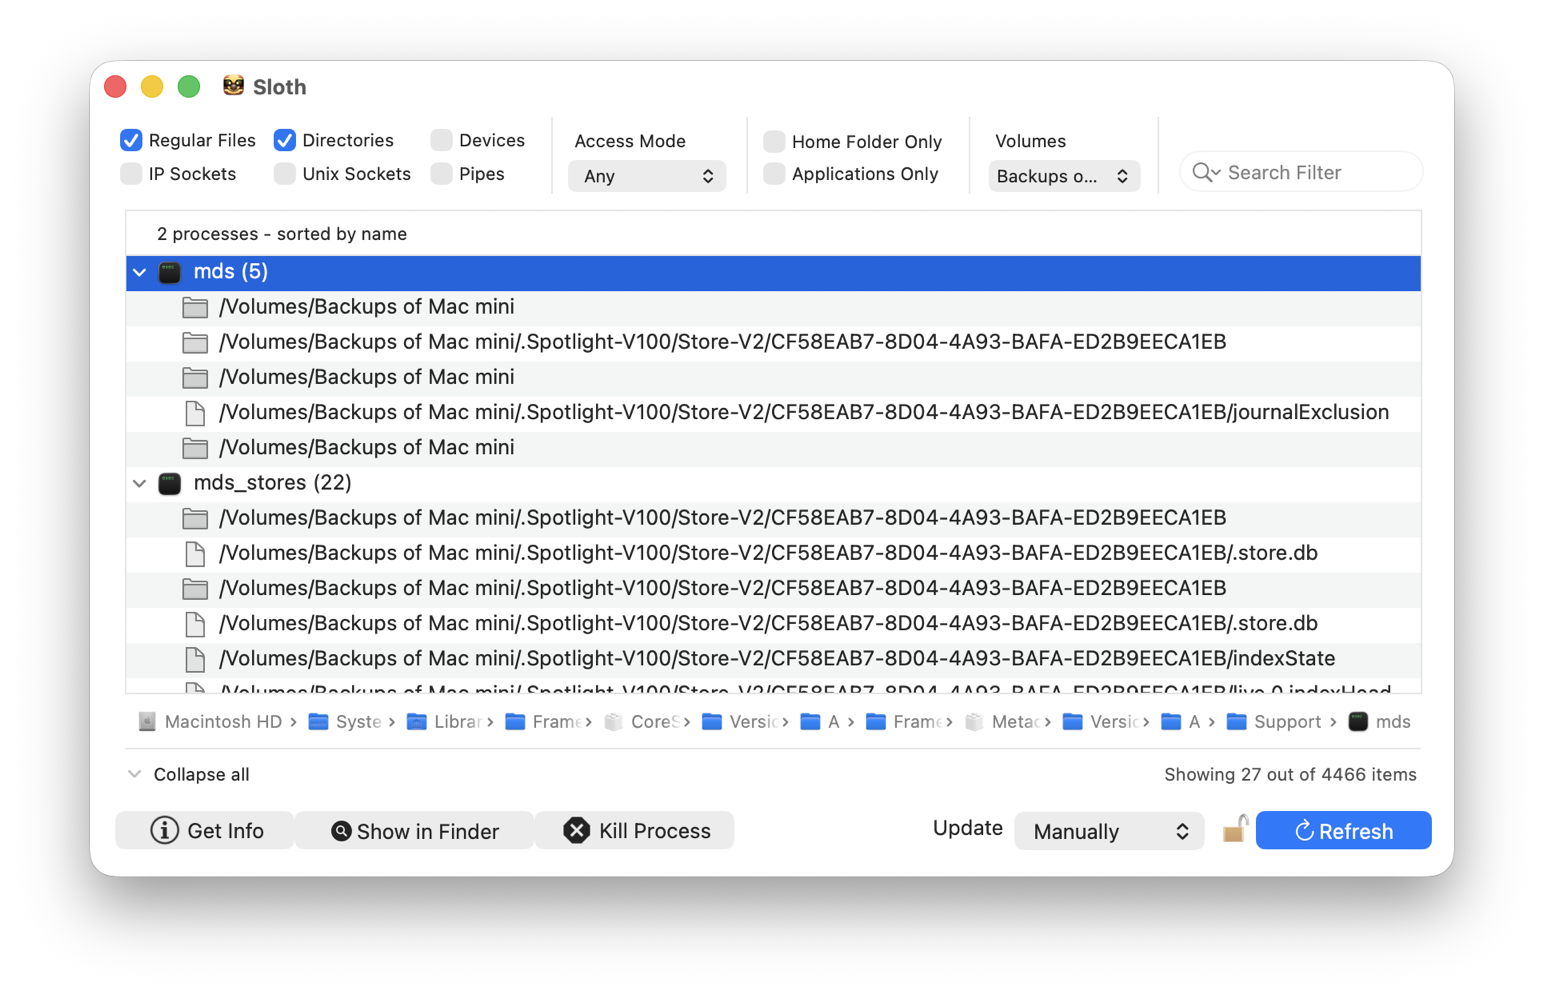
Sloth is free and open source by Sveinbjorn Thordarson, who now provides it fully signed and notarised. It’s an excellent wrapper for the lsof command detailed below, and tells you which processes you’d have to kill before that disk can be safely ejected.
Sloth
Using Sloth to tackle this problem is quick and simple. Open the app, and at the upper right select the volume you want to unmount. That will list all the processes currently known to be accessing that volume, excluding those running as root. To enable those to be shown, click on the padlock to the left of the blue Refresh button at the bottom right, and authenticate.
You can then select each process you want to kill in turn, and click on the Kill Process button at the foot of the window. Once that list is clear you should be able to unmount that volume and eject the disk without further complaint.
Sloth does a great deal more, so it’s worth taking some time to explore that with the aid of its Help page. There are alternatives, but Sloth is long-established and its author has now modernised it to include Sparkle update support and more.
lsof
If you’d rather use Terminal, the command you’re looking for is lsof.
To discover which files are open on any volume, use the command sudo lsof /Volumes/myVol
where myVol is the name of the volume. If you’re unsure how to enter a volume name containing a space, locate it in the Finder’s listing for your Mac, and drag and drop that into Terminal. Once you’ve entered that, type your admin user password at the prompt, and you’ll see a list with entries like mds 367 root 33r DIR 1,28 192 2 /Volumes/External2
mds 367 root 35u REG 1,28 0 87 /Volumes/External2/.Spotlight-V100/Store-V2/3DD5246F-9AEA-4F0E-9A53-AA63783C3C70/journalExclusion
which are the files and directories open on that volume. This needs to be run using sudo, as otherwise you won’t see any files that are opened by processes running as root, which are most often the culprits. Some recommend using grep, but that shouldn’t be necessary, as lsof is capable of its own filtering.
The information given about each open file contains, from the left:
an abbreviated name of the command associated, here mds, the Spotlight metadata server;
the open mode, as the single character following two digits, e.g. 33r is opened for read access only, while 35u is opened for read and write access;
the type, DIR meaning directory, and REG meaning a regular file;
the full path to the file or directory.
Once you know which processes are accessing files on that volume, you can decide whether to open the listing in one of Activity Monitor’s views, such as CPU or Disk, select that process, and click on the Stop tool to kill it.
Summary
Never disconnect an external drive without ejecting it first.
If you’re pushed for time, a force eject might work.
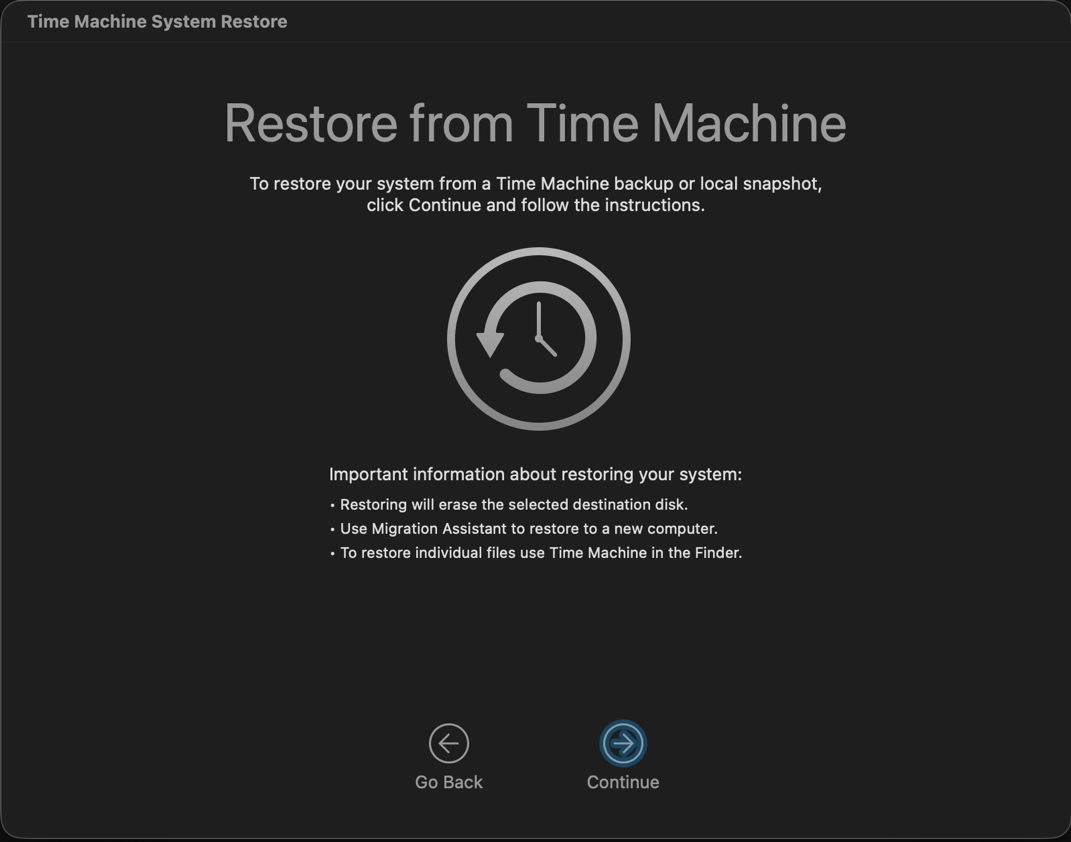
When Apple announced APFS at WWDC ten years ago, snapshots were demonstrated as one of its major features, and intended to form the basis of Time Machine’s backups in the future. Shortly after its initial release in High Sierra, Rich Trouton at Der Flounder documented their use, including how to roll back to a snapshot using Time Machine System Restore in Recovery mode. Apple described this in a support note now replaced by its successor, last revised six months ago, which carefully avoids any mention of rollback.
Snapshots are widely available in modern file systems, in some being referred to as shadow copies, and rolling back to them is a popular if not indispensable feature. Except in APFS, where there appears to be only one supported method, which is severely restricted, as I described last week. That enables you to roll back your Mac’s current Data volume to a snapshot, but doesn’t work for any other volume as far as I can discover.
Disk Utility can display and delete snapshots on any mounted disk, but can’t create or roll back to them. Its command line equivalent diskutil has the same limits (unless you’re ChatGPT). tmutil appears to be the only way to create a snapshot in macOS, but can’t perform that for an arbitrary volume, only the current Data volume and those being backed up by Time Machine.
If I wanted to make a one-off snapshot of a volume on an external SSD, I’d thus have to turn to a third-party utility. Even here I’m up against Apple again, as the API for snapshots is controlled by two restricted entitlements, com.apple.developer.vfs.snapshot for creating and deleting them, and com.apple.private.apfs.revert-to-snapshot for rollback. So far, Apple appears to have approved only apps that make backups and automatically delete their old snapshots to prevent them from overwhelming storage space, and I’m not aware of one with the com.apple.private.apfs.revert-to-snapshot entitlement to allow rollback.
As Adam Leventhal has documented in his open source command tool snaputil, the API call fs_snapshot_revert() is used to perform a rollback, but without the com.apple.private.apfs.revert-to-snapshot entitlement is non-functional.
Having drawn a blank with Apple’s tools, you might feel tempted to ask AI to help. If you’re lucky it might talk you through using Time Machine System Restore in Recovery mode, although as we’ve seen that can’t help with any volume other than the current Data volume.
ChatGPT’s responses to two queries from different people are more concerning, as it repeatedly asserted that you can roll back using a completely imaginary verb with the diskutil command, in one case using a command of the form diskutil apfs revertToSnapshot -n com.apple.TimeMachine.YYYY-MM-DD-HHMMSS /
or using diskutil apfs revertToSnapshot disk1s5 -n com.apple.TimeMachine.YYYY-MM-DD-HHMMSS
instead.
I have checked that in normal user mode and in Recovery mode, only to be told the revertToSnapshot verb isn’t recognised. With the aid of virtual machines, I’ve confirmed that as far back as macOS 12 Monterey, and there’s absolutely no sign of it. When challenged, ChatGPT maintained that it was “directionally right” that revert capability exists in APFS, as we already know from Time Machine System Restore, and that Apple’s entitlement structure “proves it”. It’s a shame I had to do so much checking to confirm that ChatGPT was plain wrong, and had apparently made up those commands.
Not being able to make a one-off snapshot of a volume on an external SSD might appear a small if annoying oversight, but it has consequences. Snapshots are not only blazingly quick in rollback, but they are also the only means of restoring some important volume content, such as document versions, which is easily demonstrated.
When files are restored by copying from a mounted snapshot, all their saved versions are lost. They are also lost from Time Machine backups, and in any case would be lost during migration. The only way to preserve those versions would be using a third-party tool such as my Versatility or Revisionist.
Ten years after Apple first promised us snapshots in APFS, we still don’t have access to their full capabilities, and their use remains largely undocumented. Yet they’re readily available in competing operating systems and file systems.
Extended attributes aren’t unique to macOS and Apple’s other OSes, but they have the longest and richest history, going right back to the first versions of Mac OS. Until the advent of Mac OS X they were resource forks, structured metadata that stored everything from executable code to keyboard layouts. After a shaky first four years in early versions of Mac OS X, 10.4 introduced extended attributes, xattrs, that steadily became used more extensively.
All files in HFS+ and APFS (and other file systems) contain a fairly standard set of metadata known as attributes, information about a file such as its name, datestamps and permissions. Xattrs are extensions to those that contain almost any other type of metadata, the first notable xattr coming in Mac OS X 10.5, named com.apple.quarantine. That contains quarantine information for apps and other files downloaded from the internet, in a format so ancient that the quarantine flag is stored not in binary but as text.
The quarantine xattr demonstrates some of the valuable properties of xattrs: it can be attached to any file or folder without changing its data, and isn’t included when calculating CDHashes for code signatures. It can thus be added safely without any danger of altering the app or its code, although it does change the way that macOS handles the code, by triggering security checks used to verify it isn’t malicious. Once those have been run, the flag inside the quarantine xattr can be changed to indicate it has been checked successfully.
Far from being a passing phase, or dying out as some had expected, xattrs have flourished since those early days. This has happened largely unseen by the user: few alter anything revealed in the Finder’s Get Info dialog, although they’re used to store some forms of visible metadata such as Finder tags, and the URL used to download items from the internet.
Xattrs are named using a reverse-URL format like com.mycorp.setting. There’s no official name registry, as that should suffice to ensure each type remains unique. Editing xattrs is normally performed silently: you’re not made aware of changes in the quarantine xattr, and in most cases the only way to manage xattrs is to use the xattr command tool, or one of very few apps like xattred that can edit and manage them.
Storage
Xattrs aren’t stored with a file’s data, nor with its normal attributes.
For smaller extended attributes up to 3,804 bytes, their data is stored alongside the xattr in the file system metadata. Larger extended attributes are stored as data streams, with separate records, but still separate from the file data. Apple doesn’t give a limit on the maximum size of xattrs, but they can certainly exceed 200 KB, and each file and folder can have an effectively unlimited number of them.
Persistence
Metadata varies in its useful lifetime. Some xattrs are intended to have a short life and then either be rewritten or discarded, while others are expected to be more or less permanent. Files that are copied to non-native file systems including FAT and ExFAT volumes can preserve xattrs in hidden shadow files, but those copied to NFS will have all their xattrs stripped.
Moving a file with xattrs within the same volume shouldn’t affect those xattrs, as they remain within the same file system, but copying them to another volume, even if both use APFS, may leave some of them behind if they’re considered to be ephemeral.
At least two xattr types may be protected by System Integrity Protection, SIP, and thus can’t be directly removed by the user. This is most widespread in the MACL xattr, com.apple.macl, but can also be seen sometimes in provenance, com.apple.provenance. The way that works is quite distinctive, in that cutting or deleting the xattr is successful for an instant before macOS adds the xattr back. As SIP protection doesn’t survive copying to another volume, when you need to remove a MACL xattr you can do so on a copy of the file on a different volume.
The most complex situation is when a file with xattrs is moved to iCloud Drive. The Mac that originated that file is likely to retain most if not all of its xattrs, because the local copy remains within the same volume and file system. However, not all xattrs are copied up to iCloud storage, so other Macs accessing that file may only see a small selection of them. The rules for which xattrs are to be preserved during file copying, including in iCloud Drive, are baked into macOS, and are outlined in the Appendix at the end.
In 2013, as part of its enhancements for iCloud in particular, Apple added support for flags on xattrs to indicate how those xattrs should be handled when the file is copied in various ways. Rather than change the file system, Apple opted to append characters to the end of the xattr’s name.
If you work with xattrs, you’ve probably already seen this in those whose name ends with a hash # then one or more characters: those are actually the flags, not part of the name, what Apple refers to as a ‘property list’. To avoid confusion I refer to them as xattr flags. A common example of this is com.apple.lastuseddate#PS, which is seen quite widely.
Appendix: Xattr flags
When first introduced in Mac OS X, no provision was made for xattrs to have type-specific preservation, and that was added later using flags suffixed to the xattr’s name. For example, the com.apple.lastuseddate xattr found commonly on edited files is shown with a full name of com.apple.lastuseddate#PS to assign the two flags P and S to it, and the most recent xattr com.apple.fileprovider.pinned, used to mark files in iCloud Drive that have been pinned, has the two flags P and X assigned to it for a the full name of com.apple.fileprovider.pinned#PX.
This is a kludge, as you normally have to refer to the xattr name including its flags, although the flags aren’t really part of its name. It’s further complicated by a set of system tables for some standard xattr types that don’t have flags suffixed, but are treated as if they do. One notable example of those is the quarantine xattr com.apple.quarantine, which is handled by macOS as if it has the PCS flags attached, although those are never used when referring to it by name.
There are also lower case flags that can be used to override those set in system tables, although those appear to be used exceedingly rarely, and I don’t recall ever coming across them. In theory, if you were using a new type based on the standard com.apple.metadata: family, com.apple.metadata:kMDItemNew, you could alter its behaviour to some similar types with the flags psB, as in com.apple.metadata:kMDItemNew#psB. I have no idea whether that would be respected in practice. For the rest of this article, I will ignore the existence of those lower case flags.
Intents
File operations involving decisions about the preservation of xattrs are simplified into the following intents:
copy – simply copying a file from a source to a destination and preserving its data, such as using cp, is labelled XATTR_OPERATION_INTENT_COPY
save – saving a file when probably changing its content, including performing a ‘safe save’; this may over-write or replace the source with the saved file. Some xattrs shouldn’t be preserved in this process of XATTR_OPERATION_INTENT_SAVE
share – sharing or exporting this file, perhaps as an attachment to email, or placing the file in a public folder. Some sensitive metadata shouldn’t be preserved in XATTR_OPERATION_INTENT_SHARE
sync – syncing the file to a service such as iCloud Drive, in XATTR_OPERATION_INTENT_SYNC
backup – backing the file up, perhaps using Time Machine, in XATTR_OPERATION_INTENT_BACKUP.
Flags
As of macOS 15.0 (including 26.0), the following flags are supported:
C: XATTR_FLAG_CONTENT_DEPENDENT ties the flag with the file contents, so the xattr has to be recreated when the file data changes. This may be appropriate for checksums and hashes, text encoding, and position information. The xattr is then preserved for copy and share, but not in a safe save.
P: XATTR_FLAG_NO_EXPORT doesn’t export or share the xattr, but preserves it during copying.
N: XATTR_FLAG_NEVER_PRESERVE ensures the xattr is never preserved, even when copying the file.
S: XATTR_FLAG_SYNCABLE ensures the xattr is preserved during syncing with services such as iCloud Drive. Default behaviour is for xattrs to be stripped during syncing, to minimise the amount of data to be transferred, but this flag overrides that.
B: XATTR_FLAG_ONLY_BACKUP keeps the xattr only in backups, including Time Machine, where there’s no desire to minimise what’s backed up.
X: XATTR_FLAG_ONLY_SAVING keeps the xattr only when saving and in backups, including Time Machine (macOS 15.0 and later only).
There’s another system limit that must be adhered to: total length of the xattr name including any # and flags cannot exceed a maximum of 127 UTF-8 characters.
System tables
These are hard-coded in source, where * represents a ‘wild card’:
com.apple.quarantine – PCS preserved in copy, sync, backup
com.apple.metadata:kMDItemCollaborationIdentifier – B backup
com.apple.metadata:kMDItemIsShared – B backup
com.apple.metadata:kMDItemSharedItemCurrentUserRole – B backup
com.apple.metadata:kMDItemOwnerName – B backup
com.apple.metadata:kMDItemFavoriteRank – B backup
com.apple.metadata:* (except those above) – PS copy, save, sync, backup
com.apple.security.* – S or N depending on sandboxing, see below
com.apple.ResourceFork – PCS copy, sync, backup
com.apple.FinderInfo – PCS copy, sync, backup
com.apple.root.installed – PC copy, backup.
System defaults for com.apple.security.* depend on whether the app performing the file operation is running in an app sandbox. Non-sandboxed apps apply S to preserve the xattr for copy, save, share, sync, backup; for sandboxed apps N is applied so the xattr is never preserved, even when copying the file.
Flags and intents
We can now revisit the list of intents, and establish the effects of xattr flags on each, as:
XATTR_OPERATION_INTENT_COPY preserves xattrs that don’t have flag N or B or X
XATTR_OPERATION_INTENT_SAVE preserves xattrs that don’t have flag C or N or B
XATTR_OPERATION_INTENT_SHARE preserves xattrs that don’t have flag P or N or B or X
XATTR_OPERATION_INTENT_SYNC preserves xattrs if they have flag S, or have neither N nor B
XATTR_OPERATION_INTENT_BACKUP preserves xattrs that don’t have flag N.
Finally, Apple provides separate information on how xattrs are synced by FileProvider, for iCloud Drive and third-party cloud services using that API. This confirms that the S flag should sync a xattr, but is vague on other flags, simply stating “some older attributes are also synced”. However, a cap is applied on the maximum size of xattrs that are syncable, at “about 32KiB total for each item”. If the xattrs exceed that limit “the system automatically makes some of the attributes nonsyncable.” More puzzlingly, it states “the resource fork is content and isn’t included in the extended attributes dictionary.”
Sources
xattr_flags.h, xattr_flags.c, xattr_properties.h in copyfile source, e.g. at Apple’s OSS Distributions Github
man xattr_name_with_flags(3), included in copyfile source FileProvider (Apple).
Like any file, a disk image can become corrupt or damaged, and like any mountable disk its file systems can also become corrupt or damaged. Although those should be very infrequent, their results can disastrous, and render the contents of that disk image inaccessible. This article suggests some solutions you can try.
In theory, if the problem is in the image’s file systems, you should be able to mount its volumes and run First Aid in Disk Utility to check and repair them. In practice that seldom works out, as macOS usually refuses to mount the image. Unless you have ready access to a recent backup, all you can do then is resort to Terminal’s command line to attempt a recovery.
Gaining access to the contents of a disk image requires two steps to complete: first the image must be attached as a device, then after probing of the file systems it contains, those can be mounted.
Read-only and compressed disk images have a checksum stored, and this is normally verified against the image file data first. If that proves invalid, then macOS will refuse to go any further.
In the past, records of checksum verifications have been stored in extended attributes such as com.apple.diskimages.recentcksum, and sometimes deleting those, or a record of the file systems being checked using fsck in com.apple.diskimages.fsck, can allow the disk image to mount. More recently those appear to have fallen into disuse.
Next you should try to attach the disk image without verification or mounting. This is best done using a command such as hdiutil attach -nomount -noverify diskImagePath
where diskImagePath is the full path to the disk image file, such as /Users/hoakley/VMs/myImage.dmg
If this succeeds, you’ll be rewarded with a list of the resulting devices, such as /dev/disk4 GUID_partition_scheme
/dev/disk4s1 EFI
/dev/disk4s2 Apple_APFS
/dev/disk5 EF57347C-0000-11AA-AA11-0030654
/dev/disk5s1 41504653-0000-11AA-AA11-0030654
The first is the disk device disk4, and is followed by its two standard partitions disk4s1 and disk4s2. The latter is its APFS container disk5 with its single APFS volume disk5s1. You can now check and repair the last two of those, such as fsck_apfs -y /dev/disk5s1
which should return a blow-by-blow account of the results. If the file system is HFS+ you may also be able to use third-party repair tools such as DiskWarrior.
When you’ve completed the required repairs, detach the disk image with a command like hdiutil detach /dev/disk4
If that fails to make the disk image mountable, some have claimed success by converting the disk image to a different format, using a command like hdiutil convert diskImagePath -format Uxxx -o outImagePath
where diskImagePath is the original disk image, outImagePath is the new image to be created, and Uxxx is the name of a disk image type, as listed in the Appendix.
If none of these gives access to the contents you require, then it’s almost certain that the only way ahead is to find the latest backup of that disk image, and use a copy of that.
Appendix: Supported disk image formats
UDRW – UDIF read/write, sparse file from macOS 12
UDRO – UDIF read-only
UDCO – UDIF ADC-compressed
UDZO – UDIF zlib-compressed
ULFO – UDIF lzfse-compressed (OS X 10.11)
ULMO – UDIF lzma-compressed (macOS 10.15)
UDTO – DVD/CD-R master for export
UDSP – sparse image, grows with content
UDSB – sparse bundle, grows with content, bundle-backed, Mac OS X 10.5
UFBI – UDIF entire image with MD5 checksum.
ASIF – sparse image, grows with content, macOS 15.
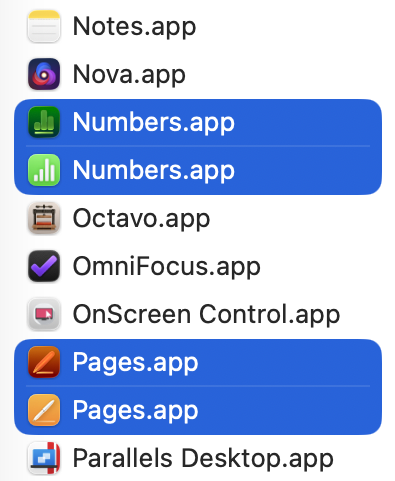
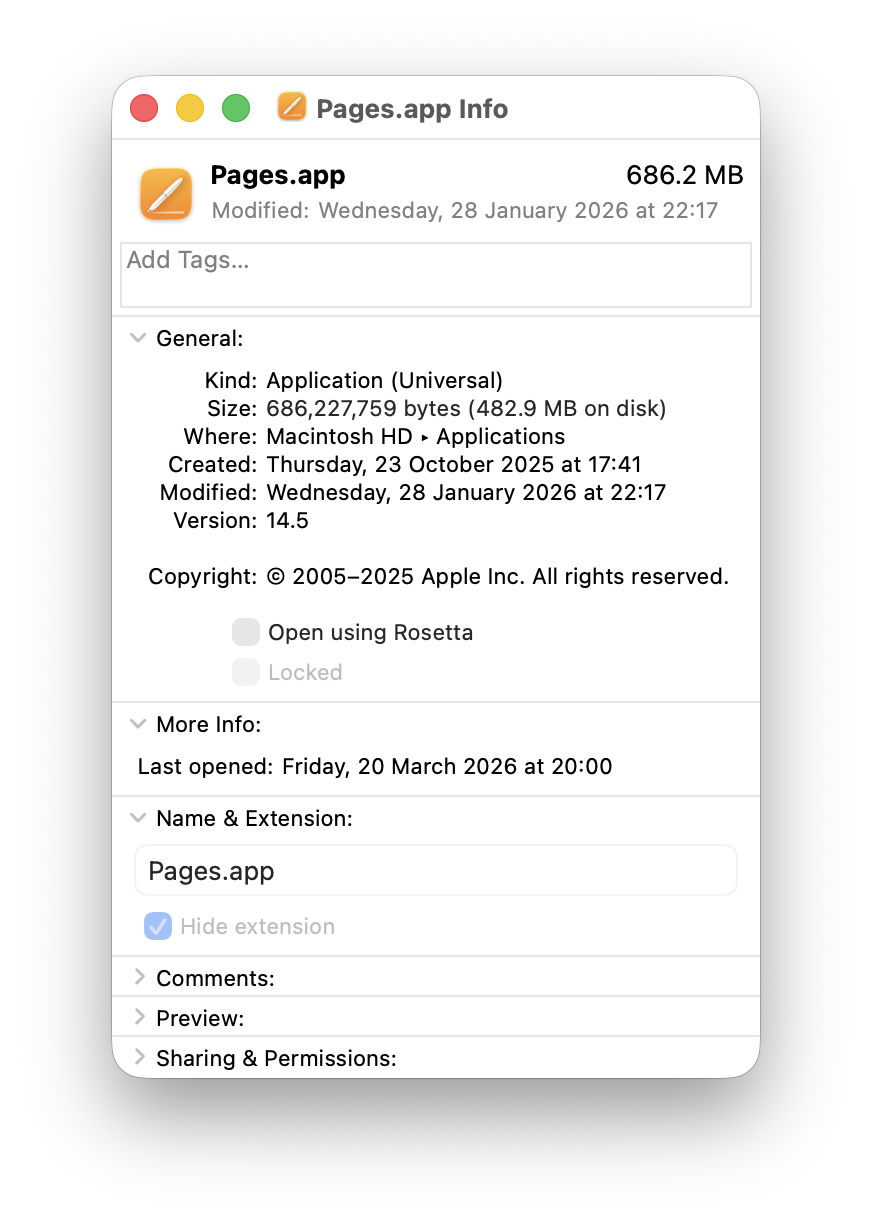
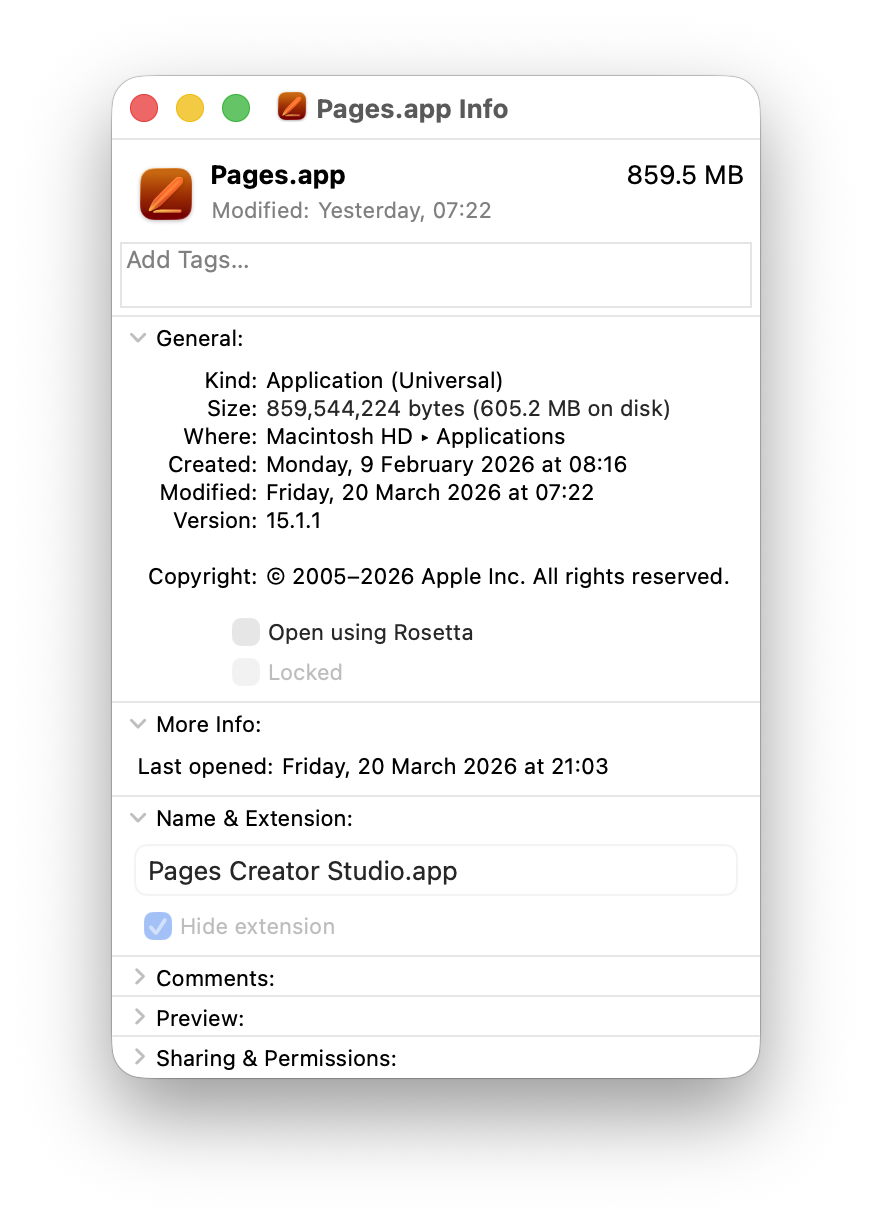
If you’ve installed Apple’s new Creator Studio versions of what used to be its iWork apps, I’m sure you noticed something odd in your Applications folder. For there, side by side, are apps with exactly the same names, two Keynote.apps, two Numbers.apps, and two Pages.apps. This article explains the trickery that went into that.
We take it for granted that what we see in the Finder is truthful, despite obvious trickery like hidden folders, and iCloud Drive which doesn’t really exist at all. When it comes to bundles like applications, the Finder doesn’t actually show the true folder name, but the bundle name set in that bundle’s Info.plist.
You can get an inkling of what’s going on by selecting the two Pages apps and opening Get Info on each.
The old Pages.app looks straight, giving its Name & Extension as Pages.app as you’d expect.
But the Name & Extension given for the new Pages.app turns out to be Pages Creator Studio.app, and that’s the real name of its app folder.
Check both using my free utility Precize and you’ll see they are completely different, with their own inode numbers and paths. Drag them into Terminal and that shows their true names in the file system, of Pages.app (old) and Pages Creator Studio.app (new).
If you have a property list or text editor handy, copy the Info.plist from inside each app bundle and inspect them side by side.
The old Pages app is still playing this straight: CFBundleDisplayName = Pages
CFBundleName = Pages
CFBundleIdentifier = com.apple.iWork.Pages
By comparison, the new app is up to no good: CFBundleAlternateNames = Pages
CFBundleDisplayName = Pages Creator Studio
CFBundleName = Pages
CFBundleIdentifier = com.apple.Pages
There’s a great deal more to accomplishing this with finesse as Apple has done here. Other locations in the app such as its About window and menus also need tweaking to ensure that nowhere breathes a word about the trick that has been pulled. And just to add a bit of spice, apps still using AppKit are quite different from those now using SwiftUI.
My only remaining question is why Apple would want to give the two apps identical names. The primary purpose of setting the CFBundleDisplayName is to accommodate better to the limited display area on devices. An app that has a long full name, like The Time Machine Mechanic, obviously needs to be shortened, and ellipses are a clumsy solution. By giving the app developer the opportunity to display something shorter it makes our iPhones look much neater.
Although it’s a clever trick to pull in macOS, I suspect it’s going to confuse more than it amazes.
This article explains how to deal with warnings and errors reported either when you run Disk Utility’s First Aid, or by the command tools fsck or fsck_apfs, on an APFS volume or container.
Keep a record
Even if the item is repaired successfully, it’s essential to keep a record of what happened. In Disk Utility, expand the First Aid window so you can see the full output of fsck_apfs, select its whole contents, copy and paste them into a text document, and save that. Do the same with the output in Terminal if that’s what you used.
You may also find two text log files of potential use: /var/log/fsck_apfs.log and /var/log/fsck_apfs_error.log, both accessible in Console or a text editor. Although errors may also be written to the Unified log, you’ll probably want to avoid going there.
Was this on the Data volume?
First Aid in Disk Utility will check and attempt to repair the current Data volume when running in normal user mode, by effectively freezing the Mac. However, that’s not as reliable as running the same procedure when your Mac is in Recovery mode. If you see warnings or errors reported from the current Data volume in normal user mode, before going any further start your Mac up in Recovery and repeat the checks in Disk Utility (or fsck_apfs) there, to confirm they are real, and give your Mac the best chance of making a successful repair.
This can also sometimes help when checking backup volumes, and any that have proved difficult to check because the volume can’t be unmounted in normal user mode.
Are these just warnings?
Read carefully through your copy of the output of fsck_apfs and check whether the comments there are warnings, or contain specific errors. Warnings aren’t uncommon, and are often of little consequence even when you can understand them. Among the commonest is Resource Fork xattr is missing for compressed file
As there’s nothing you could or should do about that, keep the record and don’t worry about it.
You’ll occasionally see a report that “deferred repairs” were completed. These appear to be minor fixes that APFS keeps for a convenient moment. Provided they are fixed without further error, you should be able to ignore them safely.
If a line explicitly reports an error, and fsck_apfs was unable to repair it, then it’s something you should take more seriously, and try to pin down the site of the problem.
Identify the item
fsck_apfs identifies items with their inode number, an integer that can be very large. To make any sense of that, you need the volume number as well, and a means of converting the two into a path. My free utility Mints can do that in its inode Resolver window, from the Window/Data/Inode menu command, or you can do it yourself in Terminal with a command like GetFileInfo /.vol/[volnumber]/[inode]
where volnumber is the volume number, and inode is the number given in the error or warning. This is explained in detail here.
Now that you know which file or folder resulted in the error or warning, you need to decide whether you can do anything about it. This is most important when you keep seeing similar errors, so you can prevent them from happening in the first place.
Is the item in a snapshot?
Checking snapshot 2 of 23 (com.apple.TimeMachine.2023-08-27-072736.local)

warning: inode (id 113812826): Resource Fork xattr is missing for compressed file
Snapshots are a special case, as they’re intended to be read-only, so are most unlikely to be repairable. If this is a snapshot on a volume that is backed up by Time Machine or another utility, then the only way you’ll fix this is by deleting that snapshot. Don’t do that, though, if the snapshot is on the volume storing your backups, as you’d be deleting one of those backups.
If this problem recurs in other snapshots, then it most probably reflects a problem in the file in the snapshot. Is it perhaps a large virtual machine (VM) or something similar? Keep your VMs on a separate volume which you exclude from backups, because of the many problems they can cause. The best way to back up a VM is when it’s shut down, as a simple copy to a separate backup storage volume. You can do the same with any other file that seems to be the cause of repeated problems in snapshots: move it to a separate volume that’s in Time Machine’s list of excluded items, and make arrangements for that volume to be backed up separately when the files aren’t in use.
Is the item in a Spotlight index?
Several of those who report repeated warnings or errors in APFS trace them to part of the Spotlight indexes on that volume, which are stored at the top level of all indexed volumes, in the hidden folder .Spotlight-V100. If that’s the case, your next move is to force those indexes to be rebuilt, in the hope that fixes the problem.
To do that, open Spotlight settings, and click the Search Privacy button at the foot of its window. Use the + tool to add the volume on which the problems have been occurring, then close those settings. Leave your Mac for a minute or so, open those settings again, select the volume you just added to the list, and use the – tool to remove it. In the next ten minutes or so, check Activity Monitor’s CPU window, where you should see high levels of activity from indexing processes such as mds and mds_stores, that confirm those indexes are being rebuilt.
Is the item in another special folder?
There are other hidden folders with special roles that appear on volumes and could be the source of APFS errors. These include .DocumentRevisions-V100, containing the document version database. If the problem file is inside that, there isn’t much you can do about it. It may be possible to delete the whole folder, but that will destroy all saved versions of documents on that volume.
It’s just a regular file
If the volfs path resolves to a regular file, then maybe deleting that file will stop the problem from recurring. Don’t expect a backup copy of that file to be any different, though, as any problem with that file could easily recur. Getting to the bottom of a recurrent file system error might require the knowledge and skills of an Apple engineer. Consider reporting this using Feedback, as it should then help iron out any remaining bugs in APFS.
Is your Mac running anything that might break files?
As a final thought, you should consider whether any third-party software might be the root cause of the problem. Normally, such products should work at a higher level that isolates them from the file system itself, but there are some surprising exceptions. If you can identify a cause, please inform the developers of that software so that it can be fixed.
One potentially dangerous practice occurs when an older version of APFS changes a newer file system. APFS back in High Sierra and Mojave knew nothing of boot volume groups, firmlinks, or many of the features of more modern versions of APFS. If you really must run different versions of macOS on the same Mac, or shared external storage, avoid such version conflicts, and never run an older version of Disk Utility or fsck_apfs on a newer APFS container or volume.