Nigel Farage’s anti-immigrant, populist agenda has helped his party, Reform U.K., emerge from the fringe of politics in Britain. But it faces an uphill climb to win power.
The director of Britain’s electronic surveillance agency warned that Moscow was getting more brazen, adding that estimates suggested 500,000 Russian soldiers had been killed in the Ukraine war.
The director of Britain’s electronic surveillance agency warned that Moscow was getting more brazen, adding that estimates suggested 500,000 Russian soldiers had been killed in the Ukraine war.
The latest artificial intelligence models from Anthropic and OpenAI are extending the United States’ lead over China and intensifying the rivalry between the countries.
Few accounts of painting in the last decades of the nineteenth century consider the importance of photography at the time. Yet photography was enjoying remarkable technical advances: in 1884, George Eastman started replacing glass plates with light-sensitive film, and four years later he launched the first Kodak camera, the predecessor of the Kodak Brownie that was to follow in 1901. As Naturalist painting was taking the Salon by storm, its rival was becoming more widely available, and no longer required a private chemistry lab.
First responses to photography by painters were often hostile.
Philipp Sporrer (1829-1899), The Photo (1870), oil on canvas, 81.5 x 63.5 cm, location not known. Wikimedia Commons.
Philipp Sporrer’s The Photo (1870) is probably the most pointed painted propaganda. The young photographer is not the sort of man you would leave your wife or daughter with. He’s down at heel, unkempt, and his straw hat is abominably tatty. His studio is poorly-lit, probably an old shed, its floor littered with rubbish, and its window broken. His subject is manifestly poor and uncouth, sitting in ill-fitting clothes and picking his nose as he waits for the photographer to fiddle with his equipment.
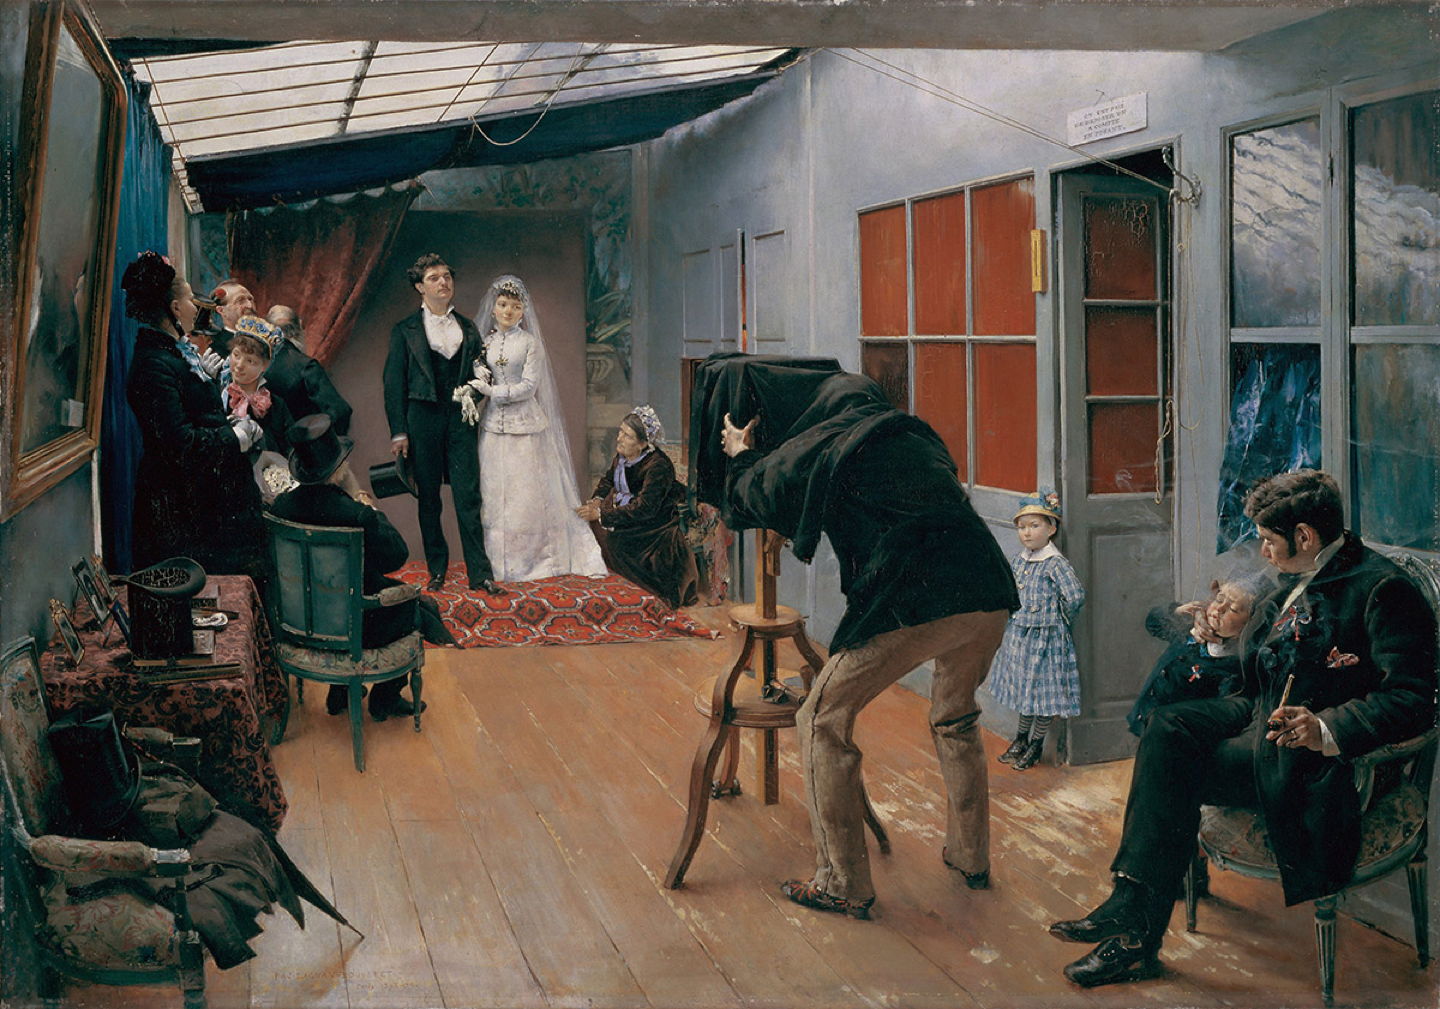
Pascal Dagnan-Bouveret (1852–1929), Une noce chez le photographe (A Wedding at the Photographer’s) (1879), oil on canvas, 120 x 81.9 cm, Musée des Beaux-Arts, Lyon, France. Wikimedia Commons.
Pascal Dagnan-Bouveret’s A Wedding at the Photographer’s (1879) seems more calculated. Hugely successful at the Salon, this artist saw no threat from wedding photography, a market in which there was no competition between painting and photography. But he still takes the opportunity to show the photographer and his studio as being tatty and tawdry.
Gradually, painting started to become influenced by the nascent art of photography, most obviously in the use of views through the lens of a camera.
Gustave Caillebotte (1848–1894), Les Raboteurs de parquet (The Floor Scrapers) (1875), oil on canvas, 102 x 147 cm, Musée d’Orsay, Paris. Wikimedia Commons.
Gustave Caillebotte’s major painting of 1875 shows three workmen preparing a wooden floor in the artist’s studio at 77 rue de Miromesnil. It’s thoroughly detailed, Realist, and despite its innovative view and unusual subject, it conformed to the highest standards of the Salon at the time.
Caillebotte was hurt and angry when he was informed that this painting had been rejected by the Salon jury. The grounds given seem extraordinary now: apparently the jury was shocked at this depiction of the working class at work, and not even fully-clothed. It was deemed to have a ‘vulgar subject matter’ unsuitable for the public to view. Or was it really because of his wide-angle photographic effect?
Gustave Caillebotte (1848–1894), Paris Street, Rainy Day (1877), oil on canvas, 212.2 x 276.2 cm, Art Institute of Chicago, Chicago, IL. Wikimedia Commons.
Caillebotte was one of the first established painters to experiment with photography, as demonstrated in another wide-angle view of Paris Street, Rainy Day from 1877.
Jules Bastien-Lepage (1848–1884), Les Foins (Haymakers) (1877), oil on canvas, 160 x 195 cm, Musée d’Orsay, Paris. Wikimedia Commons.
During his development of Naturalism, Jules Bastien-Lepage arrived at a compositional formula that achieved similar effects, as seen in his Haymakers or Hay making in the same year, with its high horizon and fine detail in the foreground. Together these also give the visual impression that the whole canvas is meticulously realist, although in fact much of its surface consists of visible brushstrokes and other more painterly forms.
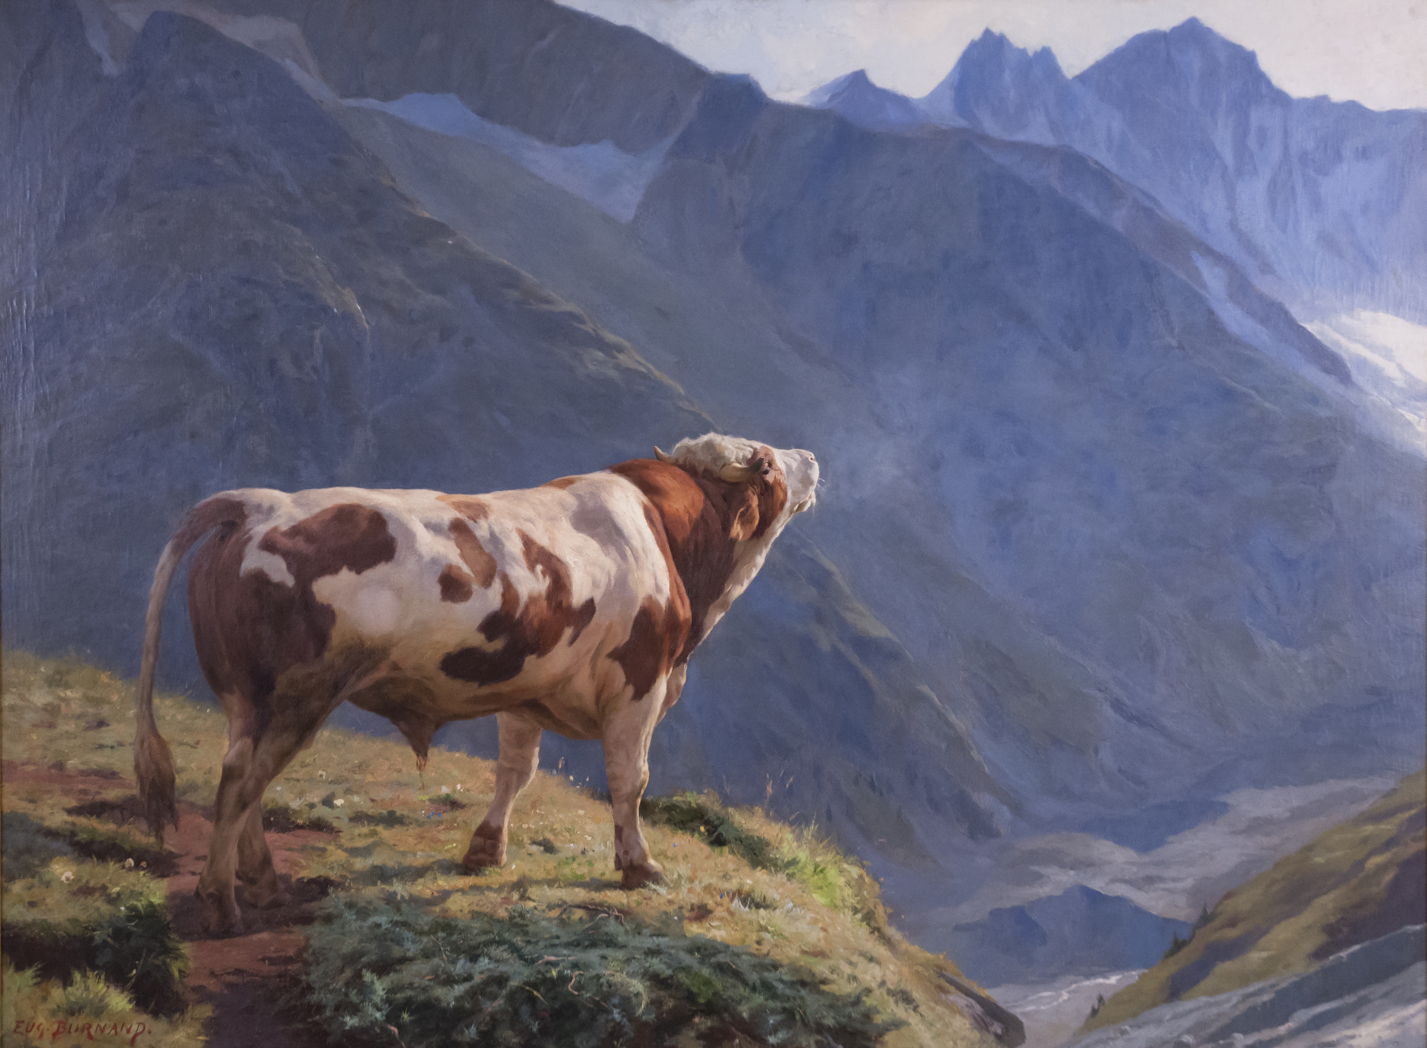
Eugène Burnand (1850–1921), Bull in the Alps (1884), oil, dimensions and location not known. Wikimedia Commons.
Eugène Burnand’s magnificent painting of Bull in the Alps from 1884 is fascinating for his use of both optical effects and extreme aerial perspective. Not only are there marked contrasts between the foreground and background in terms of chroma, hue and lightness, but Burnand has used defocussing in a photographic manner. The crisp edges of the bull stand proud of the softer edges and forms in the mountains behind. It’s worth noting that Burnand had been a pupil of Jean-Léon Gérôme.
Paul Louis Martin des Amoignes (1858–1925), In the Classroom (1886), oil on canvas, 68.5 × 110.5 cm, location not known. Wikimedia Commons.
Paul Louis Martin des Amoignes’ painted his wonderful In the Classroom two years later, in 1886. It bears unmistakeable evidence that it was either painted from photographs or strongly influenced by them. One boy, staring intently at the teacher in front of the class, is caught crisply, pencil poised in his hand. Beyond him the crowd of heads becomes more blurred.
By the 1890s, more painters were experimenting with photography.
Edgar Degas (1834–1917), Portrait of Henry Lerolle with two of his daughters, Yvonne and Christine and a mirror (1895-96), albumen print, 28 x 37 cm, Musée d’Orsay, Paris. Wikimedia Commons.
Among them was Edgar Degas. This is an albumen print of patron and amateur painter Henry Lerolle with two of his daughters, Yvonne and Christine, taken by Degas in 1895-96.
The realist painter Jean-Léon Gérôme not only experimented with photography for many years, but was an enthusiastic advocate for its recognition as an art in its own right.
Jean-Léon Gérôme (1824–1904), Truth Coming out of her Well to Shame Mankind (1896), oil on canvas, 91 x 72 cm, Musée Anne-de-Beaujeu, Moulins, France. Wikimedia Commons.
Gérôme’s Truth Coming out of her Well to Shame Mankind (1896) is based on a quotation attributed to Democritus, “Of a truth we know nothing, for truth is in a well” (or, more literally, ‘in an abyss’). Gérôme used the same allusion in his preface to Émile Bayard’s posthumous collection of collotype plates of photographs of nudes, Le Nu esthétique. L’Homme, la Femme, L’Enfant. Album de documents artistiques inédits d’après Nature, published in 1902, where he wrote: Photography is an art. It forces artists to discard their old routine and forget their old formulas. It has opened our eyes and forced us to see that which previously we have not seen; a great and inexpressible service for Art. It is thanks to photography that Truth has finally come out of her well. She will never go back.
The Naturalist painter Jules-Alexis Muenier became a photographer by the time he travelled to North Africa with Pascal Dagnan-Bouveret in 1888, armed with cameras.
Artist not known, Jules-Alexis Muenier painting ‘The Harpsichord Lesson’ (date not known), photograph, further details not known. Image by Rauzierd, via Wikimedia Commons.
Although I have been unable to find a suitable image of the painting, this photograph shows Muenier with his painting of The Harpsichord Lesson in about 1911, which became his most famous work during his lifetime. Muenier, Gérôme and Dagnan-Bouveret weren’t just happy snapper photographers, but believed in photography as fine art. All three were early members of local photographic clubs, and Muenier and Dagnan-Bouveret exhibited their photographs as seriously as their paintings.
One of the Mac’s great attractions has been its support for those whose first language isn’t English. That means many of you, as WordPress tells me that you speak German, Dutch, Chinese, Spanish, French, Italian, Japanese, Polish, Swedish, and more, although perhaps not all at once. While English is great as a lingua franca, our mother tongue is our culture and our literary tradition, and a multilingual world is far richer for all our languages.
What you may not realise is the deep support for your languages in macOS. I’m not here referring to Language & Region settings, or translation support, but to the features in the Natural Language framework, introduced in macOS 10.14. It provides support for apps to analyse text in many different natural languages and do useful things with those analyses. These days, that not only includes support provided by Apple, but enables apps to deploy custom natural language models using Machine Learning, or AI if you prefer the term.
AI seems a particular problem for non-English languages at present. In the headlong rush to be first with the most powerful Large Language Model, an industry dominated by monolingual US corporations has focussed its efforts almost entirely on English. Although most of the leading LLMs are claimed to be multilingual, and some include over 50 languages, their models are in reality overwhelmingly built on English, with less than 10% representing all other languages. And that small minority breaks down to even less when you consider individual languages: even major European languages like Italian barely get a look-in.
I’d be interested to hear of your experience accessing LLMs using non-English languages.
This is an area that Apple’s enthusiastic support for smaller, local models could make them more useful than hugely expensive LLMs built in all those US-run data centres.
When the Natural Language framework was first released for macOS, I built an app to demonstrate some of its powers, Nalaprop, and its current version still runs happily in Tahoe. Although it remains useful for some, I feel the time has come to make better use of this framework, or let Nalaprop slip away quietly with the arrival of macOS 27 this autumn/fall. Let me explain what it currently does.
Nalaprop relies on linguistic support modules loaded into macOS. As far as I can tell at present, those provide full support for English, French, Spanish, German, Italian, Portuguese, Russian and Turkish. It can also recognise many other languages, but support for those doesn’t extend to analysing them more fully.
Load your Mac up with a good selection of those, some you’d like it to aspire to, and give it an hour or so to download and install additional language support. Then open Nalaprop’s bundled demonstration text file drawn from Wikipedia’s many languages.
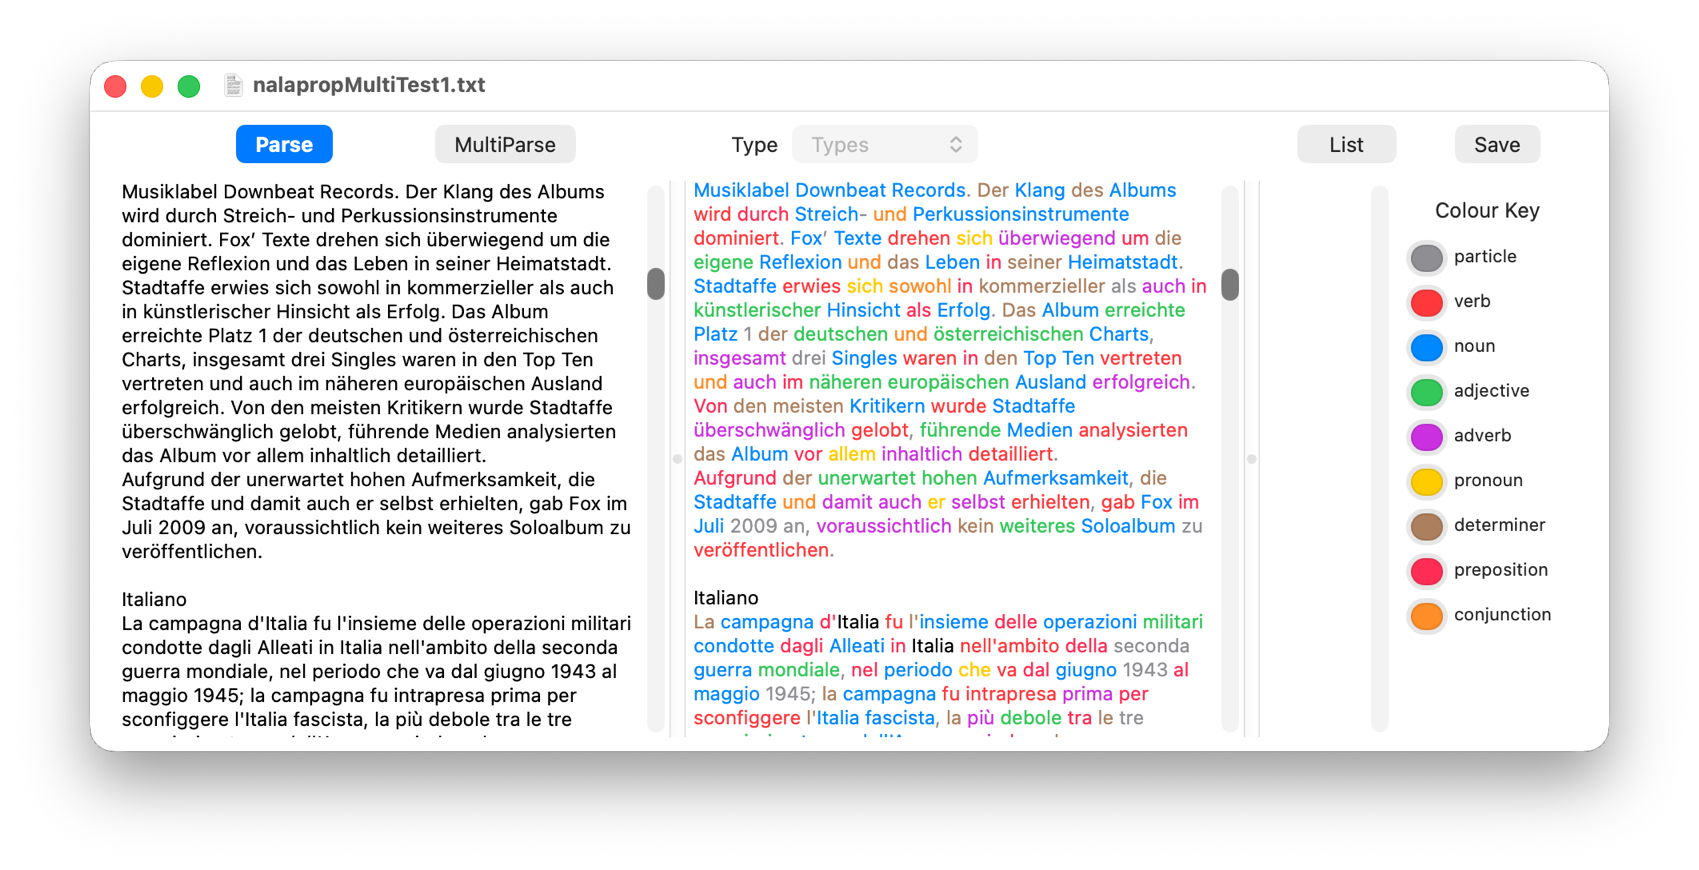
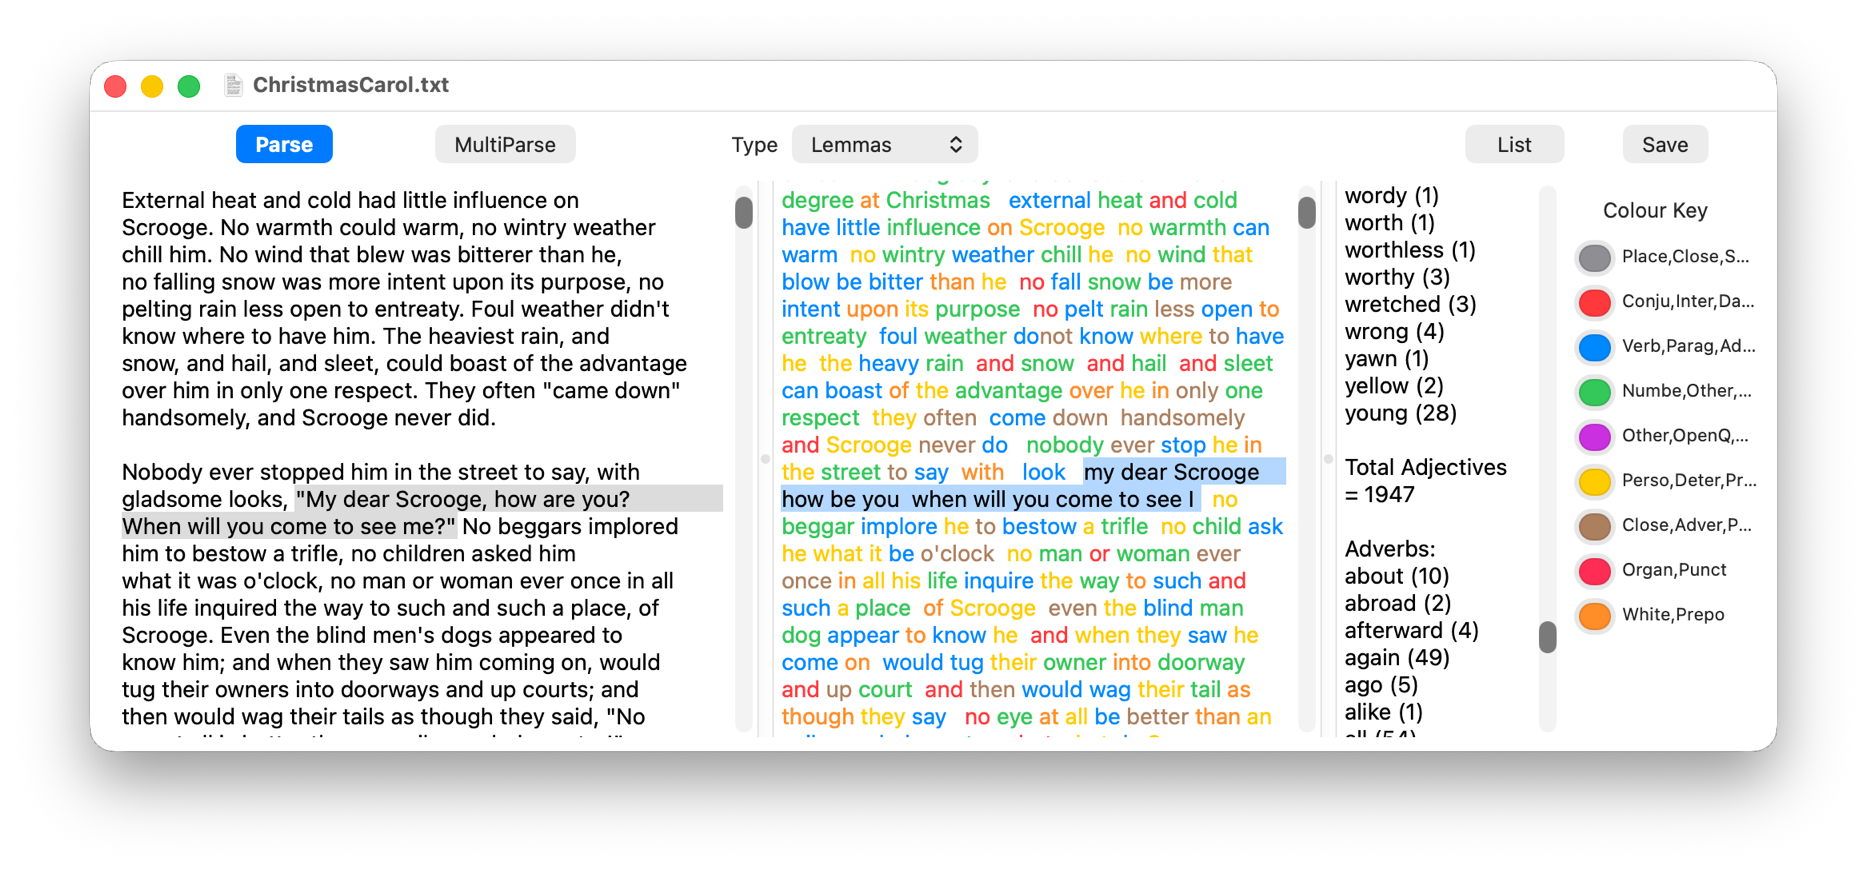
It then analyses the text (on the left) for the common parts of speech, such as nouns, verbs, adjectives, and colours all the words according to that classification (in the centre). As you can see here, it’s not afraid to do this on texts containing multiple languages, and appears to make a good job of all those its supports.
The next stage is initiated by clicking on the MultiParse button, which performs an even more thorough analysis, including lemmas, converting words into their ‘root’ form. For example, the English word is is a form of the verb to be, just as the French est is of être, so Nalaprop displays that root form of the word in the centre panel. As you can see, this doesn’t do much for English, which doesn’t decline words much, but for many languages it can be a great help when you’re trying to understand them.
Given all those lemmatised forms, Nalaprop can then build word lists by parts of speech, classifying the word young as an adjective, and finding a total of 28 examples (on the right) in the text of Charles Dickens’ novella A Christmas Carol.
Since I wrote Nalaprop, the Natural Language framework has extended its capabilities, and there’s a great deal more that the app could do, even down to building gazetteers of place-names, exploring similarities between words and sentences using semantic distance, and of course integrating AI built into macOS.
In most respects, lightweight virtualisation of macOS on Apple silicon delivers almost the same performance as running code on the host. That’s the result of having direct access to CPU cores and the GPU. However, earlier implementations in Monterey and Ventura performed poorly when accessing the Data volume in the Virtual Machine, with read/write speeds measured at 4.4/0.7 and 5.4/0.7 GB/s respectively, without FileVault or other encryption. In macOS 26.3.1 both RAW and ASIF encrypted disk images show disappointing performance particularly when writing to them. This article therefore re-evaluates VM disk performance to see if that extends to VMs.
Methods
Tests were performed on two freshly made 100 GB VMs in RAW format using the macOS 26.4 IPSW, running on a Mac mini M4 Pro in macOS 26.4. VMs were given 5 CPU cores and 16 GB memory, didn’t connect to an Apple Account, and were built and run in Viable and Vimy, both of which use the standard macOS API for virtualisation.
Performance was measured using Stibium’s ‘Gold Standard’ with 5 rather than 10 test sets, reading and writing a total of 26 GB in 80 files ranging in size between 2 MB and 2 GB. Following an initial write test, the VM was restarted before performing the read test. The first VM was configured with FileVault enabled, and the second with it disabled. In addition to those, standard read/write performance was measured as before on a 100 GB RAW disk image on the host, and on a 100 GB ASIF image, both being encrypted using 256-bit AES.
Results
Measured read/write speeds were:
Native SSD, FileVault on – 6.57/7.66 GB/s
VM, FileVault off – 6.62/5.91 GB/s
VM, FileVault on – 4.66/3.11 GB/s
RAW disk image, 256-bit AES – 2.82/1.59 GB/s
ASIF disk image, 256-bit AES – 2.85/1.76 GB/s.
With FileVault disabled, performance in the VM was surprisingly close to that of the host’s internal SSD, with a small reduction in write speed from 7.66 to 5.91 GB/s. That’s a huge improvement on previous results, with writes being almost ten times faster.
Enabling FileVault did reduce performance significantly, particularly write speed which fell to about half. However, those are still good enough to be acceptable for most purposes.
No significant change was seen in host disk image performance from those measured in 26.3.1, though, which remains substantially slower than the VM with FileVault enabled.
Conclusions
VMs are vulnerable if they don’t have FileVault enabled. Without encryption, sensitive contents would be relatively easy to access if the VM were to fall into the hands of an attacker. Enabling FileVault is thus potentially more important for a VM.
Thankfully, with such great improvements in VM disk performance, those hosted on an Apple silicon Mac’s internal SSD are unlikely to be slowed much by their disk performance.
This makes it the more puzzling that encrypted RAW and ASIF disk images should perform so poorly, and it’s disappointing to see that continues in macOS 26.4. Over the same period that VM disk performance has increased so impressively, that of disk images has headed in the opposite direction.
VMs and BSIs
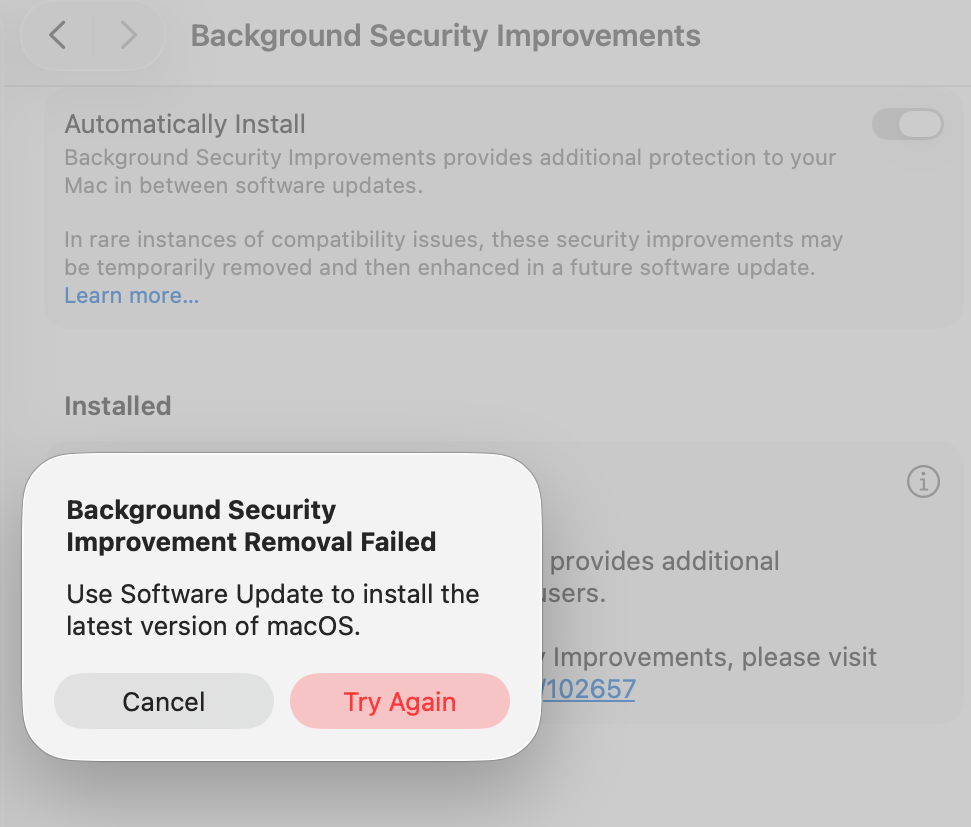
If you tried installing the recent Background Security Improvement (BSI) in a macOS 26.3.1 VM, you were probably disappointed. In this respect, the VM didn’t work as expected. I was unable to find the BSI in its section in Privacy & Security settings. What did help was downloading it using SilentKnight, although that can’t install BSIs successfully. Instead, I restarted the VM and Privacy & Security offered to install the BSI at last.
Once installed, Privacy & Security offered to remove the BSI, but failed to do so, with SecurityImprovementsExtension reporting: Rollback failed: Error Domain=SUOSUErrorDomain Code=103 "Unable to remove Background Security Improvement" UserInfo={NSLocalizedDescription=Unable to remove Background Security Improvement, NSLocalizedRecoverySuggestion=Use Software Update to install the latest version of macOS.}
For the time being BSIs appear dysfunctional in VMs.
Like any file, a disk image can become corrupt or damaged, and like any mountable disk its file systems can also become corrupt or damaged. Although those should be very infrequent, their results can disastrous, and render the contents of that disk image inaccessible. This article suggests some solutions you can try.
In theory, if the problem is in the image’s file systems, you should be able to mount its volumes and run First Aid in Disk Utility to check and repair them. In practice that seldom works out, as macOS usually refuses to mount the image. Unless you have ready access to a recent backup, all you can do then is resort to Terminal’s command line to attempt a recovery.
Gaining access to the contents of a disk image requires two steps to complete: first the image must be attached as a device, then after probing of the file systems it contains, those can be mounted.
Read-only and compressed disk images have a checksum stored, and this is normally verified against the image file data first. If that proves invalid, then macOS will refuse to go any further.
In the past, records of checksum verifications have been stored in extended attributes such as com.apple.diskimages.recentcksum, and sometimes deleting those, or a record of the file systems being checked using fsck in com.apple.diskimages.fsck, can allow the disk image to mount. More recently those appear to have fallen into disuse.
Next you should try to attach the disk image without verification or mounting. This is best done using a command such as hdiutil attach -nomount -noverify diskImagePath
where diskImagePath is the full path to the disk image file, such as /Users/hoakley/VMs/myImage.dmg
If this succeeds, you’ll be rewarded with a list of the resulting devices, such as /dev/disk4 GUID_partition_scheme
/dev/disk4s1 EFI
/dev/disk4s2 Apple_APFS
/dev/disk5 EF57347C-0000-11AA-AA11-0030654
/dev/disk5s1 41504653-0000-11AA-AA11-0030654
The first is the disk device disk4, and is followed by its two standard partitions disk4s1 and disk4s2. The latter is its APFS container disk5 with its single APFS volume disk5s1. You can now check and repair the last two of those, such as fsck_apfs -y /dev/disk5s1
which should return a blow-by-blow account of the results. If the file system is HFS+ you may also be able to use third-party repair tools such as DiskWarrior.
When you’ve completed the required repairs, detach the disk image with a command like hdiutil detach /dev/disk4
If that fails to make the disk image mountable, some have claimed success by converting the disk image to a different format, using a command like hdiutil convert diskImagePath -format Uxxx -o outImagePath
where diskImagePath is the original disk image, outImagePath is the new image to be created, and Uxxx is the name of a disk image type, as listed in the Appendix.
If none of these gives access to the contents you require, then it’s almost certain that the only way ahead is to find the latest backup of that disk image, and use a copy of that.
Appendix: Supported disk image formats
UDRW – UDIF read/write, sparse file from macOS 12
UDRO – UDIF read-only
UDCO – UDIF ADC-compressed
UDZO – UDIF zlib-compressed
ULFO – UDIF lzfse-compressed (OS X 10.11)
ULMO – UDIF lzma-compressed (macOS 10.15)
UDTO – DVD/CD-R master for export
UDSP – sparse image, grows with content
UDSB – sparse bundle, grows with content, bundle-backed, Mac OS X 10.5
UFBI – UDIF entire image with MD5 checksum.
ASIF – sparse image, grows with content, macOS 15.
One of the biggest penalties in using disk images has been their performance, particularly when they’re encrypted. Although no longer offered in Disk Utility, UDSP sparse images encrypted using 256-bit AES typically read and write as slow as 500/100 MB/s when mounted from an SSD delivering 4.7/4.9 GB/s. In contrast, UDSB sparse bundles can achieve close to that native speed.
macOS Sequoia brought a new type of disk image, Apple Sparse Image Format or ASIF, intended to deliver the high performance of sparse bundles, with their efficient use of storage space, in a single file that can be hosted on file systems beyond APFS. As this is now well over 18 months old, this article considers whether it has achieved those goals, and should become the preferred type of disk image.
Methods
Each test image was created using Disk Utility 22.7 (2510) in macOS 26.3.1 (a) running on a Mac mini M4 Pro, on its internal SSD of 2 TB. Performance measurements were made using the ‘gold standard’ method in my free Stibium on disk images of 100 GB nominal size. This writes and reads a total of 53 GB in 160 files ranging in size between 2 MB and 2 GB. As performance is likely to change with use of the disk image, the following sequence of events was used:
Create disk image, which is mounted automatically, so unmount.
Mount disk image, measure write speed, then unmount.
Mount disk image, measure read speed, then delete the last 8 of 10 sets of test files, and unmount.
Mount disk image, measure write speed, then unmount.
Mount disk image, measure read speed, then delete all test files, and unmount.
Mount disk image, measure write speed, then unmount.
Mount disk image, measure read speed, and unmount.
These provide three pairs of read/write measurements:
for an empty, unused 100 GB disk image;
for a 100 GB disk image containing over 10 GB of existing files in addition to 53 GB of test files;
for an empty 100 GB disk image that had previously contained about 66 GB of test files that had been deleted.
Disk image sizes were also measured when unmounted, using Precize or the Finder’s Get Info (for sparse bundles).
The three types of disk image tested were RAW (UDRW), UDSB (sparse bundle) and ASIF (sparse image). Each was tested fully when unencrypted, and test 1 was performed on an image encrypted using 256-bit AES.
Results
The best and most consistent performance was achieved by UDSB sparse bundles, as expected. Their read speeds were 6.13, 6.12 and 6.19 GB/s, and write 7.62, 8.03 and 7.79 GB/s for the three separate measurements, and 5.09/5.23 GB/s read/write when encrypted. When first created, the sparse bundle only occupied 32 MB on disk, but by the end had grown to 3.99 GB even though empty.
The RAW disk image, formerly known as UDRW, also largely performed as expected. Read speeds were 6.09, 6.10 and 6.08 GB/s, and write 10.11, 9.86 and 10.11 GB/s. Initially it only required 5.78 MB on disk, rising to 621 MB at the end. However, its performance when encrypted was disappointing, at 2.84/1.58 GB/s read/write.
ASIF disk images were good, but also ran into problems when encrypted. Unencrypted read speeds were 5.99, 5.88 and 5.85 GB/s, and write 9.55, 8.93 and 9.64 GB/s. When encrypted, those fell to 2.82/1.72 GB/s read/write, no better than the RAW disk image. The image file size started at 26.8 MB on disk when empty and unused, and returned to 954 MB when empty at the end.
To confirm that ASIF performance when encrypted wasn’t an anomaly, I repeated that pair of tests on a MacBook Pro M3 Pro running 26.3.1 (a), and obtained similar results at 2.63/1.52 GB/s read/write, using a 10 GB ASIF image with one-tenth of the tests, giving 3.32/1.65 GB/s, and using Blackmagic, which gave 2.92/1.15 GB/s read/write. Although there is variation, they appear remarkably similar.
Test 2 results are summarised in the table above, for ease of comparison, and with the earlier results from macOS 26.0 below.
What has gone wrong with encrypted writes?
Although most of the test results in macOS 26.3.1 are very similar to those from 26.0, performance when using 256-bit AES encryption has fallen for all three disk image types, and most significantly in write performance for RAW and ASIF images, which have reduced from 4.3 to 1.58 GB/s (RAW) and from 3.9 to 1.72 GB/s (ASIF). The magnitude of those reductions is sufficient to have obvious impact on their use. Compared to native write performance using FileVault of 7.66 GB/s, those two types of disk image are pedestrian in the extreme, turning that blisteringly fast SSD into the equivalent of 20 Gbps over USB 3.2 Gen 2×2.
It’s possible that this dramatic reduction in encryption performance may have resulted from a change to address a vulnerability, but I’ve been unable to identify an entry in Apple’s security release notes that might correspond to such an event. I will repeat these tests once the update to macOS 26.4 has been released, in the hope it might be reversed.
Which disk image type?
When their folder-based structure is acceptable, UDSB sparse images remain the disk image type of choice, for their consistent high performance even when encrypted.
There is little to choose between RAW and ASIF disk images when a single file solution is required. ASIF images are portable to other file systems that can’t support APFS native sparse files, although curiously they too are flagged in APFS as being sparse files. As their sparseness isn’t dependent on APFS trimming habits, they are now an alternative that can be used on network storage and NAS. However, those able to use sparse bundles should continue to do so, particularly if using encryption.
A disk image is a file, or a folder containing files, that stores the contents of a physical storage medium. In contemporary usage most can be mounted as a disk or volume, so giving access to their contents. Originally developed to aid the manufacture of floppy disks, they go back long before the Mac, and now see wide use in all parts of macOS and its apps.
Since they were used in Classic Mac OS, they have come in a multitude of different formats and variants, many of which are listed in the Appendix. They’re an essential part of macOS installers, home to Recovery mode, and the basis for cryptexes. They’ve been used to burn and replicate optical disks, to archive disk contents, extensively in network backups, and for the distribution of software.
History
As early as Mac OS 9 in 1999, variants of formats had become complex. Here, Disk Copy is configured to create a read-only compressed .img file containing the contents of a standard 1.4 MB floppy disk. In the upper window, it has completed validating the checksum on a self-mounting .smi disk image that’s part of a DiskSet. Those could also be signed using certificates issued not by Apple but by DigiSign.
Mac OS X 10.1 Puma in 2001 brought a new standard with Universal Disk Image Format (UDIF) used in DMG disk images. Support for compression options in Apple Data Compression (ADC) unified what had previously been two disk image types, and extended support for images larger than a floppy disk. This new format enabled disk images to represent entire storage devices, complete with a partition map and disk-based drivers.
Mac OS X 10.5 Leopard in 2007 introduced the sparse bundle format, with its folder of smaller band files containing data. These enable the image to grow and shrink in size, and became a popular means of storing mountable Mac file systems on servers using different file systems.
Use
In their most common use, Disk Utility or a third-party app such as DropDMG creates and mounts an empty container file, then copies a hierarchy of files and folders into its virtual file system. While the disk image remains mounted, it’s presented as a removable volume, and when unmounted it’s just a regular file that can be moved, copied and backed up like any other.
Its virtual file system can be any supported by macOS, but in recent years is most likely to be APFS. As the disk image can be hosted on a completely different file system, this enables you to store APFS volumes on systems that don’t themselves support APFS. This is essential for networked storage being hosted on a different file system such as Btrfs. SMB can then be used to access the contents of that disk image over the network.
Disk Utility offers a limited range of formats and variants, including RAW images (UDIF), sparse bundles (UDSB), optical disk masters (UDTO), and the new Apple Sparse Image (ASIF). They can be encrypted, and contain file systems in APFS, HFS+, FAT or ExFAT. Two command tools extend those formats and variants, diskutil with its image verb being the equivalent of Disk Utility, and hdiutil providing the most extensive support.
Opening a disk image in the Finder performs two distinct operations: first the file or bundle is attached, much in the way that you might attach physical storage. Once that has occurred, the image is probed by macOS for file structures and systems, and those that can be mounted are mounted as external file systems, normally in the path /Volumes. Cryptexes are an exception to this, as APFS will graft the image’s file system into arbitrary locations in the host file system.
Verification
Two types of verification can be performed during an attach-and-mount procedure. The first can compare the file’s checksum against a stored value to determine if the file has become corrupted, while the second is performed during probing and mounting of file structures and systems within the image. The command tools provide options to attach an image without mounting that can be used to attempt repairs on its file systems, although those seldom seem successful.
This ‘warning’ alert from 2020 illustrates one of the longstanding issues with disk images. Although integrity checking of disk images using checksums has been valuable, when an error is found there’s no possibility of repair or recovery as the image fails to attach, so its file system can’t be made accessible.
Properties
There are two other issues to consider before using disk images, their read-write performance, and use of storage space.
This table summarises read and write performance of the most popular types of disk image prior to macOS Tahoe, and demonstrates how sparse bundles have consistently performed best and most consistently, and sparse images (now dropped from Disk Utility’s options) fare worst, particularly when encrypted.
The introduction of ASIF in Sequoia has added another option, although sparse bundles remain fastest overall. I will be re-examining these in the coming weeks, now that new format has had more time to mature.
Before macOS Monterey, sparse bundles and sparse images were the only formats that made efficient use of disk space, as they grow to accommodate their contents, and should shrink again when some or all of their contents are removed. Monterey is thought to be the first version in which UDIF read/write images (UDRW) have been stored in APFS sparse file format. This has transformed what had previously been space-inefficient disk images that retained empty storage, into a format that can prove almost as space-efficient as sparse bundles.
Summary
Disk images of various formats are widely used in macOS, as they are a file or folder containing a removable file system, like an external disk.
Basic tools for the most common formats and variants are provided in Disk Utility; third-party utilities such as DropDMG are more versatile. The command tool diskutil with its image verb extends those, and hdiutil is the most comprehensive.
Errors can and do occur, and may prevent a disk image from being mounted successfully. Those are hard to repair.
Sparse bundles remain fastest, most consistent, and most space-efficient.
UDIF read/write images generally perform well, and are now space-efficient too.
Experience with more recent ASIF images remains limited, although they show promise in both speed and efficiency.
Appendix: Disk image formats
Supported
UDRW – UDIF read/write, sparse file from macOS 12
UDRO – UDIF read-only
UDCO – UDIF ADC-compressed
UDZO – UDIF zlib-compressed
ULFO – UDIF lzfse-compressed (OS X 10.11)
ULMO – UDIF lzma-compressed (macOS 10.15)
UDTO – DVD/CD-R master for export
UDSP – sparse image, grows with content
UDSB – sparse bundle, grows with content, bundle-backed, Mac OS X 10.5
UFBI – UDIF entire image with MD5 checksum.
ASIF – sparse image, grows with content, macOS 15.
Unsupported
DC42 – Disk Copy 4.2 (Classic)
DART – compressed, for Disk Archive/Retrieval Tool (Classic)
Rdxx – read-only Disk Copy 6.0 formats
NDIF – Disk Copy 6.0, including IMG and self-mounting SMI
IDME – ‘Internet enabled’, on downloading post-processed to automatically copy visible contents into a folder, then move the image to the Trash. Now deemed highly insecure.
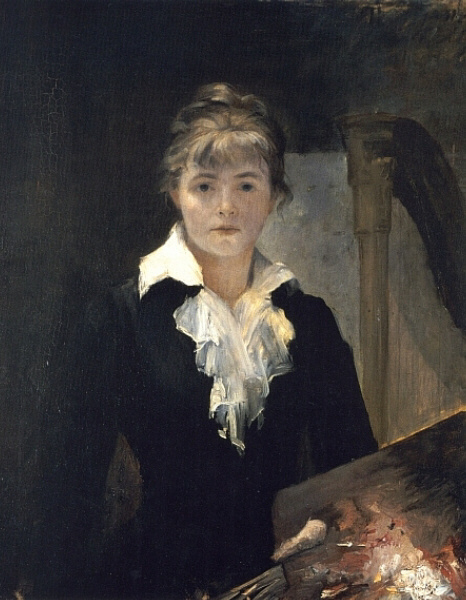
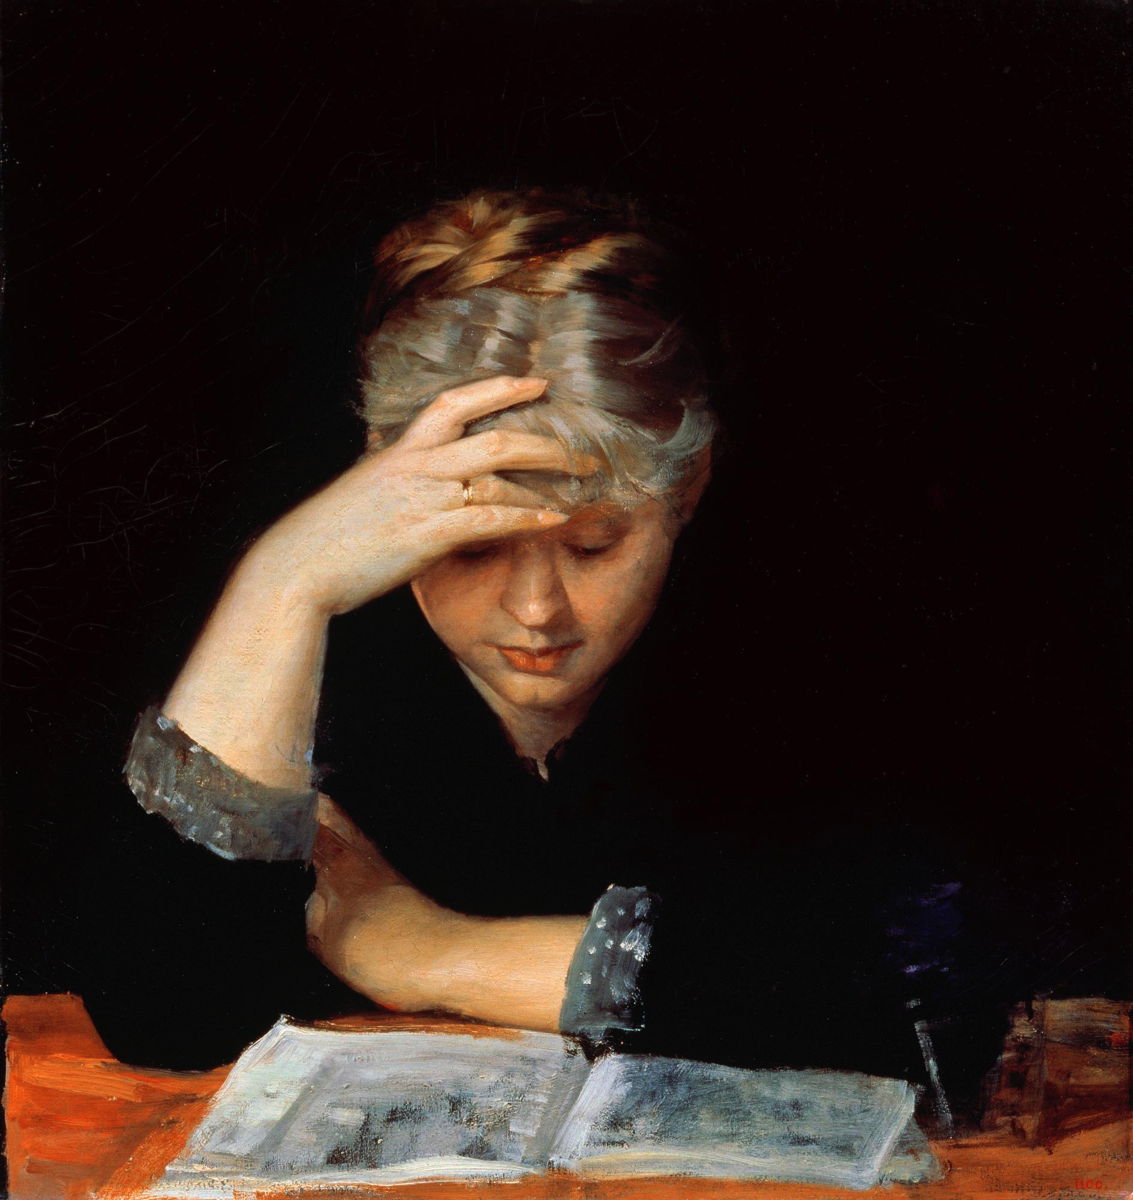
Jules Bastien-Lepage’s brilliant protégé was a young woman who started training in Paris in 1877, and who died from tuberculosis seven years later, just three months before him, Marie Bashkirtseff (1858–1884).
She was born and brought up in Havrontsi (Gavrontsi), to the north of Poltava in central Ukraine, between Kyiv and Kharkiv, where she first started to learn to draw and paint. Her affluent parents split up when she was twelve, following which she travelled around Europe with her mother, eventually settling in Paris. She originally hoped to be a singer, but after an illness ruined her voice, she decided to be an artist. She then studied with Robert-Fleury from 1877, and at the Académie Julian.
Marie Bashkirtseff (1858–1884), Self-portrait with Palette (1880), oil on canvas, dimensions not known, Musée des Beaux-Arts Jules Chéret, Nice, France. Wikimedia Commons.
A self-assured painter from the beginning, she set her sights high and had the ability and drive to paint excellently. Her early Self-portrait with Palette (1880) was painted in the same year that she first had a work accepted for exhibition at the Paris Salon, and she was successful again in every subsequent Salon until her death.
Marie Bashkirtseff (1858–1884), In the Studio (1881), oil on canvas, 188 x 154 cm, Dnipro State Art Museum, Dnipro, Ukraine. Wikimedia Commons.
While still studying at the Académie Julien in 1881, she painted In the Studio, which gives good insight into what her training was like. Her class was of course entirely female, and the Académie Julien was one of the few reputable schools that accepted women pupils at that time. The artist is seated in the centre foreground, holding her palette and knife as she looks up at one of her fellow pupils.
Marie Bashkirtseff (1858–1884), The Artist’s Sister (1881), oil on canvas, 92 x 73 cm, Rijksmuseum, Amsterdam. Wikimedia Commons.
Her early portraits are skilful if conventional, as is The Artist’s Sister from 1881. She started establishing herself in the art scene; it has been claimed that she wrote a column for the mysandrist newspaper La Citoyenne under the name of Pauline Orrel, but that appears to be unsupported by the original edited versions of her diaries.
She became a close friend of Jules Bastien-Lepage when visiting Nice in 1882, and he acted as her mentor if not teacher, as she described herself as his pupil. She also formed a close friendship with the writer Guy de Maupassant.
Marie Bashkirtseff (1858–1884), At a Book (c 1882), oil on canvas, 63 × 60.5 cm, Kharkiv Art Museum, Kharkiv, Ukraine. Wikimedia Commons.
As she developed a more distinctive style in her portraits, so her brushwork loosened. She was an astute observer of women’s life, as shown in At a Book (c 1882), with its emphasis on her model’s unusual hair.
Marie Bashkirtseff (1858–1884), Young Russian Girl (c 1882), other details not known. Wikimedia Commons.
Young Russian Girl (c 1882) is another delicate portrait, although I suspect the original isn’t as soft-focus as this image.
Marie Bashkirtseff (1858–1884), In the Mist (1882), oil on canvas, 47 x 55 cm, Österreichische Galerie Belvedere, Vienna, Austria. Wikimedia Commons.
Although Bashkirtseff accepted that her mentor Bastien-Lepage reigned supreme in the countryside, she felt that she was his match when it came to depicting the urban environment of Paris. In the Mist from 1882 is a good demonstration of how well she captures the almost deserted city streets on a foggy day, with a bright plume of flame from a fire in the centre of her canvas.
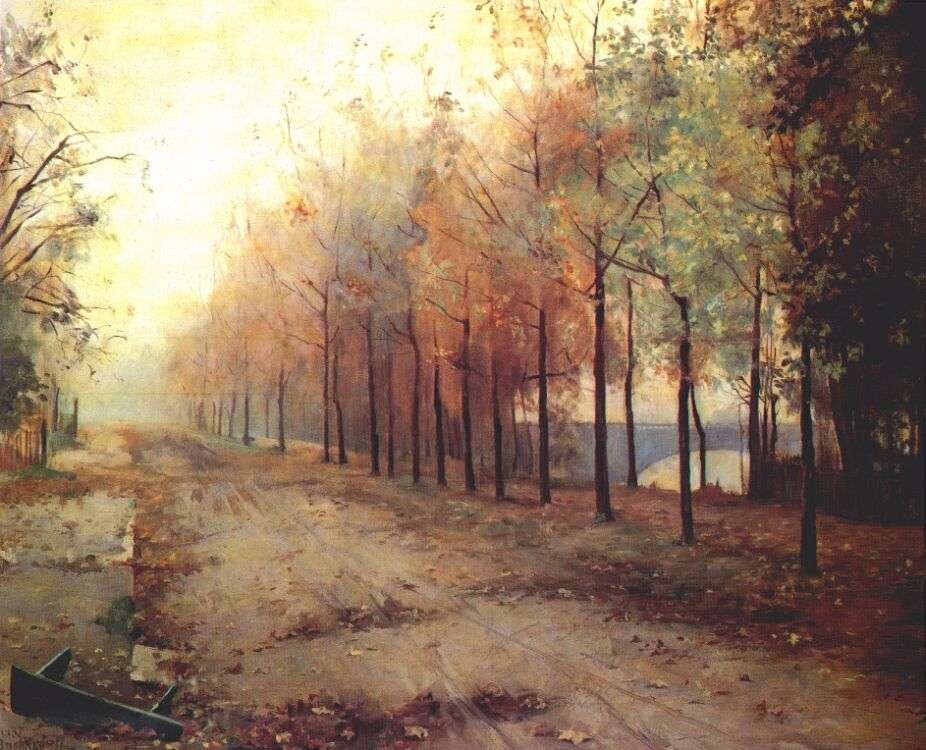
Marie Bashkirtseff (1858–1884), Autumn (1883), oil on canvas, dimensions not known, State Russian Museum, Saint Petersburg. The Athenaeum.
Autumn, from 1883, is an impressive and Impressionist depiction of a row of trees on the bank of the River Seine in the centre of Paris, but is unusual in being devoid of people. The leaf litter, occasional rubbish, and fallen bench strengthen its feeling of desolation in the midst of the bustling city.
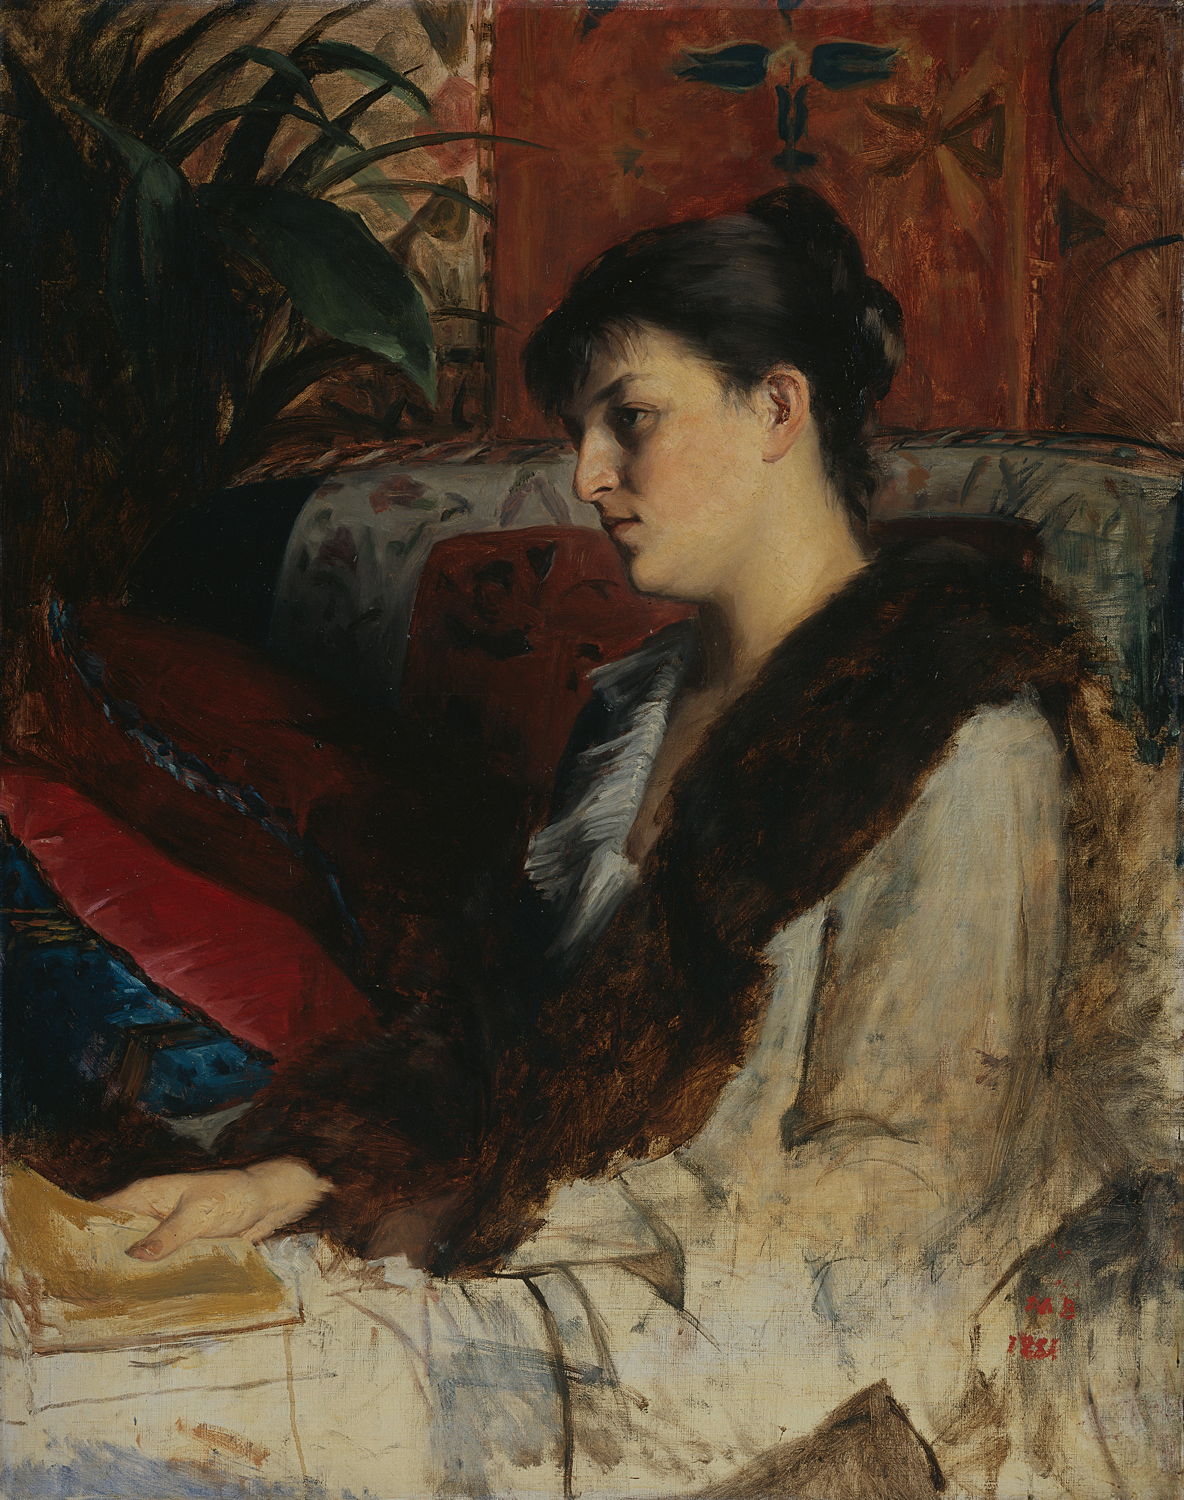
Marie Bashkirtseff (1858–1884), The Umbrella (1883), oil on canvas, 93 × 74 cm, State Russian Museum, Saint Petersburg. Wikimedia Commons.
Bastien’s composite of detailed realism blended with more painterly passages shows in one of her best portraits, The Umbrella (1883). This girl’s tenacious stare at the viewer is quite unnerving. That year she was awarded an honourable mention from the Salon.
Marie Bashkirtseff (1858–1884), A Meeting (1884), oil on canvas, 193 x 177 cm, Musée d’Orsay, Paris. Wikimedia Commons.
A Meeting (1884) finally justified her claim to paint the urban poor, and to match Bastien-Lepage. This painting was a great success when shown at the Salon that year, and is probably her finest work.
Marie Bashkirtseff (1858–1884), Portrait of Madame X (1884), pastel and charcoal, 56 x 46.5 cm, Musée d’Orsay. Wikimedia Commons.
Her pastel Portrait of Madame X (1884), now in the Musée d’Orsay together with A Meeting, was also shown in the Salon that year.
By that summer, Bashkirtseff’s fragile health was deteriorating rapidly because of tuberculosis. She died on 31 October, less than a month before she would have turned twenty-six, and less than three months before her mentor died.
Her ambition was better fulfilled after her death than in life. Her huge mausoleum in Cimitière de Passy, Paris, designed by Bastien’s younger brother Émile, contains her artist’s studio complete with an unfinished painting of Holy Women by the Grave. Three years later, her copious and revelatory diaries were published, and propelled her to international fame.