Selecting external Retina-resolution displays for use with Apple silicon Macs is extremely complicated. Even when you read Apple’s tech specs it’s often not clear exactly which combinations will work together. Thanks to the work of Parish Khan, this is now far simpler on his RetinaDesk site.
From the humble M1 MacBook Air with its single supported external display, to the eight you can drive from a Studio M2 Ultra or later, RetinaDesk details external display support for each model, provides tools to check essentials like cable bandwidth, and offers the definitive guide to 5K and 6K displays for Apple silicon Macs.
I’m sure you’ll find it useful. It’s free from advertising, sponsored content and AI, the only return to Parish comes from being an Amazon Associate, so making a tiny percentage on any monitor purchase you might make through the site’s Amazon link.
A few years ago I almost lost my main email addresses when their provider made changes. I had apparently missed a series of warning messages they had sent, as I had assumed those were just phishing attacks and deleted them without clicking on their links. Given that some days I get more than half a dozen potentially malicious emails claiming to come from that provider, I needed a better way to check the few that might be genuine. But how could I do that without putting myself at risk of a phishing attack?
What I needed was a way to be able to click on a link safe in the knowledge that my Mac would be completely isolated from any consequences. The solution is to use a locked-down virtual machine running in total isolation from the host. This is supported in a special version of my free virtualiser Viable, named ViableS, or you may be able to do something similar using a different virtualiser.
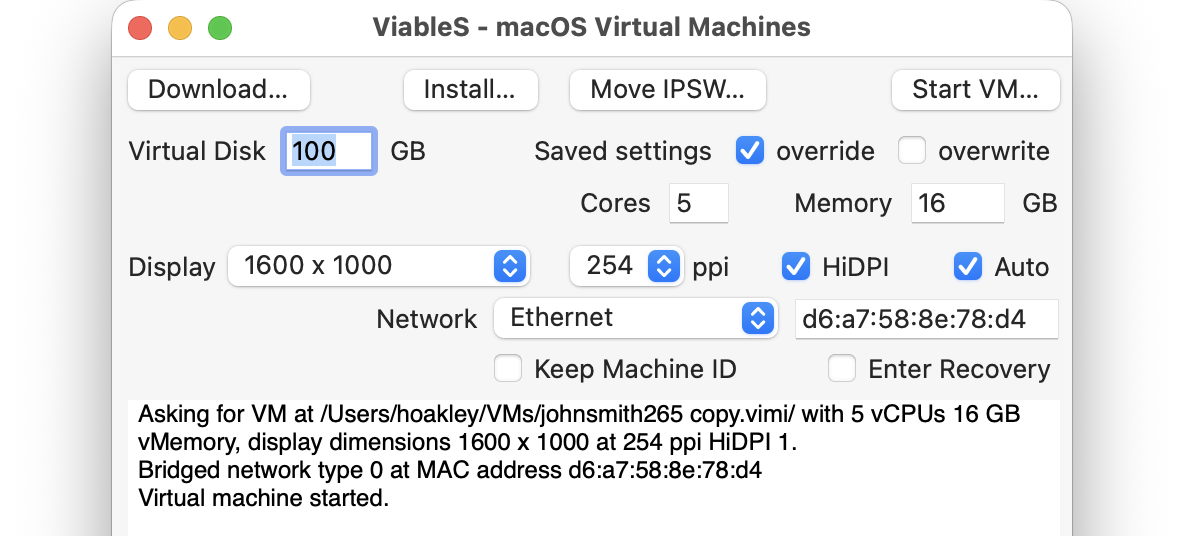
First download the IPSW image file for the latest release of macOS, either directly using Viable or from the links to Apple’s source given by Mr. Macintosh. Use Viable to build that into a fresh 100 GB VM with a single user named John Smith and a password of password. That way any stolen secrets will be effectively anonymous, and won’t even reveal your username. At this stage, run the VM with shared folders so you can transfer in any apps you might want, and the link to the suspicious site.
If you’re going to use your locked-down VM again, rather than having to create a fresh VM every time, you can now duplicate it using Command-D. The VM’s disk image is stored as a sparse file, and duplication should result in a clone anyway, greatly reducing the space taken on disk.
Save the suspicious message to a PDF or similarly accessible file, and transfer that into the VM now. Once that’s all set up and ready to go, shut that VM down.
From here on, only run that VM using ViableS, as it runs in a sandbox and has no support for sharing folders with the host, although it obviously needs a network connection to let you follow the link in the saved message. All my virtualisers including ViableS have been granted the restricted entitlement to use bridged networking, so they get their own IP address rather than sharing the host’s, and that should allow their networking to be operated securely.
The VM is now as well protected and isolated from the host Mac as possible. The virtualiser is running in a sandbox, it has no shared access to files between host and VM, and is using a bogus name and password. To remind you that VM is locked down, ViableS adds a red goblin emoji to the window’s title bar. Having double-checked each of those settings, open the saved message in the VM and click on the suspicious link.
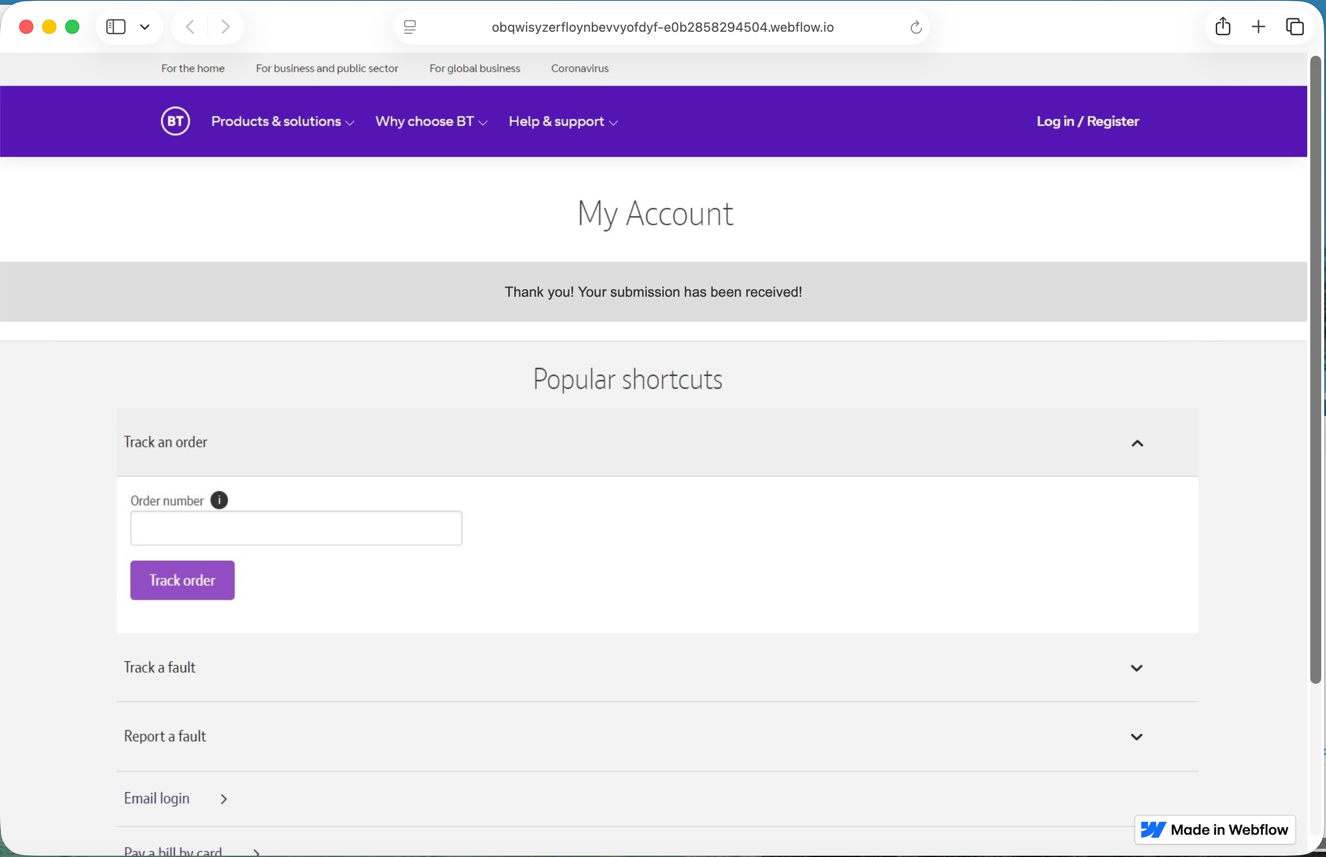
In this case, it took me to a fake version of the provider’s site built hastily using Webflow, where I was prompted to enter my email address and password, as if that would somehow ensure my email account wouldn’t be deleted. Take your time here and remember to enter your fake address and password, in my case j.smith@btconnect.com and password.
The rest of this fake proved non-functional. Whoever had set it up was clearly just harvesting user names and passwords, presumably to sell on for others to exploit in depth.
Other links might download a poisoned PDF, or take you to a ClickFix exploit.
Having reassured yourself that the email was phishing and not genuine, you can now shut down the locked-down VM and trash it. Virtualisation came to the rescue again.
In the past, getting audio reliably from virtualised macOS running on Apple silicon Macs has been something of a puzzle. Audio input seems to need some way to route it from the host to the guest, and I confess I’ve not had the patience yet to pursue that and any privacy settings required to permit it. But audio output has also been a bit hit-or-miss.
In code, this should all be straightforward by creating a VirtIO sound device configuration, with input and output streams, and assigning that to the audio devices of the VM. That should work from macOS 12 onwards. Although my virtualisers have been doing that ever since, the results haven’t been as consistent as I’d expect.
Most recently users have expressed interest in the audio processing and output capabilities of macOS VMs, so I have been assessing those, and discovered problems in synchronising audio with video.
Running all VMs on a Mac mini M4 Pro host with macOS 26.4.1, all versions of virtual macOS up to and including Tahoe 26.4.1 suffer syncing problems. Those affect all tested output in Ventura 13.7.6, but are slightly more limited in more recent guest macOS, but they still suffer marked delay in audio relative to video output. This isn’t a matter of milliseconds, but appears to be of the order of two seconds in GarageBand, at least.
So far my tests have included:
QuickLook previews of video,
QuickTime Player, playing video,
TV, playing video,
GarageBand, both in its instructional videos and synchronisation of audio output when playing tracks.
The only exception, where syncing is correct, occurs in limited circumstance in Sonoma 14.8.5 and later. To demonstrate this, select a video clip with synced audio and press the Space bar to play it in a preview. Then click on the button at the top right of that preview window to Open with QuickTime Player, and play the video there instead. That should result in correct lip-syncing, although opening the video clip directly in QuickTime Player doesn’t.
Apart from that, macOS VMs appear perfectly capable of normal audio output, at least when running on a Tahoe host.
If you have any experience of using video and/or audio in a macOS VM running on an Apple silicon Mac, I’d be interested to know whether you have encountered the same or other problems, please, in the hope that I can file a Feedback.
If the room you’re in suddenly went dark and filled with smoke, would you be able to get to the fire escape? That was the question put to me many years ago by a friend who, like me, often stayed overnight in unfamiliar locations. I think he took it to extremes, though, in travelling everywhere with a thirty-foot climbing rope in his suitcase, but his point was sound. A few years later, when I was stood outside a hotel after a fire alarm in the late evening, I was glad to have taken that advice.
Much of what we do on our Macs can be at worst relatively harmless, and there are simple measures we should take to ensure they’re safe. Accidentally delete the wrong files, and you should be able to restore them swiftly from your latest backup. Cut out a crucial section of a document, and you should be able to look back through its saved versions and paste the text back from one of those. That’s why we have all those checks and safeguards.
Every so often, though, we do something that could have greater consequences, like adding another volume to our boot disk, or installing an alternative operating system such as Asahi Linux. Those are the times we need to check where the fire escape is.
If anything goes wrong with the containers and volumes on the internal storage of an Apple silicon Mac, the result can be serious, because these Macs have to start their boot process from there.
Intel Macs, including those with T2 chips, can of course start up entirely from an external disk. Although that might appear advantageous, in the long run it’s not as good as it might seem. Those with the added boot security that comes with a T2 can only boot from an external disk when that has been specifically enabled in Startup Security Utility, in Recovery mode, and the time to think about that isn’t when it can’t boot from its internal SSD.
Unlike Apple silicon Macs, though, Intel Macs with T2 chips can’t boot from an external disk in full security. In practice it means that, if you do enable that, anyone can attach any bootable disk to your Mac, start it up from that, and make off with it. So making the decision whether to enable your T2 Mac to start up from external disks will either compromise its security or its recoverability.
There’s no compromise of security when booting an Apple silicon Mac from an external disk, as that can only happen when that disk has a LocalPolicy created for it, that in turn requires ownership, and secure controls from the internal SSD. But if the internal SSD has become messed up, that Mac may well not get as far as considering starting up from the external disk, and all you can hope for is that it will be able to enter Recovery or Fallback Recovery.
If this all seems more complex and fiddly in Apple silicon, in practice it’s not, as boot failure is far less likely, and in most cases can be managed fully in either Recovery mode. However, making changes to the layout of containers and volumes on the internal SSD is one situation where an Apple silicon Mac’s ability to boot can be compromised. The Asahi Linux Project has drawn attention to one mistake that can spell disaster, removal of the Apple_APFS_Recovery partition/container from the internal SSD.
Let’s assume that you’ve changed partitions/containers and/or volumes on your Apple silicon Mac’s internal SSD, and want to revert to its original layout. You now have a choice of attempting that in either Recovery mode, using the diskutil command tool there, or putting your Mac into DFU mode and performing a full Restore with the IPSW image file for the macOS version of your choice.
Provided you have a second Mac and USB-C cable to connect it, and a recent full backup available to migrate from, Restore in DFU mode is likely to prove the simpler and more reliable option. Unless, that is, you’re the kind of person who also likes hoisting out your car engine and disassembling it on your kitchen table.
For all its apparent complexity, this is where an Apple silicon Mac comes into its own, as you can now Restore it to Sequoia even though Apple still so earnestly wants you to savour the delights of Tahoe’s Liquid Glass.
Follow my friend’s advice. When you’re about to do something that could have serious consequences, check where the fire escape is, as one day you may well have to rely on it.
Before Apple silicon Macs, you’ve been able to run different versions of macOS, Linux or Windows in third-party virtualisers, such as those from VMware and Parallels. Those products enable a virtual machine running a different operating system to be hosted in macOS, both running code for Intel processors. As part of its engineering preparations for the switch to using Arm processors, Apple decided that the only practical way to support virtualisation on its new Mac hardware was to build it into macOS. This was to enable older versions of macOS, and other operating systems including Linux and Windows for Arm, to run in virtual machines.
This is quite different from the more challenging problem of running operating systems for different processors, such as Intel, on Apple silicon Macs. Although Intel apps can have their code translated by Rosetta 2, that doesn’t work for operating systems, which need a software emulator, a feature left for the likes of UTM.
Hypervisor
The fundamental requirement for modern virtualisers hosted on a primary operating system like macOS is a hypervisor, which Apple added to macOS back in OS X 10.10, in 2014. Like Intel processors, Arm CPUs provide hardware support for hypervisors, so much of the remaining work to implement virtualisation in Apple silicon Macs centred on device support. That had been relatively straightforward for Intel Macs, as they mainly use PC hardware components, but that isn’t the case for Apple’s new Macs.
Virtio drivers
Every single hardware device in an Apple silicon chip is different from its equivalent (if there is one) in Intel Macs. Even if Apple had wanted to document them fully for external use, the engineering effort to match device support in Intel Macs would have been too costly for any third party. Thus starting with a hypervisor and expecting others to build a complete virtualiser wasn’t feasible, nor was it likely to result in the high performance that Apple and users expected. What Apple did instead was to build device support into macOS, in the form of Virtio drivers.
Virtio is a standard originally developed by Rusty Russell to provide an abstraction layer over I/O devices. When the guest operating system calls to open a file, for example, that’s passed to a front-end Virtio storage device para-driver, and from there into a Virtio back-end driver that interacts with the storage device. Although this might seem less efficient than traditional virtualisation, in practice it can prove far more efficient.
Its most obvious advantage is that creating a virtualiser app becomes a matter of configuring and opening the required Virtio devices, and letting the guest, Virtio and the host get on with it. And that’s essentially what an app does with Apple’s Virtualisation framework.
Apple’s choice of Virtio was undoubtedly swayed by the fact that Linux already has good Virtio support, but at the time macOS had none. In the couple of years preceding the release of Monterey, Apple’s engineers thus set about building Virtio support into macOS, which explains why macOS lightweight virtualisation is only available in Monterey and later hosts, and when running Monterey and later guests. As implemented in macOS (both as guest and host), there are also extensions to support keyboard and pointing devices, a shared clipboard, and high-performance graphics with Metal and GPU support.
In the Virtio model, providing such support is the task of the operating system, not the virtualiser. For vendors like VMware and Parallels this reduces not only the cost of development, but also the commercial value of their products; there’s no scope for either of them to engineer better or faster graphics support, as that’s determined by features provided in both guest and host operating systems, via Virtio or an equivalent. That puts Apple in charge of what hardware and features are supported by virtualisation on Apple silicon.
Performance
On the other hand, it guarantees optimum performance in VMs. Not only is their CPU and GPU code run direct on the hardware, just as in the host, but Virtio devices deliver almost as good performance as on the host. Comparable Geekbench 6.3.0 benchmarks when running macOS Monterey as both guest and host are:
CPU single core VM 3,643, host 3,892
CPU multi-core VM 12,454, host 22,706 (limited by the number of cores available)
GPU Metal VM 102,282, host 110,960, with the VM as an Apple Paravirtual device.
Subsequent versions of macOS have improved on those. It’s worth noting that virtual cores allocated to a VM are primarily Performance cores, so threads running in the VM that would normally be run on Efficiency cores normally run significantly faster than they would do in the host.
Initially, performance of VM primary storage in its disk image wasn’t good, but more recently this has improved substantially, even with FileVault enabled in the VM.
Rosetta 2
Although it can’t be used to translate a guest operating system, Rosetta 2 can still be used inside a macOS VM to translate and run 64-bit Intel code in apps that are compatible with macOS 10.15 Catalina, but is subject to the same limitations as any version of macOS on Apple silicon, in that it can’t handle older or 32-bit apps. This will become most useful when Apple drops full support for Rosetta in macOS 28. VMs with older versions of macOS will still be able to translate and run compatible 64-bit Intel code, even though the host won’t be able to.
Major limitations
Support for iCloud and iCloud Drive access wasn’t made available in VMs until Sequoia, and now requires that both the guest and host must be running macOS 15.0 or later. As VMs that support these features are structurally different from earlier VMs, this also means those VMs that have been upgraded from an earlier macOS still can’t support iCloud or iCloud Drive.
The greatest remaining limitation in virtualising macOS on Apple silicon is its inability to run many apps from the App Store. Although some do run without problems, any that check their App Store credentials will fail, as a VM can’t be signed into the App Store. This appears to be the result of Apple’s authorisation restrictions, and unless Apple rethinks and reengineers its store policies, it looks unlikely to change.
Some lesser features remain problems. For example, network connections from a VM are always treated as being Ethernet, and there’s no support for them as Wi-Fi, even though they can connect using the host’s Wi-Fi. Audio also remains odd, and appears to be only partially supported. Although Sequoia has enabled support for storage devices, earlier macOS was confined to the VM’s disk image and shared folders.
Many aren’t aware that Apple’s macOS licences do cover its use in VMs, in Section 2B(iii), where there’s a limit of two macOS VMs that can be running on a Mac at any time. This is enforced by macOS, and trying to launch a third will be blocked. For the record, the licence also limits the purposes of virtualisation to “(a) software development; (b) testing during software development; (c) using macOS Server; or (d) personal, non-commercial use.” It’s worth noting that Apple discontinued macOS Server on 21 April 2022, and it’s unsupported for any macOS more recent than Monterey.
Usage
Some examples of what you can use a macOS VM for:
run apps compatible with Sonoma but not Sequoia, on M4 and M5 Macs that can’t run Sonoma;
run apps in a custom environment, e.g. with different region and language settings;
check and access potentially malicious documents or apps in a locked-down environment;
test compatibility with multiple versions and localisations of macOS;
work with highly sensitive data, in an isolated environment;
access a different iCloud account simultaneously;
run beta-test versions of macOS 27.
Summary
macOS VMs on Apple silicon can:
run Monterey and later on any model, but not Big Sur or Intel macOS;
run most betas of the next release of macOS;
run Intel apps using Rosetta 2;
deliver near-normal CPU and GPU performance, and support FileVault;
access iCloud and iCloud Drive only when both host and guest are running Sequoia or later;
For the first decade of Mac OS X there was no Recovery system. The closest equivalent had been booting in Single User Mode, which took the user straight into the command line to check and repair disks, for example. In the summer of 2011, in Mac OS X Lion, Apple introduced the first Recovery partition, complete with Disk Utility and tools to install or reinstall Mac OS X, and restore from a Time Machine backup. This was augmented by Internet Recovery, which connected to an Apple server to download a disk image containing the Recovery system, in case the local Recovery partition was damaged or unavailable.
In March 2017 macOS Sierra 10.12.4 expanded that into three different Recovery modes:
local Recovery mode, engaged with Command-R, behaved as before, in providing the version of macOS already running on that Mac, even if a more recent version was available;
remote latest Recovery mode, engaged with Command-Option-R, behaved differently according to the version of macOS installed. In 10.12.3 and earlier, reinstalling restored the version that came with that Mac. In 10.12.4 and later, reinstalling upgraded that Mac to the latest version of macOS compatible with it.
remote original Recovery mode, engaged with Command-Option-Shift-R, only worked when running macOS 10.12.4 or later, where it reinstalled the version of macOS that shipped with the Mac.
With the arrival of APFS, what had been an HFS+ partition became just another volume inside the same container as the boot volume, and when the latter was divided into conjoined System and Data volumes in macOS Catalina, the Recovery volume was paired with that boot volume group in that container.
When the first Apple silicon Macs came in 2020, they had a brand new Recovery system, dubbed 1 True Recovery (1TR), run from a hidden container on their internal SSD, and engaged by pressing and holding the Power button. For security, this requires both physical contact with the Mac and a mechanical action.
In Big Sur on an Apple silicon Mac, the Apple_APFS_Recovery container was dedicated to providing 1TR, stored in its Recovery volume. This includes a second part of iBoot and all that’s necessary for the M1’s full Recovery mode. In this scheme, there was just one True Recovery system on each M1 Mac, regardless of how many different versions of macOS it might have installed.
If you needed your M1 Mac to enter 1 True Recovery but that failed, there was a second copy of the software required for 1TR “for resiliency”, stored in the Recovery volume paired in the current boot volume group. To boot into that, instead of just holding the Power button until 1TR starts loading, you pressed the Power button twice in rapid succession, and on the second press, instead of releasing the button, hold it pressed until recovery options are reported as loading. What you then got was every bit as good as regular 1TR, with one significant exception: you couldn’t set the system security state using Startup Security Utility.
That new Recovery architecture was fine while Apple silicon Macs could only boot into the one major version of macOS, Big Sur. When Apple released the next, Monterey, it changed Recovery to cope better with those that might have two different boot volume groups installed on their internal storage. That swapped the locations of primary and fallback Recovery.
From Monterey onwards, starting up in primary Recovery using the Power button boots that Mac into the Recovery volume paired with the current boot volume group. Starting up in fallback Recovery using the doubly-pressed Power Button boots that Mac into the fallback Recovery (frOS) installed in the hidden Apple_APFS_Recovery container on the internal SSD. Now any paired Recovery volume can use Startup Security Utility, but it’s not available in fallback Recovery.
Since then there has been further economy that allows one paired Recovery volume to act as the primary Recovery system for additional boot volume groups installed within the same container.
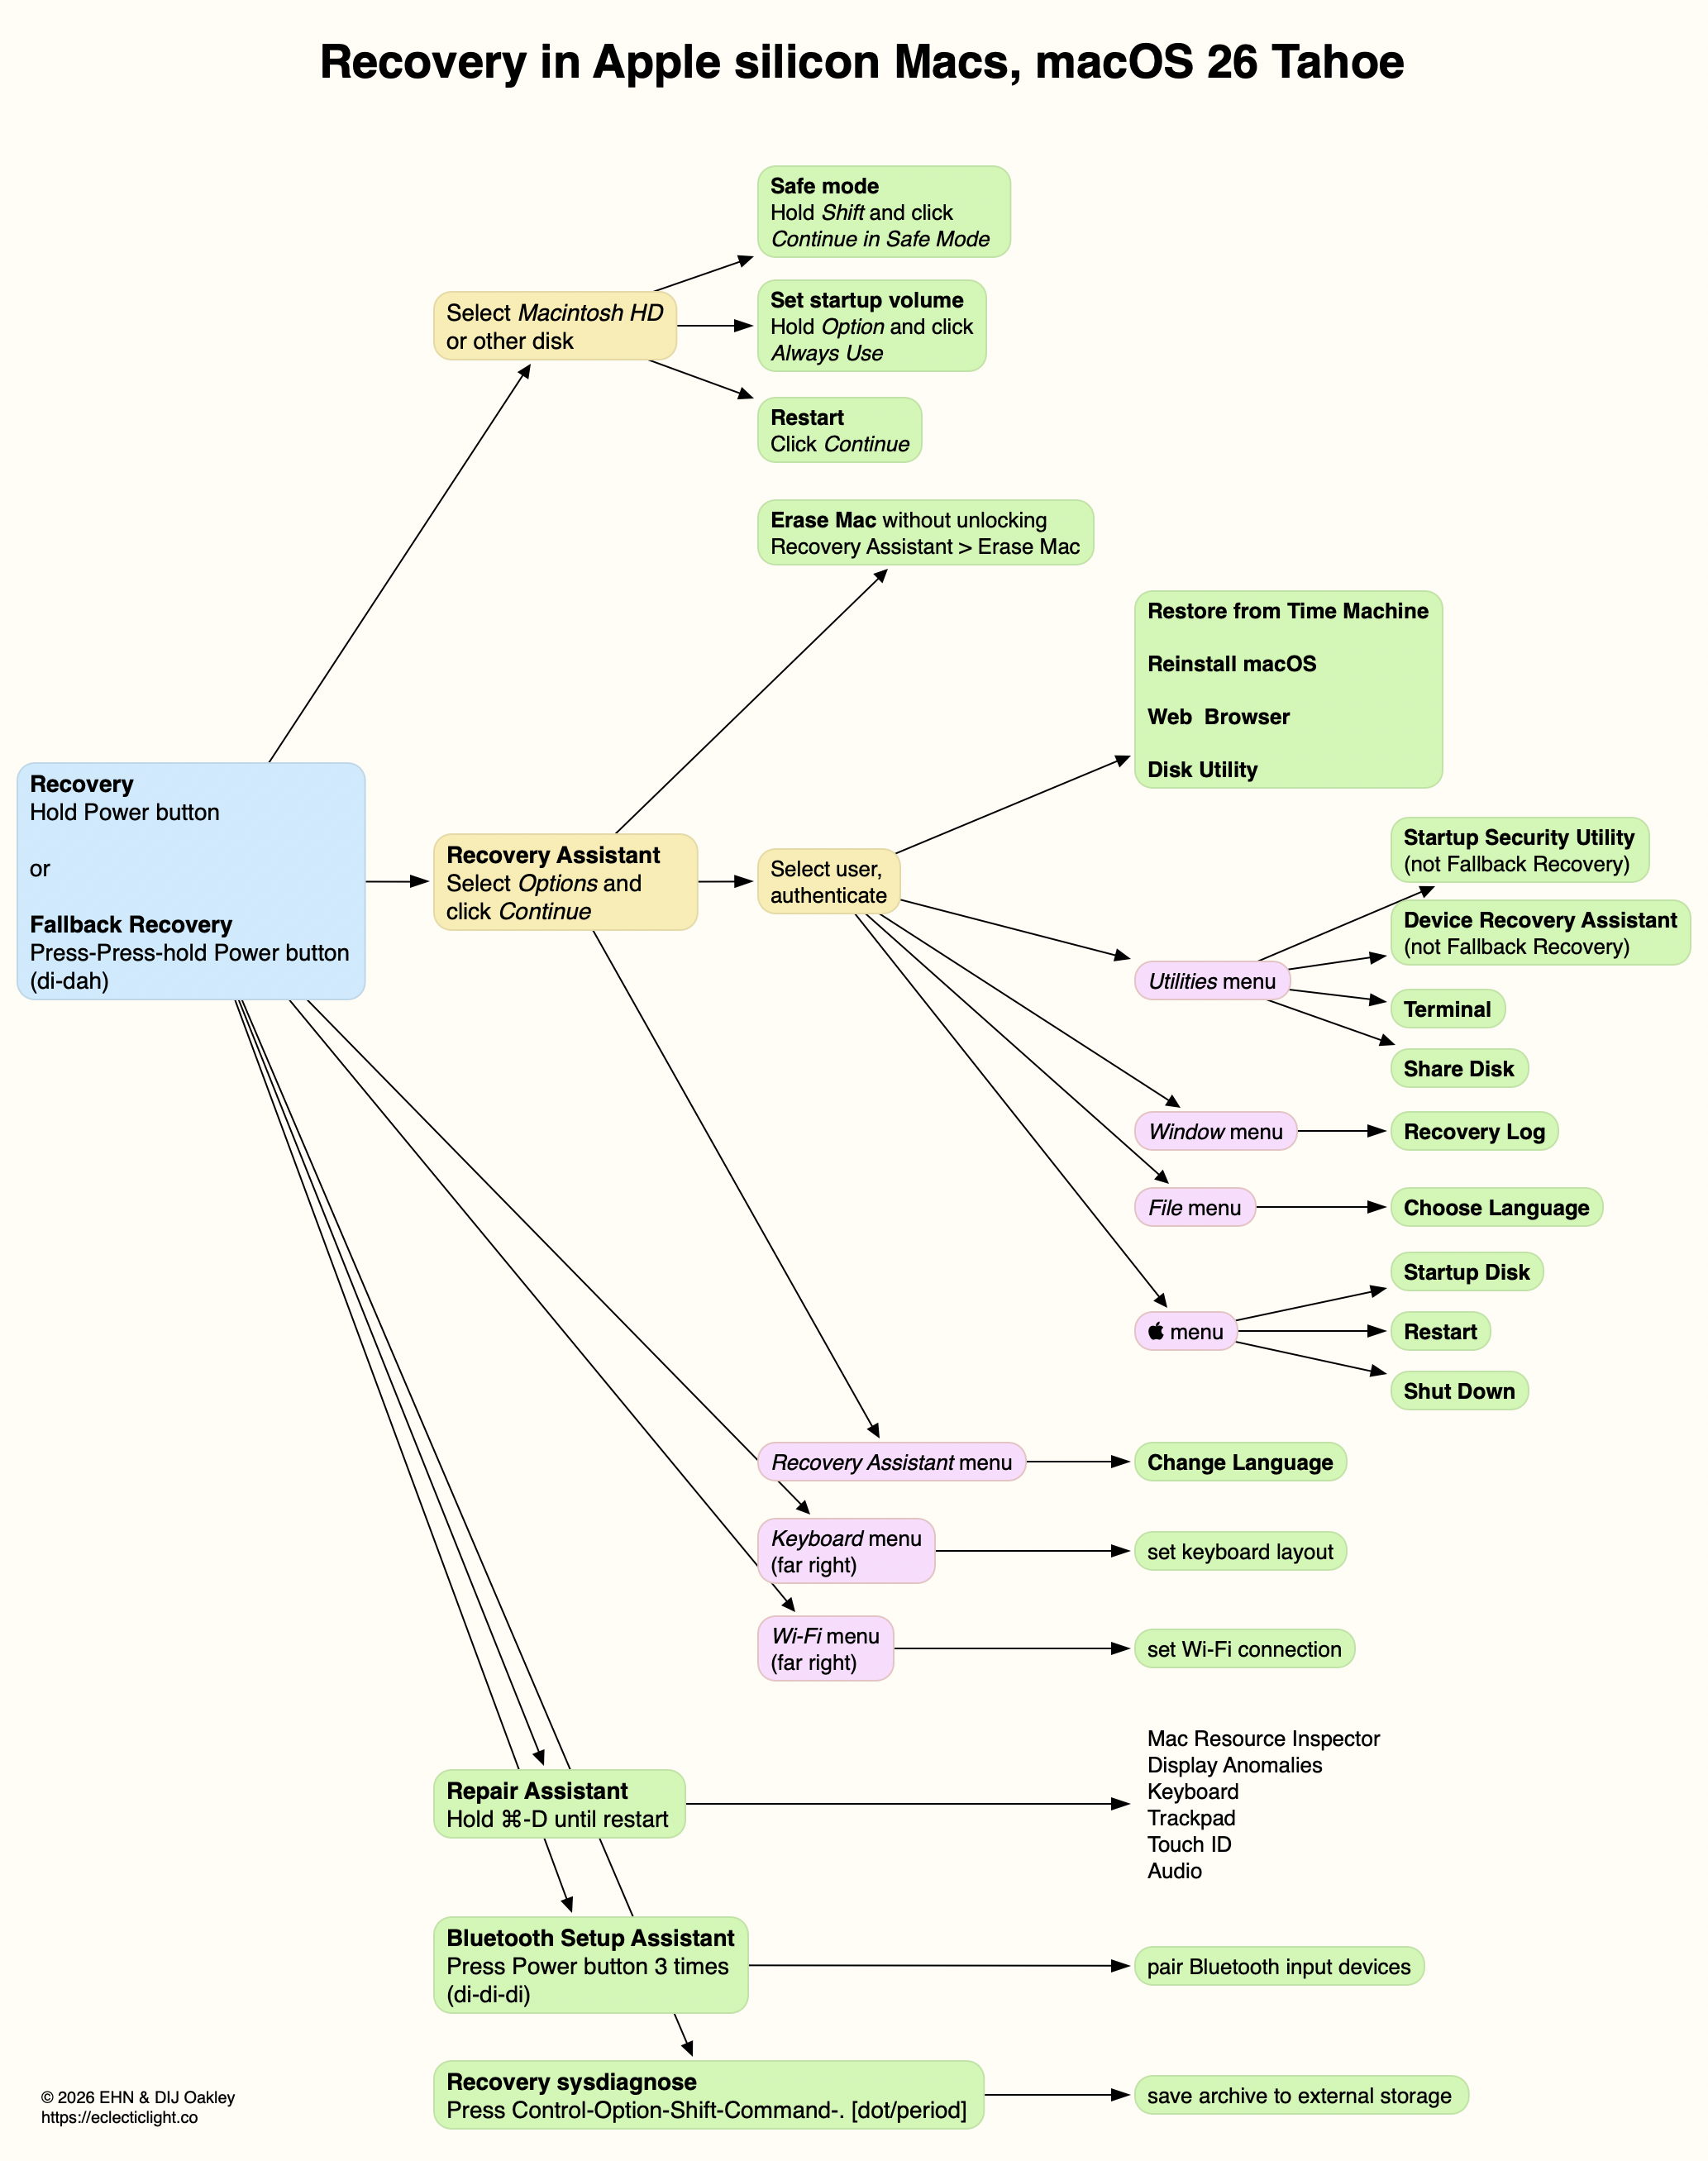
Because the Recovery system is a sealed disk image, users can’t add their own tools to augment it. However, it has become progressively more capable, with the recent addition of Device Recovery Assistant and Repair Assistant. The diagram below gives an overview of its anatomy as of macOS 26.4.
Further details are illustrated in my guide to Recovery on Apple silicon Macs.
How to enter Recovery in recent macOS
Intel Macs
local Recovery, Command-R;
remote latest Recovery, Command-Option-R, for latest version of macOS compatible with that Mac, over the internet;
remote original Recovery, Command-Option-Shift-R, to reinstall the version of macOS that shipped with the Mac, over the internet.
Apple silicon Macs
primary (paired) Recovery, press and hold Power button until entering Options;
fallback Recovery, short press, press and hold (di-dah) Power button until entering Options.
When Apple introduced the first iPhone it built into its ROM a new startup mode that didn’t rely on other firmware, to enable recovery of a bricked or troubled device: Device Firmware Upgrade, or DFU, mode. This was added to Intel Macs with the introduction of the T2 chip, and is a fundamental feature of all Apple silicon Macs. If your Mac’s hardware is still capable of booting from its ROM, and it supports DFU mode, it may well enable that Mac to be rescued from disaster.
All Macs start up from their ROM initially, and that provides essential services to support the boot process, from checking the integrity of the next stage, the low-level bootloader, to handing over to that. Boot ROMs in Macs with T2 or Apple silicon chips can also be parked in DFU mode, which stops the rest of secure boot from continuing, and waits indefinitely for a connection over a USB port. Another Mac can then connect with the Mac in DFU mode, and can install fresh firmware, or completely initialise the SSD, to resuscitate the Mac in DFU mode.
What you need
To use DFU mode, you require:
the target Mac in DFU mode, as detailed below;
a second Mac, the host, either running macOS Sonoma or later, or the current version of Apple Configurator 2 from the App Store;
a plain USB cable with a USB-C plug at each end. This should support both charging and data over USB. Although Apple has consistently warned that you shouldn’t use a regular Thunderbolt 3 cable, some claim to have got them to work correctly.
If you don’t have all three, you should find your nearest Apple store will help, as will Apple authorised service providers.
DFU host
Prepare the second Mac, that’s going to connect to the target Mac in DFU mode, as follows:
If it’s a laptop model, connect it to mains power.
Ensure it has a good internet connection.
If it’s not using Configurator, open Finder Settings and ensure CDs, DVDs and iOS Devices is selected to be shown in Finder window sidebars, as that may be necessary to see the target Mac when it connects.
Connect one end of the USB cable to any of its USB-C ports.
Put a Mac into DFU mode
Prepare the target Mac that’s going to be put into DFU mode to be resuscitated, as follows:
Disconnect all non-essential peripherals, particularly any connecting to its USB-C ports.
Ensure its DFU port is available, and connect the other end of the USB cable to that port.
If it’s a laptop model, connect it to mains power. If it has a MagSafe port, use that if possible.
If it’s running, shut it down. If you don’t know whether it’s shut down, press and hold the Power button to shut it down. If that starts it up, repeat that to shut it down again.
Apple’s official list of DFU ports is here. You’ll also find them listed in MacTracker. Unfortunately, there’s no simple rule, neither does Apple mark the port.
If the Mac is a laptop model, having ensured it’s connected to mains power and shut down, press the Power button briefly as if to start it up normally, then immediately press and hold Control and Option on the left of its keyboard, Shift on the right, and the Power button, all at once. Keep pressing all four keys for 10 seconds, then release Control, Option and Shift, and continue holding the Power button for another 10 seconds, until the host Mac shows the DFU window. If you’re shown an alert asking for consent to connect the accessory, release the Power button and click the Allow button.
Laptops with a T2 chip should display the DFU window on the host after holding the four keys for a shorter period of about 3 seconds, and don’t require the full process needed for an Apple silicon Mac.
If the Mac is a desktop model, having ensured that it’s shut down, disconnect the target Mac from mains power by unplugging its power cable, then press and hold its Power button and connect the Mac to mains power again. You may then need to continue holding its Power button for up to 10 seconds before you see the DFU window on the host Mac, and can release that button. If you’re shown an alert asking for consent to connect the accessory, release the Power button and click the Allow button.
Although putting a Mac into DFU mode isn’t really that difficult, lack of feedback from the target Mac makes this seem challenging. In DFU mode, a laptop Mac appears completely dead, and even mains adaptors don’t light up to provide any sign of life. Desktop models are more helpful, as the power status light on Mac Studio, Mac mini and Mac Pro models should show amber, and may even flash.
Revive or Restore?
The DFU window on the host Mac offers two options, to Revive or Restore the target Mac in DFU mode.
When reviving, the firmware on the target Mac is reinstalled without erasing the rest of its SSD. Unless you intend to perform a full Restore, this should normally be your first choice. It’s also significantly quicker.
The default version of firmware and macOS used for these is the latest compatible with that Mac. For Apple silicon Macs, you can instead download a different IPSW image file to use, if you prefer. This enables you to perform a full downgrade to an earlier version of macOS complete with its firmware. Links to Apple’s library of IPSW files are provided by Mr. Macintosh, and others. However, this isn’t available for Macs with T2 chips, which can only install the current firmware for that model.
A full Restore not only reinstalls the firmware, but it also erases the SSD completely and returns it to ‘factory’ condition, as it was when it was first unboxed. This erases all your data, as well as reinstalling firmware and macOS, so you will then need to migrate your data from a backup, which makes it considerably longer to complete.
Following either of these, the target Mac should restart into Recovery mode, back into macOS, or into initial personalisation and configuration as if it was new. If a Revive fails, try a full Restore, and if that fails, you might be successful with a second attempt, or you’ll need to get your Mac assessed at an Apple store, or by an Apple authorised service provider.
Key points
Use a USB cable, not Thunderbolt 3.
Check and use the correct DFU port on the Mac in DFU mode.
Laptops: left Control and Option, right Shift, and Power for 10 seconds, then Power alone for up to 10 seconds.
Desktops: disconnect from power, press and hold Power button and reconnect power cable, continue holding Power button for up to 10 seconds.
With the continuing reluctance of many to upgrade to macOS Tahoe, some are seeking compromise by retaining access to both macOS 15 Sequoia and 26 Tahoe in a dual-boot system. This article explains how you can do that on an Apple silicon Mac, and choose between
both systems installed in a single container on the internal SSD,
each installed in a separate container on the internal SSD,
one on the internal SSD, the other on an external SSD,
one on the internal SSD, the other in a virtual machine (VM).
These have become more complicated with Apple silicon Macs because, unlike Intel Macs, they’re designed to boot from external disks in full security. To achieve that, they have to start their boot process from their internal SSD, and that stores LocalPolicy files to enable handover to a boot volume group such as that on an external disk. The structure of their internal SSD is also more complex, with two hidden containers, as well as the bootable system in a boot volume group, as shown below.
One common requirement for all except a VM is that the Mac needs to be compatible with both versions of macOS that you intend to run. For example, those models with M5 chips released after Tahoe on 15 September 2025 will never be able to install Sequoia. If you want to run Sequoia on one of those, then your only option is to install it in a VM.
Another general principle is that the closer the two versions of macOS are, the better dual-booting will work. Running Sequoia and Tahoe side by side shouldn’t be a problem, but the combination of Monterey and Tahoe could prove more troublesome.
When setting up any dual-boot Mac, it’s easier to do so when booted from the older version of macOS. This is because the installer for an older version of macOS may be blocked when running a more recent version. If that isn’t possible you’ll almost certainly need to create a bootable installer disk and run the installation from that. Apple describes how to do that in this support article.
Apple’s terse summary is perhaps too generic to be useful.
Single container, internal SSD
This is by far the most straightforward and most popular option for dual-booting, where both versions are installed into the same APFS container on the internal SSD. This has the advantage that each of the volumes in the two boot volume groups shares free space within that single container.
To install the second macOS you’ll need to create a new APFS volume on the internal SSD with the name you want to give that new system, then select that as the destination for the macOS Installer. What you should end up with is complex, as it consists of the standard five (or six) volumes, plus a second pair of System and Data volumes with their own Sealed System Volume (SSV) snapshot, making a total of seven or eight volumes and two SSV snapshots, all in the single container. The two bootable systems should then share a common paired Recovery volume, and Fallback Recovery in its separate container.
Because these volumes all share a single container, any problems that arise could compromise both systems, so maintaining good backups of each is particularly important.
Two containers, internal SSD
Instead of installing both systems into the same container, it’s also possible to repartition the internal SSD to add another container into which you install the second system. If you want to try this, you’ll need to perform that repartitioning before the first macOS has taken up too much space on the internal SSD, or the repartitioning may end up being destructive and require both systems to be installed afresh, which would be even more complex and risky.
For this reason, installing the two systems into separate containers on the internal SSD is seldom attempted, despite its advantage of robustness for the systems. Because they’re in separate containers, each system is independent, and likely to have its own paired Recovery volume. In theory at least, if one container were to run into problems, it may be possible to boot into the other system and attempt to repair the damaged system from there, although I’ve not heard of anyone doing that.
One internal, the other external
This is a popular and more robust alternative, as the two (or more) systems are physically separate. However, the two systems aren’t equals, as all boots must still start from the internal SSD before handing over to the external system. This can’t enable the Mac to boot entirely from the external disk in the way that an Intel Mac can.
There are drawbacks in booting from an external disk. Its speed can’t compare with that of an internal SSD, and it can’t use hardware encryption for FileVault. But external disks are also mobile between Macs, so if you want to be able to boot more than one Mac from the same boot volume group, it has to be installed on an external disk.
I provide detailed instructions for installing the external system in these articles:
If you need more than two versions of macOS, you could install multiple boot volume groups into a single container on the external disk, or separate them into their own containers. This has become popular for those like developers who need access to multiple versions of macOS for testing.
Below is a typical partition/container containing two bootable systems named ExternalA and ExternalB. This has two Boot Volume Groups, each consisting of a System volume with its SSV, and a Data volume, to which are added their three common volumes, Preboot, Recovery and VM.
One internal, the other in a VM
Virtual Machines are the cleanest of all the options, as their boot volume group is installed inside a disk image, and tucked away within a bundle. You can store them where you like, move them between Macs, and do the most horrible things to them with little fear: if anything goes wrong, you can just delete the VM and build yourself a new one.
Ideal for software developers and security researchers, macOS VMs running on Apple silicon Macs perform almost as well as the host they’re running on, and support Rosetta 2 so they can run Intel-only code when needed. However, they can’t run Big Sur or earlier, have limited features for Monterey guests, and only support iCloud access when Sequoia (or later) is running in the guest and host. Most surprisingly, though, they’re unable to run many App Store apps, so before committing to using a VM check that the apps you need can be run inside one.
Tips
General:
The host Mac must be capable of running that version of macOS, unless it’s in a VM.
macOS installers are the most reliable means of creating and installing Boot Volume Groups.
When using a laptop Mac, run it from mains power throughout macOS installation.
Each container with one or more Boot Volume Groups should contain one set of Preboot, Recovery and VM volumes shared between them.
Older macOS:
When installing an older major version of macOS, perform this from an external bootable HFS+ volume as detailed by Apple.
Use an HFS+J partition on an external SSD rather than a USB ‘thumb’ drive.
Boot from the installer volume through Recovery mode.
Bootable external disks:
During macOS installation, an external disk must be connected to a port other than the DFU port, as listed here and in Mactracker.
Apple silicon Macs will boot from external disks in Full Security, and reducing that doesn’t solve any problems.
APFS:
The first and fundamental step in trying to diagnose problems with multiple Boot Volume Groups or bootable external disks is to examine their container and volume structure using two diskutil commands: diskutil apfs list
to list all APFS volumes by container and give key information about each, including their role and UUID, and diskutil apfs listVolumeGroups
to list all recognised Boot Volume Groups, which you can tally against the first. Pipe these to text files so you can study and refer back to them. Example output from the second is: +-- Container disk5 5BA1AAC8-3AD4-4594-AF01-7C0AA75CABAD
| |
| +-> Volume Group 68627CBB-D774-444E-97C6-F9511B5030F3
| =================================================
| APFS Volume Disk (Role): disk5s1 (Data)
| Name: Macintosh HD - Data
| Volume UUID: 68627CBB-D774-444E-97C6-F9511B5030F3
| Capacity Consumed: 580769214464 B (580.8 GB)
| -------------------------------------------------
| APFS Volume Disk (Role): disk5s5 (System)
| Name: Macintosh HD
| Volume UUID: 8B9FF440-75C8-4F7F-B09E-9222D44A2276
| Capacity Consumed: 11239186432 B (11.2 GB)
Thanks to your generous response to my appeal for information about CPU core frequencies in the MacBook Neo, M5 Pro and Max chips, this article updates the data to cover those new models, in addition to all previous M-series chips.
Super (S), Performance (P) and Efficiency (E) CPU cores in Apple silicon Macs are run at a range of different frequencies so they can deliver optimum performance with a minimum power and energy use. Cores are grouped into clusters of 2-6, and macOS sets the frequency of each cluster according to workload, Quality of Service, power mode and thermal status. Maximum frequencies differ according to the family, variant within that family, and between E, P and S cores. Current values are:
M1 E 2064 MHz or 2.1 GHz; P 3228 MHz or 3.2 GHz;
M2 E 2424 MHz or 2.4 GHz; P 3696 MHz or 3.7 GHz;
M3 E 2748 MHz or 2.7 GHz; P 4056 MHz or 4.1 GHz;
M4 E 2892 MHz or 2.9 GHz; P 4512 MHz or 4.5 GHz;
M5 E 3048 MHz or 3.0 GHz; P 4380 MHz or 4.4 GHz; S 4608 MHz or 4.6 GHz;
A18 Pro E 2424 MHz or 2.4 GHz; P 4044 MHz or 4.0 GHz.
The full table of frequencies reported by powermetrics is:
This is available for download as a Numbers spreadsheet and in CSV format here: mxfrequencies2
I have previously published a detailed analysis of frequencies in the M1 to M4 families, and a second last year adding those for the first of the M5 family. Since then, Apple has added M5 Pro and Max chips, reclassified the cores in M5 chips into three types, and released the MacBook Neo based on the A18 Pro.
Frequency range
Over the last five years and five families of chips, their frequencies have increased steadily, as shown in the charts below. Each bar in those charts spans the range of frequencies from minimum (idle) to maximum, for the base variant in that family.
Idle frequency in E cores has risen from 600 MHz to 972 MHz, a rise of over 60%, and their maximum frequency has risen from 2,064 MHz to 3,048 MHz, a rise of nearly 50%.
P and S cores have seen more substantial change. Their idle frequency has risen from 600 MHz to 1,308 MHz, a much larger rise of nearly 120%, and their maximum frequency has risen from 3,204 MHz to 4,608 MHz, just under 50%. The S core in M5 chips is notable for its greater rise in idle frequency, and smaller increase in maximum frequency.
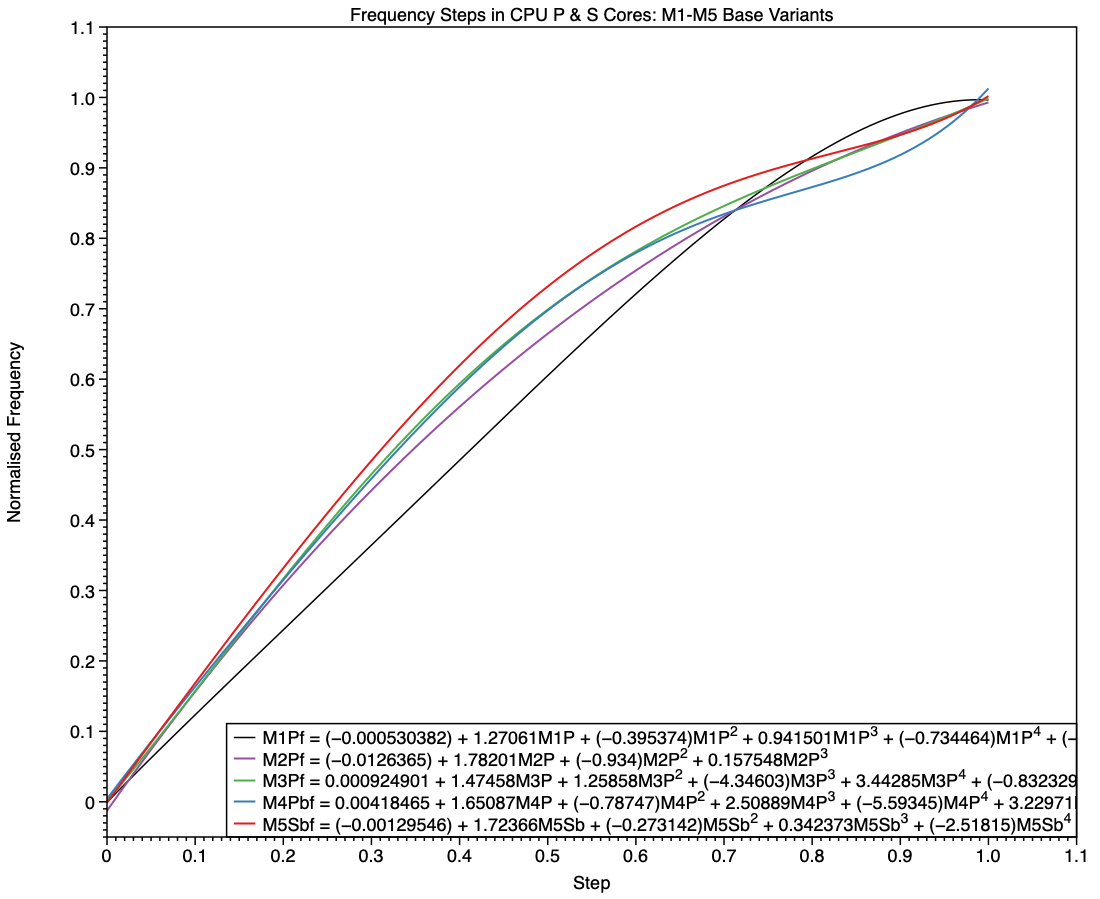
Frequency steps
Rather than macOS set an arbitrary frequency, it appears to select from a list of steps that are distinctive to that family and variant. Looking at the table of frequency steps it might be easy to assume those numbers are chosen arbitrarily, but expressing them appropriately suggests they’re the result of sophisticated modelling.
To look at frequency steps and the frequencies chosen for them, I have again converted raw frequencies to make them comparable. First, I work out the steps as evenly spaced points along a line from 0.0, representing idle, to 1.0, representing the core’s maximum frequency. For each of those evenly spaced steps, I calculate a normalised frequency, as (Fmax – Fstep)/(Fmax – Fidle)
where Fidle is the idle (lowest) frequency value, Fmax is the highest, and Fstep is the actual frequency set for that step.
For example, say a core has an idle frequency of 500 MHz, a maximum of 1,500 MHz, and only one step between those. Its steps will be 0.0, 0.5 and 1.0, and if the relationship is linear, then the frequency set by that intermediate step will be 1,000 MHz. If it’s greater than that, the relationship will be non-linear, tending to a higher frequency for that step. The following charts compare those normalised frequencies with steps evenly spaced between that core’s idle and maximum frequencies.
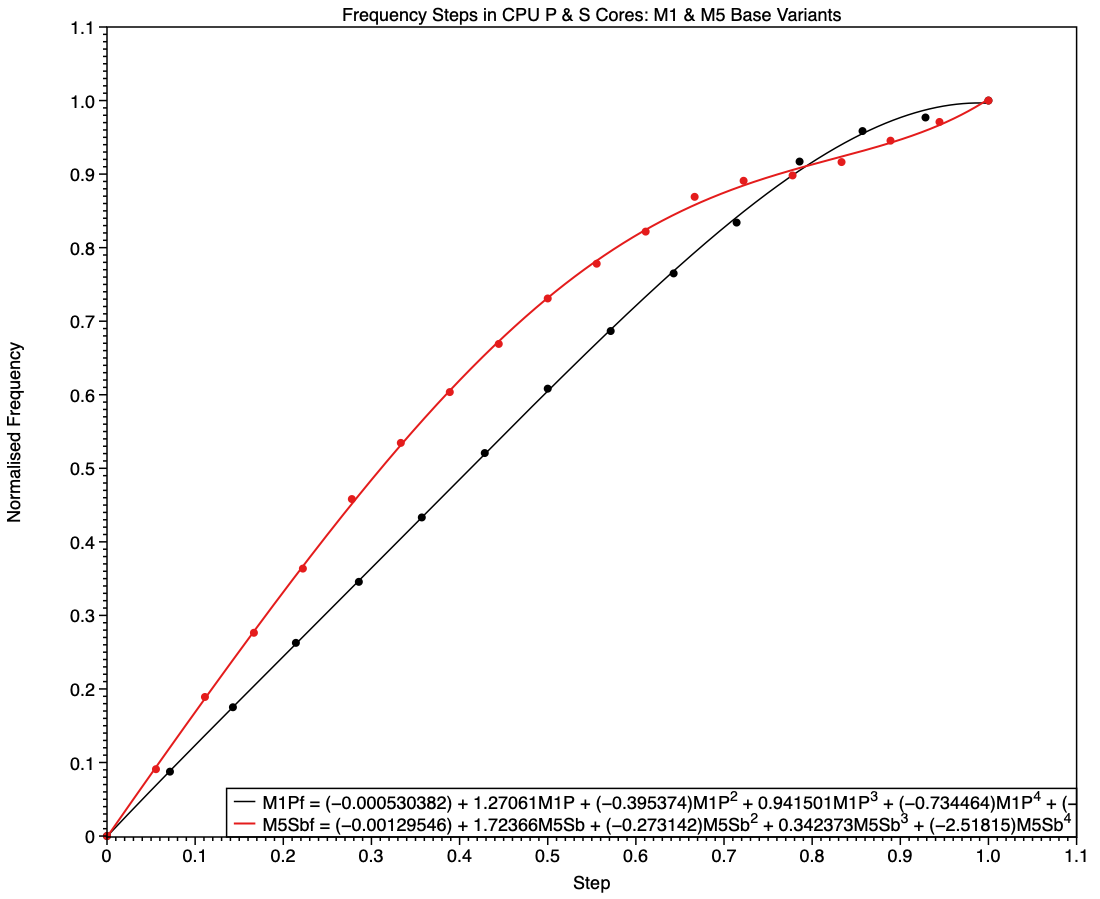
This chart shows normalised frequencies and steps for E cores in base M1 and M5 chips, the latter in red. It shows how, over those five years, the number of steps (available frequencies) has increased. In the M1, the frequency selected in the middle of its five steps was half-way between idle and maximum. Not only does the M5 have more intermediate frequencies available, six instead of three, but frequencies used in the upper half of its steps are higher those in the M1, when normalised.
This tends to boost higher frequencies used for running threads that can’t be accommodated on P cores, while running background threads at slightly lower frequencies than would be expected when at frequencies close to idle, as they are.
These curves have undergone evolution across different families, as shown here in a composite of the curves for all five families. The red curve of the M5 deviates more from the M1’s straight line of identity than any of the others, particularly at the top end.
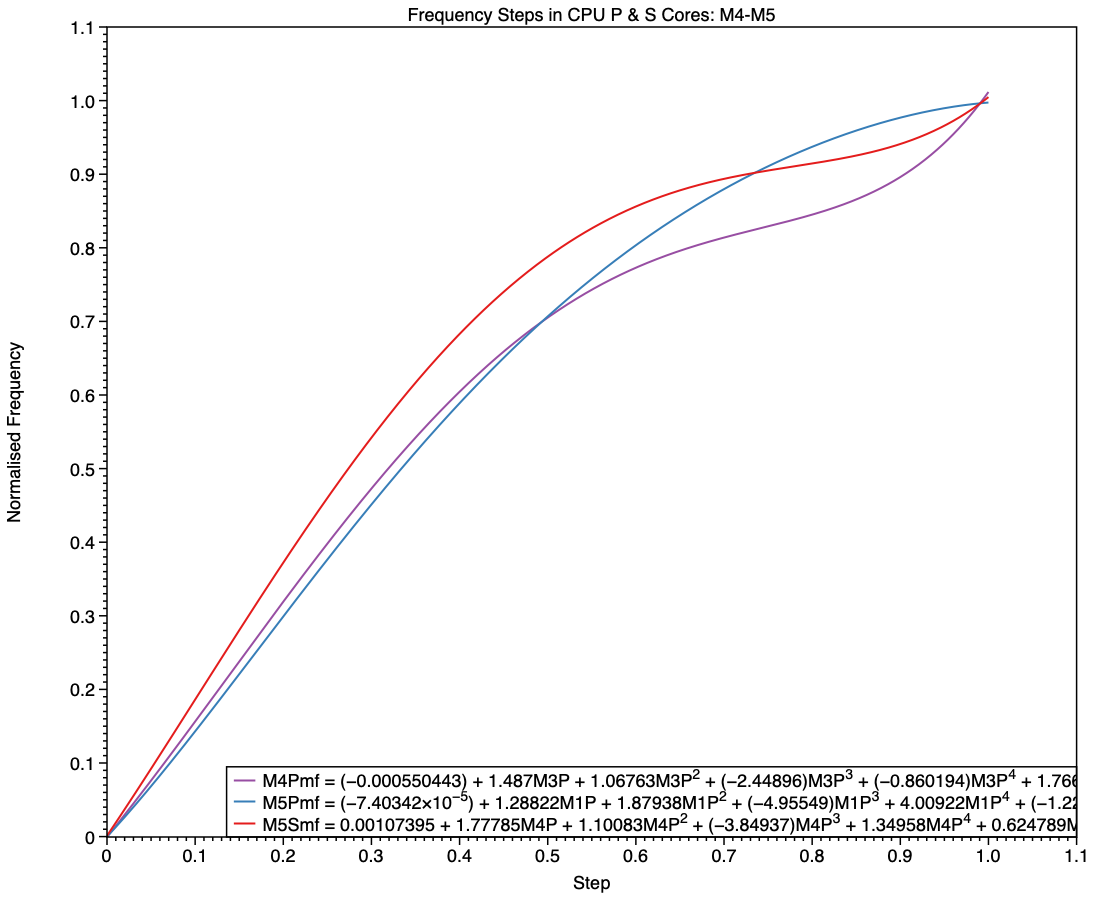
The equivalent comparison between frequencies of P cores in M1 and S cores in M5 chips (base models) shows a different picture. The M1 is again the simpler, being linear until it reaches a step of 0.8, while the M5 has higher frequencies in all except the top few values.
Shown here alongside curves for all earlier families, the red curve for the S cores in the base M5 has higher frequencies for every step apart from the last few.
Changes in M5 chips
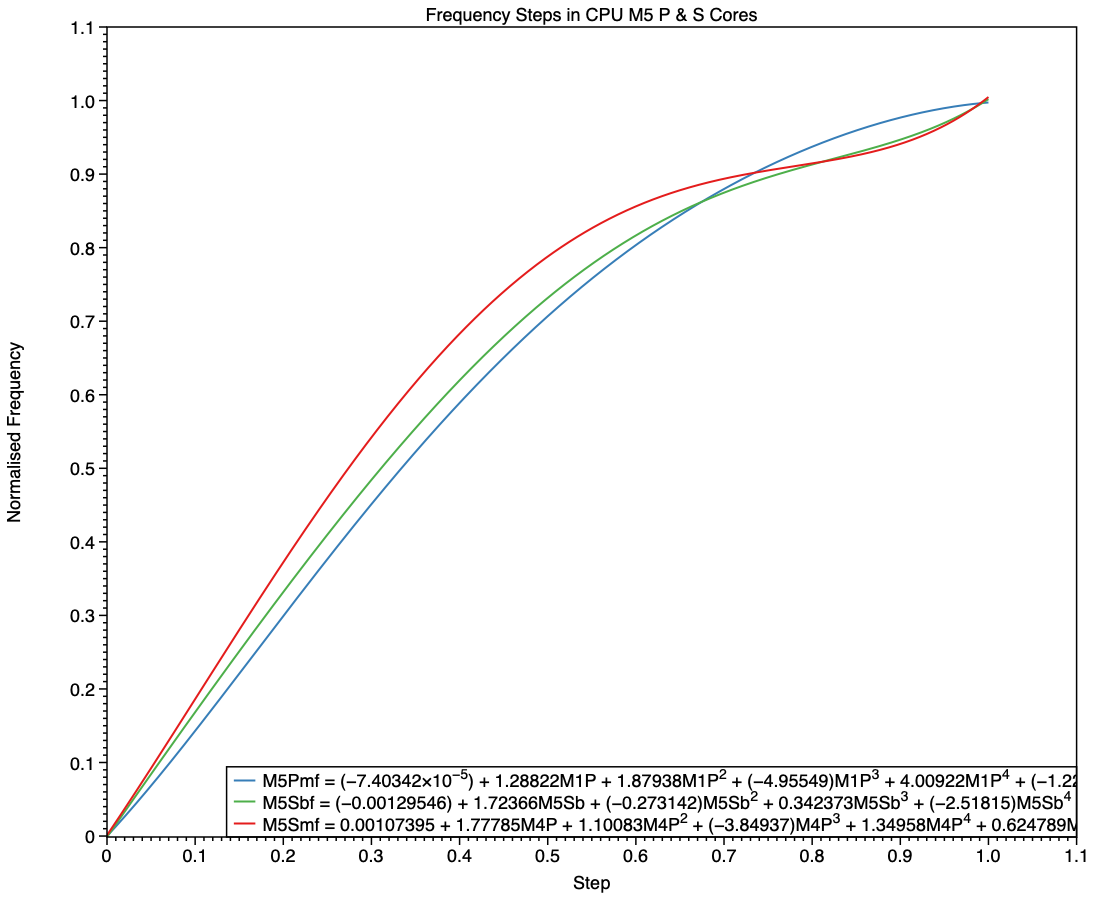
The M5 family brings a major departure from all previous M-series chips, with the introduction of the S type, and replacement of E cores in its Pro and Max variants with P cores. Although the E cores still included in M5 base chips follow on from their predecessors, it’s harder to see where the P and S cores fit in. My first comparison is between P cores in the M4 Max, and the P and S cores in the M5 Max.
The simpler curve of frequencies for the M5 P core, shown here in blue, is more similar to those seen in E cores than it is to the M4 P (purple) and M5 S (red). While the M5 P core may deliver performance closer to that of the M4 P core, this suggests that its frequency management is intended to conform more closely to that of an E core.
This final chart compares the P cores in an M5 Max with the S cores in the base M5 and its Max variant. This confirms the E-style frequency steps in the P core (blue), and the differences between the S cores in the base variant (green) and those in the Max (red). At all frequency steps, the S cores in a Max chip are run at the same or higher frequencies than those in a base variant.
MacBook Neo
In terms of frequencies, the A18 Pro used in the MacBook Neo has E cores with similar frequencies to those of an M2, while those of its P cores resemble P cores in an M3.
Conclusions
Frequency steps for the M5 P core follow the pattern of E cores rather than earlier P cores, but with more intermediate frequencies.
Frequency steps for S cores in base and Pro/Max variants of the M5 differ, although both resemble those of earlier P cores.
Key assumptions
The frequencies reported by powermetrics are accurate.
Control of frequencies uses discrete steps, rather than continuous values.
Frequency steps seldom if ever change.
Corrections
I welcome corrections to the table of frequencies. To check them, use the following command in Terminal sudo powermetrics -n 1 -s cpu_power
which then prompts you for your admin password. A few seconds later the window fills with a single set of measurements in which the frequency steps will be shown for different core types.
Apple silicon chips are designed to minimise the power and energy they use without compromising their performance. One of many tricks they use is to run their CPU cores at variable frequencies, and in more recent models to shut down those cores they don’t need. Last year, thanks to the many who contributed information about their Macs, we were able to assemble a table of CPU core frequencies for all the M-series chips then available. Those demonstrated that frequencies differed between families such as M1 and M2, and between models within each family such as M2 Pro and Max, as well as between P and E cores.
Since then Apple has released two new chips, M5 Pro and Max, a new chip series in the MacBook Neo, and reclassified the CPU cores in M5 chips into three types, Super, Performance and Efficiency. Those have brought the greatest changes since the first M1 was released. This article briefly reviews what we know about CPU core frequencies, and appeals for information about those new models.
The best way to discover which frequencies are supported by the cores in the CPU of an Apple silicon chip is using the output of the command tool powermetrics. This lists frequencies for core types, and this article relies on those it gives being correct. Although it’s most likely that these frequencies aren’t baked into silicon, so could be changed, I’ve seen no evidence to suggest that Apple has done that in any released Mac.
Frequencies
If powermetrics is to be believed, the maximum frequencies of each of the CPU cores used in each generation differ from some of those you’ll see quoted elsewhere. Correct values should be:
M1 E 2064 MHz or 2.1 GHz; P 3228 MHz or 3.2 GHz;
M2 E 2424 MHz or 2.4 GHz; P 3696 MHz or 3.7 GHz;
M3 E 2748 MHz or 2.7 GHz; P 4056 MHz or 4.1 GHz;
M4 E 2892 MHz or 2.9 GHz; P 4512 MHz or 4.5 GHz.
M5 E 3048 MHz or 3.0 GHz; Super 4608 MHz or 4.6 GHz (base variant only).
This is available for download as a Numbers spreadsheet and in CSV format here: mxfreqs1025
Why those frequencies?
Depending on workload, thread Quality of Service, power mode, and thermal status, macOS sets the frequency for each cluster of CPU cores. Those used range between the minimum or idle, and the maximum, usually given as the core’s ‘clock speed’ and an indication of its potential maximum performance. In between those are as many as 17 intermediate frequencies giving cores great flexibility in performance, power and energy use. Core design and development uses sophisticated models to select idle and maximum frequencies, and evidently to determine those in between.
Looking at the table, it would be easy to assume those numbers are chosen arbitrarily, but when expressed appropriately there are patterns. Apple’s engineers have clearly put considerable effort into picking optimised frequencies for each of the families and variants within them. If you think this is fine detail and only the maximum frequencies count, then bear in mind that both P and E cores spend a lot of their time running at those intermediate frequencies.
How to report frequencies
If you have a MacBook Neo, or a MacBook Pro with an M5 Pro or Max chip, you can add to this collection, please open Terminal and run the command sudo powermetrics -n 1 -s cpu_power
which then prompts you for your admin password. A few seconds later the window will fill with a single set of measurements looking like this:
All I’d like is a copy containing 3 lines from that:
Machine model at the top, to tell me which Mac it is, thus which chip.
E-Cluster HW active residency, which contains a list of frequencies for the E cores in the Neo.
P-Cluster HW active residency, which contains a list of frequencies for the P cores.
Super-Cluster HW active residency, which contains a list of frequencies for the Super cores in the M5 Pro or Max.
To help, I have highlighted those three lines in the screenshot above, although what you see may well be different given Apple’s new Super core type.
Macs are well known for their longevity, and are substantially cheaper when purchased used. This is a good time to consider buying a used Mac, as prices for Intel models are continuing to fall, and earlier Apple silicon models are becoming more widely available. However, buying any used computer is higher risk than buying new. This article explains how to reduce that risk.
Official refurbs
If you’re looking for discounted recent models, then the best place is Apple’s refurb store, in your local version of this page. These should be effectively as new, and include relatively recent models, but you’re unlikely to make big savings here. They’re ideal if you enjoy unboxing, as refurbs ship in their standard packaging.
Resellers
Most countries have retailers who specialise in preparing and selling used Macs. Among the best known are:
These are staffed by Apple-trained technicians who check each Mac thoroughly. They offer a wider range of models, many of them at highly affordable prices. Most offer a return period, as well as a one-year warranty, and are subject to local consumer protection law.
Private vendors
My one and only golden rule is never to buy a used Mac without seeing it in the flesh beforehand. That bargain a thousand miles away could turn out to have been stolen, and even if it’s genuine you could still end up with a useless Mac. I’ve never heard of anyone buying a house or car without seeing it for themselves, and a Mac should be no different. I suppose it’s feasible to go through the following checks over FaceTime or Zoom, but there are so many skilled con artists around I wouldn’t risk it.
When you arrive and see the Mac you’re about to purchase, work systematically through the following.
Provenance
Your first and most important question is whether this Mac is the seller’s to start with. The best answer comes in the form of its original proof of purchase, giving its serial number. Check that matches the serial number in Hardware Overview in System Information. If it doesn’t, then thank them politely and leave as quickly as you can. While you’re looking in that section, if the Mac has a T2 or Apple silicon chip, at the foot of that information you’ll see its Activation Lock Status: if that’s enabled, make a careful note, as you’ll need to get that disabled before you take your new Mac away. Intel Macs without T2 chips don’t have that to worry about.
Establishing provenance gets more complicated if that Mac has had more than one previous owner, but the current owner should ideally have a chain of bills of sale to reassure you. If they don’t, then that Mac may well have a murky past that could catch up with you.
Condition
Once you have confidence that you’re dealing with the real owner of the Mac, check it out as thoroughly as you can, without rushing or stripping it down to its logic board. A careful and undistracted visual examination is important, and gives clues through its general cleanliness as to how well it has been cared for.
It would be comforting to run hardware diagnostics just in case, although that’s not a particularly sensitive check for incipient problems. In ideal circumstances you’d want to check wear and any errors on its internal SSD using DriveDx or another SMART utility, but you’re unlikely to get the chance. If you have a friend who is a hardware technician, they could be a real boon to take along, just as you should take a good mechanic when you check out a used car.
AppleCare
If the current owner has AppleCare cover on that Mac, they should in most cases be able to transfer that with its sale. This requires them to sign into My Support for the agreement number and details, and with the original sales receipt for that Mac, to contact Apple Support and give them your details as the new owner. Apple explains this here, with useful onward links.
Haggle
I wish you success in agreeing the best price.
Activation Lock (Intel T2, Apple silicon)
The last hurdle in a successful purchase is the one most often forgotten, and the cause of much buyer remorse. It’s all the fault of Activation Lock and Find My Mac. These ensure that the owner’s Apple ID and password are required before that Mac can be used, erased, or Find My Mac disabled. In effect they make that Mac useless to anyone else until Activation Lock has been disabled.
Macs with T2 or Apple silicon chips running Catalina or later, where the user has 2FA on their Apple ID, are likely to be protected by Activation Lock. There is an additional requirement, depending on their architecture:
Apple silicon Macs must have their security policy set to Full Security;
Intel T2 Macs must have startup security set to Secure Boot, with booting from external drives disallowed.
Activation Lock is most commonly enabled when Find My Mac is turned on, and turning that off also disables Activation Lock. That requires entry of the current user’s Apple ID password, so must be done by the seller before they part with their Mac.
There are other ways to disable it:
It’s automatically disabled when the owner runs Erase All Content and Settings, only available on T2 and Apple silicon models anyway.
Activation lock can be disabled in the owner’s account at www[.]iCloud[.]com/find by removing that Mac from the list of All Devices there.
If you have proof of purchase, you can request Activation Lock to be removed by Apple support, but that’s a last measure and not something you should ever choose.
Never take possession of someone else’s Mac while its Activation Lock is active, as it will only cause you trouble and grief.
Handover
If everything is going well, you should be ready for the Mac to be handed over to your possession, accompanied by a written record of the sale. The conclusion is best seen as a mutual arrangement, as it gives the seller confidence that any data on that Mac is completely erased, and you the confidence that you’re about to gain a Mac you can use.
If it’s an Intel Mac, confirm with one another that it starts up without requiring a firmware password. If it has a T2 or Apple silicon chip, use its Erase All Content and Settings together to ensure that all its old files are made unreadable, and to be certain that Find My Mac and Activation Lock are disabled. Sadly, erasing older Intel Macs without T2 chips is a slower and more complicated process.
Checklist
Inspect the Mac before handing over any money.
Check proof of purchase and serial number, noting Activation Lock status.
Input and output have long been key factors in computer performance, and capable of bringing everything to a crawl unless carefully managed. This is most obvious when foreground and background processes contend for common resources such as disk storage. A popular solution has been to impose delays on I/O performed for intensive background tasks, like backing up, so giving more important tasks preferential access to I/O. This policy is known as I/O throttling, and has come to determine hardware choice.
For example, folk wisdom is that there’s little point in wasting a faster drive to store your Time Machine backups, because when those backups are made, their write speed is throttled by macOS.
I/O Throttling
Documentation of I/O policy is in the man page for the getiopolicy_np() call in the Standard C Library, last revised in 2019, and prevailing settings are in sysctl’s debug.lowpri_throttle_* values. Those draw a distinction between I/O to local disks, being “I/O sent to the media without going through a network”, such as I/O “to internal and external hard drives, optical media in internal and external drives, flash drives, floppy disks, ram disks, and mounted disk images which reside on these media”, and those to “remote volumes” “that require network activity to complete the operation”. The latter are “currently only supported for remote volumes mounted by SMB or AFP.”
Inclusion of remote volumes is a relatively recent change, as in the previous version of this man page from 2006, they were explicitly excluded as “remote volumes mounted through networks (AFP, SMB, NFS, etc) or disk images residing on remote volumes.”
Five policy levels are supported for IOPOL_TYPE_DISK:
IOPOL_IMPORTANT, the default, where I/O is critical to system responsiveness.
IOPOL_STANDARD, which may be delayed slightly to allow IOPOL_IMPORTANT to complete quickly, and presumably referred to in sysctl as Tier 1.
IOPOL_UTILITY, for brief background threads that may be throttled to prevent impact on higher policy levels, in Tier 2.
IOPOL_THROTTLE, for “long-running I/O intensive background work, such as backups, search indexing, or file synchronization”, that will be throttled to prevent impact on higher policy levels, in Tier 3.
IOPOL_PASSIVE, for mounting files from disk images, and the like, intended more for server situations so that lower policy levels aren’t slowed by them.
However, the idea that throttled I/O is intentionally slowed at all times isn’t supported by the explanation of how throttling works: “If a throttleable request occurs within a small time window of a request of higher priority, the thread that issued the throttleable I/O is forced to a sleep for a short period. This slows down the thread that issues the throttleable I/O so that higher-priority I/Os can complete with low-latency and receive a greater share of the disk bandwidth.”
Settings in sysctl for Tier 3 give the window duration as 500 milliseconds, and the sleep period as 200 ms, except for SSDs, whose sleep period is considerably shorter at just 25 ms. Those also set a maximum size for I/O at 131,072 bytes. You can view those settings in the debug section of Mints’ sysctl viewer.
Some years ago it was discovered that the user can globally disable IOPOL_THROTTLE and presumably all other IOPOL_TYPE_DISK policy with the command sudo sysctl debug.lowpri_throttle_enabled=0
although that doesn’t persist across restarts, and isn’t documented in the man page for sysctl. This is provided in an option in St. Clair Software’s App Tamer, to “Accelerate Time Machine backups”, for those who’d rather avoid the command line.
Apple silicon Macs
Since the man page for getiopolicy_np() was last revised, Apple silicon Macs have changed I/O. Most is now handled in some way through specialised Arm cores within the chip, and CPU cores come in two (now three) types, Efficiency and Performance (and Super in the M5 family). Background threads such as those performing the work associated with IOPOL_THROTTLE are now most likely to be running on Efficiency (or M5 Performance) CPU cores.
If you wanted to do away with all throttling, you not only have to change the debug.lowpri_throttle_enabled setting, but you’d need to move those background threads to run them on Performance (M5 Super) CPU cores, which isn’t possible unless you have control over the code. There is evidence that macOS may do this anyway when performing the first full Time Machine backup, which achieves significantly faster speeds than subsequent incremental backups.
Dangers
The big disadvantage of completely disabling I/O throttling policy is this can only be applied globally, so including I/O for Spotlight indexing, file synchronisation, and other background tasks, as well as those needing high-priority access to I/O. Leaving the policy disabled in normal circumstances could readily lead to adverse side-effects, allowing Spotlight indexing threads to swamp important user storage access, for example.
Conclusions
Even when Macs were simpler and all CPU cores were the same, disabling I/O throttling was at best experimental, and ran the risk of compromising higher priority I/O. In Apple silicon Macs, relocating threads from E to P cores isn’t possible, except when running them in a virtual machine. Without that, there seems little if any benefit from disabling I/O throttling. However, the claim that there’s no performance benefit to be obtained from faster backup storage media is demonstrably false. Perhaps it’s time to return I/O throttling to the obscurity it deserves.
In my account of how Tahoe updates macOS, I had reached the stage when Rosetta and the main update had started downloading from Pallas, Apple’s software update server (see the Appendix at the end for further explanation of terms used).
Download
Currently, the main update download (at least) is compressed using Zip, and is decompressed as a stream during download, so there’s no delay decompressing during the preparation phase later.
In this case, downloading the main update was completed within 8 minutes. The source of the Zip archive was originally given as a path on [https://]updates.cdn-apple.com/2026WinterFCS/patches, and that was written to a local path on /System/Library/AssetsV2/com_apple_MobileAsset_MacSoftwareUpdate/ In my case, though, I have a local Content Caching Server running, and immediately before the download started com.apple.AssetCacheServices substituted a download URL on that server to ensure the update was obtained through the local caching server. At the same time, an Event Report was sent back to Apple, recording the start of download.
Progress was updated every second during the download, and brought the progress bar from 16% to 53.9% over the following 8 minutes, with little other activity taking place.
Preflight
Activity then changed to what is repeatedly referred to as Preflight FDR Recovery, and is the first entry point for the UpdateBrainService, downloaded for MobileSoftwareUpdate rather than softwareupdated.
This runs an Event Recorder and begins to perform preflight checks to “recover FDR SFR”, and to perform a “firmware-only update”. To prepare for that, it retrieves various nonces and their digests for LocalPolicy, RecoveryOS boot policy, and others. Following those is the first of many attempts to determine purgeable space, in preparation for installation of the update. Those are performed by com.apple.cache_delete.
Pallas was then checked to see if there was any more recent version of RecoveryOS UpdateBrain, but there wasn’t. A further check for any newer recoveryOS was also made, before the main macOS update was prepared, at a progress level of 60% as set previously.
Preparation
The first step of the main preparation phase is to purge staged assets with com.apple.cache_delete. With that complete, UpdateBrainService recalculates cryptex size requirement for the update, and the install target prepare size:
cryptex size is 1.2 times the app cryptex size = 60 MB, plus 1.2 times the system cryptex size = 7749 MB, a total of 7809 MB, as previously calculated;
prepare size is the sum of the snapshot installation size of 3785 MB, the cryptex size of 7809 MB, three ‘slack sizes’ for VW, Recovery and Preboot of 2048 + 1024 + 1024 = 4096 MB, the new template size of 991 MB, twice the update partition size totalling 600 MB, less the old template size of 363 MB. The grand total comes to 16,918 MB.
UpdateBrainService then checks volume free sizes, and confirms that they’re sufficient to complete the update. It next creates a ‘stash’, which is protected by keys in the stash keybag, handled by the Secure Enclave Processor. There is then another round of purging with com.apple.cache_delete.
Much of the preparation phase is spent verifying the protection of installation packages, cryptexes, then the contents of /System/Applications and /System/Library. As progress is about 64% complete, System volume preparations are started, and there’s another round of purging by com.apple.cache_delete. There’s surprisingly little log activity as progress passes 70% complete.
With progress reaching 84% complete, UpdateBrainService starts unarchiving files in parallel, taking just under 5 seconds to complete those. Following that, there’s another brief period unarchiving data files in parallel, then working with the contents of /System/Volumes/Update/mnt1/private/var/MobileAsset/PreinstalledAssetsV2 as progress reaches 87% complete.
When there’s 87.5% completed, UpdateBrainService reports it’s creating hard links in parallel, then is searching for new paths and verifying files, such as those in the Ruby framework. The Recovery volume is unmounted, and there’s yet another purge with com.apple.cache_delete. After those, key volume locations are checked.
The high water mark of disk usage during update is prepared. This reveals some of the steps to be undertaken during installation, including:
prepare source package,
patch cryptexes,
patch system volume,
extract to system volume,
install personalised.
There’s a further round of purging with cache_delete before declaring PrepareUpdate as successful, then suspending the update briefly. When update resumes, the Update volume is mounted and prepared, and there’s another round of purging. The System volume is then mounted, checked, and prepared. Progress is now at 98.5% complete, and once 100% is reached, the countdown to restarting the Mac is begun.
Installation
During the download and preparation phases, apart from repeated purging, the log is generally quiet. This changes dramatically once the Mac starts preparing for shutdown and installation. WebKit is cleaned up and shut down, as are many other processes. The ‘stash’ of update components is then committed, and final scans and checks are completed.
The update is then applied, followed by Rosetta, RecoveryOS, UpdateBrain and finally minor documentation. After that period of nearly 20 seconds, this phase is declared complete, and a restart is notified before waiting for the essential reboot.
Reboot
Once rebooting by root has been initiated, the boot chime is muted to ensure the update continues in silence. The last log message is written a few seconds later, and UpdateBrain then runs the update.
Less than 3 minutes later, the system boot is recorded in the log, and kprintf is initialised 5 seconds later. About 3 minutes afterwards softwareupdated is started up, and runs various clean-up routines to complete the update sequence in conjunction with ControllerSetup and a Finite State Machine.
Key points
The main update download is decompressed while streaming, to save preparation time later.
If a local Content Caching Server is connected, AssetCacheServices will substitute its IP address for that of the Pallas server to ensure the download is obtained through the cache.
Following download, extensive preflight checks are performed.
During preparation components are verified, paths checked, and some unarchiving is performed.
Prior to reboot and installation, processes including WebKit are shut down in readiness for reboot and install.
FDR is unknown, but appears associated almost exclusively with a preflight phase.
Pallas is the internal name for Apple’s software update server. This appears throughout log entries, where for example Pallas audience is jargon for the type of user, normally macOS Customer.
RecoveryOS appears to refer to the version of Recovery in the hidden container of the internal SSD, more widely known as Fallback Recovery.
SFR appears to refer to the version of Recovery in the Recovery volume of the active boot volume group, also known as Paired Recovery.
Splat, semi-splat and rollback objects all refer to cryptexes. Splat is the general term, while semi-splat refers to a cryptex-based update that might include rapid security responses (RSR) and background security improvements (BSI) implemented by replacing one or both cryptexes. Rollback objects are older versions of a cryptex that have been saved to allow a newer cryptex to be reverted to that older one, in the event that the newer cryptex causes problems.
UpdateBrain is the executable code supplied as part of an update that prepares and installs that specific update. There’s a separate UpdateBrainService for RecoveryOS.
One of the new features coming in the next update to Tahoe, taking it to macOS 26.4, is a Rosetta warning. When you run Intel code on an Apple silicon Mac, macOS will start warning you that you won’t be able to do that in the future. At first, those will be infrequent, but as time passes their cadence will increase. This article explains why, and what you can do about it.
Virtualisation, emulation and translation
Although we’d all love to be able to run only native apps on Apple silicon, that isn’t always possible. Sometimes the app we need to use is only available for another platform, most commonly Intel. You can’t run code for a different processor in a virtual machine, though. VMs run at near-native speed only because the instructions they’re running are for the same processor. What they’re virtualising are the operating system calls, which are passed through to the host.
The traditional way to run code on a different processor is by emulation in a software engine that converts from one instruction set to another. That’s comparatively slow even on modern high-speed processors, so Rosetta 2 opts for a different approach that proved highly successful in the transition from PowerPC to Intel processors from 2006: it translates the code before running it natively. Rosetta 2 does this so well that the translated code often runs almost as fast as it would on the original processor.
Problems
One of the most common reasons for still requiring to run Intel code on Apple silicon stems from the fact that you can’t mix Arm and Intel code in the same process. Although an app might be Universal, and can run entirely on Arm, if it needs to load code modules that are still only available for Intel, then the whole app must be run for Intel, and be translated by Rosetta.
There are also two no-go areas that can’t be addressed by Rosetta: kernel extensions, and virtual machines running an operating systems for a different architecture. If you wanted to run an Intel version of Windows or Linux on your Apple silicon Macs, then you’d have to use emulation. Although this has been done for older Intel-only versions of macOS, it’s painfully slow and fragile.
One less common limitation of Rosetta 2 is that it doesn’t support AVX512 vector instructions, although it does support AVX and AVX2 instructions; that should affect very few apps.
Timescale
To help in forward planning, Apple has already set out its intentions:
Fall 2026, just 6 months away now, macOS 27 will run only on Apple silicon Macs, but will continue to enjoy full Rosetta 2 support. Security-only support will continue for Sequoia and Tahoe.
Fall 2027, macOS 28 will lose full Rosetta 2 support, although it will retain “a subset of Rosetta functionality aimed at supporting older unmaintained gaming titles, that rely on Intel-based frameworks”. Security-only support will continue for Tahoe.
Fall 2028, all support will cease for Intel versions of macOS.
Running Intel code in the future
If you do still depend on running Intel code, the best solution will be to replace that with an update that will run native on Arm. Apple’s increasing Rosetta warnings are intended to nudge us, and the few developers who haven’t yet produced Universal versions of apps, plug-ins, etc., to do so.
The most intractable problems are with code from developers who either can’t or won’t support Apple silicon. If their code is tied to hardware products that may never be addressed, and you may find the only solution is to keep some Intel Macs in service. But for most other situations, you should be able to continue running Intel code in a macOS virtual machine.
You can test this now using your favourite virtualisation app. Set up a suitable VM and install your app in it. In this example I opted to run my utility Mints using Rosetta rather than natively.
Just as in the host, when you first try to run the app, Rosetta will intervene and offer to translate it for you. The first time you do that, Rosetta will need to be downloaded first.
I chose Mints for this demonstration, as its Mach Absolute Time feature runs in Intel mode when Mints has been translated by Rosetta, as shown here.
Virtualising earlier versions of macOS doesn’t offer as wide a range of features, but if you can run your Intel-only app in Sonoma or later, using Rosetta translation, it should run very well in a VM of the same version of macOS, on a host running macOS 28 after full Rosetta support has been removed. And that should continue to work until a future version of macOS is no longer able to run such an old VM. Hopefully that will be long after 2028, but now is the time to try it.
Apple silicon Macs are about to undergo change to the numbering of their firmware versions. Accounts from beta-testing of the next minor update to macOS 26 Tahoe, version 26.4, indicate that future firmware will no longer be numbered as iBoot 13822.101.6, but as mBoot 18000.101.6 instead. This has major consequences for my free utility SilentKnight, which checks and reports the version of firmware installed. Version 2.14 should address that change in readiness for the release of the 26.4 update, and is particularly recommended for use on Apple silicon Macs.
This change was first reported in macOS 26.4 beta 2, and has apparently been sustained in the two subsequent beta releases, confirming that it’s an intended change, and not a bug.
There are currently two places in System Information that report a Mac’s firmware version, either the main Hardware section (also accessible in system_profiler SPHardwareDataType), or the Controller item within that section (or system_profiler SPiBridgeDataType).
Intel Macs without a T2 chip don’t report anything for their Controller, but those with T2 or Apple silicon chips reveal that they have a T2 or give an iBoot firmware version there. All three types of Mac also give a System Firmware Version in the Hardware overview.
This can get more confusing if you update or install macOS to an external disk. That will normally update the Mac’s firmware if the version of macOS installed on the external disk comes with more recent firmware. For example, if your Apple silicon Mac is currently running macOS Tahoe 26.3.1, it should have an iBoot firmware version of 13822.81.10. If you were to install Tahoe 26.4 to an external disk, as that has a more recent version of iBoot firmware, that should update the version installed in your Mac, and that remains so even when you start it up from its internal SSD.
As far as I can tell at present, this can result in internally inconsistent reporting. When running 26.3.1 from its internal SSD, that Mac will report its old iBoot version in the Controller section, but its new mBoot version in the Hardware section. Although that could change by 26.4 release, it might remain in all older versions, so providing lasting confusion.
As Apple hasn’t documented this change, I don’t know whether this will apply to all Apple silicon Macs updated to macOS 26.4, or to those updated to the matching versions of Sequoia or Sonoma. Therefore this new version of SilentKnight doesn’t attempt to check these new mBoot versions, and merely reports those found as well as it can. Once I know more, I will endeavour to interpret the results.
SilentKnight version 2.14 for macOS 11.5 and later is now available from here: silentknight214
from Downloads above, from its Product Page, and via its auto-update mechanism.
Please let me know how you get on with these new firmware version numbers.
Note: version 2.14 now fixes a bug that failed to recognise T2 Macs correctly in certain localisations including German. Thanks to Jan for reporting this so promptly.