Last Week on My Mac: Syncing metadata in iCloud Drive
How would you cope if you started your Mac up to find every datestamp on every file had been set to 1 January 1970 at 00:00? Or that every Finder Tag had vanished? What if all the Exif information for your images had been wiped out? Metadata like those aren’t optional extras we can afford to lose, although other metadata, like Finder Info and the URL from which a file was downloaded, are more ephemeral.
Xattr flags
Back in 2013, when iCloud was just two years old, Apple’s engineers implemented a scheme to determine how metadata stored as extended attributes (xattrs) should be copied, to take into account its permanence. This was important at that time to ensure only the right xattrs were preserved when files were stored in iCloud Drive. They did this by adding flags to the xattr’s name to indicate which actions should result in preservation of that type of xattr, and the metadata it contains.
Apple provides an extensive suite of xattr types to store metadata such as author names, keywords and comments, whose names all start with com.apple.metadata:. These are matched by corresponding metadata attribute keys, for example the xattr com.apple.metadata:kMDItemKeywords bears the metadata content accessed by the key kMDItemKeywords. Rather than appending flags to them all, this scheme laid down a table of default flags to be applied.
Being exemplary engineers, this was all detailed in the source code for copyfile, which is also open source. However, as this was just after Apple stopped creating much of its technical documentation, and little has ever been published about iCloud Drive, that’s as far as that information went.
For iCloud Drive, the relevant flag is S, XATTR_FLAG_SYNCABLE, defined as “This indicates that the extended attribute should be copied when the file is synced on services like iCloud Drive. Sync services may enforce additional restrictions on the acceptable size and number of extended attributes.”
Default flags set for xattr types com.apple.metadata:* (except for five of the less used types) are PS to preserve them during copy, save, sync and backup. You can read the macOS 26 version of those source files in Apple’s Open Source GitHub.
FileProvider
For the next decade or so, iCloud Drive mostly respected those behaviours, although without documentation it all appeared puzzling until you read the copyfile source. Then Apple decided to modernise it by implementing its FileProvider framework, a major architectural change for the better. Although the framework is intended to be common to all cloud storage services, there remains ample scope for iCloud Drive to offer enhancements.
Current FileProvider documentation for developers states:
“The extended file attributes are part of the item’s metadata. The system sets extended attributes on dataless files, and preserves them on files that it renders dataless. The system decides which attributes to sync. To sync an attribute, it calls the xattr_name_with_flags(_:_:) method and passes the XATTR_FLAG_SYNCABLE flag. Some older attributes are also synced.”
While FileProvider appears intended to conform to the xattr flag scheme, there’s no mention of the tables of default flags listed in the copyfile source code.
Implementation
Last week I set out to test and document how well iCloud Drive manages metadata, following the xattr flag system and copying up all those invaluable com.apple.metadata:* xattrs, only to discover it doesn’t any more. Of Apple’s many standard xattrs, the only ones I found that synced reliably over iCloud Drive in macOS 26.4.1 were:
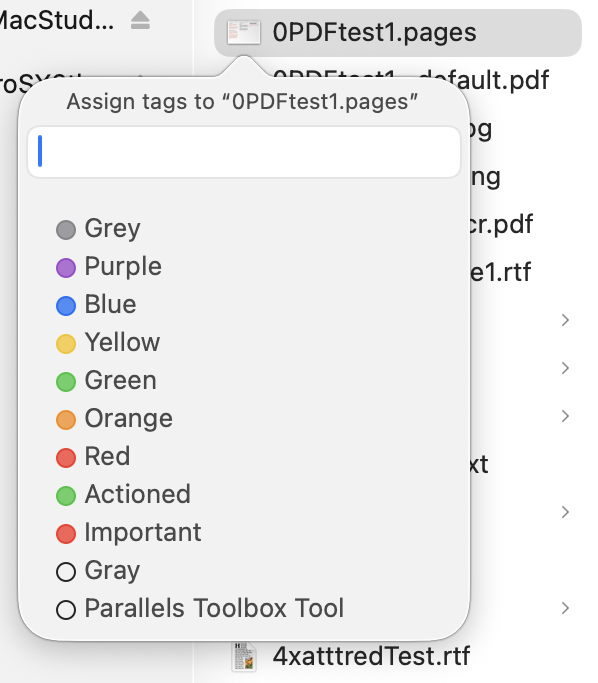
- com.apple.metadata:_kMDItemUserTags (Finder Tag)
- com.apple.lastuseddate#PS
- com.apple.quarantine
- com.apple.TextEncoding
The good news is that iCloud Drive through FileProvider does respect the S flag, but only where it’s explicit, rather than being set in that table of defaults. For those of us who have our own xattr types, such as those used for integrity checking by Dintch, Fintch and cintch, can still rely on iCloud Drive to sync those, provided they bear that S flag.
The bad news is that none of the most popular metadata-bearing xattrs are synced, apart from Finder Tags. All those com.apple.metadata:kMDItem* xattrs are blocked, as FileProvider doesn’t recognise them as having their default PS flags.
Workarounds
I have since looked at two workarounds, explicitly adding the S flag to those types that should be accorded it by default, and changing the xattr names from com.apple.metadata:kMDItem* to com.apple.metadata:_kMDItem*.
Adding xattrs like com.apple.metadata:kMDItemKeywords#S with an explicit S flag does ensure FileProvider syncs those xattrs. However, as neither Spotlight indexing nor the Finder appear to understand that flag isn’t really part of the type name, those preserved xattrs are of no use: they aren’t recognised by Spotlight for indexing, nor are they displayed in the Finder’s Get Info dialog or Preview pane.
Inserting an underscore into the xattr’s name was even worse, as it didn’t lead to their preservation, and was ignored by Spotlight indexing and the Finder.
This raises another interesting issue, in that there doesn’t appear to be a way to extend Spotlight indexing to encompass additional xattr types. There are extensive third-party type libraries, such as org.openmetainfo:* from Tom Andersen of Ironic Software and OpenMeta. But those appear to require their own indexing, search and presentation support.
Error
When I first realised the impact on metadata in iCloud Drive, I assumed this arose because the engineers implementing FileProvider, or those porting iCloud Drive to use that framework, had’t been aware of the xattr flag system and its primary purpose. But if that had been true, they couldn’t have respected explicit use of the S flag. Thus, I’m left with two plausible explanations:
- Apple’s FileProvider/iCloud Drive engineers are unaware of the system defaults table in
copyfile, so assumed thatcom.apple.metadata:*xattrs weren’t intended to be preserved when syncing. - Apple decided to end default sync support for
com.apple.metadata:*xattrs in iCloud Drive.
The second of those is even more erroneous than the first, as it reduces iCloud Drive support for metadata to a level common with third-party cloud providers. In this respect, users will see no difference from the behaviour of Dropbox or Microsoft OneDrive, which isn’t the marketing choice I’d have expected from Apple.
Conclusion
iCloud Drive no longer syncs much metadata stored in xattrs, in particular that stored in com.apple.metadata:* xattrs, apart from Finder Tags. There is no workaround, and unless Apple restores that feature, it limits the use of iCloud Drive with Macs.
![]()