Just over six months ago a series of weird bugs came to light in Spotlight indexing. The first report was that plain text files beginning with the characters LG are never indexed, so their contents can never be found by Spotlight search. The mystery deepened when the same was discovered for text files beginning with the characters NPA or Draw. It was appropriately Drew who worked out the common factor behind this apparently bizarre connected behaviour: all three files are identified as not being text by the old Unix utility file(1), used to recognise file types by ‘sniffing’ their contents.
You can verify that by creating a plain text file with any of those three sets of characters at its start, then running the command file on that file. In the case of one beginning with Draw, file will identify it as RISC OS Draw file data, even though the file has an extension of txt or text and a UTI of public.plain-text. At that the RichText mdimporter, which analyses all text-based files for metadata to enter into Spotlight’s indexes, throws its hands up in horror and refuses to index the file’s contents. Change those opening characters in that file, perhaps by adding a leading space, and all of a sudden the mdimporter works as expected.
Following our collaborative effort here, particularly Drew’s insight, we realised this bug has been silently blocking the indexing of seemingly random text files for the last three years or more. What remained unanswered at the time was what that mdimporter was doing running file(1) on files whose UTI made it clear that they were in plain text, not some long-forgotten binary vector graphics format from 1989. I believe I now have an answer, thanks to my recent work on QuickLook’s qlgenerators.
QuickLook’s generators take advantage of the hierarchical structure of UTIs. Rather than accepting the most specific UTIs such as public.jpeg, Image.qlgenerator works with all files whose UTI conforms to the generic UTI of public.image, and then undertakes its own format detection. This enables it to generate correct thumbnails and previews of HEIC images that have been given the incorrect extension of jpg, for instance.
Similarly, a Swift source-code file with the extension of swift and the UTI of public.swift-source is handled by the Text.qlgenerator because public.swift-source conforms to public.plain-text, the UTI required for use of that generator.
What if Spotlight’s mdimporters were to work the same?
We know the built-in RichText.mdimporter is used to extract metadata for a wide range of files containing text, which all conform to the generic UTI of public.text. It then classifies them on the basis of their contents to work out what to index. What if that’s performed using file(1), so rejecting perfectly valid text files as ancient binary vector graphics files, and so on?
We can’t get the same direct evidence from the log that I obtained for QuickLook, as Spotlight is far less informative in its log entries. We can get clues from looking at output from mdimport and mdls, though. While a non-deviant text file contains a metadata attribute extracted by its importer as kMDItemTextContent containing the text in the file’s data, that’s missing from a text file starting with any of the three known triggers. In turn that’s associated with the attribute _kMDItemPrimaryTextEmbedding containing ‘vec_data’ listed by mdls, which is also missing for the deviant files.
There is hope that a third party might be able to undercut RichText.mdimporter by providing a bug-free importer for public.plain-text, but that relies on the built-in importer targeting public.text rather than public.plain-text. The best solution would be for Apple to fix the identification of text files instead of relying on file(1), which dates from 1973. Given that these deviant files work perfectly with QuickLook’s generator, it appears Apple has already solved this problem there. So I suspect this bug in RichText.mdimporter will never be fixed in Sequoia or Tahoe.
With the first beta-release of macOS 27 just a couple of weeks away, this leaves those using the last Intel Macs stuck with Spotlight indexing that will never work on some text files, assuming that at some point in the not too distant future this bug is finally fixed in an Arm-only macOS. This is all sadly familiar from the loss of 32-bit support in the transition from Mojave to Catalina, when little if any effort was devoted to making Mojave as free of bugs as possible before it was abandoned in the rush forward to 64-bit.
It would have been far better to be able to look back in fondness with macOS that worked better, than looking back in anger at what never got fixed.
One last thing to remember is that, when Apple does fix this bug, you’ll have to force Spotlight indexes to be rebuilt on each of your Mac’s volumes to ensure that the contents of these files are incorporated. We learned that last time there was a serious bug in the same importer, which failed to index the contents of RTF files.
In case you haven’t got the message from the last few weeks looking at Spotlight and QuickLook, UTIs (Uniform Type Identifiers) are important, but not always as critical as they could be. To understand how macOS copes with misleading UTIs, I have a little demonstration you can try in the privacy of your own Mac.
All you need for this is an image with some Exif metadata. Those taken by an iPhone are particularly suitable, as they usually contain rich Exif information about which model took that image, focal length, aperture, exposure time and more. In my case, the image is in HEIC format. If you have my apps UTIutility and SpotTest, you can also explore UTIs more thoroughly, and inspect the metadata from images that gets indexed by Spotlight, but those are optional extras.
A file with the extension HEIC or heic is assumed to have the UTI public.heic, which conforms to public.heif-standard, and that in turn conforms to public.image, the parent of most image formats in macOS. The Help book for UTIutility shows these in a dense diagram.
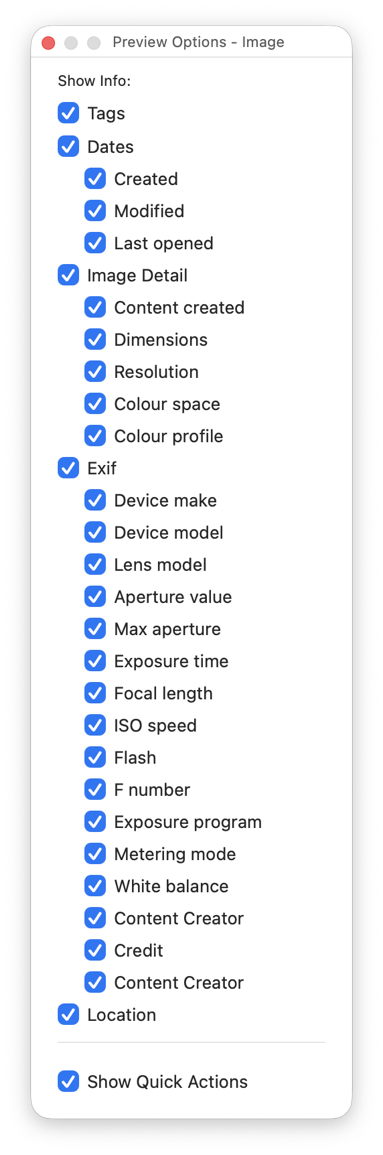
Select that image in the Finder’s Column view to inspect its public metadata. While the image is selected, open Show Preview Options in the View menu and enable all the metadata listed there to be shown in previews.
You should then have a good preview pane with lots of metadata below it.
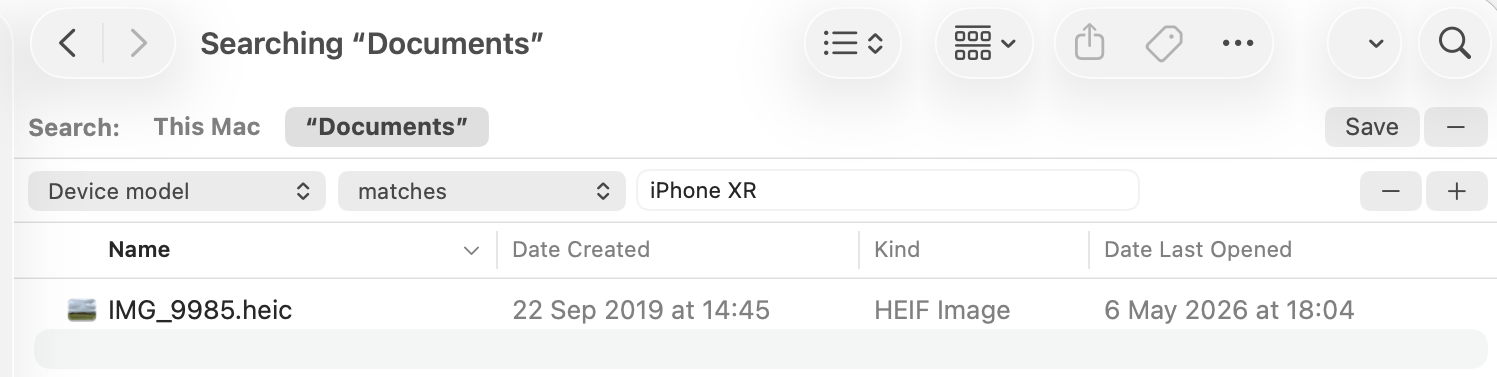
Next open a new Finder window and set it to Find. Using the search criterion popup menu, enable the Device model attribute, or another your image has metadata for, and search for that attribute, here iPhone XR, and you should see your image among the hits.
If you have SpotTest to hand, drop your image on its Drop Window. Being an image, it will crash mdimport, so the information you’ll see will be the metadata fields from Spotlight’s indexes, which should include the Device model as kMDItemAcquisitionModel.
So far, everything has worked as expected, but we’re now going to throw a spanner in the works by changing the extension on that image from HEIC to jpg, which changes the image’s UTI to public.jpeg, although that still conforms to public.image.
Its basic thumbnail icon now changes to a generic JPEG icon, so we’ve managed to confuse the basic thumbnailing scheme in QuickLook. But it’s still shown in the preview pane correctly, with all its metadata intact.
This is because that image has its larger thumbnails and previews generated by the qlgenerator for public.image, and that goes out of its way to parse the file data correctly, and recognise this is really a HEIC not a JPEG. If you’ve left the Finder Find window open, you’ll see that continues to find the image as if nothing had happened, as Spotlight also imports metadata using a common mdimporter for public.image, rather than relying on the more specific UTIs of public.jpeg or public.heic.
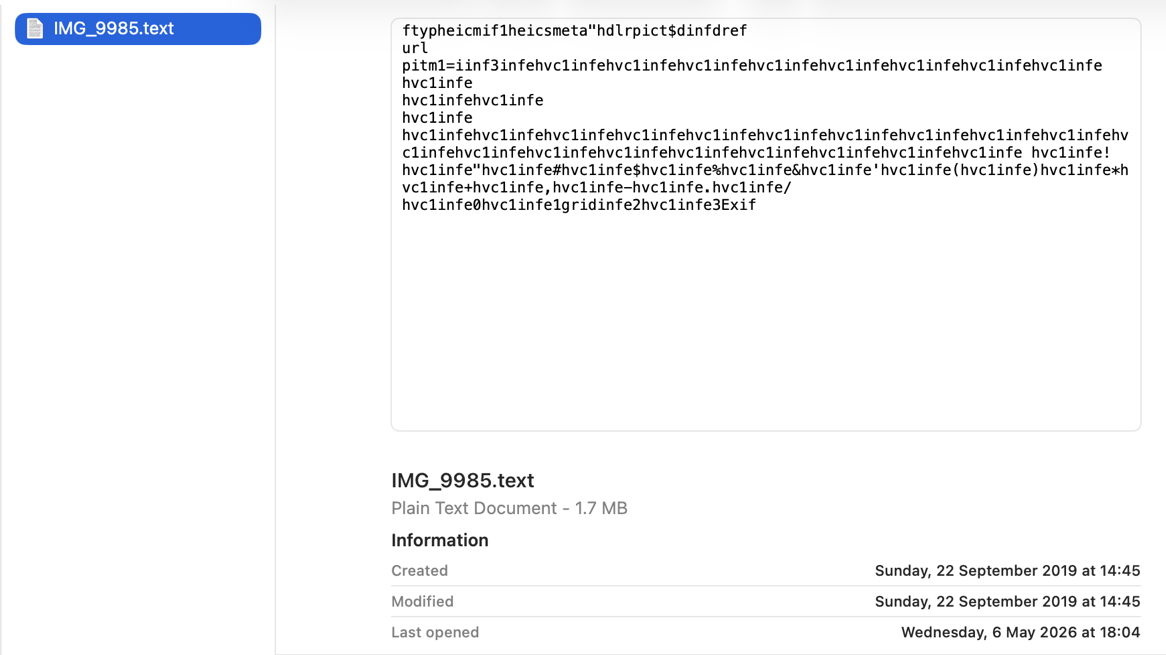
Finally, change the file’s extension to text, and you’ll see a preview of its text content, and it vanishes from the Find window too. That’s because text files are handled by their UTI of public.text, which includes public.rtf and others. Those don’t check the file data to ensure they’re not images, so the file is now being handled by the wrong qlgenerator and mdimporter, and won’t make any sense. As public.text formats don’t support Exif data, that isn’t extracted either, as you can see in SpotTest.
Change the extension back to heic, and you’ll see how quickly the right qlgenerator and mdimporter correct its thumbnails, previews, and search discovery, thanks to UTIs.
With an understanding of how QuickLook provides thumbnails and previews, you can be systematic when tackling its problems, although thankfully those are infrequent if not rare.
Generic icon
By far the most common problem with QuickLook thumbnailing is when a file’s specific thumbnail isn’t shown, but a generic icon for that type of file appears instead. This has been particularly common since the release of macOS Sequoia, as that ended support for older third-party generators in qlgenerators. To be able to extend the range of types supported by thumbnailing, third-party generators must now be supplied as appexes stored in an app bundle’s PlugIns folder or similar.
To pin this down, you’ll first need to discover the UTI of the files whose icons can no longer be turned into specific thumbnails. One easy way to do that is in my free UTIutility. Type in the file’s extension, press Return and the app will tell you that file’s UTI and those it conforms to.
You next need to discover which generator handles those UTIs. The official way to do that is using the command qlmanage -m
but that now only lists qlgenerators supplied in macOS, as qlgenerators. To see listings of others as well, open my free Mints and click on its QuickLook button.
For qlgenerators, you’re given the file UTI, the path to the qlgenerator file, and (when available) its version number, e.g. com.adobe.pdf/System/Library/QuickLook/PDF.qlgenerator (1002.2.3)
App extensions are divided into two, first those providing Previews, and second those for Thumbnails, e.g. com.apple.applescript.text/Applications/PreviewCode.app/Contents/PlugIns/Code Previewer.appex
If no generator handles the file’s UTI, ascend the list of UTIs it conforms with to discover which generator should attempt to. If you think an old qlgenerator is the problem now, contact the app’s developer and ask whether they intend supporting macOS with an appex replacement.
Occasionally you may come across an extension conflict, in which the same extension is used for another UTI, resulting in the wrong generator trying to create a thumbnail.
The nuclear option for any QuickLook problem is to reset its caches, using the command qlmanage -r
Although its effects might be to slow thumbnail generation for a while, it’s unlikely to prove any more damaging.
Digging deeper
If you have to go any deeper than that, you’re going to need to capture good log extracts to enable diagnosis. As far as Icon Services, QuickLook and related features are concerned, it’s essential to disable log privacy before going any further, or you’ll be driven crazy by all those messages gutted and rendered meaningless by censorship.
Even then, log entries refer to key items such as files and folders using references that may appear opaque. Some abbreviate file names and directories as ‘B{14}1.jpg’ for BeltedGalloways1.jpg, and ‘t{5}s’ for testims, as well as referring to them by hex numbers like 0xBBDBEFDB0. Another common habit in log entries is to refer to files by their inode number, either as an ino, or in a full URL such as file:///.file/id=6571367.243284. The use of UUIDs is also common, for example as uuid:0AD8986E-6325-4FF1-92FD-9FD3C15D57EA.
Example thumbnail generation
This was initiated by a mouse click, following which a thumbnail isn’t immediately available from cache.
This leads to the file’s UTI type being looked up in the dictionary of those known to be handled by bundled qlgenerators. These are the log entries most important to those hunting generator problems.
01.017971 QuickLookSupport com.apple.quicklook | No exact match found in type dictionary 0xc352a7ae0 for 'public.jpeg' #UTI

01.018010 QuickLookSupport com.apple.quicklook | Getting 5 for 'icon flavor' from UTI 'public.image' #UTI

01.018012 QuickLookSupport com.apple.quicklook | Getting 5 for 'icon flavor' from UTI 'public.jpeg' #UTI

01.018765 QuickLookThumbnailingDaemon com.apple.quicklook | Generating thumbnail for <QLThumbnailItem: 0xc351c36c0> (size (16.0, 16.0)) with badge type 1 with extension <QLThumbnailExtension: 0xc354ec540>
That thumbnail is then entered into the store and its index.
Once in the Thumbnail Cache, loading should be very quick, typically around 0.0001 seconds from start to the thumbnail being set as displayable.
Example missing generator
This shows some of the salient log entries made when a file type doesn’t have a generator available, in this case for an IconComposer icon file.
This is most obvious from UTI dictionary lookup
00.690352 QuickLookThumbnailingDaemon com.apple.quicklook | About to generate a thumbnail locally from URL: file:///Users/howardoakley/Documents/mints%20icon/Mints.icon/

00.690897 QuickLookSupport com.apple.quicklook | No exact match found in type dictionary 0xb933cfce0 for 'com.apple.iconcomposer.icon' #UTI

00.690957 QuickLookSupport com.apple.quicklook | No exact match found in type dictionary 0xb933cfce0 for 'com.apple.package' #UTI

00.691040 QuickLookSupport com.apple.quicklook | No exact match found in type dictionary 0xb933cfce0 for 'public.directory' #UTI

00.691092 QuickLookSupport com.apple.quicklook | No exact match found in type dictionary 0xb933cfce0 for 'public.item' #UTI

00.691098 QuickLookSupport com.apple.quicklook | Caching NSNULL as icon flavor for 'public.item' #UTI

00.691100 QuickLookSupport com.apple.quicklook | Caching NSNULL as icon flavor for 'public.directory' #UTI

00.691101 QuickLookSupport com.apple.quicklook | Caching NSNULL as icon flavor for 'com.apple.package' #UTI

00.691102 QuickLookSupport com.apple.quicklook | Caching NSNULL as icon flavor for 'com.apple.iconcomposer.icon' #UTI

00.691797 QuickLookThumbnailingDaemon com.apple.quicklook | Generating thumbnail for <QLThumbnailItem: 0xb92e10500> (size (16.0, 16.0)) with badge type 1 with extension <QLThumbnailExtension: 0xb934000e0>
The resulting error refers to the missing generator, not the file whose thumbnail is being generated.
00.769110 error QuickLookThumbnailing com.apple.quicklook | Generation error for request <QLFileThumbnailRequest:0x8cb0a8140 maximumSize=(16.00, 16.00) minimumSize=(0.00,0.00) scale=2.0 item=<QLThumbnailItem: 0x8cb014dc0>> : Error Domain=NSCocoaErrorDomain Code=260 "The file couldn’t be opened because it doesn’t exist."
The solution is to generate a placeholder icon as the ‘most representative’.
When that is accessed later for use in the Preview pane, that’s made clear.
02.773702 Finder com.apple.AppKit | ISImage reported a placeholder, image rep is providing a placeholder image for <ISBundleIcon 0xbd0165d10> Bundle URL: file:///System/Library/CoreServices/Finder.app/ type: (null) tag: (null) tag class: (null) digest:96BABFB5-FBB5-0662-25FA-99CA1A147F30
Once the generator has been made available, in this case by running the IconComposer app for the first time, it can be used to generate a thumbnail and preview. Note this requires the appex to be launched first.
02.409348 QuickLookSupport com.apple.quicklook | No exact match found in type dictionary 0xbd01fcf00 for 'com.apple.iconcomposer.icon' #UTI

02.409406 QuickLookSupport com.apple.quicklook | Getting <QLGenerator Package.qlgenerator> for 'Generator' from UTI 'com.apple.package' #UTI

02.409408 QuickLookSupport com.apple.quicklook | Getting <QLGenerator Package.qlgenerator> for 'Generator' from UTI 'com.apple.iconcomposer.icon' #UTI

02.676198 ExtensionFoundation com.apple.extensionkit | Extension `/Applications/Icon Composer.app/Contents/PlugIns/Icon Composer QuickLook Preview.appex/Contents/MacOS/Icon Composer QuickLook Preview` of type: `` launched.
To see almost all these log entries if you’re using LogUI, fetch all the entries for the period in question, then use its Search feature to display only those with a subsystem of com.apple.quicklook.
Throughout macOS, objects like files, folders and apps are displayed as icons, which are managed and delivered by Icon Services. Although many of those are generic to that class of object, the Finder and many apps use thumbnail images to represent specific objects. Zip archives and Installer packages are denoted by type-specific icons, images by individual thumbnails, and text files can use either depending on their context. In addition to those, the Finder and some apps can display the rendered contents of some types of file in previews, providing more detail and features such as annotation and text recognition.
Custom thumbnails and previews are the product of the QuickLook subsystem, and this article explains how they’re provided to Icon Services, here for use by the Finder, although the same mechanisms are available to other apps.
Caches
The success of Icon Services depends on speed of delivery as well as providing icons that are as faithful as possible for their size. Speed is achieved by maintaining a Thumbnail Cache containing those icons most likely to be needed, the primary purpose of iconservicesd. That cache is divided between memory and multiple locations on disk. The latter include a main store locked away from all access at /Library/Caches/com.apple.iconservices.store, and com.apple.iconservices and com.apple.dock.iconcache databases in private/var/folders/[2 chars]/…/C/, where … is a long alphanumeric name.
Generation
Fidelity of custom thumbnails and previews is ensured by many generators specific to the types of data to be rendered. There are currently a total of 19 bundled in macOS, in /System/Library/QuickLook, each of which will generate both thumbnails and previews. Data types are specified by UTI, thus PDF files with the UTI of com.adobe.pdf are handled by PDF.qlgenerator, while iWork.qlgenerator handles 15 different UTI types for documents written by Keynote, Numbers and Pages.
Custom UTI types that aren’t handled by any of those bundled qlgenerators can be turned into thumbnails and previews by appexes supplied by third-party app bundles. For example, Scapple documents with the UTI com.literatureandlatte.scapple.scap can have thumbnails generated by ScappleThumbnail.appex, while ScapplePreview.appex will generate previews for them. Both appexes are supplied in the Scapple app’s PlugIns folder inside the app’s bundle, as has been expected in recent macOS.
Selection of generator takes advantage of the hierarchical structure of UTIs. QuickLook’s dictionary of UTIs supported by generators normally contains no entry for the UTI public.jpeg, the most specific UTI for JPEG images, but it does for public.image, the more general type that public.jpeg conforms to. In the absence of a more specific generator, QuickLook uses Image.qlgenerator to produce thumbnails for JPEG images. This allows a third party to implement a better generator for JPEG images using their public.jpeg UTI, rather than public.image. The same is used by PreviewCode to generate thumbnails and previews of Swift source code using its specific UTI of public.swift-source, while the macOS Text.qlgenerator goes no more specific than public.plain-text, to which public.swift-source conforms.
QuickLook offers two strategies for generating thumbnails:
Best possible quality, which may take significant time to create large thumbnail images from large original files.
Multiple resolutions, which creates low resolution images quickly, then replaces them with higher resolution when it can.
You can see the latter in action sometimes when thumbnails are being generated for large Gallery view windows in the Finder.
App and bundle thumbnails
In contrast to files, app- and bundle-specific icons aren’t generated from file data, but taken from an icon located in the bundle’s Resources. When first viewed in a Finder window, if app icons haven’t already been cached, they will initially be displayed using placeholder icons. Each app is then looked up by LaunchServices in its records, and Icon Services adds its icon to the app icon section of the Thumbnail Cache.
Placeholder icons
When there’s a delay in generating or fetching a file’s specific icon, a placeholder icon is used by Icon Services instead. These are specific to the UTI type of that file, and will remain if no more specific icon can be generated.
Placeholders are used permanently for file types which don’t have specific content-based thumbnails generated for them, such as Apple Archives with the extension aar, with a UTI of com.apple.archive. The icon displayed is then based on that for public.archive, with the letters AAR added to indicate they’re Apple Archives.
Placeholders are also used in other circumstances. A common example is for text files listed in a Finder Column view, where all files with the UTI of public.plain-text are displayed using a generic icon, although they’re shown in the Preview pane as a fully rendered preview. The same applies to Rich Text files with a UTI of public.rtf, which use the same Text.qlgenerator, but not for PDF files.
QuickLook providing a thumbnail
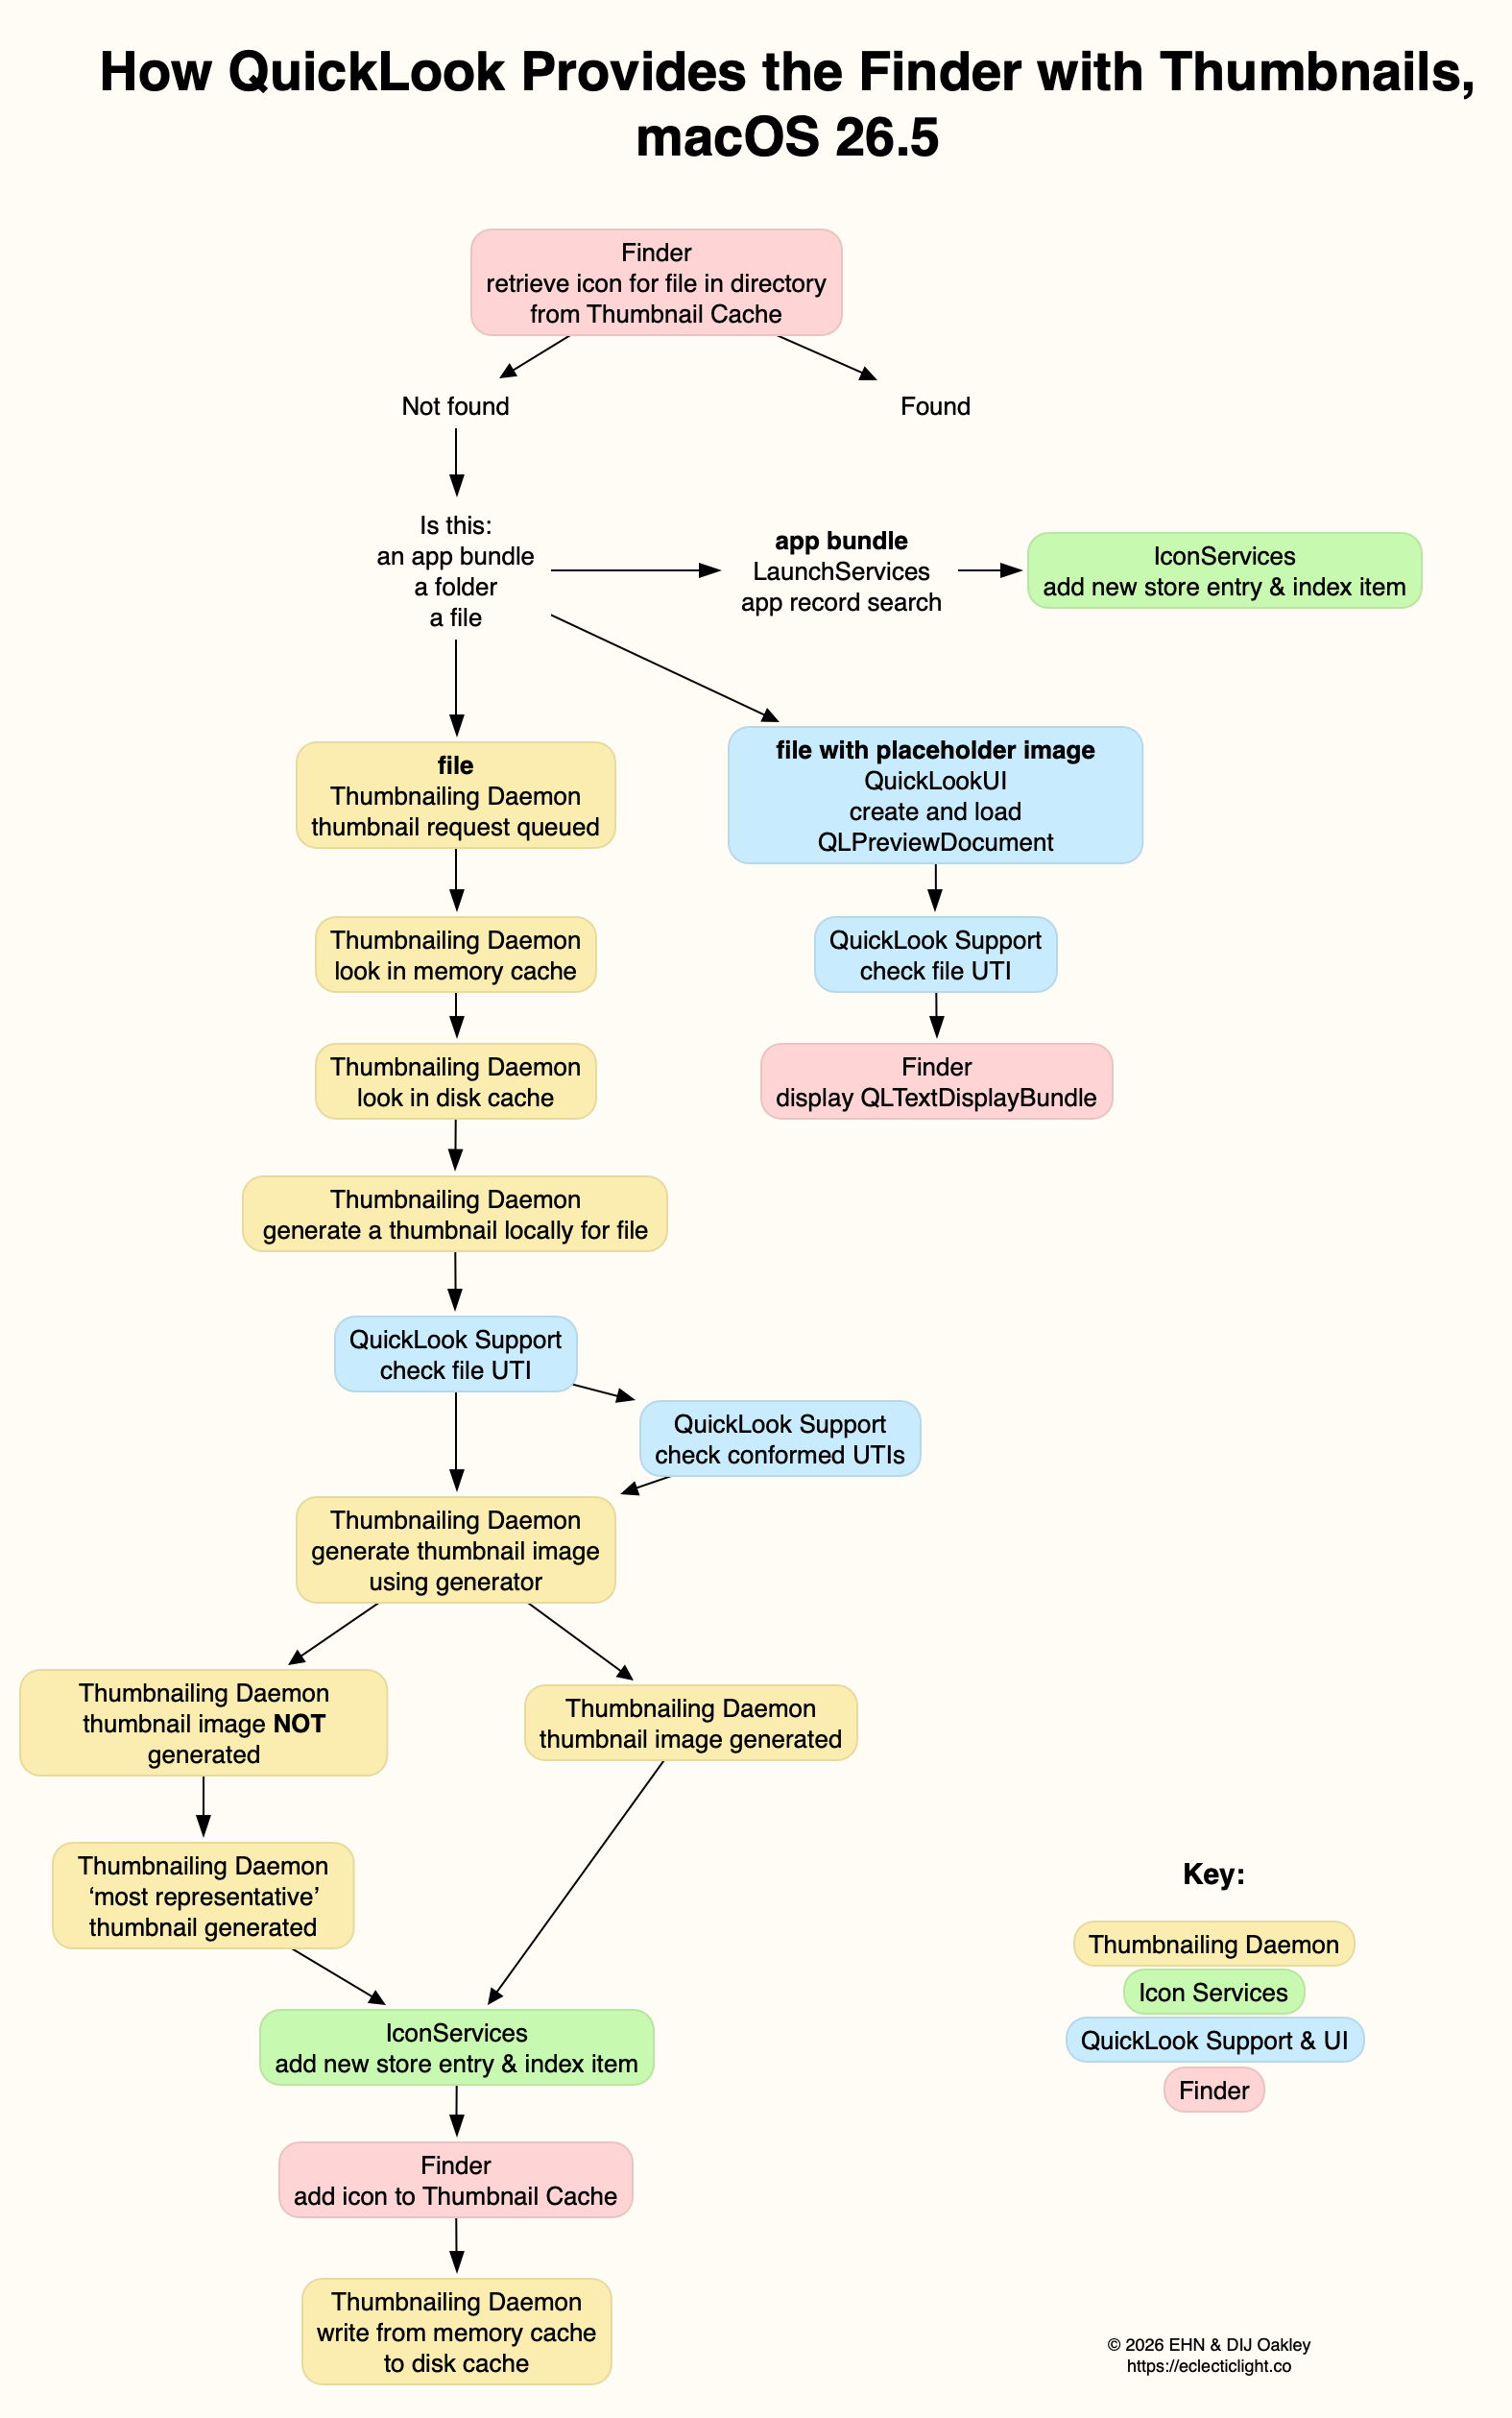
To cover the range of actions more fully, this account is a composite based on what happens when you open a folder in the Finder’s column view, extending to cover the principles for the display of contents in a Preview pane.
The initial request from the Finder is to retrieve the icon from the Thumbnail Cache. If it’s not found there, what happens next depends on what the icon represents.
For app and similar bundle icons, LaunchServices searches app records, the icon is found, and Icon Services add it as a new indexed store entry.
For files, if it already has a placeholder image, as a type icon, and its contents can be rendered into a thumbnail, QuickLook UI will create and load a QLPreviewDocument such as a QLTextDisplayBundle, for the Finder to display in the Preview pane.
Otherwise the Thumbnailing Daemon queues a thumbnail request. First the memory cache is checked, then the disk cache. If the thumbnail can’t be found in those, then a new thumbnail is generated locally for that file. The first step in that process is for QuickLook Support to check the file’s UTI, and ascend through the UTIs that conforms to, as its more generic types. This determines which generator will be called to generate the thumbnail image. If that fails to generate an image, the Thumbnailing Daemon will generate that deemed ‘most representative’, usually a placeholder icon.
The generated icon is then added as a new store entry and indexed by Icon Services, and that’s written from the memory cache to the disk cache.
QuickLook, or Quick Look, is the part of macOS responsible for generating custom Thumbnails and Previews of items in the Finder and elsewhere. Although it was only introduced in 2007, with Mac OS X 10.5 Leopard, its origins go back to 1988-91 when image Thumbnails could be saved in a file’s ICN# resource. A similar system arrived in Mac OS X, and was replaced by the first version of QuickLook in 2007, which has recently undergone revision, over the period 2019-25.
Resource-based Thumbnails in Classic Mac OS were relatively straightforward. Each type of file had its own icon, an association made in the hidden Desktop database. Image and video files often overrode that default by providing their own Thumbnail image as a resource, and had to update those when the file’s data was changed. Amazingly that’s still supported in modern macOS 35 years later.
QuickLook took on the task of generating Thumbnail images, and added larger Previews in which the whole document can be inspected without opening it in an app. This came with built-in Thumbnail and Preview generation for a wide range of common document types, extending to QuickTime media including audio and video. Apps are different, though, as they use icon image (icns) files stored in their bundle’s Resources folder, harking back to Classic icon resources.
Display of Thumbnails used the QuickLook framework documented here. This enabled third-parties to extend coverage to their own document types using QuickLook generators with the extension qlgenerator. Initially, they were installed into /Library/QuickLook from each app bundle.
Unlike Spotlight indexes and document versions, QuickLook stores all its files in the current Data volume, rather than locally on individual volumes. Normally, when QuickLook generated a Thumbnail or Preview, that was stored in its cache database kept in a temporary directory in the path C/com.apple.QuickLook.thumbnailcache/. Those could give revealing insights into images and other documents accessed recently, and Wojciech Regula and Patrick Wardle discovered that, in High Sierra and earlier, it was easy for malicious software to examine that cache. Apple addressed that in macOS 10.14 Mojave by making that cache completely inaccessible.
In-memory caching of Thumbnails has also proved controversial in more recent versions of macOS. To deliver smooth scrolling of Thumbnails in the Finder’s Gallery views in particular, the Finder has taken to caching them in memory for up to two days, sometimes using several GB in the process.
I described how QuickLook Thumbnails worked in early 2019, in the days before the SSV.
When you selected a document in the Finder, a dialog, or somewhere else where you expect its icon to be shown, the Finder passed details of the document path and its type (UTI) to IconServices, to fetch the appropriate icon. This called on its main service, iconservicesd in /System/Library/CoreServices, to check its icon cache.
Although the main icon store is locked away in /Library/Caches/com.apple.iconservices.store, there was additional data in a folder on a path based on /private/var/folders/…/C/com.apple.iconservices, where … is an unreadable alphanumeric name. For icons used in the Dock, their cache was at /private/var/folders/…/C/com.apple.dock.iconcache. If the icon should be replaced by a QuickLook Thumbnail, such as in a Finder column view, QuickLook is asked to provide that thumbnail. That in turn may be cached in its protected cache at /private/var/folders/…/C/com.apple.QuickLook.thumbnailcache.
QuickLook then relied on there being an appropriate qlgenerator to create a thumbnail of that document type; if the qlgenerator was flawed or could’t cope with the document’s contents, that could easily fall over. For example, if you renamed a text file with a .jpeg extension so that macOS considered it was a JPEG image, the bundled qlgenerator might have simply resulted in the display of a busy spinner, rather than resolving to a generic JPEG document icon. IconServices should then deliver the appropriate icon back to the Finder to display it.
In macOS 10.15 Catalina (2019), Apple started replacing this system with a new framework named QuickLook Thumbnailing, documented here. That replaces qlgenerators with QuickLook preview extensions, in particular Thumbnail Extensions, as explained to developers at WWDC in 2019.
macOS 15.0 Sequoia finally removed support for third-party qlgenerators, resulting in the unfortunate loss of custom Thumbnails and Previews for document types of apps that are still reliant on qlgenerators, and haven’t yet got round to providing equivalent app extensions.
When you now select a file in a view which should result in the display of its thumbnail in the Preview pane in that window, the Finder requests it from the QuickLookThumbnailingDaemon. That queues the request until the daemon can look for the image in its memory cache. If it can’t find it there it then looks in the disk cache, first at low quality 20 x 20 icon mode. If it still can’t find it, it queues a request for a fresh thumbnail to be generated. That uses the file data together with the appropriate code to create a Thumbnail, which is then returned and cached.
There’s at least one exception to this, the directory at ~/Library/Messages/Attachments/. For files inside that, and any others for which a Thumbnail can’t be generated, a generic icon is returned as the “most representative thumbnail”.
While third parties have been replacing their old qlgenerators with modern Thumbnail and Preview extensions (appexes), macOS still provides its standard qlgenerators in /System/Library/QuickLook. Third party appexes normally come in PlugIns folders in app bundles. Mints can provide a full listing of those installed. If a document type isn’t being thumbnailed as you’d expect, the first task is to discover its type as a UTI. You can then look up which qlgenerator or appex should be responsible for generating Thumbnails or Previews of that document type using Mints. By far the most common cause at present is an old third-party qlgenerator that hasn’t been replaced by an appex.
Following yesterday’s surprise about syncing of extended attributes via iCloud Drive, this article summarises what does and does not get synced in iCloud Drive in macOS Tahoe.
Attributes and data
File attributes are generally synced correctly and retained locally through eviction and download of each file. As those are saved in the inode data that is stored locally even when a file is dataless, they should remain reliable.
File data, complete with any embedded metadata such as EXIF fields and the optional Info section in RTF files, is retained and kept in sync with the copy in iCloud Drive while that file is kept downloaded. That is the only option when Optimise Mac Storage is turned off, and iCloud Drive is operating in replicated mode. When in nonreplicated mode, data is removed if the file is evicted from local storage, and synced down from iCloud Drive when it’s downloaded or materialised.
Extended attributes
As demonstrated in yesterday’s article, only the following xattrs are expected to sync down from iCloud Drive:
com.apple.metadata:_kMDItemUserTags (Finder Tag)
com.apple.lastuseddate#PS
com.apple.quarantine
com.apple.TextEncoding
other xattrs explicitly assigned the S flag, with #S appended to their name.
Other xattrs including those with names starting with com.apple.metadata:kMDItem aren’t likely to sync down from iCloud Drive without explicit use of the S flag.
Versions
Document versions saved in that volume’s version database in the hidden .DocumentRevisions-V100 folder will normally only be saved locally, when the local copy of that file is saved, and aren’t synced up to iCloud Drive at all. This has complicated effects best illustrated in the example below.
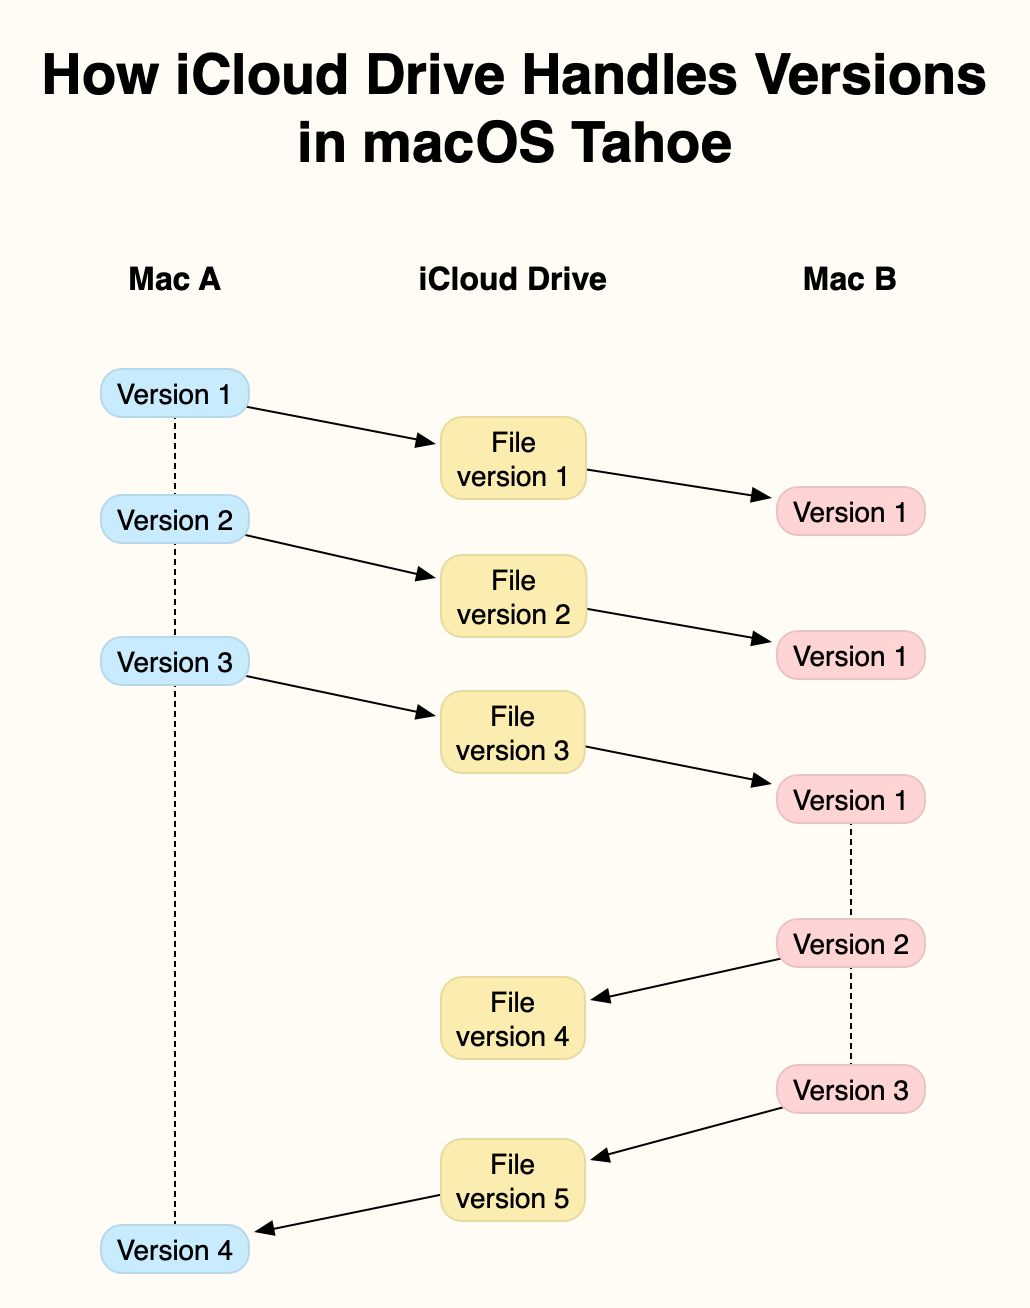
In this example, two Macs, A and B, are connected to the same iCloud Drive. At the start, Mac A creates and saves a new file, locally Version 1, in an iCloud Drive folder. This is synced up to iCloud Drive, from where it syncs down to Mac B, as the first version of that file.
Mac A then edits that file, saving it in two further versions. Each of those is synced up to iCloud Drive, and synced down to Mac B. However, as none of those versions is saved locally on Mac B, each is shown as the current and only version until the next one arrives.
Mac A is shut down after it has saved its version 3 of the file, and that has been synced up to iCloud Drive. Once that has synced down to Mac B, the document is edited there, and two versions are added to the first. Mac B’s Version 3 of that file is synced up to iCloud Drive, Mac B is shut down, and the file is opened and saved on Mac A, where that becomes its local Version 4.
At that stage, Mac A’s version database contains 4 versions, but no copy of Mac B’s Version 2. Mac B has 3 saved versions, including its Version 2 that isn’t saved in Mac A. iCloud Drive only has a single version, its Version 5, the same as Mac A’s Version 4 and Mac B’s Version 3.
The rules are simple:
Each Mac only adds a version to its own local version database when that file is saved locally.
At any moment, only the latest version is stored in iCloud Drive.
However, the behaviour can appear baffling, particularly when a document is observed in its QuickLook thumbnail as it’s being edited and saved on another Mac. You can then see its contents evolving with each save, but none of those are added to that Mac’s version database unless that version is saved there.
The end result is an incomplete version history on each Mac. The only way to unify those is in a third-party utility such as Versatility or Revisionist to consolidate them. As this doesn’t require any intervention by the File Provider framework, this is likely to be similar in third-party cloud services using that framework, such as Dropbox and Microsoft OneDrive.
Spotlight index content
No indexes from Spotlight are synced across iCloud Drive, but once a file has been synced down from iCloud Drive, its contents should be indexed locally, on the Data volume. Those indexed contents should remain accessible to search even when the file has been evicted from local storage.
QuickLook previews
QuickLook thumbnails and previews are also generated and stored locally. Those that have been cached to local storage remain accessible even when the file has been evicted. When there’s no cached version available, a generic icon for that file type will be displayed until an evicted file has been downloaded again. At one time, selecting an evicted file and calling for its thumbnail or preview was a simple way to force the file to be downloaded, but that has now been fixed.