Normal view

There are new articles available, click to refresh the page.
Before yesterdayMain stream

Does Safe mode check the startup disk?

By: hoakley
3 March 2026 at 15:30

Look in Apple’s support note explaining Safe mode, and you’ll see a list of three things that mode is claimed to do:

  • “Prevents certain software from loading as your Mac starts up. This includes login items and extensions that aren’t required by macOS, and fonts that weren’t installed by macOS.”
  • “Performs a basic check of your startup disk, similar to the more comprehensive check performed by the First Aid feature of Disk Utility.”
  • “Clears some system caches, including font caches and the kernel cache, which are automatically created again as needed. This can temporarily make more storage space available on your startup disk.”

That note is well-maintained, and its US version was last updated on 5 December last year. This article examines what “basic check of your startup disk” is performed, how “similar” it is to the First Aid feature in Disk Utility, and whether it differs from checks performed during startup in normal mode. All testing has been performed in macOS 26.3 Tahoe on Apple silicon Macs.

Reporting

Disk checks made in Safe mode aren’t reported to the user in the GUI. There’s no notification that they have been completed, neither is there any record made in System Information. They are, though, reported in three more obscure places most folk won’t try accessing:

  • /var/log/fsck_apfs.log, accessible in Console or a text editor,
  • /var/log/fsck_apfs_error.log, accessible in Console or a text editor,
  • the Unified log, accessible using a log browser such as LogUI.

A typical entry in the first of those, for the Data volume, reads
/dev/rdisk3s5: fsck_apfs started at Mon Mar 2 06:46:45 2026
/dev/rdisk3s5: error: container /dev/rdisk3 is mounted with write access; please re-run with -l.
/dev/rdisk3s5: fsck_apfs completed at Mon Mar 2 06:46:45 2026

Seven of the volumes checked during startup report that same error, and the only two in the boot volume group that report completion of the check are the System volume, unmounted during normal running, and the Signed System Volume, which has its own error-checking and is a snapshot in any case. Those that do complete and provide further information uniformly report
/dev/rdisk7s3: ** QUICKCHECK ONLY; FILESYSTEM CLEAN

fsck_apfs_error.log contributes no useful information, as many of its entries are uninformative, for example
dev= uuid=00000000-0000-0000-0000-000000000000 vers=2632.80.1.0.1 default_ans=n result=0 fp=0 fl=-1 repairs=0 time=0 iter=1
fsck_apfs completed at Mon Mar 2 06:46:45 2026

which completely fails to identify the volume being reported.

Corresponding entries in the Unified log for the Data volume are similar to those in fsck_apfs.log:
06:46:45.153989 com.apple.DiskArbitration.diskarbitrationd probed disk, id = /dev/disk3s5, with apfs, ongoing.
06:46:45.175308 com.apple.DiskArbitration.diskarbitrationd fsck status 65 /dev/rdisk3s5
06:46:45.182032 com.apple.DiskArbitration.diskarbitrationd probed disk, id = /dev/disk3s5, with apfs, success.

Checks performed

It’s clear from those reports that fsck_apfs is performing a ‘quick check’ of each volume after it has been mounted ready for use. According to man fsck_apfs, that “causes fsck_apfs to quickly check whether the device is `clean’. If device is an APFS volume, fsck_apfs will quickly check the APFS container and the specified APFS volume.” A status code of 65 is well-known from First Aid in Disk Utility as indicating that the volume being checked was mounted for writing at the time, so no check has been performed, as that would require the volume to be unmounted first.

First Aid checks

Normally, running First Aid in Disk Utility on a volume causes that volume to be unmounted, and a full fsck_apfs to be performed, in which any errors found will be repaired if possible. In addition to checking that volume, any snapshots of it will also be checked, although they cannot normally be repaired. Checking snapshots is time consuming, and when using the command tool fsck_apfs can be skipped using the -S option, although that’s not available in Disk Utility, which automatically includes snapshot checks.

Normal startup

Exactly the same checks as those made in Safe mode are also performed at the same point when starting up in normal user mode, but not when starting up in Recovery mode. Reporting in fsck_apfs.log and the Unified log is identical, with the same volumes returning status 65 each time.

In this respect, Safe mode is no different to normal user mode.

History

Prior to the introduction of macOS Catalina in 2019, starting up in Safe mode resulted in a full scan of all volumes and snapshots using fsck_apfs in normal mode. As that could take an hour or more, and delayed startup for the whole of that period, checks changed in Catalina, since when they have only used quick checks. Despite that, Apple has continued to claim that one of Safe mode’s features is checking disks similarly to First Aid in Disk Utility.

Q&A

Does Safe mode perform “a basic check of your startup disk”?
Although quick checks are attempted during startup in Safe mode, because of the circumstances, they can’t be run on the Data volume, but they should complete on external volumes.

Is that check “similar to the more comprehensive check performed by the First Aid feature of Disk Utility”?
No. When it is able to complete, all it does is verify the file system is ‘clean’ and not already in need of repair. Checks in First Aid are more extensive, include any snapshots, and include any repairs found to be necessary.

Do the disk checks performed in Safe mode differ from those that occur during normal startup?
No. Safe mode doesn’t add any disk checks beyond those that already occur during normal startup.

Recommendations

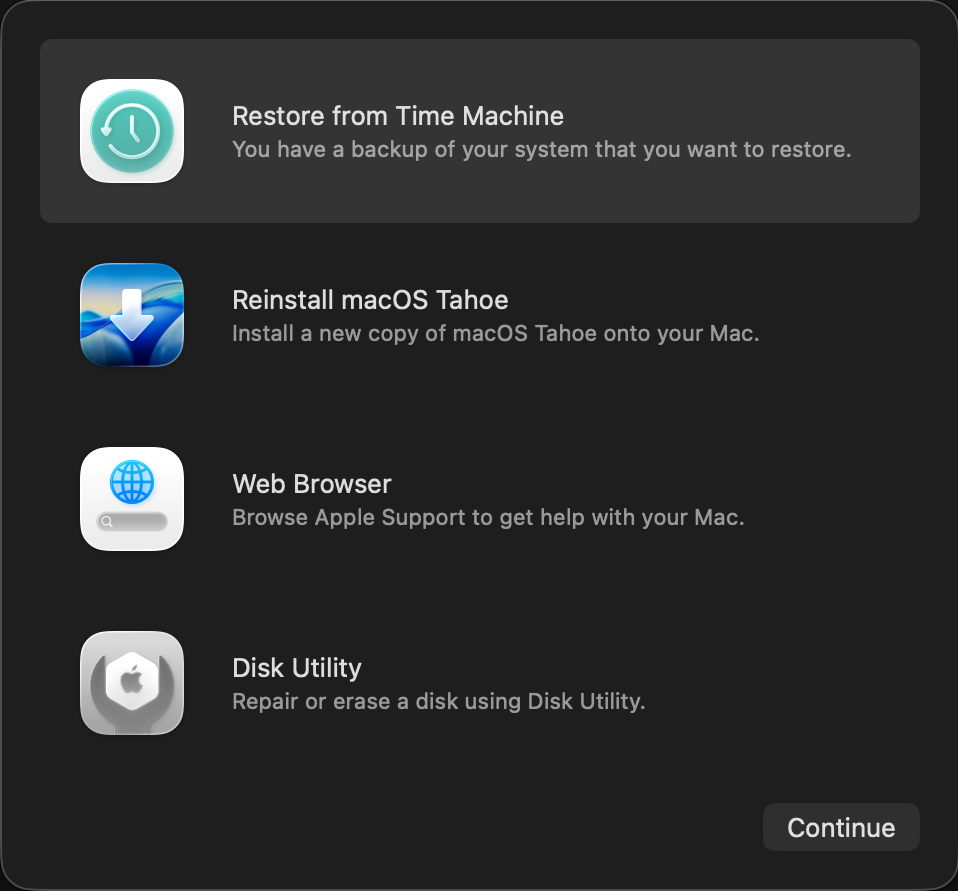
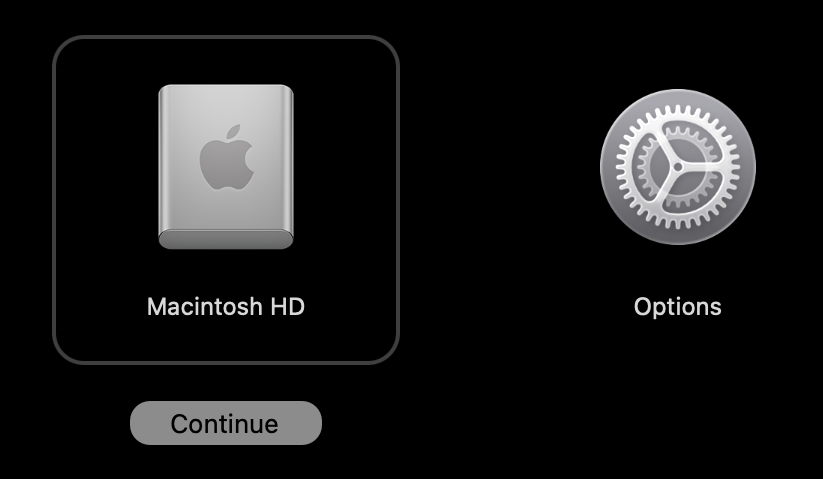
If you want to check any of your Mac’s volumes or disks, don’t try using Safe mode. Instead, use First Aid in Disk Utility (or fsck_apfs). If you want to check one of the volumes in the current boot volume group, prefer doing so in Recovery mode.

An illustrated guide to Recovery on Apple silicon Macs 2.0

By: hoakley
16 February 2026 at 15:30

There have been substantial changes made to Recovery for Apple silicon Macs in recent versions of macOS. This article guides you through its increasing complexities, using the road map below.

There’s one overriding caution: you will come across two different features with the same name. When you click on Options in the opening screen, that opens Recovery Assistant, where you select the user and authenticate to gain access to the Recovery app with its window of four options. If you open the Utilities menu in that, you’ll see a command Recovery Assistant, which opens another app that calls itself Device Recovery Assistant, but is generally referred to simply as Recovery Assistant, although it’s not the same as the other Recovery Assistant at all.

That’s also available as a downloadable PDF: RecoveryMap26

Apple’s current guide is surprisingly incomplete.

Enter Recovery Mode

To enter Recovery Mode on an Apple silicon Mac, press and hold the Power button until the display shows Loading Startup Options, then release it.

If a Mac running Tahoe has problems starting up correctly, it should automatically restart and open Device Recovery Assistant.

If your Mac has a second boot volume group, it has Recovery volumes paired with each of those bootable systems. As they may have different versions of Recovery, you should prefer to start up in the Recovery paired with a bootable system you want to repair. That should happen if you first start up from that boot system, shut down, and then start up in Recovery. However, this is no longer necessary when changing boot security, as you’re given a choice as to which bootable system to apply changes to.

If there’s a problem with Recovery Mode and your Mac has previously had a macOS update installed, you may instead be able to enter Fallback Recovery Mode. Press the Power button twice in rapid succession, and on the second of those presses hold the button until the display shows Loading Startup Options, then release it. The only drawback with this is that Startup Security Utility can’t be used to make changes to boot security, and Device Recovery Assistant may not be available either.

Startup Options

Language & Wi-Fi settings

To change the keyboard language and layout, use the Keyboard menu at the far right.

To set the Wi-Fi connection, use the Wi-Fi menu at the far right. Its icon indicates connection status and strength of signal.

To change the language used throughout, look for a Change Language command in the menus at the left, for example in the Recovery Assistant menu, where offered.

Bluetooth Setup Assistant

To pair Bluetooth devices using this assistant, press the Power button three times in rapid succession, with no more than one second between each press.

Recovery sysdiagnose

To perform a sysdiagnose when experiencing problems with Recovery, press Control-Option-Shift-Command-. (the dot or period key). This requires the resulting archive to be saved to external storage, which needs to be connected for this purpose.

Startup disk

To restart in Safe Mode, select the disk which you wish to boot from in Safe Mode, press and hold the Shift key then click Continue in Safe Mode underneath it. The Mac then starts up in Safe mode from that disk.

To set the default startup volume, select the disk you wish to make the default boot disk, press and hold the Option key then click Always Use underneath it. The Mac then starts up in normal mode from that disk.

To start up in normal user mode, select the disk you wish to start up from and click Continue underneath it. The Mac then starts up in normal mode from that disk.

Repair Assistant

Press and hold the Command ⌘ and D keys until you hear the startup chime indicating the Mac has restarted into Repair Assistant.

Repair Assistant offers a choice of tests from the available diagnostic suites according to your Mac’s hardware, including:

  • Mac Resource Inspector, to test the main Mac hardware over a period of 1-7 minutes;
  • Display Anomalies, for any built-in LCD panel;
  • Keyboard, only when built-in;
  • Trackpad, only when built-in;
  • Touch ID, for any built-in Touch ID sensor;
  • Audio, to verify audio output using a set of test tones.

Once a test has completed, it’s marked with a green ✅ to indicate success, or a warning triangle or error symbol if the test couldn’t be attempted (power supply when not connected to a laptop), or problems were discovered. Individual tests and their results are listed from each test’s ⓘ button.

Repair Assistant’s substitute for an About window provides details of your Mac, including its serial number, also provided as a QR code, and the version of macOS.

Recovery Assistant

Select the Options icon and click Continue underneath it. You will then be prompted to select a user you know the password for. Do that and click on Next. Enter the password for that user and click Continue.

Erase Mac

To erase the Mac fully without unlocking it, select that command from the Recovery Assistant menu. This completely erases all boot volume groups on the Mac’s internal SSD, ready to reinstall macOS, for which it requires an internet connection.

Recovery Window

To restore from a Time Machine backup, select that item and click Continue.

If your backup is on external storage, this is the time to connect it and locate the backup you want to restore from.

To reinstall macOS, select that item and click Continue. You’ll then pass through the licence agreement and can select which disk to reinstall macOS on, but you don’t get a choice of which version to install.

To read Apple’s help information on Recovery Mode and its tools, or browse the web, select Web Browser and click Continue.

To check and repair volumes, and perform other storage management, select Disk Utility and click Continue.

Recovery Utilities

Access these through the Utilities menu in Recovery.

Startup Security Utility

To change the Security Policy for a boot volume group, open Startup Security Utility and select the boot volume group whose policy you want to inspect or change. Click Unlock and enter the password for that.

This should normally be at Full Security.

To run that boot volume group at Reduced Security, for example to allow the loading of third-party kernel extensions, select Reduced Security instead, then tick the option you want and click OK.

To reduce security further, for example when disabling SIP, select Reduced Security then use Terminal to disable SIP.

Device Recovery Assistant

Use the Recovery Assistant command in the Utilities menu. Note that its app menu identifies itself as Device Recovery Assistant. This requires an internet connection to function. If you’re asked to choose a connection, opt for a Wi-Fi network if possible.

Distinctive to DRA’s opening window is its first aid symbol ⊕. Click on the Continue button to move on.

The next window invites you to send data to Apple for diagnostic purposes. Make your choice as you move on.

If your startup Data volume is protected by FileVault, you’ll then be prompted for the password to unlock it. Once that has been provided, DRA attempts to perform a recovery.

At the end of that, you should see one of three outcomes:

  • no problems were found, and you can restart your Mac back into normal mode;
  • problems were found and repaired successfully, so you can restart your Mac back into normal mode;
  • problems were found but aren’t fully repaired.

When your Mac restarts, it may show a notification that you need to recover iCloud data. If so, open System Settings and you should see a new item in its sidebar to Recover iCloud Data.

To shut down or restart your Mac, use the commands in the Apple  menu. The only way to return to any of the options offered in the initial screen, such as starting up in Safe mode, is to shut down and enter Recovery Mode again.

Miscellaneous

To open Terminal to run commands there, open Terminal from the Utilities menu. Note that you currently get bash rather than zsh, and run as root.

To put that Mac’s disk into Shared Disk mode, select the Share Disk… command from the Utilities menu and follow the instructions.

To browse the Recovery log, select that command from the Window menu.

Leave Recovery

The Apple  menu offers three exit routes: Startup Disk to change that and restart, Restart from the current startup disk, and Shut Down.

❌
❌