Apple has released the update to bring macOS Tahoe to version 26.5, and security updates for Sequoia and Sonoma to bring them to 15.7.7 and 14.8.7.
If you were expecting 15.7.6 or 14.8.6, then you’ll be as surprised as I was that Apple appears to have skipped those and gone straight on to x.x.7. I haven’t seen any explanation for this curious change in version numbering.
Download size for the 26.5 update on an Apple silicon Mac is around 3.8 GB, and the last 5 minutes of preparation takes maybe a tad longer than that. Intel Macs should download around 2.9 GB instead.
In Apple silicon Macs, firmware is updated to mBoot 18000.120.36, while Intel firmware is updated to 2103.100.6.0.0 (iBridge 23.16.15067.0.0,0).
Release notes are the bland and unhelpful statement that “This update includes enhancements, bug fixes, and security updates for your Mac.”
Security release notes are here for Tahoe with around 69 vulnerabilities fixed including more kernel bugs than I’ve ever seen in a single update, here for Sequoia with around 45, and here for Sonoma with a mere 43 or so.
Apple still hasn’t posted any enterprise release notes here but might think of something to report later.
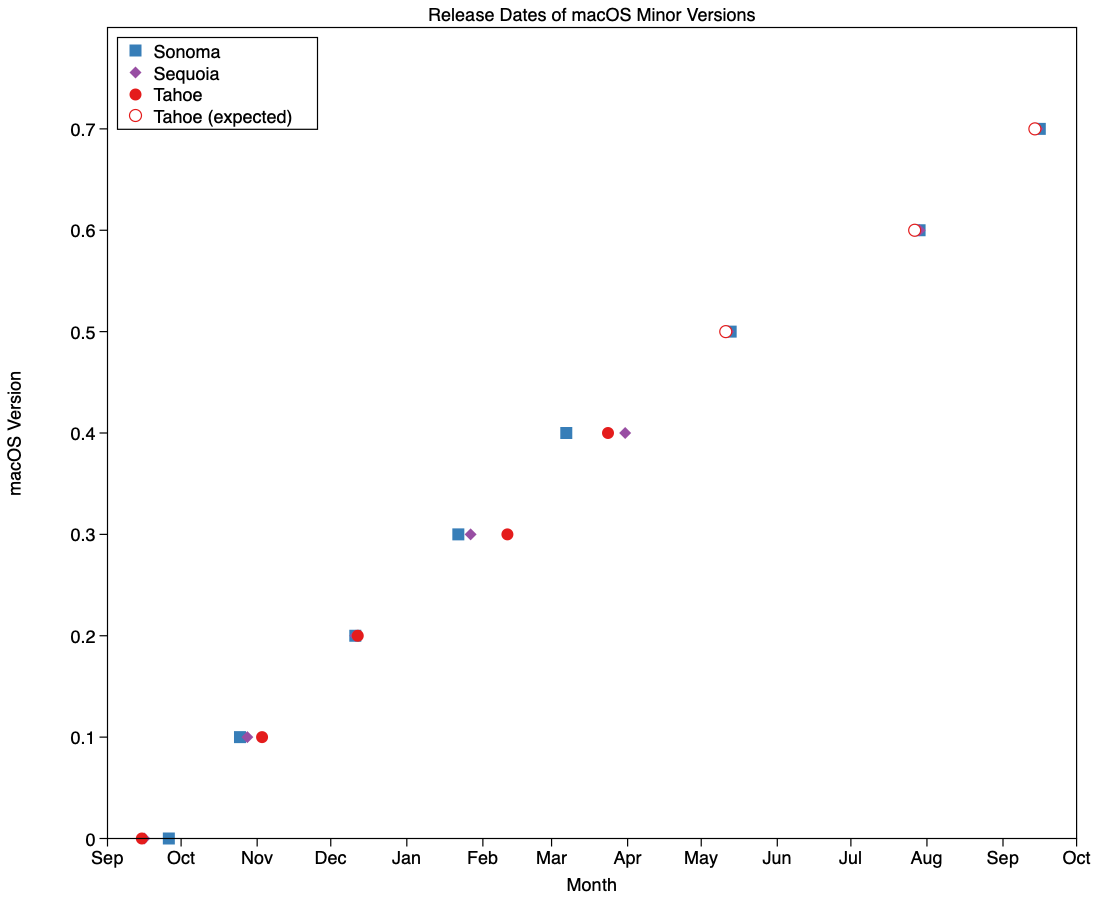
With macOS Tahoe already more than half way through its cycle, and Apple’s WWDC announced, now is a good time to plan your Mac’s calendar. This article peeks at what lies ahead for macOS over the next six months.
Since the pandemic disruption settled, minor version updates to macOS have become more regular. Looking across Sonoma, Sequoia and Tahoe, greatest variation in their timing has been in their x.3 and x.4 releases, that have varied between 22 Jan – 11 Feb, and 7 – 31 March, respectively. x.5 to x.7 have been more consistent, as they’re more tightly constrained by events including WWDC, the subsequent new beta season, and for some maybe even a vacation.
Those are summarised in the chart above, together with my predictions for the dates we should expect the remaining minor versions of Tahoe. Those should bring its cycle to look like:
26.0 – 15 September 2025
26.1 – 3 November 2025
26.2 – 12 December 2025
26.3 – 11 February 2026
26.4 – 24 March 2026
26.5 – 11 May 2026
26.6 – 27 July 2026
26.7 – 14 September 2026.
Where my forecasts are given in italics. Patch releases, such as 26.3.1, and BSIs occur outside that schedule. While we’re on the topic of BSIs, all indications are that Apple only intends to provide them for the current release of macOS, as it did with RSRs, which means that those Macs staying with Tahoe from 26.7 will no longer get them. It’s unclear how significant a loss that might prove.
WWDC this year is being held between 8-12 June, and will almost certainly bring the first developer beta release of macOS 27.0 (and all Apple’s other OSes). That’s likely to be made available to public beta-testers in early July. This is particularly significant this year, as it will be the first version of macOS to run exclusively on Apple silicon Macs.
For those with Intel Macs, or intending to remain with older versions of macOS, likely dates of release for scheduled security updates to Sonoma and Sequoia are:
15.7.6, 14.8.6 – 11 May 2026
15.7.7, 14.8.7 – 27 July 2026
15.7.8, 14.8.8 – 25 August 2026
15.8 – 14 September 2026.
The date at the end of August is possible, but less likely than the previous two. So far this year, security updates for Sonoma and Sequoia have been keeping reasonably close to those for Tahoe, in terms of vulnerabilities addressed, so the security gap between them has been rather less than in previous cycles.
However, the important message here is that it’s unlikely that Sonoma will receive any further security updates after the end of August this year. If your Mac is capable of being upgraded to Sequoia, now is the time to plan that, or it’ll all too quickly be September and your macOS will have lost its last support.
Similarly, if you’ve been holding back from upgrading to Tahoe in the hope that it will undergo interface improvements, I’m afraid that’s now looking increasingly unlikely. If it’s an Intel Mac capable of running Tahoe, there’s little point in avoiding making that decision any longer. There’s only limited time and scope left for improvement in macOS 26, with most engineers now more focussed on getting macOS 27 ready for WWDC.
Freeform joins Creator Studio, with advanced tools and a premium content library
Purchase Sharing in Family Sharing
and eight new emoji.
Security release notes for 26.4 list over 70 fixes, those for Sequoia 15.7.5 list about 56, and those for Sonoma 14.8.5 list about 50. None are reported as being known to be exploited in the wild at present.
Firmware in Apple silicon Macs is updated to a new mBoot firmware version numbering system, with the current version given as 18000.101.7. The macOS build number is 25E246, and Safari is version 26.4 (21624.1.16.11.4). Firmware in Intel Macs with T2 chips is updated from 2094.80.5.0.0 (iBridge 23.16.13120.0.0,0) to 2103.100.6.0.0 (iBridge 23.16.14242.0.0,0).
If you’re running SilentKnight older than version 2.14 (71), then it’s likely that it will crash as a result of the change in firmware version. Please use version 2.14 from here.
I’ll be posting an analysis of what has changed later today.
Updated 09:15 25 March 2026 with firmware details for Intel Macs.