In just over a week the razzle of this year’s WWDC will have started, and we’ll see what macOS 27 has to offer those with Apple silicon Macs. This is unusually important, as it also marks the end of further improvements to the last version of macOS that can run on Intel Macs. For the many who still use Intel Macs with T2 chips it’s time to decide whether to see their remaining years out with Sequoia or Tahoe, and that in turn is limited by Tahoe’s flawed and dazzling interface. For those with Apple silicon Macs who have delayed upgrading to Tahoe, what we are shown in WWDC may also be decisive.
Has Tahoe recovered? Will macOS 27 be any more usable?
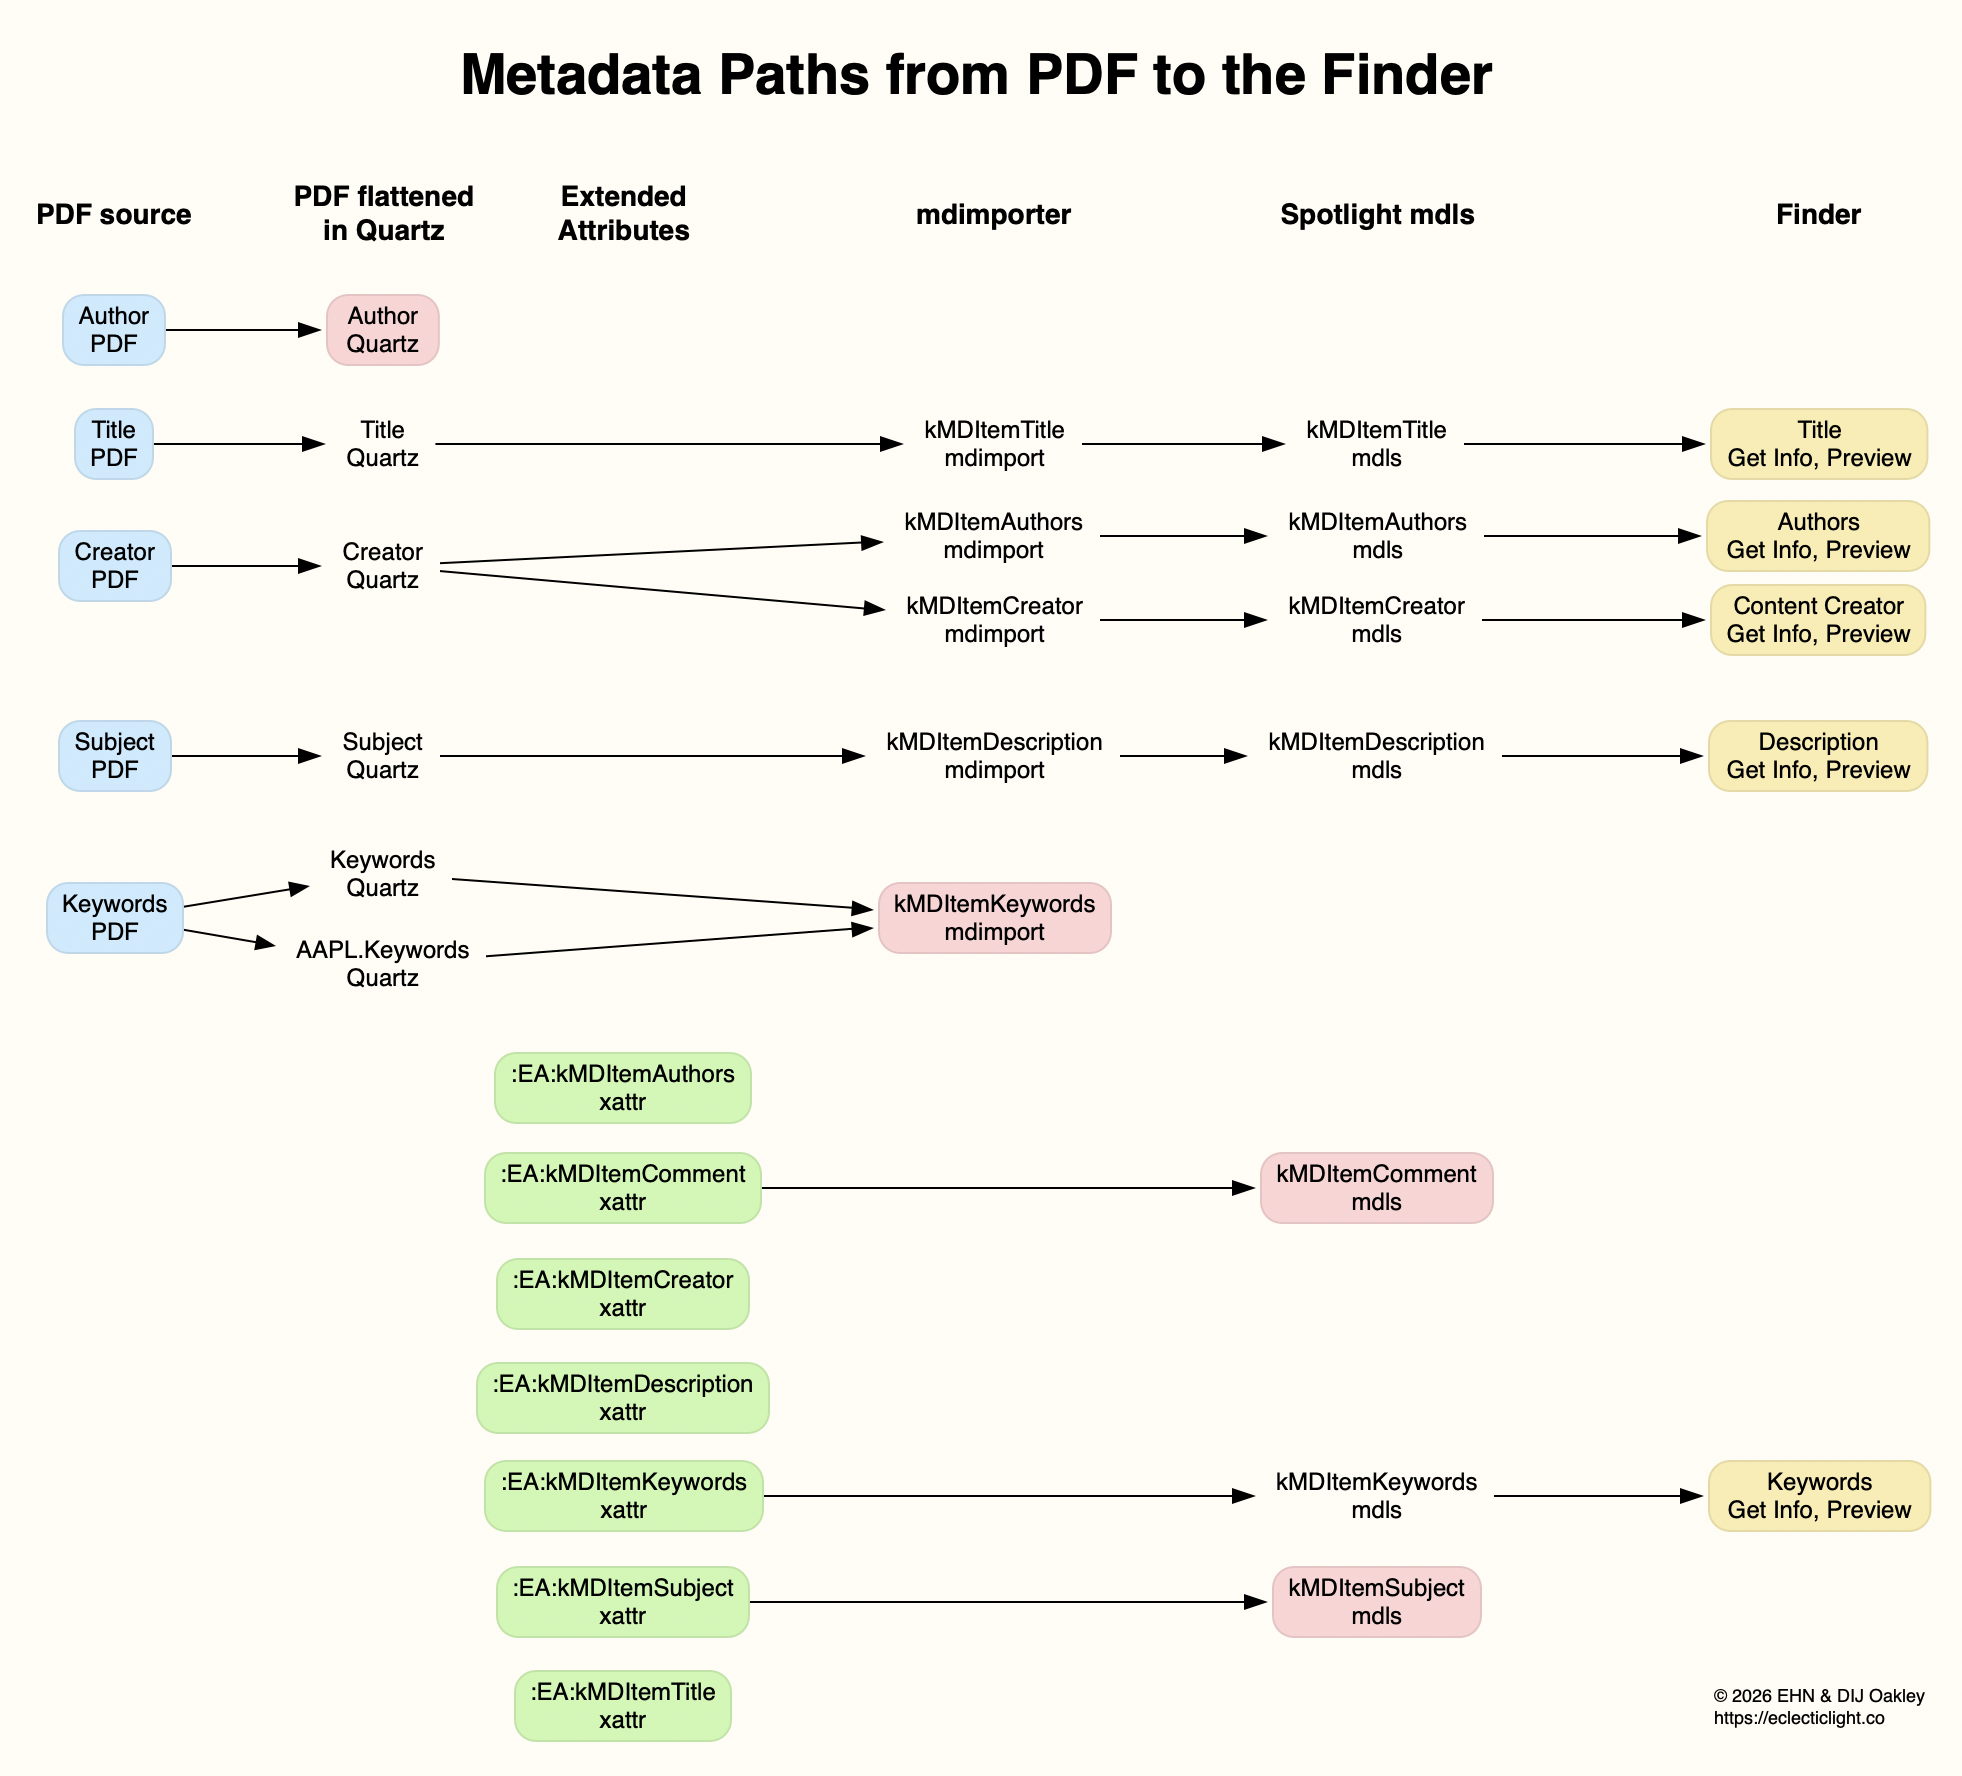
When macOS 26.0 was released it came with three sets of controls over its appearance, increasing to four in 26.1:
Appearance mode, Light or Dark, in Appearance settings;
Display variations to Reduce transparency or Increase contrast, in Accessibility settings;
Icon & widget style, in Appearance settings;
A Liquid Glass setting, Clear or Tinted, in Appearance settings, added in 26.1.
Although these offer many different combinations, I have examined some of their flaws in graphic detail. Here I compare the more obvious functional shortcomings in 26.0 with the new, improved 26.5.
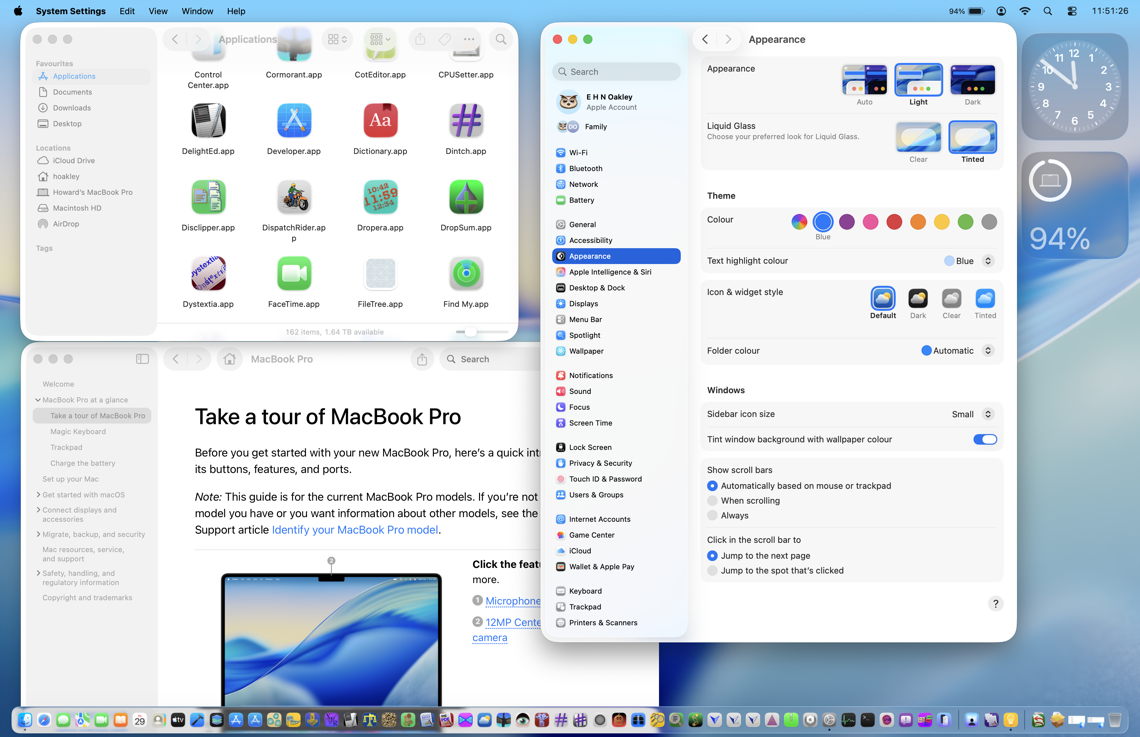
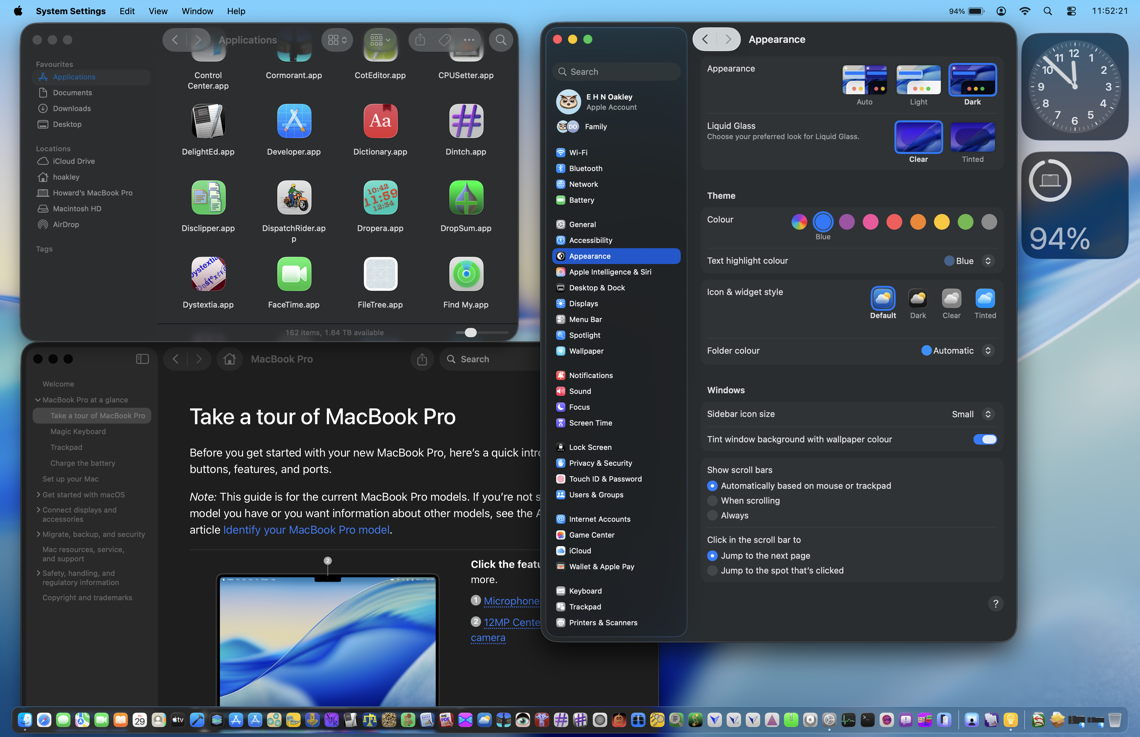
The overall appearance of macOS 26.0 above appears little changed in 26.5 below. In the Finder window at the upper left, app icons still deface the window title bar as much. Dock transparency is more obvious not because it has changed, but it demonstrates how that affects readability of app icons when they overlie dark objects in the window behind. Tinting from the wallpaper is more apparent in the upper part of System Settings’ navigation sidebar, and the new Liquid Glass setting added to Appearance settings is perhaps the most noticeable change.
With the new Liquid Glass control set to Tinted, no change is apparent in 26.1 above, or 26.5 below. I still can’t tell the difference this new control makes in general use.
Above and below are light mode with Reduce transparency enabled in Accessibility settings. This disables all Liquid Glass effects, restoring the traditional opaque menu bar and Dock, and making the Finder’s toolbar more readable.
Dark mode, default transparency, Liquid Glass clear
Dark mode differs in its use of what appears a more opaque Dock when it overlies window content, but not over wallpaper.
Defaced controls in Light mode, default transparency, Liquid Glass clear
The most glaring visual faults in 26.0 were in the use of Liquid Glass transparency in the top of navigation sidebars and in toolbars and other controls in window title bars.
At the top left of System Settings in 26.0, underlying text defaces the search box to the point where both are unreadable and unusable without scrolling the list below. Apple has improved this in 26.5 (below) by softening the underlying text to a faint blur. The similar problem with window title bars remains, though, and is unaffected by the Liquid Glass tinting option.
Whiteout
Lack of contrast in controls results in a ‘whiteout’, where text entry boxes can’t be distinguished from the bleached background. This remains exactly the same in both 26.0 above, and 26.5 below.
Has Tahoe’s interface improved?
It’s now almost a year since we got our first glimpse of Tahoe at WWDC 2025, and eight months since it was released to the public. Despite widespread outcry and detailed criticism, it has changed remarkably little. If you were unconvinced of its merits last September, I see little here that’s likely to persuade you otherwise. The only remaining question is whether, in the razzle of WWDC, Apple will do anything substantial to relieve the dazzle on our displays. I fear I already know the answer.
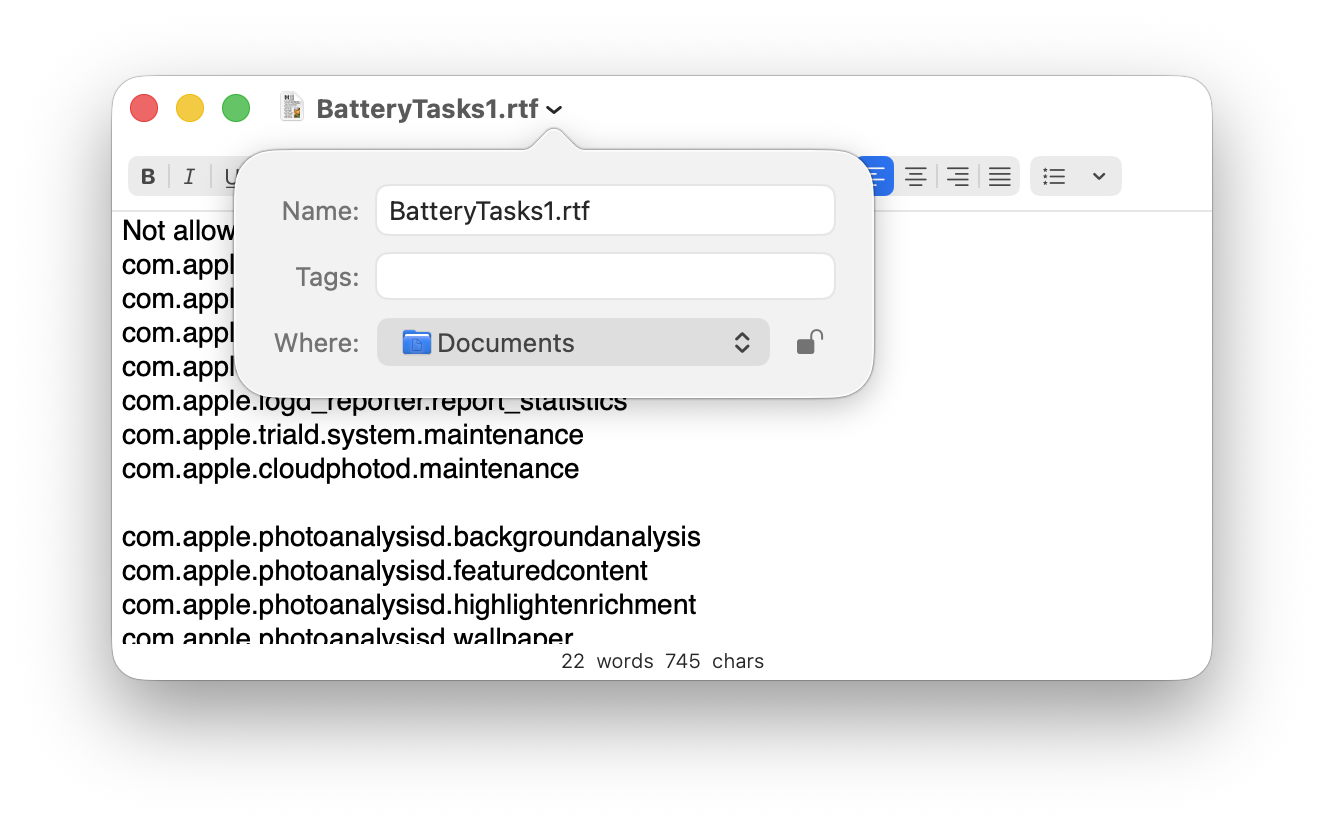
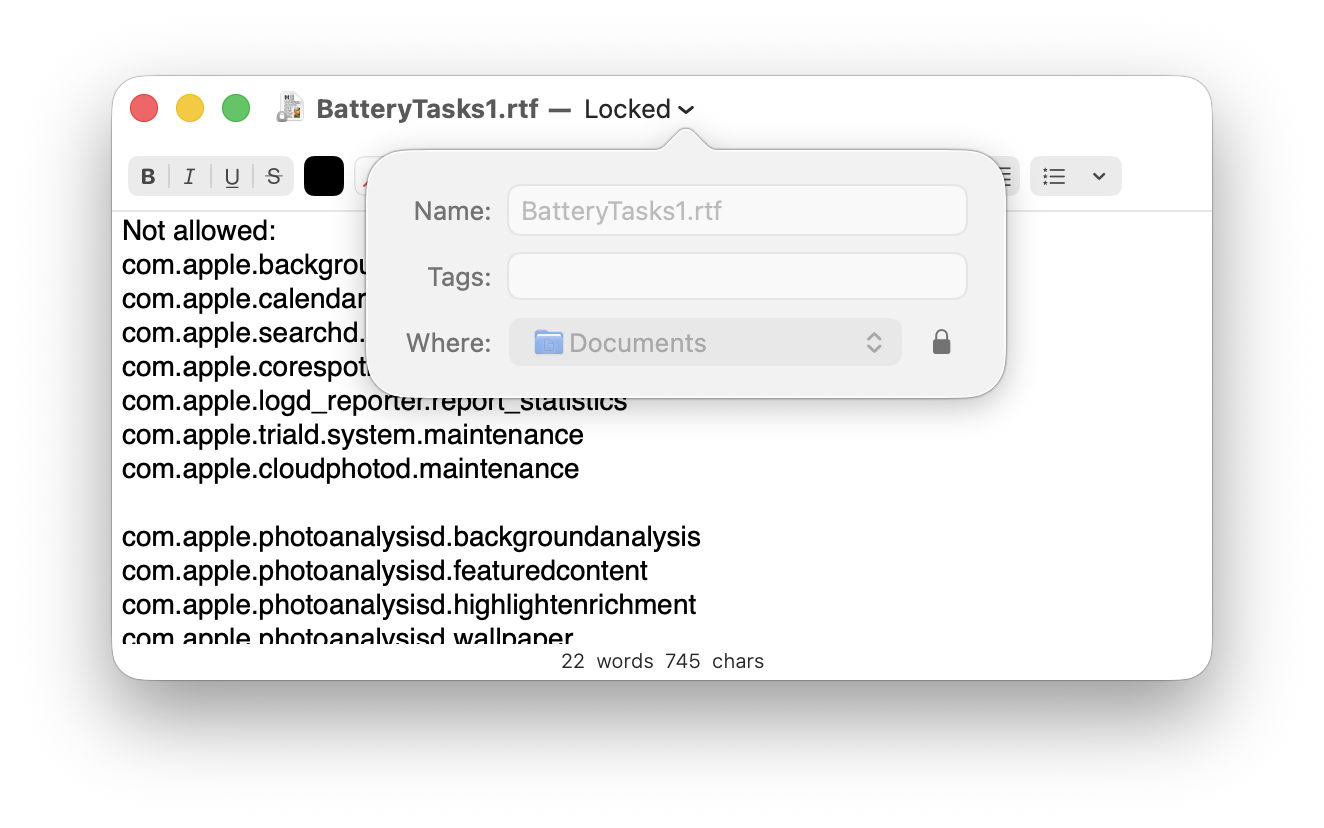
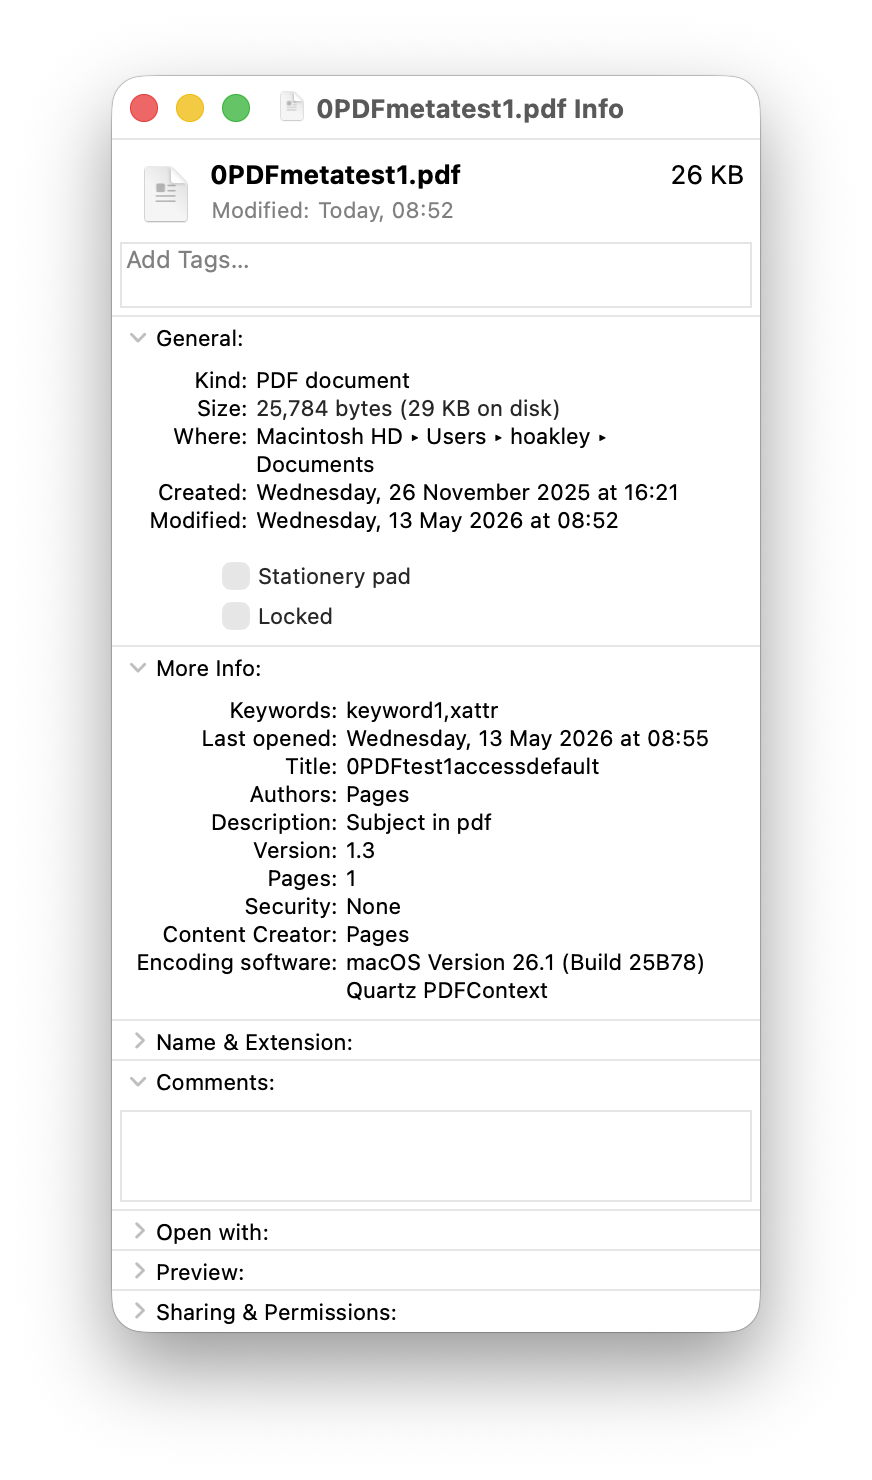
The Locked or Immutable flag is one of the most underused and readily accessible features in macOS. It can help you avoid deleting important files, and as I’ll show later can form the basis of your own lightweight version management system. However, this all depends on you keeping it well clear of iCloud Drive, which unaccountably can’t cope with it.
Use
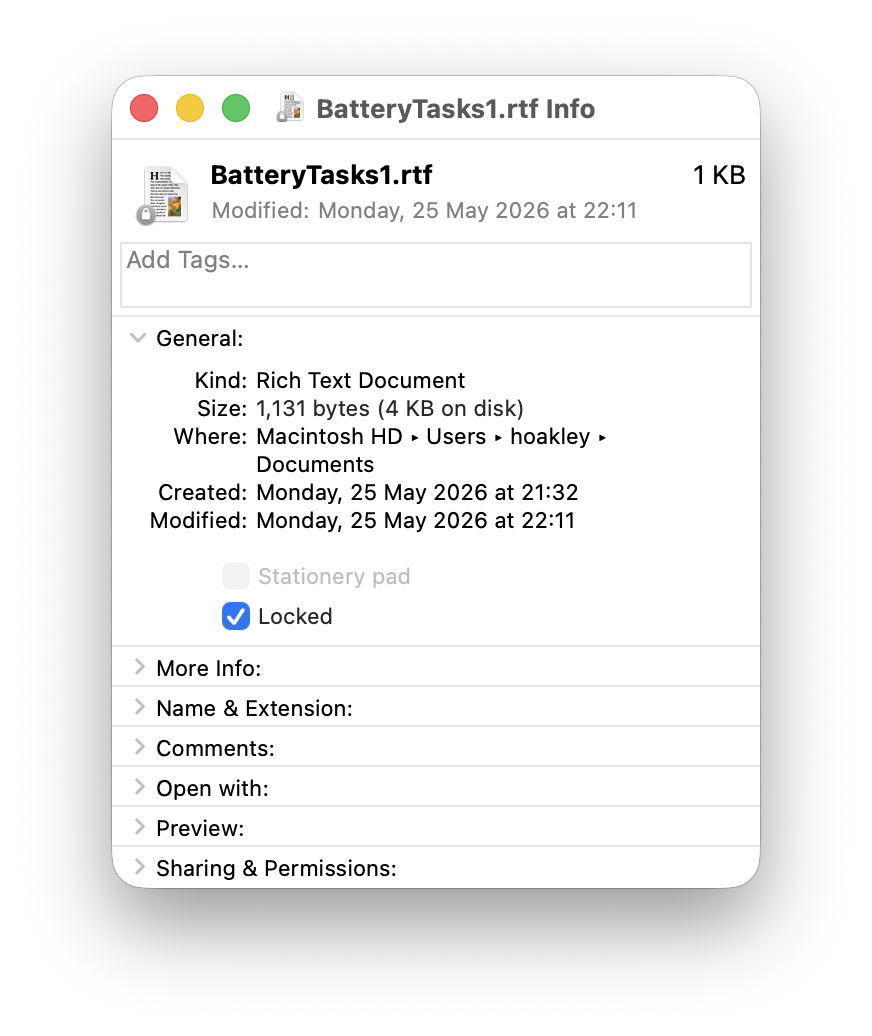
You’ll already be aware that you can lock files in the Finder’s Get Info dialog.
You can also lock an open file inside an app. Click on the down arrow to the right of its name in the title bar to see this pane, then click on the padlock to lock that file.
Sequoia and older versions of macOS show a Locked checkbox rather than a padlock.
In Terminal, use the chflags command in the form chflags uchg filename
to set the user Immutable flag, the same thing as the Finder lock, and use chflags nouchg filename
to unlock it.
Terminal also supports a second flag schg for the system immutable flag, which can only be set or cleared by the super-user, so isn’t recommended for general use. You can check these flags using ls -lO, and full details of this and other flags are given in man chflags.
Effect
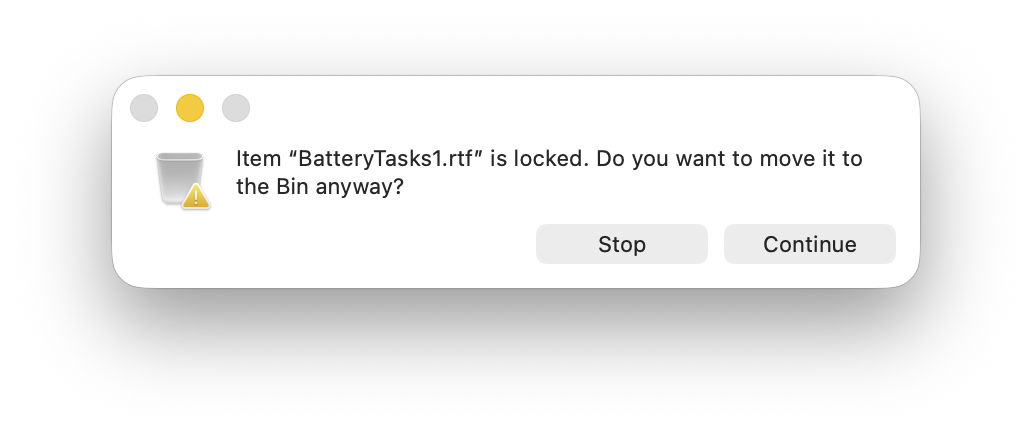
When locked or immutable, you can still delete a file by dragging it to the Trash, but when you do so, the Finder warns you of the presence of the flag.
If you press ahead, you get no second chance when you empty the trash, though, as the locked file will then be deleted immediately.
Retention
The Immutable flag is stored in the file’s attributes, in the bsd_flags value in the file’s inode. It’s therefore generally preserved in local file operations, including
moving the file within a volume,
duplicating or copying the file within a volume,
copying the file to a different local volume,
except with iCloud Drive.
iCloud Drive
iCloud Drive (through the FileProvider framework) doesn’t preserve the Immutable flag as you would have expected, given that it’s a file attribute rather than an extended attribute. Copying an immutable file to an iCloud Drive folder unlocks the file immediately. As if to compensate for this deviant behaviour, the file will be copied to iCloud Drive rather than moved, so leaving the locked original where it is. This is even more confusing as this behaviour is propagated to all other files being moved at the same time. If you move ten files, one of which is locked, all ten are copied rather than moved; if none are locked, then the group is moved rather than copied. This is so bizarre that it can only be a bug.
If you lock the file when it’s in iCloud Drive, the lock isn’t synced through iCloud, so that file isn’t locked on other Macs sharing the same iCloud Drive folder, although it still behaves as expected on the Mac that copied it to iCloud Drive, and will trigger a warning if moved to the Trash, but only on that Mac. Those other Macs can delete that file without any warning of it being locked, indeed they can’t even see that it’s locked on the other Mac.
Locked files in iCloud Drive when operating in non-replicating mode (with Optimise Mac Storage enabled) can’t be evicted from local storage, as that results in the error Unable to Remove Download, Resource busy. They can, though, be pinned locally with the Keep Downloaded setting.
FileProvider doesn’t yet appear to cope with locked files in any consistent way. Given how long Macs have used BSD flags in their file systems, that’s an extraordinary shortcoming.
Versioning with locking
You can use locking and clone files in a lightweight versioning system that achieves good space economy. To do this:
Save the first version of the document, lock it using its titlebar, and close the window.
In the Finder, duplicate that locked first version, unlock the duplicate and edit its name appropriately.
Open that new version of the document (a clone file), edit it until you want to save a new version, then return to 1 above, and repeat.
Note that using Save As to create a new version doesn’t result in a clone file, and the only alternative to protecting old versions is to make them read-only, as does Versatility.
In yesterday’s guide to dealing with apps that crash immediately you open them, I carefully avoided mentioning what you might find in the log. This article puts that right.
The list of common causes I gave is:
macOS intentionally crashed the app because of an error in code signing, or another serious security failure;
the app failed because it was in translocation;
the app couldn’t open a damaged or incompatible document;
the app had a problem with its Preferences.
Investigating these in the log is among the simplest tasks for those learning to access it, providing the app crashes reliably. Show the seconds value in the menu bar clock, and open the Applications folder containing the app. Select it as the seconds reach about 45, to allow time for its icon to be displayed, then double-click the app to run it as the seconds reach 00, but not a moment earlier. Don’t touch the mouse/trackpad or keyboard for at least 5 seconds, by which time the crash should have occurred and the notification or crash log should have been displayed.
Then open LogUI (or a substitute), and set it to extract and display all the entries for 5 seconds from 00 seconds. If you open a new window in LogUI the start time will be preset to the time you opened the app, all ready to get the log extract.
The double-click is easy to spot in the log, as it’s marked by four almost identical Activity entries with a yellow softball emoji, each reading something like AppKit Finder sendAction:
short entries that are quick to locate. Entries following the fourth of those then report what happened next.
Code signing errors
These are normally easy to recognise, as they start with a call to verify the signature, 00.940943 Finder sendAction:
00.963228 syspolicyd SecTrustEvaluateIfNecessary
00.963982 trustd SecKeyVerifySignature
that’s followed by an error that’s repeated many times, 00.981296 lsd com.apple.securityd MacOS error: -67030
Follow those down a bit further and you’ll see this reported in other subsystems 01.013084 com.apple.launchservices Error -67030 validating the signing information for [private], error=Error Domain=NSOSStatusErrorDomain Code=-67030 "(null)" UserInfo={SecCSArchitecture=arm64}
Normally, this will be checked again by AMFI (Apple Mobile File Integrity) 01.030162 amfid Entering OSX path for /Users/hoakley/Documents/000aa/DelightEd.app/Contents/MacOS/DelightEd
01.031629 amfid SecKeyVerifySignature
01.036291 amfid com.apple.securityd MacOS error: -67030
01.048491 error amfid com.apple.MobileFileIntegrity.framework Code failed basic validity check (error: -67030): Error Domain=NSOSStatusErrorDomain Code=-67030 UserInfo={SecCSArchitecture=[private]}
01.048857 amfid /Users/hoakley/Documents/000aa/DelightEd.app/Contents/MacOS/DelightEd not valid: Error Domain=AppleMobileFileIntegrityError Code=-420 "The signature on the file is invalid" UserInfo={NSURL=file:///Users/hoakley/Documents/
000aa/DelightEd.app/Contents/MacOS/DelightEd, NSLocalizedDescription=The signature on the file is invalid}
That’s confirmed and actioned by the kernel 01.048950 kernel AMFI: code signature validation failed.
01.052968 amfid com.apple.MobileFileIntegrity [private]: Broken signature with Team ID fatal.
01.053043 kernel AMFI: When validating /Users/hoakley/Documents/000aa/DelightEd.app/Contents/MacOS/DelightEd: The code contains a Team ID, but validating its signature failed. Please check your system log.
01.053052 kernel mac_vnode_check_signature: /Users/hoakley/Documents/000aa/DelightEd.app/Contents/MacOS/DelightEd: code signature validation failed fatally: When validating /Users/hoakley/Documents/000aa/DelightEd.app/Contents/MacOS/DelightEd: The code contains a Team ID, but validating its signature failed. Please check your system log.
01.053059 kernel validation of code signature failed through MACF policy: 1
01.053061 kernel check_signature[pid: 2718]: error = 1
01.053066 kernel proc 2718: load code signature error 4 for file "DelightEd"
01.053461 kernel AMFI: hook..execve() killing xpcproxy (pid 2718): Attempt to execute completely unsigned code (must be at least ad-hoc signed).
01.053624 kernel ASP: Sleep interrupted: ref 29, signal 0x100, pid: 2718
with the conclusion 01.053627 kernel ASP: Security policy would not allow process: 2718, /Users/hoakley/Documents/000aa/DelightEd.app/Contents/MacOS/DelightEd
You’re not likely to miss those.
Common error codes from signature validation include:
-2147409652 CSSMERR_TP_CERT_REVOKED, the certificate has been revoked
-67007 resource envelope is obsolete (version 1 signature)
-67008 unsealed contents present in the root directory of an embedded framework
-67013 resource envelope is obsolete (custom omit rules)
-67021 nested code is modified or invalid
-67023 invalid resource directory (directory or signature have been modified)
-67030 invalid Info.plist (plist or signature have been modified)
-67054 a sealed resource is missing or invalid
-67056 code has no resources but signature indicates they must be present
-67061 invalid signature (code or signature have been modified)
-67062 code object is not signed at all, which is by far the most common.
In this case, I had changed a single character in the app’s Info.plist, which broke its CDHashes, and resulted in the correct error code of -67030.
App translocation
In this case, you’re looking for two related pieces of evidence, that a process mentions the act of translocation, and that the app is run from a translocation location. Again, these normally aren’t hard to find.
Shortly after the double-click, 00.968186 Finder sendAction:
you should see mention of the creation of the translocation directory 01.040587 lsd com.apple.securityd SecTranslocateCreateSecureDirectoryForURL: created /private/var/folders/x4/
x00kny5x0_5dsnmmxhtw6hc80000gn/T/AppTranslocation/B9651238-6B8C-4750-BFAC-E0D1A327768C/d/DelightEd.app
A little further down the log you’ll see the app being referenced in that long path 01.069877 amfid Entering OSX path for /private/var/folders/x4/x00kny5x0_5dsnmmxhtw6hc80000gn/T/AppTranslocation/
B9651238-6B8C-4750-BFAC-E0D1A327768C/d/DelightEd.app/Contents/MacOS/DelightEd
01.090927 com.apple.runningboard _executablePath = /private/var/folders/x4/x00kny5x0_5dsnmmxhtw6hc80000gn/T/AppTranslocation/
B9651238-6B8C-4750-BFAC-E0D1A327768C/d/DelightEd.app/Contents/MacOS/DelightEd
and so on.
If you’re struggling to find those, select the Messages item at the right end of the toolbar in LogUI, type the app name into the search box there and press Return, to filter entries.
Failed to open document
Of the four common causes of early app crashes, these are hardest to find evidence in the log. This is because the only process likely to know what went wrong is the app itself, and few third-party apps write anything useful to the log. You might find a useful entry or two by setting that menu at the right end of LogUI’s toolbar to Processes, entering the app name into the search box, and pressing Return. However, in many cases there will be little or no useful information.
Preference file problems
My previous article referred only to standard preferences that are handled by cfprefsd. Some apps run their own preferences using their own code, and neither cfprefsd nor the defaults command covers them. If they have a problem when accessing those custom files, it’s most unlikely to be recorded in the log.
In other apps, you should look for evidence that the crash happened shortly after the cfprefsd service is connected to the app, to support the standard features.
Starting once again with the double-click 01.579559 Finder sendAction:
it may take some time for the opening stages to complete. You should then see the XPC connection between the app and cfprefsd being set up for both root and the user 01.638428 DelightEd com.apple.xpc [0x102cf6980] activating connection: mach=true listener=false peer=false name=com.apple.cfprefsd.daemon
01.638504 DelightEd com.apple.xpc [0x102cf7960] activating connection: mach=true listener=false peer=false name=com.apple.cfprefsd.agent
01.638563 cfprefsd com.apple.xpc [0xa252bdb00] activating connection: mach=false listener=false peer=true name=com.apple.cfprefsd.daemon.peer[2910].0xa252bdb00
01.638659 cfprefsd com.apple.xpc [0x86f2d3600] activating connection: mach=false listener=false peer=true name=com.apple.cfprefsd.agent.peer[2910].0x86f2d3600
The app will normally crash during or shortly after the loading of preferences, marked by entries like 01.641152 DelightEd Loading Preferences From User CFPrefsD
01.706158 DelightEd Loading Preferences From System CFPrefsD
These too can be found more easily by setting the menu at the right end of LogUI’s toolbar to Processes, entering the app name into the search box, and pressing Return.
One of the most common and frustrating problems with apps is when they crash as soon as you try to open them. Before that app has even had a chance to display its menu bar or splash screen, it has vanished, leaving you without a clue as to why. How could its developer release an app that can’t even run? Where do you look for clues as to what happened when the app was only there for an instant? Fortunately, this is when examining the crash log can be useful, and could help solve the problem.
Common causes include:
macOS intentionally crashed the app because of an error in code signing, or another serious security failure;
the app failed because it was in translocation;
the app couldn’t open a damaged or incompatible document;
the app had a problem with its Preferences.
Signs and logs
Depending on the type of Mac, the version of macOS it’s running, and the nature of the crash, you may see nothing at all, a simple notification, or a full crash report.
While panic logs can be impossible to recover if you miss them, app crash reports are almost invariably saved to disk, normally in the path ~/Library/Logs/DiagnosticReports, although in some cases you’ll have to look a bit harder there, or in /Library/Logs/DiagnosticReports. As the report’s name should start with the app name, they’re easy to identify, and double-clicking them opens the report in Console (one of its good uses).
Reading the crash log
In the upper Translated Report look for the following:
Path – check whether this is a long semi-random path typical of app translocation.
Code Type – on an Apple silicon Mac, check whether the app is running native on Arm, or translated by Rosetta 2.
Exception Type – this could be EXC_BAD_ACCESS (SIGKILL (Code Signature Invalid)) if macOS has crashed the app because of a code signing problem.
Termination Reason – this may be given as Namespace CODESIGNING, Code 2 Invalid Page or similar for code signature problems.
An exception type of EXC_CRASH (SIGKILL) indicates macOS terminated the app, and its crash report should give a Termination Reason with a code explaining the reason for the crash. Apple silicon Macs running recent versions of macOS are less likely to crash apps with signature problems, as they now tend to handle these in a dialog reporting the app is damaged and offering to remove it. Intel Macs with older macOS are more likely to crash the app and leave you wondering.
If you want to learn more about crash reports, they’re well documented for developers, starting from this master page. Worth reading are:
One recent and innocent cause of signing and notarisation errors occurs in apps that update themselves, normally using the popular Sparkle method. If an app had worked fine before it updated itself and then can’t start up, it may not have updated its code signature or notarisation correctly. This is easy to fix, by deleting the broken app and downloading a fresh copy of the current version. If that still crashes with a signature error, contact its developer as it may have a bigger problem.
Apparency, free from Mothers Ruin, is the definitive app for checking code signing and notarisation problems. It doesn’t just identify the problem, but explains it in careful detail.
If you’re absolutely certain that the app doesn’t contain any malicious code, you may be able to work around code signing errors by re-signing the app. Doing this to an app that might be malicious would be extremely dangerous, so you require great confidence in the app’s integrity.
Before proceeding any further, you might need to add Terminal to the list in the App Management section of Privacy & Security settings, otherwise your commands could be unable to make any changes to the app. Once you’ve done that, open Terminal and use the command codesign --remove-signature MyApp.app
to strip the existing signature from the app MyApp.app. Note that two hyphens precede remove-signature. When that’s done, use the command codesign --sign - MyApp.app
to sign that app with an ad hoc signature. Ad hoc signatures provide only limited security, as they don’t use an Apple-issued certificate for verification against a chain of trust. They’re widely used by malware as a result, and easily exploited.
If that doesn’t work you’ll need to refer the problem to the app’s developer, who should in any case be informed of any problems with their app’s code signature, notarisation or security checks.
App translocation
There are some circumstances in which perfectly good apps may prove unable to run as expected when they’ve been translocated, and some become stuck in translocation, continuing to crash each time you try to run them. If you’ve looked at the crash log, the Path given there should make it obvious if that app is being run in translocation.
The best solution is to try reinstalling the app. Delete the current copy, and download the app again from its source on the internet. If it comes as a compressed archive, decompress it, then move the app from the folder it came in to one of your Applications folders before trying to run it. Do this one app at a time, rather than as one of several, and ensure it doesn’t remain in the folder it came in. If that doesn’t help, contact its developer.
A more hazardous option is to strip the quarantine extended attribute from the download, but you should only consider that as a last resort as it reduces the security checks made by macOS.
Failed to open document
If the app was last quit with a document still open, and that document now has a serious incompatibility with the app, that can cause the app to crash when it’s next opened, and tries to re-open that document. The same effect can occur when an app is opened by opening one of its documents. Try opening the app alone before opening the document. If necessary you can enable Close windows when quitting an application, in the Windows section of Desktop & Dock settings, or move the offending document to a different volume so that app loses track of it.
Preference file problems
Apps that use Property List files stored in ~/Library/Preferences, or an equivalent in the app’s folder in the ~/Library/Containers folder, open them during app startup. If that preference file is malformed or corrupted, it can cause the app to crash when it tries reading it. This may not be easy to recognise in a crash log, although references there to cfprefsd, the path to the preference file, or UserDefaults are useful clues.
The best way to address this is to delete the app’s preference file, forcing the app to create a fresh default preference file, and open normally again. Although you can do this by locating the correct file and dragging it to the Trash, it’s more reliable to use the defaults command in Terminal, as that should delete the right copy and avoid overwriting it and causing the problem to recur. For this you’ll need the app’s formal ID, available from Apparency or taking a peek at the value for the CFBundleIdentifier key in its Info.plist. It should be in the form of a reverse URL like com.mothersruin.Apparency.
The command that you need to enter into Terminal is of the form defaults delete com.developer.appname
where com.developer.appname is the app’s ID or CFBundleIdentifier.
You should then be able to open the app, which will have to recreate its default settings, hopefully without crashing again.
Other causes
Most other potential causes tend to prolong app opening rather than causing it to crash. Apps that check for updates over the internet usually do so soon after opening, but should perform that check without blocking or crashing the app. Similarly, apps needing to connect to an external authorisation service more usually hang, leaving their Dock icon bouncing indefinitely.
Any damaged or incompatible app may well crash during opening. If you suspect that, check with the app’s support site that the version you are trying to run is the latest that’s compatible with your Mac and macOS. If in doubt, re-install the app.
Apple has released its regular weekly update to XProtect for all versions of macOS, bringing it to version 5346. As usual it doesn’t release information about what security issues this update might address.
This version removes 11 Yara rules for MACOS.f3edc61, MACOS.d1e06b8, OSX.Bundlore.D, OSX.OpinionSpy, OSX.DevilRobber.A, OSX.DevilRobber.B, OSX.Mdropper.i, OSX.FkCodec.i, MACOS.d4735e3, MACOS.HONKBOX.B, and MACOS.FLUFFYFERRET.CT, and many of the component rules for MACOS.ADLOAD. There are no changes in the Osascript rules in XPScripts.yr.
You can check whether this update has been installed by opening System Information via About This Mac, and selecting the Installations item under Software.
A full listing of security data file versions is given by SilentKnight and SystHist for El Capitan to Tahoe available from their product page. If your Mac hasn’t yet installed this update, you can force it using SilentKnight or at the command line.
If you want to install this as a named update in SilentKnight, its label is XProtectPlistConfigData_10_15-5346
Sequoia and Tahoe systems only
This update has already been released for Sequoia and Tahoe via iCloud. If you want to check it manually, use the Terminal command sudo xprotect check
then enter your admin password. If that returns version 5346 but your Mac still reports an older version is installed, you should be able to force the update using sudo xprotect update
With extended running time on battery and fast charging, your MacBook Air or MacBook Pro probably doesn’t spend long on mains (AC) power. What you may not have realised is that it does require mains power to perform some tasks, so there are benefits to periodically leaving it awake and running when connected to a mains power supply, to allow it time to catch up on those. This article examines the benefits.
Background tasks
If you look through the property lists used for macOS LaunchDaemons and LaunchAgents you’ll come across two keys used for their activities and background services that determine whether they run when powered by battery alone:
AllowBattery is set to true when the service can be run on battery, or to false when it can’t;
RequiresExternalPower, its converse, is set to true when it can’t be run on battery, or to false when it can.
Unfortunately Apple doesn’t explain either of these, and they’re omitted from the last systematic account of those property lists, which was last revised ten years ago. Neither are they mentioned in man launchd.plist. There is evidence, though, that they may not both apply to macOS. For XPC activities there’s a global variable XPC_ACTIVITY_ALLOW_BATTERY, whose default value is false for activities with a maintenance priority, but is true for utility priority activities. However, requiresExternalPower is normally used for Background Tasks in iOS/iPadOS/etc., and thus doesn’t appear to apply to macOS. Clear, up to date documentation would be very helpful, please, Apple.
Of the 878 property lists in /System/Library/LaunchAgents and LaunchDaemons in macOS 26.5, 47 set a value for the AllowBattery key, and many more assign maintenance priority to activities. Among the activities and services that appear unlikely to run when on battery alone are:
com.apple.corespotlightd.updateContacts in corespotlightd, which presumably updates search information for Contacts’ database;
com.apple.calendar.daemon.databasecleanup, performing maintenance on Calendar databases;
com.apple.cloudphotod.maintenance, performing maintenance on iCloudPhotos;
com.apple.photoanalysisd.backgroundanalysis and several other photoanalysisd services, used to analyse media content, particularly for indexing by Spotlight;
com.apple.photolibraryd.periodicmaintenance, performing maintenance on Photos libraries;
Of these the most noticeable are photoanalysisd services, which can flood the E cores when a laptop Mac is left connected to mains power, particularly when many images have been added or modified since the last session on mains. Those can in turn trigger copious Spotlight indexing activity with mds and related processes.
XProtect Remediator
Regular scans performed by XProtect Remediator (XPR) to detect and remove known malicious software can busy a whole E core for well over half an hour, and are accompanied by intense disk activity. Because of that, some of its services will only be run when a Mac is powered by mains.
Current property lists in XPR call for three types of scan:
Fast scan, run every 6 hours, when AllowBattery is set to true;
Regular scan limited by a timer, run every 24 hours, AllowBattery false;
Slow scan without any time limit, run every 7 days, AllowBattery false.
You should therefore expect daily XPR scans only to take place when your laptop is awake and connected to power. Fast scans don’t result in any of the distinctive reports from scan modules that are checked by utilities like XProCheck and SilentKnight, and appear to pass unrecorded in the log.
You can observe this yourself after starting your Mac up for the day. If it’s running on mains power and left alone for 10-15 minutes, XPR will usually start scanning with each of its modules. However, if you start your Mac up on battery and leave it for a couple of hours, there’s no sign of those scans starting.
Sparse bundles
Sparse bundles (disk images that store files inside a bundle folder rather than in a single file) need to be compacted occasionally to ensure they don’t grow larger than they need. Because compaction can take a long time and can’t be interrupted without risking the whole sparse bundle’s contents, by default it won’t be performed when a Mac is running on battery power. That can be overridden in some utilities like my own Spundle, and in the hdiutil command.
Catching up
If your MacBook Air or Pro spends much of its waking life running on battery, it’s a good idea to give it a break every few days by leaving it awake and powered from its mains adaptor for an hour or two. How often you should do that is more flexible. If you like to run a regular routine, scheduling it every 2-3 days should be sufficient, with a minimum frequency of once a week. An ideal routine for a laptop in frequent heavy use might be for a daily break at lunchtime.
If you want to tailor this more to demand, observe how long your laptop is running heavy loads from photoanalysisd and others when it’s taking a break on mains power, and adjust the frequency of those breaks until those periods of heavy load are sufficiently brief to fit in with your schedule.
These will also ensure your Mac gets at least one complete scan by XProtect Remediator each week.
I’m grateful once again to Michele for raising this question.
Selecting external Retina-resolution displays for use with Apple silicon Macs is extremely complicated. Even when you read Apple’s tech specs it’s often not clear exactly which combinations will work together. Thanks to the work of Parish Khan, this is now far simpler on his RetinaDesk site.
From the humble M1 MacBook Air with its single supported external display, to the eight you can drive from a Studio M2 Ultra or later, RetinaDesk details external display support for each model, provides tools to check essentials like cable bandwidth, and offers the definitive guide to 5K and 6K displays for Apple silicon Macs.
I’m sure you’ll find it useful. It’s free from advertising, sponsored content and AI, the only return to Parish comes from being an Amazon Associate, so making a tiny percentage on any monitor purchase you might make through the site’s Amazon link.
A few years ago I almost lost my main email addresses when their provider made changes. I had apparently missed a series of warning messages they had sent, as I had assumed those were just phishing attacks and deleted them without clicking on their links. Given that some days I get more than half a dozen potentially malicious emails claiming to come from that provider, I needed a better way to check the few that might be genuine. But how could I do that without putting myself at risk of a phishing attack?
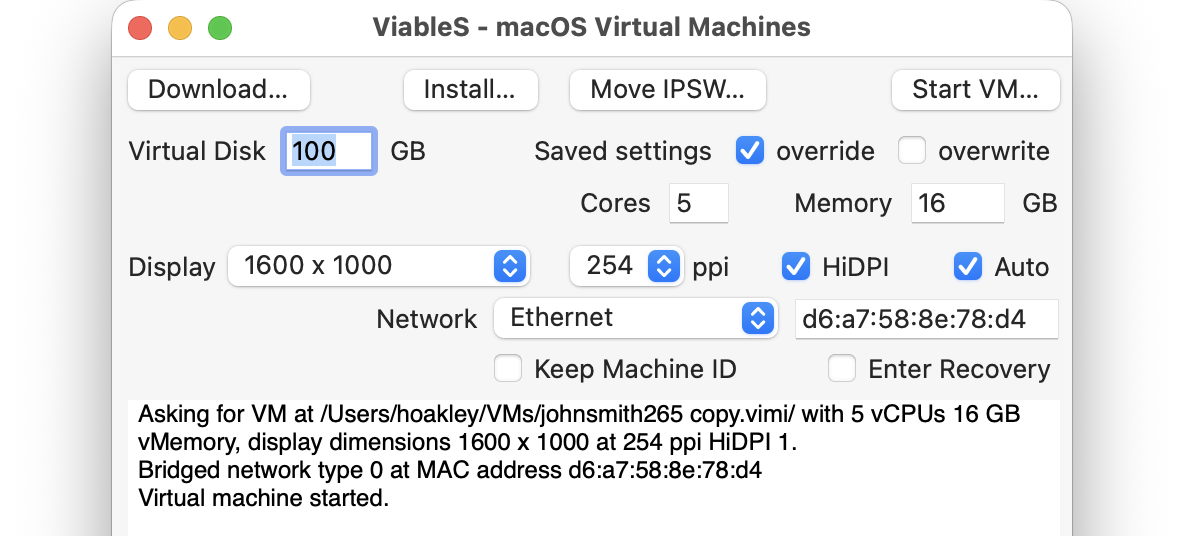
What I needed was a way to be able to click on a link safe in the knowledge that my Mac would be completely isolated from any consequences. The solution is to use a locked-down virtual machine running in total isolation from the host. This is supported in a special version of my free virtualiser Viable, named ViableS, or you may be able to do something similar using a different virtualiser.
First download the IPSW image file for the latest release of macOS, either directly using Viable or from the links to Apple’s source given by Mr. Macintosh. Use Viable to build that into a fresh 100 GB VM with a single user named John Smith and a password of password. That way any stolen secrets will be effectively anonymous, and won’t even reveal your username. At this stage, run the VM with shared folders so you can transfer in any apps you might want, and the link to the suspicious site.
If you’re going to use your locked-down VM again, rather than having to create a fresh VM every time, you can now duplicate it using Command-D. The VM’s disk image is stored as a sparse file, and duplication should result in a clone anyway, greatly reducing the space taken on disk.
Save the suspicious message to a PDF or similarly accessible file, and transfer that into the VM now. Once that’s all set up and ready to go, shut that VM down.
From here on, only run that VM using ViableS, as it runs in a sandbox and has no support for sharing folders with the host, although it obviously needs a network connection to let you follow the link in the saved message. All my virtualisers including ViableS have been granted the restricted entitlement to use bridged networking, so they get their own IP address rather than sharing the host’s, and that should allow their networking to be operated securely.
The VM is now as well protected and isolated from the host Mac as possible. The virtualiser is running in a sandbox, it has no shared access to files between host and VM, and is using a bogus name and password. To remind you that VM is locked down, ViableS adds a red goblin emoji to the window’s title bar. Having double-checked each of those settings, open the saved message in the VM and click on the suspicious link.
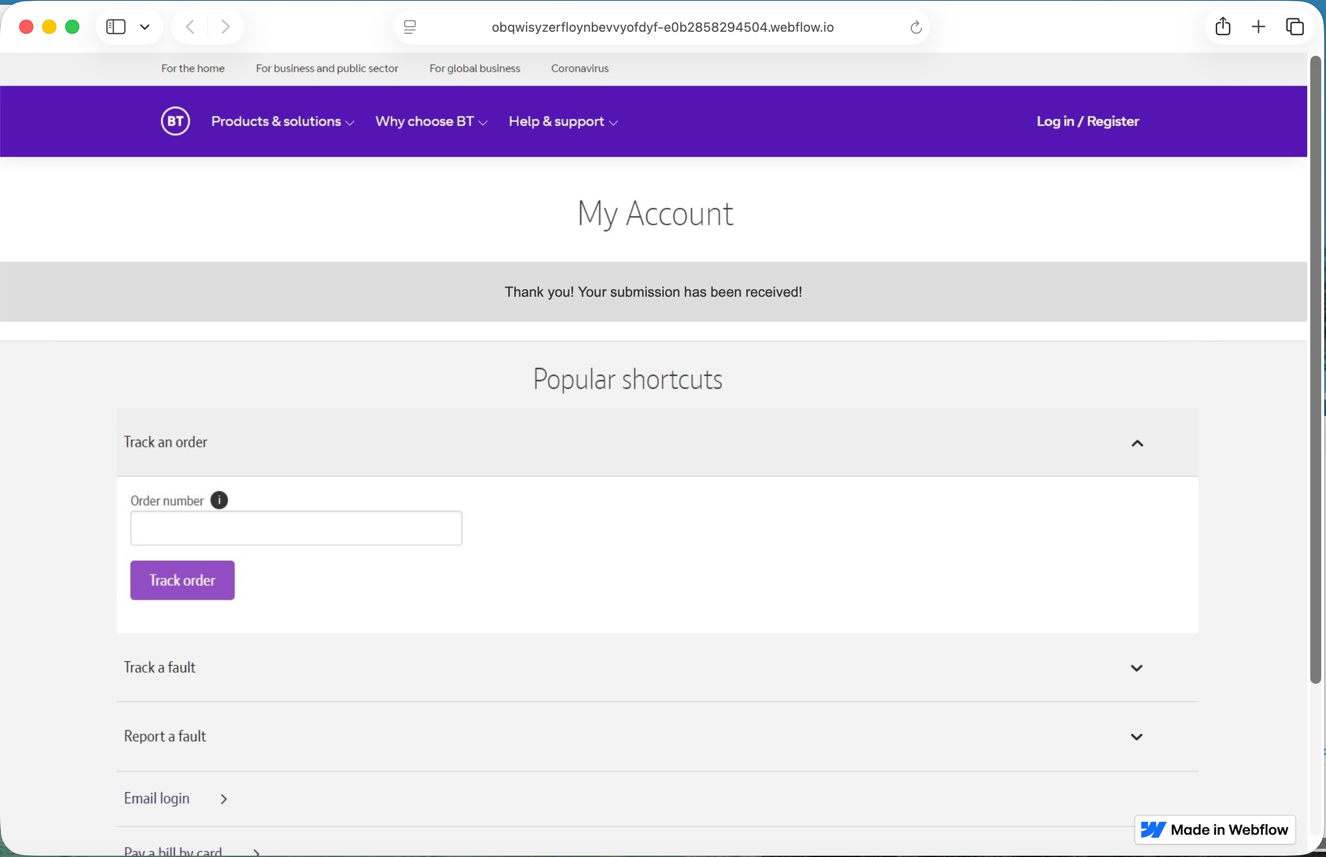
In this case, it took me to a fake version of the provider’s site built hastily using Webflow, where I was prompted to enter my email address and password, as if that would somehow ensure my email account wouldn’t be deleted. Take your time here and remember to enter your fake address and password, in my case j.smith@btconnect.com and password.
The rest of this fake proved non-functional. Whoever had set it up was clearly just harvesting user names and passwords, presumably to sell on for others to exploit in depth.
Other links might download a poisoned PDF, or take you to a ClickFix exploit.
Having reassured yourself that the email was phishing and not genuine, you can now shut down the locked-down VM and trash it. Virtualisation came to the rescue again.
I hope you enjoyed Saturday’s Mac Riddles, episode 361. Here are my solutions to them.
1: This second was actually the sixth and bumped up by 20.
Click for a solution
Macintosh II
This second (II) was actually the sixth (there had been five previous Mac models) and bumped up by 20 (its CPU was the first 68020 used in a Mac).
2: Its A5 followed the A4, without any one, and a third thinner.
Click for a solution
iPad 2
Its A5 (its chip) followed the A4 (the chip in the original iPad), without any one (there was no iPad 1), and a third thinner (it was claimed to be about 33% thinner than the original iPad).
3: First with a 750 followed the 604, but there was neither 1 nor 2.
Click for a solution
Power Macintosh G3
First with a 750 (it was one of the first Macs with a PowerPC 750 processor) followed the 604 (previous models had PowerPC 601-604 processors), but there was neither 1 nor 2 (Apple didn’t start naming Power Macs by generation until the G3).
The common factor
Click for a solution
They were each the first model in their series to be numbered, but didn’t start at 1.
Document versioning built into macOS is an unfinished masterpiece that promises much but never seems to have been developed as fully as it deserved. This article looks at how macOS can’t search saved versions, and how you can work around that.
In essence versioning is simple: apps that support it, and a great many do now, save a series of versions to the volume’s hidden and sealed database in the .DocummentRevisions-V100 folder at its top level. To access those versions you’d normally use the Time-Machine-like browser provided by the Browse All Versions command in the Revert To item in the app’s File menu. Whenever the app saves a document, the open document becomes the current version, and its saved state becomes the previous version. This works for manual saves, and for any automatic timed saves the app might make.
Unlike all other versioning systems, this is all handled automatically by macOS, and neither you the user nor the app developer has to make any effort to create or manage those versions. It really does come for free.
Unfortunately, all those saved versions in the version database fall outside the scope of Spotlight indexing, and Spotlight search can’t look inside any of the old versions saved in a volume’s version database. Surprisingly, the version browser doesn’t offer any search facilities either, as that’s presumably another feature intended for a future that never came.
This is a serious omission, as I access old versions not infrequently, and being able to search for them saves me laborious browsing. It might be a few hours or days after I removed a section from a document, that I realise I need it back. By that time it may well have vanished from Time Machine’s hourly backups, or the section may have been too transient to be retained there. But the chances are that the missing content will be safe inside a saved version, if only I can find it.
Pulling tricks with the hidden .DocumentRevisions-V100 folder isn’t a good approach to solve this. It’s clear from its contents that previous versions aren’t saved as discrete files, but it uses a chunking system to store what has changed between versions, for economy in space. Access supported by macOS is strictly limited to looking up saved versions for any given file in that volume, and there’s no way to search their contents like that.
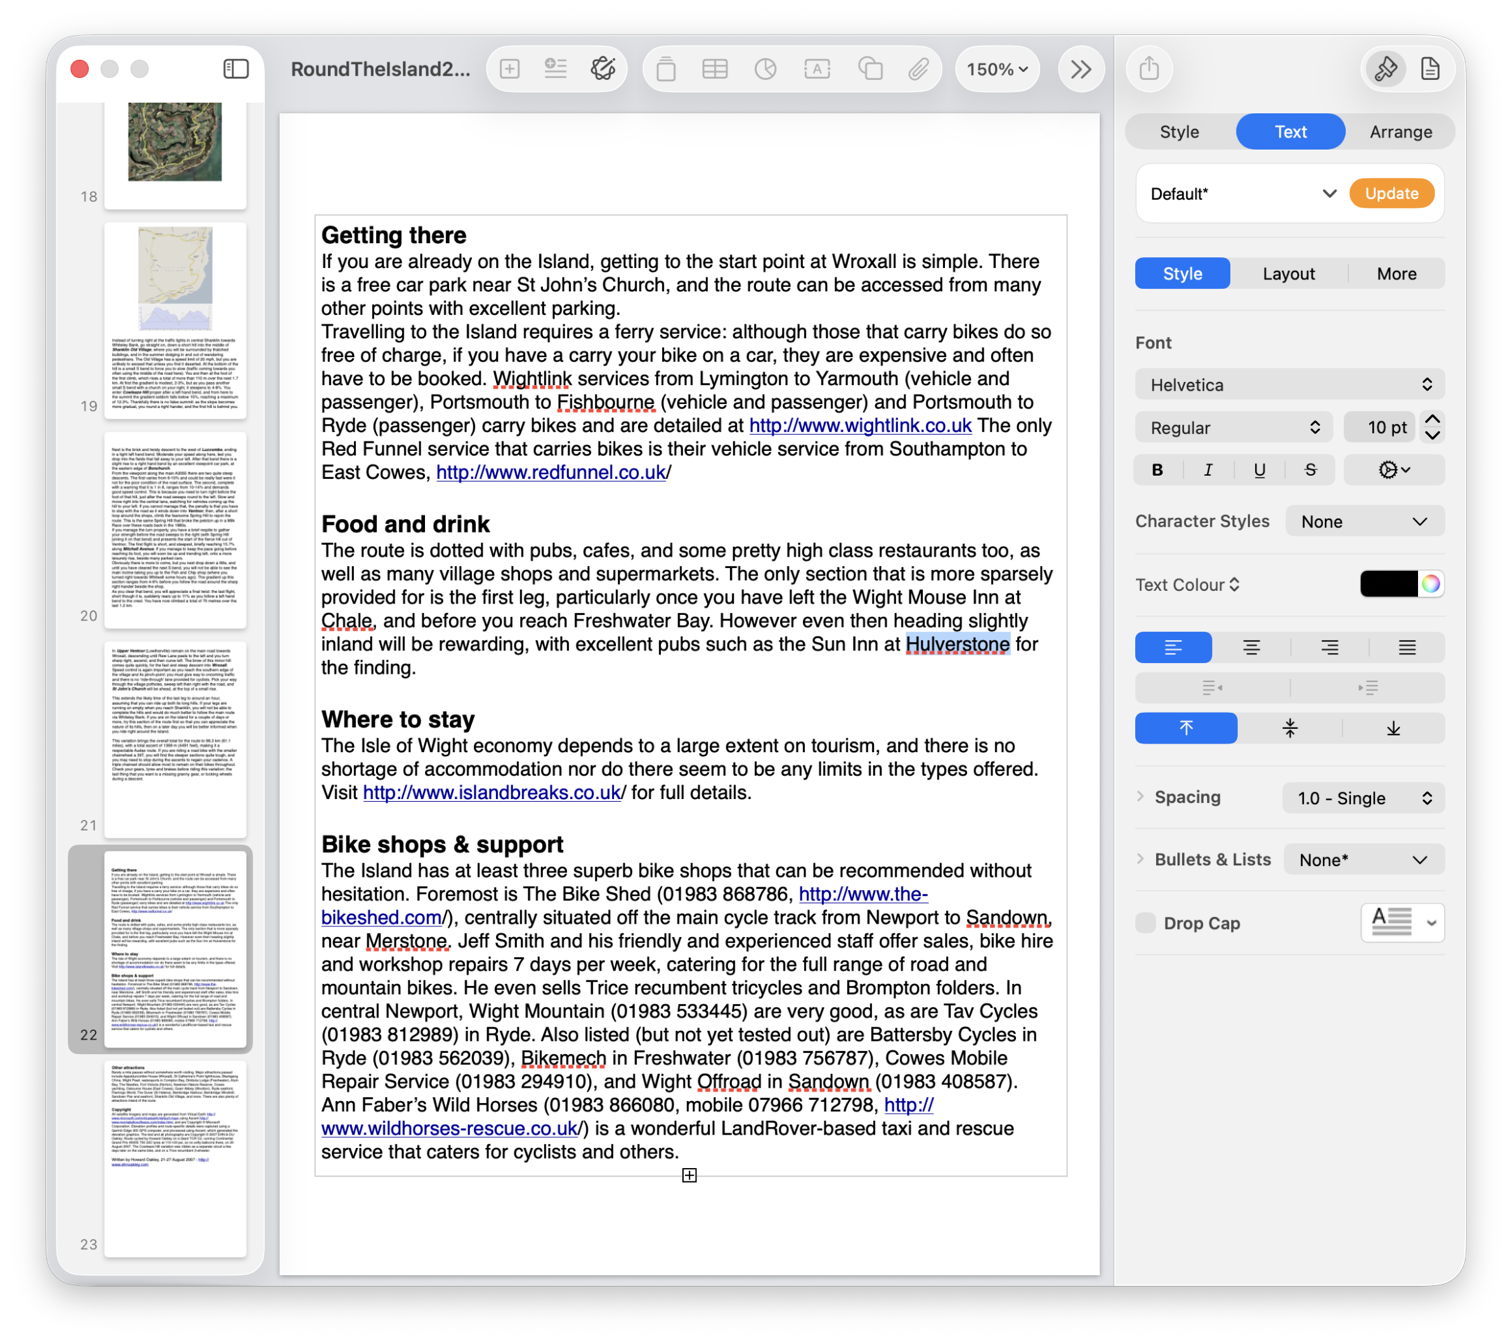
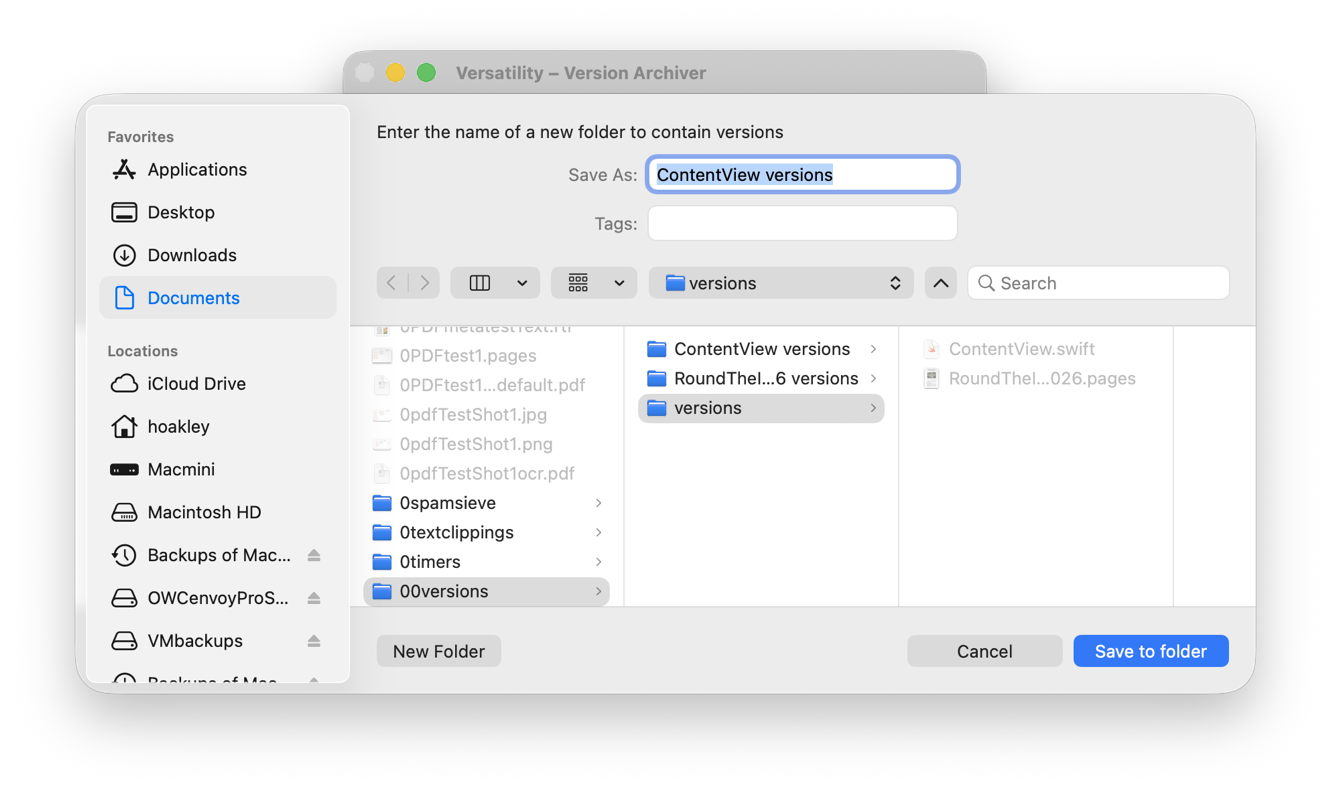
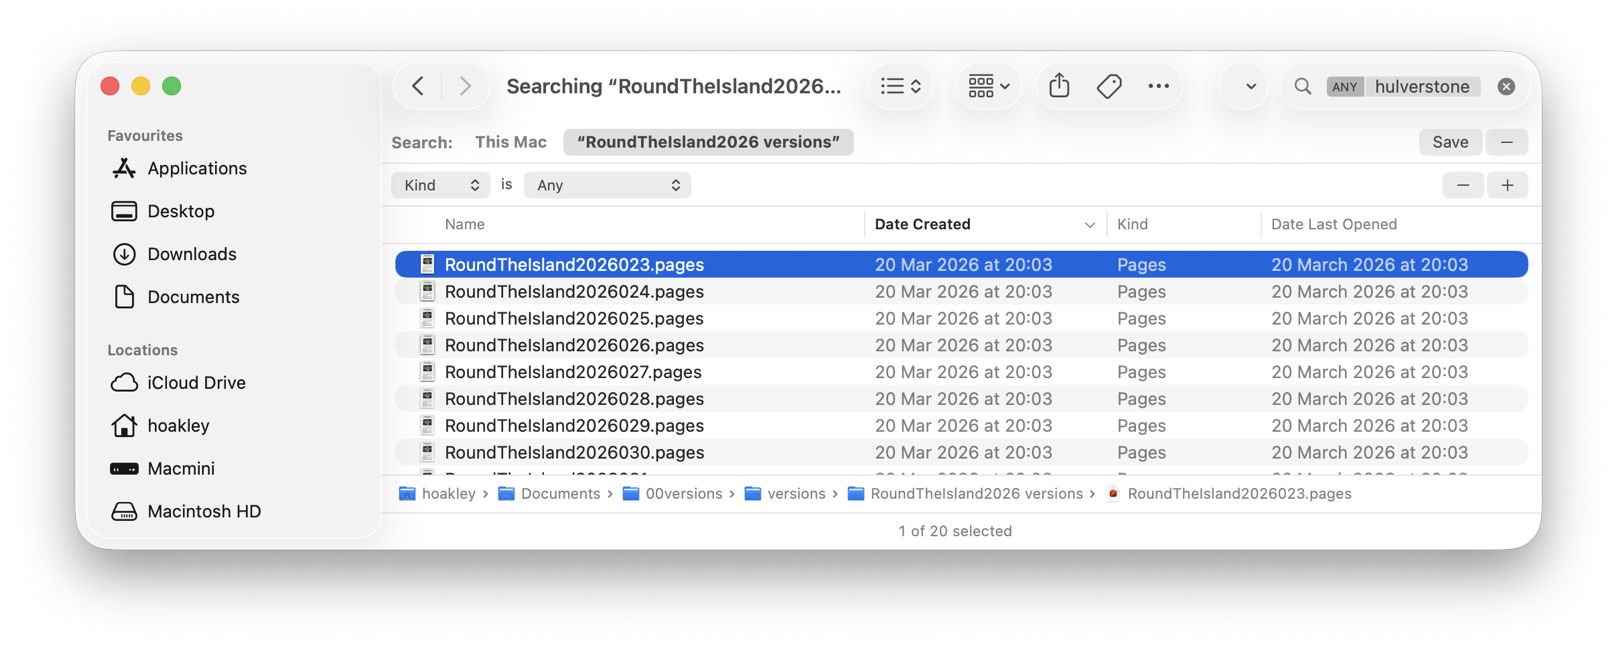
One way around this is to save each document version as a separate file, allow Spotlight to extract their contents and add those to its indexes for that volume, then to search those files. This is quick and simple using my free utility Versatility. To demonstrate this, I picked two documents with a substantial number of versions:
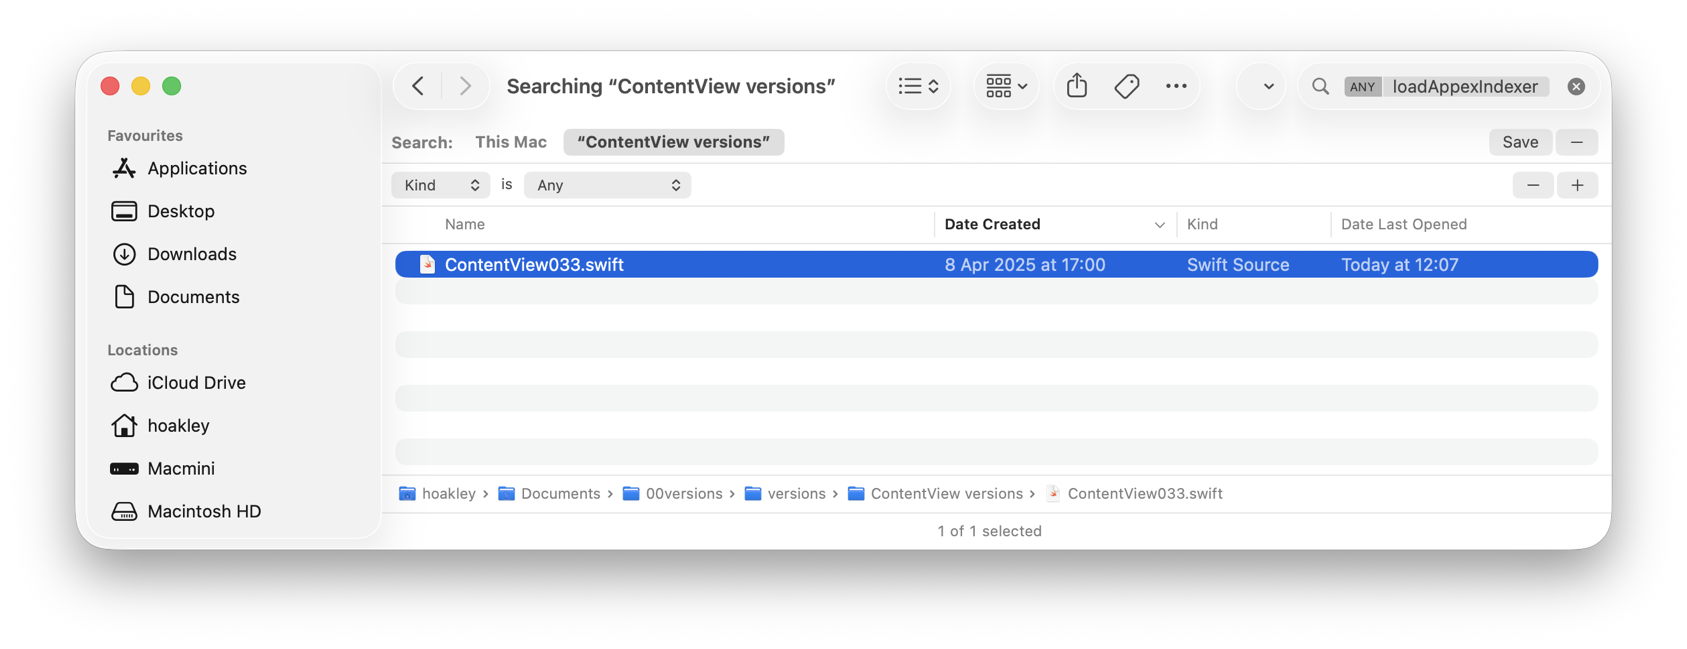
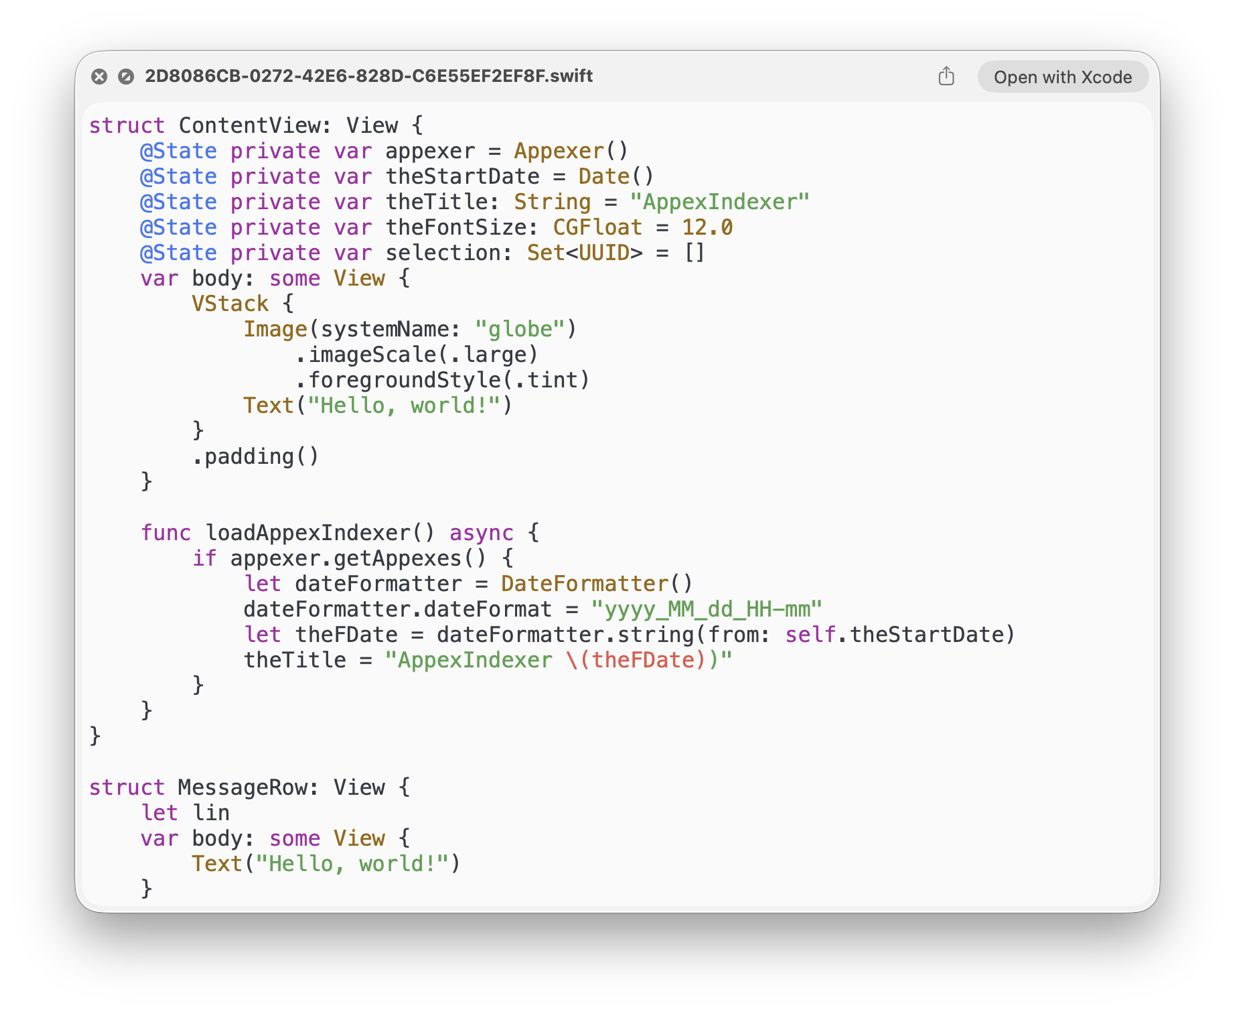
a Swift source code file edited in Xcode with 112 versions, with just one of them containing a function named loadAppexIndexer;
a large Pages document with a mere 49 versions, where I was looking for the first containing the placename Hulverstone.
In both cases I started by dropping the current document onto Veratility’s window, and saving individual archived versions to a new folder alongside that original document. I then opened that archive folder in a Finder window, and converted that to a Find window with that command in the Finder’s File menu. I entered my term, loadAppexIndexer or Hulverstone, into the search box, and changed the search scope from This Mac to the open archive folder.
In the Swift code, Spotlight immediately found the term in the file numbered 033 by Versatility, and all versions from the file numbered 023 in the case of the Pages document.
With that Finder window still open I was then able to locate those versions in the original documents:
Using my free Revisionist, the version numbers start from 1, whereas Versatility starts them at 000. So I added 1 to the number in the filename, and previewed that version in Revisionist. In both cases that’s sufficient to copy content that had gone missing from the current version of the document, for example.
Using the version browser in XCode or Pages, I looked back for that version’s datestamp, given in the Finder window as its Date Created, and brought that old version up in the browser.
Once happy I had done what I wanted with that old version, I then trashed the archive folder created by Versatility.
To summarise the sequence:
drop the versioned document on Versatility’s window;
save the archive folder alongside the original document;
open a Finder Find window on that archive folder;
using the search box and find bars, locate the version(s) in the archive folder;
to open the versioned document in Revisionist, add 1 to its file version number;
to open in an app version browser, select the date of that version as shown in the Finder window;
Just over six months ago a series of weird bugs came to light in Spotlight indexing. The first report was that plain text files beginning with the characters LG are never indexed, so their contents can never be found by Spotlight search. The mystery deepened when the same was discovered for text files beginning with the characters NPA or Draw. It was appropriately Drew who worked out the common factor behind this apparently bizarre connected behaviour: all three files are identified as not being text by the old Unix utility file(1), used to recognise file types by ‘sniffing’ their contents.
You can verify that by creating a plain text file with any of those three sets of characters at its start, then running the command file on that file. In the case of one beginning with Draw, file will identify it as RISC OS Draw file data, even though the file has an extension of txt or text and a UTI of public.plain-text. At that the RichText mdimporter, which analyses all text-based files for metadata to enter into Spotlight’s indexes, throws its hands up in horror and refuses to index the file’s contents. Change those opening characters in that file, perhaps by adding a leading space, and all of a sudden the mdimporter works as expected.
Following our collaborative effort here, particularly Drew’s insight, we realised this bug has been silently blocking the indexing of seemingly random text files for the last three years or more. What remained unanswered at the time was what that mdimporter was doing running file(1) on files whose UTI made it clear that they were in plain text, not some long-forgotten binary vector graphics format from 1989. I believe I now have an answer, thanks to my recent work on QuickLook’s qlgenerators.
QuickLook’s generators take advantage of the hierarchical structure of UTIs. Rather than accepting the most specific UTIs such as public.jpeg, Image.qlgenerator works with all files whose UTI conforms to the generic UTI of public.image, and then undertakes its own format detection. This enables it to generate correct thumbnails and previews of HEIC images that have been given the incorrect extension of jpg, for instance.
Similarly, a Swift source-code file with the extension of swift and the UTI of public.swift-source is handled by the Text.qlgenerator because public.swift-source conforms to public.plain-text, the UTI required for use of that generator.
What if Spotlight’s mdimporters were to work the same?
We know the built-in RichText.mdimporter is used to extract metadata for a wide range of files containing text, which all conform to the generic UTI of public.text. It then classifies them on the basis of their contents to work out what to index. What if that’s performed using file(1), so rejecting perfectly valid text files as ancient binary vector graphics files, and so on?
We can’t get the same direct evidence from the log that I obtained for QuickLook, as Spotlight is far less informative in its log entries. We can get clues from looking at output from mdimport and mdls, though. While a non-deviant text file contains a metadata attribute extracted by its importer as kMDItemTextContent containing the text in the file’s data, that’s missing from a text file starting with any of the three known triggers. In turn that’s associated with the attribute _kMDItemPrimaryTextEmbedding containing ‘vec_data’ listed by mdls, which is also missing for the deviant files.
There is hope that a third party might be able to undercut RichText.mdimporter by providing a bug-free importer for public.plain-text, but that relies on the built-in importer targeting public.text rather than public.plain-text. The best solution would be for Apple to fix the identification of text files instead of relying on file(1), which dates from 1973. Given that these deviant files work perfectly with QuickLook’s generator, it appears Apple has already solved this problem there. So I suspect this bug in RichText.mdimporter will never be fixed in Sequoia or Tahoe.
With the first beta-release of macOS 27 just a couple of weeks away, this leaves those using the last Intel Macs stuck with Spotlight indexing that will never work on some text files, assuming that at some point in the not too distant future this bug is finally fixed in an Arm-only macOS. This is all sadly familiar from the loss of 32-bit support in the transition from Mojave to Catalina, when little if any effort was devoted to making Mojave as free of bugs as possible before it was abandoned in the rush forward to 64-bit.
It would have been far better to be able to look back in fondness with macOS that worked better, than looking back in anger at what never got fixed.
One last thing to remember is that, when Apple does fix this bug, you’ll have to force Spotlight indexes to be rebuilt on each of your Mac’s volumes to ensure that the contents of these files are incorporated. We learned that last time there was a serious bug in the same importer, which failed to index the contents of RTF files.
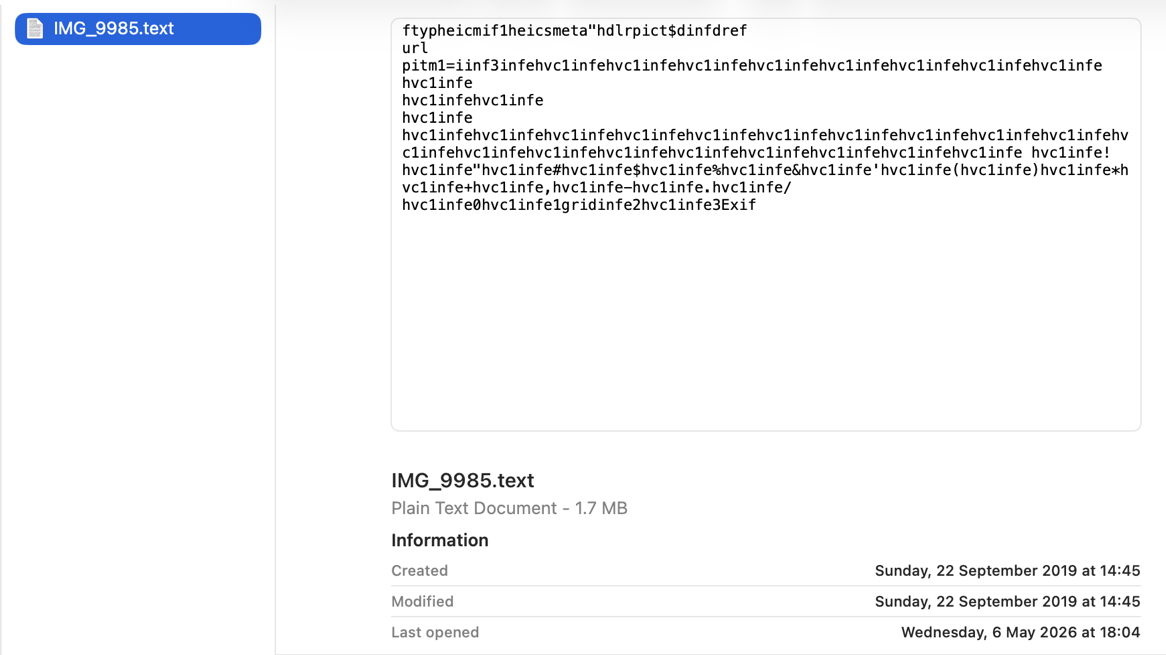
In case you haven’t got the message from the last few weeks looking at Spotlight and QuickLook, UTIs (Uniform Type Identifiers) are important, but not always as critical as they could be. To understand how macOS copes with misleading UTIs, I have a little demonstration you can try in the privacy of your own Mac.
All you need for this is an image with some Exif metadata. Those taken by an iPhone are particularly suitable, as they usually contain rich Exif information about which model took that image, focal length, aperture, exposure time and more. In my case, the image is in HEIC format. If you have my apps UTIutility and SpotTest, you can also explore UTIs more thoroughly, and inspect the metadata from images that gets indexed by Spotlight, but those are optional extras.
A file with the extension HEIC or heic is assumed to have the UTI public.heic, which conforms to public.heif-standard, and that in turn conforms to public.image, the parent of most image formats in macOS. The Help book for UTIutility shows these in a dense diagram.
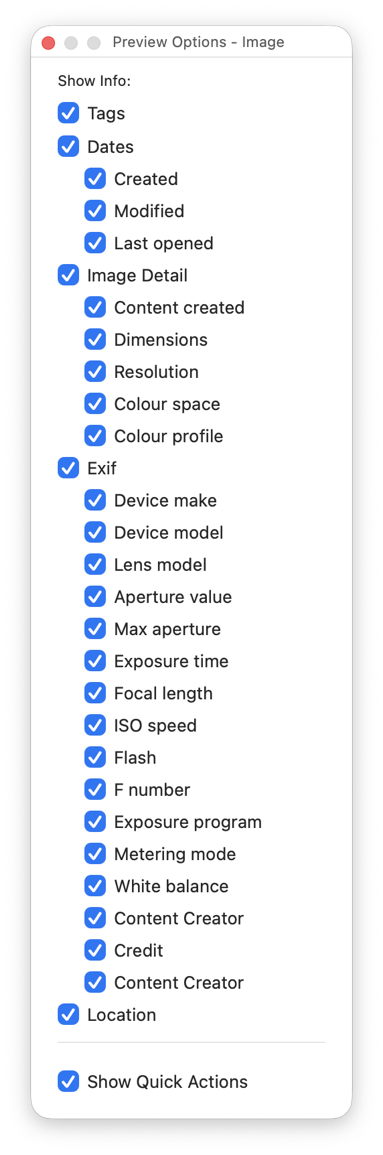
Select that image in the Finder’s Column view to inspect its public metadata. While the image is selected, open Show Preview Options in the View menu and enable all the metadata listed there to be shown in previews.
You should then have a good preview pane with lots of metadata below it.
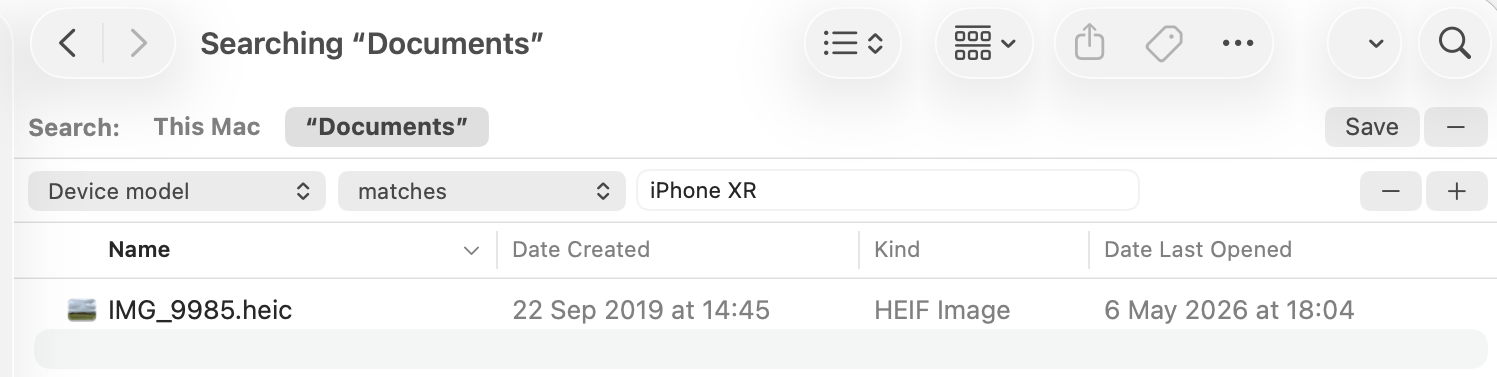
Next open a new Finder window and set it to Find. Using the search criterion popup menu, enable the Device model attribute, or another your image has metadata for, and search for that attribute, here iPhone XR, and you should see your image among the hits.
If you have SpotTest to hand, drop your image on its Drop Window. Being an image, it will crash mdimport, so the information you’ll see will be the metadata fields from Spotlight’s indexes, which should include the Device model as kMDItemAcquisitionModel.
So far, everything has worked as expected, but we’re now going to throw a spanner in the works by changing the extension on that image from HEIC to jpg, which changes the image’s UTI to public.jpeg, although that still conforms to public.image.
Its basic thumbnail icon now changes to a generic JPEG icon, so we’ve managed to confuse the basic thumbnailing scheme in QuickLook. But it’s still shown in the preview pane correctly, with all its metadata intact.
This is because that image has its larger thumbnails and previews generated by the qlgenerator for public.image, and that goes out of its way to parse the file data correctly, and recognise this is really a HEIC not a JPEG. If you’ve left the Finder Find window open, you’ll see that continues to find the image as if nothing had happened, as Spotlight also imports metadata using a common mdimporter for public.image, rather than relying on the more specific UTIs of public.jpeg or public.heic.
Finally, change the file’s extension to text, and you’ll see a preview of its text content, and it vanishes from the Find window too. That’s because text files are handled by their UTI of public.text, which includes public.rtf and others. Those don’t check the file data to ensure they’re not images, so the file is now being handled by the wrong qlgenerator and mdimporter, and won’t make any sense. As public.text formats don’t support Exif data, that isn’t extracted either, as you can see in SpotTest.
Change the extension back to heic, and you’ll see how quickly the right qlgenerator and mdimporter correct its thumbnails, previews, and search discovery, thanks to UTIs.
For the last 15 years or so, local Time Machine backup storage has been required to be included in the volumes that are indexed by Spotlight. We also know too well that they have been indexed, as it has been common for their indexing to take longer than the backup they have just made. Some time around the release of Sonoma, those indexing sessions became less noticeable, but unless you tried to search your backups, you probably didn’t notice any change. For, as far as I can tell, Spotlight doesn’t currently appear able to search Time Machine backups reliably, at least not in Sequoia or Tahoe, although this may not be universal.
For most purposes, the ability to search backups is essential. If you have a series of more than 100 backups over the last couple of years, finding a lost file by inspecting each backup individually is a frustrating waste of time, and requires you to know where to look in each. Even if full content and metadata searching aren’t feasible, the ability to search on file attributes such as name, extension and datestamps is surely fundamental.
As we’ve come to expect, Apple’s documentation isn’t in the least bit helpful. What is surprising is that the instructions given are almost identical for every version of macOS from Mojave to Tahoe.
That page opens with a bold promise: “If you use Time Machine to back up your Mac, you can use Spotlight to initiate a search of Time Machine to recover lost or deleted items.”
That’s just what I’m looking for, so how do I do that? “On your Mac, open a Finder window, then type a search word or phrase in the search field in the upper-right corner. Refine the results by specifying search criteria using the search bar.”
Everything’s good so far, but as the document I’m looking isn’t there, how do I search for it in my backups? “Click the Time Machine icon in the menu bar, then choose ‘Browse Time Machine backups’.”
That opens the Time Machine app, blows away my search criteria, and lists the volumes including Macintosh HD and my backup storage, as of now. So how do I search for the file that I accidentally deleted a couple of hours ago?
“Use the arrows and timeline to browse the Time Machine backups.” But that’s looking for the missing file, not searching those backups for it.
If I now step back through my backups to reach one that I know contains that file, I can restore it. But if I type anything into the search field, nothing is found. If I change the scope of the search to that backup, the window title changes but its contents remain blank, and there isn’t even a busy spinner to indicate a search is in progress.
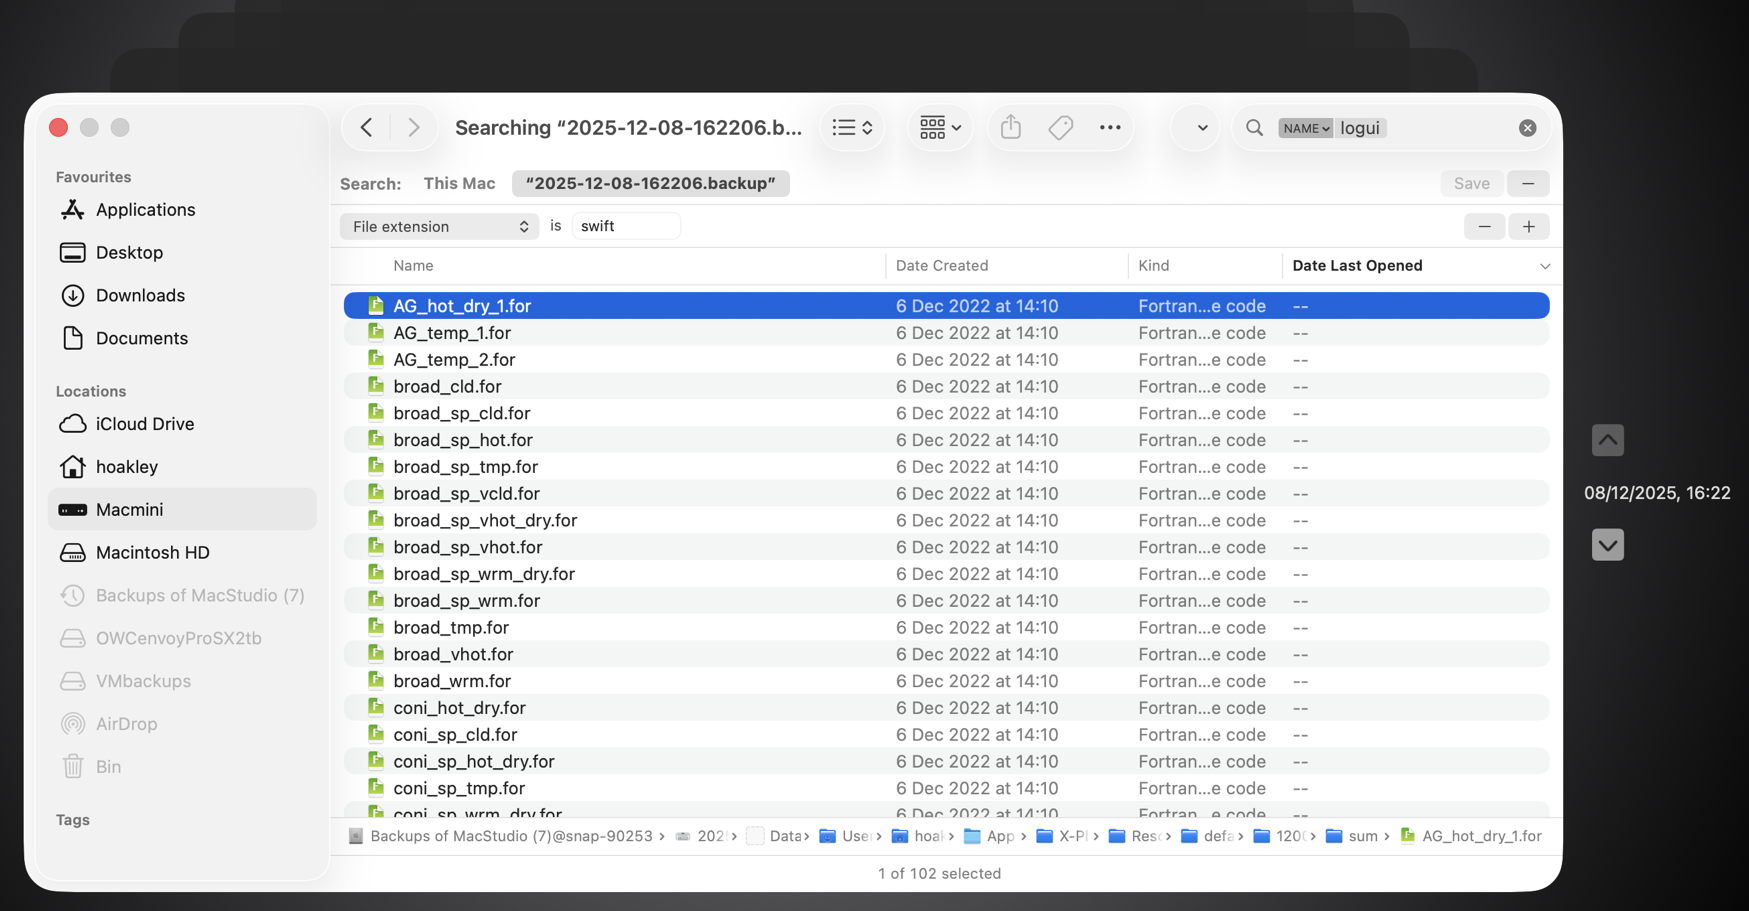
With a little fiddling, I managed to get some results for other searches. Here’s an example where I was looking for files whose name contains logui with the extension swift.
Here I ended up with 102 hits, all of them old Fortran source files, none of which meets either of those criteria.
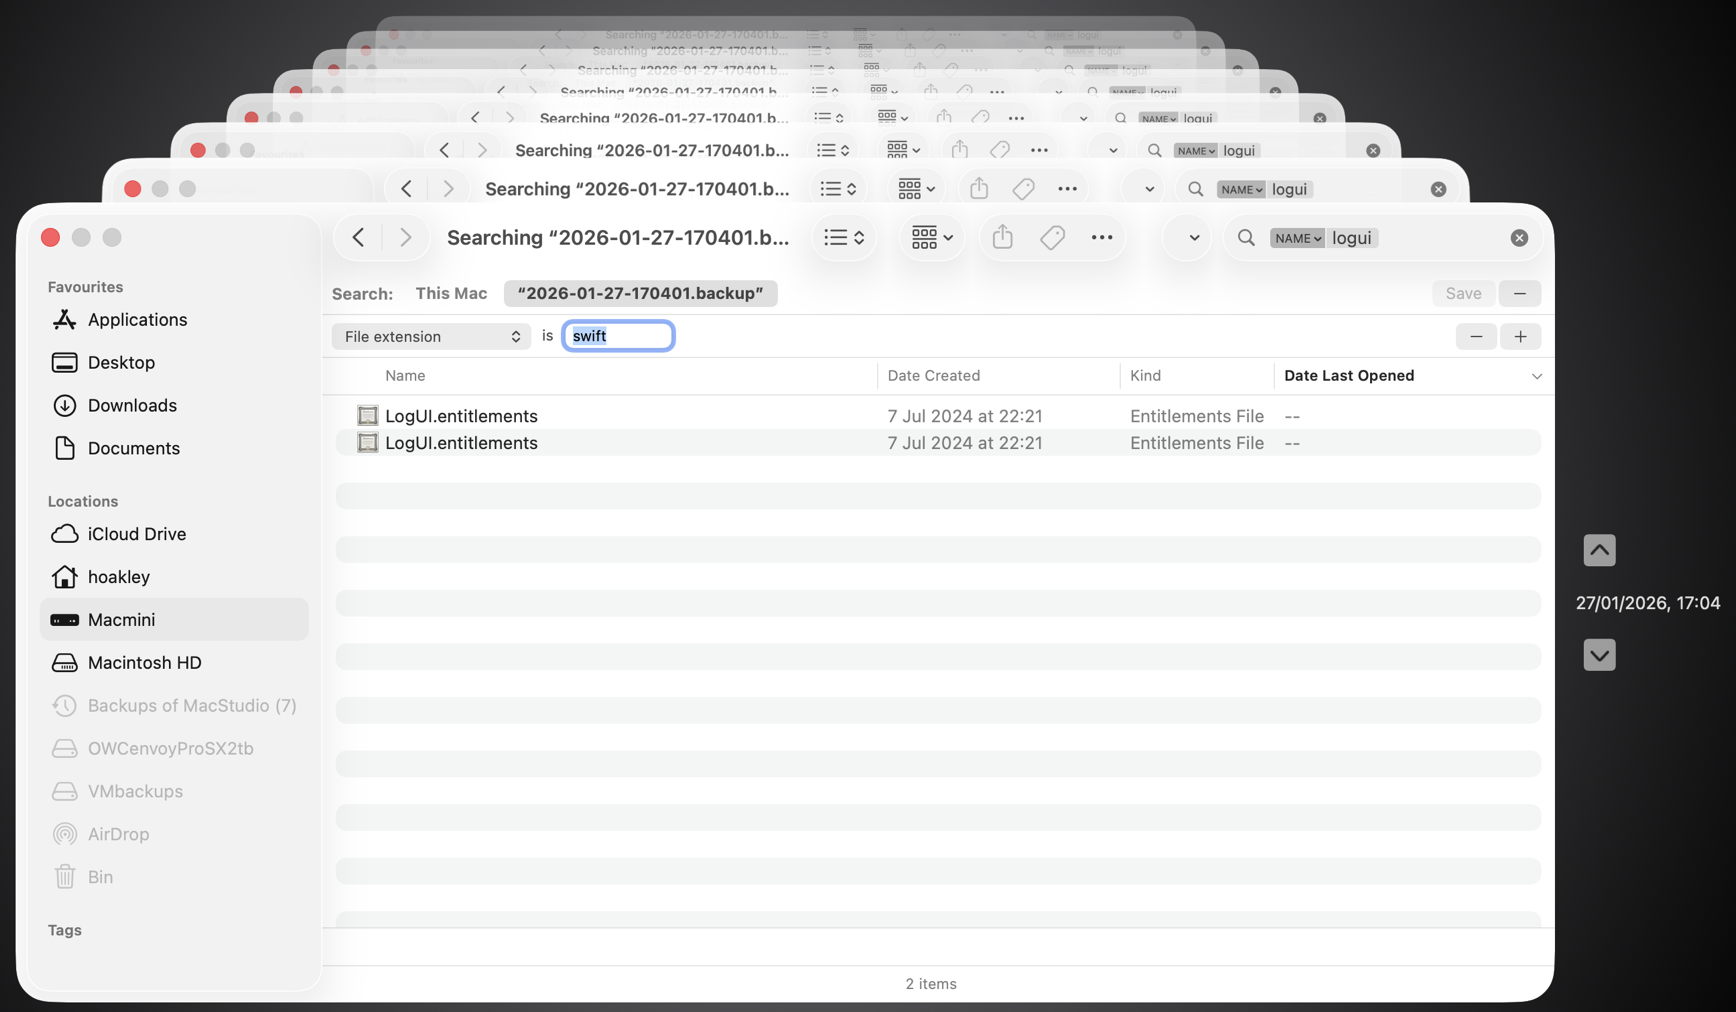
This time the two items found had appropriate names, but a completely different extension.
Undeterred, I left my Mac for over 24 hours, and tried again, only to discover the hourly backup containing my missing file had already been deleted. However, searching for files whose name contains logui with the extension swift proved just as futile. As I can’t disable Spotlight indexing on that volume without macOS telling me that it’s required to be indexed by Spotlight, neither can I force that volume to be reindexed.
There are third-party alternatives, including BackupLoupe and Find Any File (FAF). The former tellingly needs to create and maintain its own indexes, and FAF appears to work fairly reliably but takes an age to search each backup in turn.
In case this was a problem with one set of backups, I have now created a new backup set that suffers identical problems, and have reproduced this in both Sequoia and Tahoe, running on vastly different hardware. My conclusion is that using Spotlight to search Time Machine backups no longer works, and the instructions given by Apple are also broken. If you’ve managed to get reliable search working across your Time Machine backups without resorting to a third-party product, I’d be very grateful if you could explain how you did it.
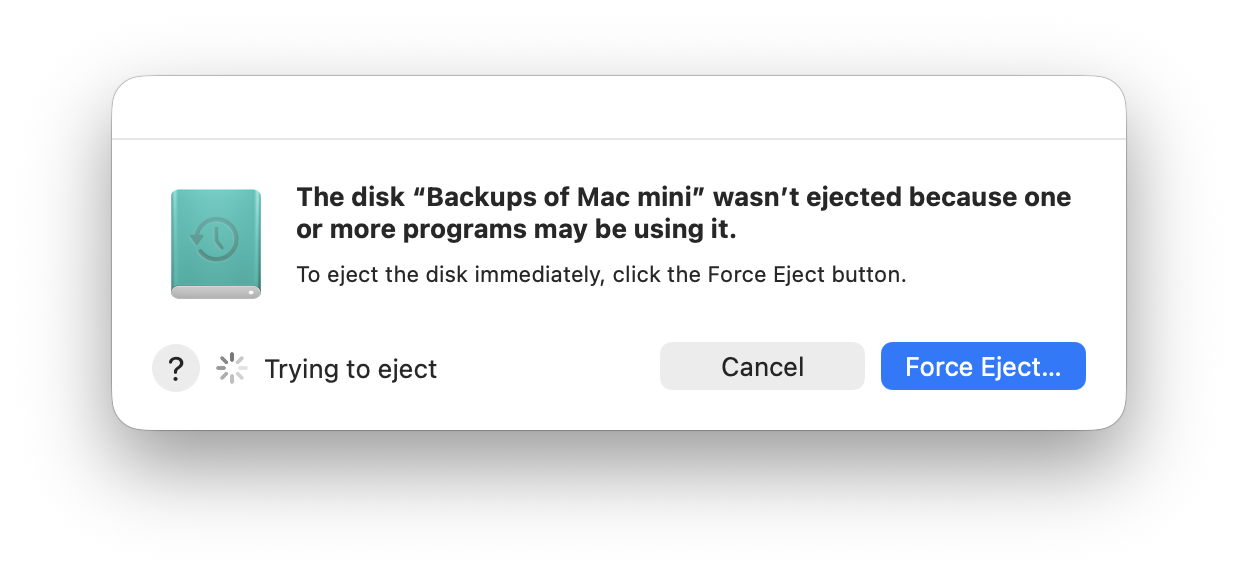
It always happens when you’re in a rush to get your MacBook Pro ready. When you try to eject its external disk, macOS tells you that volume or disk can’t be unmounted or ejected because “one or more programs may be using it”, and asks you whether you want to force it. Should you resort to force, or is there a better way?
Whatever you choose, don’t just disconnect the cable of an external disk. Not only will your Mac complain, but you could end up damaging the contents of its files, or even the file system on that volume. That would only worsen your problem.
Try again or force eject
If every second counts, you can cancel and try again, or go straight to force ejection, if it’s offered. macOS will then try to identify the processes that are still accessing that volume or disk, and kill them, before trying again to eject it. That can take time, and seldom appears successful even if you allow a minute or two for it to complete. However, when it does work, it’s likely to be the fastest solution.
If you encounter this problem when trying to run First Aid on a volume or container in Disk Utility, it’s often best to select the offending volume or container and unmount it using the tool in Disk Utility’s toolbar. You should also double-check that you’re trying the correct volume: if it’s one of the current boot volume group, System or Data, then you’re better off running First Aid in Recovery mode anyway.
Best options
When you have time to address this properly, or all else has failed, there are at least two good options, Jettison and Sloth.
Jettison, $6.95 from St. Clair Software, provides a menu bar control you can use to eject individual or all external disks, and will also do that automatically before sleep or after the display powers off. Every laptop Mac user should have this ready for ejecting external disks.
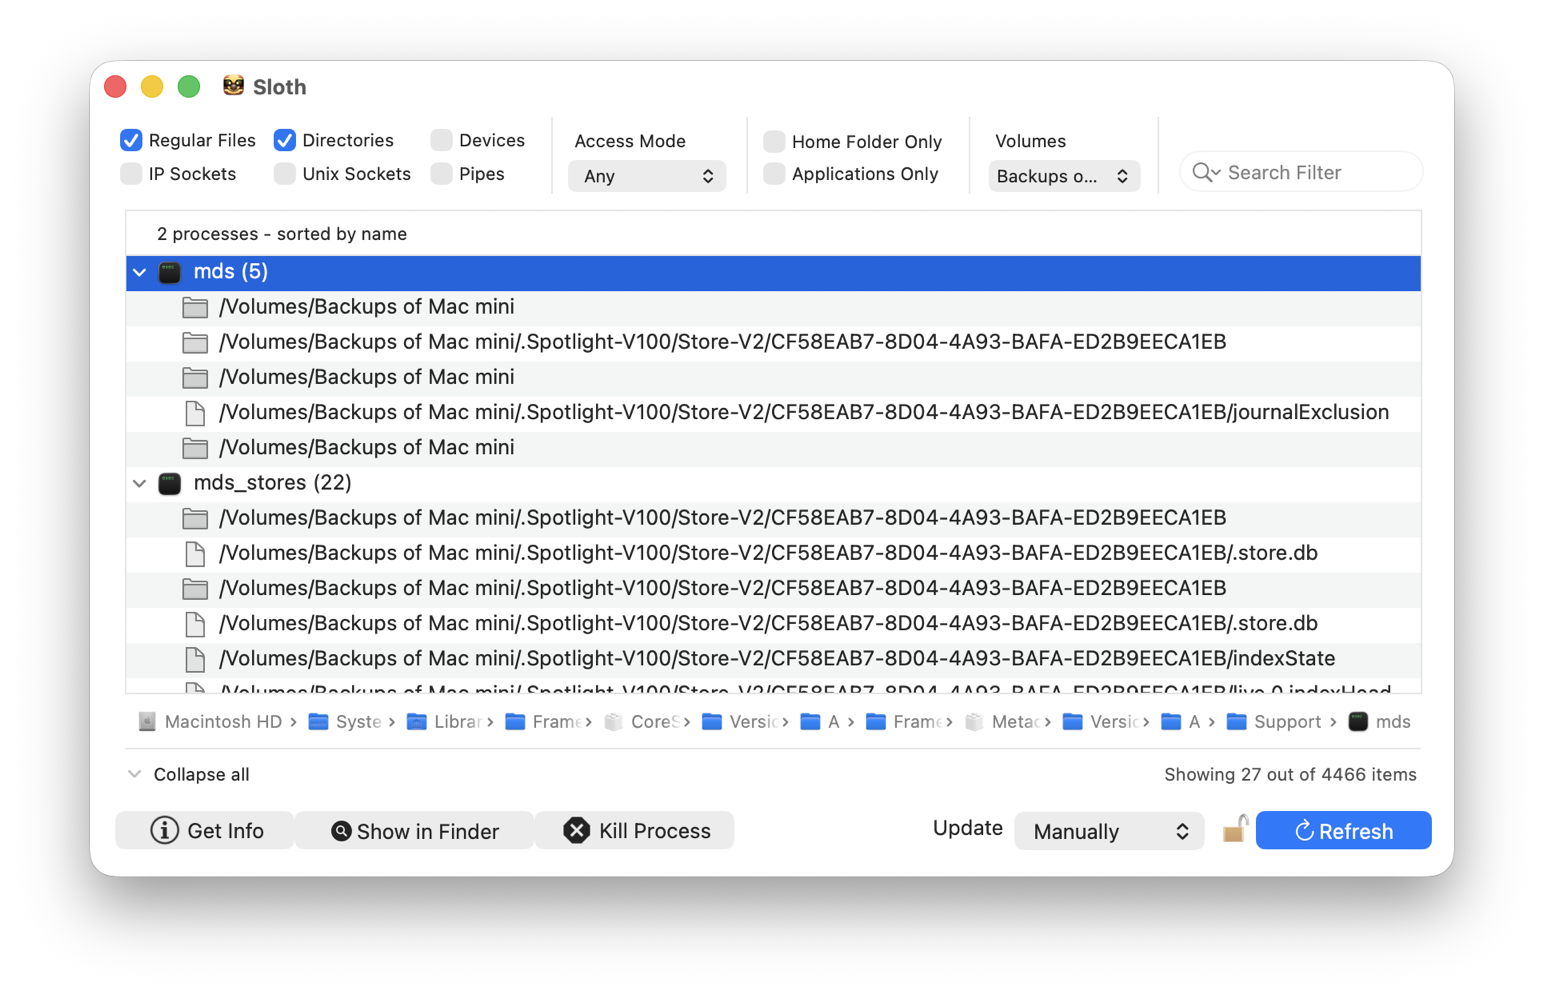
Sloth is free and open source by Sveinbjorn Thordarson, who now provides it fully signed and notarised. It’s an excellent wrapper for the lsof command detailed below, and tells you which processes you’d have to kill before that disk can be safely ejected.
Sloth
Using Sloth to tackle this problem is quick and simple. Open the app, and at the upper right select the volume you want to unmount. That will list all the processes currently known to be accessing that volume, excluding those running as root. To enable those to be shown, click on the padlock to the left of the blue Refresh button at the bottom right, and authenticate.
You can then select each process you want to kill in turn, and click on the Kill Process button at the foot of the window. Once that list is clear you should be able to unmount that volume and eject the disk without further complaint.
Sloth does a great deal more, so it’s worth taking some time to explore that with the aid of its Help page. There are alternatives, but Sloth is long-established and its author has now modernised it to include Sparkle update support and more.
lsof
If you’d rather use Terminal, the command you’re looking for is lsof.
To discover which files are open on any volume, use the command sudo lsof /Volumes/myVol
where myVol is the name of the volume. If you’re unsure how to enter a volume name containing a space, locate it in the Finder’s listing for your Mac, and drag and drop that into Terminal. Once you’ve entered that, type your admin user password at the prompt, and you’ll see a list with entries like mds 367 root 33r DIR 1,28 192 2 /Volumes/External2
mds 367 root 35u REG 1,28 0 87 /Volumes/External2/.Spotlight-V100/Store-V2/3DD5246F-9AEA-4F0E-9A53-AA63783C3C70/journalExclusion
which are the files and directories open on that volume. This needs to be run using sudo, as otherwise you won’t see any files that are opened by processes running as root, which are most often the culprits. Some recommend using grep, but that shouldn’t be necessary, as lsof is capable of its own filtering.
The information given about each open file contains, from the left:
an abbreviated name of the command associated, here mds, the Spotlight metadata server;
the open mode, as the single character following two digits, e.g. 33r is opened for read access only, while 35u is opened for read and write access;
the type, DIR meaning directory, and REG meaning a regular file;
the full path to the file or directory.
Once you know which processes are accessing files on that volume, you can decide whether to open the listing in one of Activity Monitor’s views, such as CPU or Disk, select that process, and click on the Stop tool to kill it.
Summary
Never disconnect an external drive without ejecting it first.
If you’re pushed for time, a force eject might work.
With an understanding of how QuickLook provides thumbnails and previews, you can be systematic when tackling its problems, although thankfully those are infrequent if not rare.
Generic icon
By far the most common problem with QuickLook thumbnailing is when a file’s specific thumbnail isn’t shown, but a generic icon for that type of file appears instead. This has been particularly common since the release of macOS Sequoia, as that ended support for older third-party generators in qlgenerators. To be able to extend the range of types supported by thumbnailing, third-party generators must now be supplied as appexes stored in an app bundle’s PlugIns folder or similar.
To pin this down, you’ll first need to discover the UTI of the files whose icons can no longer be turned into specific thumbnails. One easy way to do that is in my free UTIutility. Type in the file’s extension, press Return and the app will tell you that file’s UTI and those it conforms to.
You next need to discover which generator handles those UTIs. The official way to do that is using the command qlmanage -m
but that now only lists qlgenerators supplied in macOS, as qlgenerators. To see listings of others as well, open my free Mints and click on its QuickLook button.
For qlgenerators, you’re given the file UTI, the path to the qlgenerator file, and (when available) its version number, e.g. com.adobe.pdf/System/Library/QuickLook/PDF.qlgenerator (1002.2.3)
App extensions are divided into two, first those providing Previews, and second those for Thumbnails, e.g. com.apple.applescript.text/Applications/PreviewCode.app/Contents/PlugIns/Code Previewer.appex
If no generator handles the file’s UTI, ascend the list of UTIs it conforms with to discover which generator should attempt to. If you think an old qlgenerator is the problem now, contact the app’s developer and ask whether they intend supporting macOS with an appex replacement.
Occasionally you may come across an extension conflict, in which the same extension is used for another UTI, resulting in the wrong generator trying to create a thumbnail.
The nuclear option for any QuickLook problem is to reset its caches, using the command qlmanage -r
Although its effects might be to slow thumbnail generation for a while, it’s unlikely to prove any more damaging.
Digging deeper
If you have to go any deeper than that, you’re going to need to capture good log extracts to enable diagnosis. As far as Icon Services, QuickLook and related features are concerned, it’s essential to disable log privacy before going any further, or you’ll be driven crazy by all those messages gutted and rendered meaningless by censorship.
Even then, log entries refer to key items such as files and folders using references that may appear opaque. Some abbreviate file names and directories as ‘B{14}1.jpg’ for BeltedGalloways1.jpg, and ‘t{5}s’ for testims, as well as referring to them by hex numbers like 0xBBDBEFDB0. Another common habit in log entries is to refer to files by their inode number, either as an ino, or in a full URL such as file:///.file/id=6571367.243284. The use of UUIDs is also common, for example as uuid:0AD8986E-6325-4FF1-92FD-9FD3C15D57EA.
Example thumbnail generation
This was initiated by a mouse click, following which a thumbnail isn’t immediately available from cache.
This leads to the file’s UTI type being looked up in the dictionary of those known to be handled by bundled qlgenerators. These are the log entries most important to those hunting generator problems.
01.017971 QuickLookSupport com.apple.quicklook | No exact match found in type dictionary 0xc352a7ae0 for 'public.jpeg' #UTI

01.018010 QuickLookSupport com.apple.quicklook | Getting 5 for 'icon flavor' from UTI 'public.image' #UTI

01.018012 QuickLookSupport com.apple.quicklook | Getting 5 for 'icon flavor' from UTI 'public.jpeg' #UTI

01.018765 QuickLookThumbnailingDaemon com.apple.quicklook | Generating thumbnail for <QLThumbnailItem: 0xc351c36c0> (size (16.0, 16.0)) with badge type 1 with extension <QLThumbnailExtension: 0xc354ec540>
That thumbnail is then entered into the store and its index.
Once in the Thumbnail Cache, loading should be very quick, typically around 0.0001 seconds from start to the thumbnail being set as displayable.
Example missing generator
This shows some of the salient log entries made when a file type doesn’t have a generator available, in this case for an IconComposer icon file.
This is most obvious from UTI dictionary lookup
00.690352 QuickLookThumbnailingDaemon com.apple.quicklook | About to generate a thumbnail locally from URL: file:///Users/howardoakley/Documents/mints%20icon/Mints.icon/

00.690897 QuickLookSupport com.apple.quicklook | No exact match found in type dictionary 0xb933cfce0 for 'com.apple.iconcomposer.icon' #UTI

00.690957 QuickLookSupport com.apple.quicklook | No exact match found in type dictionary 0xb933cfce0 for 'com.apple.package' #UTI

00.691040 QuickLookSupport com.apple.quicklook | No exact match found in type dictionary 0xb933cfce0 for 'public.directory' #UTI

00.691092 QuickLookSupport com.apple.quicklook | No exact match found in type dictionary 0xb933cfce0 for 'public.item' #UTI

00.691098 QuickLookSupport com.apple.quicklook | Caching NSNULL as icon flavor for 'public.item' #UTI

00.691100 QuickLookSupport com.apple.quicklook | Caching NSNULL as icon flavor for 'public.directory' #UTI

00.691101 QuickLookSupport com.apple.quicklook | Caching NSNULL as icon flavor for 'com.apple.package' #UTI

00.691102 QuickLookSupport com.apple.quicklook | Caching NSNULL as icon flavor for 'com.apple.iconcomposer.icon' #UTI

00.691797 QuickLookThumbnailingDaemon com.apple.quicklook | Generating thumbnail for <QLThumbnailItem: 0xb92e10500> (size (16.0, 16.0)) with badge type 1 with extension <QLThumbnailExtension: 0xb934000e0>
The resulting error refers to the missing generator, not the file whose thumbnail is being generated.
00.769110 error QuickLookThumbnailing com.apple.quicklook | Generation error for request <QLFileThumbnailRequest:0x8cb0a8140 maximumSize=(16.00, 16.00) minimumSize=(0.00,0.00) scale=2.0 item=<QLThumbnailItem: 0x8cb014dc0>> : Error Domain=NSCocoaErrorDomain Code=260 "The file couldn’t be opened because it doesn’t exist."
The solution is to generate a placeholder icon as the ‘most representative’.
When that is accessed later for use in the Preview pane, that’s made clear.
02.773702 Finder com.apple.AppKit | ISImage reported a placeholder, image rep is providing a placeholder image for <ISBundleIcon 0xbd0165d10> Bundle URL: file:///System/Library/CoreServices/Finder.app/ type: (null) tag: (null) tag class: (null) digest:96BABFB5-FBB5-0662-25FA-99CA1A147F30
Once the generator has been made available, in this case by running the IconComposer app for the first time, it can be used to generate a thumbnail and preview. Note this requires the appex to be launched first.
02.409348 QuickLookSupport com.apple.quicklook | No exact match found in type dictionary 0xbd01fcf00 for 'com.apple.iconcomposer.icon' #UTI

02.409406 QuickLookSupport com.apple.quicklook | Getting <QLGenerator Package.qlgenerator> for 'Generator' from UTI 'com.apple.package' #UTI

02.409408 QuickLookSupport com.apple.quicklook | Getting <QLGenerator Package.qlgenerator> for 'Generator' from UTI 'com.apple.iconcomposer.icon' #UTI

02.676198 ExtensionFoundation com.apple.extensionkit | Extension `/Applications/Icon Composer.app/Contents/PlugIns/Icon Composer QuickLook Preview.appex/Contents/MacOS/Icon Composer QuickLook Preview` of type: `` launched.
To see almost all these log entries if you’re using LogUI, fetch all the entries for the period in question, then use its Search feature to display only those with a subsystem of com.apple.quicklook.
Apple has released its regular weekly update to XProtect for all versions of macOS, bringing it to version 5345. As usual it doesn’t release information about what security issues this update might address.
This version adds one new Yara rule for MACOS.SILLYSTRAW.IMA, which appears to be a new genus, and in the Osascript rules in XPScripts.yr it adds a new rule for MACOS.OSASCRIPT.TADE and amends the existing rule for MACOS.OSASCRIPT.SYPR.
You can check whether this update has been installed by opening System Information via About This Mac, and selecting the Installations item under Software.
A full listing of security data file versions is given by SilentKnight and SystHist for El Capitan to Tahoe available from their product page. If your Mac hasn’t yet installed this update, you can force it using SilentKnight or at the command line.
If you want to install this as a named update in SilentKnight, its label is XProtectPlistConfigData_10_15-5345
Sequoia and Tahoe systems only
This update has already been released for Sequoia and Tahoe via iCloud. If you want to check it manually, use the Terminal command sudo xprotect check
then enter your admin password. If that returns version 5345 but your Mac still reports an older version is installed, you should be able to force the update using sudo xprotect update
Most apps rely on settings that persist each time you use them, whether they’re exposed to the user in a Settings dialog or just records of the size and placement of their windows. In Classic Mac OS those were often saved to the app’s resources or those of its documents. In Unix there are plain text config files that may serve similar purposes. Mac OS X inherited a novel alternative from NeXTSTEP, a human-readable property list to store serialised objects.
Mac OS X replaced the old format of those preference files with two formatting schemes, with XML the standard for app preferences. Those property lists consist of a dictionary of key-value pairs, such as
<dict>
<key>metricUnits</key>
<true/>
<key>filePrefix</key>
<string>MyFile</string>
</dict>
to set metricUnits to true and filePrefix to the string “MyFile”. At first those were stored in plain text, but by Mac OS X 10.4 they had become stored in a more efficient binary format, the binary property list, or bplist.
Defaults and their server
As these preference files became near-universal, Apple built support for them into Mac OS X, as User Defaults. With settings as preferences and now defaults, the next step was to provide a defaults server, cfprefsd, to automatically open an app’s preferences as that app started up, and make those key-value pairs available to the app when it’s running. Instead of each app having to do that for itself, macOS provides it as a service with a standard API for fetching and saving those key-value pairs.
cfprefsd is transparent to the developer, whose code simply accesses key-value pairs as they are required. cfprefsd may opt to keep the whole preference file in memory, and manages it however it sees fit. Thus the property list’s contents on disk may not represent those held in memory for the app, and any changes to the property list file may be overwritten when cfprefsd saves changed values from memory.
For a simple app, working with cfprefsd should be straightforward. The app’s preference property list is opened by cfprefsd shortly after the app is launched, and the app’s code works through UserDefaults to make any changes to key-value pairs while the app is running. As the app is shutting down, cfprefsd updates the preference file, and the user is once again free to change or delete that property list as they wish. However, there’s ample scope for that to become more complicated, or to misuse it.
Problems
Many apps today aren’t that simple in their structure, and use helper apps and other executable code that may still be running with access to the app’s preferences even though the main app is shut down. When the user thinks it’s safe to modify the contents of that property list, it may still be in the care of cfprefsd. The preferred approach then is to use the defaults command tool, which should work with cfprefsd rather than competing against it.
In the past, UserDefaults and cfprefsd weren’t always reliable, and some developers worked around their problems with a combination of the official API and performing their own direct manipulation of preference files. Those dangerous practices should have died out now.
Because an app’s preferences are accessed early as it’s being launched, any bugs or incompatibilities in those key-value pairs can have fatal effects before the app is fully open. For example, if a new version of an app reuses an existing preference key with a different data type, if it reads an old version of its preferences, that will throw an error. If that’s not handled well, that can cause the new version of the app to crash when launched.
Fortunately, all apps have to be able to create their own preference file when they’re first run. There’s scope for further bugs there, when the file created isn’t updated to work with changed key-value pairs in a newer version of the app. That may result in an app that crashes when launched even when there’s no existing preference file saved, a problem for which there’s no workaround.
Finally, many apps have multiple preference files. If they run in a sandbox, the copy they use normally is in the Data/Library/Preferences folder in their container, in ~/Library/Containers. But they may also have a different property list in ~/Library/Preferences, and sometimes a master copy in /Library/Preferences as well. While I’m sure cfprefsd knows which to access, you may need to check by inspecting each file’s timestamps.
Changing settings
There are only two safe and robust ways to change settings in preference files or user defaults: an app like Prefs Editor that works through cfprefsd, or the command tool defaults which does much the same.
If you’re certain that no app or other process might still be accessing its preferences, so they will have been safely saved to disk, you should be able to open a preferences file and edit it using a good text editor that can work with bplists, such as BBEdit, or remove the file altogether to force the app to create a new one.
defaults should be simple to use in most circumstances, although it can get complicated if you need to specify hosts, or to manipulate complex data types. Start by identifying the domain name of an app with saved preferences, which should look like a URL reversed, such as co.eclecticlight.Consolation2. This is the preferences file name, less its extension. To list all the key-value pairs for that preference file use the command defaults read co.eclecticlight.Consolation2
What that listing doesn’t tell you is the data type of those values. Those in double quotation marks “” are strings of plain text, but numbers without quotation marks can be Booleans, integers or real numbers. If in doubt, use a command like defaults read-type co.eclecticlight.Consolation2 textStartTime
to tell you the data type for the key textStartTime.
Check an individual key-value pair by specifying the key in a command like defaults read co.eclecticlight.Consolation2 textStartTime
to return the value 08:16:13
which must be a string because of its contents.
To change that value, use a command like defaults write co.eclecticlight.Consolation2 textStartTime "18:10:43"
and check that’s been written correctly by repeating the defaults read command.
To set data types other than strings you must specify the type explicitly, as in defaults write co.eclecticlight.Consolation2 noUpdateCheck -bool "TRUE"
where you can use TRUE, FALSE, YES or NO for the new value.
The final essential defaults commands let you remove complete key-value pairs, as in defaults delete co.eclecticlight.Consolation2 noUpdateCheck
or the whole preference file defaults delete co.eclecticlight.Consolation2
If you make a mess of the preferences file, don’t be afraid to restore it from a recent backup, or to delete the whole thing and let the app build a new one from scratch.
Finally, these days with the threat of ClickFix malware, never copy and paste any command into Terminal without understanding exactly what it does, and checking it thoroughly before pressing Return.
Key points
Don’t mess with preferences files carelessly.
Use a preferences editor that works with cfprefsd, or the defaults command in Terminal.
For more simple tasks, using the defaults command should be straightforward.
If a simple app isn’t running, you should be able to get away with editing or deleting its preferences file directly, if you pick the correct one.
Never blindly paste any command into Terminal. Beware ClickFix!
I hope you enjoyed Saturday’s Mac Riddles, episode 360. Here are my solutions to them.
1: With parents born in 1984 and 1989, it was born a server and raised with aqua.
Click for a solution
Mac OS X
With parents born in 1984 (Classic Mac OS) and 1989 (NeXTSTEP), it was born a server (first released as Mac OS X Server 1.0 in 1999) and raised with aqua (its initial GUI, explained by Steve Jobs as “when you saw it you wanted to lick it”).
2: First with Face ID and no Home to go to in 2017.
Click for a solution
iPhone X
First with Face ID (it was the first iPhone to feature it) and no Home to go to (it was the first iPhone without a Home button) in 2017 (announced in September, and released in November).
3: It shocked without MIDI in 2009, and ten years later went solo.
Click for a solution
QuickTime X
It shocked without MIDI in 2009 (it first shipped with Snow Leopard, and dropped MIDI support), and ten years later went solo (when Catalina was released in 2019, support for previous 32-bit QuickTime was removed, leaving just QuickTime X).
The common factor
Click for a solution
They each use the Roman numeral X for decimal 10, and should be pronounced ‘ten’ rather than ‘ecks’.
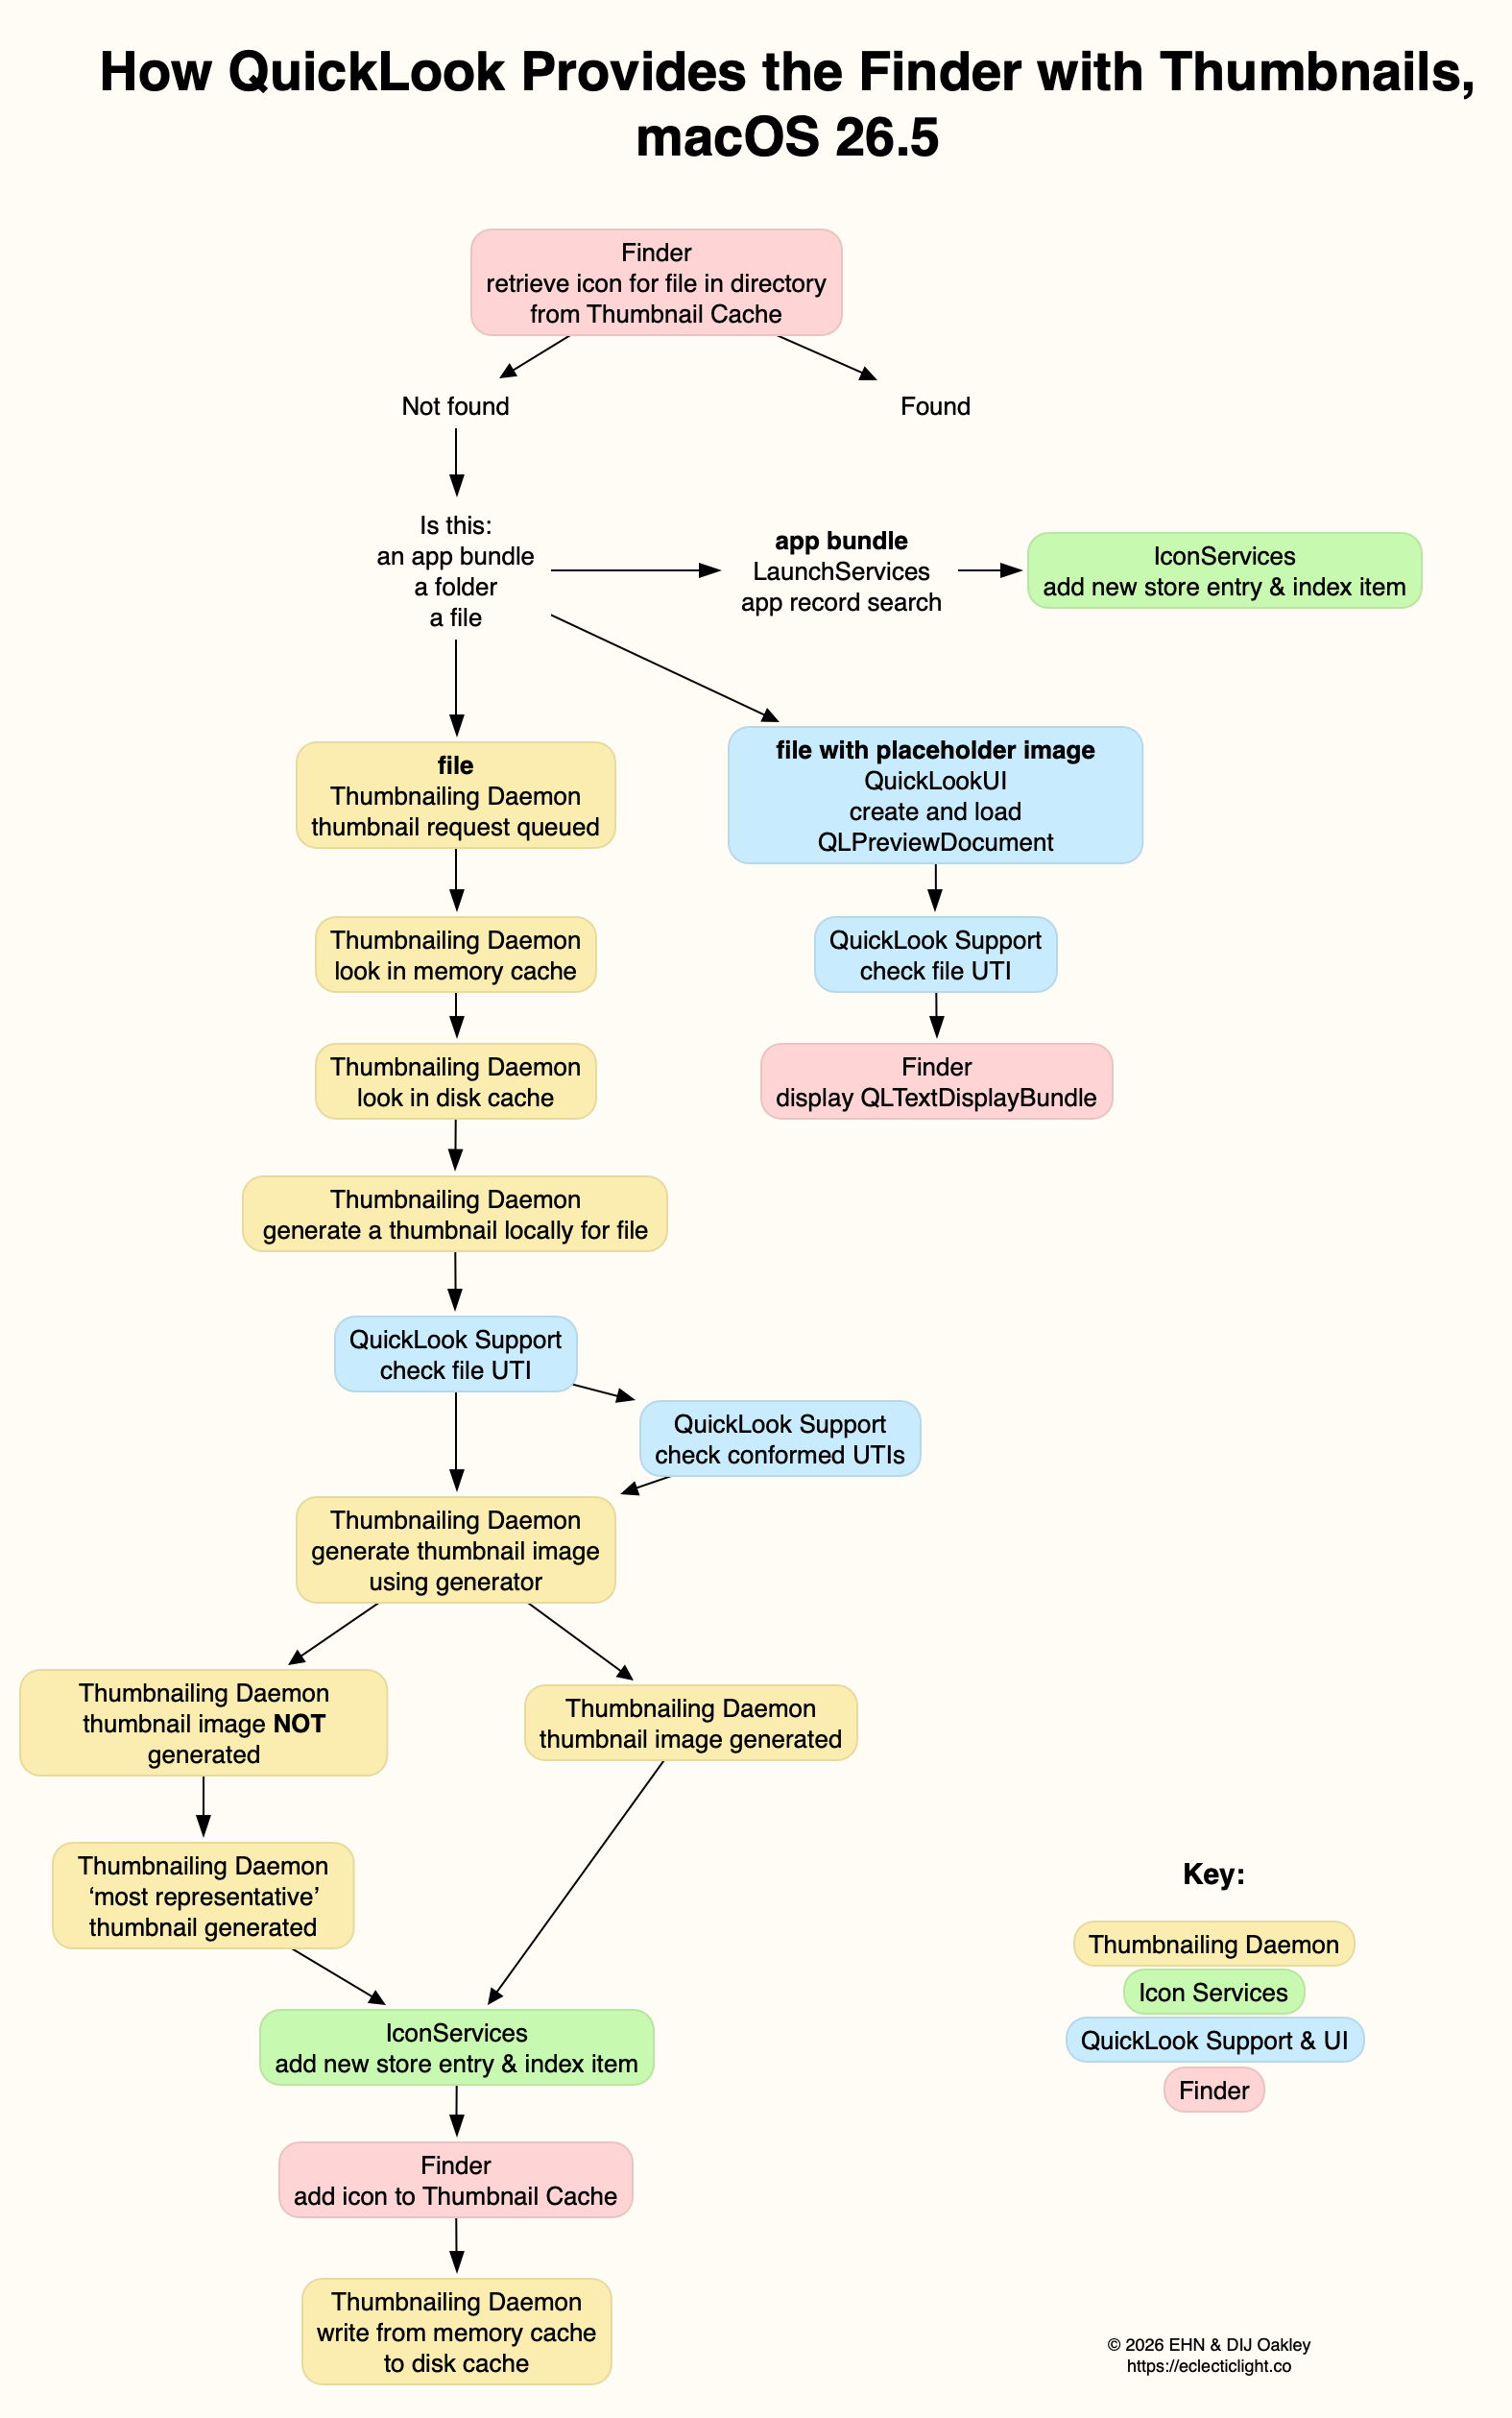
Throughout macOS, objects like files, folders and apps are displayed as icons, which are managed and delivered by Icon Services. Although many of those are generic to that class of object, the Finder and many apps use thumbnail images to represent specific objects. Zip archives and Installer packages are denoted by type-specific icons, images by individual thumbnails, and text files can use either depending on their context. In addition to those, the Finder and some apps can display the rendered contents of some types of file in previews, providing more detail and features such as annotation and text recognition.
Custom thumbnails and previews are the product of the QuickLook subsystem, and this article explains how they’re provided to Icon Services, here for use by the Finder, although the same mechanisms are available to other apps.
Caches
The success of Icon Services depends on speed of delivery as well as providing icons that are as faithful as possible for their size. Speed is achieved by maintaining a Thumbnail Cache containing those icons most likely to be needed, the primary purpose of iconservicesd. That cache is divided between memory and multiple locations on disk. The latter include a main store locked away from all access at /Library/Caches/com.apple.iconservices.store, and com.apple.iconservices and com.apple.dock.iconcache databases in private/var/folders/[2 chars]/…/C/, where … is a long alphanumeric name.
Generation
Fidelity of custom thumbnails and previews is ensured by many generators specific to the types of data to be rendered. There are currently a total of 19 bundled in macOS, in /System/Library/QuickLook, each of which will generate both thumbnails and previews. Data types are specified by UTI, thus PDF files with the UTI of com.adobe.pdf are handled by PDF.qlgenerator, while iWork.qlgenerator handles 15 different UTI types for documents written by Keynote, Numbers and Pages.
Custom UTI types that aren’t handled by any of those bundled qlgenerators can be turned into thumbnails and previews by appexes supplied by third-party app bundles. For example, Scapple documents with the UTI com.literatureandlatte.scapple.scap can have thumbnails generated by ScappleThumbnail.appex, while ScapplePreview.appex will generate previews for them. Both appexes are supplied in the Scapple app’s PlugIns folder inside the app’s bundle, as has been expected in recent macOS.
Selection of generator takes advantage of the hierarchical structure of UTIs. QuickLook’s dictionary of UTIs supported by generators normally contains no entry for the UTI public.jpeg, the most specific UTI for JPEG images, but it does for public.image, the more general type that public.jpeg conforms to. In the absence of a more specific generator, QuickLook uses Image.qlgenerator to produce thumbnails for JPEG images. This allows a third party to implement a better generator for JPEG images using their public.jpeg UTI, rather than public.image. The same is used by PreviewCode to generate thumbnails and previews of Swift source code using its specific UTI of public.swift-source, while the macOS Text.qlgenerator goes no more specific than public.plain-text, to which public.swift-source conforms.
QuickLook offers two strategies for generating thumbnails:
Best possible quality, which may take significant time to create large thumbnail images from large original files.
Multiple resolutions, which creates low resolution images quickly, then replaces them with higher resolution when it can.
You can see the latter in action sometimes when thumbnails are being generated for large Gallery view windows in the Finder.
App and bundle thumbnails
In contrast to files, app- and bundle-specific icons aren’t generated from file data, but taken from an icon located in the bundle’s Resources. When first viewed in a Finder window, if app icons haven’t already been cached, they will initially be displayed using placeholder icons. Each app is then looked up by LaunchServices in its records, and Icon Services adds its icon to the app icon section of the Thumbnail Cache.
Placeholder icons
When there’s a delay in generating or fetching a file’s specific icon, a placeholder icon is used by Icon Services instead. These are specific to the UTI type of that file, and will remain if no more specific icon can be generated.
Placeholders are used permanently for file types which don’t have specific content-based thumbnails generated for them, such as Apple Archives with the extension aar, with a UTI of com.apple.archive. The icon displayed is then based on that for public.archive, with the letters AAR added to indicate they’re Apple Archives.
Placeholders are also used in other circumstances. A common example is for text files listed in a Finder Column view, where all files with the UTI of public.plain-text are displayed using a generic icon, although they’re shown in the Preview pane as a fully rendered preview. The same applies to Rich Text files with a UTI of public.rtf, which use the same Text.qlgenerator, but not for PDF files.
QuickLook providing a thumbnail
To cover the range of actions more fully, this account is a composite based on what happens when you open a folder in the Finder’s column view, extending to cover the principles for the display of contents in a Preview pane.
The initial request from the Finder is to retrieve the icon from the Thumbnail Cache. If it’s not found there, what happens next depends on what the icon represents.
For app and similar bundle icons, LaunchServices searches app records, the icon is found, and Icon Services add it as a new indexed store entry.
For files, if it already has a placeholder image, as a type icon, and its contents can be rendered into a thumbnail, QuickLook UI will create and load a QLPreviewDocument such as a QLTextDisplayBundle, for the Finder to display in the Preview pane.
Otherwise the Thumbnailing Daemon queues a thumbnail request. First the memory cache is checked, then the disk cache. If the thumbnail can’t be found in those, then a new thumbnail is generated locally for that file. The first step in that process is for QuickLook Support to check the file’s UTI, and ascend through the UTIs that conforms to, as its more generic types. This determines which generator will be called to generate the thumbnail image. If that fails to generate an image, the Thumbnailing Daemon will generate that deemed ‘most representative’, usually a placeholder icon.
The generated icon is then added as a new store entry and indexed by Icon Services, and that’s written from the memory cache to the disk cache.
How would you cope if you started your Mac up to find every datestamp on every file had been set to 1 January 1970 at 00:00? Or that every Finder Tag had vanished? What if all the Exif information for your images had been wiped out? Metadata like those aren’t optional extras we can afford to lose, although other metadata, like Finder Info and the URL from which a file was downloaded, are more ephemeral.
Xattr flags
Back in 2013, when iCloud was just two years old, Apple’s engineers implemented a scheme to determine how metadata stored as extended attributes (xattrs) should be copied, to take into account its permanence. This was important at that time to ensure only the right xattrs were preserved when files were stored in iCloud Drive. They did this by adding flags to the xattr’s name to indicate which actions should result in preservation of that type of xattr, and the metadata it contains.
Apple provides an extensive suite of xattr types to store metadata such as author names, keywords and comments, whose names all start with com.apple.metadata:. These are matched by corresponding metadata attribute keys, for example the xattr com.apple.metadata:kMDItemKeywords bears the metadata content accessed by the key kMDItemKeywords. Rather than appending flags to them all, this scheme laid down a table of default flags to be applied.
Being exemplary engineers, this was all detailed in the source code for copyfile, which is also open source. However, as this was just after Apple stopped creating much of its technical documentation, and little has ever been published about iCloud Drive, that’s as far as that information went.
For iCloud Drive, the relevant flag is S, XATTR_FLAG_SYNCABLE, defined as “This indicates that the extended attribute should be copied when the file is synced on services like iCloud Drive. Sync services may enforce additional restrictions on the acceptable size and number of extended attributes.”
Default flags set for xattr types com.apple.metadata:* (except for five of the less used types) are PS to preserve them during copy, save, sync and backup. You can read the macOS 26 version of those source files in Apple’s Open Source GitHub.
FileProvider
For the next decade or so, iCloud Drive mostly respected those behaviours, although without documentation it all appeared puzzling until you read the copyfile source. Then Apple decided to modernise it by implementing its FileProvider framework, a major architectural change for the better. Although the framework is intended to be common to all cloud storage services, there remains ample scope for iCloud Drive to offer enhancements.
Current FileProvider documentation for developers states:
“The extended file attributes are part of the item’s metadata. The system sets extended attributes on dataless files, and preserves them on files that it renders dataless. The system decides which attributes to sync. To sync an attribute, it calls the xattr_name_with_flags(_:_:) method and passes the XATTR_FLAG_SYNCABLE flag. Some older attributes are also synced.”
While FileProvider appears intended to conform to the xattr flag scheme, there’s no mention of the tables of default flags listed in the copyfile source code.
Implementation
Last week I set out to test and document how well iCloud Drive manages metadata, following the xattr flag system and copying up all those invaluable com.apple.metadata:* xattrs, only to discover it doesn’t any more. Of Apple’s many standard xattrs, the only ones I found that synced reliably over iCloud Drive in macOS 26.4.1 were:
com.apple.metadata:_kMDItemUserTags (Finder Tag)
com.apple.lastuseddate#PS
com.apple.quarantine
com.apple.TextEncoding
The good news is that iCloud Drive through FileProvider does respect the S flag, but only where it’s explicit, rather than being set in that table of defaults. For those of us who have our own xattr types, such as those used for integrity checking by Dintch, Fintch and cintch, can still rely on iCloud Drive to sync those, provided they bear that S flag.
The bad news is that none of the most popular metadata-bearing xattrs are synced, apart from Finder Tags. All those com.apple.metadata:kMDItem* xattrs are blocked, as FileProvider doesn’t recognise them as having their default PS flags.
Workarounds
I have since looked at two workarounds, explicitly adding the S flag to those types that should be accorded it by default, and changing the xattr names from com.apple.metadata:kMDItem* to com.apple.metadata:_kMDItem*.
Adding xattrs like com.apple.metadata:kMDItemKeywords#S with an explicit S flag does ensure FileProvider syncs those xattrs. However, as neither Spotlight indexing nor the Finder appear to understand that flag isn’t really part of the type name, those preserved xattrs are of no use: they aren’t recognised by Spotlight for indexing, nor are they displayed in the Finder’s Get Info dialog or Preview pane.
Inserting an underscore into the xattr’s name was even worse, as it didn’t lead to their preservation, and was ignored by Spotlight indexing and the Finder.
This raises another interesting issue, in that there doesn’t appear to be a way to extend Spotlight indexing to encompass additional xattr types. There are extensive third-party type libraries, such as org.openmetainfo:* from Tom Andersen of Ironic Software and OpenMeta. But those appear to require their own indexing, search and presentation support.
Error
When I first realised the impact on metadata in iCloud Drive, I assumed this arose because the engineers implementing FileProvider, or those porting iCloud Drive to use that framework, had’t been aware of the xattr flag system and its primary purpose. But if that had been true, they couldn’t have respected explicit use of the S flag. Thus, I’m left with two plausible explanations:
Apple’s FileProvider/iCloud Drive engineers are unaware of the system defaults table in copyfile, so assumed that com.apple.metadata:* xattrs weren’t intended to be preserved when syncing.
Apple decided to end default sync support for com.apple.metadata:* xattrs in iCloud Drive.
The second of those is even more erroneous than the first, as it reduces iCloud Drive support for metadata to a level common with third-party cloud providers. In this respect, users will see no difference from the behaviour of Dropbox or Microsoft OneDrive, which isn’t the marketing choice I’d have expected from Apple.
Conclusion
iCloud Drive no longer syncs much metadata stored in xattrs, in particular that stored in com.apple.metadata:* xattrs, apart from Finder Tags. There is no workaround, and unless Apple restores that feature, it limits the use of iCloud Drive with Macs.
QuickLook, or Quick Look, is the part of macOS responsible for generating custom Thumbnails and Previews of items in the Finder and elsewhere. Although it was only introduced in 2007, with Mac OS X 10.5 Leopard, its origins go back to 1988-91 when image Thumbnails could be saved in a file’s ICN# resource. A similar system arrived in Mac OS X, and was replaced by the first version of QuickLook in 2007, which has recently undergone revision, over the period 2019-25.
Resource-based Thumbnails in Classic Mac OS were relatively straightforward. Each type of file had its own icon, an association made in the hidden Desktop database. Image and video files often overrode that default by providing their own Thumbnail image as a resource, and had to update those when the file’s data was changed. Amazingly that’s still supported in modern macOS 35 years later.
QuickLook took on the task of generating Thumbnail images, and added larger Previews in which the whole document can be inspected without opening it in an app. This came with built-in Thumbnail and Preview generation for a wide range of common document types, extending to QuickTime media including audio and video. Apps are different, though, as they use icon image (icns) files stored in their bundle’s Resources folder, harking back to Classic icon resources.
Display of Thumbnails used the QuickLook framework documented here. This enabled third-parties to extend coverage to their own document types using QuickLook generators with the extension qlgenerator. Initially, they were installed into /Library/QuickLook from each app bundle.
Unlike Spotlight indexes and document versions, QuickLook stores all its files in the current Data volume, rather than locally on individual volumes. Normally, when QuickLook generated a Thumbnail or Preview, that was stored in its cache database kept in a temporary directory in the path C/com.apple.QuickLook.thumbnailcache/. Those could give revealing insights into images and other documents accessed recently, and Wojciech Regula and Patrick Wardle discovered that, in High Sierra and earlier, it was easy for malicious software to examine that cache. Apple addressed that in macOS 10.14 Mojave by making that cache completely inaccessible.
In-memory caching of Thumbnails has also proved controversial in more recent versions of macOS. To deliver smooth scrolling of Thumbnails in the Finder’s Gallery views in particular, the Finder has taken to caching them in memory for up to two days, sometimes using several GB in the process.
I described how QuickLook Thumbnails worked in early 2019, in the days before the SSV.
When you selected a document in the Finder, a dialog, or somewhere else where you expect its icon to be shown, the Finder passed details of the document path and its type (UTI) to IconServices, to fetch the appropriate icon. This called on its main service, iconservicesd in /System/Library/CoreServices, to check its icon cache.
Although the main icon store is locked away in /Library/Caches/com.apple.iconservices.store, there was additional data in a folder on a path based on /private/var/folders/…/C/com.apple.iconservices, where … is an unreadable alphanumeric name. For icons used in the Dock, their cache was at /private/var/folders/…/C/com.apple.dock.iconcache. If the icon should be replaced by a QuickLook Thumbnail, such as in a Finder column view, QuickLook is asked to provide that thumbnail. That in turn may be cached in its protected cache at /private/var/folders/…/C/com.apple.QuickLook.thumbnailcache.
QuickLook then relied on there being an appropriate qlgenerator to create a thumbnail of that document type; if the qlgenerator was flawed or could’t cope with the document’s contents, that could easily fall over. For example, if you renamed a text file with a .jpeg extension so that macOS considered it was a JPEG image, the bundled qlgenerator might have simply resulted in the display of a busy spinner, rather than resolving to a generic JPEG document icon. IconServices should then deliver the appropriate icon back to the Finder to display it.
In macOS 10.15 Catalina (2019), Apple started replacing this system with a new framework named QuickLook Thumbnailing, documented here. That replaces qlgenerators with QuickLook preview extensions, in particular Thumbnail Extensions, as explained to developers at WWDC in 2019.
macOS 15.0 Sequoia finally removed support for third-party qlgenerators, resulting in the unfortunate loss of custom Thumbnails and Previews for document types of apps that are still reliant on qlgenerators, and haven’t yet got round to providing equivalent app extensions.
When you now select a file in a view which should result in the display of its thumbnail in the Preview pane in that window, the Finder requests it from the QuickLookThumbnailingDaemon. That queues the request until the daemon can look for the image in its memory cache. If it can’t find it there it then looks in the disk cache, first at low quality 20 x 20 icon mode. If it still can’t find it, it queues a request for a fresh thumbnail to be generated. That uses the file data together with the appropriate code to create a Thumbnail, which is then returned and cached.
There’s at least one exception to this, the directory at ~/Library/Messages/Attachments/. For files inside that, and any others for which a Thumbnail can’t be generated, a generic icon is returned as the “most representative thumbnail”.
While third parties have been replacing their old qlgenerators with modern Thumbnail and Preview extensions (appexes), macOS still provides its standard qlgenerators in /System/Library/QuickLook. Third party appexes normally come in PlugIns folders in app bundles. Mints can provide a full listing of those installed. If a document type isn’t being thumbnailed as you’d expect, the first task is to discover its type as a UTI. You can then look up which qlgenerator or appex should be responsible for generating Thumbnails or Previews of that document type using Mints. By far the most common cause at present is an old third-party qlgenerator that hasn’t been replaced by an appex.
Chinese whispers is an old children’s game where everyone sits in a circle, and one child whispers into the ear of the next on their right a sentence like Send reinforcements, we’re going to advance. That child then whispers the message they heard to the child on their right, until it reaches the one who started it, who says out loud what they heard, classically Send three-and-fourpence, we’re going to a dance, as a demonstration of how messages can so easily become corrupted. What this has to do with China remains one of childhood’s mysteries. I should also explain that three-and-fourpence was idiomatic British English in the days before our currency was ‘decimalised’, and meant three shillings and four (old) pence, about 17 (new) pence, sufficient at one time to enjoy a good night out.
In this article I’m going to do much the same with metadata for a PDF document, tracing what gets indexed by Spotlight, so becoming discoverable by search, and what is displayed in the Finder. This relies on several of my utilities, most of which are available from this page.
Source PDF
I prepared a completely unrelated PDF using my favourite PDF editor, PDF Expert, by adding metadata to be saved in the file’s data. As you might expect, there are several ways that could be stored in the PDF format, including XMP metadata, but in this case for simplicity they were added in the document information dictionary.
I inspected that in a source view in Podofyllin, which found the following fields: /Author (Author name in pdf)
/Creator (Pages)
/Keywords (keyword1 pdf)
/Subject (Subject in pdf)
/Title (0PDFtest1accessdefault)
When rendered in macOS, those are ‘flattened’ by its Quartz PDF engine, to /Author (Author name in pdf)
/Creator (Pages)
/Keywords (keyword1 pdf)
/AAPL:Keywords [(keyword1 pdf)]
/Subject (Subject in pdf)
/Title (0PDFtest1accessdefault)
Note the copying of keywords into a new attribute AAPL:Keywords.
Extended attributes
I then added seven extended attributes using Metamer, with names such as com.apple.metadata:kMDItemAuthors, as shown below in xattred.
Spotlight import
I then inspected the file in SpotTest’s new Drop Window, which reported the following attributes found by mdimport: ":EA:kMDItemAuthors" = "author in xattr";
":EA:kMDItemComment" = "xattr comment";
":EA:kMDItemCreator" = "xattr creator";
":EA:kMDItemDescription" = "xattr description";
":EA:kMDItemKeywords" = "keyword1,xattr";
":EA:kMDItemSubject" = "xattr subject";
":EA:kMDItemTitle" = "xattr title";
all from the extended attributes, while those derived from the PDF data were kMDItemAuthors = (Pages);
kMDItemCreator = Pages;
kMDItemDescription = "Subject in pdf";
kMDItemKeywords = ("keyword1 pdf");
kMDItemTitle = 0PDFtest1accessdefault;
Those attributes have already changed, with PDF Subject becoming kMDItemDescription, Creator being duplicated into kMDItemAuthors, and the loss of PDF Author.
Spotlight indexes
Attributes reported by mdls changed again to kMDItemAuthors = (Pages)
kMDItemComment = "xattr comment"
kMDItemCreator = "Pages"
kMDItemDescription = "Subject in pdf"
kMDItemKeywords = ("keyword1,xattr")
kMDItemSubject = "xattr subject"
kMDItemTitle = "0PDFtest1accessdefault"
This has lost the xattr attributes kMDItemAuthors, kMDItemCreator, kMDItemDescription and kMDItemTitle, and the PDF kMDItemKeywords. That list of 7 attributes should then be searchable using Spotlight.
The Finder
The final step was to discover which of those could be displayed in the Finder, either in its Get Info dialog, or in the Preview panel of a Finder window.
Only 5 of those attributes survived in the Finder, and were given as Authors: Pages
Content Creator: Pages
Description: Subject in pdf
Keywords: keyword1,xattr
Title: 0PDFtest1accessdefault
Of those, 4 are taken from the metadata in the PDF file, and only the Keywords were taken from its extended attribute. The attribute named as Authors contains a duplicate of what had originally been in the PDF Creator field, but neither of the PDF Author or xattr kMDItemAuthors fields. Those paths are traced in the diagram below.
Conclusions
Of the total of 12 distinct metadata attributes added in the PDF data and extended attributes, only 6 different items were indexed by Spotlight, and 4 were displayed in the Finder (allowing for the duplication of Authors and Content Creator).
Before relying on metadata for search and access in the Finder, it’s essential to verify that the attributes you intend using are successfully indexed and displayed. Choose the wrong attributes and you’ll never find anything.
As promised, here is a new version of my free Spotlight test utility SpotTest, which will now display full information from two Spotlight command tools listing metadata for files.
To open its new Drop Window, either click on the new tool at the right end of the toolbar in its main window, or use the command in its Window menu. Then drag and drop files you want to inspect onto that window.
The app then runs two command tools on those files: mdimport -t -d2 filename
to list all known metadata recognised by the mdimporter used, and mdls filename
to list all indexed metadata.
That mdimport command currently crashes on most images, so won’t return any information about their metadata until Apple fixes the bug.
If you want to save the output in this Drop Window, select the file(s) output in its display, copy and paste it into a text editor or similar. You don’t have to keep the app main window open, and could use the Drop Window alone as a convenient way to inspect metadata.
As you’ll see, the length of mdimport output is significantly greater than that from mdls. Although there are matching entries, there’s no simple way to align those matches. Of all the possible layouts, I found this linked arrangement, where both outputs scroll alongside one another, the most effective for comparing their contents. It also allows you to view output for several files in the single window.
SpotTest version 1.2 is now available from here: spottest12
from Downloads above, and from its Product Page.
Tomorrow I’ll be using it to trace the paths of metadata from a source file to their display in the Finder.
Keeping previous versions of a document you’re working on can be a great timesaver. Although I seldom restore files from backups, it’s far more frequent that I look back in a file’s versions to recover changed or removed contents. In most cases, those had changed so rapidly that even hourly backups didn’t capture them. Had those versions not been saved automatically by macOS, I would have wasted time trying to recreate them from scratch.
Although a great many apps now come with built-in version support, macOS doesn’t preserve those versions as well as it could. Duplicate a document with versions, save it as another document, or move it to a different volume, and all its versions are blown away. As I explained yesterday, versions don’t transfer in iCloud Drive either. This article explains how you can work around all those, how to ensure versions get backed up, and how you can create PDF documents with versions.
How versions work
Many apps now have built-in support to automatically save versions of documents you edit with them. The tell-tale sign is when the app has a Revert To command in its File menu, which opens the current document in a version browser resembling the Time Machine app.
Each time you save a document in those apps, the existing document is saved to a hidden and locked-down database at the root level of that volume, in the .DocumentRevisions-V100 folder. When you use the Revert To command to browse all versions, you can look back at all the versions of that document saved to that volume. You can then revert to an older version, or copy contents from an older version to the current one. As long as that document remains in its current volume, those versions will remain accessible. However, if that document is moved to a different volume, even on the same disk, those versions don’t move with it, but will be retained in the original volume until it’s deleted from there.
If you’ve been editing a document in your Documents folder and move it into iCloud Drive, which is actually a folder inside your Home Library folder, its versions will be preserved when you access it from the same Mac. However, other Macs connected to the same iCloud account won’t see those versions, as they remain on the original Mac and don’t get synced to iCloud Drive.
How to extend versions
Apps can’t access stored versions directly, but have to do that via macOS. The most compatible way for them to do that is to fetch previous versions from the volume version database. They can then save each version as a separate file, and reconstitute a document complete with its versions by adding those files back to a document’s versions in the volume’s database. That’s exactly what my free utilities Versatility and Revisionist do. Versatility is the simpler of the two to use here, while Revisionist adds more features including checking documents to see how many versions they already have stored in their volume database.
Archive versions
Simply drag and drop a file with saved versions onto Versatility’s window, and it will extract all its versions and save them as a series of numbered files in a folder. You can then copy or move that folder to any other location, where you can reconstitute the original document with all its versions intact.
Unarchive versions
Simply drag and drop a folder containing archived version files onto Versatility’s window, and it will reconstitute the original document with all its previous versions.
Versions in iCloud Drive
To preserve all versions in iCloud Drive and make them available to all that connect to that folder, move the document from its existing location in your Home folder, to the correct folder in iCloud Drive. Once it’s there:
Perform any editing necessary.
Archive. Drop the document onto Versatility’s window, and save that archive folder to the same location.
Move the original document elsewhere.
When you want to edit that document, particularly on another Mac, on that Mac:
Unarchive. Drop the archive folder onto Versatility’s window, and save the document to the same location.
Edit the document, saving whenever you want to create a new version.
When you’ve finished, save for the last time, and close the document.
Archive. Drop the document onto Versatility’s window, and save that archive folder to the same location.
Tidy up old archive folders and files.
That leaves the most recent archive folder, with composite versions written in the correct order, with the right timestamps, ready to be unarchived on the next Mac to edit that document. This may appear complicated, but once you have tried it out, it’s really a simple sequence to unarchive-edit-save-archive and hand over to the next editor.
Backing up versions
I’m not aware of any backup utility for macOS, including Time Machine, that backs up and preserves versions, although they are stored in local volume snapshots. However, all you have to do is archive the versions of important files into folders using Versatility, and back up those folders. When you want to restore the original document with all its versions, simply unarchive that folder using Versatility.
PDF versions
One of the lesser-known features of the PDF format are incremental updates, which can provide a primitive form of versioning within a single file. In practice it catches users out when they publish a PDF containing old edited content they thought had been removed.
Few PDF editors and viewers support the macOS version system, but Preview does, and Versatility can be used to assemble a PDF document with versions.
For my example, rather than edit a PDF, I generated a series from an archived RTF, converting each file into a consecutively numbered PDF, starting from 000.pdf and rising to 010.pdf. I then dropped that folder onto Versatility’s window and it unarchived those into a single PDF document with all those versions.
Key points
Archive a file with saved versions to a folder by dropping it onto Versatility’s window.
Unarchive a folder containing version files to a file with saved versions by dropping it onto Versatility’s window.
In iCloud Drive, unarchive-edit-save-archive to preserve versions for the next editor.
Wherever you want to preserve versions, archive the file using Versatility.