A few years ago I almost lost my main email addresses when their provider made changes. I had apparently missed a series of warning messages they had sent, as I had assumed those were just phishing attacks and deleted them without clicking on their links. Given that some days I get more than half a dozen potentially malicious emails claiming to come from that provider, I needed a better way to check the few that might be genuine. But how could I do that without putting myself at risk of a phishing attack?
What I needed was a way to be able to click on a link safe in the knowledge that my Mac would be completely isolated from any consequences. The solution is to use a locked-down virtual machine running in total isolation from the host. This is supported in a special version of my free virtualiser Viable, named ViableS, or you may be able to do something similar using a different virtualiser.
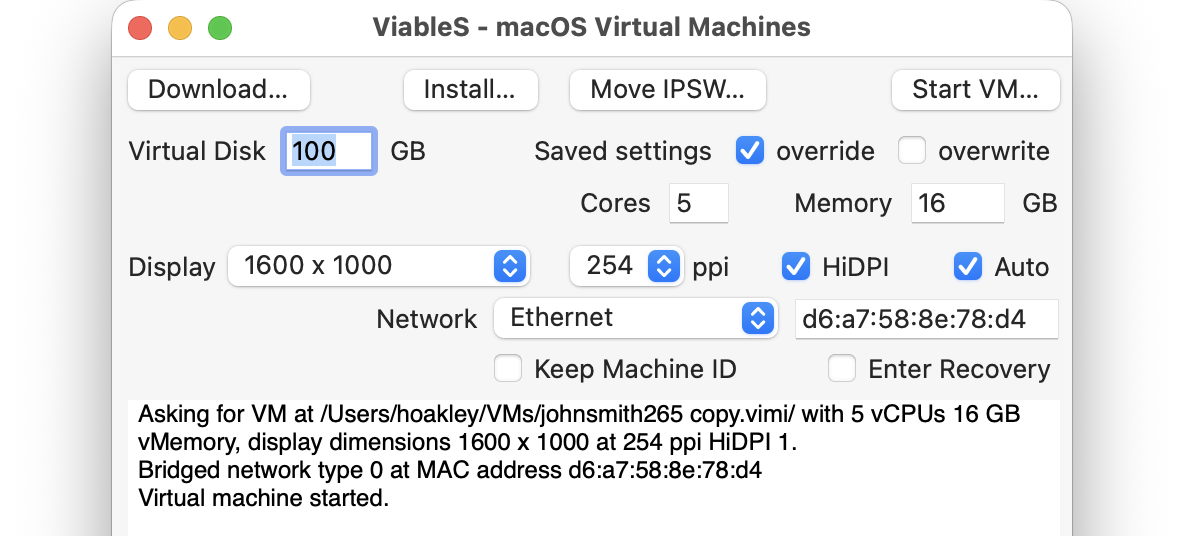
First download the IPSW image file for the latest release of macOS, either directly using Viable or from the links to Apple’s source given by Mr. Macintosh. Use Viable to build that into a fresh 100 GB VM with a single user named John Smith and a password of password. That way any stolen secrets will be effectively anonymous, and won’t even reveal your username. At this stage, run the VM with shared folders so you can transfer in any apps you might want, and the link to the suspicious site.
If you’re going to use your locked-down VM again, rather than having to create a fresh VM every time, you can now duplicate it using Command-D. The VM’s disk image is stored as a sparse file, and duplication should result in a clone anyway, greatly reducing the space taken on disk.
Save the suspicious message to a PDF or similarly accessible file, and transfer that into the VM now. Once that’s all set up and ready to go, shut that VM down.
From here on, only run that VM using ViableS, as it runs in a sandbox and has no support for sharing folders with the host, although it obviously needs a network connection to let you follow the link in the saved message. All my virtualisers including ViableS have been granted the restricted entitlement to use bridged networking, so they get their own IP address rather than sharing the host’s, and that should allow their networking to be operated securely.
The VM is now as well protected and isolated from the host Mac as possible. The virtualiser is running in a sandbox, it has no shared access to files between host and VM, and is using a bogus name and password. To remind you that VM is locked down, ViableS adds a red goblin emoji to the window’s title bar. Having double-checked each of those settings, open the saved message in the VM and click on the suspicious link.
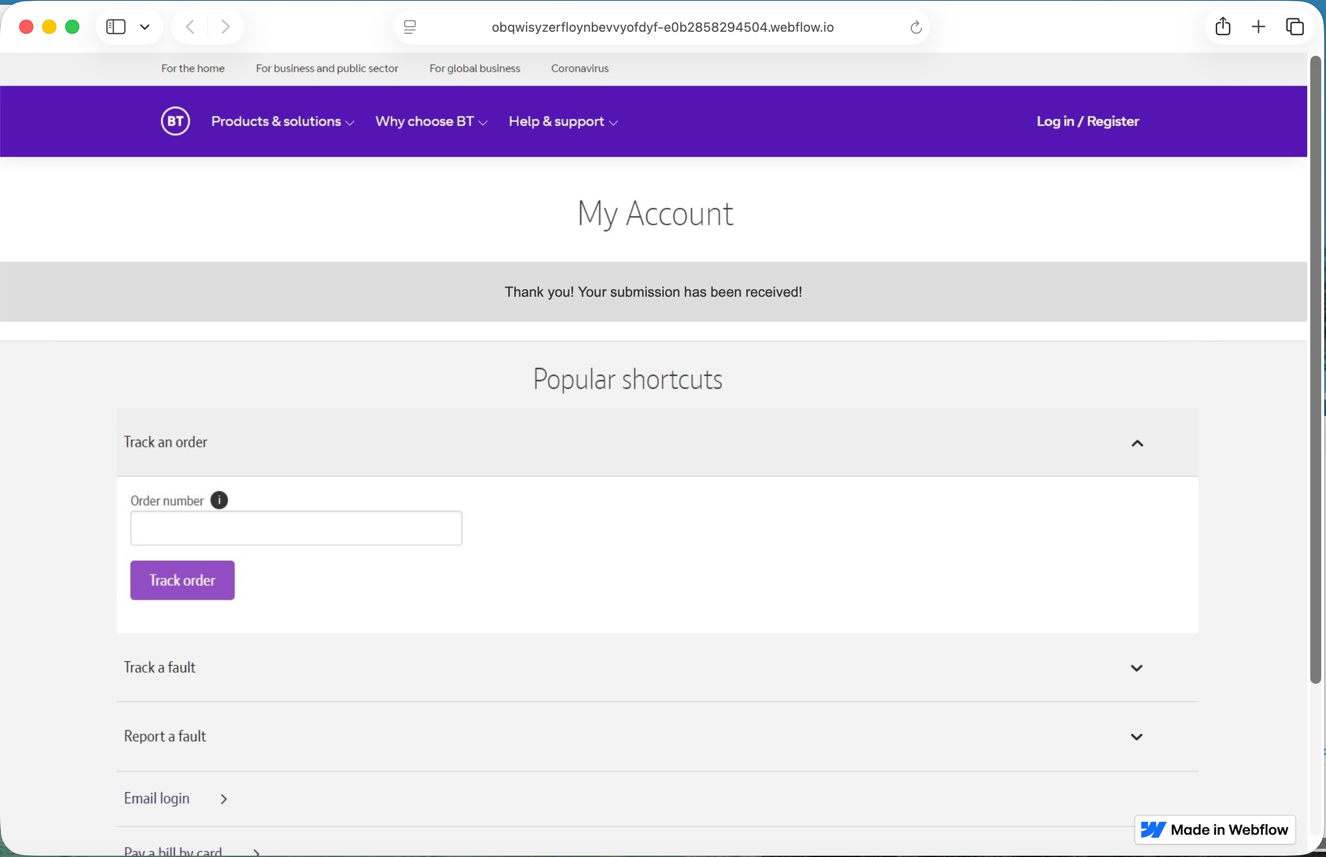
In this case, it took me to a fake version of the provider’s site built hastily using Webflow, where I was prompted to enter my email address and password, as if that would somehow ensure my email account wouldn’t be deleted. Take your time here and remember to enter your fake address and password, in my case j.smith@btconnect.com and password.
The rest of this fake proved non-functional. Whoever had set it up was clearly just harvesting user names and passwords, presumably to sell on for others to exploit in depth.
Other links might download a poisoned PDF, or take you to a ClickFix exploit.
Having reassured yourself that the email was phishing and not genuine, you can now shut down the locked-down VM and trash it. Virtualisation came to the rescue again.
In the past, getting audio reliably from virtualised macOS running on Apple silicon Macs has been something of a puzzle. Audio input seems to need some way to route it from the host to the guest, and I confess I’ve not had the patience yet to pursue that and any privacy settings required to permit it. But audio output has also been a bit hit-or-miss.
In code, this should all be straightforward by creating a VirtIO sound device configuration, with input and output streams, and assigning that to the audio devices of the VM. That should work from macOS 12 onwards. Although my virtualisers have been doing that ever since, the results haven’t been as consistent as I’d expect.
Most recently users have expressed interest in the audio processing and output capabilities of macOS VMs, so I have been assessing those, and discovered problems in synchronising audio with video.
Running all VMs on a Mac mini M4 Pro host with macOS 26.4.1, all versions of virtual macOS up to and including Tahoe 26.4.1 suffer syncing problems. Those affect all tested output in Ventura 13.7.6, but are slightly more limited in more recent guest macOS, but they still suffer marked delay in audio relative to video output. This isn’t a matter of milliseconds, but appears to be of the order of two seconds in GarageBand, at least.
So far my tests have included:
QuickLook previews of video,
QuickTime Player, playing video,
TV, playing video,
GarageBand, both in its instructional videos and synchronisation of audio output when playing tracks.
The only exception, where syncing is correct, occurs in limited circumstance in Sonoma 14.8.5 and later. To demonstrate this, select a video clip with synced audio and press the Space bar to play it in a preview. Then click on the button at the top right of that preview window to Open with QuickTime Player, and play the video there instead. That should result in correct lip-syncing, although opening the video clip directly in QuickTime Player doesn’t.
Apart from that, macOS VMs appear perfectly capable of normal audio output, at least when running on a Tahoe host.
If you have any experience of using video and/or audio in a macOS VM running on an Apple silicon Mac, I’d be interested to know whether you have encountered the same or other problems, please, in the hope that I can file a Feedback.
In my review of macOS virtualisation on Apple silicon, I quoted performance figures that were obtained some time ago, and didn’t consider minimum specifications for a usable VM. Given current interest in running a VM on a MacBook Neo, I thought it would be worth examining these afresh, from macOS Tahoe.
How fast?
Using the same host, a Mac mini M4 Pro, this time running macOS 26.4.1 on its 14 cores (10 P + 4 E) with 48 GB RAM and a 2 TB internal SSD, Geekbench 6.7.1 scores are slightly faster, on both the host and a guest given 5 virtual cores and 16 GB of virtual RAM:
The last of those gives single precision, half-precision and quantised test results, in that order.
Comparing CPU single-core figures, the VM runs effectively at 98% of the speed of the host. Comparison between the multi-core CPU results is difficult, as the host has more than twice the number of cores, although four of them are E cores. However, given that the host has twice the number of P cores alone, the VM appears to perform rather better than the host on this test.
GPU performance isn’t quite as good, with the VM delivering performance of 95% of that of the host, when the latter isn’t contending for the GPU as well.
The only real disappointment here is the virtual neural engine, which performs far slower than the host on half-precision and quantised tests. We might hope that macOS would process AI tasks using the CPU and GPU rather than the neural engine, when running in a VM.
How small?
With the arrival of the MacBook Neo, some wondered whether it would be able to run VMs. While there’s no doubt it should make a good host for Linux, I doubted whether it would be able to do anything useful with macOS in a VM. I was wrong.
To assess how small a macOS VM could be, I ran the same VM of macOS 26.4.1 on progressively smaller CPU core and memory allocations, using my virtualiser Viable. The VM’s display window was set to a standard 1600 x 1000, and I ran Safari through its paces and performed some lightweight everyday tasks, including Storage analysis in Settings.
Starting with 4 virtual cores and 8 GB vRAM, where the VM ran perfectly briskly with around 5 GB of memory used, I stepped down to 3 cores and 6 GB, to discover that memory usage fell to 3.9 GB and everything worked well. With just 2 cores and 4 GB of memory only 3.1 GB of that was used, and the VM continued to handle those lightweight tasks normally.
The only thing to be careful of when creating VMs on Macs with small internal SSDs is their size. Any macOS VM significantly smaller than 50 GB isn’t going to be able to update its macOS, and for comfort and safety you should aim for at least 60 GB. Fortunately, APFS comes to your aid here, as VMs are stored as sparse files, and a basic 100 GB VM should only require about 54 GB on disk. That would be better accommodated on the MacBook Neo with a 512 GB SSD.
Although not the place to try running your LLM, a macOS VM given only 2 virtual cores and 4 GB of memory, as should be feasible in a MacBook Neo, is thoroughly usable and capable of everyday tasks. Bring on the Neos!
Before Apple silicon Macs, you’ve been able to run different versions of macOS, Linux or Windows in third-party virtualisers, such as those from VMware and Parallels. Those products enable a virtual machine running a different operating system to be hosted in macOS, both running code for Intel processors. As part of its engineering preparations for the switch to using Arm processors, Apple decided that the only practical way to support virtualisation on its new Mac hardware was to build it into macOS. This was to enable older versions of macOS, and other operating systems including Linux and Windows for Arm, to run in virtual machines.
This is quite different from the more challenging problem of running operating systems for different processors, such as Intel, on Apple silicon Macs. Although Intel apps can have their code translated by Rosetta 2, that doesn’t work for operating systems, which need a software emulator, a feature left for the likes of UTM.
Hypervisor
The fundamental requirement for modern virtualisers hosted on a primary operating system like macOS is a hypervisor, which Apple added to macOS back in OS X 10.10, in 2014. Like Intel processors, Arm CPUs provide hardware support for hypervisors, so much of the remaining work to implement virtualisation in Apple silicon Macs centred on device support. That had been relatively straightforward for Intel Macs, as they mainly use PC hardware components, but that isn’t the case for Apple’s new Macs.
Virtio drivers
Every single hardware device in an Apple silicon chip is different from its equivalent (if there is one) in Intel Macs. Even if Apple had wanted to document them fully for external use, the engineering effort to match device support in Intel Macs would have been too costly for any third party. Thus starting with a hypervisor and expecting others to build a complete virtualiser wasn’t feasible, nor was it likely to result in the high performance that Apple and users expected. What Apple did instead was to build device support into macOS, in the form of Virtio drivers.
Virtio is a standard originally developed by Rusty Russell to provide an abstraction layer over I/O devices. When the guest operating system calls to open a file, for example, that’s passed to a front-end Virtio storage device para-driver, and from there into a Virtio back-end driver that interacts with the storage device. Although this might seem less efficient than traditional virtualisation, in practice it can prove far more efficient.
Its most obvious advantage is that creating a virtualiser app becomes a matter of configuring and opening the required Virtio devices, and letting the guest, Virtio and the host get on with it. And that’s essentially what an app does with Apple’s Virtualisation framework.
Apple’s choice of Virtio was undoubtedly swayed by the fact that Linux already has good Virtio support, but at the time macOS had none. In the couple of years preceding the release of Monterey, Apple’s engineers thus set about building Virtio support into macOS, which explains why macOS lightweight virtualisation is only available in Monterey and later hosts, and when running Monterey and later guests. As implemented in macOS (both as guest and host), there are also extensions to support keyboard and pointing devices, a shared clipboard, and high-performance graphics with Metal and GPU support.
In the Virtio model, providing such support is the task of the operating system, not the virtualiser. For vendors like VMware and Parallels this reduces not only the cost of development, but also the commercial value of their products; there’s no scope for either of them to engineer better or faster graphics support, as that’s determined by features provided in both guest and host operating systems, via Virtio or an equivalent. That puts Apple in charge of what hardware and features are supported by virtualisation on Apple silicon.
Performance
On the other hand, it guarantees optimum performance in VMs. Not only is their CPU and GPU code run direct on the hardware, just as in the host, but Virtio devices deliver almost as good performance as on the host. Comparable Geekbench 6.3.0 benchmarks when running macOS Monterey as both guest and host are:
CPU single core VM 3,643, host 3,892
CPU multi-core VM 12,454, host 22,706 (limited by the number of cores available)
GPU Metal VM 102,282, host 110,960, with the VM as an Apple Paravirtual device.
Subsequent versions of macOS have improved on those. It’s worth noting that virtual cores allocated to a VM are primarily Performance cores, so threads running in the VM that would normally be run on Efficiency cores normally run significantly faster than they would do in the host.
Initially, performance of VM primary storage in its disk image wasn’t good, but more recently this has improved substantially, even with FileVault enabled in the VM.
Rosetta 2
Although it can’t be used to translate a guest operating system, Rosetta 2 can still be used inside a macOS VM to translate and run 64-bit Intel code in apps that are compatible with macOS 10.15 Catalina, but is subject to the same limitations as any version of macOS on Apple silicon, in that it can’t handle older or 32-bit apps. This will become most useful when Apple drops full support for Rosetta in macOS 28. VMs with older versions of macOS will still be able to translate and run compatible 64-bit Intel code, even though the host won’t be able to.
Major limitations
Support for iCloud and iCloud Drive access wasn’t made available in VMs until Sequoia, and now requires that both the guest and host must be running macOS 15.0 or later. As VMs that support these features are structurally different from earlier VMs, this also means those VMs that have been upgraded from an earlier macOS still can’t support iCloud or iCloud Drive.
The greatest remaining limitation in virtualising macOS on Apple silicon is its inability to run many apps from the App Store. Although some do run without problems, any that check their App Store credentials will fail, as a VM can’t be signed into the App Store. This appears to be the result of Apple’s authorisation restrictions, and unless Apple rethinks and reengineers its store policies, it looks unlikely to change.
Some lesser features remain problems. For example, network connections from a VM are always treated as being Ethernet, and there’s no support for them as Wi-Fi, even though they can connect using the host’s Wi-Fi. Audio also remains odd, and appears to be only partially supported. Although Sequoia has enabled support for storage devices, earlier macOS was confined to the VM’s disk image and shared folders.
Many aren’t aware that Apple’s macOS licences do cover its use in VMs, in Section 2B(iii), where there’s a limit of two macOS VMs that can be running on a Mac at any time. This is enforced by macOS, and trying to launch a third will be blocked. For the record, the licence also limits the purposes of virtualisation to “(a) software development; (b) testing during software development; (c) using macOS Server; or (d) personal, non-commercial use.” It’s worth noting that Apple discontinued macOS Server on 21 April 2022, and it’s unsupported for any macOS more recent than Monterey.
Usage
Some examples of what you can use a macOS VM for:
run apps compatible with Sonoma but not Sequoia, on M4 and M5 Macs that can’t run Sonoma;
run apps in a custom environment, e.g. with different region and language settings;
check and access potentially malicious documents or apps in a locked-down environment;
test compatibility with multiple versions and localisations of macOS;
work with highly sensitive data, in an isolated environment;
access a different iCloud account simultaneously;
run beta-test versions of macOS 27.
Summary
macOS VMs on Apple silicon can:
run Monterey and later on any model, but not Big Sur or Intel macOS;
run most betas of the next release of macOS;
run Intel apps using Rosetta 2;
deliver near-normal CPU and GPU performance, and support FileVault;
access iCloud and iCloud Drive only when both host and guest are running Sequoia or later;
In most respects, lightweight virtualisation of macOS on Apple silicon delivers almost the same performance as running code on the host. That’s the result of having direct access to CPU cores and the GPU. However, earlier implementations in Monterey and Ventura performed poorly when accessing the Data volume in the Virtual Machine, with read/write speeds measured at 4.4/0.7 and 5.4/0.7 GB/s respectively, without FileVault or other encryption. In macOS 26.3.1 both RAW and ASIF encrypted disk images show disappointing performance particularly when writing to them. This article therefore re-evaluates VM disk performance to see if that extends to VMs.
Methods
Tests were performed on two freshly made 100 GB VMs in RAW format using the macOS 26.4 IPSW, running on a Mac mini M4 Pro in macOS 26.4. VMs were given 5 CPU cores and 16 GB memory, didn’t connect to an Apple Account, and were built and run in Viable and Vimy, both of which use the standard macOS API for virtualisation.
Performance was measured using Stibium’s ‘Gold Standard’ with 5 rather than 10 test sets, reading and writing a total of 26 GB in 80 files ranging in size between 2 MB and 2 GB. Following an initial write test, the VM was restarted before performing the read test. The first VM was configured with FileVault enabled, and the second with it disabled. In addition to those, standard read/write performance was measured as before on a 100 GB RAW disk image on the host, and on a 100 GB ASIF image, both being encrypted using 256-bit AES.
Results
Measured read/write speeds were:
Native SSD, FileVault on – 6.57/7.66 GB/s
VM, FileVault off – 6.62/5.91 GB/s
VM, FileVault on – 4.66/3.11 GB/s
RAW disk image, 256-bit AES – 2.82/1.59 GB/s
ASIF disk image, 256-bit AES – 2.85/1.76 GB/s.
With FileVault disabled, performance in the VM was surprisingly close to that of the host’s internal SSD, with a small reduction in write speed from 7.66 to 5.91 GB/s. That’s a huge improvement on previous results, with writes being almost ten times faster.
Enabling FileVault did reduce performance significantly, particularly write speed which fell to about half. However, those are still good enough to be acceptable for most purposes.
No significant change was seen in host disk image performance from those measured in 26.3.1, though, which remains substantially slower than the VM with FileVault enabled.
Conclusions
VMs are vulnerable if they don’t have FileVault enabled. Without encryption, sensitive contents would be relatively easy to access if the VM were to fall into the hands of an attacker. Enabling FileVault is thus potentially more important for a VM.
Thankfully, with such great improvements in VM disk performance, those hosted on an Apple silicon Mac’s internal SSD are unlikely to be slowed much by their disk performance.
This makes it the more puzzling that encrypted RAW and ASIF disk images should perform so poorly, and it’s disappointing to see that continues in macOS 26.4. Over the same period that VM disk performance has increased so impressively, that of disk images has headed in the opposite direction.
VMs and BSIs
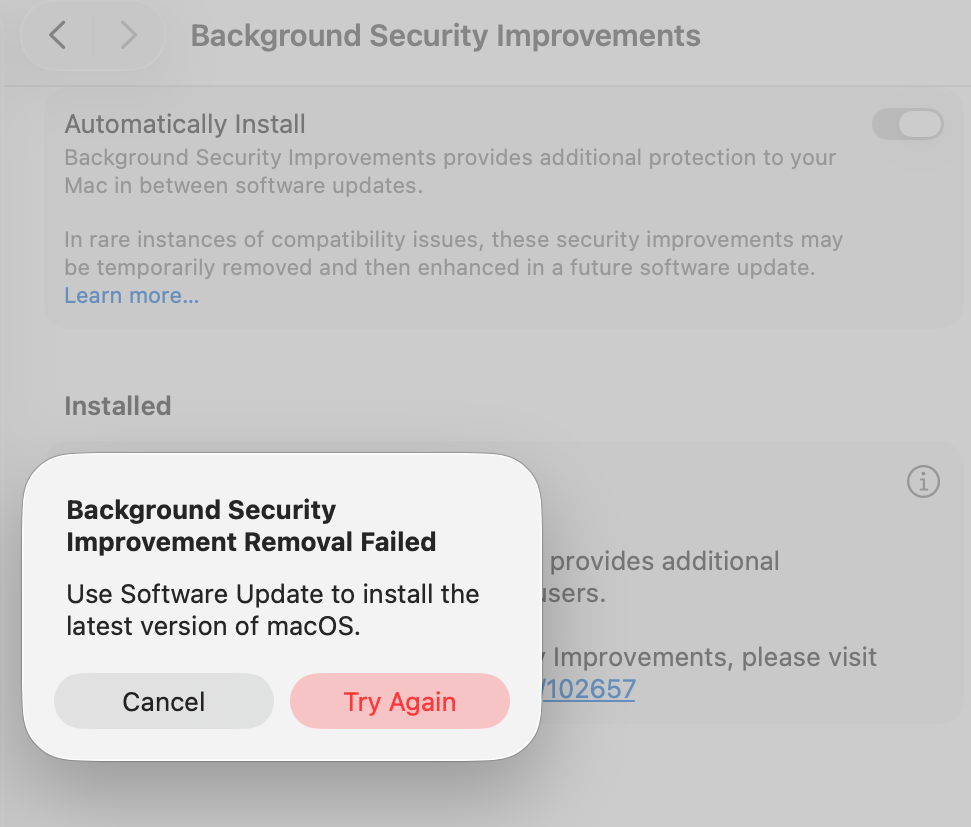
If you tried installing the recent Background Security Improvement (BSI) in a macOS 26.3.1 VM, you were probably disappointed. In this respect, the VM didn’t work as expected. I was unable to find the BSI in its section in Privacy & Security settings. What did help was downloading it using SilentKnight, although that can’t install BSIs successfully. Instead, I restarted the VM and Privacy & Security offered to install the BSI at last.
Once installed, Privacy & Security offered to remove the BSI, but failed to do so, with SecurityImprovementsExtension reporting: Rollback failed: Error Domain=SUOSUErrorDomain Code=103 "Unable to remove Background Security Improvement" UserInfo={NSLocalizedDescription=Unable to remove Background Security Improvement, NSLocalizedRecoverySuggestion=Use Software Update to install the latest version of macOS.}
For the time being BSIs appear dysfunctional in VMs.