Innovative systems to keep ships from hitting North Atlantic right whales are coming into use. The Trump administration is weighing whether they can replace a bedrock protection.
The National Science Foundation lifted a hold on some grants for Harvard and other universities this week after inquiries from media outlets, including The New York Times.
In the foothills of the Ecuadorean Amazon, a 101-year-old farmer and a young scientist turned an amateur collection into a scientific survey of one of the most diverse snake habitats on Earth.
Manuel Genaro Peñafiel Flores with some of his collection of snakes at home in Mera, Ecuador.
The types of Ebola and hantavirus worrying officials are very different from the species identified decades ago, raising new questions about how to respond.
Document versioning built into macOS is an unfinished masterpiece that promises much but never seems to have been developed as fully as it deserved. This article looks at how macOS can’t search saved versions, and how you can work around that.
In essence versioning is simple: apps that support it, and a great many do now, save a series of versions to the volume’s hidden and sealed database in the .DocummentRevisions-V100 folder at its top level. To access those versions you’d normally use the Time-Machine-like browser provided by the Browse All Versions command in the Revert To item in the app’s File menu. Whenever the app saves a document, the open document becomes the current version, and its saved state becomes the previous version. This works for manual saves, and for any automatic timed saves the app might make.
Unlike all other versioning systems, this is all handled automatically by macOS, and neither you the user nor the app developer has to make any effort to create or manage those versions. It really does come for free.
Unfortunately, all those saved versions in the version database fall outside the scope of Spotlight indexing, and Spotlight search can’t look inside any of the old versions saved in a volume’s version database. Surprisingly, the version browser doesn’t offer any search facilities either, as that’s presumably another feature intended for a future that never came.
This is a serious omission, as I access old versions not infrequently, and being able to search for them saves me laborious browsing. It might be a few hours or days after I removed a section from a document, that I realise I need it back. By that time it may well have vanished from Time Machine’s hourly backups, or the section may have been too transient to be retained there. But the chances are that the missing content will be safe inside a saved version, if only I can find it.
Pulling tricks with the hidden .DocumentRevisions-V100 folder isn’t a good approach to solve this. It’s clear from its contents that previous versions aren’t saved as discrete files, but it uses a chunking system to store what has changed between versions, for economy in space. Access supported by macOS is strictly limited to looking up saved versions for any given file in that volume, and there’s no way to search their contents like that.
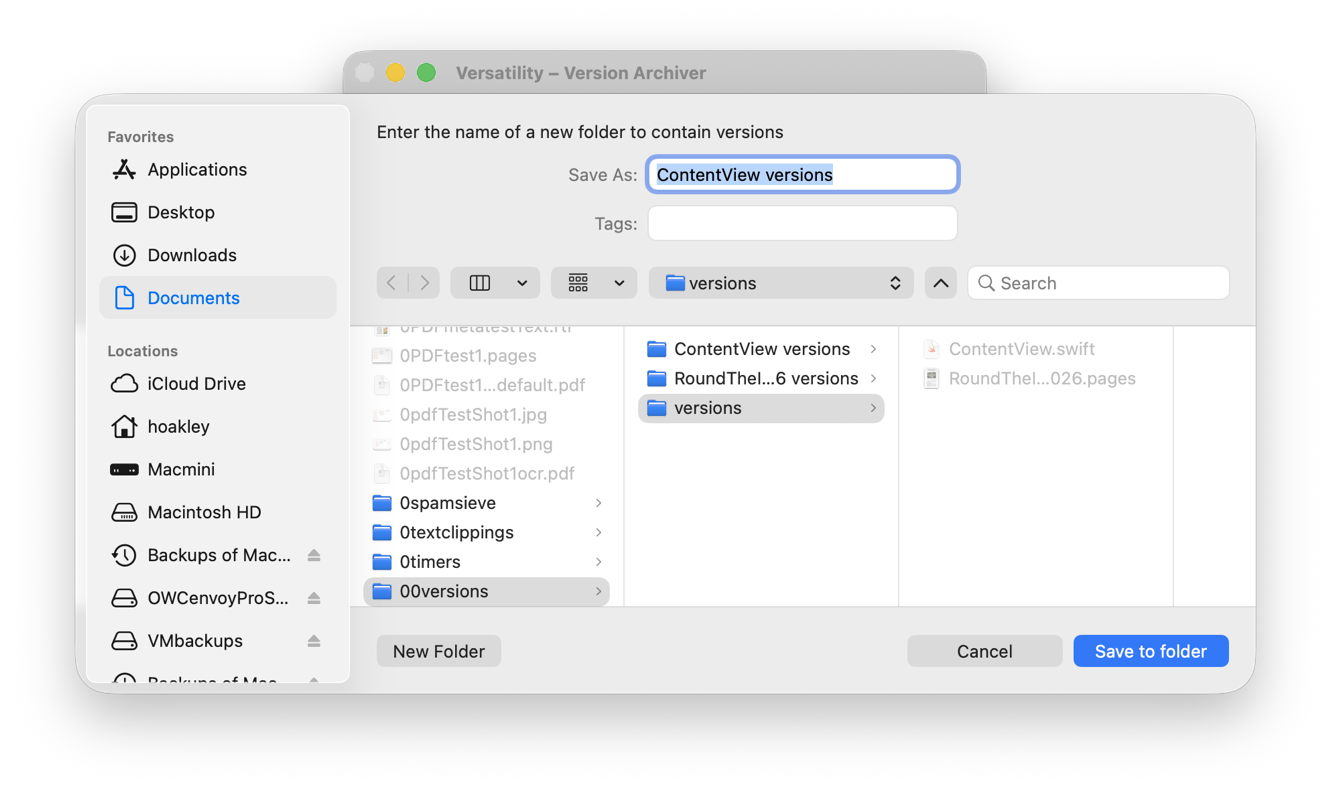
One way around this is to save each document version as a separate file, allow Spotlight to extract their contents and add those to its indexes for that volume, then to search those files. This is quick and simple using my free utility Versatility. To demonstrate this, I picked two documents with a substantial number of versions:
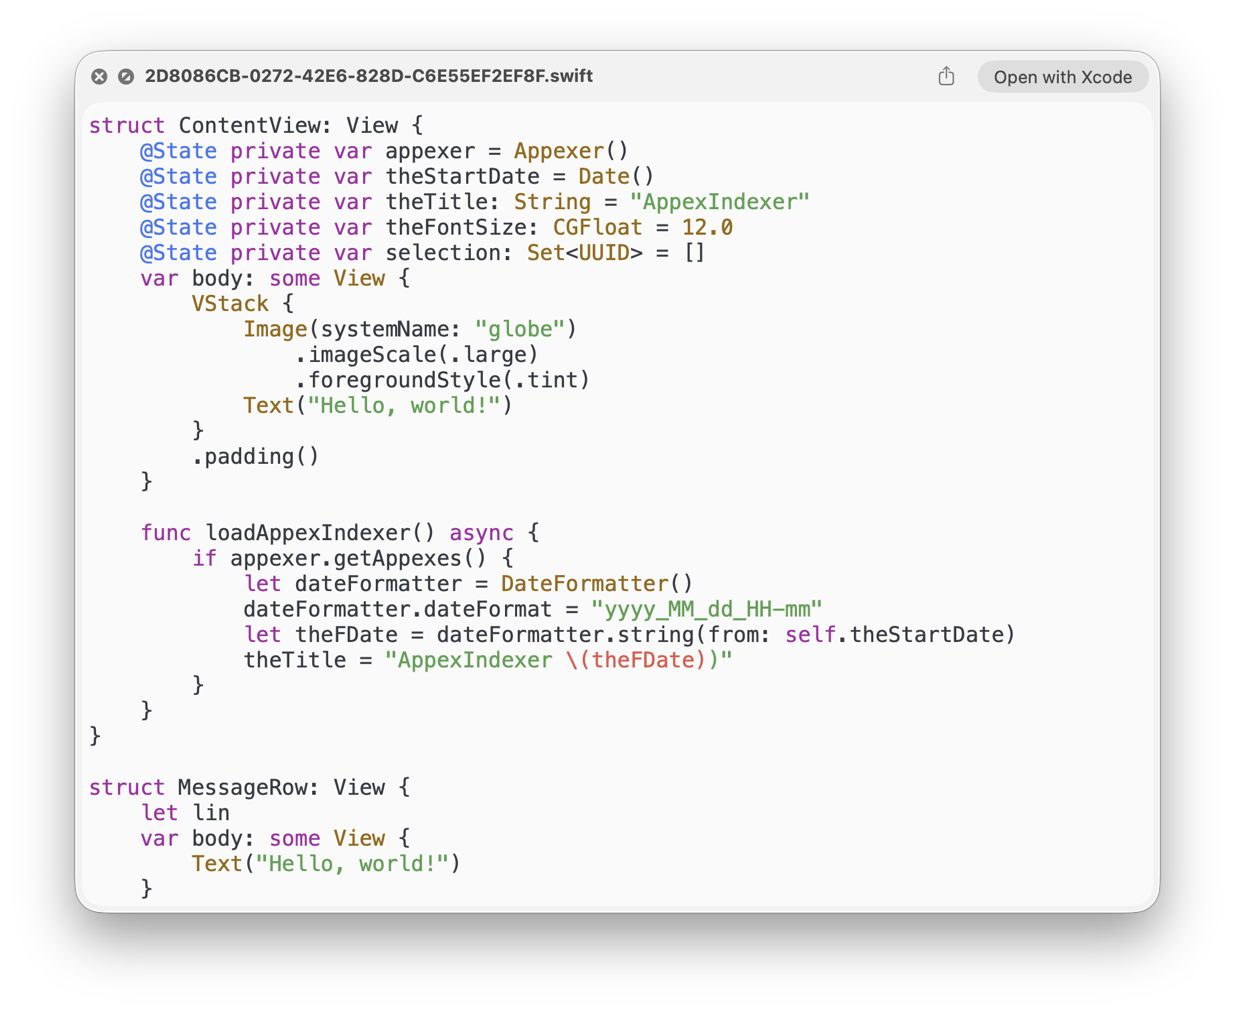
a Swift source code file edited in Xcode with 112 versions, with just one of them containing a function named loadAppexIndexer;
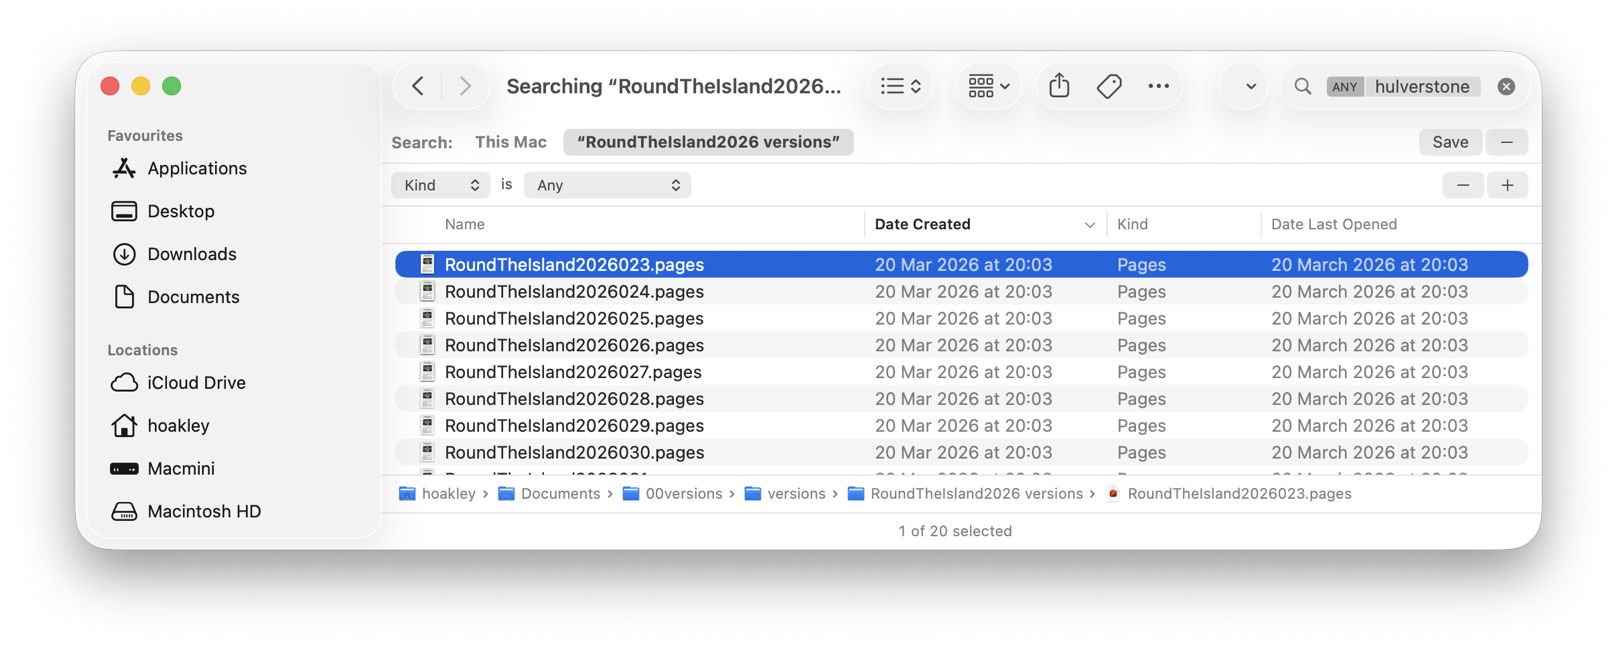
a large Pages document with a mere 49 versions, where I was looking for the first containing the placename Hulverstone.
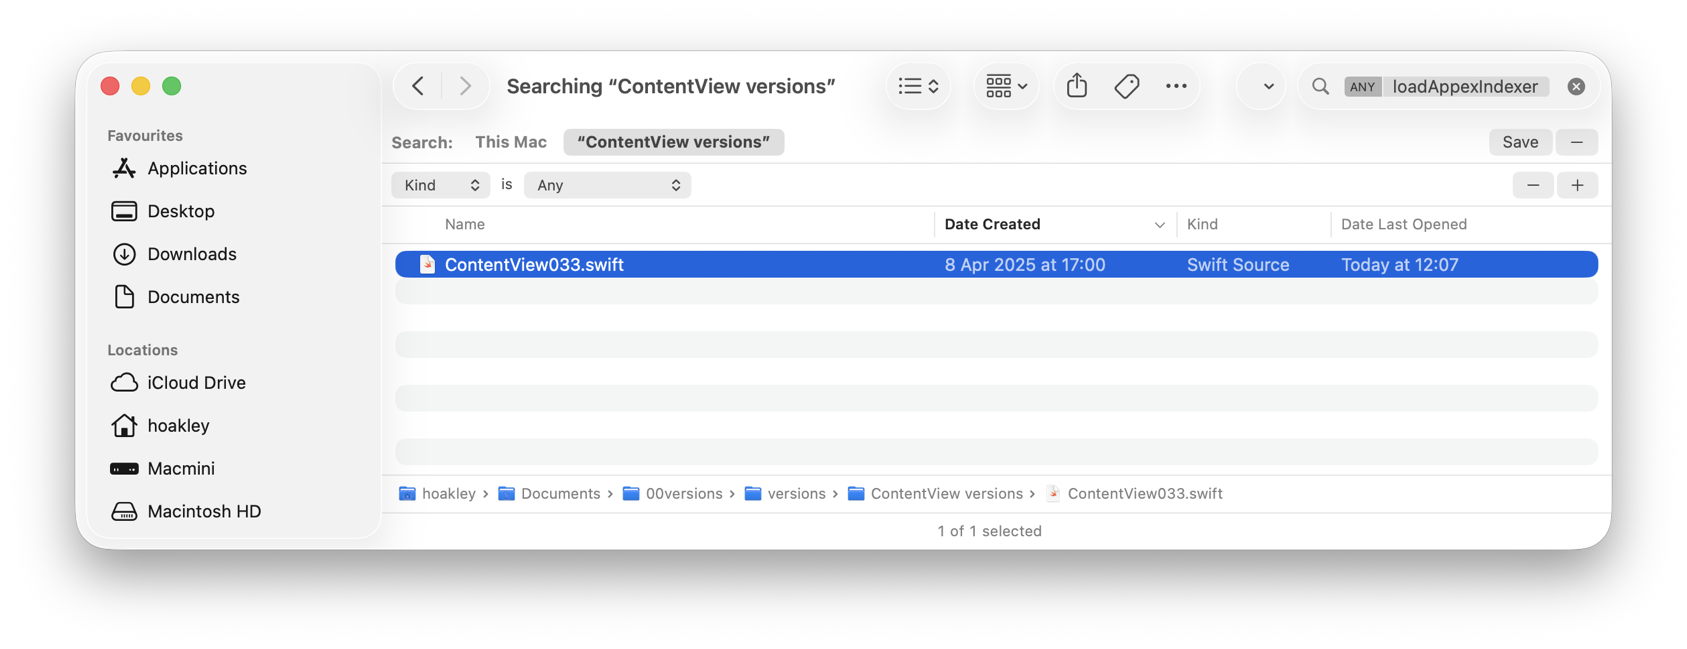
In both cases I started by dropping the current document onto Veratility’s window, and saving individual archived versions to a new folder alongside that original document. I then opened that archive folder in a Finder window, and converted that to a Find window with that command in the Finder’s File menu. I entered my term, loadAppexIndexer or Hulverstone, into the search box, and changed the search scope from This Mac to the open archive folder.
In the Swift code, Spotlight immediately found the term in the file numbered 033 by Versatility, and all versions from the file numbered 023 in the case of the Pages document.
With that Finder window still open I was then able to locate those versions in the original documents:
Using my free Revisionist, the version numbers start from 1, whereas Versatility starts them at 000. So I added 1 to the number in the filename, and previewed that version in Revisionist. In both cases that’s sufficient to copy content that had gone missing from the current version of the document, for example.
Using the version browser in XCode or Pages, I looked back for that version’s datestamp, given in the Finder window as its Date Created, and brought that old version up in the browser.
Once happy I had done what I wanted with that old version, I then trashed the archive folder created by Versatility.
To summarise the sequence:
drop the versioned document on Versatility’s window;
save the archive folder alongside the original document;
open a Finder Find window on that archive folder;
using the search box and find bars, locate the version(s) in the archive folder;
to open the versioned document in Revisionist, add 1 to its file version number;
to open in an app version browser, select the date of that version as shown in the Finder window;
For the last 15 years or so, local Time Machine backup storage has been required to be included in the volumes that are indexed by Spotlight. We also know too well that they have been indexed, as it has been common for their indexing to take longer than the backup they have just made. Some time around the release of Sonoma, those indexing sessions became less noticeable, but unless you tried to search your backups, you probably didn’t notice any change. For, as far as I can tell, Spotlight doesn’t currently appear able to search Time Machine backups reliably, at least not in Sequoia or Tahoe, although this may not be universal.
For most purposes, the ability to search backups is essential. If you have a series of more than 100 backups over the last couple of years, finding a lost file by inspecting each backup individually is a frustrating waste of time, and requires you to know where to look in each. Even if full content and metadata searching aren’t feasible, the ability to search on file attributes such as name, extension and datestamps is surely fundamental.
As we’ve come to expect, Apple’s documentation isn’t in the least bit helpful. What is surprising is that the instructions given are almost identical for every version of macOS from Mojave to Tahoe.
That page opens with a bold promise: “If you use Time Machine to back up your Mac, you can use Spotlight to initiate a search of Time Machine to recover lost or deleted items.”
That’s just what I’m looking for, so how do I do that? “On your Mac, open a Finder window, then type a search word or phrase in the search field in the upper-right corner. Refine the results by specifying search criteria using the search bar.”
Everything’s good so far, but as the document I’m looking isn’t there, how do I search for it in my backups? “Click the Time Machine icon in the menu bar, then choose ‘Browse Time Machine backups’.”
That opens the Time Machine app, blows away my search criteria, and lists the volumes including Macintosh HD and my backup storage, as of now. So how do I search for the file that I accidentally deleted a couple of hours ago?
“Use the arrows and timeline to browse the Time Machine backups.” But that’s looking for the missing file, not searching those backups for it.
If I now step back through my backups to reach one that I know contains that file, I can restore it. But if I type anything into the search field, nothing is found. If I change the scope of the search to that backup, the window title changes but its contents remain blank, and there isn’t even a busy spinner to indicate a search is in progress.
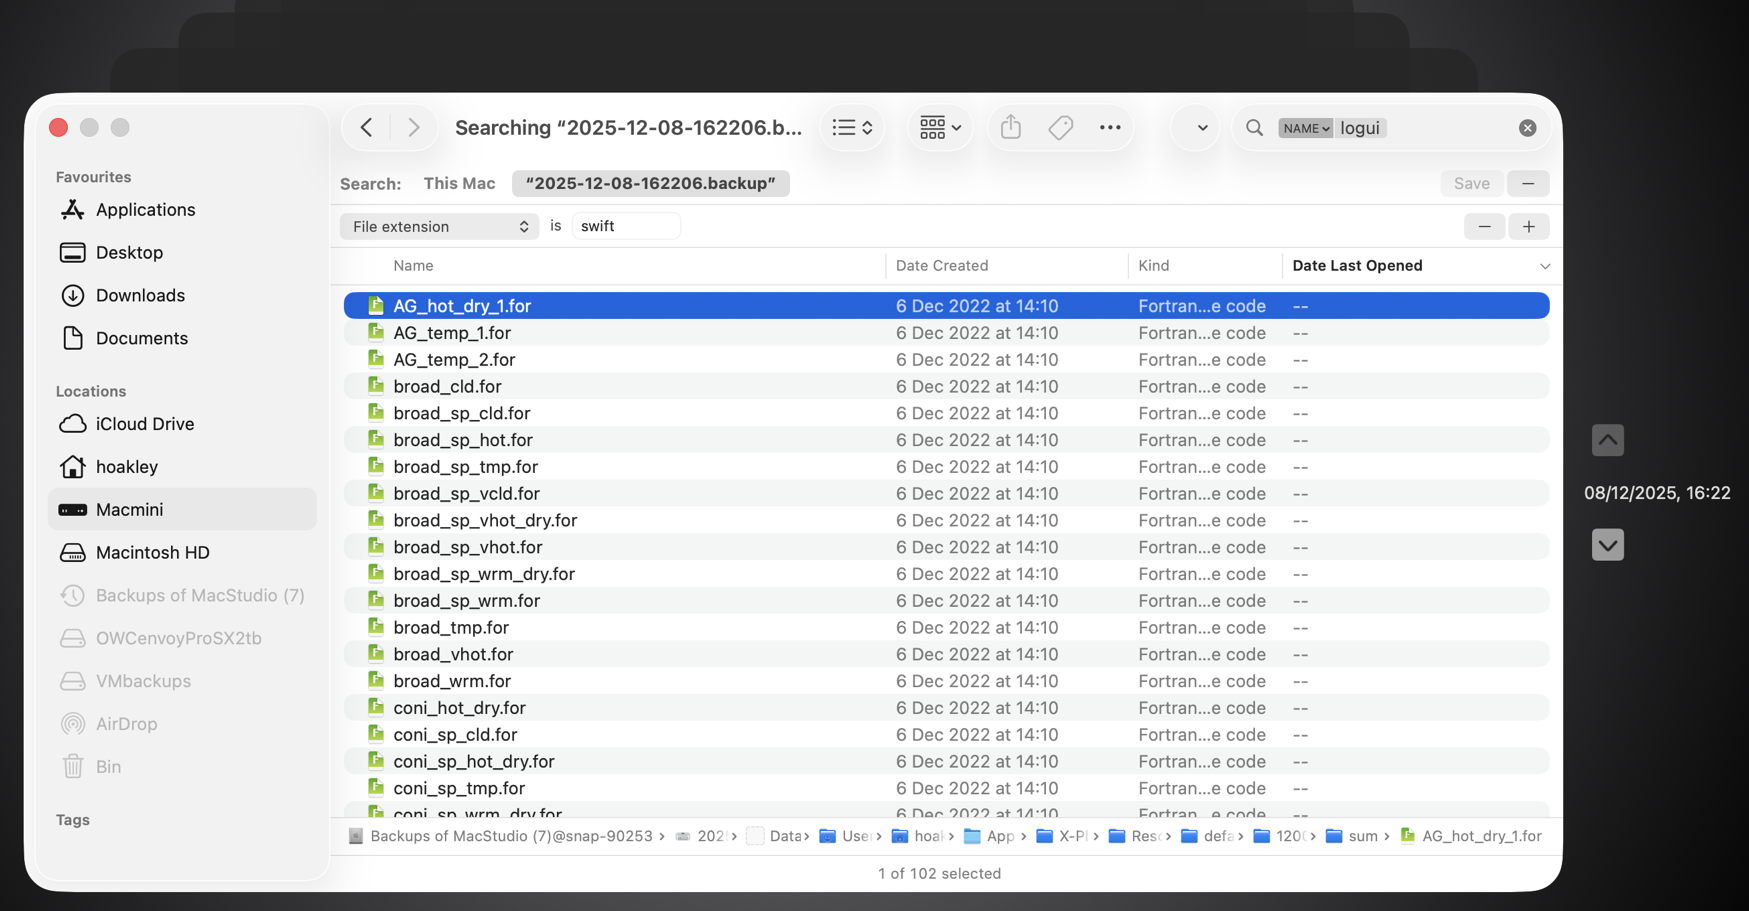
With a little fiddling, I managed to get some results for other searches. Here’s an example where I was looking for files whose name contains logui with the extension swift.
Here I ended up with 102 hits, all of them old Fortran source files, none of which meets either of those criteria.
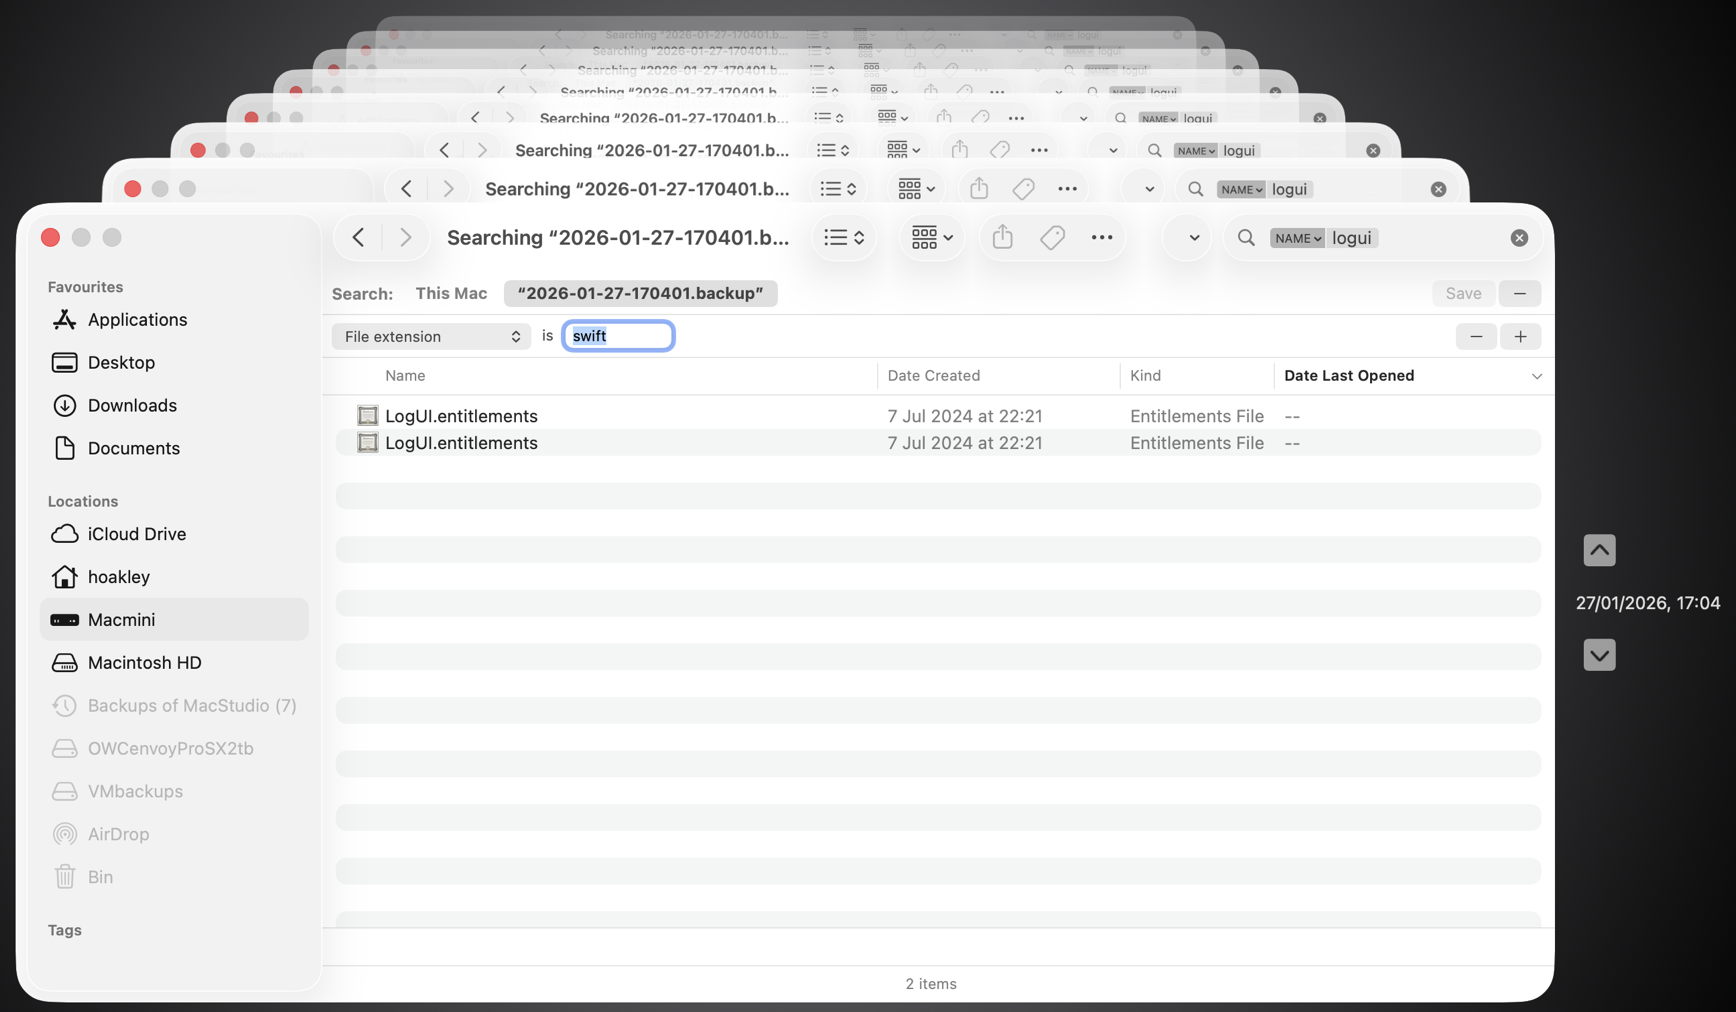
This time the two items found had appropriate names, but a completely different extension.
Undeterred, I left my Mac for over 24 hours, and tried again, only to discover the hourly backup containing my missing file had already been deleted. However, searching for files whose name contains logui with the extension swift proved just as futile. As I can’t disable Spotlight indexing on that volume without macOS telling me that it’s required to be indexed by Spotlight, neither can I force that volume to be reindexed.
There are third-party alternatives, including BackupLoupe and Find Any File (FAF). The former tellingly needs to create and maintain its own indexes, and FAF appears to work fairly reliably but takes an age to search each backup in turn.
In case this was a problem with one set of backups, I have now created a new backup set that suffers identical problems, and have reproduced this in both Sequoia and Tahoe, running on vastly different hardware. My conclusion is that using Spotlight to search Time Machine backups no longer works, and the instructions given by Apple are also broken. If you’ve managed to get reliable search working across your Time Machine backups without resorting to a third-party product, I’d be very grateful if you could explain how you did it.
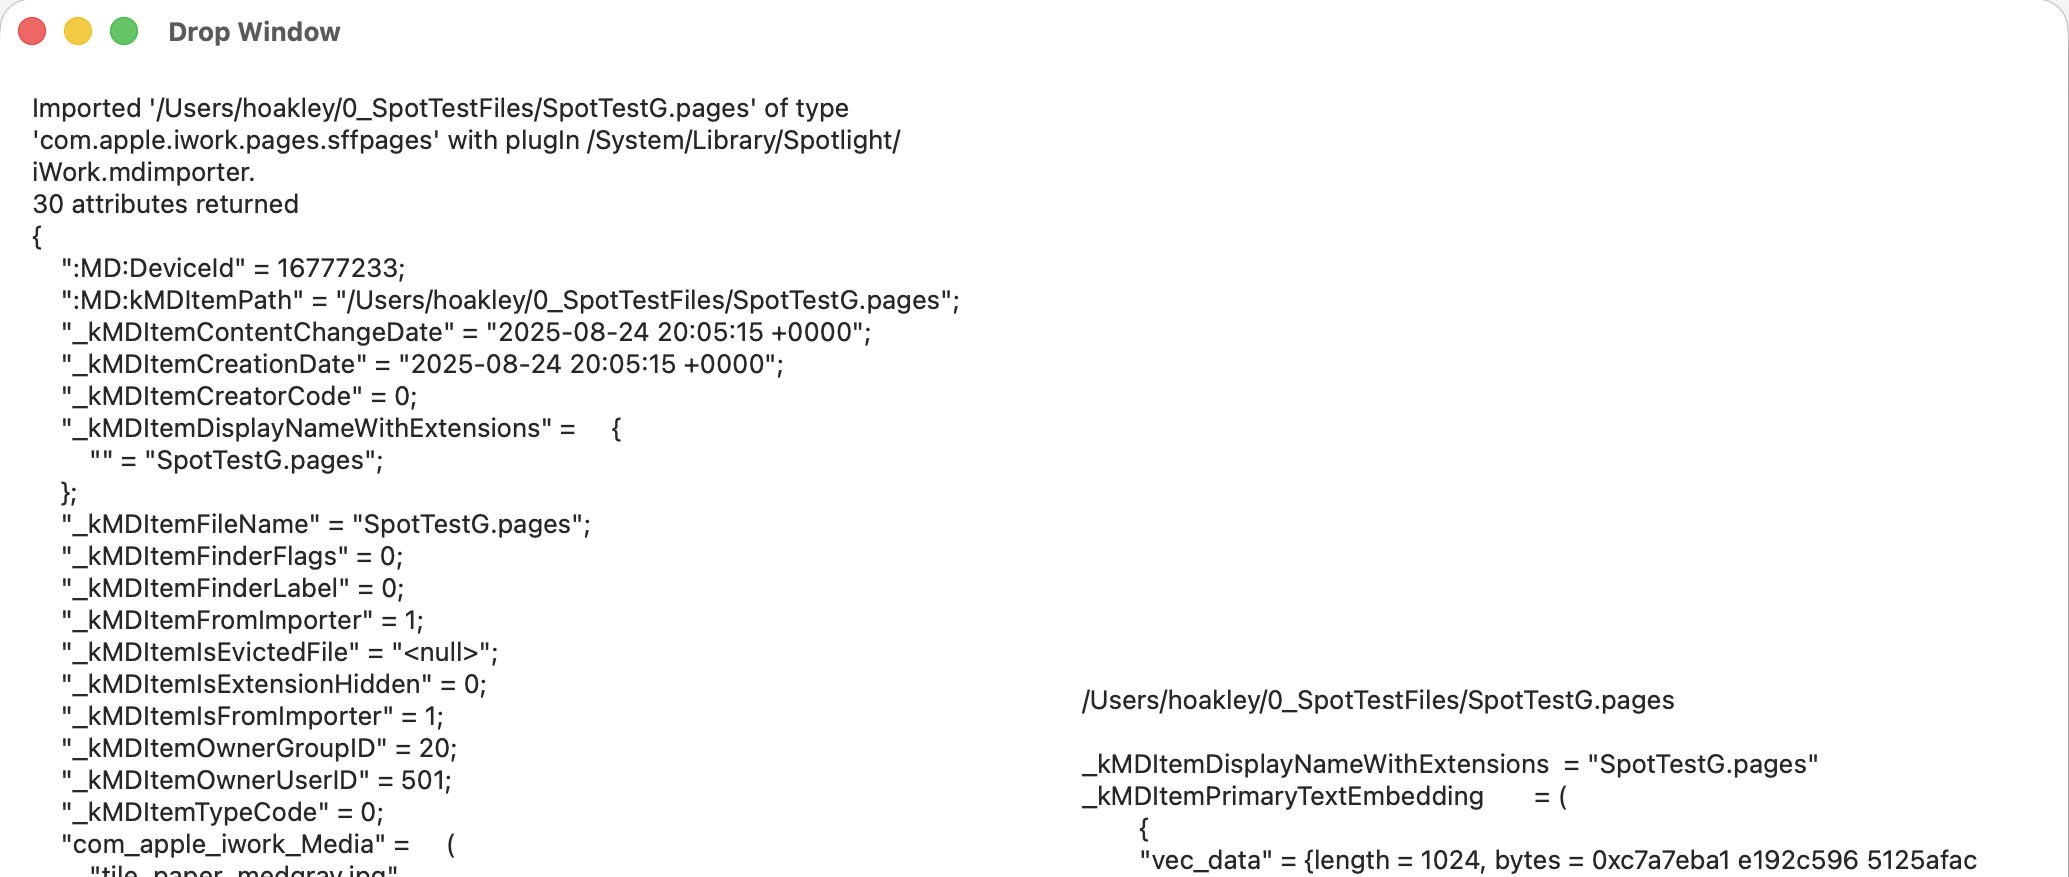
As promised, here is a new version of my free Spotlight test utility SpotTest, which will now display full information from two Spotlight command tools listing metadata for files.
To open its new Drop Window, either click on the new tool at the right end of the toolbar in its main window, or use the command in its Window menu. Then drag and drop files you want to inspect onto that window.
The app then runs two command tools on those files: mdimport -t -d2 filename
to list all known metadata recognised by the mdimporter used, and mdls filename
to list all indexed metadata.
That mdimport command currently crashes on most images, so won’t return any information about their metadata until Apple fixes the bug.
If you want to save the output in this Drop Window, select the file(s) output in its display, copy and paste it into a text editor or similar. You don’t have to keep the app main window open, and could use the Drop Window alone as a convenient way to inspect metadata.
As you’ll see, the length of mdimport output is significantly greater than that from mdls. Although there are matching entries, there’s no simple way to align those matches. Of all the possible layouts, I found this linked arrangement, where both outputs scroll alongside one another, the most effective for comparing their contents. It also allows you to view output for several files in the single window.
SpotTest version 1.2 is now available from here: spottest12
from Downloads above, and from its Product Page.
Tomorrow I’ll be using it to trace the paths of metadata from a source file to their display in the Finder.
Following yesterday’s surprise about syncing of extended attributes via iCloud Drive, this article summarises what does and does not get synced in iCloud Drive in macOS Tahoe.
Attributes and data
File attributes are generally synced correctly and retained locally through eviction and download of each file. As those are saved in the inode data that is stored locally even when a file is dataless, they should remain reliable.
File data, complete with any embedded metadata such as EXIF fields and the optional Info section in RTF files, is retained and kept in sync with the copy in iCloud Drive while that file is kept downloaded. That is the only option when Optimise Mac Storage is turned off, and iCloud Drive is operating in replicated mode. When in nonreplicated mode, data is removed if the file is evicted from local storage, and synced down from iCloud Drive when it’s downloaded or materialised.
Extended attributes
As demonstrated in yesterday’s article, only the following xattrs are expected to sync down from iCloud Drive:
com.apple.metadata:_kMDItemUserTags (Finder Tag)
com.apple.lastuseddate#PS
com.apple.quarantine
com.apple.TextEncoding
other xattrs explicitly assigned the S flag, with #S appended to their name.
Other xattrs including those with names starting with com.apple.metadata:kMDItem aren’t likely to sync down from iCloud Drive without explicit use of the S flag.
Versions
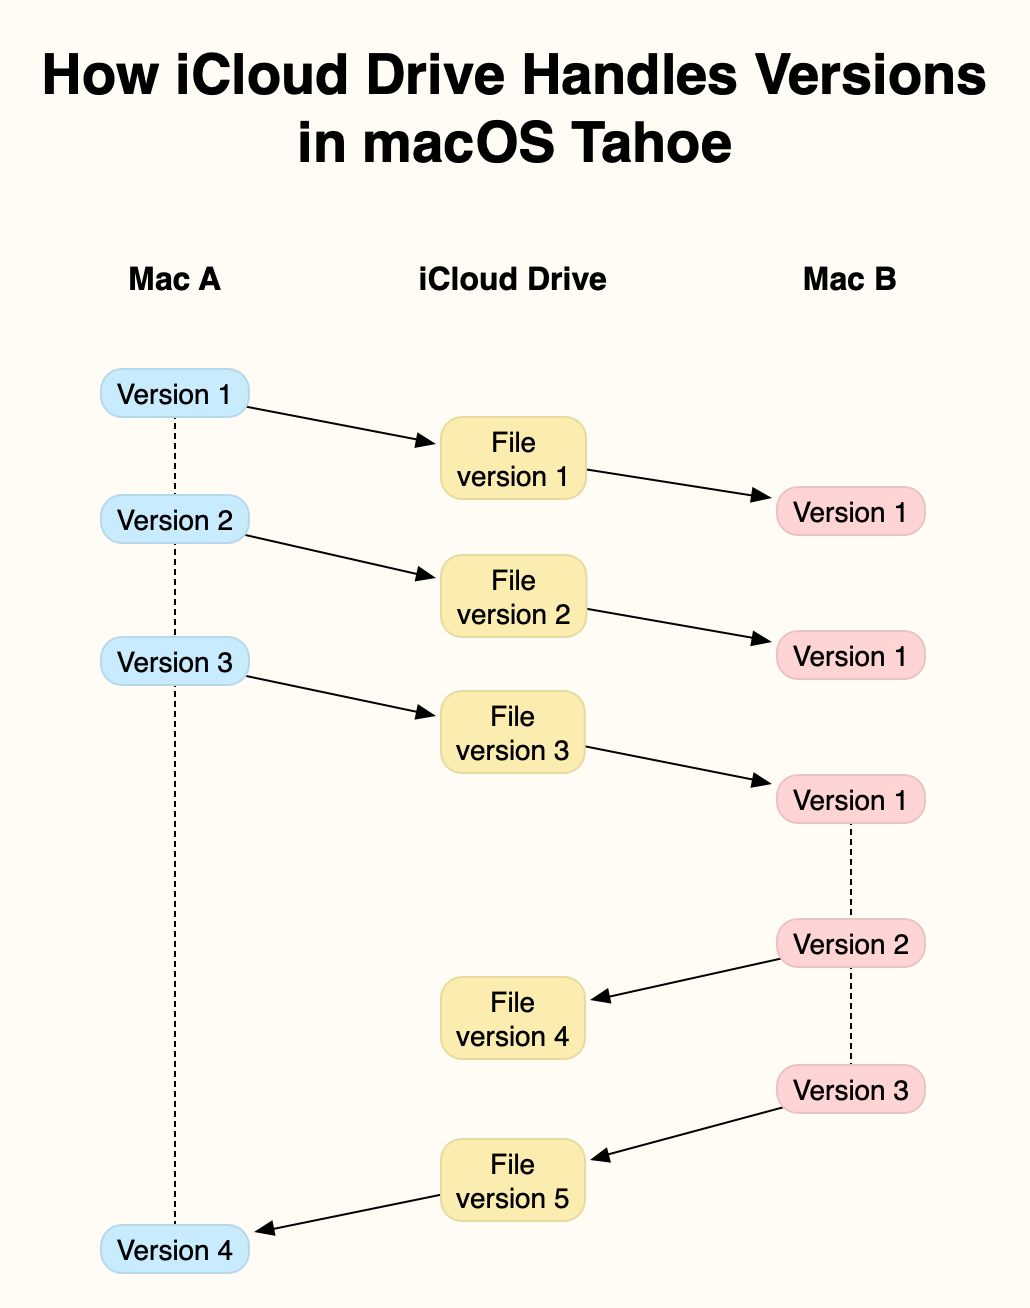
Document versions saved in that volume’s version database in the hidden .DocumentRevisions-V100 folder will normally only be saved locally, when the local copy of that file is saved, and aren’t synced up to iCloud Drive at all. This has complicated effects best illustrated in the example below.
In this example, two Macs, A and B, are connected to the same iCloud Drive. At the start, Mac A creates and saves a new file, locally Version 1, in an iCloud Drive folder. This is synced up to iCloud Drive, from where it syncs down to Mac B, as the first version of that file.
Mac A then edits that file, saving it in two further versions. Each of those is synced up to iCloud Drive, and synced down to Mac B. However, as none of those versions is saved locally on Mac B, each is shown as the current and only version until the next one arrives.
Mac A is shut down after it has saved its version 3 of the file, and that has been synced up to iCloud Drive. Once that has synced down to Mac B, the document is edited there, and two versions are added to the first. Mac B’s Version 3 of that file is synced up to iCloud Drive, Mac B is shut down, and the file is opened and saved on Mac A, where that becomes its local Version 4.
At that stage, Mac A’s version database contains 4 versions, but no copy of Mac B’s Version 2. Mac B has 3 saved versions, including its Version 2 that isn’t saved in Mac A. iCloud Drive only has a single version, its Version 5, the same as Mac A’s Version 4 and Mac B’s Version 3.
The rules are simple:
Each Mac only adds a version to its own local version database when that file is saved locally.
At any moment, only the latest version is stored in iCloud Drive.
However, the behaviour can appear baffling, particularly when a document is observed in its QuickLook thumbnail as it’s being edited and saved on another Mac. You can then see its contents evolving with each save, but none of those are added to that Mac’s version database unless that version is saved there.
The end result is an incomplete version history on each Mac. The only way to unify those is in a third-party utility such as Versatility or Revisionist to consolidate them. As this doesn’t require any intervention by the File Provider framework, this is likely to be similar in third-party cloud services using that framework, such as Dropbox and Microsoft OneDrive.
Spotlight index content
No indexes from Spotlight are synced across iCloud Drive, but once a file has been synced down from iCloud Drive, its contents should be indexed locally, on the Data volume. Those indexed contents should remain accessible to search even when the file has been evicted from local storage.
QuickLook previews
QuickLook thumbnails and previews are also generated and stored locally. Those that have been cached to local storage remain accessible even when the file has been evicted. When there’s no cached version available, a generic icon for that file type will be displayed until an evicted file has been downloaded again. At one time, selecting an evicted file and calling for its thumbnail or preview was a simple way to force the file to be downloaded, but that has now been fixed.
A Bristol Myers Squibb plant that makes cancer drugs was the only manufacturer in the U.S. recognized for innovation by the World Economic Forum this year.